2010 MERCEDES-BENZ ML320 seats
[x] Cancel search: seatsPage 94 of 368

Memory function
Notes
With the memory function you can store up
to three different configurations per front
seat.
Each memory position button on the driver’s
side can store all of the following settings:
RSeat position
RSteering wheel position
RExterior rear view mirrors’ position
GWarning!
Do not activate the memory function while
driving. Activating the memory function while
driving could cause the driver to lose control
of the vehicle.
Each memory position button on the front
passenger side can store the setting of the
seat position.
Storing positions into memory
XAdjust the seats.XOn the driver’s side, also adjust the
steering wheel and exterior rear view
mirrors to the desired positions.
XPress memory button M once and within
3 seconds press memory position button
1, 2 or 3.
When the settings are stored to the
selected position, an acknowledgement
signal sounds.
Recalling positions from memoryXPress and hold desired memory position
button 1, 2 or 3 until the seat has moved
to the stored position completely. On the
driver’s side, also wait for the steering
wheel and exterior rear view mirrors to
move to the stored position.
iReleasing the memory position button
stops movement to the stored positions
immediately.
Lighting
Notes
iIf you drive in countries with left-hand
driving, you must have the headlamps
modified for symmetrical low beams.
Relevant information can be obtained at
any authorized Mercedes-Benz Center.
iVehicles equipped with active Bi-Xenon
headlamps:
The active Bi-Xenon headlamps increase
usable illumination over conventional
headlamps because they follow the
curvature of the road ahead. The beams of
the active Bi-Xenon headlamps shift to
either side according to the vehicle’s
steering angle and speed.
92LightingControls in detail
164_AKB; 7; 31, en-USd2ureepe,Version: 2.11.8.12009-09-11T12:07:36+02:00 - Seite 92
Page 103 of 368
are located on the front passenger door and
on the rear doors.
i Operating the rear door windows from
the rear is not possible when you activate
the override switch (Y page 60).
GObserve Safety notes, see page 55.GWarning!
When opening or closing the door windows,
make sure there is no danger of anyone being
harmed by the opening/closing procedure.
The door windows are equipped with the
express operation and automatic reversal
function. If in express operation mode a door
window encounters an obstruction that
blocks its path, the automatic reversal
function will stop the door window and open
it slightly.
The door windows operate differently when
the switch is pulled and held. See the “Closing
when a door window is blocked” section in
this chapter for details.
The closing of the door windows can be
immediately halted by releasing the switch or,
if the switch was pulled past the resistance
point and released, by either pressing or
pulling the respective switch.
If a door window encounters an obstruction
that blocks its path in a circumstance where
you are closing the door windows by pressing
and holding button & on the SmartKey or
by pressing and holding the lock button
(vehicles with KEYLESS-GO) on an outside
door handle, the automatic reversal function
will not operate.
Activate the override switch when children
are riding in the back seats of the vehicle. The
children may otherwise injure themselves,
e.g. by becoming trapped in the door window
opening.
GWarning!
Do not keep any part of your body up against
the window pane when opening a window. The
downward motion of the pane may pull that
part of your body down between the window
pane and the door frame and trap it there. If
there is a risk of entrapment, release the
switch and pull it to close the window.
iYou can also open or close the door
windows using the SmartKey, see
“Summer opening feature” (Y page 102)
and “Convenience closing feature”
(Y page 102).
iAfter switching off the ignition or
removing the SmartKey from the starter
switch, you can operate the door windows
until you open the driver’s or front
passenger door. If no door was opened you
can operate the door windows for up to
5 minutes.
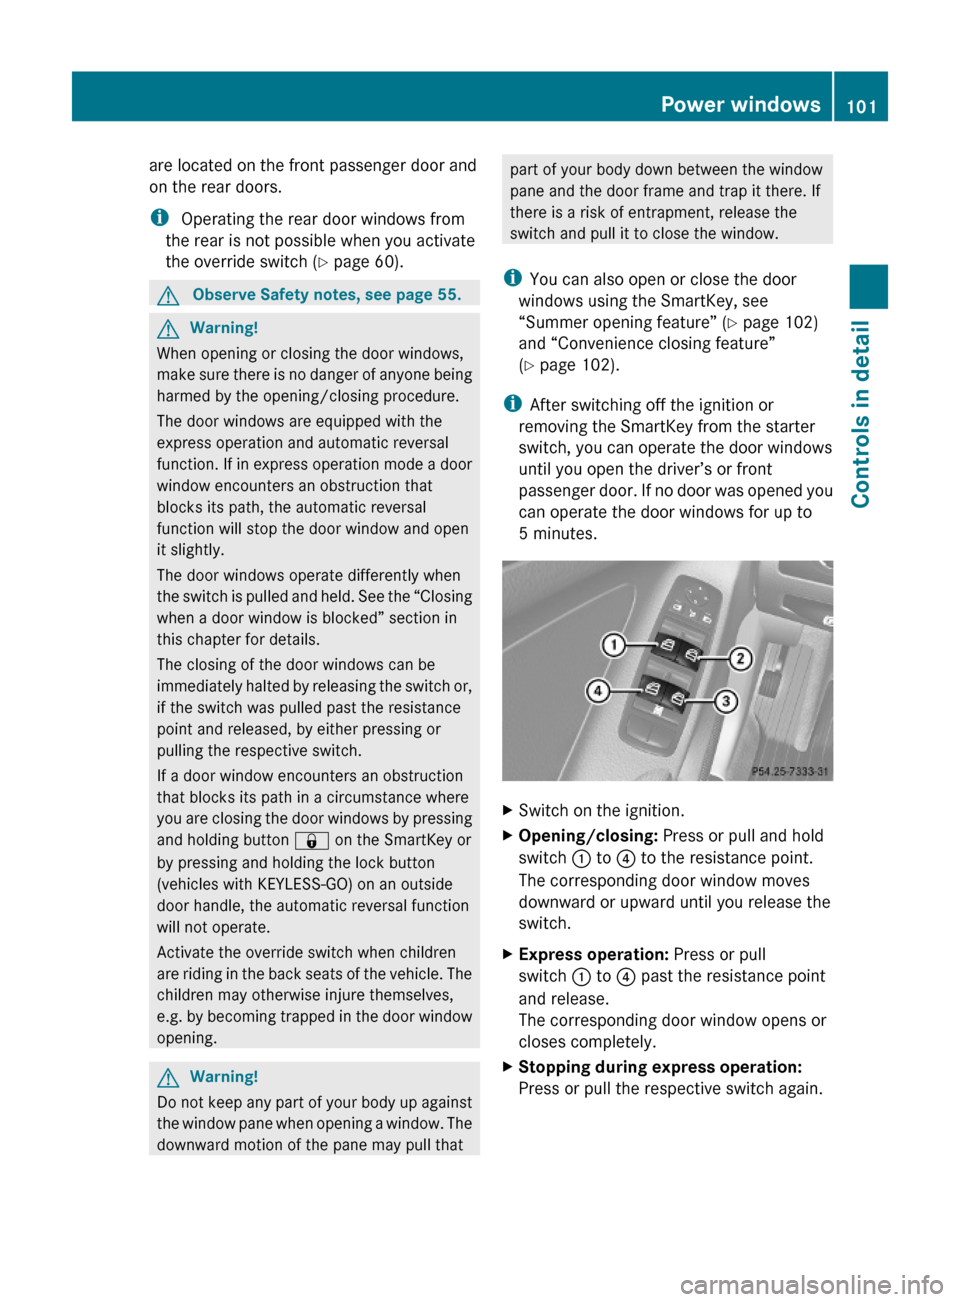
XSwitch on the ignition.XOpening/closing: Press or pull and hold
switch : to ? to the resistance point.
The corresponding door window moves
downward or upward until you release the
switch.
XExpress operation: Press or pull
switch : to ? past the resistance point
and release.
The corresponding door window opens or
closes completely.
XStopping during express operation:
Press or pull the respective switch again.
Power windows101Controls in detail164_AKB; 7; 31, en-USd2ureepe,Version: 2.11.8.12009-09-11T12:07:36+02:00 - Seite 101Z
Page 189 of 368
The cargo compartment is the preferred place
to carry objects. Always use cargo tie-down
rings, and if so equipped, always use the cargo
net when transporting cargo.
Never drive a vehicle with the tailgate open.
Deadly carbon monoxide (CO) gases may
enter vehicle interior resulting in
unconsciousness and death.
Load distribution
The Gross Vehicle Weight (GVW) is the weight
of the vehicle including:Rfuel
Rtools
Rspare wheel
Rinstalled accessories
Rpassengers
Rluggage/cargo
It must never exceed the load limit and the
Gross Vehicle Weight Rating (GVWR) for your
vehicle. The load limit and the GVWR are
specified on the placard located on the
driver’s door B-pillar (Y page 227).
In addition, the load must be distributed so
that the weight on each axle never exceeds
the Gross Axle Weight Rating (GAWR) for the
front and rear axle. The GVWR and GAWR for
your vehicle are indicated on the certification
label located on the driver’s door B-pillar
(Y page 227).
For more information, see “Tire and Loading
Information” (Y page 227).
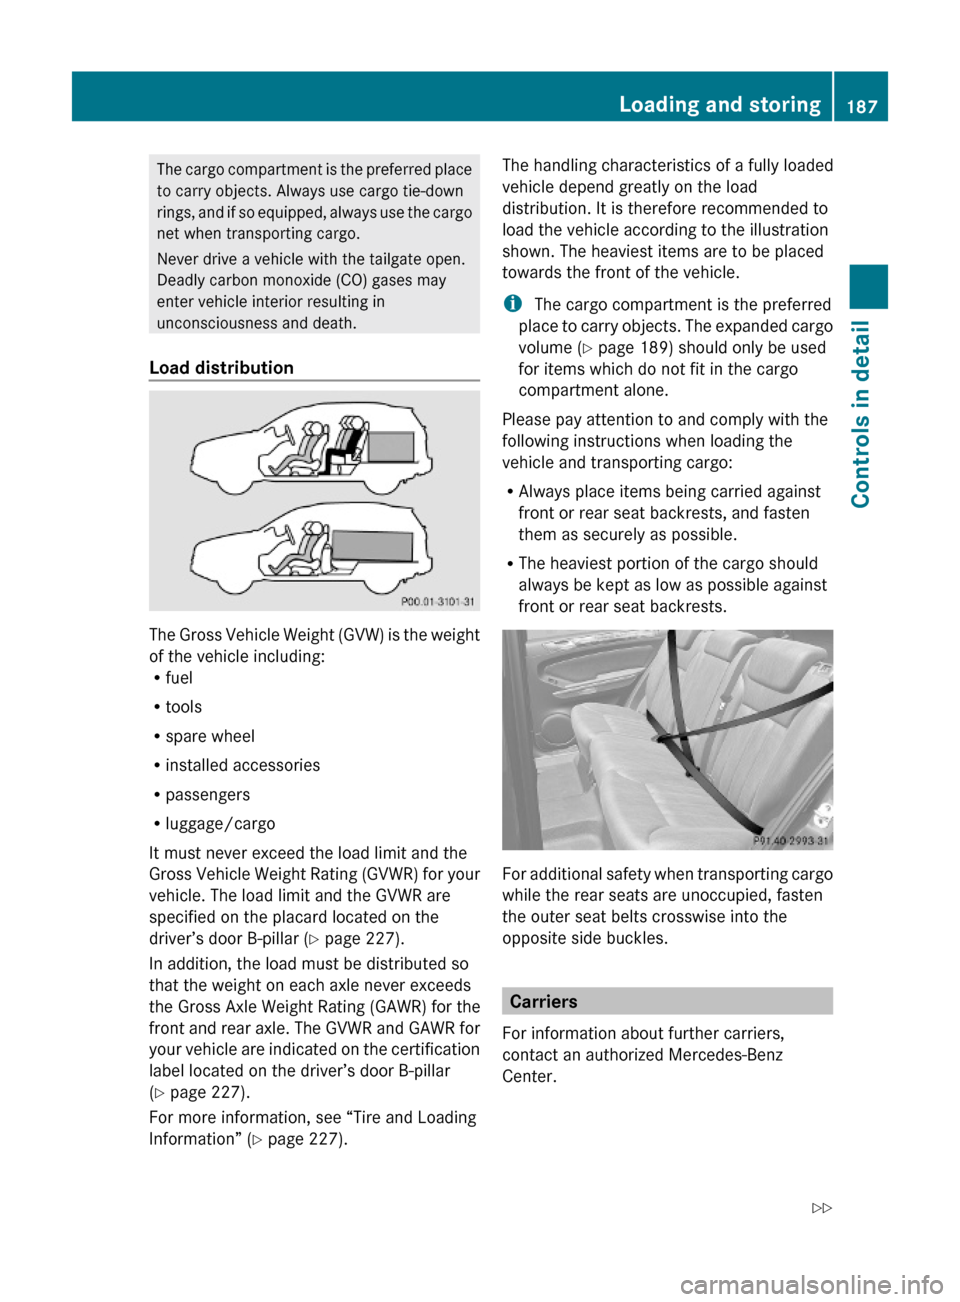
The handling characteristics of a fully loaded
vehicle depend greatly on the load
distribution. It is therefore recommended to
load the vehicle according to the illustration
shown. The heaviest items are to be placed
towards the front of the vehicle.
i The cargo compartment is the preferred
place to carry objects. The expanded cargo
volume (Y page 189) should only be used
for items which do not fit in the cargo
compartment alone.
Please pay attention to and comply with the
following instructions when loading the
vehicle and transporting cargo:
RAlways place items being carried against
front or rear seat backrests, and fasten
them as securely as possible.
RThe heaviest portion of the cargo should
always be kept as low as possible against
front or rear seat backrests.
For additional safety when transporting cargo
while the rear seats are unoccupied, fasten
the outer seat belts crosswise into the
opposite side buckles.
Carriers
For information about further carriers,
contact an authorized Mercedes-Benz
Center.
Loading and storing187Controls in detail164_AKB; 7; 31, en-USd2ureepe,Version: 2.11.8.12009-09-11T12:07:36+02:00 - Seite 187Z
Page 191 of 368
Cargo tie down rings, second-row footwell
Hooks
Four hooks are located on the rear
compartment trim panels, two on each side.
Use the hooks to secure light-weight items
only. The maximum permissible weight per
hook is 9 lbs (4 kg).
Expanding cargo volume
You can separately fold the left and right rear
seat backrests to expand the cargo volume.
GWarning!
When expanding the cargo volume, always
fully fold the corresponding seats and, if so
equipped, always use the cargo net when
transporting cargo.
Unless you are transporting cargo, the seat
backrests must remain properly locked in the
upright position.
In an accident, during hard braking or sudden
maneuvers, loose items will be thrown around
inside the vehicle. This can cause injury to
vehicle occupants unless the items are
securely fastened in the vehicle.
Always use the cargo tie-down rings.
GWarning!
Never drive a vehicle with the tailgate open.
Deadly carbon monoxide (CO) gases may
enter vehicle interior resulting in
unconsciousness and death.
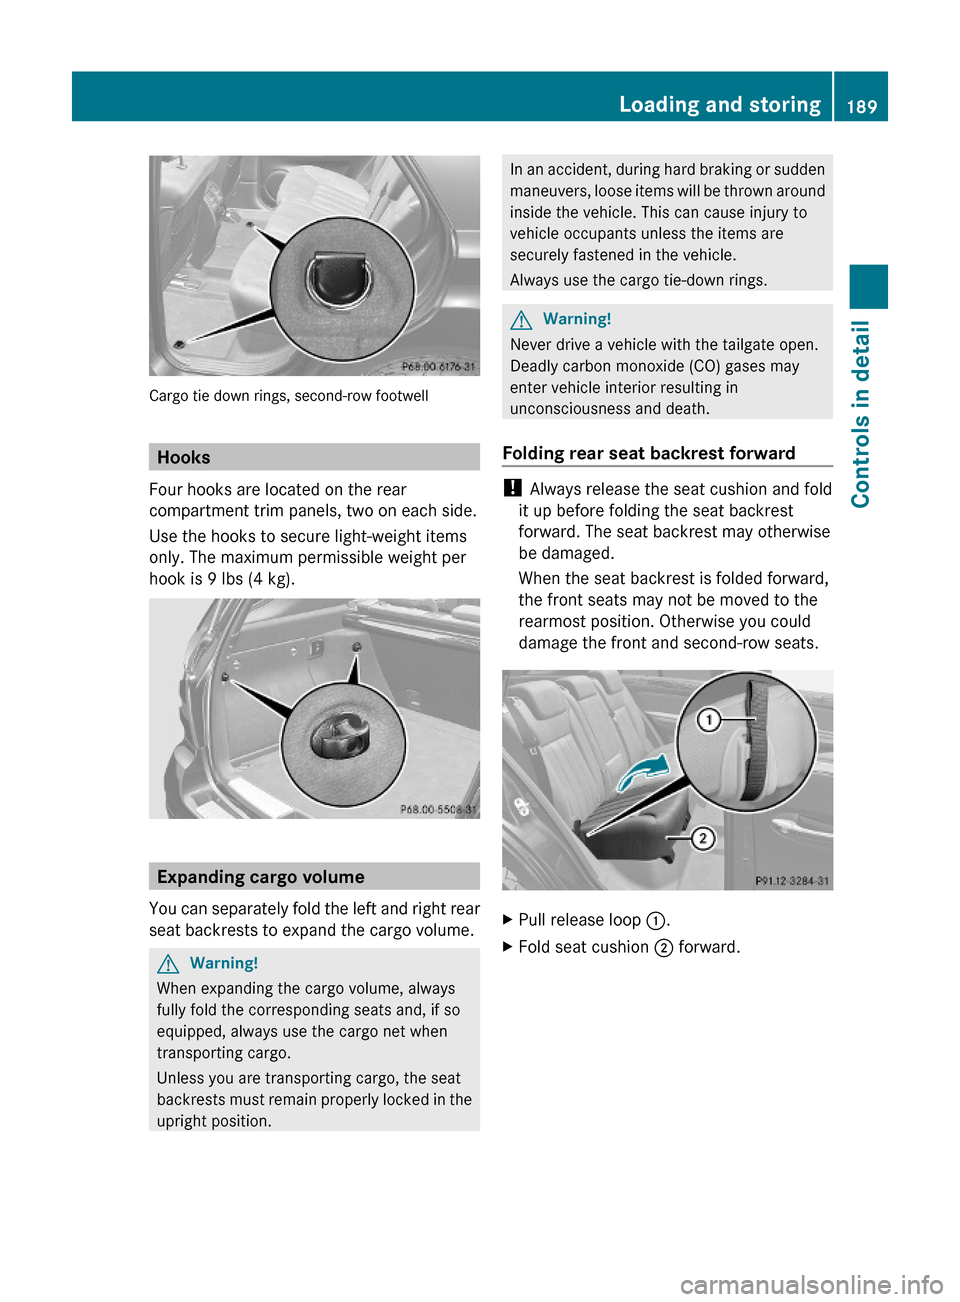
Folding rear seat backrest forward
! Always release the seat cushion and fold
it up before folding the seat backrest
forward. The seat backrest may otherwise
be damaged.
When the seat backrest is folded forward,
the front seats may not be moved to the
rearmost position. Otherwise you could
damage the front and second-row seats.
XPull release loop :.XFold seat cushion ; forward.Loading and storing189Controls in detail164_AKB; 7; 31, en-USd2ureepe,Version: 2.11.8.12009-09-11T12:07:36+02:00 - Seite 189Z
Page 192 of 368

XLower the rear seat head restraints
completely (Y page 84).
XPull release handle =.
A red indicator A will be visible and seat
backrest ? is released.
XFold seat backrest ? forward.
Returning rear seat backrest to original
position
! Make sure that the seat belt is not
pinched when folding rear seat backrest.
XFold seat backrest : rearward until it
engages.
Red indicator A should no longer be
visible.
XFold seat cushion ; rearward until it locks
into position.
XCheck for secure locking by pushing and
pulling on seat backrest :.
GWarning!
If a red indicator is visible with the seat
backrest up, then the seat backrest is not
properly locked into position.
Always lock seat backrest in its upright
position when the rear seats are occupied, or
the extended cargo compartment is not in
use. Check for secure locking by pushing and
pulling on the seat backrest.
XAdjust the rear seat head restraints, if
necessary (Y page 83).
Cargo compartment cover blind
The cargo compartment cover blind can be
installed behind the rear seats.
! With the cargo compartment cover blind
installed, do not pile luggage higher than
the lower edges of the rear side windows.
190Loading and storingControls in detail
164_AKB; 7; 31, en-USd2ureepe,Version: 2.11.8.12009-09-11T12:07:36+02:00 - Seite 190
Page 193 of 368

XRolling out: Pull cargo compartment cover
blind on handle : across the cargo
compartment.
XGuide cargo compartment cover blind into
mounts ; and release.
XRolling up: Disengage cargo compartment
cover blind and guide retraction by its
handle :.
Before removing or installing cargo
compartment cover blind behind the rear
seats, fold the left or right rear seat forward
(Y page 189). Afterwards, return the left or
right rear seat into its original position.
XRemoving: Roll up cargo compartment
cover blind.
XPush release button =.XPull cargo compartment cover blind ? to
the left.
XRemove cargo compartment cover blind.XInstalling: Make sure release button =
faces up and handle : is to the rear before
inserting the cargo compartment cover
blind.
XPlace left side of cargo compartment cover
blind in left mount.
XPosition right side of cargo compartment
cover blind over right mount.
XPress release button = and guide cargo
compartment cover blind into mount.
XMake sure cargo compartment cover blind
is securely fastened.Cargo netGWarning!
Make sure the cargo net is properly engaged
at top and bottom position and the tightening
belts are securely fastened.
Never use a damaged cargo net.
Always use cargo net when transporting
cargo. This helps to avoid personal injury from
smaller objects being thrown around in the
occupant compartment during a collision or
sudden maneuver.
The cargo net cannot prevent the movement
of large, heavier objects into the passenger
compartment in an accident. Such items must
be properly secured using the cargo tie-down
rings in the cargo compartment floor.
Passenger use of seats behind installed cargo
net is restricted because of the footwell being
taken up by the net.
Use of the cargo net is a particularly
important safety factor when the vehicle is
loaded higher than the top of the seat
backrests with smaller objects. For your
safety, always use the cargo net when
transporting cargo.
The cargo net can be installed behind the
B-pillar or the C-pillar.
RWith the cargo volume expanded
(Y page 189), use holders : behind
B-pillars and the cargo tie-down rings in the
second-row footwell (Y page 189).
RWithout the cargo volume expanded, use
holders ; behind C-pillars and the cargo
Loading and storing191Controls in detail164_AKB; 7; 31, en-USd2ureepe,Version: 2.11.8.12009-09-11T12:07:36+02:00 - Seite 191Z
Page 196 of 368
E (Y page 202) are located in the
storage compartment.
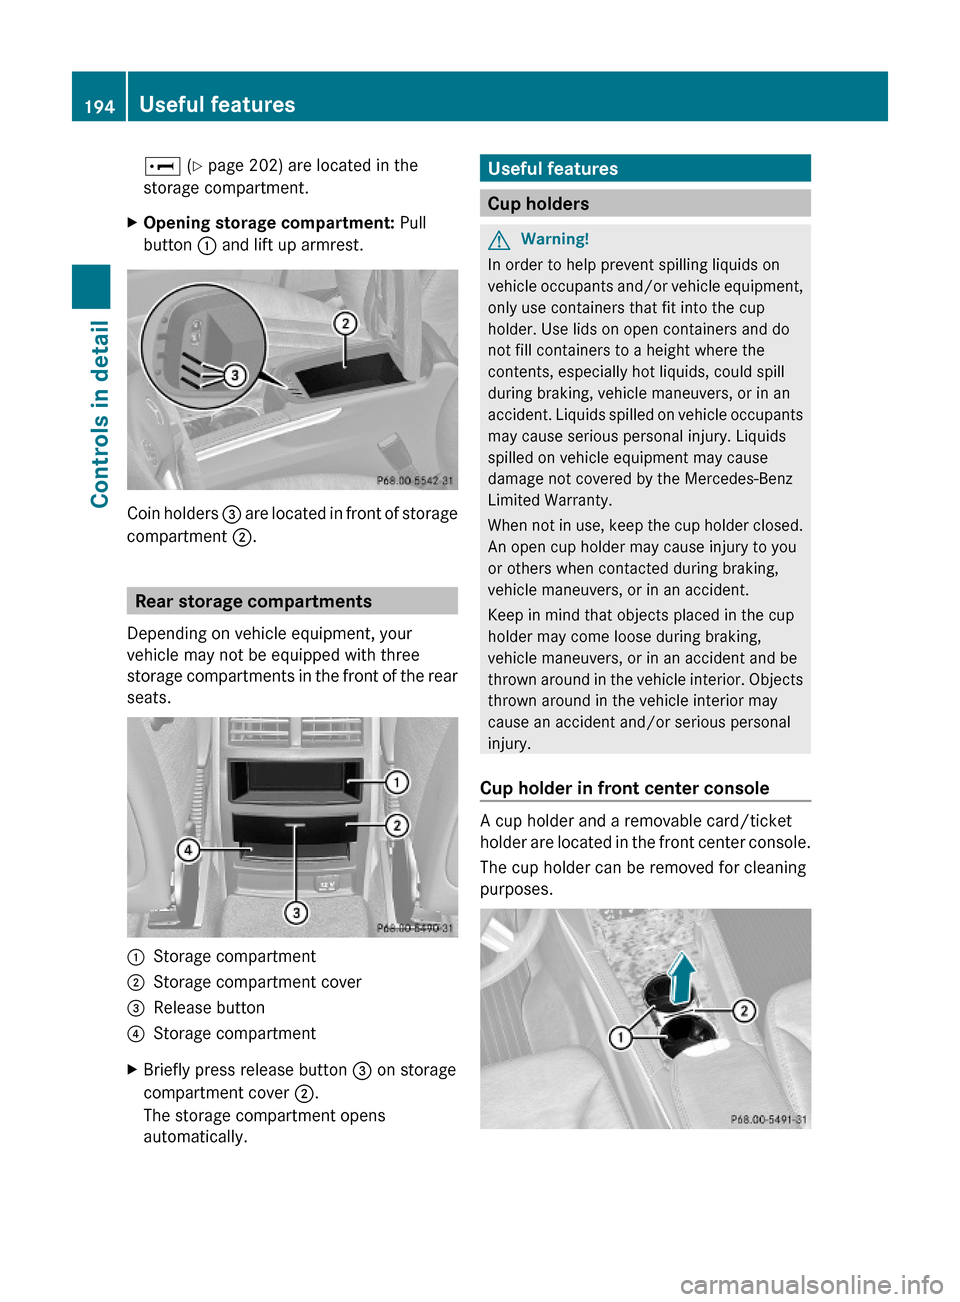
XOpening storage compartment: Pull
button : and lift up armrest.
Coin holders = are located in front of storage
compartment ;.
Rear storage compartments
Depending on vehicle equipment, your
vehicle may not be equipped with three
storage compartments in the front of the rear
seats.
:Storage compartment;Storage compartment cover=Release button?Storage compartmentXBriefly press release button = on storage
compartment cover ;.
The storage compartment opens
automatically.
Useful features
Cup holders
GWarning!
In order to help prevent spilling liquids on
vehicle occupants and/or vehicle equipment,
only use containers that fit into the cup
holder. Use lids on open containers and do
not fill containers to a height where the
contents, especially hot liquids, could spill
during braking, vehicle maneuvers, or in an
accident. Liquids spilled on vehicle occupants
may cause serious personal injury. Liquids
spilled on vehicle equipment may cause
damage not covered by the Mercedes-Benz
Limited Warranty.
When not in use, keep the cup holder closed.
An open cup holder may cause injury to you
or others when contacted during braking,
vehicle maneuvers, or in an accident.
Keep in mind that objects placed in the cup
holder may come loose during braking,
vehicle maneuvers, or in an accident and be
thrown around in the vehicle interior. Objects
thrown around in the vehicle interior may
cause an accident and/or serious personal
injury.
Cup holder in front center console
A cup holder and a removable card/ticket
holder are located in the front center console.
The cup holder can be removed for cleaning
purposes.
194Useful featuresControls in detail
164_AKB; 7; 31, en-USd2ureepe,Version: 2.11.8.12009-09-11T12:07:36+02:00 - Seite 194
Page 198 of 368
Vanity mirror
Vanity mirror lamp = only functions when
sun visor : is engaged in mounting C.
XFlip sun visor down.XLift up vanity mirror cover ?.
Vanity mirror lamp = comes on.
Ashtrays
Center console ashtray
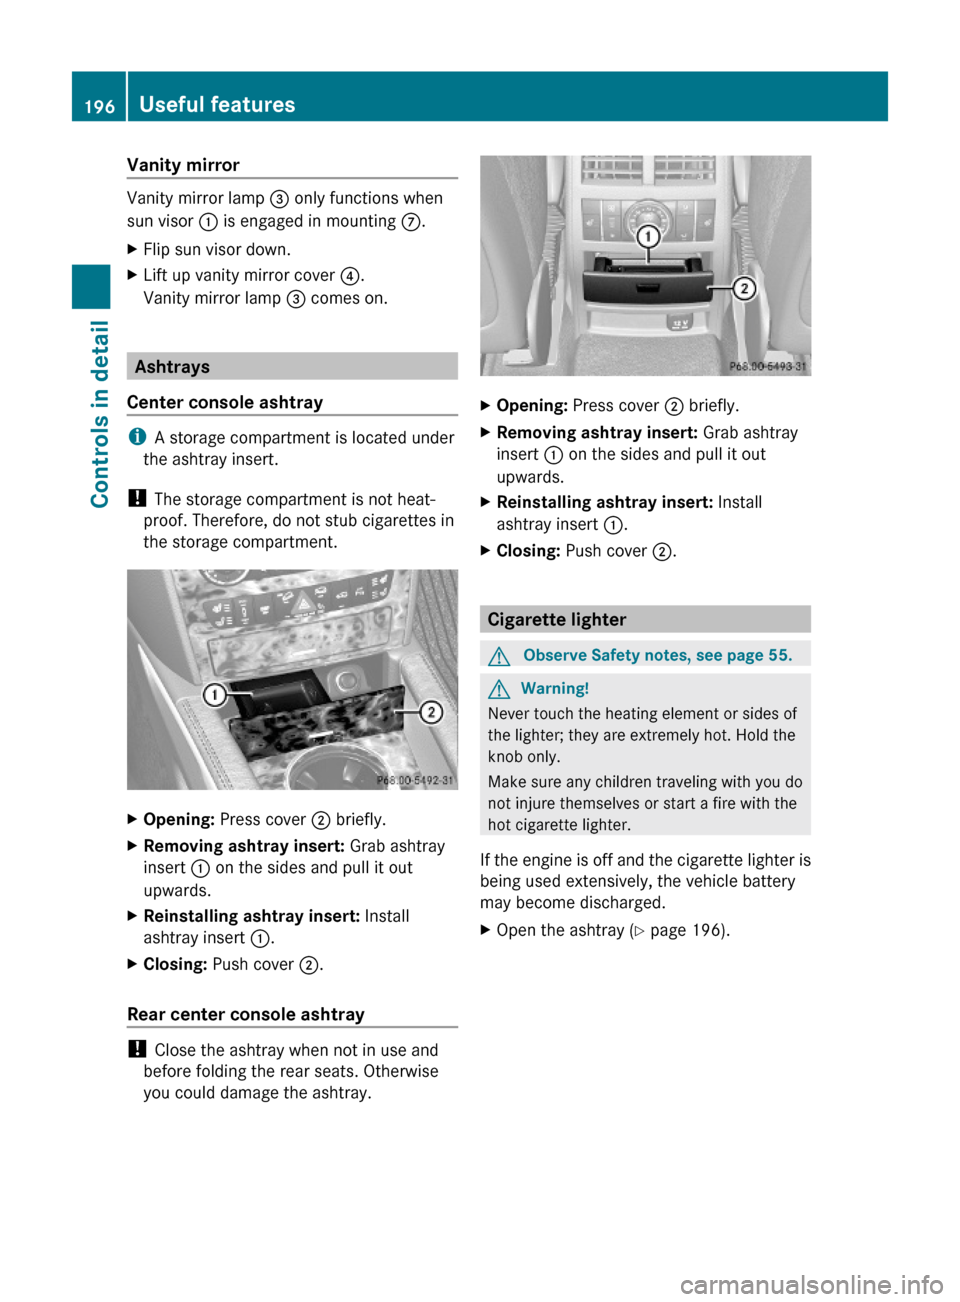
iA storage compartment is located under
the ashtray insert.
! The storage compartment is not heat-
proof. Therefore, do not stub cigarettes in
the storage compartment.
XOpening: Press cover ; briefly.XRemoving ashtray insert: Grab ashtray
insert : on the sides and pull it out
upwards.
XReinstalling ashtray insert: Install
ashtray insert :.
XClosing: Push cover ;.
Rear center console ashtray
! Close the ashtray when not in use and
before folding the rear seats. Otherwise
you could damage the ashtray.
XOpening: Press cover ; briefly.XRemoving ashtray insert: Grab ashtray
insert : on the sides and pull it out
upwards.
XReinstalling ashtray insert: Install
ashtray insert :.
XClosing: Push cover ;.
Cigarette lighter
GObserve Safety notes, see page 55.GWarning!
Never touch the heating element or sides of
the lighter; they are extremely hot. Hold the
knob only.
Make sure any children traveling with you do
not injure themselves or start a fire with the
hot cigarette lighter.
If the engine is off and the cigarette lighter is
being used extensively, the vehicle battery
may become discharged.
XOpen the ashtray (Y page 196).196Useful featuresControls in detail
164_AKB; 7; 31, en-USd2ureepe,Version: 2.11.8.12009-09-11T12:07:36+02:00 - Seite 196