2010 MERCEDES-BENZ ML320 weight
[x] Cancel search: weightPage 52 of 368
Fastening the seat beltsGWarning!
According to accident statistics, children are
safer when properly restrained in the rear
seating positions than in the front seating
position. Thus, we strongly recommend that
children be placed in the rear seats whenever
possible. Regardless of seating position,
children 12 years old and under must be
seated and properly secured in an
appropriately sized infant restraint, toddler
restraint, or booster seat recommended for
the size and weight of the child. For additional
information, see “Children in the vehicle”.
A child’s risk of serious or fatal injuries is
significantly increased if the child restraints
are not properly secured in the vehicle and/
or the child is not properly secured in the child
restraint.
GWarning!
Vehicles with BabySmart™ air bag
deactivation system, Canada only: Children
12 years old and under must never ride in the
front seat, except in a Mercedes-Benz
authorized BabySmart™ compatible child
seat, which operates with the BabySmart™
system installed in the vehicle to deactivate
the front passenger front air bag when it is
installed properly. Otherwise they will be
struck by the air bag when it inflates in a
crash. If this happens, serious or fatal injury
will result.
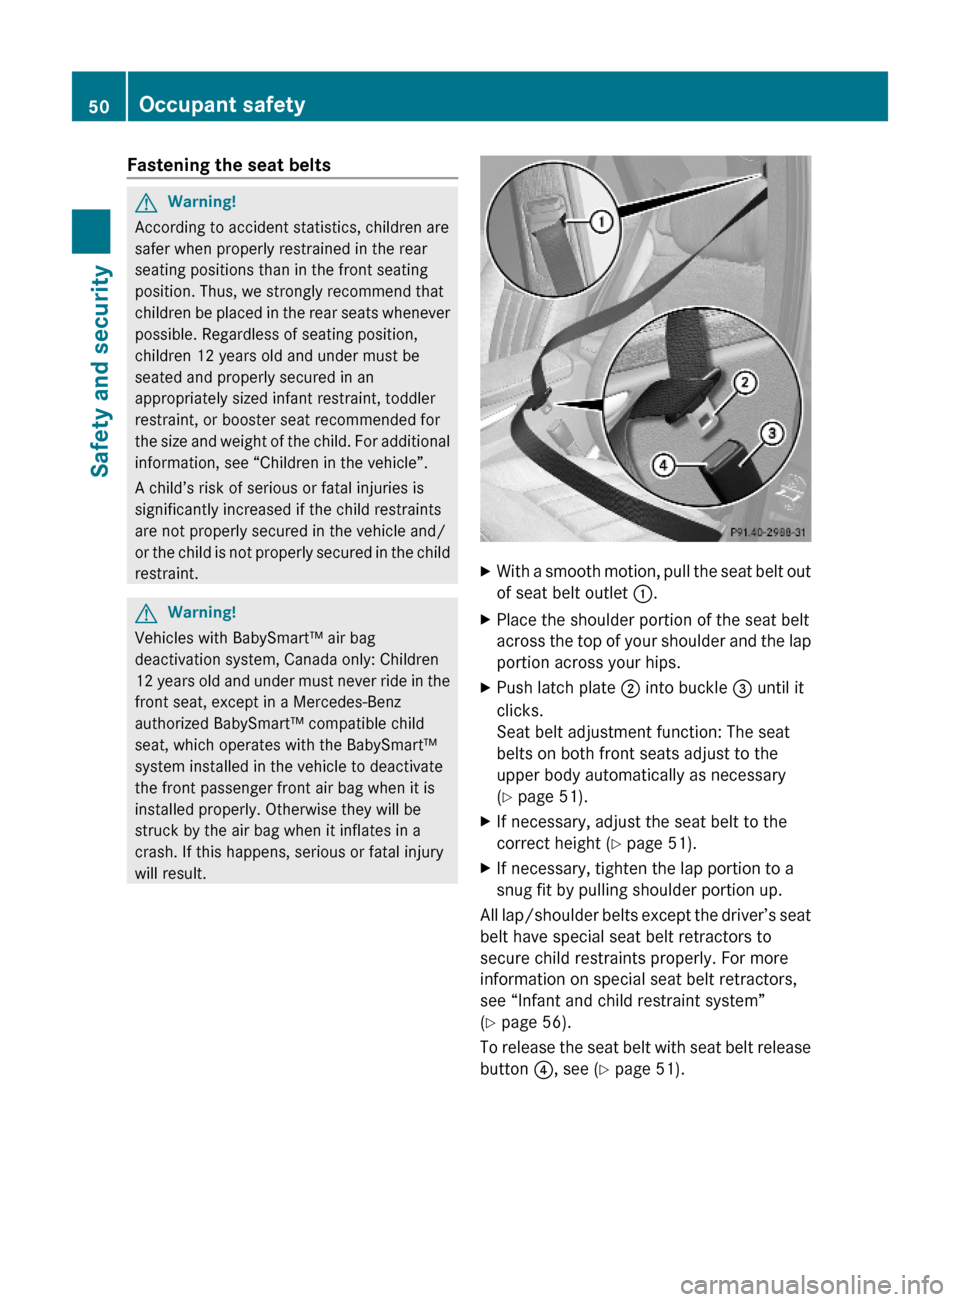
XWith a smooth motion, pull the seat belt out
of seat belt outlet :.
XPlace the shoulder portion of the seat belt
across the top of your shoulder and the lap
portion across your hips.
XPush latch plate ; into buckle = until it
clicks.
Seat belt adjustment function: The seat
belts on both front seats adjust to the
upper body automatically as necessary
(Y page 51).
XIf necessary, adjust the seat belt to the
correct height (Y page 51).
XIf necessary, tighten the lap portion to a
snug fit by pulling shoulder portion up.
All lap/shoulder belts except the driver’s seat
belt have special seat belt retractors to
secure child restraints properly. For more
information on special seat belt retractors,
see “Infant and child restraint system”
(Y page 56).
To release the seat belt with seat belt release
button ?, see (Y page 51).
50Occupant safetySafety and security
164_AKB; 7; 31, en-USd2ureepe,Version: 2.11.8.12009-09-11T12:07:36+02:00 - Seite 50
Page 59 of 368

infant restraint, toddler restraint, or booster
seat recommended for the size and weight of
the child.
The infant or child restraint must be properly
secured with the vehicle’s seat belt, the seat
belt and top tether strap, or lower anchors and
top tether strap, fully in accordance with the
child seat manufacturer’s instructions.
Occupants, especially children, should always
sit as upright as possible, wear the seat belt
properly and use an appropriately sized infant
restraint, toddler restraint, or booster seat
recommended for the size and weight of the
child.
Children can be killed or seriously injured by
an inflating air bag. Note the following
important information when circumstances
require you to place a child in the front
passenger seat:
R USA only: Your vehicle is equipped with air
bag technology designed to deactivate the
front passenger front air bag in your vehicle
when the system senses the weight of a
typical 12-month-old child or less along
with the weight of a standard appropriate
child restraint on the front passenger seat.
R USA only: For children larger than the
typical 12-month-old child, the front
passenger front air bag may or may not be
activated. Always make sure the
42 indicator lamp is
illuminated, indicating that the front
passenger front air bag is deactivated.
R Canada only: Children 12 years old and
under must never ride in the front seat,
except in a Mercedes-Benz authorized
BabySmart™ compatible child seat, which
operates with the BabySmart™ system
installed in the vehicle to deactivate the
front passenger front air bag when it is
installed properly. Otherwise they will be
struck by the air bag when it inflates in a
crash. If this happens, serious or fatal injury
will result.R A child in a rear-facing child restraint on the
front passenger seat will be seriously
injured or even killed if the front passenger
front air bag inflates in a collision which
could occur under some circumstances,
even with the air bag technology installed
in your vehicle. The only means to
completely eliminate this risk is to never
place a child in a rear-facing child restraint
in the front seat. We therefore strongly
recommend that you always place a child
in a rear-facing child restraint in a backseat.
R If you must install a rear-facing child
restraint on the front passenger seat
because circumstances require you to do
so, make sure the 42
indicator lamp is illuminated, indicating
that the front passenger front air bag is
deactivated. Should the 42
indicator lamp not illuminate or go out while
the restraint is installed, please check
installation. Periodically check the
42 indicator lamp while
driving to make sure the 42
indicator lamp is illuminated. If the
42 indicator lamp goes out or
remains out, do not transport a child on the
front passenger seat until the system has
been repaired.
A child in a rear-facing child restraint on the
front passenger seat will be seriously
injured or even killed if the front passenger
front air bag inflates.
R If you have to place a child in a forward-
facing child restraint on the front passenger
seat, move the seat as far back as possible,
use the proper child restraint
recommended for the age, size and weight
of the child, and secure child restraint with
the vehicle’s seat belt according to the child
seat manufacturer’s instructions.GWarning!
Infants and small children should never share
a seat belt with another occupant. During an
Occupant safety57Safety and security164_AKB; 7; 31, en-USd2ureepe,Version: 2.11.8.12009-09-11T12:07:36+02:00 - Seite 57Z
Page 84 of 368
vehicle could result in an accident and/or
serious personal injury.
GWarning!
According to accident statistics, children are
safer when properly restrained in the rear
seating positions than in the front seating
position. Thus, we strongly recommend that
children be placed in the rear seats whenever
possible. Regardless of seating position,
children 12 years old and under must be
seated and properly secured in an
appropriately sized infant restraint, toddler
restraint, or booster seat recommended for
the size and weight of the child. For additional
information, see “Children in the vehicle”.
A child’s risk of serious or fatal injuries is
significantly increased if the child restraints
are not properly secured in the vehicle and/
or the child is not properly secured in the child
restraint.
GWarning!
For your protection, drive only with properly
positioned head restraints.
Adjust the head restraint so that it is as close
to the head as possible and the center of the
head restraint supports the back of the head
at eye level. This will reduce the potential for
injury to the head and neck in the event of an
accident or similar situation.
Do not drive the vehicle without the seat head
restraints. Head restraints are intended to
help reduce injuries during an accident.
Seat adjustment
! When moving the seats, make sure there
are no items in the footwell or behind the
seats. Otherwise, you could damage the
seats and/or the items.
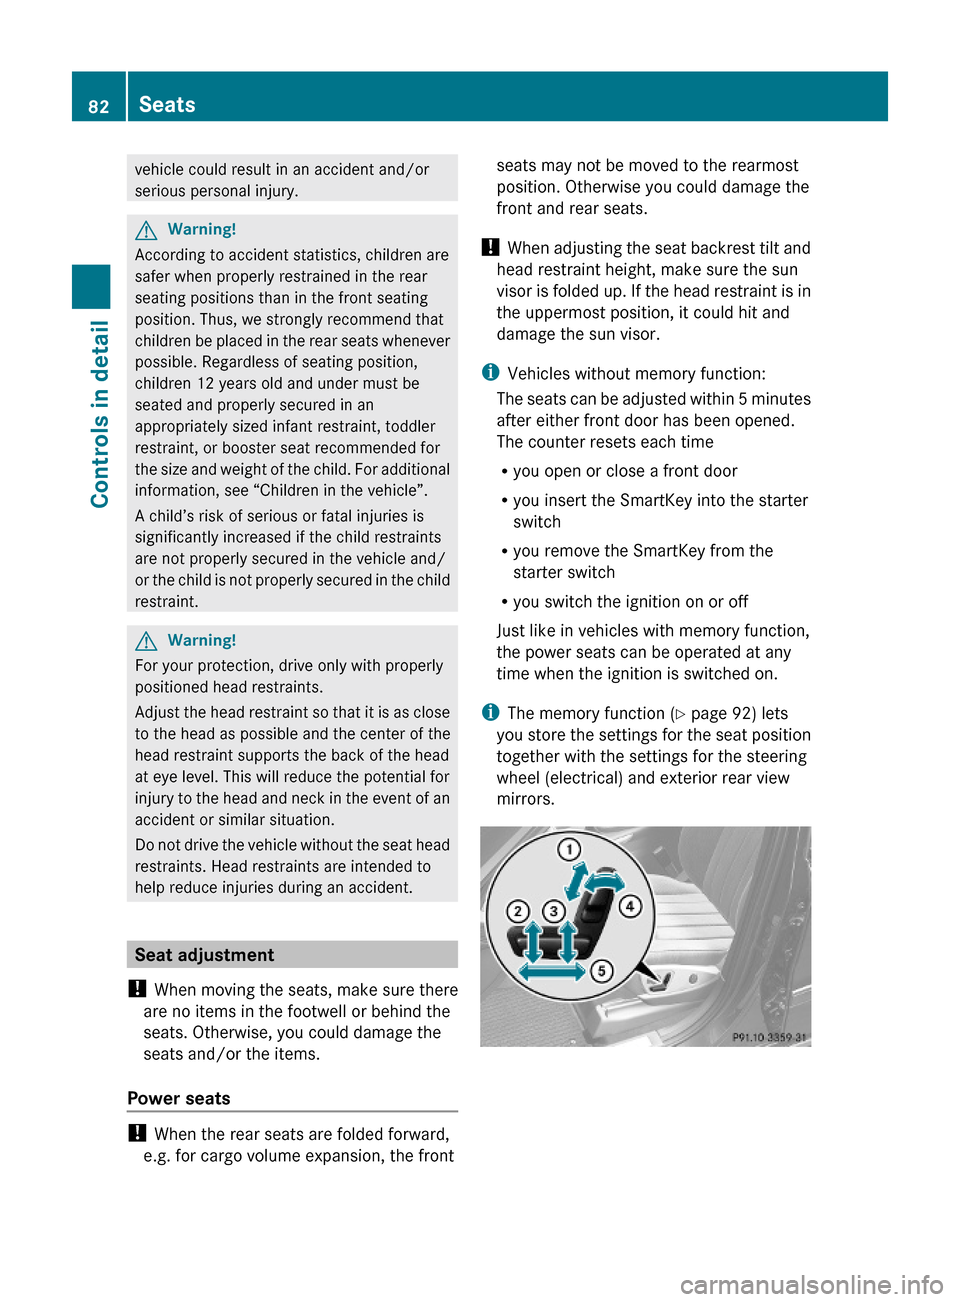
Power seats
! When the rear seats are folded forward,
e.g. for cargo volume expansion, the front
seats may not be moved to the rearmost
position. Otherwise you could damage the
front and rear seats.
! When adjusting the seat backrest tilt and
head restraint height, make sure the sun
visor is folded up. If the head restraint is in
the uppermost position, it could hit and
damage the sun visor.
iVehicles without memory function:
The seats can be adjusted within 5 minutes
after either front door has been opened.
The counter resets each time
Ryou open or close a front door
Ryou insert the SmartKey into the starter
switch
Ryou remove the SmartKey from the
starter switch
Ryou switch the ignition on or off
Just like in vehicles with memory function,
the power seats can be operated at any
time when the ignition is switched on.
iThe memory function (Y page 92) lets
you store the settings for the seat position
together with the settings for the steering
wheel (electrical) and exterior rear view
mirrors.
82SeatsControls in detail
164_AKB; 7; 31, en-USd2ureepe,Version: 2.11.8.12009-09-11T12:07:36+02:00 - Seite 82
Page 188 of 368
closing the tilt/sliding sunroof with greater
force or without automatic reversal function.
If the movement of the tilt/sliding sunroof is
blocked during the closing procedure (e.g. by
ice or pollution), the tilt/sliding sunroof will
stop and open slightly.XImmediately after the tilt/sliding sunroof
has stopped and opened because it was
blocked, pull and hold the sunroof switch
in direction of arrow = until the tilt/sliding
sunroof is fully closed.
The tilt/sliding sunroof closes with greater
force.
If the tilt/sliding sunroof is blocked again and
opens slightly:
XImmediately after the tilt/sliding sunroof
was blocked and has opened, pull and hold
the sunroof switch in direction of arrow
= until the tilt/sliding sunroof is fully
closed.
The tilt/sliding sunroof closes without
automatic reversal function.GWarning!
Pulling and holding the sunroof switch to
close the tilt/sliding sunroof immediately
after it had been blocked two times will cause
the tilt/sliding sunroof to close without any
reversal function for as long as you hold the
sunroof switch.
Synchronizing
The tilt/sliding sunroof must be synchronized
R after the battery has been disconnected or
discharged
R after a malfunction
R if the tilt/sliding sunroof does not open
smoothly
! If the tilt/sliding sunroof cannot be closed
or synchronized, contact an authorized
Mercedes-Benz Center or call Roadside
Assistance.
XVehicles with SmartKey: Switch off the
ignition and remove the SmartKey from the
starter switch.XVehicles with KEYLESS-GO: Switch off the
ignition and open the driver’s door. This
puts the starter switch in position 0, same
as with the SmartKey removed from the
starter switch. The driver’s door then can
be closed again.XRemove the fuse for the tilt/sliding sunroof
from the fuse box ( Y page 342).XReinsert the fuse in the fuse box.XSwitch on the ignition.XPress and hold the sunroof switch in
direction of arrow : ( Y page 185) until the
tilt/sliding sunroof is fully raised at the
rear.XKeep holding the sunroof switch in
direction of arrow : for approximately
1 second.XCheck the express operation feature
( Y page 185).
If the tilt/sliding sunroof opens and closes
completely, the roof is synchronized.
Otherwise repeat the above steps.
Loading and storing
Loading instructions
GWarning!
Always fasten items being carried as securely
as possible. Use cargo tie-down rings and
fastening materials appropriate for the weight
and size of the load.
In an accident, during hard braking or sudden
maneuvers, loose items will be thrown around
inside the vehicle. This can cause injury to
vehicle occupants unless the items are
securely fastened in the vehicle.
To help avoid personal injury during a collision
or sudden maneuver, exercise care when
transporting cargo. Do not pile luggage or
cargo higher than the seat backrests.
186Loading and storingControls in detail
164_AKB; 7; 31, en-USd2ureepe,Version: 2.11.8.12009-09-11T12:07:36+02:00 - Seite 186
Page 189 of 368
The cargo compartment is the preferred place
to carry objects. Always use cargo tie-down
rings, and if so equipped, always use the cargo
net when transporting cargo.
Never drive a vehicle with the tailgate open.
Deadly carbon monoxide (CO) gases may
enter vehicle interior resulting in
unconsciousness and death.
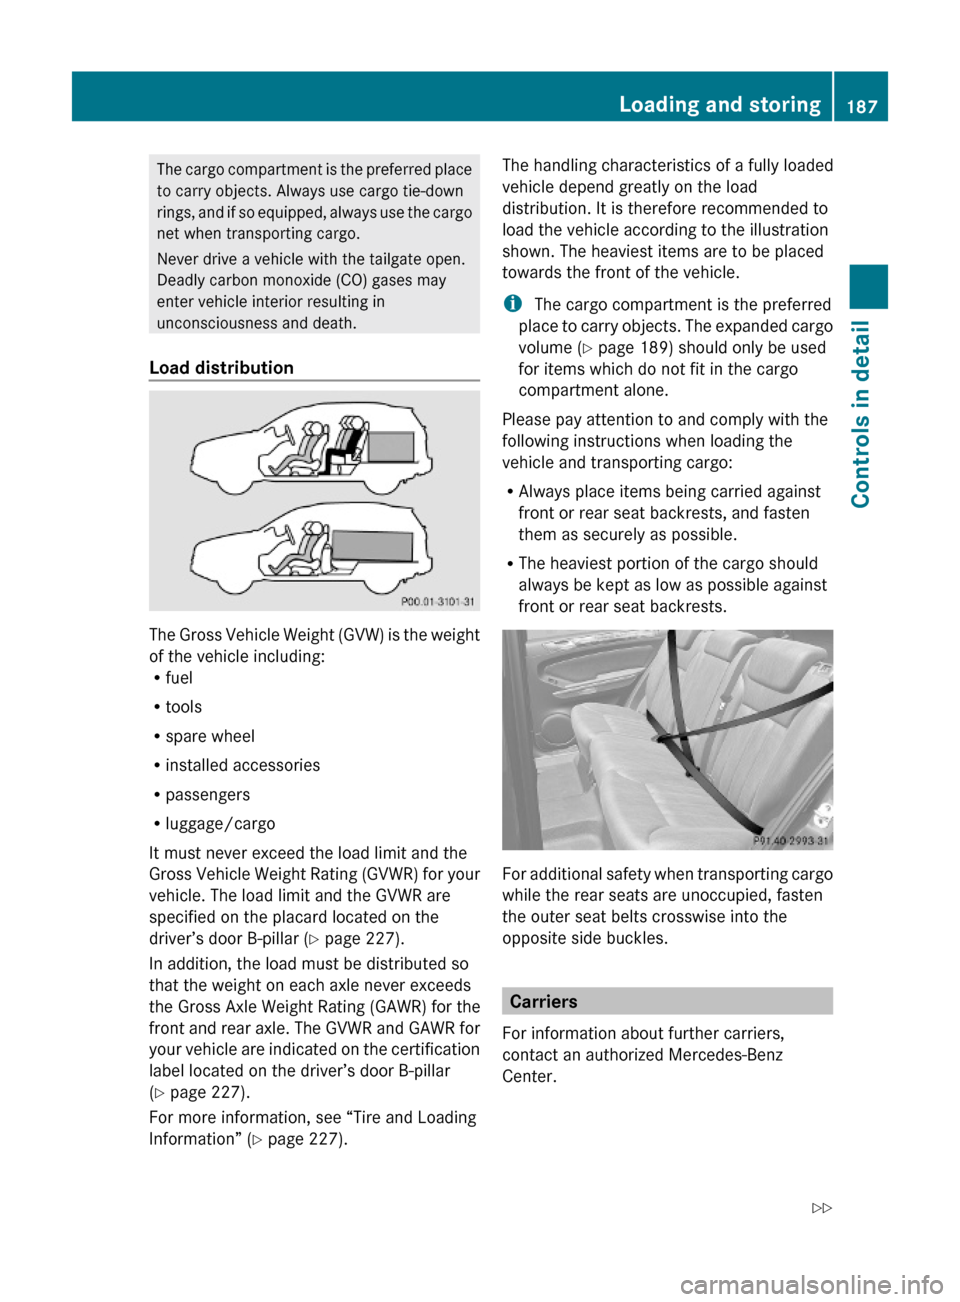
Load distribution
The Gross Vehicle Weight (GVW) is the weight
of the vehicle including:Rfuel
Rtools
Rspare wheel
Rinstalled accessories
Rpassengers
Rluggage/cargo
It must never exceed the load limit and the
Gross Vehicle Weight Rating (GVWR) for your
vehicle. The load limit and the GVWR are
specified on the placard located on the
driver’s door B-pillar (Y page 227).
In addition, the load must be distributed so
that the weight on each axle never exceeds
the Gross Axle Weight Rating (GAWR) for the
front and rear axle. The GVWR and GAWR for
your vehicle are indicated on the certification
label located on the driver’s door B-pillar
(Y page 227).
For more information, see “Tire and Loading
Information” (Y page 227).
The handling characteristics of a fully loaded
vehicle depend greatly on the load
distribution. It is therefore recommended to
load the vehicle according to the illustration
shown. The heaviest items are to be placed
towards the front of the vehicle.
i The cargo compartment is the preferred
place to carry objects. The expanded cargo
volume (Y page 189) should only be used
for items which do not fit in the cargo
compartment alone.
Please pay attention to and comply with the
following instructions when loading the
vehicle and transporting cargo:
RAlways place items being carried against
front or rear seat backrests, and fasten
them as securely as possible.
RThe heaviest portion of the cargo should
always be kept as low as possible against
front or rear seat backrests.
For additional safety when transporting cargo
while the rear seats are unoccupied, fasten
the outer seat belts crosswise into the
opposite side buckles.
Carriers
For information about further carriers,
contact an authorized Mercedes-Benz
Center.
Loading and storing187Controls in detail164_AKB; 7; 31, en-USd2ureepe,Version: 2.11.8.12009-09-11T12:07:36+02:00 - Seite 187Z
Page 190 of 368
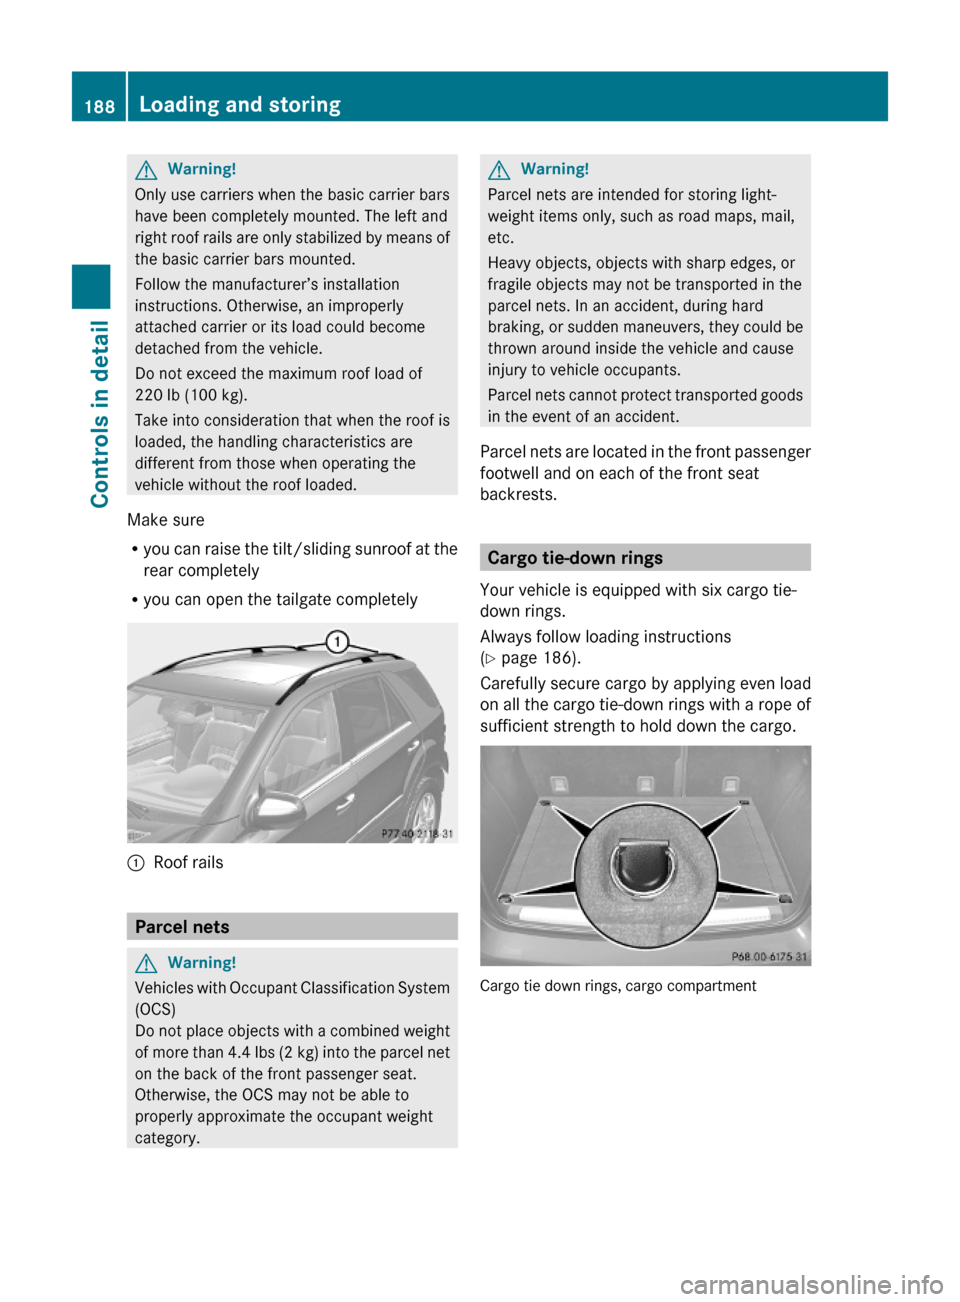
GWarning!
Only use carriers when the basic carrier bars
have been completely mounted. The left and
right roof rails are only stabilized by means of
the basic carrier bars mounted.
Follow the manufacturer’s installation
instructions. Otherwise, an improperly
attached carrier or its load could become
detached from the vehicle.
Do not exceed the maximum roof load of
220 lb (100 kg).
Take into consideration that when the roof is
loaded, the handling characteristics are
different from those when operating the
vehicle without the roof loaded.
Make sure
Ryou can raise the tilt/sliding sunroof at the
rear completely
Ryou can open the tailgate completely
:Roof rails
Parcel nets
GWarning!
Vehicles with Occupant Classification System
(OCS)
Do not place objects with a combined weight
of more than 4.4 lbs (2 kg) into the parcel net
on the back of the front passenger seat.
Otherwise, the OCS may not be able to
properly approximate the occupant weight
category.
GWarning!
Parcel nets are intended for storing light-
weight items only, such as road maps, mail,
etc.
Heavy objects, objects with sharp edges, or
fragile objects may not be transported in the
parcel nets. In an accident, during hard
braking, or sudden maneuvers, they could be
thrown around inside the vehicle and cause
injury to vehicle occupants.
Parcel nets cannot protect transported goods
in the event of an accident.
Parcel nets are located in the front passenger
footwell and on each of the front seat
backrests.
Cargo tie-down rings
Your vehicle is equipped with six cargo tie-
down rings.
Always follow loading instructions
(Y page 186).
Carefully secure cargo by applying even load
on all the cargo tie-down rings with a rope of
sufficient strength to hold down the cargo.
Cargo tie down rings, cargo compartment
188Loading and storingControls in detail
164_AKB; 7; 31, en-USd2ureepe,Version: 2.11.8.12009-09-11T12:07:36+02:00 - Seite 188
Page 191 of 368
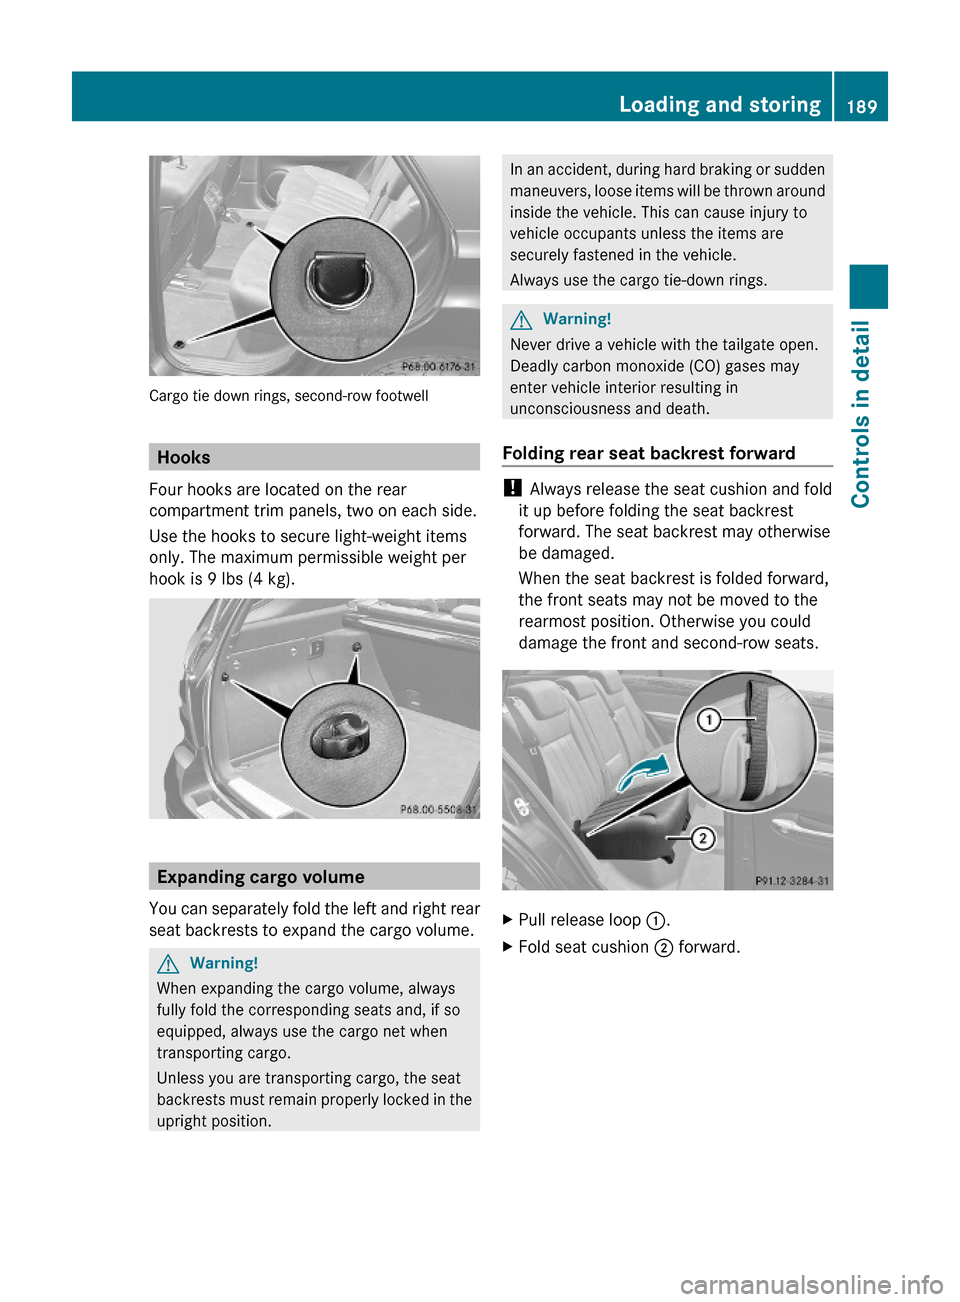
Cargo tie down rings, second-row footwell
Hooks
Four hooks are located on the rear
compartment trim panels, two on each side.
Use the hooks to secure light-weight items
only. The maximum permissible weight per
hook is 9 lbs (4 kg).
Expanding cargo volume
You can separately fold the left and right rear
seat backrests to expand the cargo volume.
GWarning!
When expanding the cargo volume, always
fully fold the corresponding seats and, if so
equipped, always use the cargo net when
transporting cargo.
Unless you are transporting cargo, the seat
backrests must remain properly locked in the
upright position.
In an accident, during hard braking or sudden
maneuvers, loose items will be thrown around
inside the vehicle. This can cause injury to
vehicle occupants unless the items are
securely fastened in the vehicle.
Always use the cargo tie-down rings.
GWarning!
Never drive a vehicle with the tailgate open.
Deadly carbon monoxide (CO) gases may
enter vehicle interior resulting in
unconsciousness and death.
Folding rear seat backrest forward
! Always release the seat cushion and fold
it up before folding the seat backrest
forward. The seat backrest may otherwise
be damaged.
When the seat backrest is folded forward,
the front seats may not be moved to the
rearmost position. Otherwise you could
damage the front and second-row seats.
XPull release loop :.XFold seat cushion ; forward.Loading and storing189Controls in detail164_AKB; 7; 31, en-USd2ureepe,Version: 2.11.8.12009-09-11T12:07:36+02:00 - Seite 189Z
Page 197 of 368

XRemoving: Hold cup holder at its
bridge ; and pull out bridge in direction of
arrow.
XPull cup holder : out in direction of arrow.XReinstalling: First, insert cup holder :
and then insert bridge ;.
Cup holder in rear armrest
XFold down the rear armrest.
! Do not sit on or lean your body weight
against the armrest when it is folded down,
as you could otherwise damage it.
Sun visors
GWarning!
Do not use the vanity mirror while driving.
Keep the vanity mirrors in the sun visors
closed while vehicle is in motion. Reflected
glare can endanger you and others.
:Sun visor;Additional sun visor=Vanity mirror lamp?Vanity mirror coverAHolder, e.g. for gas cardsBVanity mirrorCMounting
Glare through the windshield
XFlip sun visor : down when you
experience glare.
Glare through a door window
XClose vanity mirror cover ? if opened.XDisengage sun visor : from mounting C.XPivot sun visor : to the side.XAdjust sun visor : by pushing or pulling in
direction of arrows.
XFlip down additional sun visor ; when you
experience additional glare through the
windshield.
Useful features195Controls in detail164_AKB; 7; 31, en-USd2ureepe,Version: 2.11.8.12009-09-11T12:07:36+02:00 - Seite 195Z