2010 MERCEDES-BENZ GLK350 4MATIC warning
[x] Cancel search: warningPage 76 of 344
RPress or pull the remote tailgate opening/
closing switch on the driver’s door.
RPress the tailgate closing switch.
RPress the KEYLESS-GO locking/closing
switch.
RPull outside handle on the tailgate.
RWhen no SmartKey is inserted in the starter
switch (vehicles with KEYLESS-GO: Make
sure the vehicle’s on-board electronics
have status 0): Press button F on the
SmartKey.
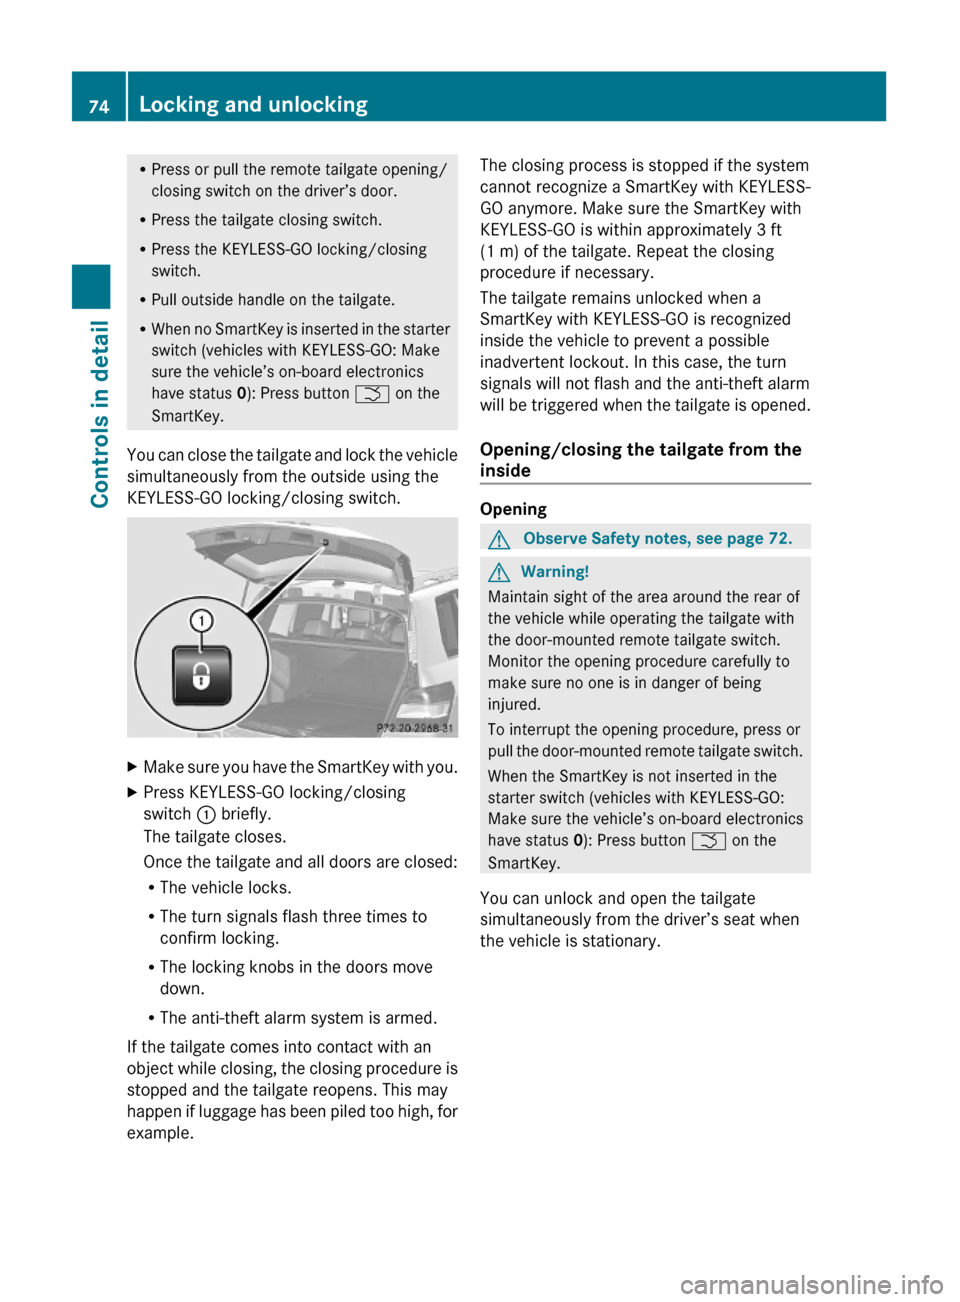
You can close the tailgate and lock the vehicle
simultaneously from the outside using the
KEYLESS-GO locking/closing switch.
XMake sure you have the SmartKey with you.XPress KEYLESS-GO locking/closing
switch : briefly.
The tailgate closes.
Once the tailgate and all doors are closed:
RThe vehicle locks.
RThe turn signals flash three times to
confirm locking.
RThe locking knobs in the doors move
down.
RThe anti-theft alarm system is armed.
If the tailgate comes into contact with an
object while closing, the closing procedure is
stopped and the tailgate reopens. This may
happen if luggage has been piled too high, for
example.
The closing process is stopped if the system
cannot recognize a SmartKey with KEYLESS-
GO anymore. Make sure the SmartKey with
KEYLESS-GO is within approximately 3 ft
(1 m) of the tailgate. Repeat the closing
procedure if necessary.
The tailgate remains unlocked when a
SmartKey with KEYLESS-GO is recognized
inside the vehicle to prevent a possible
inadvertent lockout. In this case, the turn
signals will not flash and the anti-theft alarm
will be triggered when the tailgate is opened.
Opening/closing the tailgate from the
inside
Opening
GObserve Safety notes, see page 72.GWarning!
Maintain sight of the area around the rear of
the vehicle while operating the tailgate with
the door-mounted remote tailgate switch.
Monitor the opening procedure carefully to
make sure no one is in danger of being
injured.
To interrupt the opening procedure, press or
pull the door-mounted remote tailgate switch.
When the SmartKey is not inserted in the
starter switch (vehicles with KEYLESS-GO:
Make sure the vehicle’s on-board electronics
have status 0): Press button F on the
SmartKey.
You can unlock and open the tailgate
simultaneously from the driver’s seat when
the vehicle is stationary.
74Locking and unlockingControls in detail
X204_AKB; 3; 23, en-USd2ureepe,Version: 2.11.8.12009-07-16T19:16:58+02:00 - Seite 74
Page 77 of 344
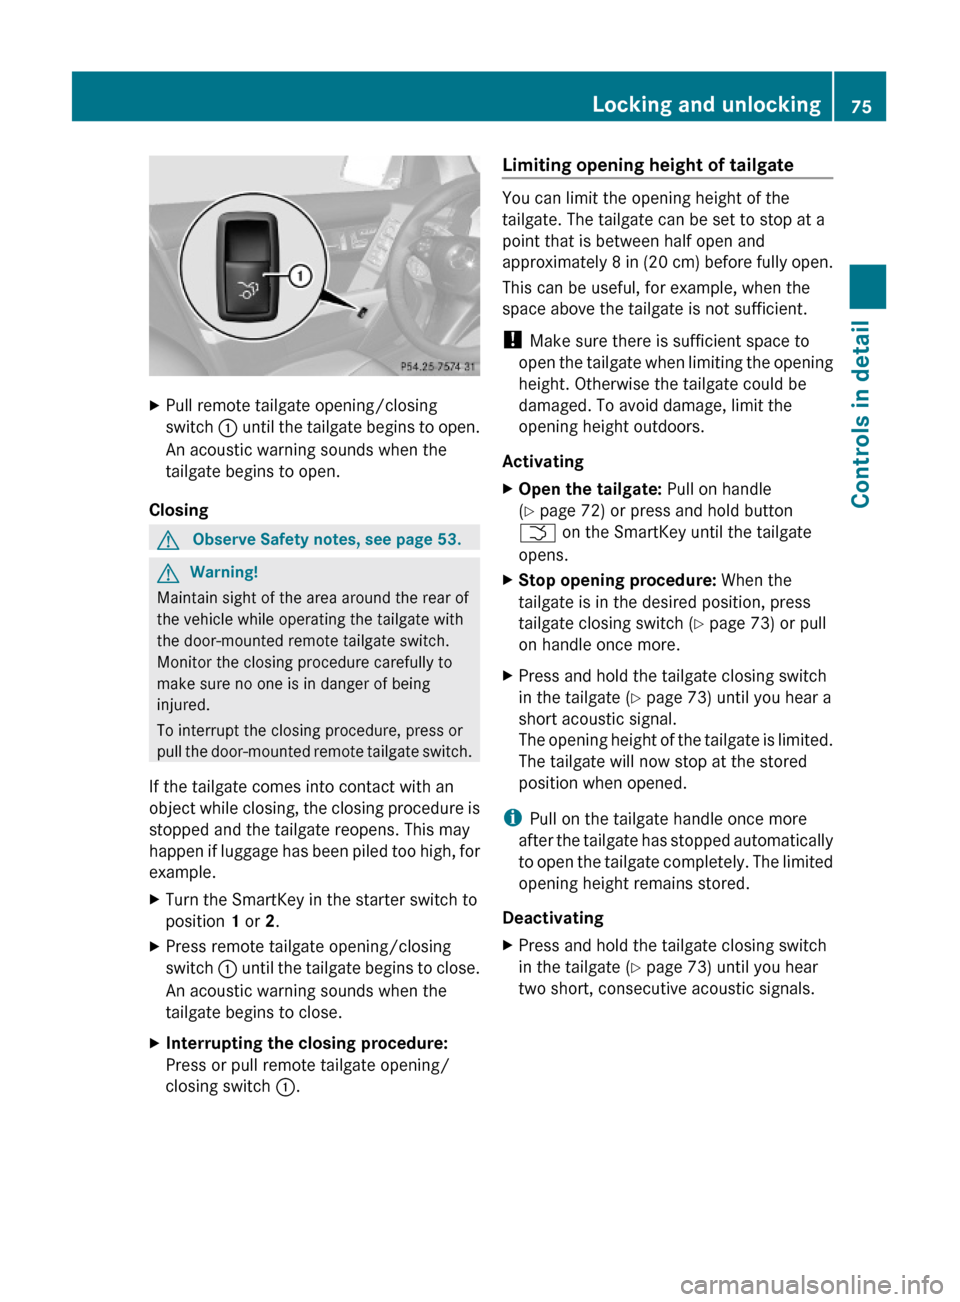
XPull remote tailgate opening/closing
switch : until the tailgate begins to open.
An acoustic warning sounds when the
tailgate begins to open.
Closing
GObserve Safety notes, see page 53.GWarning!
Maintain sight of the area around the rear of
the vehicle while operating the tailgate with
the door-mounted remote tailgate switch.
Monitor the closing procedure carefully to
make sure no one is in danger of being
injured.
To interrupt the closing procedure, press or
pull the door-mounted remote tailgate switch.
If the tailgate comes into contact with an
object while closing, the closing procedure is
stopped and the tailgate reopens. This may
happen if luggage has been piled too high, for
example.
XTurn the SmartKey in the starter switch to
position 1 or 2.
XPress remote tailgate opening/closing
switch : until the tailgate begins to close.
An acoustic warning sounds when the
tailgate begins to close.
XInterrupting the closing procedure:
Press or pull remote tailgate opening/
closing switch :.
Limiting opening height of tailgate
You can limit the opening height of the
tailgate. The tailgate can be set to stop at a
point that is between half open and
approximately 8 in (20 cm) before fully open.
This can be useful, for example, when the
space above the tailgate is not sufficient.
! Make sure there is sufficient space to
open the tailgate when limiting the opening
height. Otherwise the tailgate could be
damaged. To avoid damage, limit the
opening height outdoors.
Activating
XOpen the tailgate: Pull on handle
(Y page 72) or press and hold button
F on the SmartKey until the tailgate
opens.
XStop opening procedure: When the
tailgate is in the desired position, press
tailgate closing switch (Y page 73) or pull
on handle once more.
XPress and hold the tailgate closing switch
in the tailgate (Y page 73) until you hear a
short acoustic signal.
The opening height of the tailgate is limited.
The tailgate will now stop at the stored
position when opened.
iPull on the tailgate handle once more
after the tailgate has stopped automatically
to open the tailgate completely. The limited
opening height remains stored.
Deactivating
XPress and hold the tailgate closing switch
in the tailgate (Y page 73) until you hear
two short, consecutive acoustic signals.
Locking and unlocking75Controls in detailX204_AKB; 3; 23, en-USd2ureepe,Version: 2.11.8.12009-07-16T19:16:58+02:00 - Seite 75Z
Page 80 of 344
Seats
Safety notes
GWarning!
In order to avoid possible loss of vehicle
control the following must be done before the
vehicle is put into motion:
R seat adjustment
R head restraint adjustment
R steering wheel adjustment
R rear view mirror adjustment
R fastening of seat belts
GWarning!
Do not adjust the driver’s seat while driving.
Adjusting the seat while driving could cause
the driver to lose control of the vehicle.
Never ride in a moving vehicle with the seat
backrest in an excessively reclined position as
this can be dangerous. You could slide under
the seat belt in a collision. If you slide under
it, the seat belt would apply force at the
abdomen or neck. That could cause serious
or fatal injuries. The seat backrest and seat
belts provide the best restraint when the
wearer is in a position that is as upright as
possible and seat belts are properly
positioned on the body.
GWarning!
Your seat must be adjusted so that you can
correctly fasten your seat belt.
Observe the following points:
R Adjust the seat backrest until your arms are
slightly angled when holding the steering
wheel.
R Adjust the seat to a comfortable seating
position that still allows you to reach the
accelerator/brake pedal safely. The
position should be as far back as possible
with the driver still able to operate the
controls properly.
R Adjust the head restraint so that it is as
close to the head as possible. The center of
the head restraint must support the back of
the head at eye level.
R Never place hands under the seat or near
any moving parts while a seat is being
adjusted.
Failure to do so could result in an accident
and/or serious personal injury.GWarning!
The power seats can be operated at any time.
Therefore, do not leave children unattended
in the vehicle, or with access to an unlocked
vehicle. A child’s unsupervised access to a
vehicle could result in an accident and/or
serious personal injury.
GWarning!
According to accident statistics, children are
safer when properly restrained in the rear
seating positions than in the front seating
position. Thus, we strongly recommend that
children be placed in the rear seats whenever
possible. Regardless of seating position,
children 12 years old and under must be
seated and properly secured in an
appropriately sized infant restraint, toddler
restraint, or booster seat recommended for
the size and weight of the child. For additional
information, see “Children in the vehicle”.
A child’s risk of serious or fatal injuries is
significantly increased if the child restraints
are not properly secured in the vehicle and/
or the child is not properly secured in the child
restraint.
GWarning!
For your protection, drive only with properly
positioned head restraints.
Adjust the head restraint so that it is as close
to the head as possible and the center of the
head restraint supports the back of the head
at eye level. This will reduce the potential for
injury to the head and neck in the event of an
accident or similar situation.
78SeatsControls in detail
X204_AKB; 3; 23, en-USd2ureepe,Version: 2.11.8.12009-07-16T19:16:58+02:00 - Seite 78
Page 82 of 344
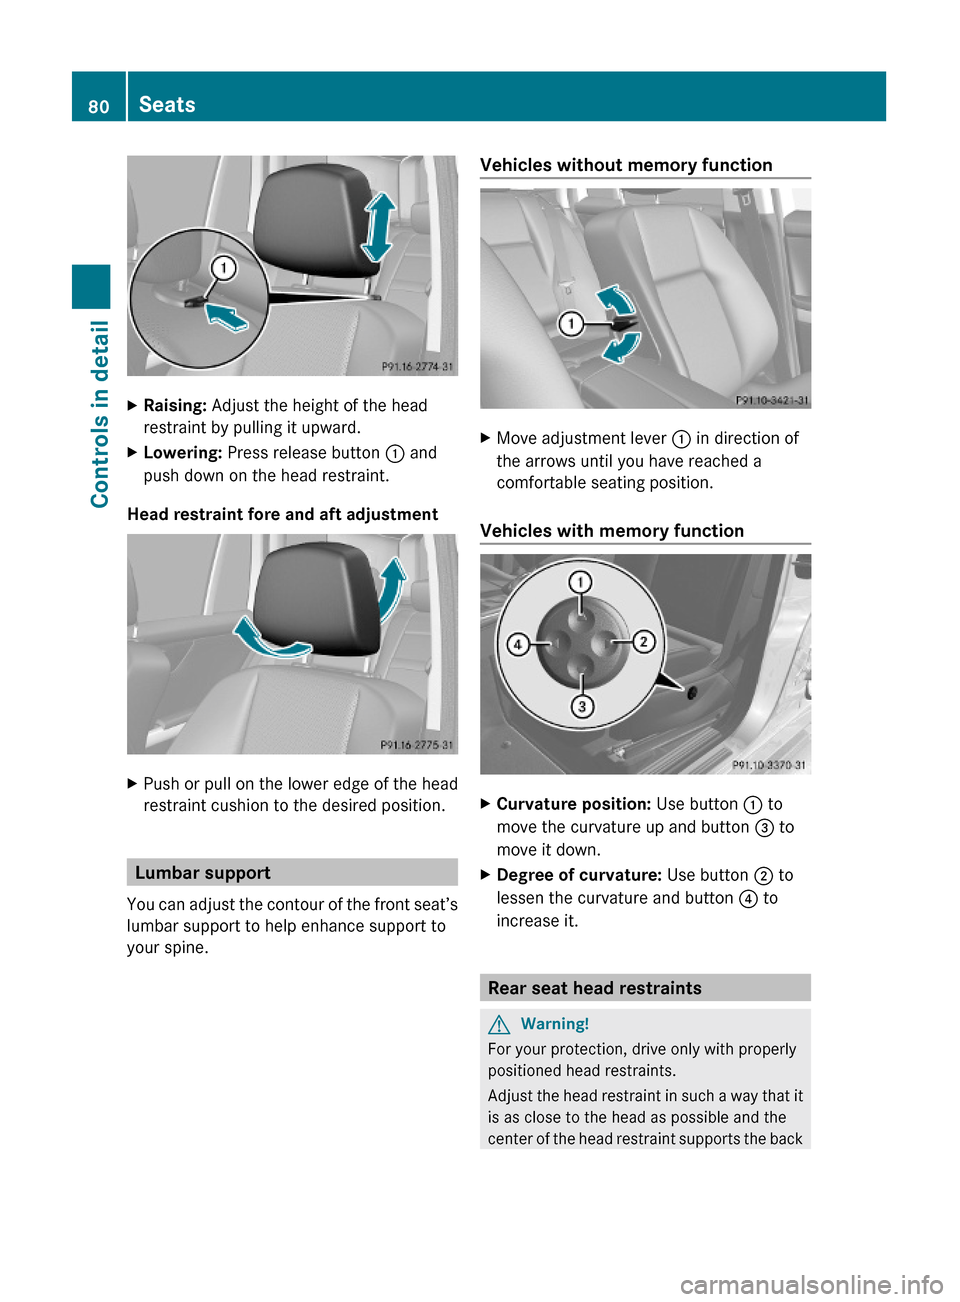
XRaising: Adjust the height of the head
restraint by pulling it upward.
XLowering: Press release button : and
push down on the head restraint.
Head restraint fore and aft adjustment
XPush or pull on the lower edge of the head
restraint cushion to the desired position.
Lumbar support
You can adjust the contour of the front seat’s
lumbar support to help enhance support to
your spine.
Vehicles without memory functionXMove adjustment lever : in direction of
the arrows until you have reached a
comfortable seating position.
Vehicles with memory function
XCurvature position: Use button : to
move the curvature up and button = to
move it down.
XDegree of curvature: Use button ; to
lessen the curvature and button ? to
increase it.
Rear seat head restraints
GWarning!
For your protection, drive only with properly
positioned head restraints.
Adjust the head restraint in such a way that it
is as close to the head as possible and the
center of the head restraint supports the back
80SeatsControls in detail
X204_AKB; 3; 23, en-USd2ureepe,Version: 2.11.8.12009-07-16T19:16:58+02:00 - Seite 80
Page 84 of 344
The seat heating switches from level 3 (high)
to level 2 after approximately 5 minutes.
The seat heating switches from level 2 to level
1 (low) after approximately 10 minutes.
After approximately 20 minutes in level 1, the
seat heating switches off automatically.
XSwitch on the ignition.XSwitching on: Press seat heating
switch :.
Three red indicator lamps in seat heating
switch : come on.
XPress seat heating switch : repeatedly
until the desired seat heating level is set.
XSwitching off: Press seat heating
switch : repeatedly until all indicator
lamps go out.
If there is insufficient voltage the seat heating
switches off automatically.
The seat heating will switch back on again
automatically as soon as sufficient voltage is
available.
Multifunction steering wheel
Safety notes
GWarning!
Do not adjust the steering wheel while driving.
Adjusting the steering wheel while driving, or
driving without the steering wheel adjustment
feature locked could cause the driver to lose
control of the vehicle.
The electrical steering wheel adjustment
feature can be operated at any time.
Therefore, do not leave children unattended
in the vehicle, or with access to an unlocked
vehicle. A child’s unsupervised access to a
vehicle could result in an accident and/or
serious personal injury.
Make sure
Ryou can reach the steering wheel with your
arms slightly bent at the elbows
Ryou can move your legs freely
Rall displays (including malfunction and
indicator lamps) on the instrument cluster
are clearly visible
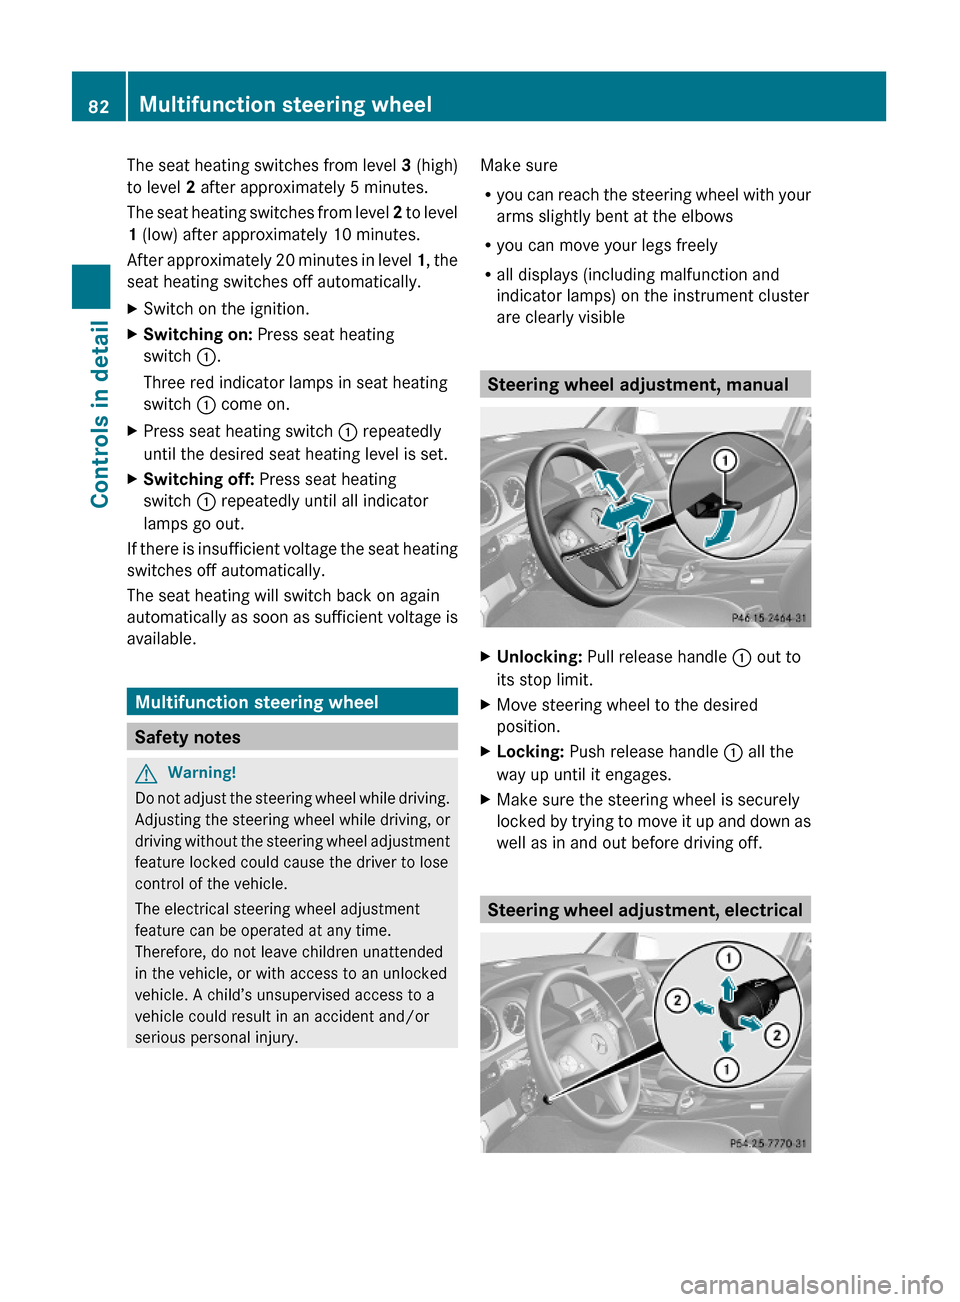
Steering wheel adjustment, manual
XUnlocking: Pull release handle : out to
its stop limit.
XMove steering wheel to the desired
position.
XLocking: Push release handle : all the
way up until it engages.
XMake sure the steering wheel is securely
locked by trying to move it up and down as
well as in and out before driving off.
Steering wheel adjustment, electrical
82Multifunction steering wheelControls in detail
X204_AKB; 3; 23, en-USd2ureepe,Version: 2.11.8.12009-07-16T19:16:58+02:00 - Seite 82
Page 85 of 344
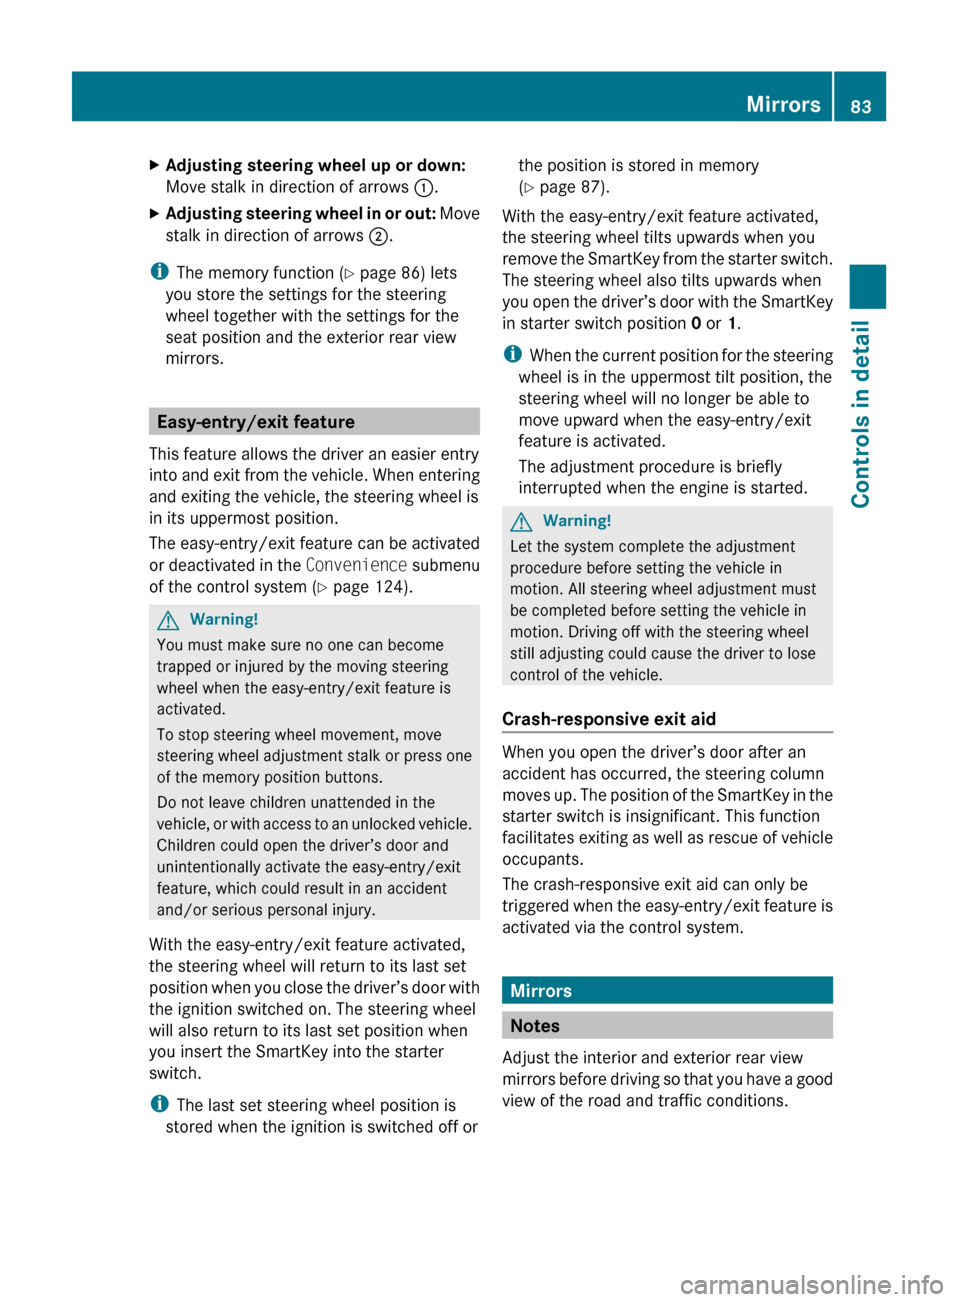
XAdjusting steering wheel up or down:
Move stalk in direction of arrows :.XAdjusting steering wheel in or out: Move
stalk in direction of arrows ;.
i
The memory function ( Y page 86) lets
you store the settings for the steering
wheel together with the settings for the
seat position and the exterior rear view
mirrors.
Easy-entry/exit feature
This feature allows the driver an easier entry
into and exit from the vehicle. When entering
and exiting the vehicle, the steering wheel is
in its uppermost position.
The easy-entry/exit feature can be activated
or deactivated in the Convenience submenu
of the control system ( Y page 124).
GWarning!
You must make sure no one can become
trapped or injured by the moving steering
wheel when the easy-entry/exit feature is
activated.
To stop steering wheel movement, move
steering wheel adjustment stalk or press one
of the memory position buttons.
Do not leave children unattended in the
vehicle, or with access to an unlocked vehicle.
Children could open the driver’s door and
unintentionally activate the easy-entry/exit
feature, which could result in an accident
and/or serious personal injury.
With the easy-entry/exit feature activated,
the steering wheel will return to its last set
position when you close the driver’s door with
the ignition switched on. The steering wheel
will also return to its last set position when
you insert the SmartKey into the starter
switch.
i The last set steering wheel position is
stored when the ignition is switched off or
the position is stored in memory
( Y page 87).
With the easy-entry/exit feature activated,
the steering wheel tilts upwards when you
remove the SmartKey from the starter switch.
The steering wheel also tilts upwards when
you open the driver’s door with the SmartKey
in starter switch position 0 or 1.
i When the current position for the steering
wheel is in the uppermost tilt position, the
steering wheel will no longer be able to
move upward when the easy-entry/exit
feature is activated.
The adjustment procedure is briefly
interrupted when the engine is started.GWarning!
Let the system complete the adjustment
procedure before setting the vehicle in
motion. All steering wheel adjustment must
be completed before setting the vehicle in
motion. Driving off with the steering wheel
still adjusting could cause the driver to lose
control of the vehicle.
Crash-responsive exit aid
When you open the driver’s door after an
accident has occurred, the steering column
moves up. The position of the SmartKey in the
starter switch is insignificant. This function
facilitates exiting as well as rescue of vehicle
occupants.
The crash-responsive exit aid can only be
triggered when the easy-entry/exit feature is
activated via the control system.
Mirrors
Notes
Adjust the interior and exterior rear view
mirrors before driving so that you have a good
view of the road and traffic conditions.
Mirrors83Controls in detailX204_AKB; 3; 23, en-USd2ureepe,Version: 2.11.8.12009-07-16T19:16:58+02:00 - Seite 83Z
Page 86 of 344
Interior rear view mirrorXAdjust the interior rear view mirror
manually.
Interior rear view mirror, antiglare
position
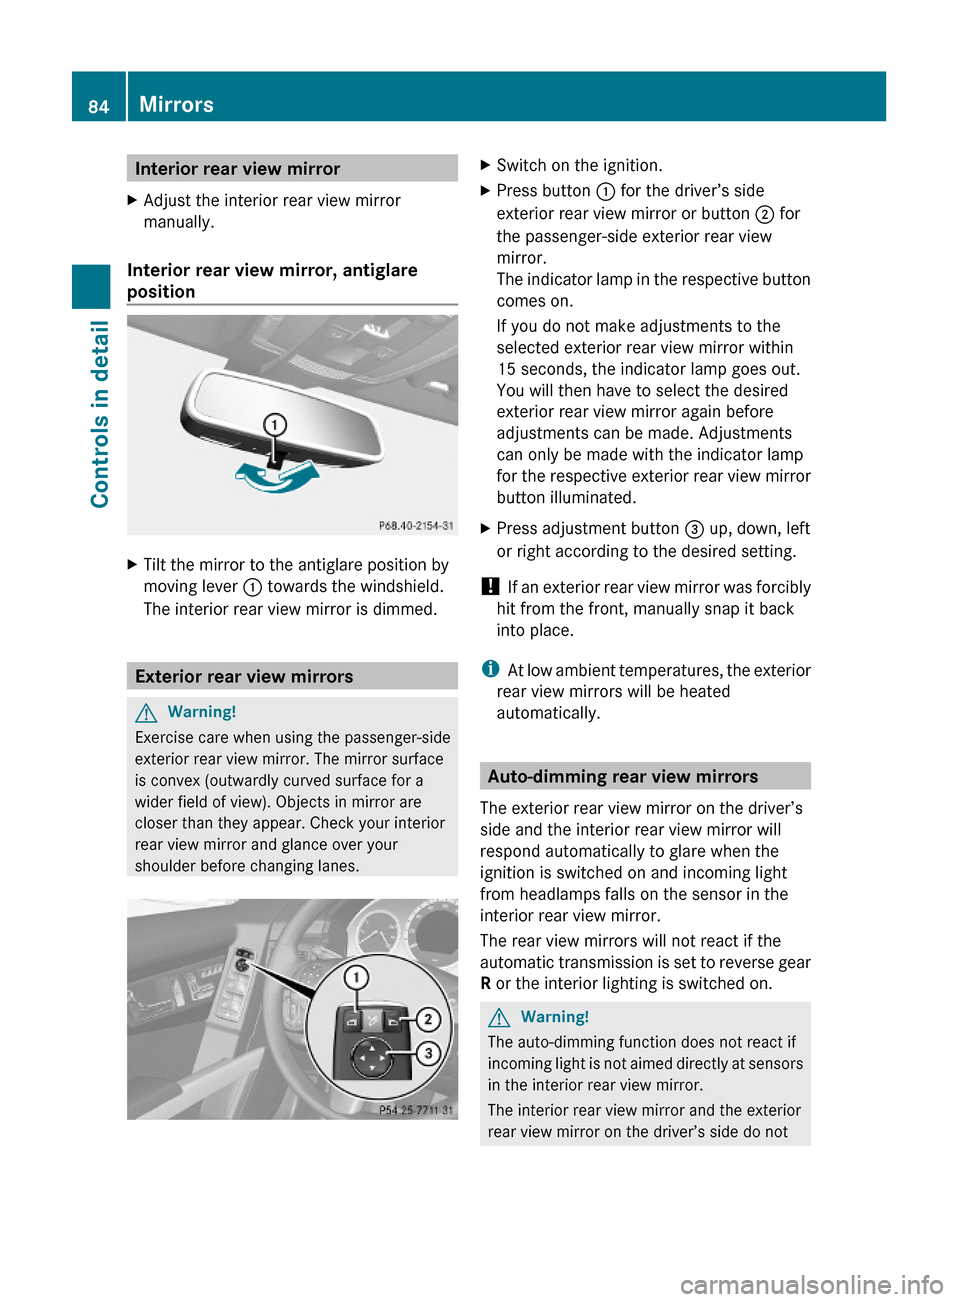
XTilt the mirror to the antiglare position by
moving lever : towards the windshield.
The interior rear view mirror is dimmed.
Exterior rear view mirrors
GWarning!
Exercise care when using the passenger-side
exterior rear view mirror. The mirror surface
is convex (outwardly curved surface for a
wider field of view). Objects in mirror are
closer than they appear. Check your interior
rear view mirror and glance over your
shoulder before changing lanes.
XSwitch on the ignition.XPress button : for the driver’s side
exterior rear view mirror or button ; for
the passenger-side exterior rear view
mirror.
The indicator lamp in the respective button
comes on.
If you do not make adjustments to the
selected exterior rear view mirror within
15 seconds, the indicator lamp goes out.
You will then have to select the desired
exterior rear view mirror again before
adjustments can be made. Adjustments
can only be made with the indicator lamp
for the respective exterior rear view mirror
button illuminated.
XPress adjustment button = up, down, left
or right according to the desired setting.
! If an exterior rear view mirror was forcibly
hit from the front, manually snap it back
into place.
iAt low ambient temperatures, the exterior
rear view mirrors will be heated
automatically.
Auto-dimming rear view mirrors
The exterior rear view mirror on the driver’s
side and the interior rear view mirror will
respond automatically to glare when the
ignition is switched on and incoming light
from headlamps falls on the sensor in the
interior rear view mirror.
The rear view mirrors will not react if the
automatic transmission is set to reverse gear
R or the interior lighting is switched on.
GWarning!
The auto-dimming function does not react if
incoming light is not aimed directly at sensors
in the interior rear view mirror.
The interior rear view mirror and the exterior
rear view mirror on the driver’s side do not
84MirrorsControls in detail
X204_AKB; 3; 23, en-USd2ureepe,Version: 2.11.8.12009-07-16T19:16:58+02:00 - Seite 84
Page 88 of 344
! Before you drive the vehicle through an
automatic car wash, fold in the exterior rear
view mirrors. Otherwise they may get
damaged.
Folding in and out automatically
The function must be activated in the
Convenience submenu (Y page 124).
The exterior rear view mirrors fold in
automatically as soon as the vehicle is locked
from the outside.
The exterior rear view mirrors fold out
automatically as soon as the vehicle is
unlocked and the driver’s or front passenger
door is subsequently opened.
Resetting the automatic exterior rear
view mirror fold-in function
You need to reset the automatic exterior rear
view mirror fold-in function whenever the
battery was disconnected or discharged.
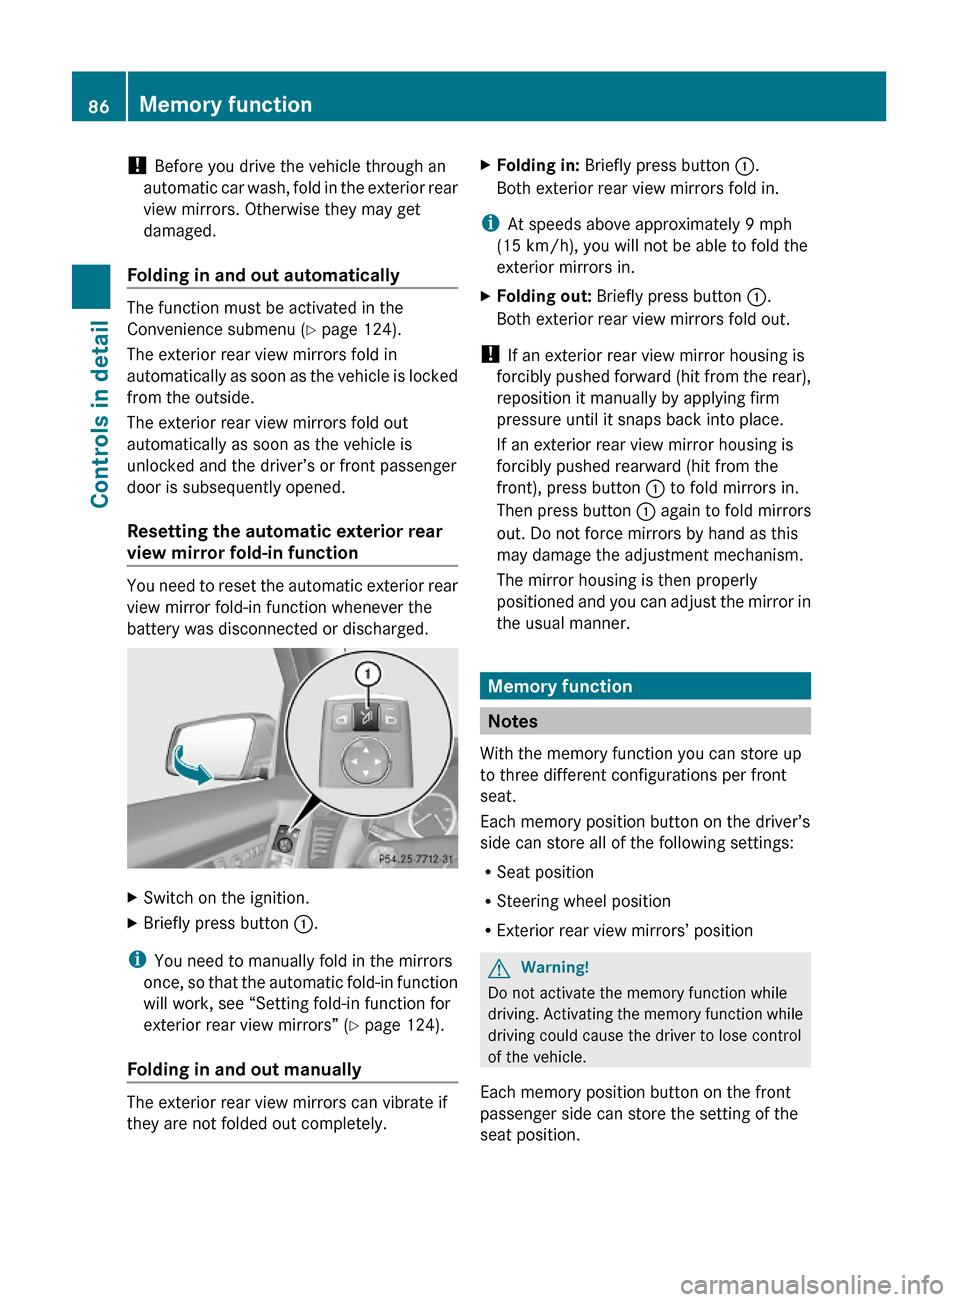
XSwitch on the ignition.XBriefly press button :.
iYou need to manually fold in the mirrors
once, so that the automatic fold-in function
will work, see “Setting fold-in function for
exterior rear view mirrors” (Y page 124).
Folding in and out manually
The exterior rear view mirrors can vibrate if
they are not folded out completely.
XFolding in: Briefly press button :.
Both exterior rear view mirrors fold in.
iAt speeds above approximately 9 mph
(15 km/h), you will not be able to fold the
exterior mirrors in.
XFolding out: Briefly press button :.
Both exterior rear view mirrors fold out.
! If an exterior rear view mirror housing is
forcibly pushed forward (hit from the rear),
reposition it manually by applying firm
pressure until it snaps back into place.
If an exterior rear view mirror housing is
forcibly pushed rearward (hit from the
front), press button : to fold mirrors in.
Then press button : again to fold mirrors
out. Do not force mirrors by hand as this
may damage the adjustment mechanism.
The mirror housing is then properly
positioned and you can adjust the mirror in
the usual manner.
Memory function
Notes
With the memory function you can store up
to three different configurations per front
seat.
Each memory position button on the driver’s
side can store all of the following settings:
RSeat position
RSteering wheel position
RExterior rear view mirrors’ position
GWarning!
Do not activate the memory function while
driving. Activating the memory function while
driving could cause the driver to lose control
of the vehicle.
Each memory position button on the front
passenger side can store the setting of the
seat position.
86Memory functionControls in detail
X204_AKB; 3; 23, en-USd2ureepe,Version: 2.11.8.12009-07-16T19:16:58+02:00 - Seite 86