Page 318 of 344

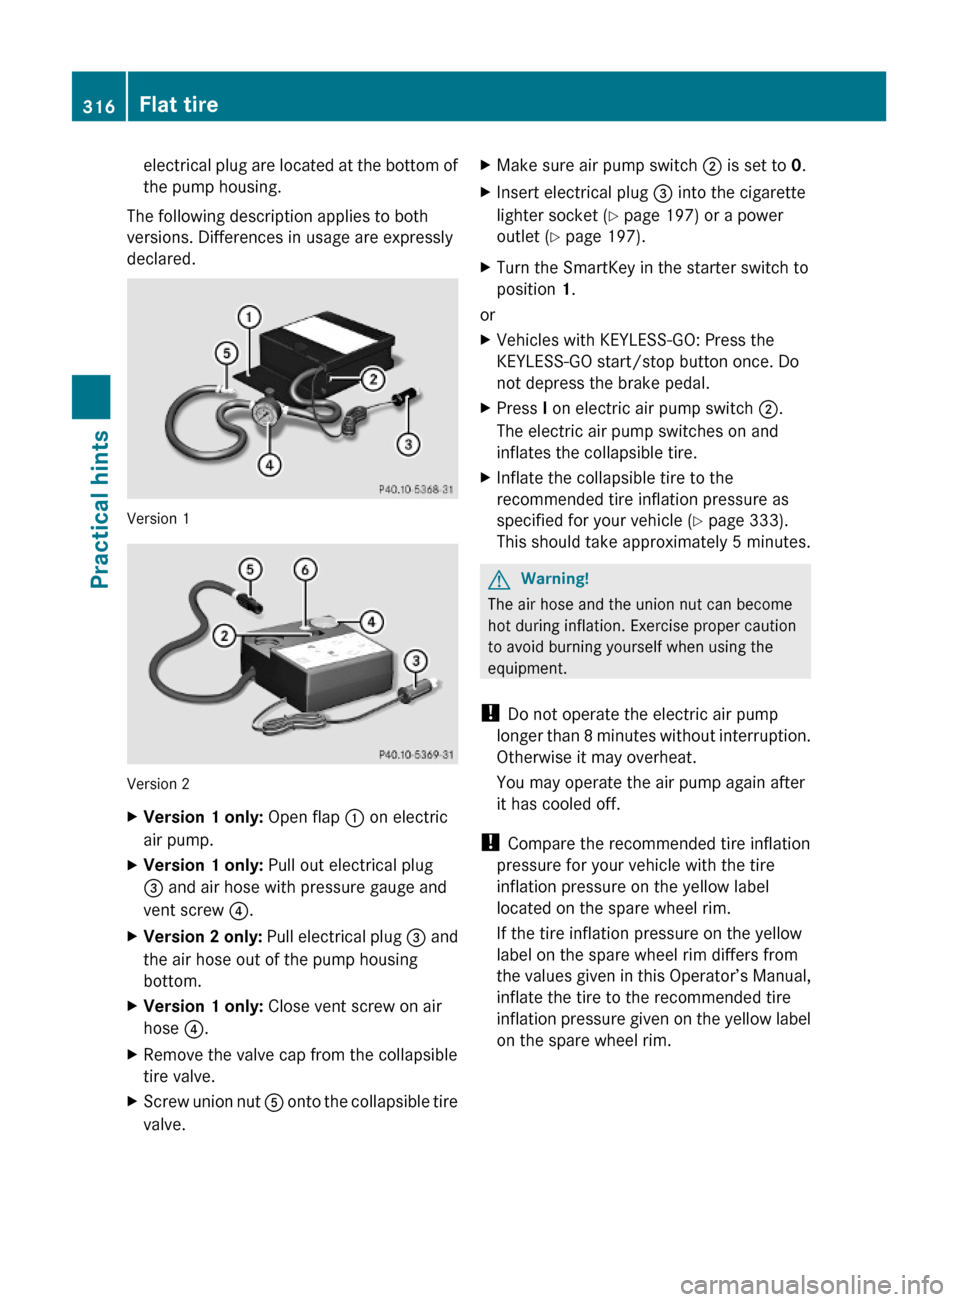
electrical plug are located at the bottom of
the pump housing.
The following description applies to both
versions. Differences in usage are expressly
declared.
Version 1
Version 2
XVersion 1 only: Open flap : on electric
air pump.
XVersion 1 only: Pull out electrical plug
= and air hose with pressure gauge and
vent screw ?.
XVersion 2 only: Pull electrical plug = and
the air hose out of the pump housing
bottom.
XVersion 1 only: Close vent screw on air
hose ?.
XRemove the valve cap from the collapsible
tire valve.
XScrew union nut A onto the collapsible tire
valve.
XMake sure air pump switch ; is set to 0.XInsert electrical plug = into the cigarette
lighter socket (Y page 197) or a power
outlet (Y page 197).
XTurn the SmartKey in the starter switch to
position 1.
or
XVehicles with KEYLESS-GO: Press the
KEYLESS-GO start/stop button once. Do
not depress the brake pedal.
XPress I on electric air pump switch ;.
The electric air pump switches on and
inflates the collapsible tire.
XInflate the collapsible tire to the
recommended tire inflation pressure as
specified for your vehicle (Y page 333).
This should take approximately 5 minutes.
GWarning!
The air hose and the union nut can become
hot during inflation. Exercise proper caution
to avoid burning yourself when using the
equipment.
! Do not operate the electric air pump
longer than 8 minutes without interruption.
Otherwise it may overheat.
You may operate the air pump again after
it has cooled off.
! Compare the recommended tire inflation
pressure for your vehicle with the tire
inflation pressure on the yellow label
located on the spare wheel rim.
If the tire inflation pressure on the yellow
label on the spare wheel rim differs from
the values given in this Operator’s Manual,
inflate the tire to the recommended tire
inflation pressure given on the yellow label
on the spare wheel rim.
316Flat tirePractical hints
X204_AKB; 3; 23, en-USd2ureepe,Version: 2.11.8.12009-07-16T19:16:58+02:00 - Seite 316
Page 319 of 344

XPress 0 on electric air pump switch ;.XTurn the SmartKey in the starter switch to
position 0.
or
XVehicles with KEYLESS-GO: Press the
KEYLESS-GO start/stop button twice. Do
not depress the brake pedal.
XVersion 1 only: If the tire inflation pressure
is above the recommended tire inflation
pressure as specified for your vehicle
(Y page 333), decrease tire pressure using
the vent screw on air hose ?.
XVersion 2 only: If the tire inflation pressure
is above the recommended tire inflation
pressure as specified for your vehicle
(Y page 333), decrease tire pressure using
deflate button B.
GObserve Safety notes, see page 221.XDetach the electric air pump.XReinstall collapsible tire valve cap.XVersion 1 only: Store electrical plug =
and air hose ? behind flap :.
XVersion 2 only: Store electrical plug =
and the air hose back into the pump
housing bottom.
XPlace the electric air pump back in its
designated storage space.
XLower the vehicle.
Lowering the vehicle
GWarning!
Inflate collapsible tire only after the wheel is
properly attached.
Inflate the collapsible tire using the electric
air pump before lowering the vehicle.
XAttach ratchet to vehicle jack so that the
word DOWN can be seen.
Lower the vehicle until the vehicle is resting
fully on its own weight:
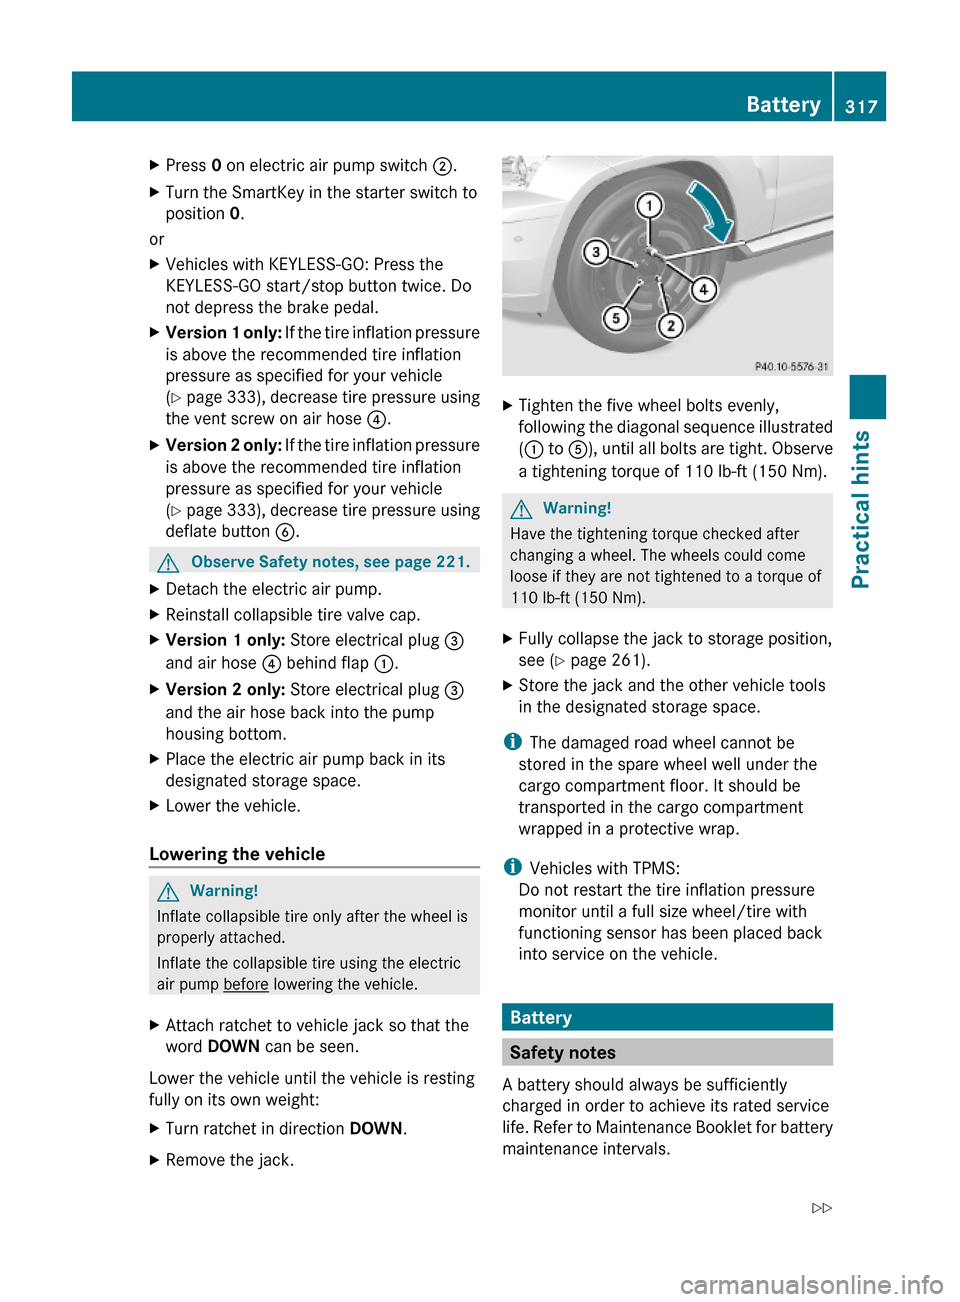
XTurn ratchet in direction DOWN.XRemove the jack.XTighten the five wheel bolts evenly,
following the diagonal sequence illustrated
(: to A), until all bolts are tight. Observe
a tightening torque of 110 lb-ft (150 Nm).
GWarning!
Have the tightening torque checked after
changing a wheel. The wheels could come
loose if they are not tightened to a torque of
110 lb-ft (150 Nm).
XFully collapse the jack to storage position,
see (Y page 261).
XStore the jack and the other vehicle tools
in the designated storage space.
iThe damaged road wheel cannot be
stored in the spare wheel well under the
cargo compartment floor. It should be
transported in the cargo compartment
wrapped in a protective wrap.
iVehicles with TPMS:
Do not restart the tire inflation pressure
monitor until a full size wheel/tire with
functioning sensor has been placed back
into service on the vehicle.
Battery
Safety notes
A battery should always be sufficiently
charged in order to achieve its rated service
life. Refer to Maintenance Booklet for battery
maintenance intervals.
Battery317Practical hintsX204_AKB; 3; 23, en-USd2ureepe,Version: 2.11.8.12009-07-16T19:16:58+02:00 - Seite 317Z
Page 335 of 344

Same size tiresModelGLK 35022
GLK 350 4MATIC17" wheelsRims (light alloy)
Wheel offset7.5 J x 17 H2
1.87 in (47.5 mm)Winter tires 23,24235/60 R17 102H M+S
i19" wheelsRims (light alloy)
Wheel offset7.5 J x 19 H2
1.85 in (47 mm)All-season tires 23235/50 R19 99H M+S20" wheelsRims (light alloy)
Wheel offset8.5 J x 20 H2
1.77 in (45 mm)All-season tires 23235/45 R20 100H XL (Extra Load) M+S
Spare wheel
! Compare the recommended tire inflation pressure for your vehicle with the tire inflation
pressure on the yellow label located on the spare wheel rim.
If the tire inflation pressure on the yellow label on the spare wheel rim differs from the values
given in this Operator’s Manual, inflate the tire to the recommended tire inflation pressure
given on the yellow label on the spare wheel rim.
i Please note that the tire inflation pressure of the spare wheel differs from the tire inflation
pressure of the road tires.
ModelAll modelsRim (light alloy)6 B x 17 H2Wheel offset0.98 in (25 mm)Collapsible tire 25185/75-17 98PRecommended tire inflation pressure41 psi (2.8 bar)22
USA only.
23 Radial-ply tires.
24 Not available as factory equipment.
25 Must not be used with snow chains.Rims and tires333Technical dataX204_AKB; 3; 23, en-USd2ureepe,Version: 2.11.8.12009-07-16T19:16:58+02:00 - Seite 333Z