2010 MERCEDES-BENZ GLK350 4MATIC fuel
[x] Cancel search: fuelPage 111 of 344
If you must continue to drive, do so with added
caution. Contact an authorized Mercedes-
Benz Center as soon as possible.
The language setting for the multifunction
display can be changed with the audio system
(Y page 136) or with the COMAND system.
Vehicles with COMAND system: Refer to
separate operating instructions.
Activating the instrument cluster
The instrument cluster is activated when you
Ropen the driver’s door
Rswitch on the ignition
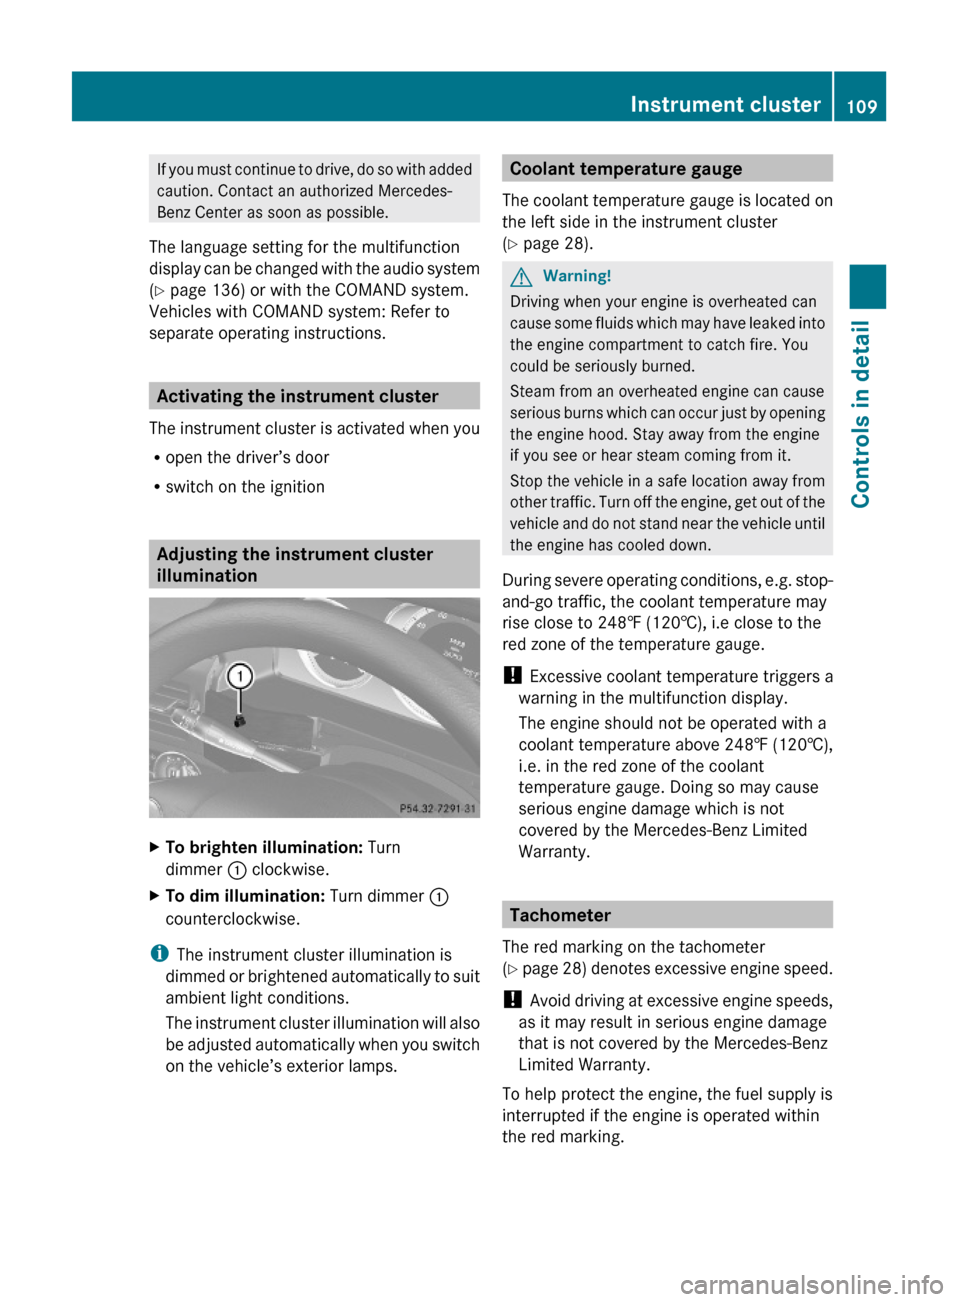
Adjusting the instrument cluster
illumination
XTo brighten illumination: Turn
dimmer : clockwise.
XTo dim illumination: Turn dimmer :
counterclockwise.
iThe instrument cluster illumination is
dimmed or brightened automatically to suit
ambient light conditions.
The instrument cluster illumination will also
be adjusted automatically when you switch
on the vehicle’s exterior lamps.
Coolant temperature gauge
The coolant temperature gauge is located on
the left side in the instrument cluster
(Y page 28).
GWarning!
Driving when your engine is overheated can
cause some fluids which may have leaked into
the engine compartment to catch fire. You
could be seriously burned.
Steam from an overheated engine can cause
serious burns which can occur just by opening
the engine hood. Stay away from the engine
if you see or hear steam coming from it.
Stop the vehicle in a safe location away from
other traffic. Turn off the engine, get out of the
vehicle and do not stand near the vehicle until
the engine has cooled down.
During severe operating conditions, e.g. stop-
and-go traffic, the coolant temperature may
rise close to 248‡ (120†), i.e close to the
red zone of the temperature gauge.
! Excessive coolant temperature triggers a
warning in the multifunction display.
The engine should not be operated with a
coolant temperature above 248‡ (120†),
i.e. in the red zone of the coolant
temperature gauge. Doing so may cause
serious engine damage which is not
covered by the Mercedes-Benz Limited
Warranty.
Tachometer
The red marking on the tachometer
(Y page 28) denotes excessive engine speed.
! Avoid driving at excessive engine speeds,
as it may result in serious engine damage
that is not covered by the Mercedes-Benz
Limited Warranty.
To help protect the engine, the fuel supply is
interrupted if the engine is operated within
the red marking.
Instrument cluster109Controls in detailX204_AKB; 3; 23, en-USd2ureepe,Version: 2.11.8.12009-07-16T19:16:58+02:00 - Seite 109Z
Page 112 of 344
Outside temperature indicator
The outside temperature indicator is
displayed in the multifunction display
(Y page 112).
GWarning!
The outside temperature indicator is not
designed to serve as an ice-warning device
and is therefore unsuitable for that purpose.
Indicated temperatures just above the
freezing point do not guarantee that the road
surface is free of ice. The road may still be icy,
especially in wooded areas or on bridges.
Fuel gauge
The fuel gauge is on the left-hand side of the
instrument cluster (Y page 28). Once the fuel
level has fallen below the reserve mark, the
yellow fuel tank reserve warning lamp 8
for the fuel reserve comes on.
Control system
Introduction
The control system is activated as soon as the
starter switch is in position 2.
The control system enables you to call up
information about your vehicle and to change
vehicle settings.
For example, you can use the control system
to find out when your vehicle is next due for
maintenance service, to call up statistical
data on your vehicle, and much more.
GWarning!
A driver’s attention to the road and traffic
conditions must always be his/her primary
focus when driving.
For your safety and the safety of others,
selecting features through the multifunction
steering wheel should only be done by the
driver when traffic and road conditions permit
it to be done safely.
Bear in mind that at a speed of just 30 mph
(approximately 50 km/h), your vehicle is
covering a distance of 44 feet (approximately
14 m) every second.
The control system relays information to the
multifunction display.
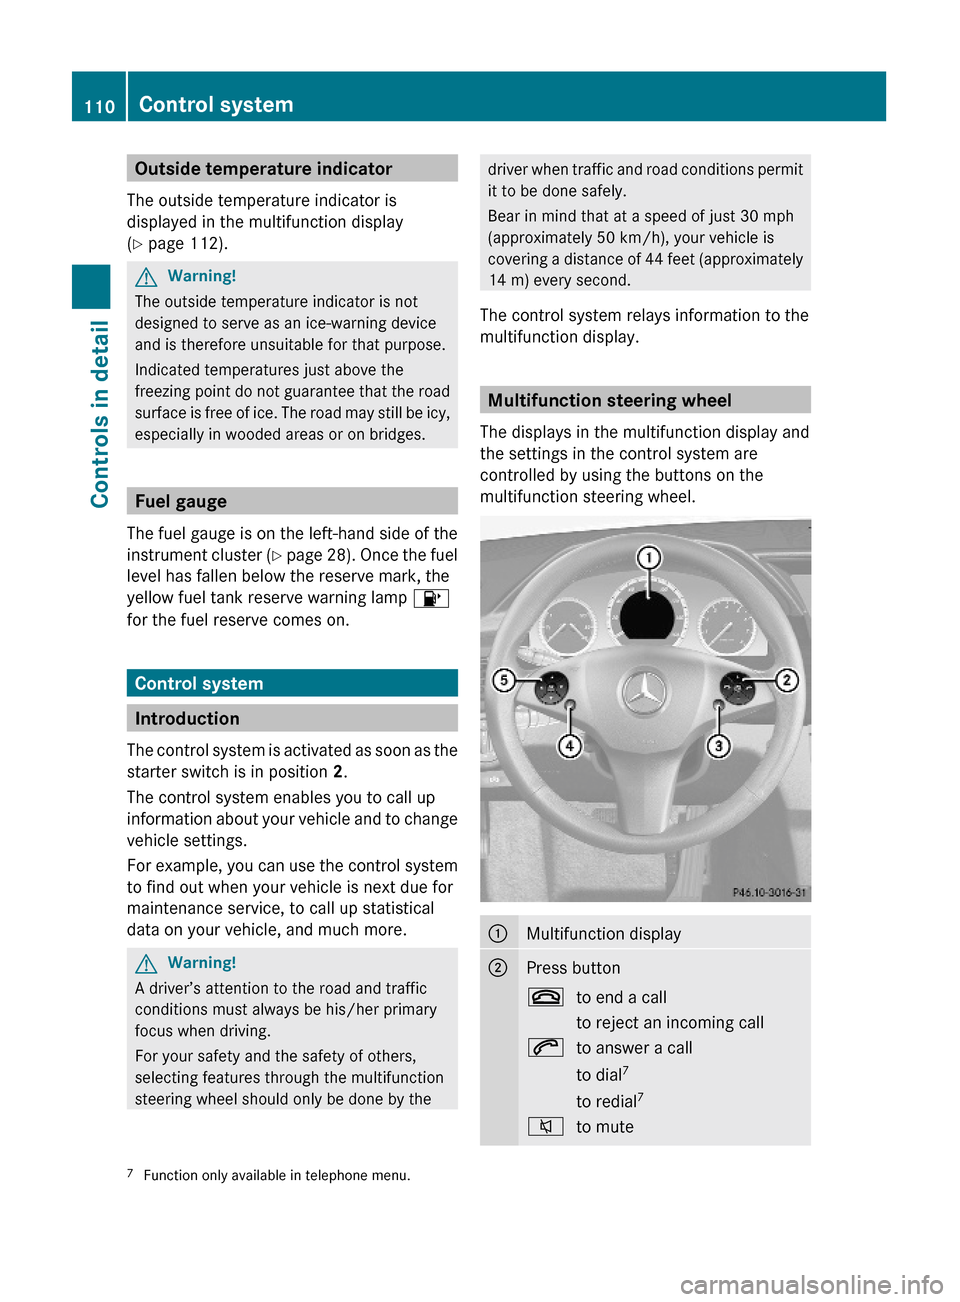
Multifunction steering wheel
The displays in the multifunction display and
the settings in the control system are
controlled by using the buttons on the
multifunction steering wheel.
:Multifunction display;Press button~to end a call
to reject an incoming call
6to answer a call
to dial7
to redial7
8to mute7Function only available in telephone menu.110Control systemControls in detail
X204_AKB; 3; 23, en-USd2ureepe,Version: 2.11.8.12009-07-16T19:16:58+02:00 - Seite 110
Page 115 of 344
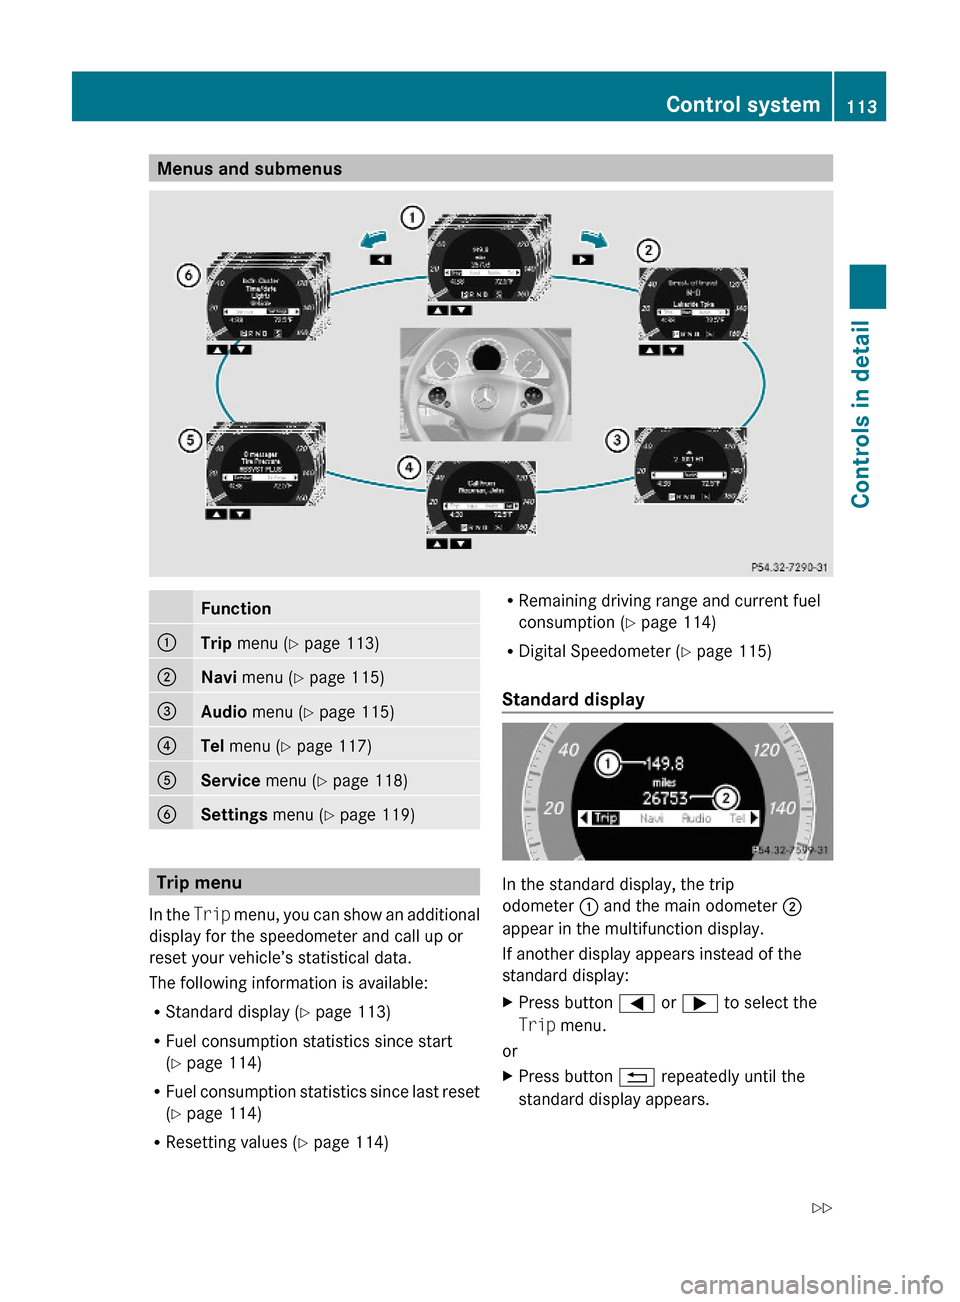
Menus and submenusFunction:Trip menu (Y page 113);Navi menu (Y page 115)=Audio menu (Y page 115)?Tel menu (Y page 117)AService menu (Y page 118)BSettings menu (Y page 119)
Trip menu
In the Trip menu, you can show an additional
display for the speedometer and call up or
reset your vehicle’s statistical data.
The following information is available:
RStandard display (Y page 113)
RFuel consumption statistics since start
(Y page 114)
RFuel consumption statistics since last reset
(Y page 114)
RResetting values (Y page 114)
RRemaining driving range and current fuel
consumption (Y page 114)
RDigital Speedometer (Y page 115)
Standard display
In the standard display, the trip
odometer : and the main odometer ;
appear in the multifunction display.
If another display appears instead of the
standard display:
XPress button = or ; to select the
Trip menu.
or
XPress button % repeatedly until the
standard display appears.
Control system113Controls in detailX204_AKB; 3; 23, en-USd2ureepe,Version: 2.11.8.12009-07-16T19:16:58+02:00 - Seite 113Z
Page 116 of 344
orXPress and hold button % until the
standard display appears.
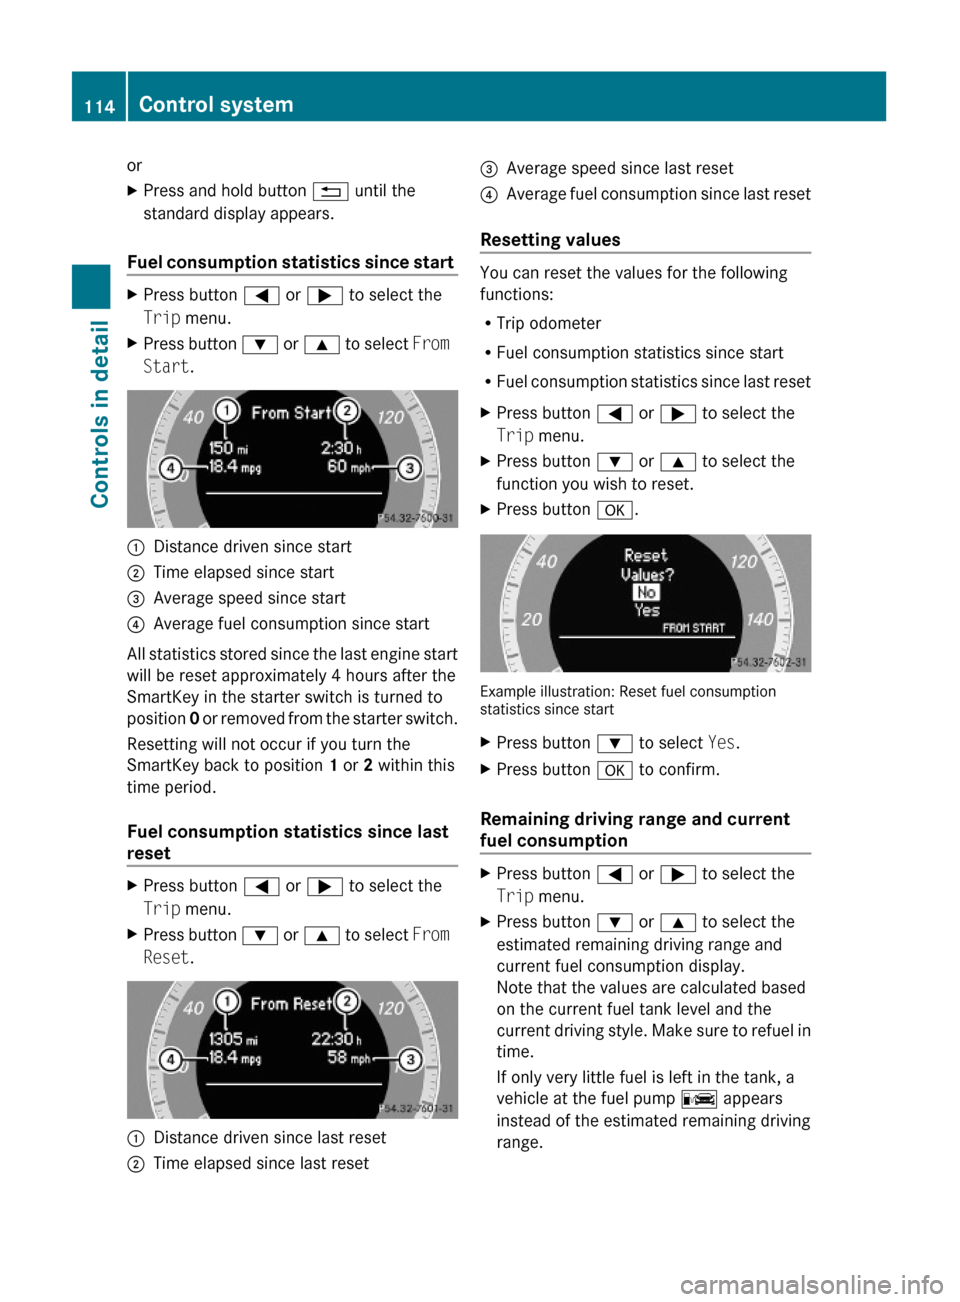
Fuel consumption statistics since start
XPress button = or ; to select the
Trip menu.
XPress button : or 9 to select From
Start.
:Distance driven since start;Time elapsed since start=Average speed since start?Average fuel consumption since start
All statistics stored since the last engine start
will be reset approximately 4 hours after the
SmartKey in the starter switch is turned to
position 0 or removed from the starter switch.
Resetting will not occur if you turn the
SmartKey back to position 1 or 2 within this
time period.
Fuel consumption statistics since last
reset
XPress button = or ; to select the
Trip menu.
XPress button : or 9 to select From
Reset.
:Distance driven since last reset;Time elapsed since last reset=Average speed since last reset?Average fuel consumption since last reset
Resetting values
You can reset the values for the following
functions:
RTrip odometer
RFuel consumption statistics since start
RFuel consumption statistics since last reset
XPress button = or ; to select the
Trip menu.
XPress button : or 9 to select the
function you wish to reset.
XPress button a.
Example illustration: Reset fuel consumptionstatistics since start
XPress button : to select Yes.XPress button a to confirm.
Remaining driving range and current
fuel consumption
XPress button = or ; to select the
Trip menu.
XPress button : or 9 to select the
estimated remaining driving range and
current fuel consumption display.
Note that the values are calculated based
on the current fuel tank level and the
current driving style. Make sure to refuel in
time.
If only very little fuel is left in the tank, a
vehicle at the fuel pump C appears
instead of the estimated remaining driving
range.
114Control systemControls in detail
X204_AKB; 3; 23, en-USd2ureepe,Version: 2.11.8.12009-07-16T19:16:58+02:00 - Seite 114
Page 117 of 344
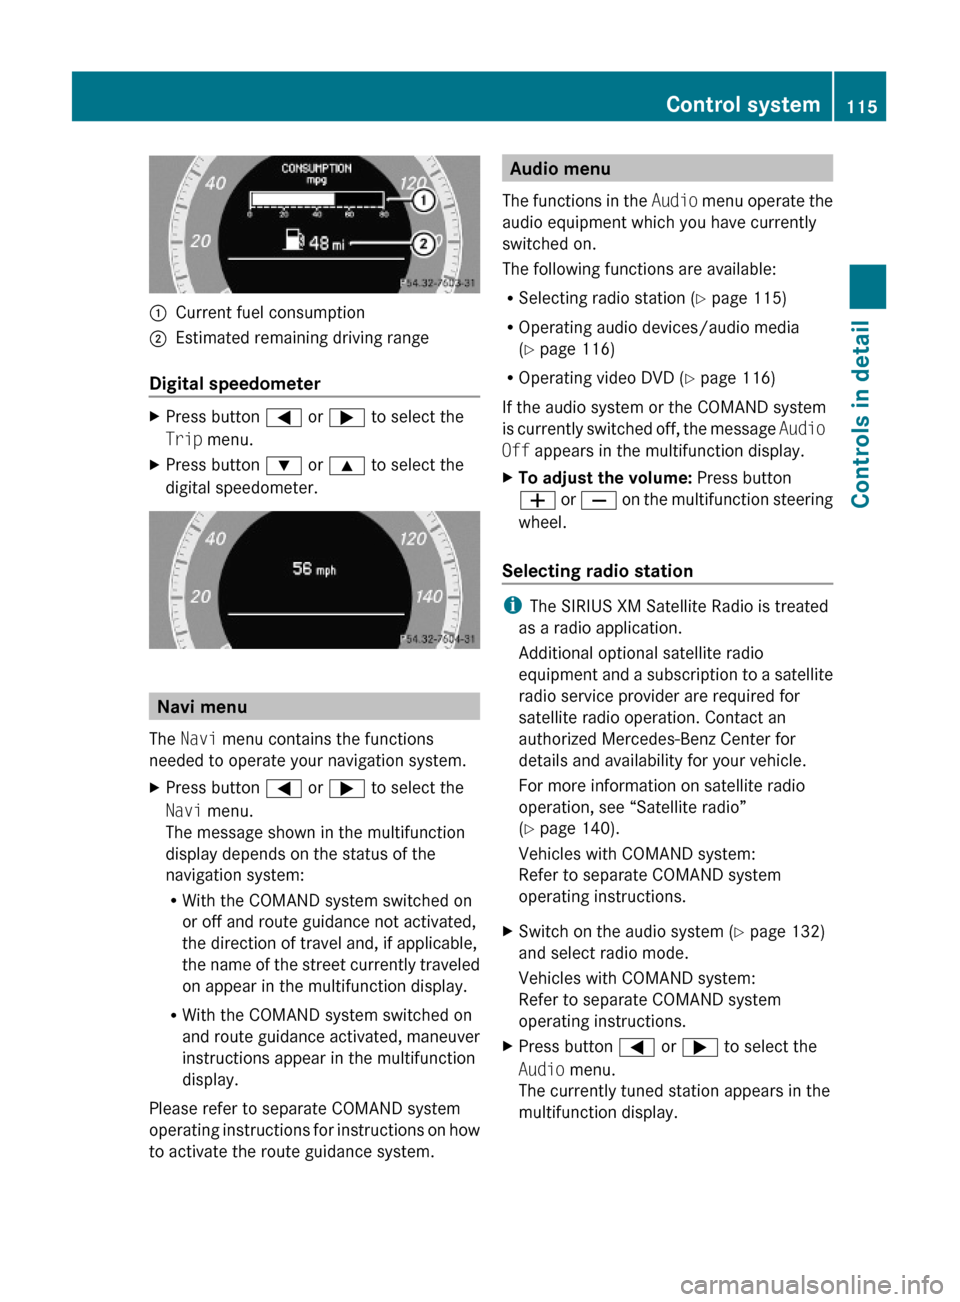
:Current fuel consumption;Estimated remaining driving range
Digital speedometer
XPress button = or ; to select the
Trip menu.
XPress button : or 9 to select the
digital speedometer.
Navi menu
The Navi menu contains the functions
needed to operate your navigation system.
XPress button = or ; to select the
Navi menu.
The message shown in the multifunction
display depends on the status of the
navigation system:
RWith the COMAND system switched on
or off and route guidance not activated,
the direction of travel and, if applicable,
the name of the street currently traveled
on appear in the multifunction display.
RWith the COMAND system switched on
and route guidance activated, maneuver
instructions appear in the multifunction
display.
Please refer to separate COMAND system
operating instructions for instructions on how
to activate the route guidance system.
Audio menu
The functions in the Audio menu operate the
audio equipment which you have currently
switched on.
The following functions are available:
RSelecting radio station (Y page 115)
ROperating audio devices/audio media
(Y page 116)
ROperating video DVD (Y page 116)
If the audio system or the COMAND system
is currently switched off, the message Audio
Off appears in the multifunction display.
XTo adjust the volume: Press button
W or X on the multifunction steering
wheel.
Selecting radio station
iThe SIRIUS XM Satellite Radio is treated
as a radio application.
Additional optional satellite radio
equipment and a subscription to a satellite
radio service provider are required for
satellite radio operation. Contact an
authorized Mercedes-Benz Center for
details and availability for your vehicle.
For more information on satellite radio
operation, see “Satellite radio”
(Y page 140).
Vehicles with COMAND system:
Refer to separate COMAND system
operating instructions.
XSwitch on the audio system (Y page 132)
and select radio mode.
Vehicles with COMAND system:
Refer to separate COMAND system
operating instructions.
XPress button = or ; to select the
Audio menu.
The currently tuned station appears in the
multifunction display.
Control system115Controls in detailX204_AKB; 3; 23, en-USd2ureepe,Version: 2.11.8.12009-07-16T19:16:58+02:00 - Seite 115Z
Page 189 of 344
XSwitch on the ignition.XPush and hold the roof panel switch in
direction of arrow ; (Y page 184) until the
roller sunblinds are fully retracted.
XPush and hold the roof panel switch in
direction of arrow ; until the tilt/sliding
panel is opened approximately 4 inch
(10 cm).
XPull and hold the roof panel switch in
direction of arrow = until the tilt/sliding
panel is fully closed.
XKeep holding the roof panel switch in
direction of arrow = for approximately
1 second.
XPull and hold the roof panel switch in
direction of arrow = (Y page 184) until the
roller sunblinds are fully extended.
XKeep holding the roof panel switch in
direction of arrow = for approximately
1 second.
XCheck the express operation feature of the
tilt/sliding panel (Y page 185).
If the tilt/sliding panel opens completely,
the roof is synchronized. Otherwise repeat
the above steps.
Loading and storing
Loading instructions
GWarning!
Always fasten items being carried as securely
as possible using cargo tie-down rings and
fastening materials appropriate for the weight
and size of the load.
In an accident, during hard braking or sudden
maneuvers, loose items will be thrown around
inside the vehicle. This can cause injury to
vehicle occupants unless the items are
securely fastened in the vehicle.
To help avoid personal injury during a collision
or sudden maneuver, exercise care when
transporting cargo. Do not pile luggage or
cargo higher than the seat backrests.
Never drive a vehicle with the tailgate open.
Deadly carbon monoxide (CO) gases may
enter vehicle interior resulting in
unconsciousness and death.
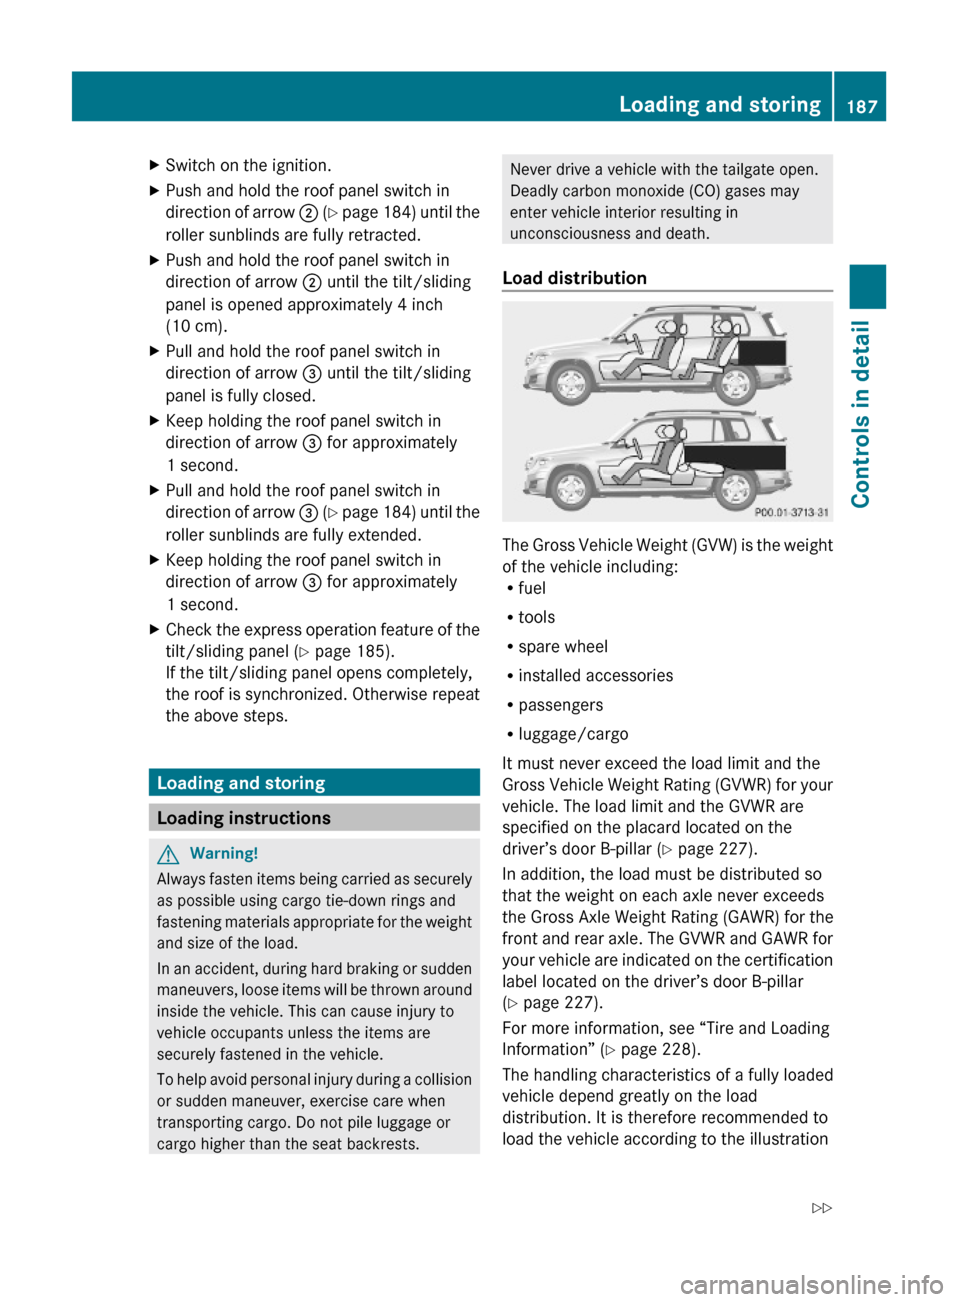
Load distribution
The Gross Vehicle Weight (GVW) is the weight
of the vehicle including:Rfuel
Rtools
Rspare wheel
Rinstalled accessories
Rpassengers
Rluggage/cargo
It must never exceed the load limit and the
Gross Vehicle Weight Rating (GVWR) for your
vehicle. The load limit and the GVWR are
specified on the placard located on the
driver’s door B-pillar (Y page 227).
In addition, the load must be distributed so
that the weight on each axle never exceeds
the Gross Axle Weight Rating (GAWR) for the
front and rear axle. The GVWR and GAWR for
your vehicle are indicated on the certification
label located on the driver’s door B-pillar
(Y page 227).
For more information, see “Tire and Loading
Information” (Y page 228).
The handling characteristics of a fully loaded
vehicle depend greatly on the load
distribution. It is therefore recommended to
load the vehicle according to the illustration
Loading and storing187Controls in detailX204_AKB; 3; 23, en-USd2ureepe,Version: 2.11.8.12009-07-16T19:16:58+02:00 - Seite 187Z
Page 205 of 344
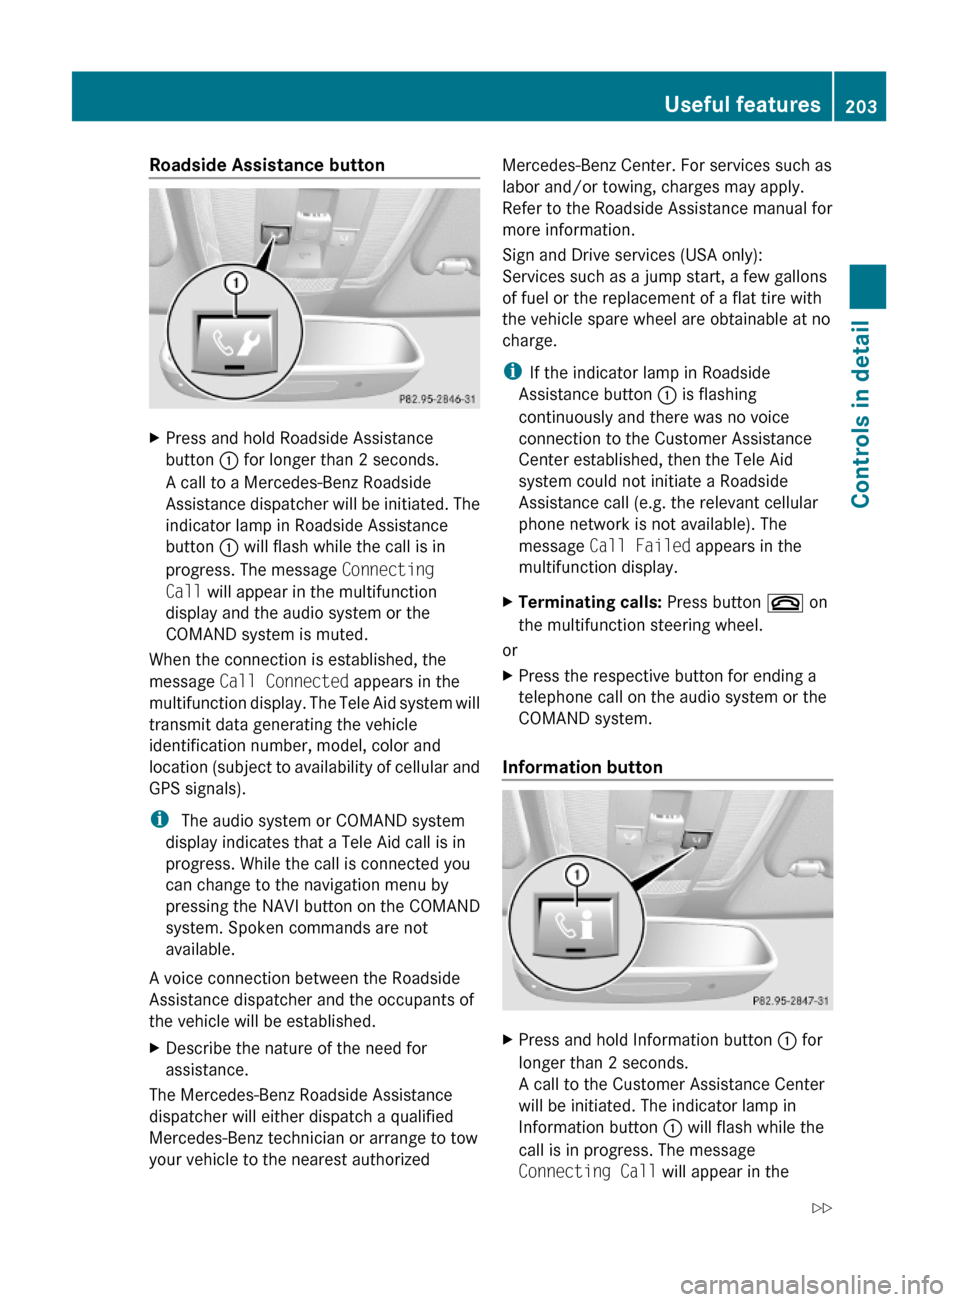
Roadside Assistance button XPress and hold Roadside Assistance
button : for longer than 2 seconds.
A call to a Mercedes-Benz Roadside
Assistance dispatcher will be initiated. The
indicator lamp in Roadside Assistance
button : will flash while the call is in
progress. The message Connecting
Call will appear in the multifunction
display and the audio system or the
COMAND system is muted.
When the connection is established, the
message Call Connected appears in the
multifunction display. The Tele Aid system will
transmit data generating the vehicle
identification number, model, color and
location (subject to availability of cellular and
GPS signals).
i The audio system or COMAND system
display indicates that a Tele Aid call is in
progress. While the call is connected you
can change to the navigation menu by
pressing the NAVI button on the COMAND
system. Spoken commands are not
available.
A voice connection between the Roadside
Assistance dispatcher and the occupants of
the vehicle will be established.
XDescribe the nature of the need for
assistance.
The Mercedes-Benz Roadside Assistance
dispatcher will either dispatch a qualified
Mercedes-Benz technician or arrange to tow
your vehicle to the nearest authorized
Mercedes-Benz Center. For services such as
labor and/or towing, charges may apply.
Refer to the Roadside Assistance manual for
more information.
Sign and Drive services (USA only):
Services such as a jump start, a few gallons
of fuel or the replacement of a flat tire with
the vehicle spare wheel are obtainable at no
charge.
iIf the indicator lamp in Roadside
Assistance button : is flashing
continuously and there was no voice
connection to the Customer Assistance
Center established, then the Tele Aid
system could not initiate a Roadside
Assistance call (e.g. the relevant cellular
phone network is not available). The
message Call Failed appears in the
multifunction display.
XTerminating calls: Press button ~ on
the multifunction steering wheel.
or
XPress the respective button for ending a
telephone call on the audio system or the
COMAND system.
Information button
XPress and hold Information button : for
longer than 2 seconds.
A call to the Customer Assistance Center
will be initiated. The indicator lamp in
Information button : will flash while the
call is in progress. The message
Connecting Call will appear in the
Useful features203Controls in detailX204_AKB; 3; 23, en-USd2ureepe,Version: 2.11.8.12009-07-16T19:16:58+02:00 - Seite 203Z
Page 214 of 344
Vehicle equipment
i This Operator’s Manual describes all
features, standard or optional, potentially
available for your vehicle at the time of
purchase. Please be aware that your
vehicle might not be equipped with all
features described in this manual.
The first 1000 miles (1500 km)
The more cautiously you treat your vehicle
during the break-in period, the more satisfied
you will be with its performance later on.
R Drive your vehicle during the first
1 000 miles (1 500 km) at varying but
moderate vehicle and engine speeds.
R During this period, avoid heavy loads (full
throttle driving) and excessive engine
speeds (no more than 2
/ 3 of maximum rpm
in each gear).
R Select C as the preferred shift program
( Y page 106) for the first 1 000 miles
(1 500 km).
R Avoid accelerating by kickdown.
R Do not attempt to slow the vehicle down by
shifting to a lower gear using the gear
selector lever.
R Select gear ranges 3, 2 or 1 (Y page 106)
only when driving at moderate speeds (for
hill driving).
After 1 000 miles (1 500 km) you may
gradually increase vehicle and engine speeds
to the permissible maximum.
All of the above instructions, as may apply to
your vehicle type, also apply when driving the
first 1 000 miles (1 500 km) after the engine,
the transfer case, the front differential or the
rear differential have been replaced.
i Always obey applicable speed limits.
At the gas station
Refueling
GWarning!
Gasoline is highly flammable and poisonous.
It burns violently and can cause serious
personal injury.
Never allow sparks, flames or smoking
materials near gasoline!
Turn off the engine before refueling.
Whenever you are around gasoline, avoid
inhaling fumes and any skin or clothing
contact. Extinguish all smoking materials.
Direct skin contact with fuels and the
inhalation of fuel vapors are damaging your
health.
GWarning!
Overfilling of the fuel tank may create
pressure in the system which could cause a
gas discharge. This could cause the gas to
spray back out when removing the fuel pump
nozzle, which could cause personal injury.
! Never refuel vehicles with gasoline engine
with diesel fuel. Even small amounts of
diesel fuel will damage the fuel system and
engine. Damage resulting from the use of
non-approved fuels or fuel additives or
resulting from mixing gasoline with diesel
fuel is not covered by the Mercedes-Benz
Limited Warranty.
! If you have accidentally filled the tank
with incorrect or non-approved fuel, do not
switch on the ignition. Otherwise the
incorrect or non-approved fuel will get into
the fuel lines. The fuel system must be
drained completely. Contact an authorized
Mercedes-Benz Center to have the fuel
system drained completely.
! To prevent damage to the catalytic
converters, only use premium unleaded
gasoline in this vehicle.
212At the gas stationOperation
X204_AKB; 3; 23, en-USd2ureepe,Version: 2.11.8.12009-07-16T19:16:58+02:00 - Seite 212