2010 MERCEDES-BENZ GLK350 4MATIC buttons
[x] Cancel search: buttonsPage 128 of 344
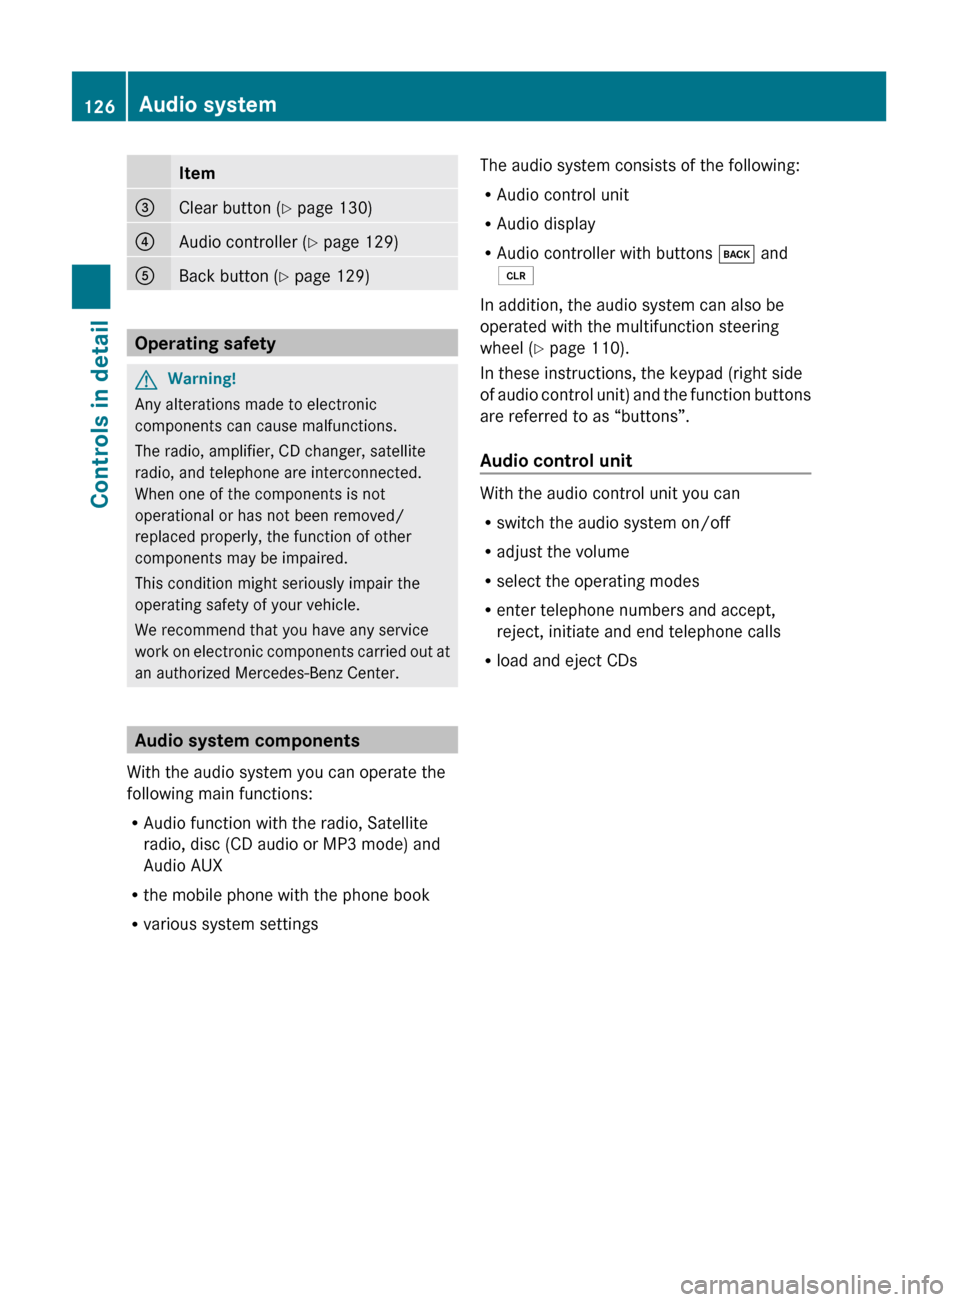
Item=Clear button (Y page 130)?Audio controller ( Y page 129)ABack button ( Y page 129)
Operating safety
GWarning!
Any alterations made to electronic
components can cause malfunctions.
The radio, amplifier, CD changer, satellite
radio, and telephone are interconnected.
When one of the components is not
operational or has not been removed/
replaced properly, the function of other
components may be impaired.
This condition might seriously impair the
operating safety of your vehicle.
We recommend that you have any service
work on electronic components carried out at
an authorized Mercedes-Benz Center.
Audio system components
With the audio system you can operate the
following main functions:
R Audio function with the radio, Satellite
radio, disc (CD audio or MP3 mode) and
Audio AUX
R the mobile phone with the phone book
R various system settings
The audio system consists of the following:
R Audio control unit
R Audio display
R Audio controller with buttons k and
2
In addition, the audio system can also be
operated with the multifunction steering
wheel ( Y page 110).
In these instructions, the keypad (right side
of audio control unit) and the function buttons
are referred to as “buttons”.
Audio control unit
With the audio control unit you can
R switch the audio system on/off
R adjust the volume
R select the operating modes
R enter telephone numbers and accept,
reject, initiate and end telephone calls
R load and eject CDs
126Audio systemControls in detail
X204_AKB; 3; 23, en-USd2ureepe,Version: 2.11.8.12009-07-16T19:16:58+02:00 - Seite 126
Page 131 of 344
multifunction steering wheel buttons as they
relate to audio functions described in this
section.
Audio controller
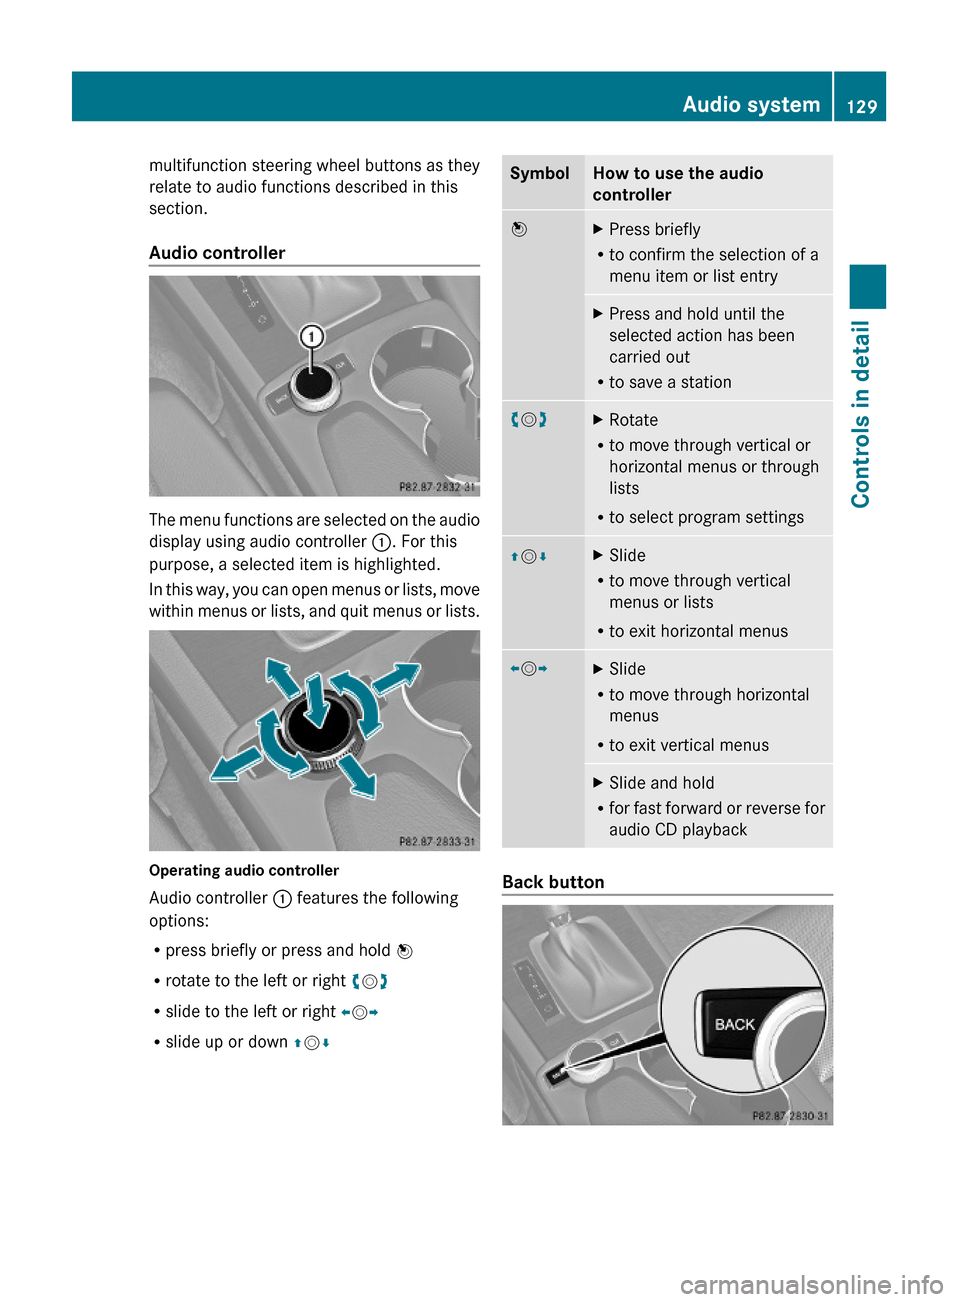
The menu functions are selected on the audio
display using audio controller :. For this
purpose, a selected item is highlighted.
In this way, you can open menus or lists, move
within menus or lists, and quit menus or lists.
Operating audio controller
Audio controller : features the following
options:
Rpress briefly or press and hold W
Rrotate to the left or right cVd
Rslide to the left or right XVY
Rslide up or down ZVÆ
SymbolHow to use the audio
controller
WXPress briefly
Rto confirm the selection of a
menu item or list entry
XPress and hold until the
selected action has been
carried out
Rto save a station
cVdXRotate
Rto move through vertical or
horizontal menus or through
lists
Rto select program settings
ZVÆXSlide
Rto move through vertical
menus or lists
Rto exit horizontal menus
XVYXSlide
Rto move through horizontal
menus
Rto exit vertical menus
XSlide and hold
Rfor fast forward or reverse for
audio CD playback
Back button
Audio system129Controls in detailX204_AKB; 3; 23, en-USd2ureepe,Version: 2.11.8.12009-07-16T19:16:58+02:00 - Seite 129Z
Page 140 of 344
The wave band currently selected appears
in the main area of the audio display. The
last selected station in the selected wave
band is heard.
Selecting a station/channel
The following functions are available:
R Station search function
R Channel list (Weather Band/satellite radio)
R Station memory (except Weather Band)
R Manual frequency entry (except Weather
Band/satellite radio)
For using satellite radio see ( Y page 140).
The station search proceeds in the following
frequency increments:
R 200 kHz in FM range
R 10 kHz in AM range
Tuning to a station/channel via station/
channel search function
i The search function searches for the next
receivable station in the FM or AM wave
band. In Weather Band (WB) the search
function switches to the next channel in the
channel list. For tuning to a station/
channel you can also use the buttons on
the multifunction steering wheel, see
Audio menu ( Y page 115).
XPress button $ on audio control unit
repeatedly until the FM/AM/WB wave
band is selected.XSlide XV Y or rotate cV d when the main
area in the basic menu is active.
Depending on the direction in which the
controller is being slid or rotated, thesystem searches upward or downward and
stops at the next station/channel.
or
XPress button E or F on audio control
unit.
Depending on the pressed button, the
system searches downward or upward and
stops at the next station/channel.
Selecting a station using station memory
i This function is not available for Weather
Band.
XPress button $ on audio control unit
repeatedly until desired wave band has
been selected.XSelect Presets .
or
XPress W when the main area is selected.
The memory menu appears. The dot # in
front of a memory position indicates that
the currently selected station is saved
there.XSelect a station in the memory menu by
rotating cV d or sliding ZV Æ and press
W .
or
XPress desired station button k to
x , with the keypad in audio control unit
briefly.
Tuning to a station by entering the
frequency manually
i This function is not available for Weather
Band/satellite radio.
X$ Q Radio Q Enter Frequency
The menu for manual frequency entry
appears.138Audio systemControls in detail
X204_AKB; 3; 23, en-USd2ureepe,Version: 2.11.8.12009-07-16T19:16:58+02:00 - Seite 138
Page 141 of 344
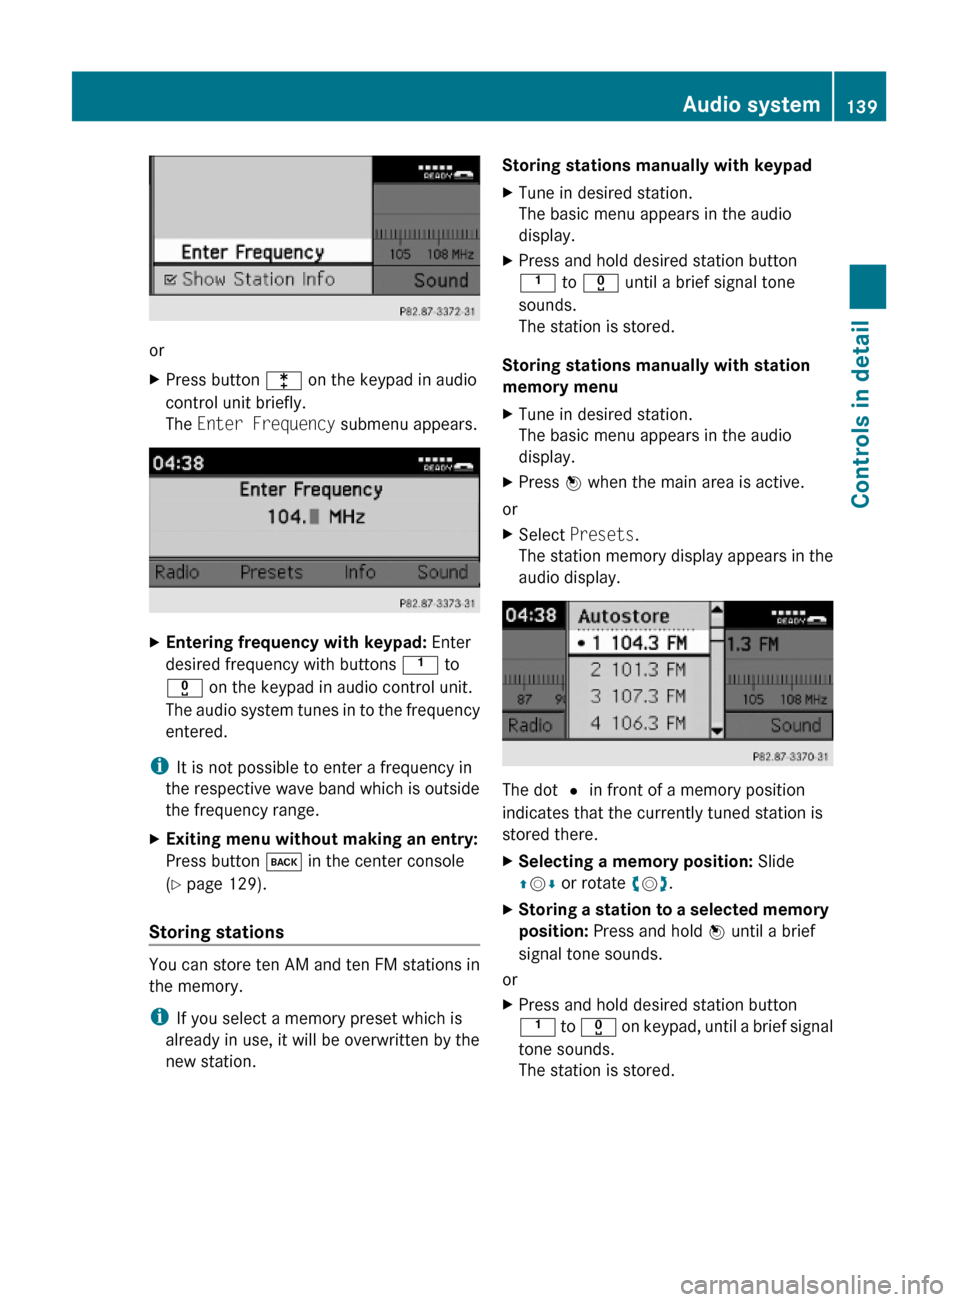
or
XPress button l on the keypad in audio
control unit briefly.
The Enter Frequency submenu appears.
XEntering frequency with keypad: Enter
desired frequency with buttons k to
x on the keypad in audio control unit.
The audio system tunes in to the frequency
entered.
iIt is not possible to enter a frequency in
the respective wave band which is outside
the frequency range.
XExiting menu without making an entry:
Press button k in the center console
(Y page 129).
Storing stations
You can store ten AM and ten FM stations in
the memory.
iIf you select a memory preset which is
already in use, it will be overwritten by the
new station.
Storing stations manually with keypadXTune in desired station.
The basic menu appears in the audio
display.
XPress and hold desired station button
k to x until a brief signal tone
sounds.
The station is stored.
Storing stations manually with station
memory menu
XTune in desired station.
The basic menu appears in the audio
display.
XPress W when the main area is active.
or
XSelect Presets.
The station memory display appears in the
audio display.
The dot # in front of a memory position
indicates that the currently tuned station is
stored there.
XSelecting a memory position: Slide
ZVÆ or rotate cVd.
XStoring a station to a selected memory
position: Press and hold W until a brief
signal tone sounds.
or
XPress and hold desired station button
k to x on keypad, until a brief signal
tone sounds.
The station is stored.
Audio system139Controls in detailX204_AKB; 3; 23, en-USd2ureepe,Version: 2.11.8.12009-07-16T19:16:58+02:00 - Seite 139Z
Page 145 of 344
Selecting program category
iThe channels are categorized. Categories
allow you to tune to stations broadcasting
a certain type of program.
Satellite radio channels are split up into
categories such as News, Sports, Rock, or
Country, if available. The category list is
sorted alphabetically.
XCalling up category list: $
(repeatedly, if necessary) Q Cat .
or
XIn Sat mode, slide XV Y or rotate cV d until
Cat. is highlighted and press W.
The category list appears.XSelecting a category: Slide ZV Æ or rotate
c V d.XSetting the selected category: Press W.
The selected program category
(alphabetical order) will appear in the audio
display. The last tuned channel in the new
category will begin to play.
When searching, tuning in, or selecting
from the channel list, the All Channels
option accesses all of your subscribed
channels.
i When you select the category All
Channels , you have access to all the
channels you subscribed to, regardless of
category.
Tuning in channels
You have the following selection options:
R the channel search function
R the manual channel number entry
R the channel list
R the channel presets
Tuning in channels using channel search
functionXSlide XV Y or rotate cV d when the main
area in the basic menu is active.
Depending on the direction in which the
controller is being slid or rotated, the
system searches upward or downward and
stops at the next subscribed channel.
or
XPress button E or F on audio control
unit.
Depending on the pressed button, the
system searches upward or downward and
stops at the next subscribed channel.
i Which channels are available depends on
which channels you have subscribed to and
the program category you have selected
( Y page 143). For tuning in channels you
can also use the buttons on the
multifunction steering wheel, see “Audio
menu” ( Y page 115).
Tuning in channels using manual channel
number entry
X$ (repeatedly, if necessary) Q Sat
Q Enter Channel .
The menu for manual channel number entry
appears.
or
XIn Sat mode, press button l on the
keypad in audio control unit briefly.XChannel number entry with keypad:
Enter desired channel number with buttons
k to x with the keypad in audio
control unit briefly.
Further operation depends on whether the
selected channel number is valid or if the
channel is included in your subscription.
XExiting menu without making an entry:
Press button k in the center console
( Y page 129).
Channel number is valid and channel is
included in subscription: The audio system
tunes in the channel entered.
Audio system143Controls in detailX204_AKB; 3; 23, en-USd2ureepe,Version: 2.11.8.12009-07-16T19:16:58+02:00 - Seite 143Z
Page 154 of 344
XPress desired button k to p in the
keypad to select a magazine compartment.
or
XSlide XVY or rotate cVd the audio
controller to select the desired CD.
XPress W to confirm.
The CD is ejected.
XRemove the CD from CD slot :.
If you do not remove the CD from the CD
slot, the CD changer will automatically pull
the CD back in after a short while.
iIf audio source is changed during eject
procedure (e.g. pressing button $) the
eject procedure will be aborted and any
CDs being ejected will be drawn back into
the unit.
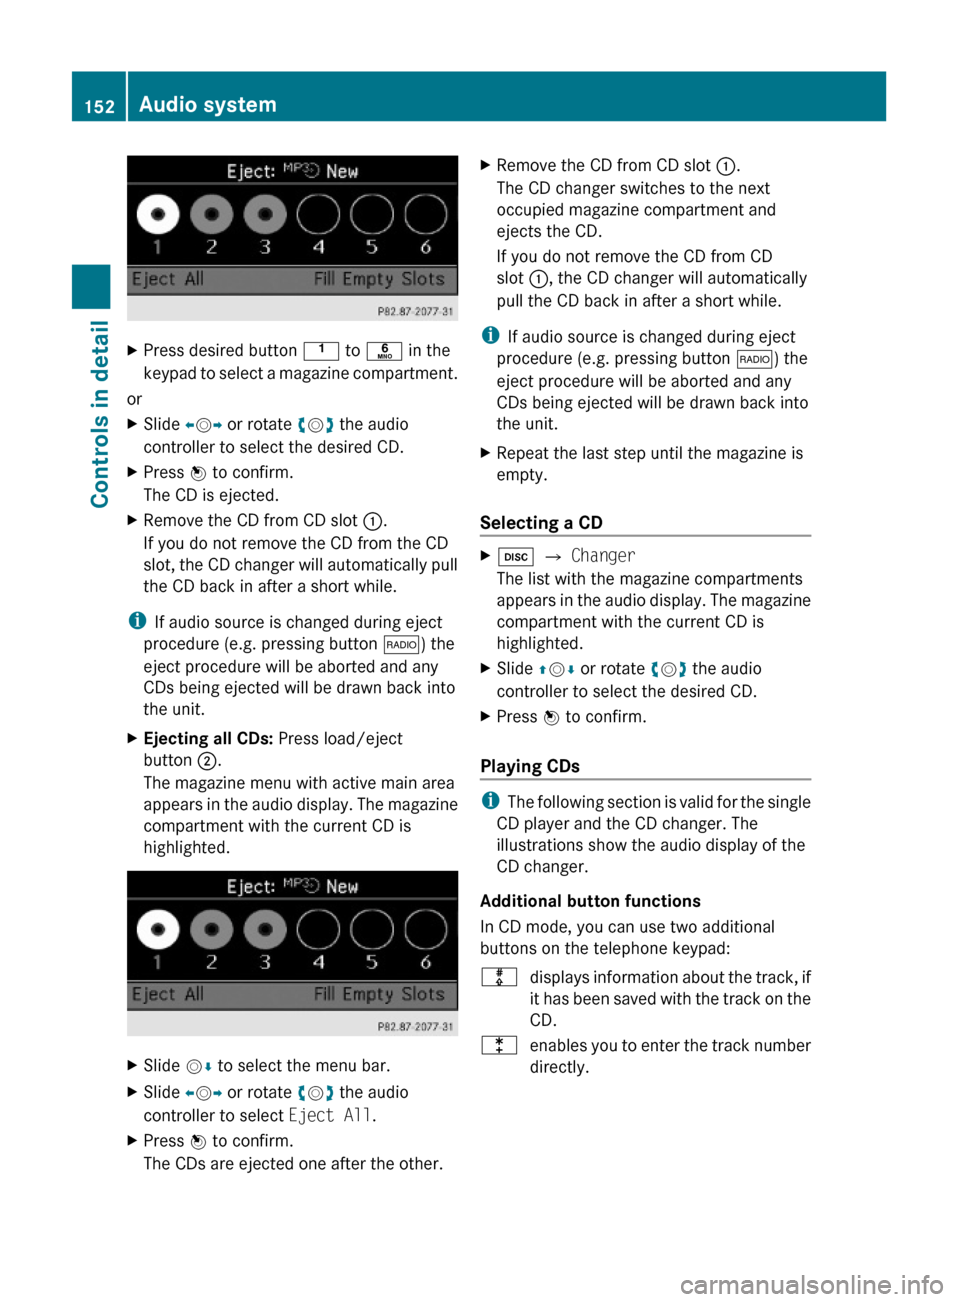
XEjecting all CDs: Press load/eject
button ;.
The magazine menu with active main area
appears in the audio display. The magazine
compartment with the current CD is
highlighted.
XSlide VÆ to select the menu bar.XSlide XVY or rotate cVd the audio
controller to select Eject All.
XPress W to confirm.
The CDs are ejected one after the other.
XRemove the CD from CD slot :.
The CD changer switches to the next
occupied magazine compartment and
ejects the CD.
If you do not remove the CD from CD
slot :, the CD changer will automatically
pull the CD back in after a short while.
iIf audio source is changed during eject
procedure (e.g. pressing button $) the
eject procedure will be aborted and any
CDs being ejected will be drawn back into
the unit.
XRepeat the last step until the magazine is
empty.
Selecting a CD
Xh Q Changer
The list with the magazine compartments
appears in the audio display. The magazine
compartment with the current CD is
highlighted.
XSlide ZVÆ or rotate cVd the audio
controller to select the desired CD.
XPress W to confirm.
Playing CDs
iThe following section is valid for the single
CD player and the CD changer. The
illustrations show the audio display of the
CD changer.
Additional button functions
In CD mode, you can use two additional
buttons on the telephone keypad:
mdisplays information about the track, if
it has been saved with the track on the
CD.
lenables you to enter the track number
directly.
152Audio systemControls in detail
X204_AKB; 3; 23, en-USd2ureepe,Version: 2.11.8.12009-07-16T19:16:58+02:00 - Seite 152
Page 158 of 344
iThe functions and services available to
you while using the mobile phone depend
on your service provider and the type of
mobile phone you are using. Also see
separate operating manual of your mobile
phone for instructions on how to use your
mobile phone.
When the mobile phone is connected via the
Bluetooth ®
interface to the audio system, you
can operate the mobile phone using the
following devices:
R Audio system ( Y page 165)
- Audio controller
- Audio control unit
R Buttons 6 and ~ on the
multifunction steering wheel ( Y page 110)
R Mobile phone keypad or similar input
device
Please note that these functions are only
available with Mercedes-Benz approved
mobile phones.
TEL MenuMenuFunctionTelephoneBluetooth ®
PhonesReceive Business
Card(s) (vCards)Delete external dataNamePhone bookCall lists
Microphone off/
onCall Lists or Mic On/
Mic OffDelete Call Lists
General notes
Making calls via Bluetooth ®
interface
The audio system telephone function via the
Bluetooth ®
interface is available in
conjunction with a Bluetooth ®
enabled
mobile phone.
With a suitable mobile phone, you can use the
hands-free device and receive electronic
business cards (vCards) via the Bluetooth ®
interface.
Calls disconnected while the vehicle is in
motion
Interruptions to the connection may occur if
R there is insufficient mobile network
coverage
R you move from one mobile network
transmitter/receiver area (mobile network
cell) into another and no channels are free
or the cell is full
R you are using a SIM card that is not
compatible with the available network
R when using a mobile phone with
“Twincard”, the mobile phone is
simultaneously logged into the network
with the second SIM card
Operating options
i The components and operating principles
of the audio system can be found on
( Y page 126) and ( Y page 131).
When the mobile phone is connected via the
Bluetooth ®
interface to the audio system, you
can operate the mobile phone using the
following devices:
R Buttons 6 and ~ and keypad on
audio control unit ( Y page 127)
R Audio controller in center console
( Y page 129)
R Multifunction steering wheel ( Y page 110)
Please note that these functions are only
available with Mercedes-Benz approved
mobile phones. Please contact an authorized
Mercedes-Benz Center for information on
features available for your mobile phone of
choice.
i In order for the functions described in this
section to work correctly, the Bluetooth ®
telephone must be linked to the audio156Audio systemControls in detail
X204_AKB; 3; 23, en-USd2ureepe,Version: 2.11.8.12009-07-16T19:16:58+02:00 - Seite 156
Page 208 of 344
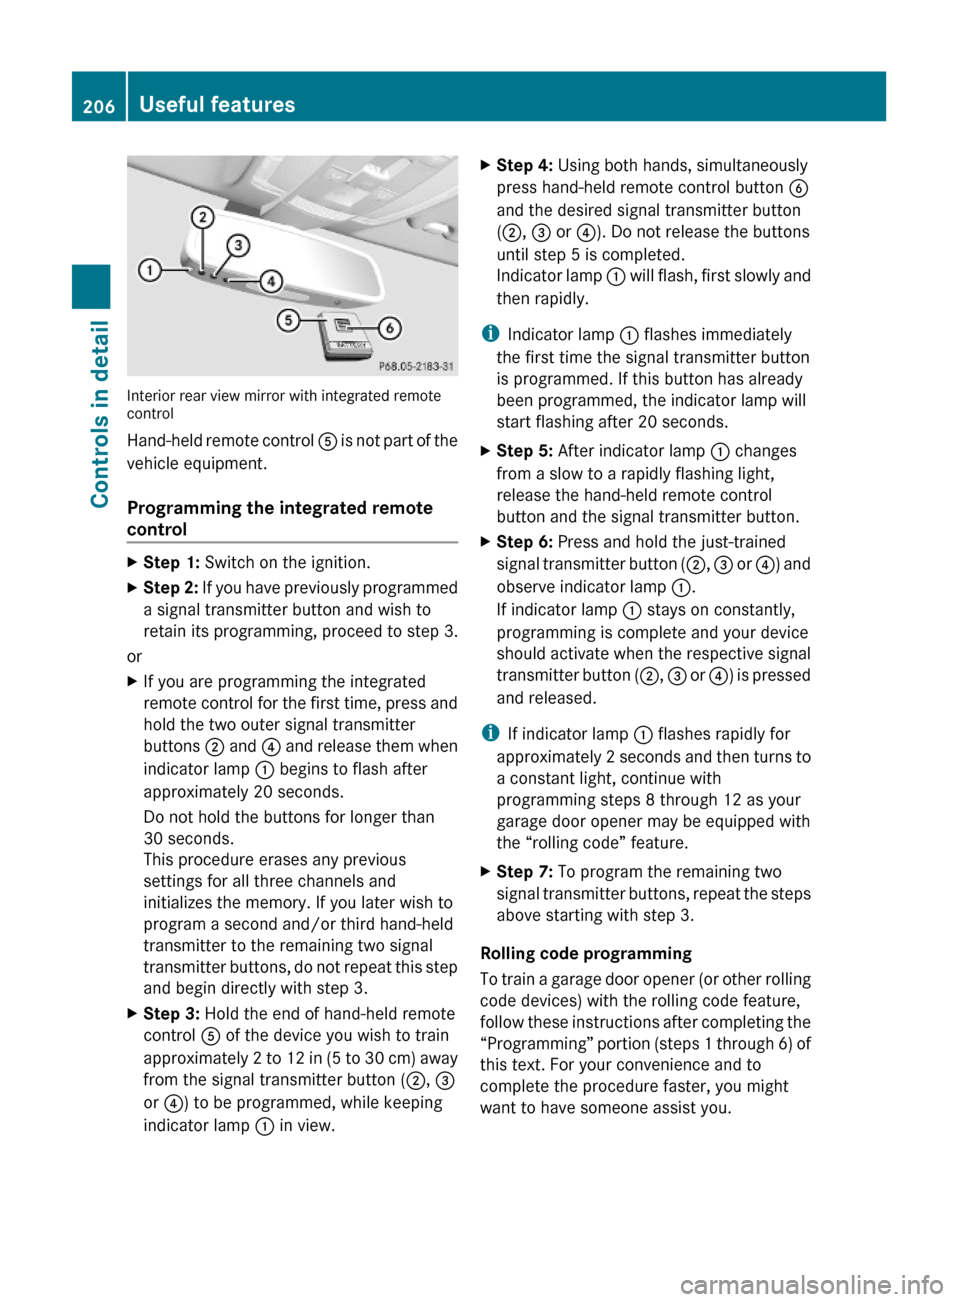
Interior rear view mirror with integrated remotecontrol
Hand-held remote control A is not part of the
vehicle equipment.
Programming the integrated remote
control
XStep 1: Switch on the ignition.XStep 2: If you have previously programmed
a signal transmitter button and wish to
retain its programming, proceed to step 3.
or
XIf you are programming the integrated
remote control for the first time, press and
hold the two outer signal transmitter
buttons ; and ? and release them when
indicator lamp : begins to flash after
approximately 20 seconds.
Do not hold the buttons for longer than
30 seconds.
This procedure erases any previous
settings for all three channels and
initializes the memory. If you later wish to
program a second and/or third hand-held
transmitter to the remaining two signal
transmitter buttons, do not repeat this step
and begin directly with step 3.
XStep 3: Hold the end of hand-held remote
control A of the device you wish to train
approximately 2 to 12 in (5 to 30 cm) away
from the signal transmitter button (;, =
or ?) to be programmed, while keeping
indicator lamp : in view.
XStep 4: Using both hands, simultaneously
press hand-held remote control button B
and the desired signal transmitter button
(;, = or ?). Do not release the buttons
until step 5 is completed.
Indicator lamp : will flash, first slowly and
then rapidly.
iIndicator lamp : flashes immediately
the first time the signal transmitter button
is programmed. If this button has already
been programmed, the indicator lamp will
start flashing after 20 seconds.
XStep 5: After indicator lamp : changes
from a slow to a rapidly flashing light,
release the hand-held remote control
button and the signal transmitter button.
XStep 6: Press and hold the just-trained
signal transmitter button (;, = or ?) and
observe indicator lamp :.
If indicator lamp : stays on constantly,
programming is complete and your device
should activate when the respective signal
transmitter button (;, = or ?) is pressed
and released.
iIf indicator lamp : flashes rapidly for
approximately 2 seconds and then turns to
a constant light, continue with
programming steps 8 through 12 as your
garage door opener may be equipped with
the “rolling code” feature.
XStep 7: To program the remaining two
signal transmitter buttons, repeat the steps
above starting with step 3.
Rolling code programming
To train a garage door opener (or other rolling
code devices) with the rolling code feature,
follow these instructions after completing the
“Programming” portion (steps 1 through 6) of
this text. For your convenience and to
complete the procedure faster, you might
want to have someone assist you.
206Useful featuresControls in detail
X204_AKB; 3; 23, en-USd2ureepe,Version: 2.11.8.12009-07-16T19:16:58+02:00 - Seite 206