2010 MERCEDES-BENZ GLK350 4MATIC battery
[x] Cancel search: batteryPage 78 of 344
Starter switch positions
SmartKey
GObserve Safety notes, see page 53.
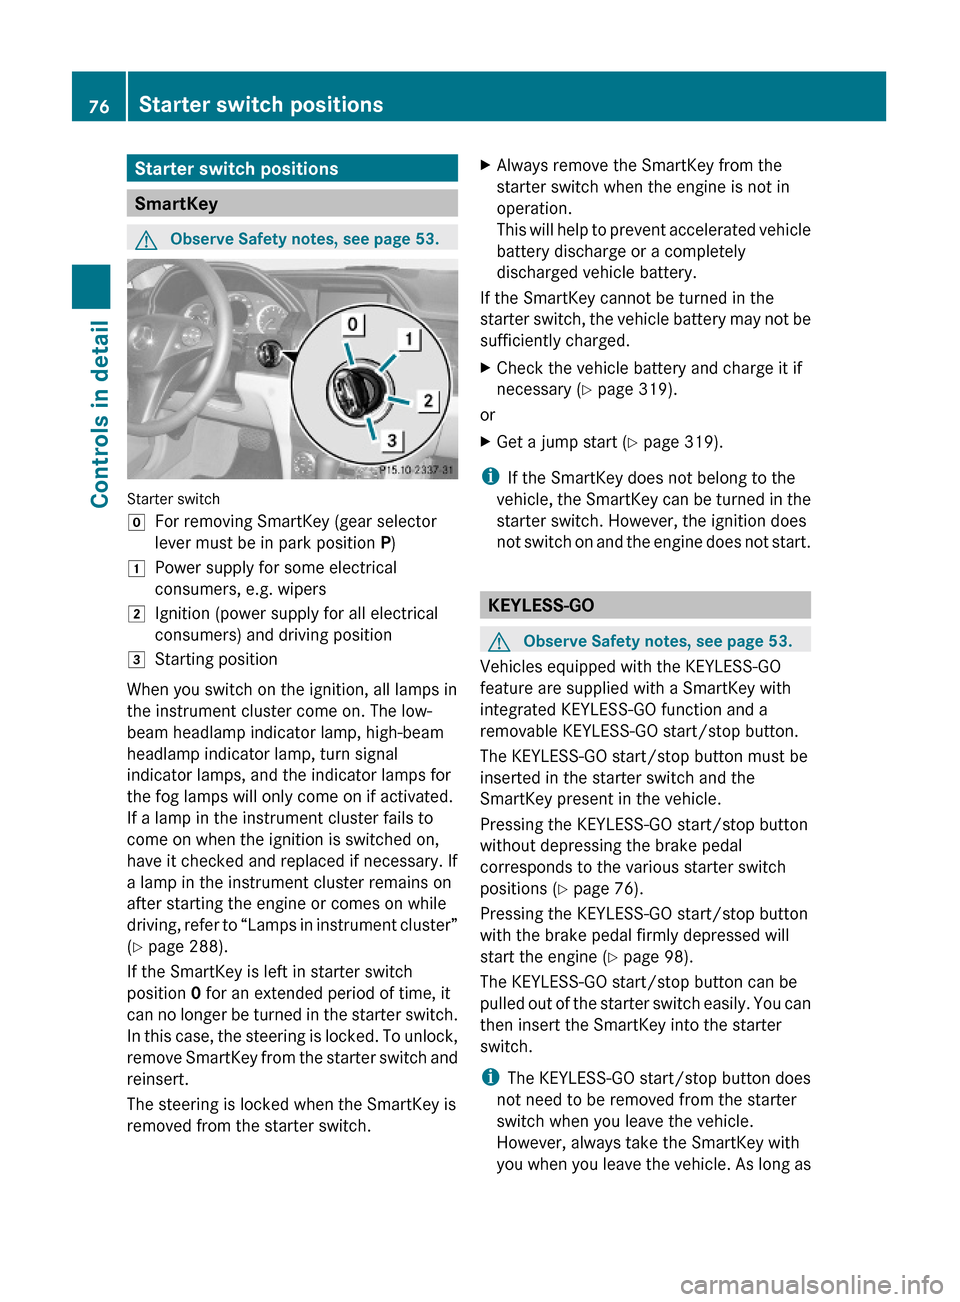
Starter switch
gFor removing SmartKey (gear selector
lever must be in park position P)
1Power supply for some electrical
consumers, e.g. wipers
2Ignition (power supply for all electrical
consumers) and driving position
3Starting position
When you switch on the ignition, all lamps in
the instrument cluster come on. The low-
beam headlamp indicator lamp, high-beam
headlamp indicator lamp, turn signal
indicator lamps, and the indicator lamps for
the fog lamps will only come on if activated.
If a lamp in the instrument cluster fails to
come on when the ignition is switched on,
have it checked and replaced if necessary. If
a lamp in the instrument cluster remains on
after starting the engine or comes on while
driving, refer to “Lamps in instrument cluster”
(Y page 288).
If the SmartKey is left in starter switch
position 0 for an extended period of time, it
can no longer be turned in the starter switch.
In this case, the steering is locked. To unlock,
remove SmartKey from the starter switch and
reinsert.
The steering is locked when the SmartKey is
removed from the starter switch.
XAlways remove the SmartKey from the
starter switch when the engine is not in
operation.
This will help to prevent accelerated vehicle
battery discharge or a completely
discharged vehicle battery.
If the SmartKey cannot be turned in the
starter switch, the vehicle battery may not be
sufficiently charged.
XCheck the vehicle battery and charge it if
necessary (Y page 319).
or
XGet a jump start (Y page 319).
iIf the SmartKey does not belong to the
vehicle, the SmartKey can be turned in the
starter switch. However, the ignition does
not switch on and the engine does not start.
KEYLESS-GO
GObserve Safety notes, see page 53.
Vehicles equipped with the KEYLESS-GO
feature are supplied with a SmartKey with
integrated KEYLESS-GO function and a
removable KEYLESS-GO start/stop button.
The KEYLESS-GO start/stop button must be
inserted in the starter switch and the
SmartKey present in the vehicle.
Pressing the KEYLESS-GO start/stop button
without depressing the brake pedal
corresponds to the various starter switch
positions (Y page 76).
Pressing the KEYLESS-GO start/stop button
with the brake pedal firmly depressed will
start the engine (Y page 98).
The KEYLESS-GO start/stop button can be
pulled out of the starter switch easily. You can
then insert the SmartKey into the starter
switch.
iThe KEYLESS-GO start/stop button does
not need to be removed from the starter
switch when you leave the vehicle.
However, always take the SmartKey with
you when you leave the vehicle. As long as
76Starter switch positionsControls in detail
X204_AKB; 3; 23, en-USd2ureepe,Version: 2.11.8.12009-07-16T19:16:58+02:00 - Seite 76
Page 88 of 344
! Before you drive the vehicle through an
automatic car wash, fold in the exterior rear
view mirrors. Otherwise they may get
damaged.
Folding in and out automatically
The function must be activated in the
Convenience submenu (Y page 124).
The exterior rear view mirrors fold in
automatically as soon as the vehicle is locked
from the outside.
The exterior rear view mirrors fold out
automatically as soon as the vehicle is
unlocked and the driver’s or front passenger
door is subsequently opened.
Resetting the automatic exterior rear
view mirror fold-in function
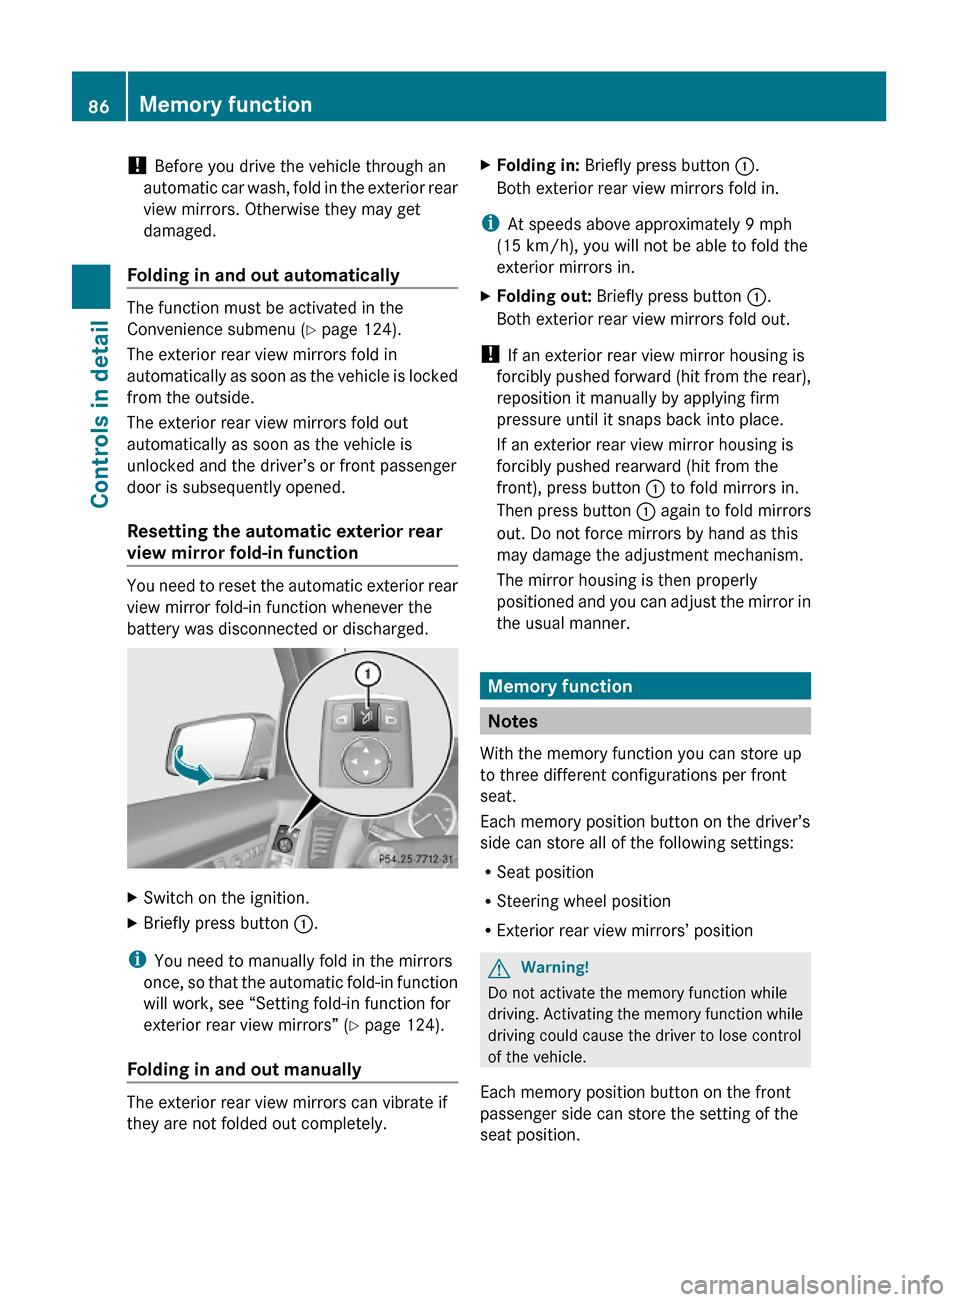
You need to reset the automatic exterior rear
view mirror fold-in function whenever the
battery was disconnected or discharged.
XSwitch on the ignition.XBriefly press button :.
iYou need to manually fold in the mirrors
once, so that the automatic fold-in function
will work, see “Setting fold-in function for
exterior rear view mirrors” (Y page 124).
Folding in and out manually
The exterior rear view mirrors can vibrate if
they are not folded out completely.
XFolding in: Briefly press button :.
Both exterior rear view mirrors fold in.
iAt speeds above approximately 9 mph
(15 km/h), you will not be able to fold the
exterior mirrors in.
XFolding out: Briefly press button :.
Both exterior rear view mirrors fold out.
! If an exterior rear view mirror housing is
forcibly pushed forward (hit from the rear),
reposition it manually by applying firm
pressure until it snaps back into place.
If an exterior rear view mirror housing is
forcibly pushed rearward (hit from the
front), press button : to fold mirrors in.
Then press button : again to fold mirrors
out. Do not force mirrors by hand as this
may damage the adjustment mechanism.
The mirror housing is then properly
positioned and you can adjust the mirror in
the usual manner.
Memory function
Notes
With the memory function you can store up
to three different configurations per front
seat.
Each memory position button on the driver’s
side can store all of the following settings:
RSeat position
RSteering wheel position
RExterior rear view mirrors’ position
GWarning!
Do not activate the memory function while
driving. Activating the memory function while
driving could cause the driver to lose control
of the vehicle.
Each memory position button on the front
passenger side can store the setting of the
seat position.
86Memory functionControls in detail
X204_AKB; 3; 23, en-USd2ureepe,Version: 2.11.8.12009-07-16T19:16:58+02:00 - Seite 86
Page 90 of 344
When the parking lamps or the rear fog
lamp are switched on and you remove the
SmartKey from the starter switch and open
the driver’s door, an acoustic signal
sounds.
In addition the message Switch Off
Lights appears in the multifunction
display.
Switch off the parking lamps or the rear fog
lamp manually.
! Failure to switch off the parking lamps
when leaving the vehicle may result in a
discharged battery.
Low-beam headlamps
The low-beam headlamps can be switched on
and off with the exterior lamp switch.
XSwitch on the ignition.XSwitching on: Turn the exterior lamp
switch to position L.
The following lamps come on:
R Low-beam headlamps
R Tail lamps
R Parking lamps
R License plate lamps
R Side marker lamps
R Instrument panel lamps
R Green indicator lamp L in the
instrument clusterXSwitching off: Turn the exterior lamp
switch to position $.
Automatic headlamp mode
The following lamps come on and go out
automatically depending on the brightness of
the ambient light:
R Low-beam headlamps
R Tail lamps
R Parking lamps
RLicense plate lamps
R Side marker lampsGWarning!
If the exterior lamp switch is set to c, the
headlamps will not automatically come on
under foggy conditions.
To minimize risk to you and to others, activate
headlamps by turning exterior lamp switch to
L when driving or when traffic and/or
ambient lighting conditions require you to do
so.
In low ambient lighting conditions, only switch
from position c to L with the vehicle
at a standstill in a safe location. Switching
from c to L will briefly switch off the
headlamps. Doing so while driving in low
ambient lighting conditions may result in an
accident.
The automatic headlamp feature is only an aid
to the driver. The driver is responsible for the
operation of the vehicle’s lights at all times.
XSwitching on: Turn the exterior lamp
switch to position c.
The following lamps come on and go out
depending on the brightness of the ambient
light with the SmartKey in starter switch
position 1 or the KEYLESS-GO start/stop
button pressed once:
R Tail lamps
R Parking lamps
R License plate lamps
R Side marker lamps
When the engine is running, the low-beam
headlamps will also come on and turn off
automatically.
Canada only: High-beam headlamps are only
available in low ambient lighting conditions.
Daytime running lamp mode
In Canada, the daytime running lamp mode is
mandatory and therefore in a constant mode.
88LightingControls in detail
X204_AKB; 3; 23, en-USd2ureepe,Version: 2.11.8.12009-07-16T19:16:58+02:00 - Seite 88
Page 94 of 344
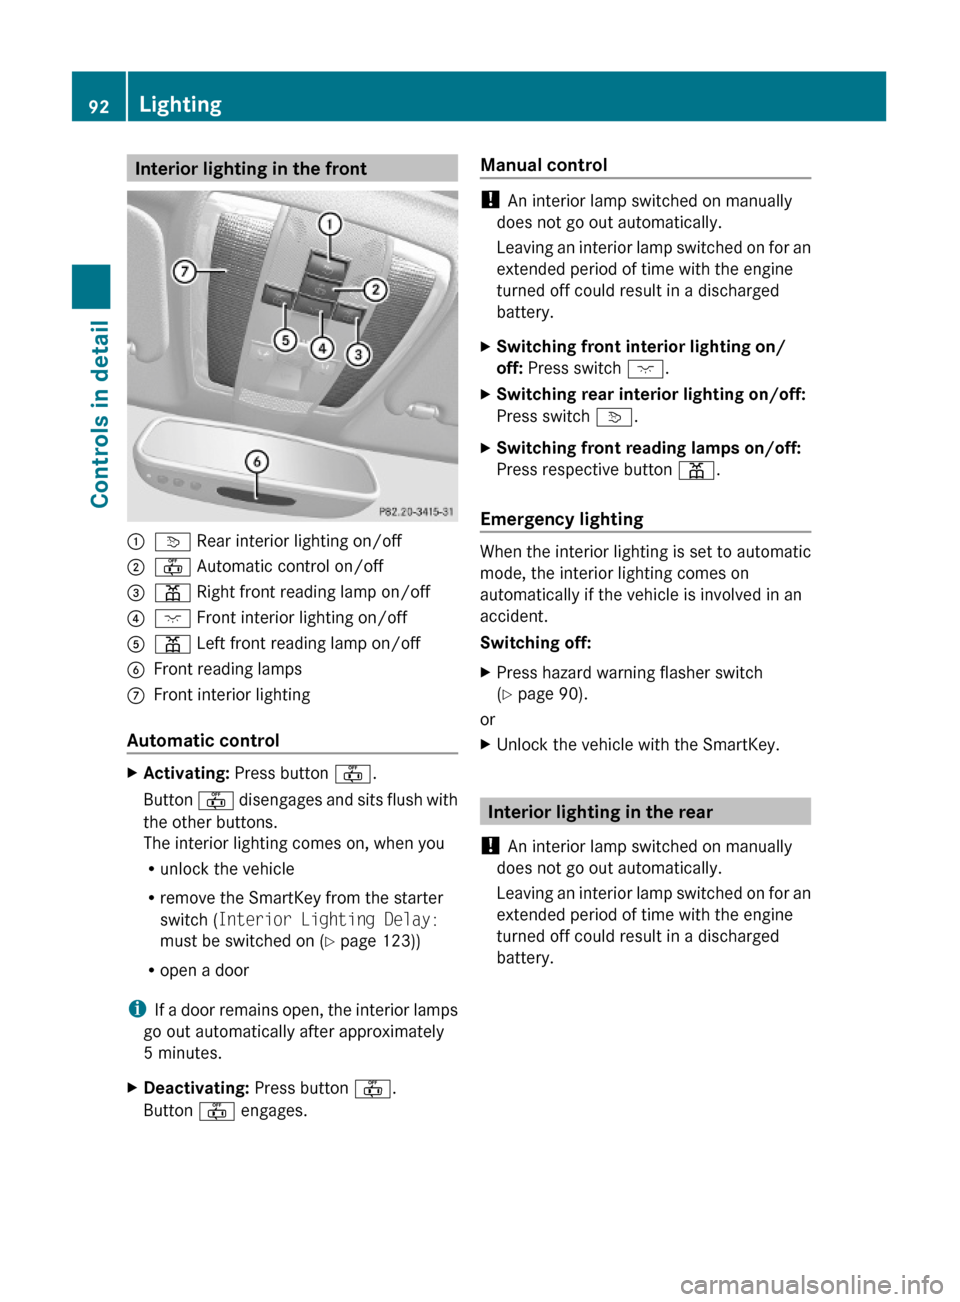
Interior lighting in the front:v Rear interior lighting on/off;~ Automatic control on/off=p Right front reading lamp on/off?c Front interior lighting on/off Ap Left front reading lamp on/offBFront reading lamps CFront interior lighting
Automatic control
XActivating: Press button ~.
Button ~ disengages and sits flush with
the other buttons.
The interior lighting comes on, when you
Runlock the vehicle
Rremove the SmartKey from the starter
switch (Interior Lighting Delay:
must be switched on (Y page 123))
Ropen a door
iIf a door remains open, the interior lamps
go out automatically after approximately
5 minutes.
XDeactivating: Press button ~.
Button ~ engages.
Manual control
! An interior lamp switched on manually
does not go out automatically.
Leaving an interior lamp switched on for an
extended period of time with the engine
turned off could result in a discharged
battery.
XSwitching front interior lighting on/
off: Press switch c.
XSwitching rear interior lighting on/off:
Press switch v.
XSwitching front reading lamps on/off:
Press respective button p.
Emergency lighting
When the interior lighting is set to automatic
mode, the interior lighting comes on
automatically if the vehicle is involved in an
accident.
Switching off:
XPress hazard warning flasher switch
(Y page 90).
or
XUnlock the vehicle with the SmartKey.
Interior lighting in the rear
! An interior lamp switched on manually
does not go out automatically.
Leaving an interior lamp switched on for an
extended period of time with the engine
turned off could result in a discharged
battery.
92LightingControls in detail
X204_AKB; 3; 23, en-USd2ureepe,Version: 2.11.8.12009-07-16T19:16:58+02:00 - Seite 92
Page 101 of 344
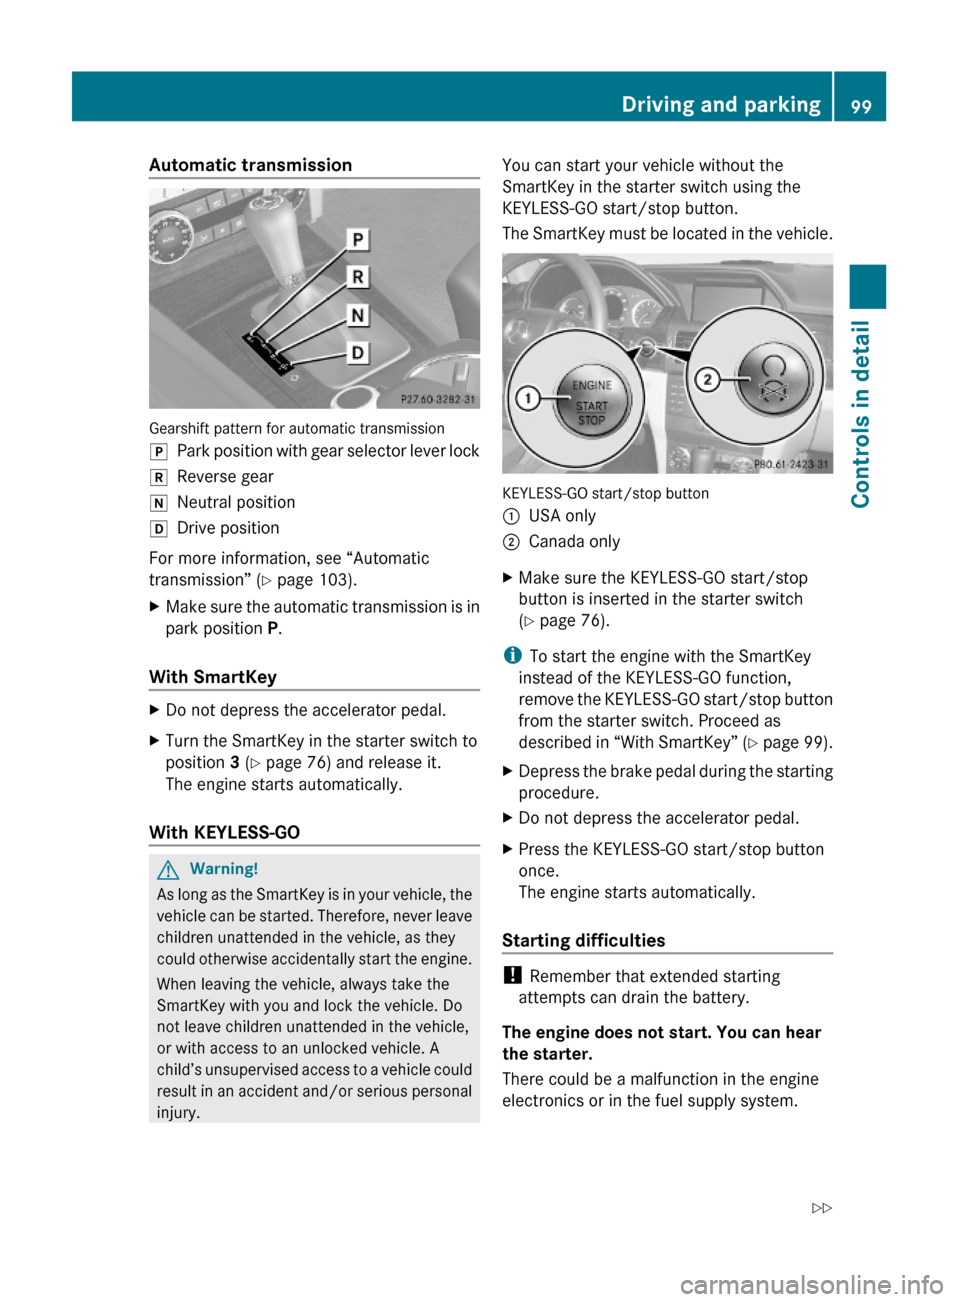
Automatic transmission
Gearshift pattern for automatic transmission
jPark position with gear selector lever lockkReverse geariNeutral positionhDrive position
For more information, see “Automatic
transmission” (Y page 103).
XMake sure the automatic transmission is in
park position P.
With SmartKey
XDo not depress the accelerator pedal.XTurn the SmartKey in the starter switch to
position 3 (Y page 76) and release it.
The engine starts automatically.
With KEYLESS-GO
GWarning!
As long as the SmartKey is in your vehicle, the
vehicle can be started. Therefore, never leave
children unattended in the vehicle, as they
could otherwise accidentally start the engine.
When leaving the vehicle, always take the
SmartKey with you and lock the vehicle. Do
not leave children unattended in the vehicle,
or with access to an unlocked vehicle. A
child’s unsupervised access to a vehicle could
result in an accident and/or serious personal
injury.
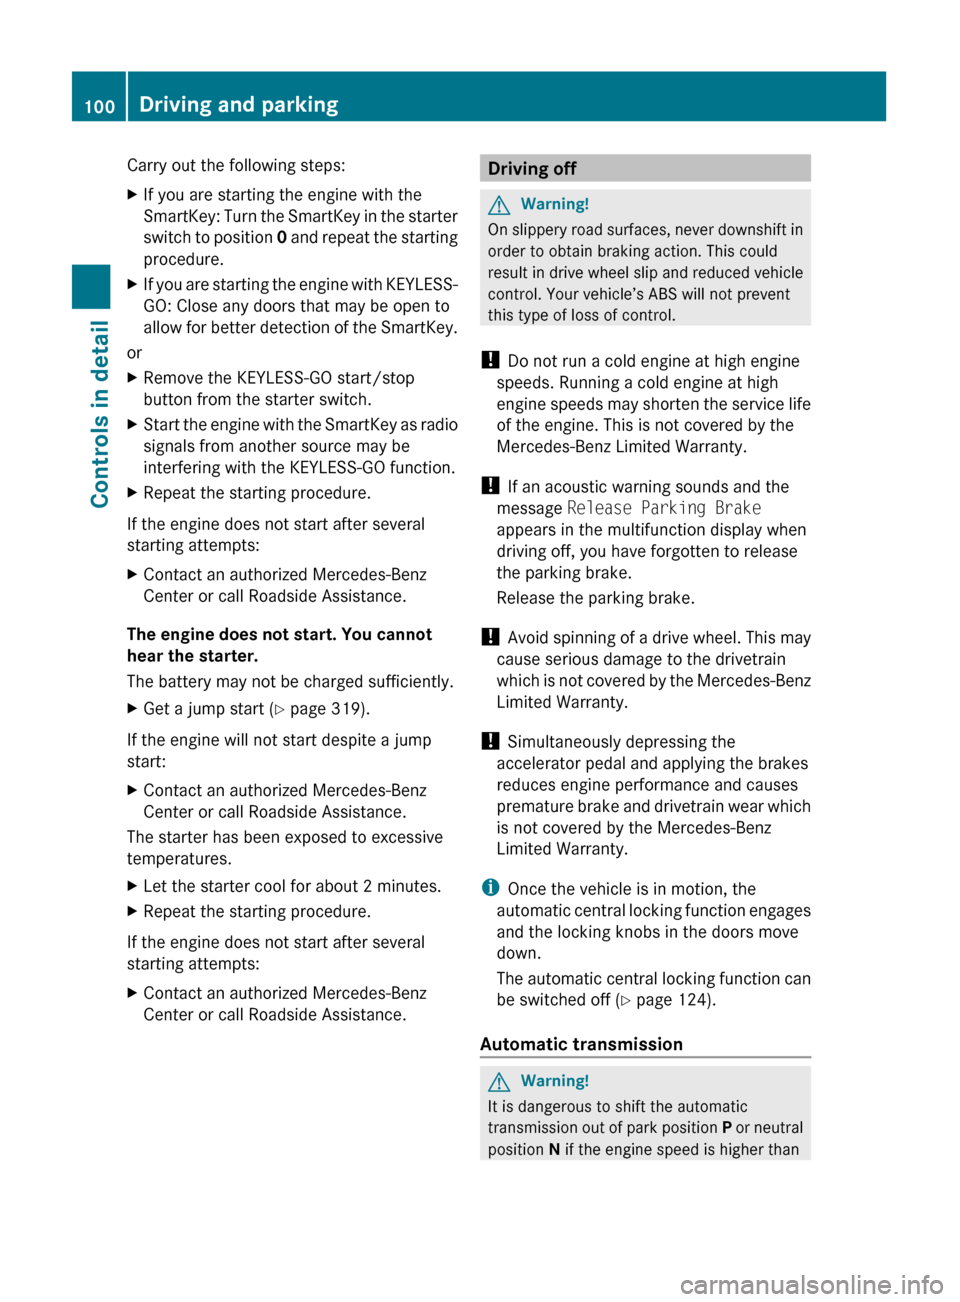
You can start your vehicle without the
SmartKey in the starter switch using the
KEYLESS-GO start/stop button.
The SmartKey must be located in the vehicle.
KEYLESS-GO start/stop button
:USA only;Canada onlyXMake sure the KEYLESS-GO start/stop
button is inserted in the starter switch
(Y page 76).
iTo start the engine with the SmartKey
instead of the KEYLESS-GO function,
remove the KEYLESS-GO start/stop button
from the starter switch. Proceed as
described in “With SmartKey” (Y page 99).
XDepress the brake pedal during the starting
procedure.
XDo not depress the accelerator pedal.XPress the KEYLESS-GO start/stop button
once.
The engine starts automatically.
Starting difficulties
! Remember that extended starting
attempts can drain the battery.
The engine does not start. You can hear
the starter.
There could be a malfunction in the engine
electronics or in the fuel supply system.
Driving and parking99Controls in detailX204_AKB; 3; 23, en-USd2ureepe,Version: 2.11.8.12009-07-16T19:16:58+02:00 - Seite 99Z
Page 102 of 344
Carry out the following steps:XIf you are starting the engine with the
SmartKey: Turn the SmartKey in the starter
switch to position 0 and repeat the starting
procedure.XIf you are starting the engine with KEYLESS-
GO: Close any doors that may be open to
allow for better detection of the SmartKey.
or
XRemove the KEYLESS-GO start/stop
button from the starter switch.XStart the engine with the SmartKey as radio
signals from another source may be
interfering with the KEYLESS-GO function.XRepeat the starting procedure.
If the engine does not start after several
starting attempts:
XContact an authorized Mercedes-Benz
Center or call Roadside Assistance.
The engine does not start. You cannot
hear the starter.
The battery may not be charged sufficiently.
XGet a jump start ( Y page 319).
If the engine will not start despite a jump
start:
XContact an authorized Mercedes-Benz
Center or call Roadside Assistance.
The starter has been exposed to excessive
temperatures.
XLet the starter cool for about 2 minutes.XRepeat the starting procedure.
If the engine does not start after several
starting attempts:
XContact an authorized Mercedes-Benz
Center or call Roadside Assistance.Driving offGWarning!
On slippery road surfaces, never downshift in
order to obtain braking action. This could
result in drive wheel slip and reduced vehicle
control. Your vehicle’s ABS will not prevent
this type of loss of control.
! Do not run a cold engine at high engine
speeds. Running a cold engine at high
engine speeds may shorten the service life
of the engine. This is not covered by the
Mercedes-Benz Limited Warranty.
! If an acoustic warning sounds and the
message Release Parking Brake
appears in the multifunction display when
driving off, you have forgotten to release
the parking brake.
Release the parking brake.
! Avoid spinning of a drive wheel. This may
cause serious damage to the drivetrain
which is not covered by the Mercedes-Benz
Limited Warranty.
! Simultaneously depressing the
accelerator pedal and applying the brakes
reduces engine performance and causes
premature brake and drivetrain wear which
is not covered by the Mercedes-Benz
Limited Warranty.
i Once the vehicle is in motion, the
automatic central locking function engages
and the locking knobs in the doors move
down.
The automatic central locking function can
be switched off ( Y page 124).
Automatic transmission
GWarning!
It is dangerous to shift the automatic
transmission out of park position P or neutral
position N if the engine speed is higher than
100Driving and parkingControls in detail
X204_AKB; 3; 23, en-USd2ureepe,Version: 2.11.8.12009-07-16T19:16:58+02:00 - Seite 100
Page 181 of 344
Deactivating the climate control
systemGWarning!
When the climate control system is
deactivated, the outside air supply and
circulation are also deactivated. Only choose
this setting for a short time. Otherwise the
windows could fog up, impairing visibility and
endangering you and others.
XDeactivating: Press button ^.
The indicator lamp in the button comes on.XReactivating: Press button ^.
The indicator lamp in the button goes out.
The previous settings are once again in
effect.
or
XPress button Ã.
The indicator lamp in the button comes on.
Air volume and air distribution are adjusted
automatically.
Air conditioning
The air conditioning is operational while the
engine is running and cools the interior air to
the temperature set by the operator. In
addition, the air conditioning dehumidifies
the interior air and helps prevent window
fogging.
GWarning!
If you deactivate the air conditioning, the
vehicle will not be cooled when weather
conditions are warm. The windows can fog up
more quickly. Window fogging may impair
visibility and endanger you and others.
i Condensated water may drip out from
underneath the vehicle. This is normal and
not an indication of a malfunction.
The air conditioning uses the refrigerant
R134a. This refrigerant is free of CFCs which
are harmful to the ozone layer.
Deactivating
It is possible to deactivate the air
conditioning. The interior air will then no
longer be cooled or dehumidified.
XPress button ¿.
The indicator lamp in the button goes out.
The cooling function switches off after a
short delay.
Activating
Moist air can fog up the windows. You can
dehumidify the interior air with the air
conditioning.
XPress button ¿.
The indicator lamp in the button comes on.
i The evaporator will be vented when the
air conditioning has been in use.
Approximately 1 hour after locking the
vehicle, the blower switches on
automatically. The blower will run for
30 minutes at its lowest level. The blower
noise is normal and not an indication of a
malfunction. When you unlock the vehicle
in the meantime, venting will be
interrupted. If the vehicle battery is low,
automatic evaporator venting will not occur
in order to preserve the battery.
Automatic mode
When operating the climate control system in
automatic mode, the interior air temperature,
air volume and air distribution are adjusted
automatically.
In automatic mode, cooling with
dehumidification is switched on. This function
can be switched off if necessary.
GWarning!
If you deactivate the air conditioning, the
vehicle will not be cooled when weather
conditions are warm. The windows can fog up
Climate control system179Controls in detailX204_AKB; 3; 23, en-USd2ureepe,Version: 2.11.8.12009-07-16T19:16:58+02:00 - Seite 179Z
Page 186 of 344
Rear window defrosterGWarning!
Any accumulation of snow and ice should be
removed from the rear window before driving.
Visibility could otherwise be impaired,
endangering you and others.
The rear window defroster uses a large
amount of power. To keep the battery drain
to a minimum, switch off the defroster as
soon as the rear window is clear. The
defroster is switched off automatically after
some time of operation depending on the
outside temperature.
XSwitch on the ignition.XSwitching on: Press button ¤.
The indicator lamp in the button comes on.
XSwitching off: Press button ¤ again.
The rear window defroster switches off when
the battery voltage is too low. Too many
electrical consumers may be operating
simultaneously.
XSwitch off consumers that are currently not
needed if required.
Panorama roof with power tilt/
sliding panel
Extending and retracting the roller
sunblinds
The roller sunblinds only operate with the tilt/
sliding panel closed. The front and rear roller
sunblind cannot be operated individually.
GWarning!
When extending the roller sunblinds, make
sure no one is in danger of being injured by
the extending procedure.
The roller sunblinds are equipped with the
express operation and automatic reversal
function. If the movement of the roller
sunblinds is blocked during the extending
procedure, the roller sunblinds will stop and
retract slightly.
The extending of the roller sunblinds can be
immediately halted by releasing the roof panel
switch or, if the roof panel switch was moved
past the resistance point and released, by
moving the roof panel switch in any direction.
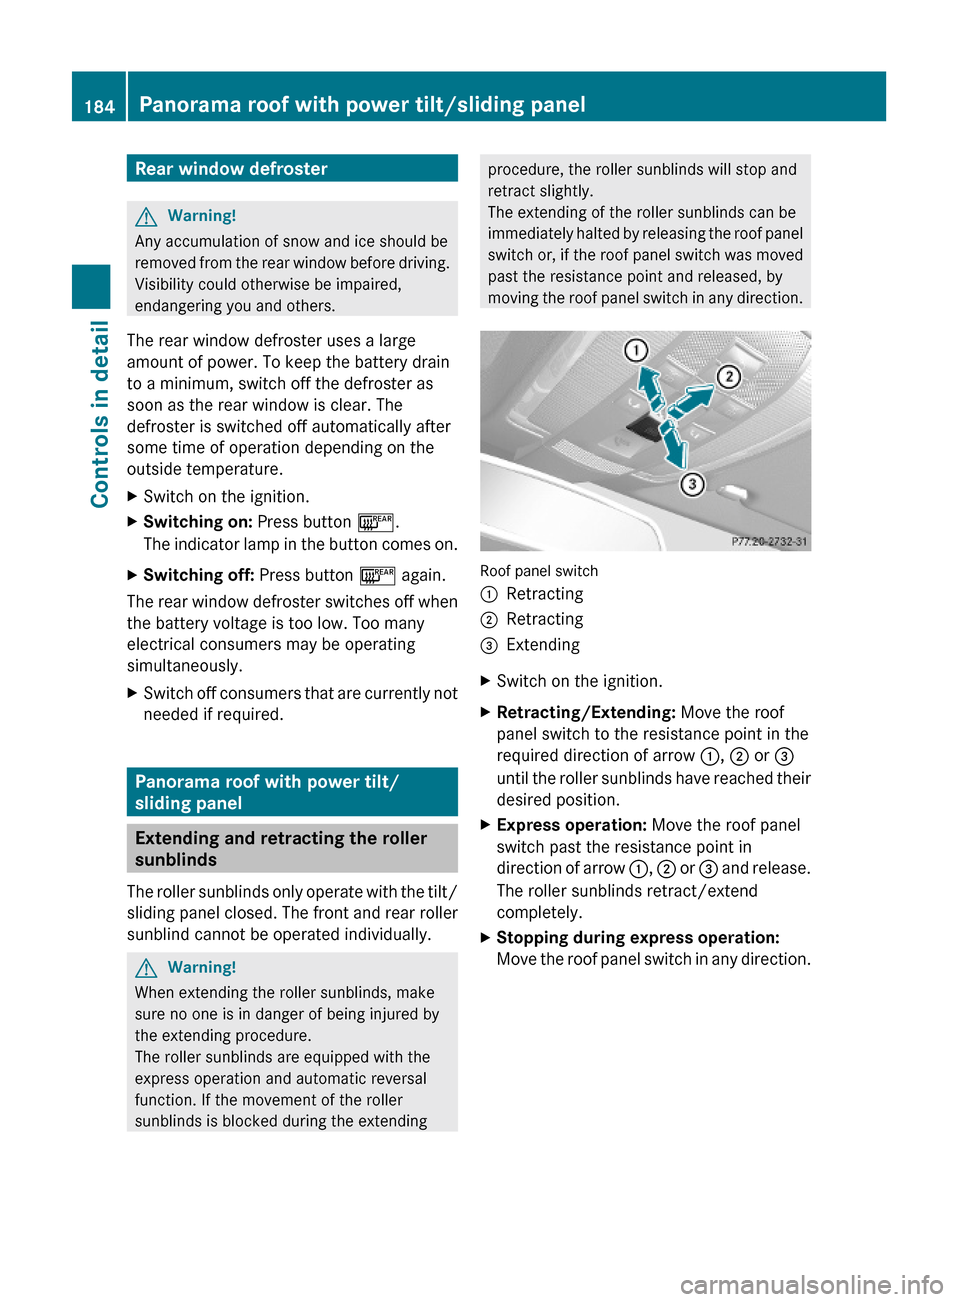
Roof panel switch
:Retracting;Retracting=ExtendingXSwitch on the ignition.XRetracting/Extending: Move the roof
panel switch to the resistance point in the
required direction of arrow :, ; or =
until the roller sunblinds have reached their
desired position.
XExpress operation: Move the roof panel
switch past the resistance point in
direction of arrow :, ; or = and release.
The roller sunblinds retract/extend
completely.
XStopping during express operation:
Move the roof panel switch in any direction.
184Panorama roof with power tilt/sliding panelControls in detail
X204_AKB; 3; 23, en-USd2ureepe,Version: 2.11.8.12009-07-16T19:16:58+02:00 - Seite 184