2010 MERCEDES-BENZ GL550 spare wheel
[x] Cancel search: spare wheelPage 342 of 380
Version 2
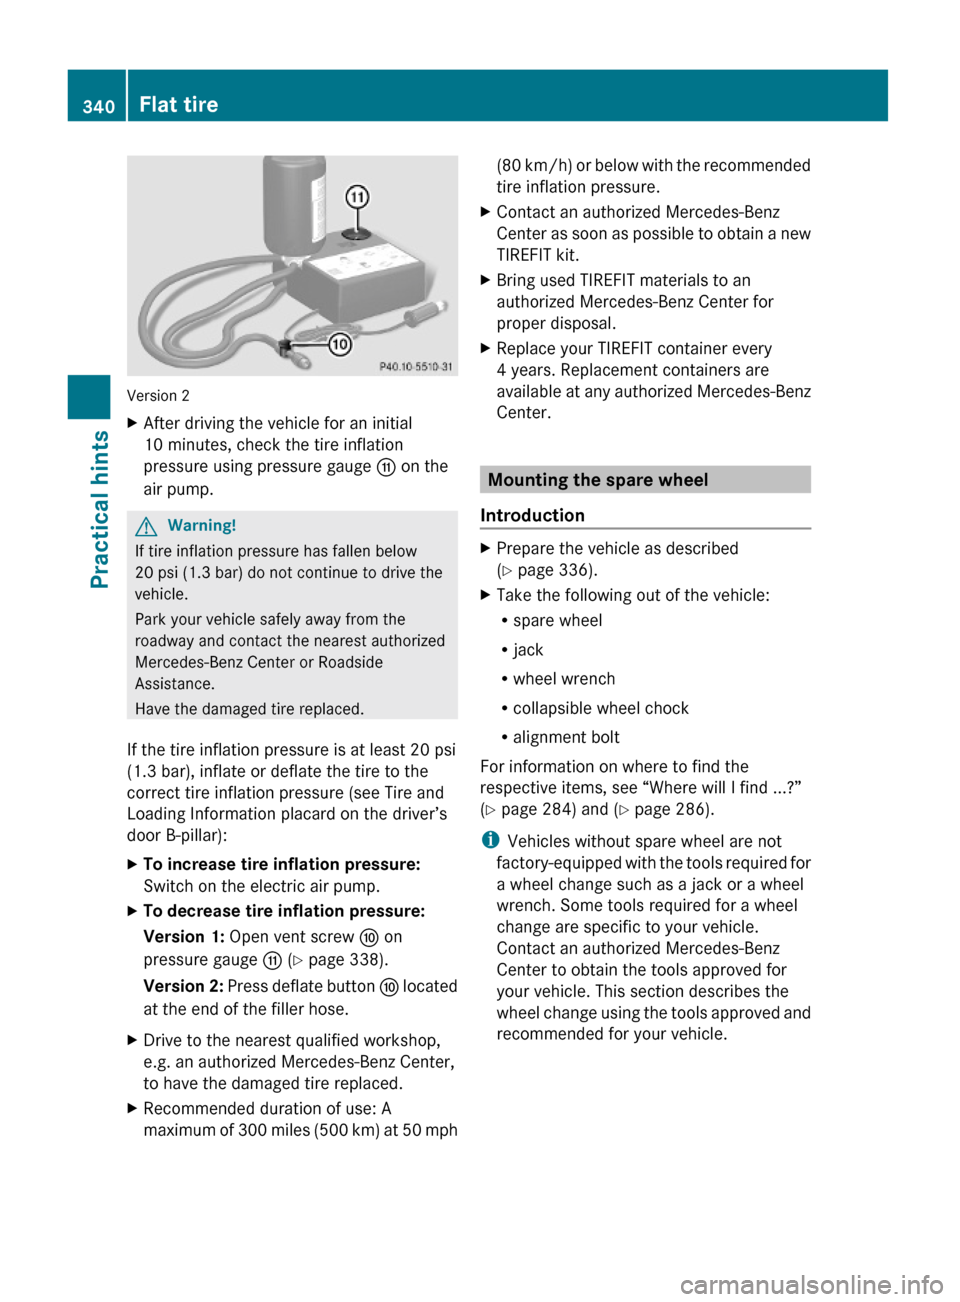
XAfter driving the vehicle for an initial
10 minutes, check the tire inflation
pressure using pressure gauge G on the
air pump.
GWarning!
If tire inflation pressure has fallen below
20 psi (1.3 bar) do not continue to drive the
vehicle.
Park your vehicle safely away from the
roadway and contact the nearest authorized
Mercedes-Benz Center or Roadside
Assistance.
Have the damaged tire replaced.
If the tire inflation pressure is at least 20 psi
(1.3 bar), inflate or deflate the tire to the
correct tire inflation pressure (see Tire and
Loading Information placard on the driver’s
door B-pillar):
XTo increase tire inflation pressure:
Switch on the electric air pump.
XTo decrease tire inflation pressure:
Version 1: Open vent screw F on
pressure gauge G (Y page 338).
Version 2: Press deflate button F located
at the end of the filler hose.
XDrive to the nearest qualified workshop,
e.g. an authorized Mercedes-Benz Center,
to have the damaged tire replaced.
XRecommended duration of use: A
maximum of 300 miles (500 km) at 50 mph
(80 km/h) or below with the recommended
tire inflation pressure.
XContact an authorized Mercedes-Benz
Center as soon as possible to obtain a new
TIREFIT kit.
XBring used TIREFIT materials to an
authorized Mercedes-Benz Center for
proper disposal.
XReplace your TIREFIT container every
4 years. Replacement containers are
available at any authorized Mercedes-Benz
Center.
Mounting the spare wheel
Introduction
XPrepare the vehicle as described
(Y page 336).
XTake the following out of the vehicle:
Rspare wheel
Rjack
Rwheel wrench
Rcollapsible wheel chock
Ralignment bolt
For information on where to find the
respective items, see “Where will I find ...?”
(Y page 284) and (Y page 286).
iVehicles without spare wheel are not
factory-equipped with the tools required for
a wheel change such as a jack or a wheel
wrench. Some tools required for a wheel
change are specific to your vehicle.
Contact an authorized Mercedes-Benz
Center to obtain the tools approved for
your vehicle. This section describes the
wheel change using the tools approved and
recommended for your vehicle.
340Flat tirePractical hints
X164_AKB; 5; 31, en-USd2ureepe,Version: 2.11.8.12009-09-11T12:30:16+02:00 - Seite 340
Page 345 of 380
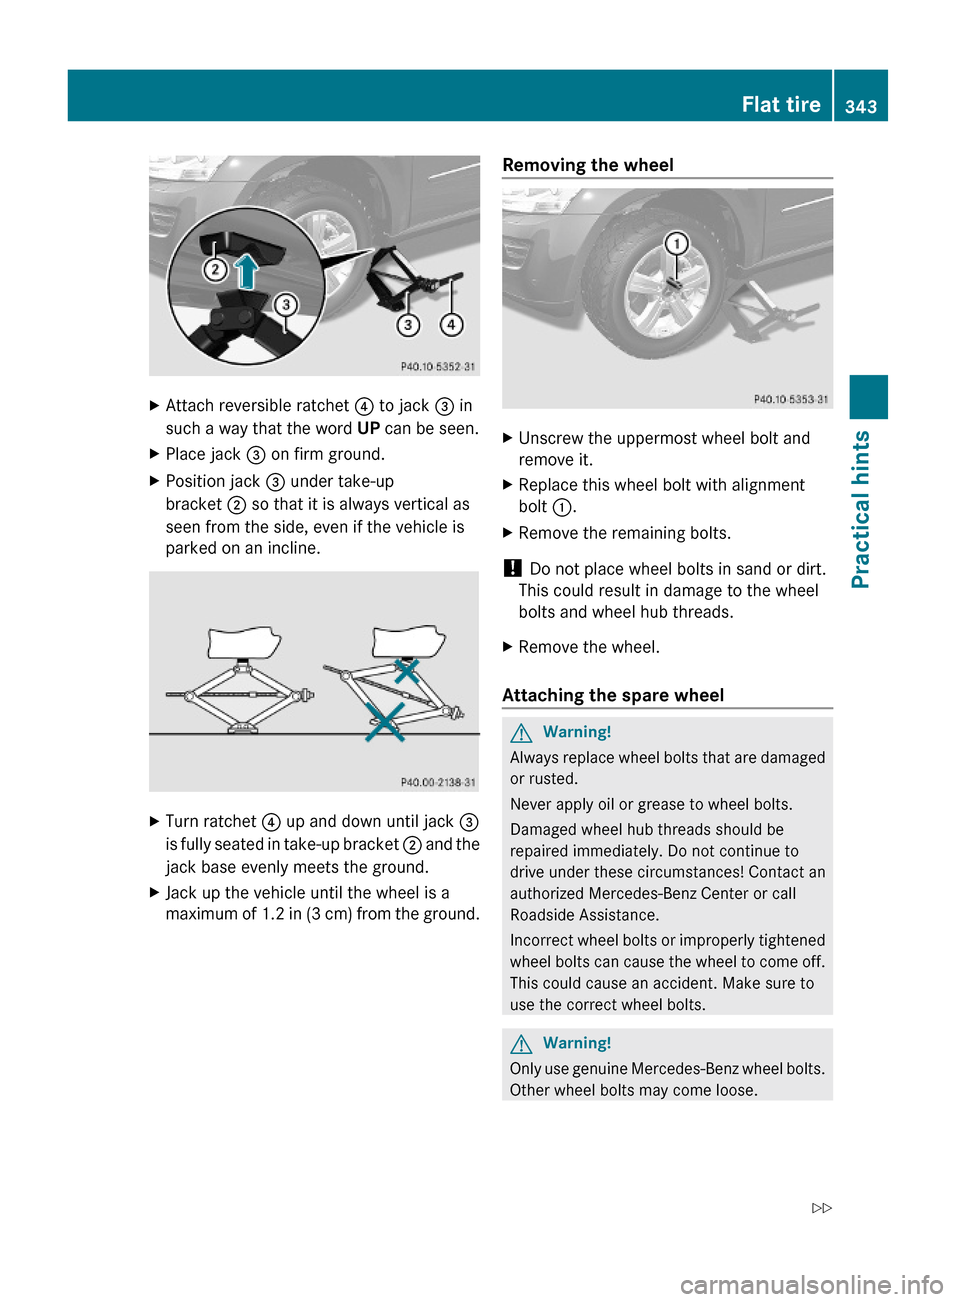
XAttach reversible ratchet ? to jack = in
such a way that the word UP can be seen.
XPlace jack = on firm ground.XPosition jack = under take-up
bracket ; so that it is always vertical as
seen from the side, even if the vehicle is
parked on an incline.
XTurn ratchet ? up and down until jack =
is fully seated in take-up bracket ; and the
jack base evenly meets the ground.
XJack up the vehicle until the wheel is a
maximum of 1.2 in (3 cm) from the ground.
Removing the wheelXUnscrew the uppermost wheel bolt and
remove it.
XReplace this wheel bolt with alignment
bolt :.
XRemove the remaining bolts.
! Do not place wheel bolts in sand or dirt.
This could result in damage to the wheel
bolts and wheel hub threads.
XRemove the wheel.
Attaching the spare wheel
GWarning!
Always replace wheel bolts that are damaged
or rusted.
Never apply oil or grease to wheel bolts.
Damaged wheel hub threads should be
repaired immediately. Do not continue to
drive under these circumstances! Contact an
authorized Mercedes-Benz Center or call
Roadside Assistance.
Incorrect wheel bolts or improperly tightened
wheel bolts can cause the wheel to come off.
This could cause an accident. Make sure to
use the correct wheel bolts.
GWarning!
Only use genuine Mercedes-Benz wheel bolts.
Other wheel bolts may come loose.
Flat tire343Practical hintsX164_AKB; 5; 31, en-USd2ureepe,Version: 2.11.8.12009-09-11T12:30:16+02:00 - Seite 343Z
Page 346 of 380
Do not tighten the wheel bolts when the
vehicle is raised. Otherwise the vehicle could
fall off the jack.
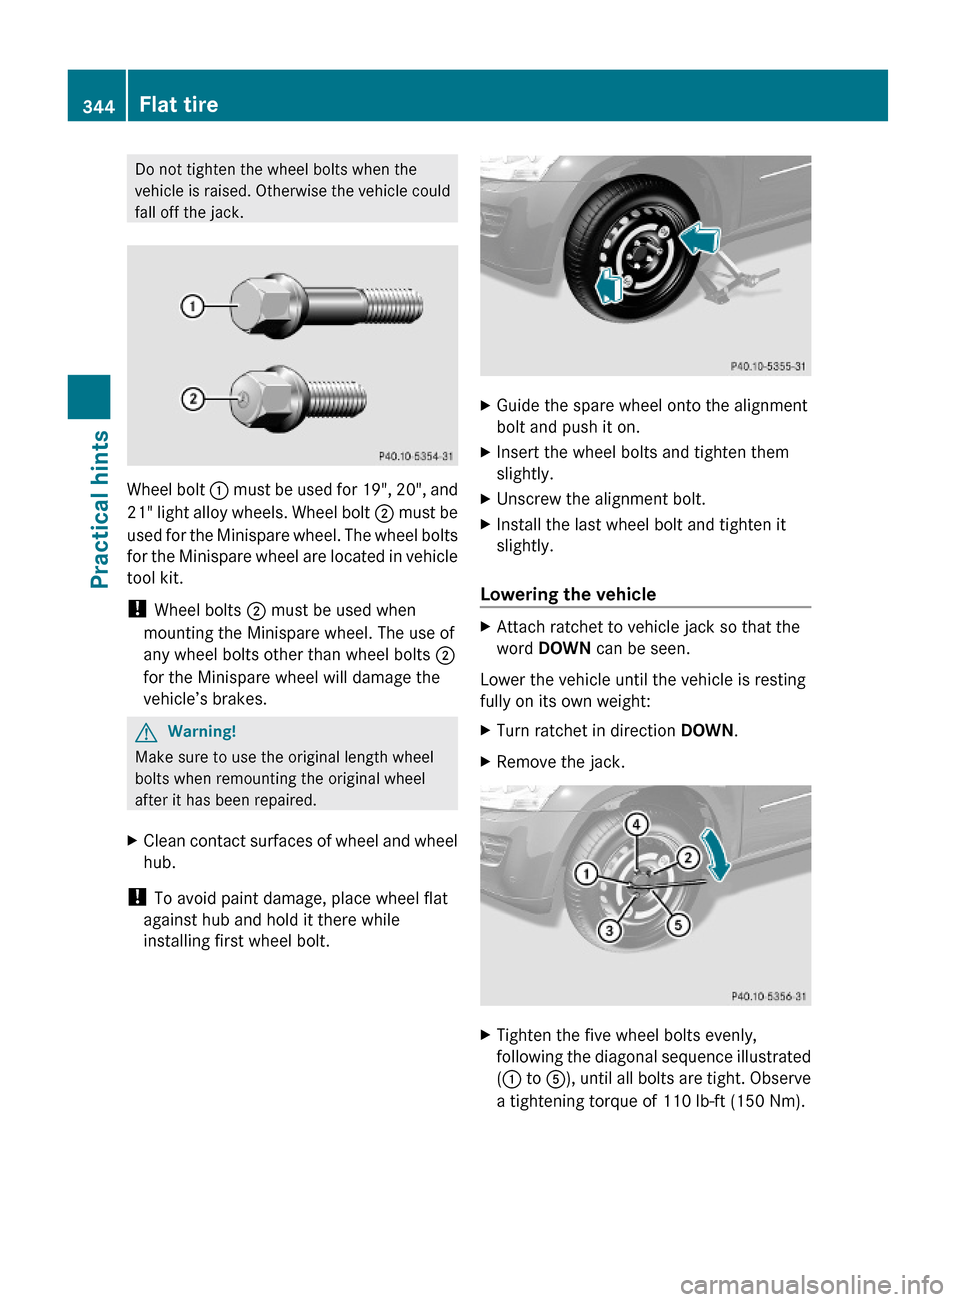
Wheel bolt : must be used for 19", 20", and
21" light alloy wheels. Wheel bolt ; must be
used for the Minispare wheel. The wheel bolts
for the Minispare wheel are located in vehicle
tool kit.
! Wheel bolts ; must be used when
mounting the Minispare wheel. The use of
any wheel bolts other than wheel bolts ;
for the Minispare wheel will damage the
vehicle’s brakes.
GWarning!
Make sure to use the original length wheel
bolts when remounting the original wheel
after it has been repaired.
XClean contact surfaces of wheel and wheel
hub.
! To avoid paint damage, place wheel flat
against hub and hold it there while
installing first wheel bolt.
XGuide the spare wheel onto the alignment
bolt and push it on.
XInsert the wheel bolts and tighten them
slightly.
XUnscrew the alignment bolt.XInstall the last wheel bolt and tighten it
slightly.
Lowering the vehicle
XAttach ratchet to vehicle jack so that the
word DOWN can be seen.
Lower the vehicle until the vehicle is resting
fully on its own weight:
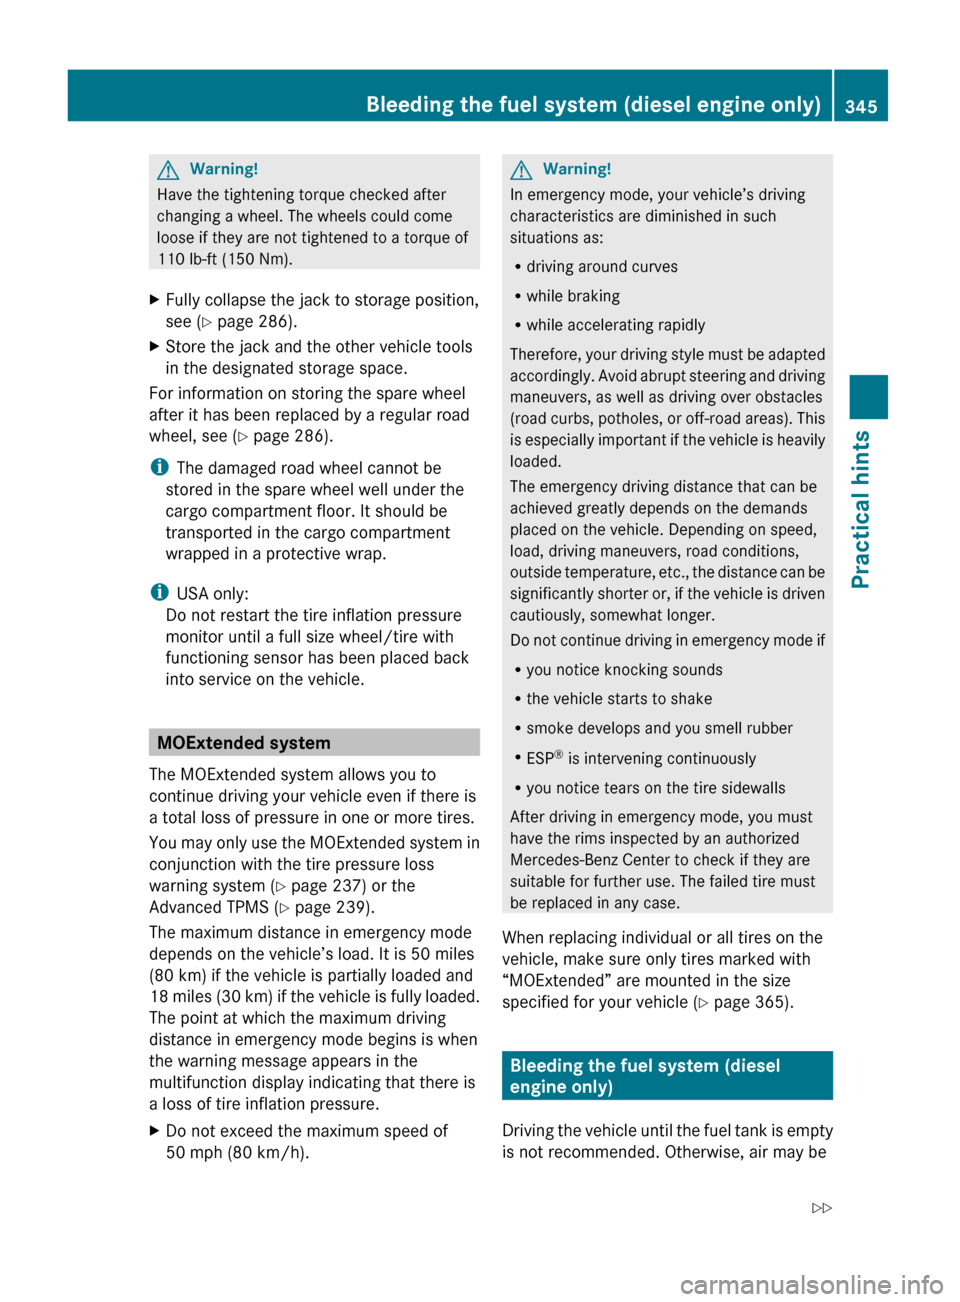
XTurn ratchet in direction DOWN.XRemove the jack.XTighten the five wheel bolts evenly,
following the diagonal sequence illustrated
(: to A), until all bolts are tight. Observe
a tightening torque of 110 lb-ft (150 Nm).
344Flat tirePractical hints
X164_AKB; 5; 31, en-USd2ureepe,Version: 2.11.8.12009-09-11T12:30:16+02:00 - Seite 344
Page 347 of 380
GWarning!
Have the tightening torque checked after
changing a wheel. The wheels could come
loose if they are not tightened to a torque of
110 lb-ft (150 Nm).
XFully collapse the jack to storage position,
see ( Y page 286).XStore the jack and the other vehicle tools
in the designated storage space.
For information on storing the spare wheel
after it has been replaced by a regular road
wheel, see ( Y page 286).
i The damaged road wheel cannot be
stored in the spare wheel well under the
cargo compartment floor. It should be
transported in the cargo compartment
wrapped in a protective wrap.
i USA only:
Do not restart the tire inflation pressure
monitor until a full size wheel/tire with
functioning sensor has been placed back
into service on the vehicle.
MOExtended system
The MOExtended system allows you to
continue driving your vehicle even if there is
a total loss of pressure in one or more tires.
You may only use the MOExtended system in
conjunction with the tire pressure loss
warning system ( Y page 237) or the
Advanced TPMS ( Y page 239).
The maximum distance in emergency mode
depends on the vehicle’s load. It is 50 miles
(80 km) if the vehicle is partially loaded and
18 miles (30 km) if the vehicle is fully loaded.
The point at which the maximum driving
distance in emergency mode begins is when
the warning message appears in the
multifunction display indicating that there is
a loss of tire inflation pressure.
XDo not exceed the maximum speed of
50 mph (80 km/h).GWarning!
In emergency mode, your vehicle’s driving
characteristics are diminished in such
situations as:
R driving around curves
R while braking
R while accelerating rapidly
Therefore, your driving style must be adapted
accordingly. Avoid abrupt steering and driving
maneuvers, as well as driving over obstacles
(road curbs, potholes, or off-road areas). This
is especially important if the vehicle is heavily
loaded.
The emergency driving distance that can be
achieved greatly depends on the demands
placed on the vehicle. Depending on speed,
load, driving maneuvers, road conditions,
outside temperature, etc., the distance can be
significantly shorter or, if the vehicle is driven
cautiously, somewhat longer.
Do not continue driving in emergency mode if
R you notice knocking sounds
R the vehicle starts to shake
R smoke develops and you smell rubber
R ESP ®
is intervening continuously
R you notice tears on the tire sidewalls
After driving in emergency mode, you must
have the rims inspected by an authorized
Mercedes-Benz Center to check if they are
suitable for further use. The failed tire must
be replaced in any case.
When replacing individual or all tires on the
vehicle, make sure only tires marked with
“MOExtended” are mounted in the size
specified for your vehicle ( Y page 365).
Bleeding the fuel system (diesel
engine only)
Driving the vehicle until the fuel tank is empty
is not recommended. Otherwise, air may be
Bleeding the fuel system (diesel engine only)345Practical hintsX164_AKB; 5; 31, en-USd2ureepe,Version: 2.11.8.12009-09-11T12:30:16+02:00 - Seite 345Z
Page 357 of 380
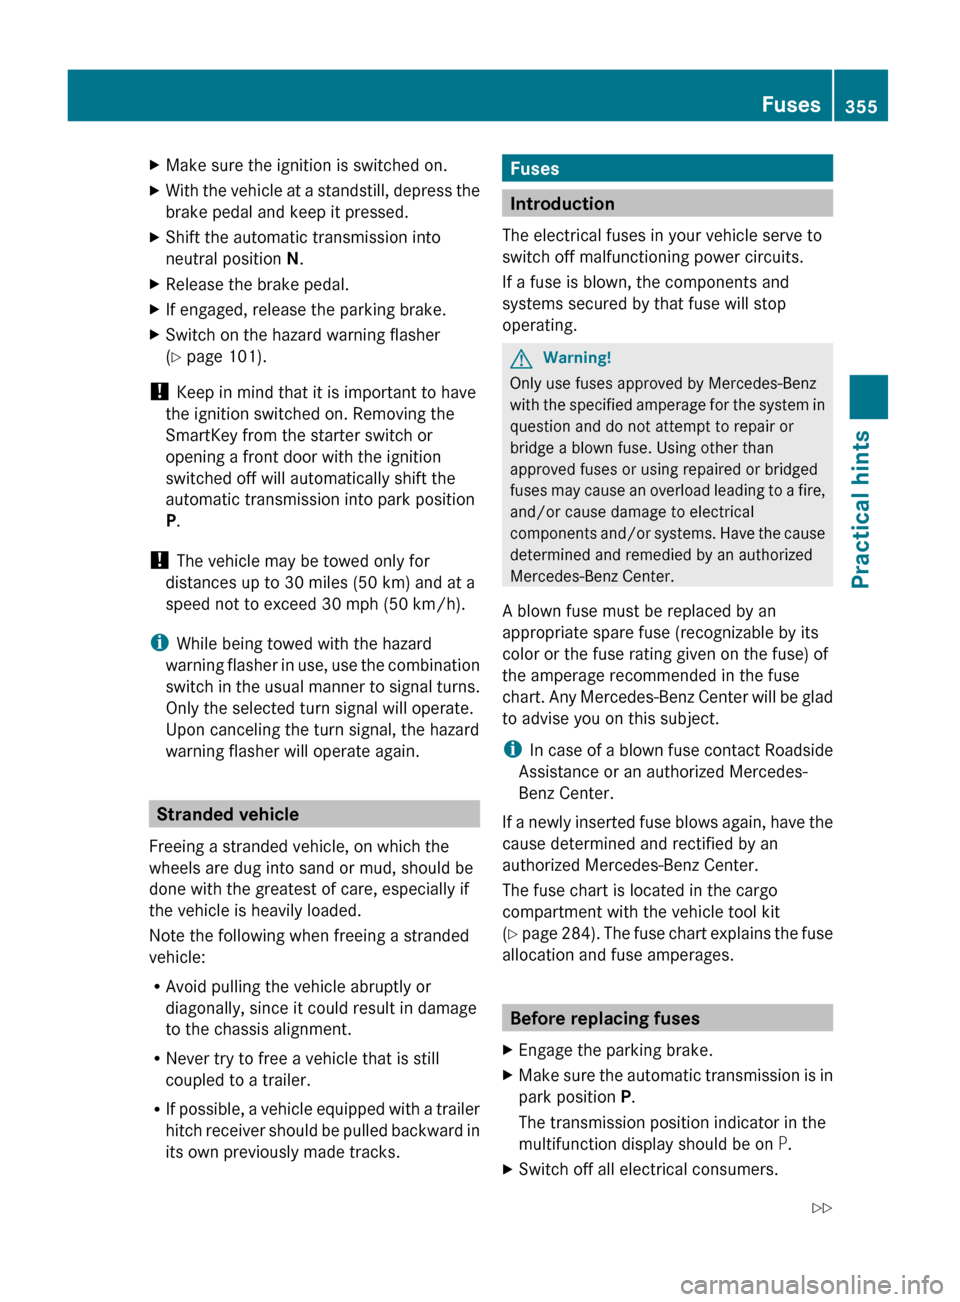
XMake sure the ignition is switched on.XWith the vehicle at a standstill, depress the
brake pedal and keep it pressed.XShift the automatic transmission into
neutral position N.XRelease the brake pedal.XIf engaged, release the parking brake.XSwitch on the hazard warning flasher
( Y page 101).
!
Keep in mind that it is important to have
the ignition switched on. Removing the
SmartKey from the starter switch or
opening a front door with the ignition
switched off will automatically shift the
automatic transmission into park position
P .
! The vehicle may be towed only for
distances up to 30 miles (50 km) and at a
speed not to exceed 30 mph (50 km/h).
i While being towed with the hazard
warning flasher in use, use the combination
switch in the usual manner to signal turns.
Only the selected turn signal will operate.
Upon canceling the turn signal, the hazard
warning flasher will operate again.
Stranded vehicle
Freeing a stranded vehicle, on which the
wheels are dug into sand or mud, should be
done with the greatest of care, especially if
the vehicle is heavily loaded.
Note the following when freeing a stranded
vehicle:
R Avoid pulling the vehicle abruptly or
diagonally, since it could result in damage
to the chassis alignment.
R Never try to free a vehicle that is still
coupled to a trailer.
R If possible, a vehicle equipped with a trailer
hitch receiver should be pulled backward in
its own previously made tracks.
Fuses
Introduction
The electrical fuses in your vehicle serve to
switch off malfunctioning power circuits.
If a fuse is blown, the components and
systems secured by that fuse will stop
operating.
GWarning!
Only use fuses approved by Mercedes-Benz
with the specified amperage for the system in
question and do not attempt to repair or
bridge a blown fuse. Using other than
approved fuses or using repaired or bridged
fuses may cause an overload leading to a fire,
and/or cause damage to electrical
components and/or systems. Have the cause
determined and remedied by an authorized
Mercedes-Benz Center.
A blown fuse must be replaced by an
appropriate spare fuse (recognizable by its
color or the fuse rating given on the fuse) of
the amperage recommended in the fuse
chart. Any Mercedes-Benz Center will be glad
to advise you on this subject.
i In case of a blown fuse contact Roadside
Assistance or an authorized Mercedes-
Benz Center.
If a newly inserted fuse blows again, have the
cause determined and rectified by an
authorized Mercedes-Benz Center.
The fuse chart is located in the cargo
compartment with the vehicle tool kit
( Y page 284). The fuse chart explains the fuse
allocation and fuse amperages.
Before replacing fuses
XEngage the parking brake.XMake sure the automatic transmission is in
park position P.
The transmission position indicator in the
multifunction display should be on P.XSwitch off all electrical consumers.Fuses355Practical hintsX164_AKB; 5; 31, en-USd2ureepe,Version: 2.11.8.12009-09-11T12:30:16+02:00 - Seite 355Z
Page 370 of 380
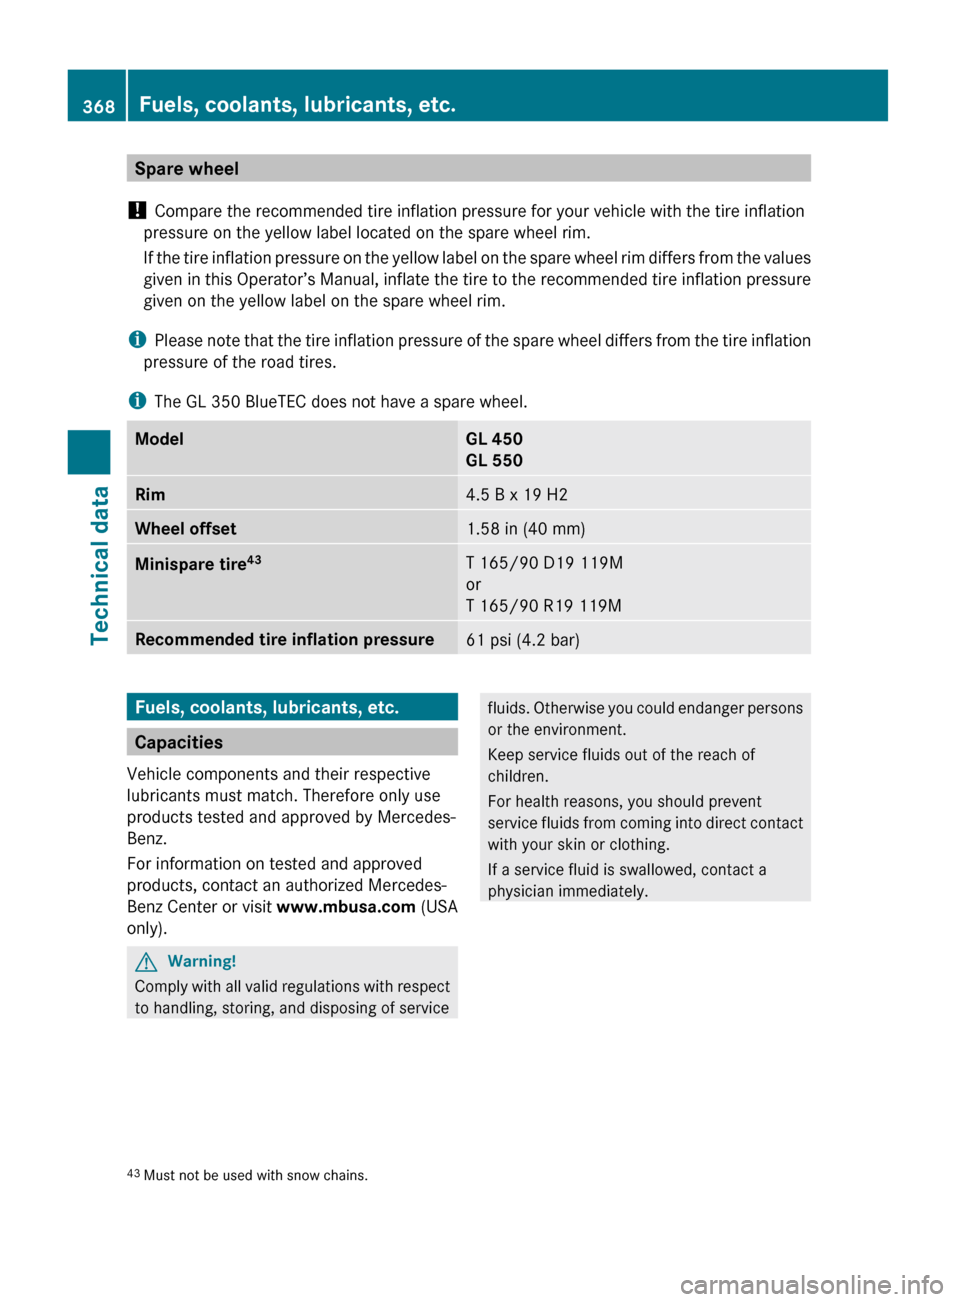
Spare wheel
! Compare the recommended tire inflation pressure for your vehicle with the tire inflation
pressure on the yellow label located on the spare wheel rim.
If the tire inflation pressure on the yellow label on the spare wheel rim differs from the values
given in this Operator’s Manual, inflate the tire to the recommended tire inflation pressure
given on the yellow label on the spare wheel rim.
i Please note that the tire inflation pressure of the spare wheel differs from the tire inflation
pressure of the road tires.
i The GL 350 BlueTEC does not have a spare wheel.ModelGL 450
GL 550Rim4.5 B x 19 H2Wheel offset1.58 in (40 mm)Minispare tire 43T 165/90 D19 119M
or
T 165/90 R19 119MRecommended tire inflation pressure61 psi (4.2 bar)Fuels, coolants, lubricants, etc.
Capacities
Vehicle components and their respective
lubricants must match. Therefore only use
products tested and approved by Mercedes-
Benz.
For information on tested and approved
products, contact an authorized Mercedes-
Benz Center or visit www.mbusa.com (USA
only).
GWarning!
Comply with all valid regulations with respect
to handling, storing, and disposing of service
fluids. Otherwise you could endanger persons
or the environment.
Keep service fluids out of the reach of
children.
For health reasons, you should prevent
service fluids from coming into direct contact
with your skin or clothing.
If a service fluid is swallowed, contact a
physician immediately.43 Must not be used with snow chains.368Fuels, coolants, lubricants, etc.Technical data
X164_AKB; 5; 31, en-USd2ureepe,Version: 2.11.8.12009-09-11T12:30:16+02:00 - Seite 368