2010 MERCEDES-BENZ GL550 roof
[x] Cancel search: roofPage 199 of 380

objects attached to them could come loose
from your vehicle and cause an accident,
thereby injuring you and other persons and/
or causing damage to property, including
damage to your vehicle.GWarning!
Every time the crossbars are mounted, before
you set off on a journey and periodically
during longer journeys, check all the screws
on the crossbars to make sure that they are
secure, and tighten them if necessary. Repeat
these checks at regular intervals as road-
surface conditions dictate, and at least after
every 1500 miles (2500 km) of continuous
use.
Otherwise, the crossbars, mounted
accessories and the objects attached to them
could come loose from the vehicle causing an
accident, thereby injuring you and other
persons and/or causing damage to property,
including damage to your vehicle.
Do not use lubricant on the screws of the
crossbars. The screws could work loose and
the crossbars could become detached from
your vehicle, together with the objects
attached to them causing an accident,
thereby injuring you and other persons and/
or causing damage to property, including
damage to your vehicle.
GWarning!
Only install the crossbars at the exact
locations designated on the roof rails. The
designated locations for the front crossbars
are between the markings engraved on the
inside of the roof rails. The designated
locations for the rear crossbars are between
the gaps on the roof rails.
Otherwise, the crossbars, mounted
accessories and the objects attached to them
could come loose from the vehicle causing an
accident, thereby injuring you and other
persons and/or causing damage to property,
including damage to your vehicle.
GWarning!
A roof load creates a greater surface area
exposed to the wind and causes the vehicle
to have a higher center of gravity, thereby
changing the vehicle’s driving characteristics.
Accordingly, the additional weight on the roof
of the vehicle can have a detrimental effect
on braking, cornering and acceleration.
Never exceed the maximum permissible roof
load or the maximum permissible vehicle
weight, even when accessories for the
crossbars (e.g. ski racks, bicycle racks, etc.)
are being used. Overloading the vehicle could
result in an accident. When calculating the
weight placed on the roof please make sure
to add the weight of the crossbars, accessory
racks and the load carried together.
Always adapt your driving style to the road,
traffic and weather conditions, and drive with
added caution when the roof is loaded.
Always drive with extreme care when the
carrier is loaded. Take into consideration that
when the carrier is loaded, the handling
characteristics are different from those when
operating the vehicle without a carrier loaded.
GWarning!
Do not use accessories which have not been
approved by Mercedes-Benz for use in
conjunction with these crossbars. If non-
approved accessories are used, these
accessories and/or the objects attached to
them could come loose from the vehicle,
thereby injuring you and other persons and/
or causing damage to property, including
damage to your vehicle.
! Have a second person assist you when
installing the crossbars. The vehicle could
otherwise be damaged.
! Objects attached to the crossbar
system’s accessories must not be allowed
to restrict the movement of the tilt/sliding
sunroof. The tilt/sliding sunroof could
otherwise be damaged when it is raised.
Loading and storing197Controls in detailX164_AKB; 5; 31, en-USd2ureepe,Version: 2.11.8.12009-09-11T12:30:16+02:00 - Seite 197Z
Page 200 of 380
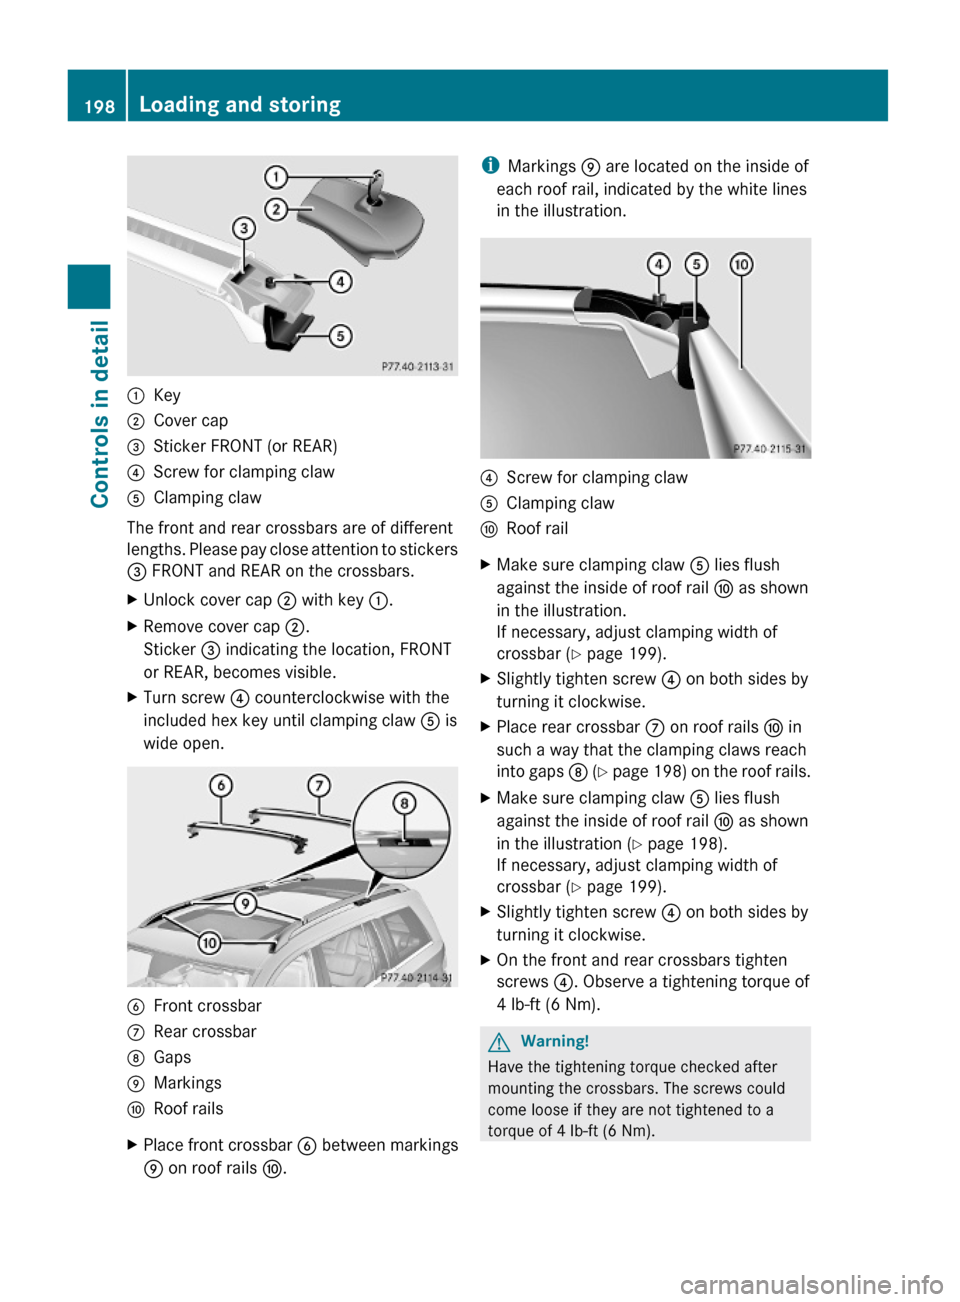
:Key;Cover cap=Sticker FRONT (or REAR)?Screw for clamping clawAClamping claw
The front and rear crossbars are of different
lengths. Please pay close attention to stickers
= FRONT and REAR on the crossbars.
XUnlock cover cap ; with key :.XRemove cover cap ;.
Sticker = indicating the location, FRONT
or REAR, becomes visible.
XTurn screw ? counterclockwise with the
included hex key until clamping claw A is
wide open.
BFront crossbarCRear crossbarDGapsEMarkingsFRoof railsXPlace front crossbar B between markings
E on roof rails F.
iMarkings E are located on the inside of
each roof rail, indicated by the white lines
in the illustration.
?Screw for clamping clawAClamping clawFRoof railXMake sure clamping claw A lies flush
against the inside of roof rail F as shown
in the illustration.
If necessary, adjust clamping width of
crossbar (Y page 199).
XSlightly tighten screw ? on both sides by
turning it clockwise.
XPlace rear crossbar C on roof rails F in
such a way that the clamping claws reach
into gaps D (Y page 198) on the roof rails.
XMake sure clamping claw A lies flush
against the inside of roof rail F as shown
in the illustration (Y page 198).
If necessary, adjust clamping width of
crossbar (Y page 199).
XSlightly tighten screw ? on both sides by
turning it clockwise.
XOn the front and rear crossbars tighten
screws ?. Observe a tightening torque of
4 lb-ft (6 Nm).
GWarning!
Have the tightening torque checked after
mounting the crossbars. The screws could
come loose if they are not tightened to a
torque of 4 lb-ft (6 Nm).
198Loading and storingControls in detail
X164_AKB; 5; 31, en-USd2ureepe,Version: 2.11.8.12009-09-11T12:30:16+02:00 - Seite 198
Page 201 of 380
XAttach cover caps (Y page 198) and lock
them.
XStore key and hex key back into the storage
well (Y page 284).
Adjusting the clamping widths of the
crossbars
GWarning!
Only install the crossbars at the exact
locations designated on the roof rails. The
designated locations for the front crossbars
are between the markings engraved on the
inside of the roof rails. The designated
locations for the rear crossbars are between
the gaps on the roof rails.
Otherwise, the crossbars, mounted
accessories and the objects attached to them
could come loose from the vehicle causing an
accident, thereby injuring you and other
persons and/or causing damage to property,
including damage to your vehicle.
The clamping widths of the crossbars are
factory set for your vehicle. These clamping
widths are solely intended for the designated
positions.
Only install the crossbars at the designated
locations and pay attention to the stickers
= FRONT and REAR (Y page 198).
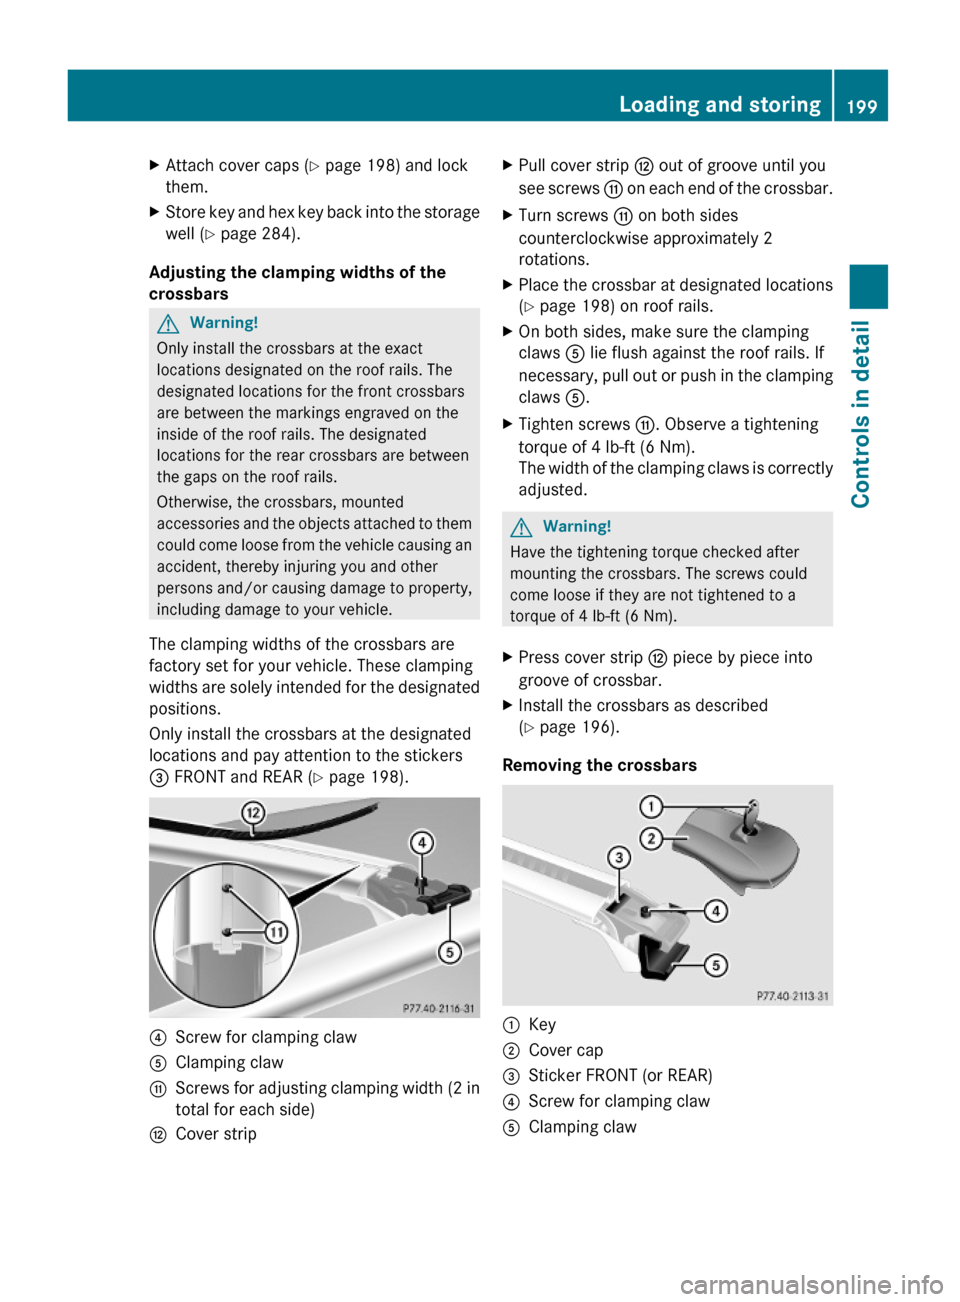
?Screw for clamping clawAClamping clawGScrews for adjusting clamping width (2 in
total for each side)
HCover stripXPull cover strip H out of groove until you
see screws G on each end of the crossbar.
XTurn screws G on both sides
counterclockwise approximately 2
rotations.
XPlace the crossbar at designated locations
(Y page 198) on roof rails.
XOn both sides, make sure the clamping
claws A lie flush against the roof rails. If
necessary, pull out or push in the clamping
claws A.
XTighten screws G. Observe a tightening
torque of 4 lb-ft (6 Nm).
The width of the clamping claws is correctly
adjusted.
GWarning!
Have the tightening torque checked after
mounting the crossbars. The screws could
come loose if they are not tightened to a
torque of 4 lb-ft (6 Nm).
XPress cover strip H piece by piece into
groove of crossbar.
XInstall the crossbars as described
(Y page 196).
Removing the crossbars
:Key;Cover cap=Sticker FRONT (or REAR)?Screw for clamping clawAClamping clawLoading and storing199Controls in detailX164_AKB; 5; 31, en-USd2ureepe,Version: 2.11.8.12009-09-11T12:30:16+02:00 - Seite 199Z
Page 202 of 380
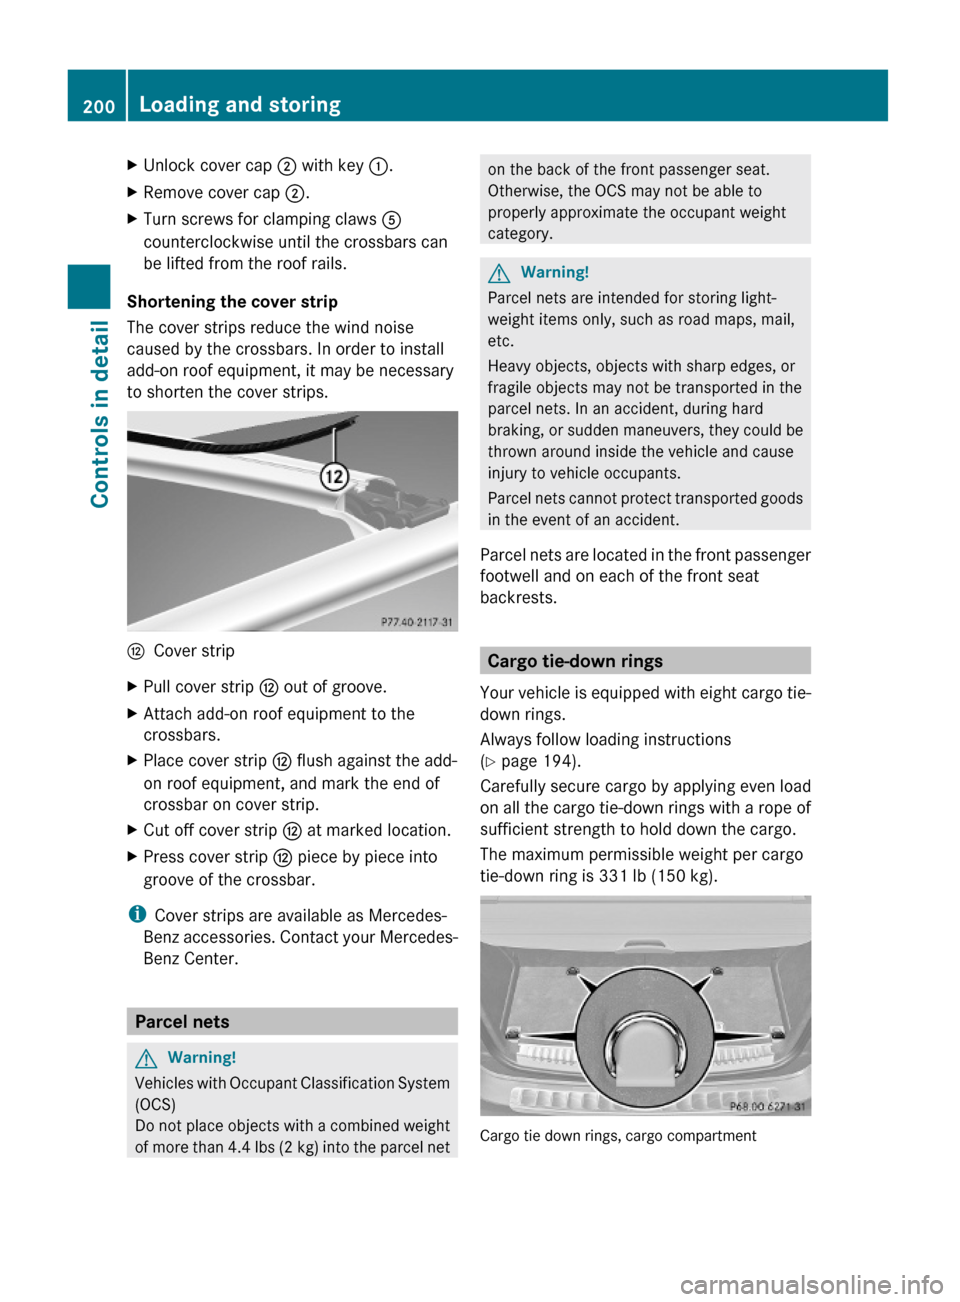
XUnlock cover cap ; with key :.XRemove cover cap ;.XTurn screws for clamping claws A
counterclockwise until the crossbars can
be lifted from the roof rails.
Shortening the cover strip
The cover strips reduce the wind noise
caused by the crossbars. In order to install
add-on roof equipment, it may be necessary
to shorten the cover strips.
HCover stripXPull cover strip H out of groove.XAttach add-on roof equipment to the
crossbars.
XPlace cover strip H flush against the add-
on roof equipment, and mark the end of
crossbar on cover strip.
XCut off cover strip H at marked location.XPress cover strip H piece by piece into
groove of the crossbar.
iCover strips are available as Mercedes-
Benz accessories. Contact your Mercedes-
Benz Center.
Parcel nets
GWarning!
Vehicles with Occupant Classification System
(OCS)
Do not place objects with a combined weight
of more than 4.4 lbs (2 kg) into the parcel net
on the back of the front passenger seat.
Otherwise, the OCS may not be able to
properly approximate the occupant weight
category.
GWarning!
Parcel nets are intended for storing light-
weight items only, such as road maps, mail,
etc.
Heavy objects, objects with sharp edges, or
fragile objects may not be transported in the
parcel nets. In an accident, during hard
braking, or sudden maneuvers, they could be
thrown around inside the vehicle and cause
injury to vehicle occupants.
Parcel nets cannot protect transported goods
in the event of an accident.
Parcel nets are located in the front passenger
footwell and on each of the front seat
backrests.
Cargo tie-down rings
Your vehicle is equipped with eight cargo tie-
down rings.
Always follow loading instructions
(Y page 194).
Carefully secure cargo by applying even load
on all the cargo tie-down rings with a rope of
sufficient strength to hold down the cargo.
The maximum permissible weight per cargo
tie-down ring is 331 lb (150 kg).
Cargo tie down rings, cargo compartment
200Loading and storingControls in detail
X164_AKB; 5; 31, en-USd2ureepe,Version: 2.11.8.12009-09-11T12:30:16+02:00 - Seite 200
Page 213 of 380
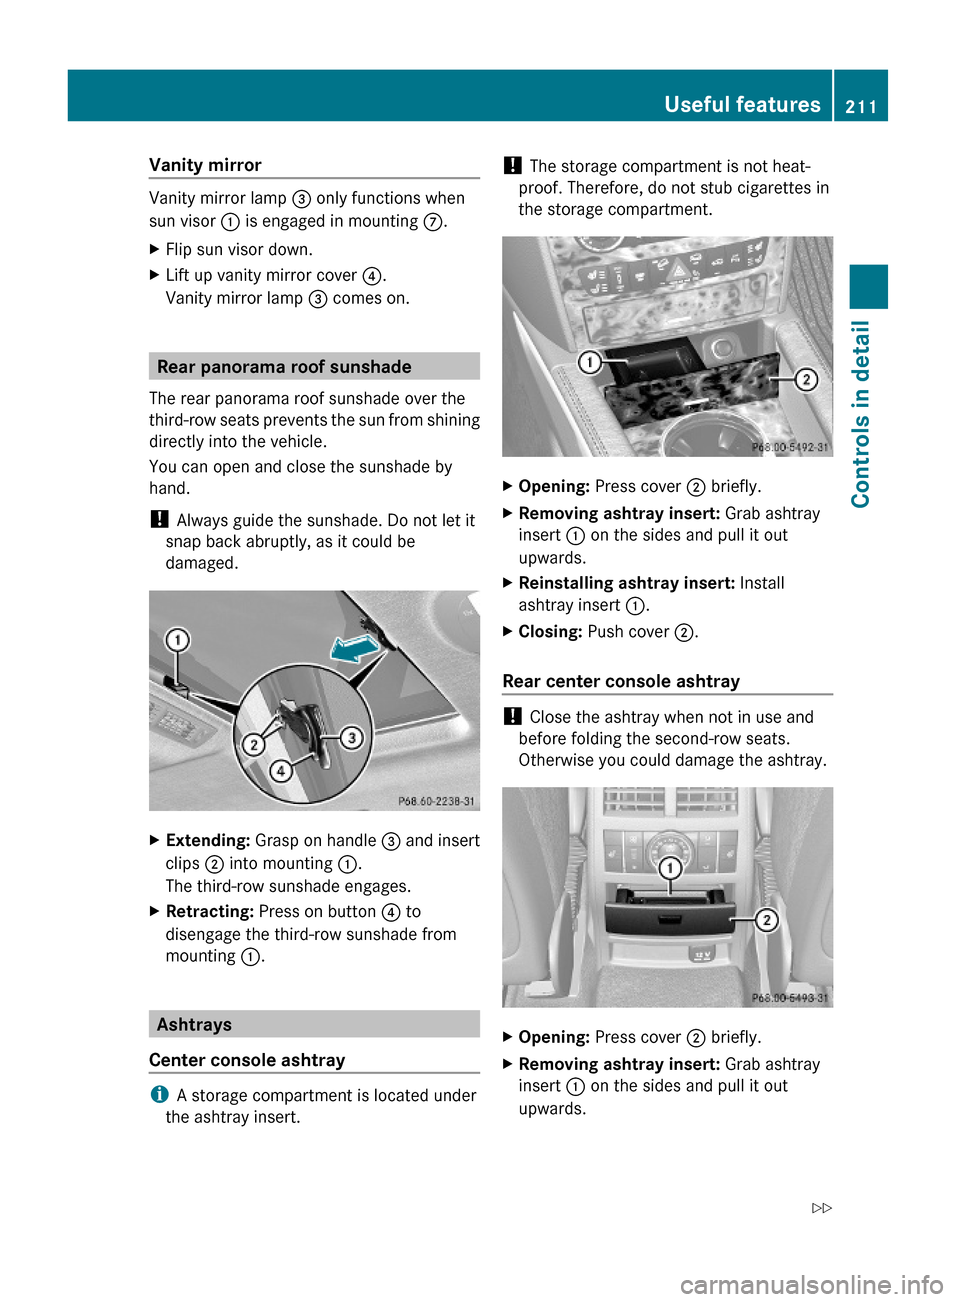
Vanity mirror
Vanity mirror lamp = only functions when
sun visor : is engaged in mounting C.
XFlip sun visor down.XLift up vanity mirror cover ?.
Vanity mirror lamp = comes on.
Rear panorama roof sunshade
The rear panorama roof sunshade over the
third-row seats prevents the sun from shining
directly into the vehicle.
You can open and close the sunshade by
hand.
! Always guide the sunshade. Do not let it
snap back abruptly, as it could be
damaged.
XExtending: Grasp on handle = and insert
clips ; into mounting :.
The third-row sunshade engages.
XRetracting: Press on button ? to
disengage the third-row sunshade from
mounting :.
Ashtrays
Center console ashtray
iA storage compartment is located under
the ashtray insert.
! The storage compartment is not heat-
proof. Therefore, do not stub cigarettes in
the storage compartment.
XOpening: Press cover ; briefly.XRemoving ashtray insert: Grab ashtray
insert : on the sides and pull it out
upwards.
XReinstalling ashtray insert: Install
ashtray insert :.
XClosing: Push cover ;.
Rear center console ashtray
! Close the ashtray when not in use and
before folding the second-row seats.
Otherwise you could damage the ashtray.
XOpening: Press cover ; briefly.XRemoving ashtray insert: Grab ashtray
insert : on the sides and pull it out
upwards.
Useful features211Controls in detailX164_AKB; 5; 31, en-USd2ureepe,Version: 2.11.8.12009-09-11T12:30:16+02:00 - Seite 211Z
Page 258 of 380
Maximum loaded vehicle weight
The sum of curb weight, accessory weight,
total load limit, and production options
weight.
Maximum permissible tire inflation
pressure
This number is the greatest amount of air
pressure that should ever be put in the tire.
Normal occupant weight
The number of occupants the vehicle is
designed to seat, multiplied by 68 kilograms
(150 lb).
Occupant distribution
The distribution of occupants in a vehicle at
their designated seating positions.
Production options weight
The combined weight of those installed
regular production options weighing over
5 lbs (2.3 kilograms) in excess of those
standard items which they replace, not
previously considered in curb weight or
accessory weight, including heavy duty
brakes, ride levelers, roof rack, heavy duty
battery, and special trim.
PSI (Pounds per square inch)
A standard unit of measure for air pressure.
Recommended tire inflation pressure
The recommended tire inflation pressure for
normal driving conditions is listed on the Tire
and Loading Information placard located on
the driver’s door B-pillar. It provides best
handling, tread life and riding comfort.
Supplemental information pertaining to
special driving situations can be found on the
tire inflation pressure label on the inside of
the fuel filler flap.
Rim
A metal support for a tire or a tire and tube
assembly upon which the tire beads are
seated.
Sidewall
The portion of a tire between the tread and
the bead.
TIN (Tire Identification Number)
Unique identifier which facilitates efforts by
tire manufacturers to notify purchasers in
recall situations or other safety matters
concerning tires and gives purchasers the
means to easily identify such tires. The TIN is
comprised of “Manufacturer’s identification
mark”, “Tire size”, “Tire type code” and “Date
of manufacture”.
Tire ply composition and material used
This indicates the number of plies or the
number of layers of rubber-coated fabric in
the tire tread and sidewall. Tire
manufacturers also must indicate the ply
materials in the tire and sidewall, which
include steel, nylon, polyester, and others.
Tire speed rating
Part of tire designation (speed symbol);
indicates the speed range for which a tire is
approved.
Total load limit
Rated cargo and luggage load plus
68 kilograms (150 lb) times the vehicle’s
designated seating capacity.
Traction
The adhesive friction of a tire on a surface on
which it moves. The amount of grip provided.
256Tires and wheelsOperation
X164_AKB; 5; 31, en-USd2ureepe,Version: 2.11.8.12009-09-11T12:30:16+02:00 - Seite 256
Page 265 of 380
We recommend that you start out with easy
off-road travel.
Special driving features for off-road
driving
The following driving features are available for
specific kind of operation:
R Off-road ABS ( Y page 63)
R Off-road ESP ®
(Y page 65)
R Off-road 4-ETS ( Y page 64)
R Hill-start assist system ( Y page 117)
R LOW RANGE mode ( Y page 120)
R Differential locks ( Y page 121)
R Downhill Speed Regulation (DSR)
( Y page 155)
R Off-road driving program (Vehicles without
enhanced off-road package) ( Y page 158)
R Air suspension program ( Y page 159)
Off-road driving rules
R Engage the off-road driving program
( Y page 158) or LOW RANGE mode
( Y page 120) before driving under off-road
conditions.
R If necessary, activate differential locks
( Y page 121).
R Make sure you select a vehicle level
( Y page 159) appropriate to the
topographical conditions. Always make
sure the vehicle has enough ground
clearance.
R Fasten items being carried as securely as
possible ( Y page 194).
R Always navigate gradients with the engine
on and with the transmission engaged in a
gear. Switch on the DSR ( Y page 155) to
help maintain a preset speed.
! Observe the following during off-road
driving:
R Keep doors, tailgate, windows, and tilt/
sliding sunroof closed whenever driving
off-road.
R Adjust vehicle speed to condition of
terrain. The more uneven, rutty and
steeper the terrain, the lower the speed
should be. Drive through water slowly at
an even speed, avoiding a bow wave.
R Be especially careful when driving in
unknown territory. It may be necessary
to get out of the vehicle and scout the
path you intend to take.
R Watch out for obstacles, such as rocks,
holes, tree stumps and ruts.
R Before driving through water, determine
its depth.
R Do not stop vehicle while immersed in
water, and do not shut off the engine.
R In sandy soil, drive at a steady speed as
allowed by conditions. This helps
overcome the vehicle rolling resistance
and reduces the likelihood of the vehicle
sinking into the ground.
R Do not initiate jumps with the vehicle. It
interrupts the forward momentum of the
vehicle.
R Always drive onto slopes with the engine
running and the vehicle in gear.
R Do not shift automatic transmission into
neutral position N.GWarning!
Do not reduce the tire inflation pressure
before driving through sand. However, if you
do so, remember to correct the tire inflation
pressure before continuing your trip. Driving
with reduced tire inflation pressure increases
the risk of losing control of the vehicle and
rolling over.
Driving instructions263OperationX164_AKB; 5; 31, en-USd2ureepe,Version: 2.11.8.12009-09-11T12:30:16+02:00 - Seite 263Z
Page 277 of 380
damage not covered by the Mercedes-Benz
Limited Warranty.
Vehicle care
Cleaning and care of the vehicle
Notes
Regular and proper care will help to maintain
the value of your vehicle.
GWarning!
Many cleaning products can be hazardous.
Some are poisonous, others are flammable.
Always follow the instructions on the
particular container. Always open your
vehicle’s doors or windows when cleaning the
inside.
Never use fluids or solvents that are not
designed for cleaning your vehicle.
Always lock away cleaning products and keep
them out of reach of children.
! When cleaning the vehicle, do not use
scouring agents. Never apply strong force
and only use a soft, wet cloth or sponge.
Otherwise you may scratch or damage the
surface to be cleaned.
While in operation, even while parked, your
vehicle is subjected to varying external
influences which, if gone unchecked, can
attack the paintwork as well as the vehicle
underbody and cause lasting damage.
Such damage is caused not only by extreme
and varying climatic conditions, but also by:
R Air pollution
R Road salt
R Tar
R Gravel and stone chipping
To avoid paint damage, you should
immediately remove:
R Grease and oil
R Fuel
R
Coolant
R Brake fluid
R Bird droppings
R Insects
R Tree resins etc.
Frequent washing reduces and/or eliminates
the aggressiveness and potency of the above
adverse influences.
More frequent washings are necessary to
deal with unfavorable conditions:
R near the ocean
R in industrial areas (smoke, exhaust
emissions)
R during winter operation
You should check your vehicle from time to
time for stone chipping or other damage. Any
damage should be repaired as soon as
possible to prevent corrosion.
In doing so, do not neglect the underbody of
the vehicle. A prerequisite for a thorough
check is a washing of the underbody followed
by a thorough inspection. Damaged areas
need to be re-undercoated.
Your vehicle has been treated at the factory
with a wax-base rustproofing in the body
cavities which will last for the lifetime of the
vehicle. Post-production treatment is neither
necessary nor recommended by Mercedes-
Benz because of the possibility of
incompatibility between materials used in the
production process and others applied later.
We have selected vehicle-care products and
compiled recommendations which are
specially matched to our vehicles and which
always reflect the latest technology. You can
obtain Mercedes-Benz approved vehicle-care
products at an authorized Mercedes-Benz
Center.
Scratches, corrosive deposits, corrosion or
damage due to negligent or incorrect care
cannot always be removed or repaired with
the vehicle-care products recommendedVehicle care275OperationX164_AKB; 5; 31, en-USd2ureepe,Version: 2.11.8.12009-09-11T12:30:16+02:00 - Seite 275Z