2010 MERCEDES-BENZ GL550 parking lamp
[x] Cancel search: parking lampPage 139 of 380
RParking lamps
RTail lamps
RLicense plate lamps
RSide marker lamps
RFront fog lamps
The locator lighting goes out when the driver’s
door is opened.
If you do not open the driver’s door after
unlocking the vehicle with the SmartKey, the
lamps will go out automatically after
approximately 40 seconds.
XPress button V or U repeatedly until
the Settings menu appears in the
multifunction display.
XPress button &.XMove the selection marker with button
W or X to the Lighting submenu.
XPress button & or * repeatedly until
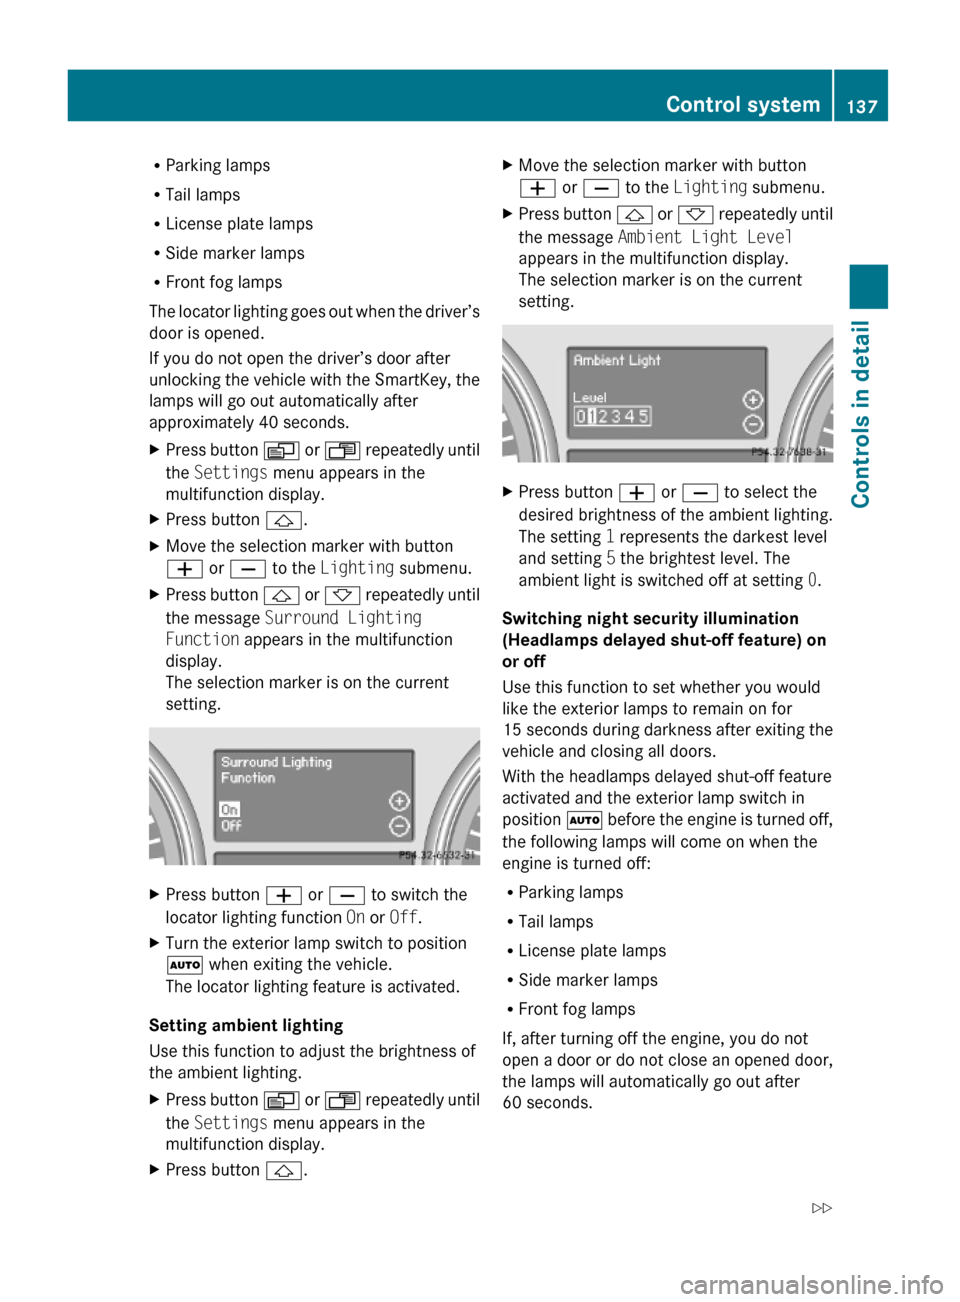
the message Surround Lighting
Function appears in the multifunction
display.
The selection marker is on the current
setting.
XPress button W or X to switch the
locator lighting function On or Off.
XTurn the exterior lamp switch to position
à when exiting the vehicle.
The locator lighting feature is activated.
Setting ambient lighting
Use this function to adjust the brightness of
the ambient lighting.
XPress button V or U repeatedly until
the Settings menu appears in the
multifunction display.
XPress button &.XMove the selection marker with button
W or X to the Lighting submenu.
XPress button & or * repeatedly until
the message Ambient Light Level
appears in the multifunction display.
The selection marker is on the current
setting.
XPress button W or X to select the
desired brightness of the ambient lighting.
The setting 1 represents the darkest level
and setting 5 the brightest level. The
ambient light is switched off at setting 0.
Switching night security illumination
(Headlamps delayed shut-off feature) on
or off
Use this function to set whether you would
like the exterior lamps to remain on for
15 seconds during darkness after exiting the
vehicle and closing all doors.
With the headlamps delayed shut-off feature
activated and the exterior lamp switch in
position à before the engine is turned off,
the following lamps will come on when the
engine is turned off:
RParking lamps
RTail lamps
RLicense plate lamps
RSide marker lamps
RFront fog lamps
If, after turning off the engine, you do not
open a door or do not close an opened door,
the lamps will automatically go out after
60 seconds.
Control system137Controls in detailX164_AKB; 5; 31, en-USd2ureepe,Version: 2.11.8.12009-09-11T12:30:16+02:00 - Seite 137Z
Page 157 of 380
have not yet been detected by the Distronic.
There will be insufficient distance to the
preceding vehicles.
Distance warning function
This function warns you at a vehicle speed of
above approximately 20 mph (30 km/h) in
the following cases:
R At the current speed, the distance between
your vehicle and the preceding vehicle is
too low for several seconds. The distance
warning lamp · in the instrument
cluster comes on.
R You are gaining on a preceding vehicle
rapidly. An intermittent warning sounds
and the distance warning lamp · in the
instrument cluster comes on.
If these warnings are issued, you must apply
the brakes to maintain a safe distance and
avoid a collision with the preceding vehicle.
When depressing the brake pedal, the
warning sound ceases. The warning sound
will also cease when the distance to the
preceding vehicle is sufficient again without
applying the brakes. In this case, the distance
warning lamp · will also go out.
GWarning!
If the distance warning lamp · in the
instrument cluster comes on while driving
and/or an intermittent warning sounds,
immediate attention on the part of the driver
is required. As required by the traffic
situation, apply the brakes and navigate
around a possible obstacle. However, do not
drive by relying on the distance warning
function, as this will result in an emergency
braking application. This will not always
enable you to avoid a collision, especially
when traveling on varying road surface
conditions and with varying driver reaction.
Complex driving situations are not always
fully recognized by the distance warning
function. This could result in wrong or missing
distance warnings.
XActivating/deactivating: Activate or
deactivate the distance warning function in
the control system ( Y page 140).
When activated, the distance warning
function indicator Ä appears in the
multifunction display.
Hill-start assist system
GWarning!
The hill-start assist system is not designed to
function as a parking brake. It does not
prevent the vehicle from moving when parked
on an incline.
Always engage the parking brake in addition
to shifting the automatic transmission into
park position P.
On uphill grades, the hill-start assist system
maintains the pressure in the brake system
for approximately 1 second after you have
released the brake pedal. Therefore, you can
start off smoothly without the vehicle moving
immediately after releasing the brake pedal.
XDepress the brake pedal.XShift the automatic transmission into drive
position D or reverse gear R.XRelease the brake pedal.XCarefully depress the accelerator pedal.
The hill-start assist system is inactive
R when starting off on a level road or downhill
grades
R with the automatic transmission in neutral
position N
R with the parking brake engaged
R if the ESP ®
has switched off due to a
malfunction
Downhill Speed Regulation (DSR)
For information on off-road driving, see “Off-
road driving” ( Y page 262).
Driving systems155Controls in detailX164_AKB; 5; 31, en-USd2ureepe,Version: 2.11.8.12009-09-11T12:30:16+02:00 - Seite 155Z
Page 168 of 380
iThe message can be cleared by pressing
the V, U, & or * button on
the multifunction steering wheel.
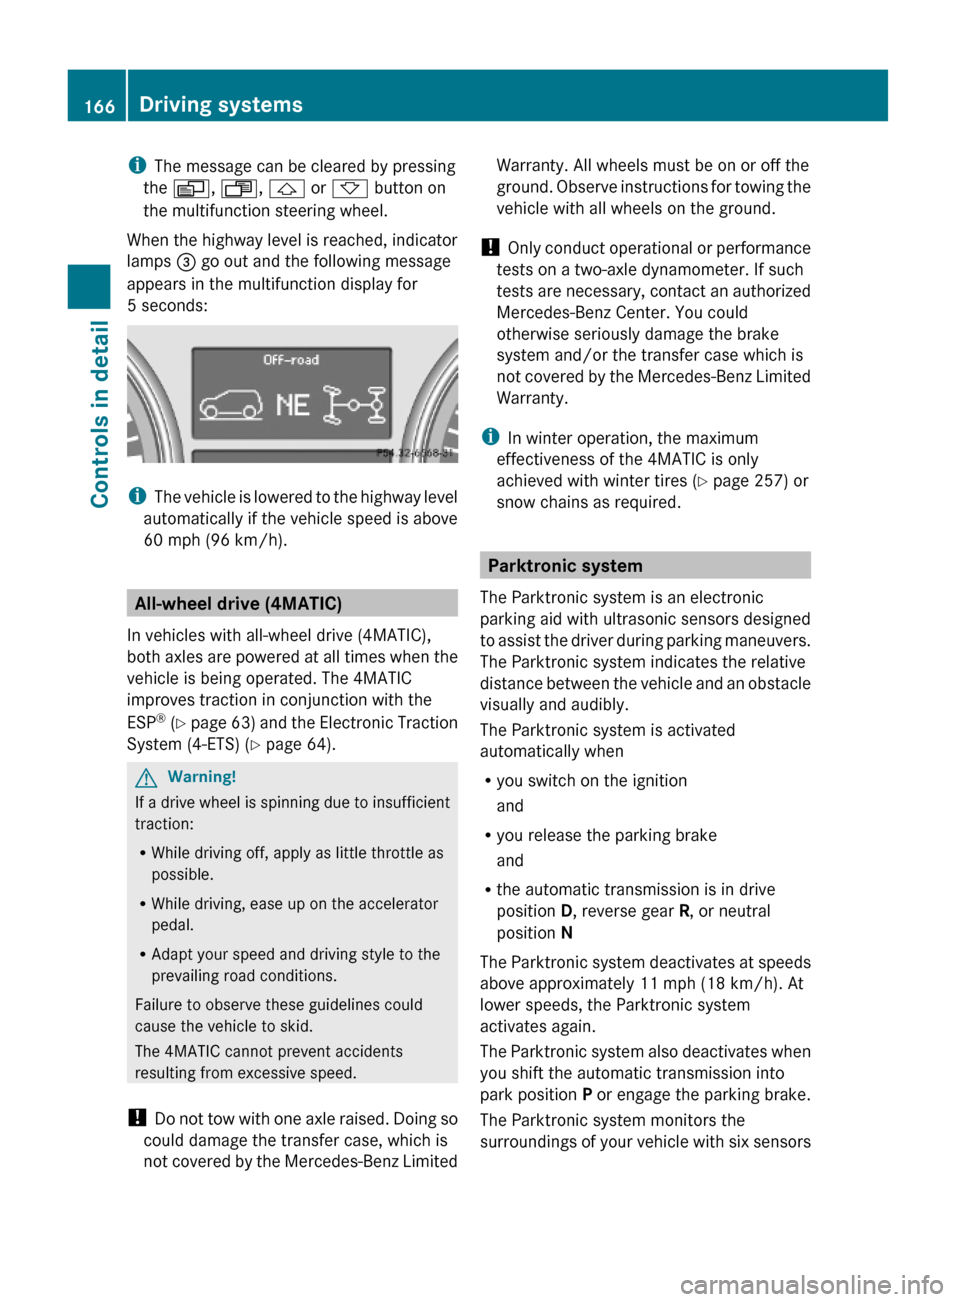
When the highway level is reached, indicator
lamps = go out and the following message
appears in the multifunction display for
5 seconds:
iThe vehicle is lowered to the highway level
automatically if the vehicle speed is above
60 mph (96 km/h).
All-wheel drive (4MATIC)
In vehicles with all-wheel drive (4MATIC),
both axles are powered at all times when the
vehicle is being operated. The 4MATIC
improves traction in conjunction with the
ESP® (Y page 63) and the Electronic Traction
System (4-ETS) (Y page 64).
GWarning!
If a drive wheel is spinning due to insufficient
traction:
RWhile driving off, apply as little throttle as
possible.
RWhile driving, ease up on the accelerator
pedal.
RAdapt your speed and driving style to the
prevailing road conditions.
Failure to observe these guidelines could
cause the vehicle to skid.
The 4MATIC cannot prevent accidents
resulting from excessive speed.
! Do not tow with one axle raised. Doing so
could damage the transfer case, which is
not covered by the Mercedes-Benz Limited
Warranty. All wheels must be on or off the
ground. Observe instructions for towing the
vehicle with all wheels on the ground.
! Only conduct operational or performance
tests on a two-axle dynamometer. If such
tests are necessary, contact an authorized
Mercedes-Benz Center. You could
otherwise seriously damage the brake
system and/or the transfer case which is
not covered by the Mercedes-Benz Limited
Warranty.
iIn winter operation, the maximum
effectiveness of the 4MATIC is only
achieved with winter tires (Y page 257) or
snow chains as required.
Parktronic system
The Parktronic system is an electronic
parking aid with ultrasonic sensors designed
to assist the driver during parking maneuvers.
The Parktronic system indicates the relative
distance between the vehicle and an obstacle
visually and audibly.
The Parktronic system is activated
automatically when
Ryou switch on the ignition
and
Ryou release the parking brake
and
Rthe automatic transmission is in drive
position D, reverse gear R, or neutral
position N
The Parktronic system deactivates at speeds
above approximately 11 mph (18 km/h). At
lower speeds, the Parktronic system
activates again.
The Parktronic system also deactivates when
you shift the automatic transmission into
park position P or engage the parking brake.
The Parktronic system monitors the
surroundings of your vehicle with six sensors
166Driving systemsControls in detail
X164_AKB; 5; 31, en-USd2ureepe,Version: 2.11.8.12009-09-11T12:30:16+02:00 - Seite 166
Page 171 of 380

Vehicle without enhanced off-road package
Vehicle with enhanced off-road package
XSwitching off: Press Parktronic
switch :.
Indicator lamp ; comes on.
XSwitching on: Press Parktronic switch :
again.
Trailer towing
The rear Parktronic sensors will be
deactivated when you have established the
electrical connection between your vehicle
and the trailer you are about to tow.
! The distance between the sensors in the
bumpers and an obstacle is referred to as
the minimum range of the Parktronic. A
trailer hitch will reduce the distance to an
obstacle. Keep this in mind to avoid any
damage.
Parktronic system malfunction
There is a malfunction in the Parktronic
system, if only the red distance segments
illuminate and an acoustic warning sounds.
The Parktronic system will switch off
automatically after 20 seconds and indicator
lamp ; in Parktronic switch : comes on.
XHave the Parktronic system checked at an
authorized Mercedes-Benz Center as soon
as possible.
If only the red distance segments illuminate
and no acoustic warning sounds, the
Parktronic system sensors are dirty (e.g. dirt,
ice, snow and slush). Another cause could be
interference from other radio or ultrasonic
signals (e.g. truck air brakes, car wash, or
jackhammers). The Parktronic system will
switch off automatically after 20 seconds and
indicator lamp ; in Parktronic switch :
comes on.
XSwitch off the ignition.XClean the Parktronic system sensors
(Y page 278).
XSwitch on the ignition.
or
XCheck the Parktronic system operation at
another location to rule out interference
from outside radio or ultrasonic signals.
Rear view camera
The rear view camera is an optical parking aid.
The area behind the vehicle appears in the
COMAND system display as a mirror image,
like in the rear view mirror.
In addition, the rear view camera contains
guidelines to help you with driving in reverse.
GWarning!
Make sure no persons or animals are in or
near the area in which you are parking/
maneuvering. Otherwise, they could be
injured.
Driving systems169Controls in detailX164_AKB; 5; 31, en-USd2ureepe,Version: 2.11.8.12009-09-11T12:30:16+02:00 - Seite 169Z
Page 262 of 380
Steering and braking requires significantly
more effort and you could lose control of the
vehicle and cause an accident as a result.
Do not turn off the engine while the vehicle is
in motion.
Brakes
Downhill grades
! When driving down long and steep
grades, relieve the load on the brakes by
shifting into a lower gear to use the
engine’s braking power. This helps prevent
overheating of the brakes and reduces
wear.
When using the engine’s braking power, a
drive wheel may not spin for an extended
period of time, e.g. on slippery road
surfaces. This may cause serious damage
to the drivetrain which is not covered by the
Mercedes-Benz Limited Warranty.
Continuous or hard braking
GWarning!
Resting your foot on the brake pedal will
cause excessive and premature wear of the
brake pads.
It can also result in the brakes overheating,
thereby significantly reducing their
effectiveness. It may not be possible to stop
the vehicle in sufficient time to avoid an
accident.
After hard braking, it is advisable to drive on
for some time, rather than immediately park,
so that the air stream will cool down the
brakes faster.
Wet roads
GWarning!
After driving in heavy rain for some time
without applying the brakes or through water
deep enough to wet brake components, the
first braking action may be somewhat
reduced and increased pedal pressure may be
necessary to obtain expected brake effect.
Maintain a safe distance from vehicles in
front.
To help prevent brake disk corrosion after
driving on wet or salt-covered roads, it is
advisable to brake the vehicle with
considerable force prior to parking. The heat
generated serves to dry the brakes.
Salt-covered roadsGWarning!
A layer of salt on the brake discs and the brake
linings may cause a delay in the braking
effect, resulting in a significantly increased
braking distance, which could lead to an
accident.
To avoid this danger, you should:
R occasionally brake carefully when you are
driving on salt-covered roads, so that any
layer of salt that may have built up on the
brake discs and the brake linings is
removed without putting other road users
at risk
R maintain a greater distance to the vehicle
ahead and drive with particular care
R carefully apply the brakes at the end of a
trip and immediately after commencing a
new trip, so that salt residues are removed
from the brake disc
Brake service
! The brake fluid level in the reservoir may
be too low if the brake warning lamp in the
instrument cluster comes on and an
acoustic warning sounds although the
parking brake is released. Observe
additional messages in the multifunction
display that may appear.
Brake pad wear or a leak in the system may
be the reason for low brake fluid in the
reservoir.
260Driving instructionsOperation
X164_AKB; 5; 31, en-USd2ureepe,Version: 2.11.8.12009-09-11T12:30:16+02:00 - Seite 260
Page 293 of 380
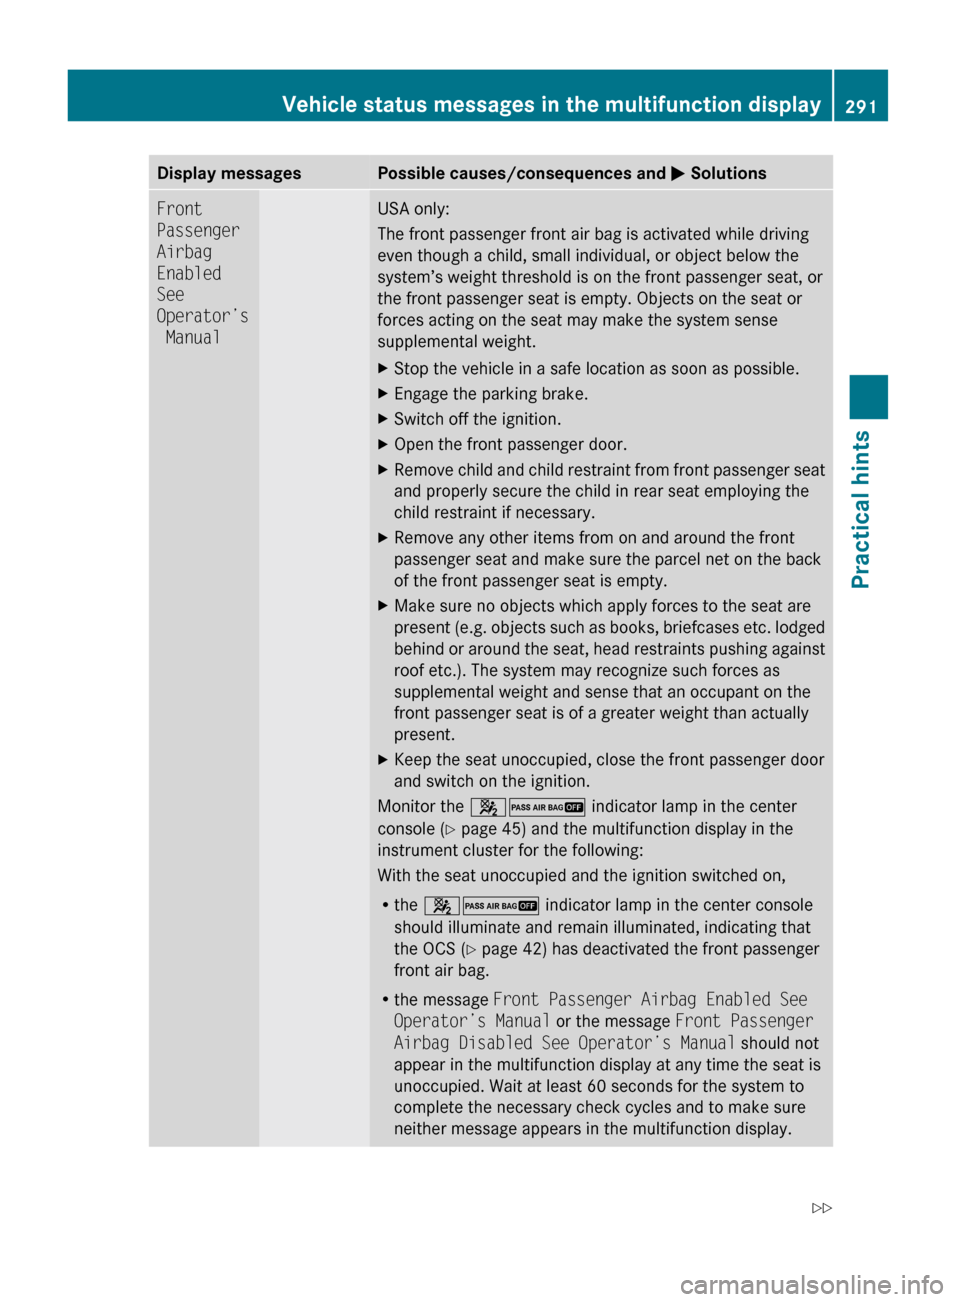
Display messagesPossible causes/consequences and M SolutionsFront
Passenger
Airbag
Enabled
See
Operator’s
ManualUSA only:
The front passenger front air bag is activated while driving
even though a child, small individual, or object below the
system’s weight threshold is on the front passenger seat, or
the front passenger seat is empty. Objects on the seat or
forces acting on the seat may make the system sense
supplemental weight.XStop the vehicle in a safe location as soon as possible.XEngage the parking brake.XSwitch off the ignition.XOpen the front passenger door.XRemove child and child restraint from front passenger seat
and properly secure the child in rear seat employing the
child restraint if necessary.XRemove any other items from on and around the front
passenger seat and make sure the parcel net on the back
of the front passenger seat is empty.XMake sure no objects which apply forces to the seat are
present (e.g. objects such as books, briefcases etc. lodged
behind or around the seat, head restraints pushing against
roof etc.). The system may recognize such forces as
supplemental weight and sense that an occupant on the
front passenger seat is of a greater weight than actually
present.XKeep the seat unoccupied, close the front passenger door
and switch on the ignition.
Monitor the 42 indicator lamp in the center
console ( Y page 45) and the multifunction display in the
instrument cluster for the following:
With the seat unoccupied and the ignition switched on,
R the 42 indicator lamp in the center console
should illuminate and remain illuminated, indicating that
the OCS ( Y page 42) has deactivated the front passenger
front air bag.
R the message Front Passenger Airbag Enabled See
Operator’s Manual or the message Front Passenger
Airbag Disabled See Operator’s Manual should not
appear in the multifunction display at any time the seat is
unoccupied. Wait at least 60 seconds for the system to
complete the necessary check cycles and to make sure
neither message appears in the multifunction display.
Vehicle status messages in the multifunction display291Practical hintsX164_AKB; 5; 31, en-USd2ureepe,Version: 2.11.8.12009-09-11T12:30:16+02:00 - Seite 291Z
Page 295 of 380
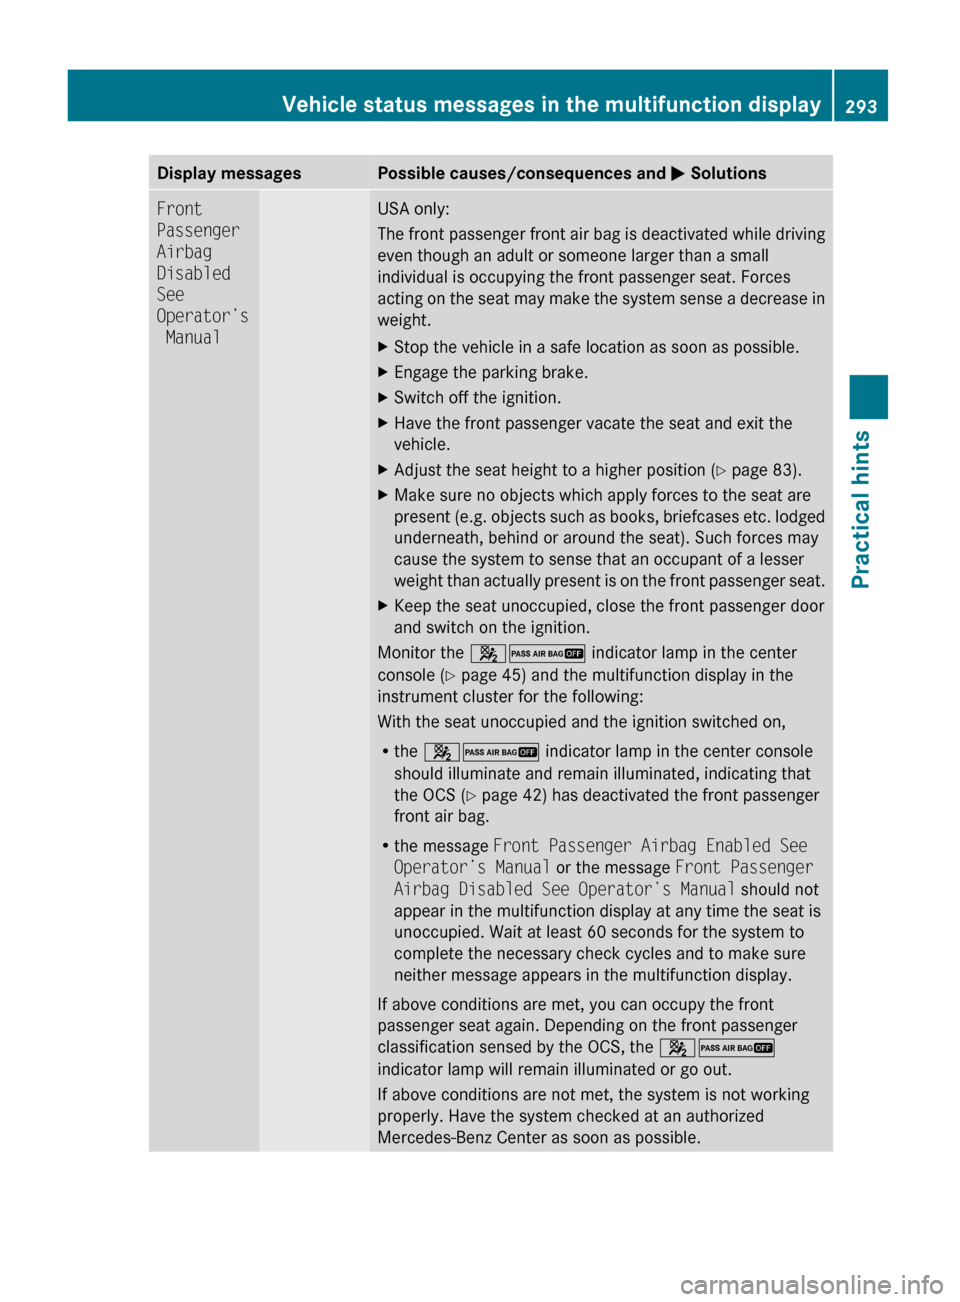
Display messagesPossible causes/consequences and M SolutionsFront
Passenger
Airbag
Disabled
See
Operator’s
ManualUSA only:
The front passenger front air bag is deactivated while driving
even though an adult or someone larger than a small
individual is occupying the front passenger seat. Forces
acting on the seat may make the system sense a decrease in
weight.XStop the vehicle in a safe location as soon as possible.XEngage the parking brake.XSwitch off the ignition.XHave the front passenger vacate the seat and exit the
vehicle.XAdjust the seat height to a higher position ( Y page 83).XMake sure no objects which apply forces to the seat are
present (e.g. objects such as books, briefcases etc. lodged
underneath, behind or around the seat). Such forces may
cause the system to sense that an occupant of a lesser
weight than actually present is on the front passenger seat.XKeep the seat unoccupied, close the front passenger door
and switch on the ignition.
Monitor the 42 indicator lamp in the center
console ( Y page 45) and the multifunction display in the
instrument cluster for the following:
With the seat unoccupied and the ignition switched on,
R the 42 indicator lamp in the center console
should illuminate and remain illuminated, indicating that
the OCS ( Y page 42) has deactivated the front passenger
front air bag.
R the message Front Passenger Airbag Enabled See
Operator’s Manual or the message Front Passenger
Airbag Disabled See Operator’s Manual should not
appear in the multifunction display at any time the seat is
unoccupied. Wait at least 60 seconds for the system to
complete the necessary check cycles and to make sure
neither message appears in the multifunction display.
If above conditions are met, you can occupy the front
passenger seat again. Depending on the front passenger
classification sensed by the OCS, the 42
indicator lamp will remain illuminated or go out.
If above conditions are not met, the system is not working
properly. Have the system checked at an authorized
Mercedes-Benz Center as soon as possible.
Vehicle status messages in the multifunction display293Practical hintsX164_AKB; 5; 31, en-USd2ureepe,Version: 2.11.8.12009-09-11T12:30:16+02:00 - Seite 293Z
Page 313 of 380
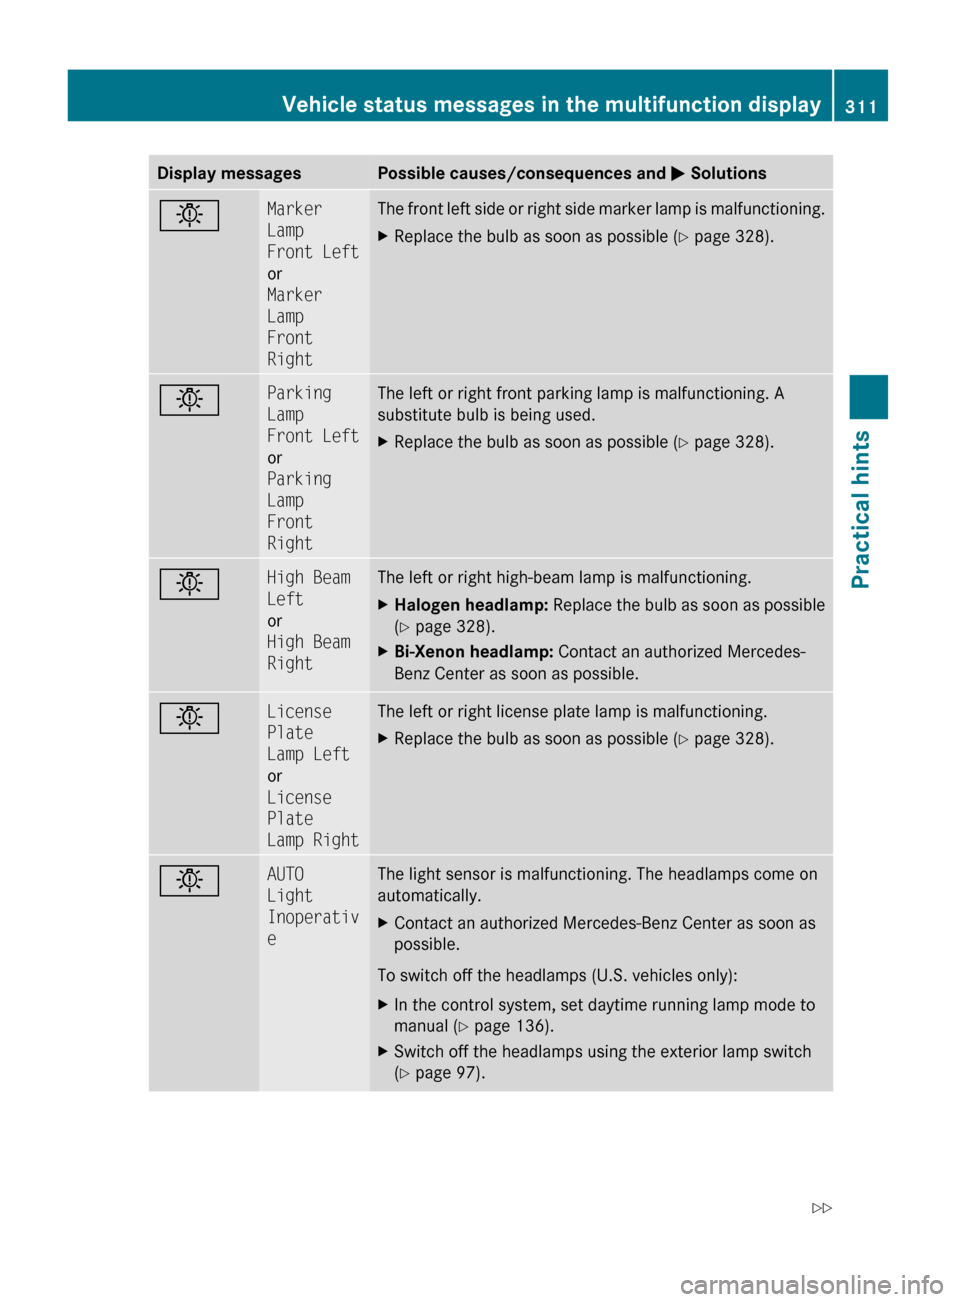
Display messagesPossible causes/consequences and M SolutionsbMarker
Lamp
Front Left
or
Marker
Lamp
Front
RightThe front left side or right side marker lamp is malfunctioning.XReplace the bulb as soon as possible ( Y page 328).bParking
Lamp
Front Left
or
Parking
Lamp
Front
RightThe left or right front parking lamp is malfunctioning. A
substitute bulb is being used.XReplace the bulb as soon as possible ( Y page 328).bHigh Beam
Left
or
High Beam
RightThe left or right high-beam lamp is malfunctioning.XHalogen headlamp: Replace the bulb as soon as possible
( Y page 328).XBi-Xenon headlamp: Contact an authorized Mercedes-
Benz Center as soon as possible.bLicense
Plate
Lamp Left
or
License
Plate
Lamp RightThe left or right license plate lamp is malfunctioning.XReplace the bulb as soon as possible ( Y page 328).bAUTO
Light
Inoperativ
eThe light sensor is malfunctioning. The headlamps come on
automatically.XContact an authorized Mercedes-Benz Center as soon as
possible.
To switch off the headlamps (U.S. vehicles only):
XIn the control system, set daytime running lamp mode to
manual ( Y page 136).XSwitch off the headlamps using the exterior lamp switch
( Y page 97).Vehicle status messages in the multifunction display311Practical hintsX164_AKB; 5; 31, en-USd2ureepe,Version: 2.11.8.12009-09-11T12:30:16+02:00 - Seite 311Z