2010 MERCEDES-BENZ GL550 sensor
[x] Cancel search: sensorPage 44 of 380
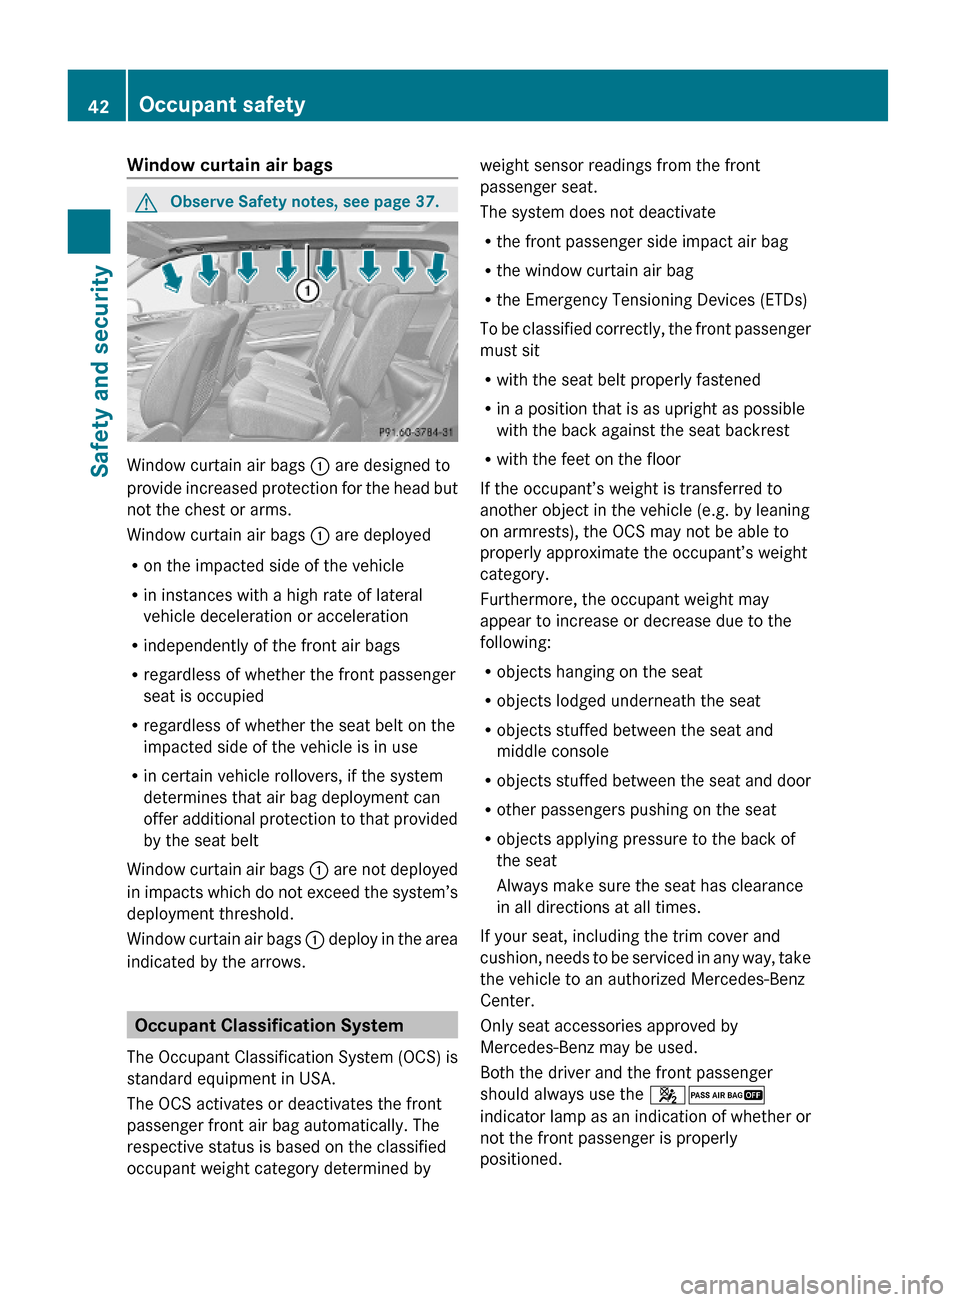
Window curtain air bags GObserve Safety notes, see page 37.
Window curtain air bags : are designed to
provide increased protection for the head but
not the chest or arms.
Window curtain air bags : are deployed
Ron the impacted side of the vehicle
Rin instances with a high rate of lateral
vehicle deceleration or acceleration
Rindependently of the front air bags
Rregardless of whether the front passenger
seat is occupied
Rregardless of whether the seat belt on the
impacted side of the vehicle is in use
Rin certain vehicle rollovers, if the system
determines that air bag deployment can
offer additional protection to that provided
by the seat belt
Window curtain air bags : are not deployed
in impacts which do not exceed the system’s
deployment threshold.
Window curtain air bags : deploy in the area
indicated by the arrows.
Occupant Classification System
The Occupant Classification System (OCS) is
standard equipment in USA.
The OCS activates or deactivates the front
passenger front air bag automatically. The
respective status is based on the classified
occupant weight category determined by
weight sensor readings from the front
passenger seat.
The system does not deactivate
Rthe front passenger side impact air bag
Rthe window curtain air bag
Rthe Emergency Tensioning Devices (ETDs)
To be classified correctly, the front passenger
must sit
Rwith the seat belt properly fastened
Rin a position that is as upright as possible
with the back against the seat backrest
Rwith the feet on the floor
If the occupant’s weight is transferred to
another object in the vehicle (e.g. by leaning
on armrests), the OCS may not be able to
properly approximate the occupant’s weight
category.
Furthermore, the occupant weight may
appear to increase or decrease due to the
following:
Robjects hanging on the seat
Robjects lodged underneath the seat
Robjects stuffed between the seat and
middle console
Robjects stuffed between the seat and door
Rother passengers pushing on the seat
Robjects applying pressure to the back of
the seat
Always make sure the seat has clearance
in all directions at all times.
If your seat, including the trim cover and
cushion, needs to be serviced in any way, take
the vehicle to an authorized Mercedes-Benz
Center.
Only seat accessories approved by
Mercedes-Benz may be used.
Both the driver and the front passenger
should always use the 42
indicator lamp as an indication of whether or
not the front passenger is properly
positioned.
42Occupant safetySafety and security
X164_AKB; 5; 31, en-USd2ureepe,Version: 2.11.8.12009-09-11T12:30:16+02:00 - Seite 42
Page 45 of 380
GWarning!
If the 42 indicator lamp
illuminates when an adult or someone larger
than a small individual is in the front
passenger seat, have the front passenger
reposition himself or herself in the seat until
the 42 indicator lamp goes out,
or check whether objects are caught under or
around the seat.
In the event of a collision, the air bag control
unit will not allow front passenger front air bag
deployment when the OCS has classified the
front passenger seat occupant as weighting
as much as or less than a typical 12-month-
old child in a standard child restraint or if the
front passenger seat is classified as being
empty.
When the OCS senses that the front
passenger seat occupant is classified as
being up to or less than the weight of a typical
12-month-old child in a standard child
restraint, the 42 indicator lamp
will illuminate when the engine is started and
remain illuminated, indicating that the front
passenger front air bag is deactivated.
When the OCS senses that the front
passenger seat is classified as being empty,
the 42 indicator lamp will
illuminate when the engine is started and
remain illuminated, indicating that the front
passenger front air bag is deactivated.
When the OCS senses that the front
passenger seat occupant is classified as
being heavier than the weight of a typical
12-month-old child seated in a standard child
restraint or as being a small individual (such
as a young teenager or a small adult), the
42 indicator lamp will illuminate
for approximately 6 seconds when the engine
is started and then, depending on occupant
weight sensor readings from the seat, remain
illuminated or go out. With the
42 indicator lamp illuminated,
the front passenger front air bag is
deactivated. With the 42
indicator lamp out, the front passenger front
air bag is activated.
When the OCS senses that the front
passenger seat occupant is classified as an
adult or someone larger than a small
individual, the 42 indicator lamp
will illuminate for approximately 6 seconds
when the engine is started and then goes out,
indicating that the front passenger front air
bag is activated.
If the 42 indicator lamp is
illuminated, the front passenger front air bag
is deactivated and will not be deployed.
If the 42 indicator lamp is not
illuminated, the front passenger front air bag
is activated and will be deployed
R in the event of certain frontal impacts
R if impact exceeds a preset deployment
threshold
R independently of the side impact air bags
If the front passenger front air bag is
deployed, the rate of inflation will be
influenced by
R the rate of relevant vehicle deceleration as
assessed by the air bag control unit
R the front passenger’s weight category as
identified by the OCS
For more information on air bag display
messages in the multifunction display, see
( Y page 291).GWarning!
According to accident statistics, children are
safer when properly restrained in the rear
seating positions than in the front seating
position. Thus, we strongly recommend that
children be placed in the rear seats whenever
possible. Regardless of seating position,
children 12 years old and under must be
seated and properly secured in an appropriate
infant restraint, toddler restraint, or booster
seat recommended for the size and weight of
the child.
Occupant safety43Safety and securityX164_AKB; 5; 31, en-USd2ureepe,Version: 2.11.8.12009-09-11T12:30:16+02:00 - Seite 43Z
Page 96 of 380

Interior rear view mirror, antiglare
position
XTilt the mirror to the antiglare position by
moving lever : towards the windshield.
The interior rear view mirror is dimmed.
Exterior rear view mirrors
GWarning!
Exercise care when using the passenger-side
exterior rear view mirror. The mirror surface
is convex (outwardly curved surface for a
wider field of view). Objects in mirror are
closer than they appear. Check your interior
rear view mirror and glance over your
shoulder before changing lanes.
XSwitch on the ignition.XPress button : for the driver’s side
exterior rear view mirror or button = for
the passenger-side exterior rear view
mirror.
The indicator lamp in the respective button
comes on for approximately 15 seconds.
If you do not make adjustments to the
selected exterior rear view mirror within
15 seconds, the indicator lamp goes out.
You will then have to select the desired
exterior rear view mirror again before
adjustments can be made. Adjustments
can only be made with the indicator lamp
for the respective exterior rear view mirror
button illuminated.
XPress adjustment button ; up, down, left
or right according to the desired setting.
! If an exterior rear view mirror was forcibly
hit from the front, manually snap it back
into place.
! Vehicle with power-folding exterior rear
view mirrors:
If an exterior rear view mirror housing is
forcibly pushed forward (hit from the rear)
or forcibly pushed rearward (hit from front),
press fold button to fold mirrors in, then
press fold button again to fold mirrors out.
Do not force mirrors by hand as this may
damage the adjustment mechanism.
The mirror housing is then properly
positioned and you can adjust the mirror in
the usual manner.
iAt low ambient temperatures, the exterior
rear view mirrors will be heated
automatically.
Auto-dimming rear view mirrors
The exterior rear view mirror on the driver’s
side and the interior rear view mirror will
respond automatically to glare when the
ignition is switched on and incoming light
from headlamps falls on the sensor in the
interior rear view mirror.
94MirrorsControls in detail
X164_AKB; 5; 31, en-USd2ureepe,Version: 2.11.8.12009-09-11T12:30:16+02:00 - Seite 94
Page 97 of 380
The rear view mirrors will not react if the
automatic transmission is set to reverse gear
R or the interior lighting is switched on.
GWarning!
The auto-dimming function does not react if
incoming light is not aimed directly at sensors
in the interior rear view mirror.
The interior rear view mirror and the exterior
rear view mirror on the driver’s side do not
react, for example, when transporting cargo
which covers the rear window.
Light hitting the mirror(s) at certain angles
(incident light) could blind you. As a result,
you may not be able to observe traffic
conditions and could cause an accident.
Exterior rear view mirror parking
position
For more convenient parking, you can set the
passenger-side exterior rear view mirror so
that you can see the rear wheel and the road
curb.
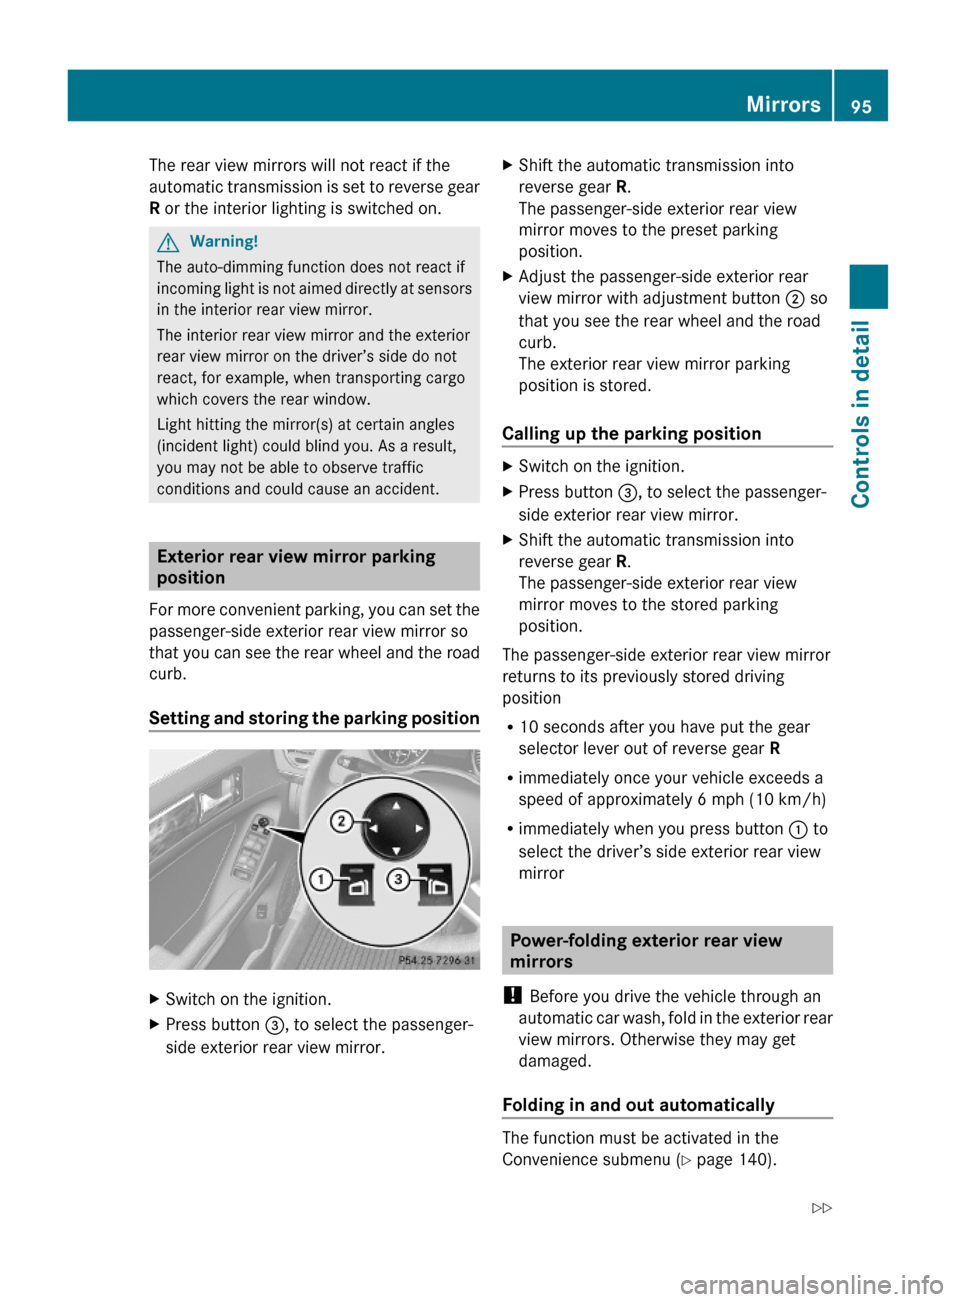
Setting and storing the parking position
XSwitch on the ignition.XPress button =, to select the passenger-
side exterior rear view mirror.
XShift the automatic transmission into
reverse gear R.
The passenger-side exterior rear view
mirror moves to the preset parking
position.
XAdjust the passenger-side exterior rear
view mirror with adjustment button ; so
that you see the rear wheel and the road
curb.
The exterior rear view mirror parking
position is stored.
Calling up the parking position
XSwitch on the ignition.XPress button =, to select the passenger-
side exterior rear view mirror.
XShift the automatic transmission into
reverse gear R.
The passenger-side exterior rear view
mirror moves to the stored parking
position.
The passenger-side exterior rear view mirror
returns to its previously stored driving
position
R10 seconds after you have put the gear
selector lever out of reverse gear R
Rimmediately once your vehicle exceeds a
speed of approximately 6 mph (10 km/h)
Rimmediately when you press button : to
select the driver’s side exterior rear view
mirror
Power-folding exterior rear view
mirrors
! Before you drive the vehicle through an
automatic car wash, fold in the exterior rear
view mirrors. Otherwise they may get
damaged.
Folding in and out automatically
The function must be activated in the
Convenience submenu (Y page 140).
Mirrors95Controls in detailX164_AKB; 5; 31, en-USd2ureepe,Version: 2.11.8.12009-09-11T12:30:16+02:00 - Seite 95Z
Page 105 of 380
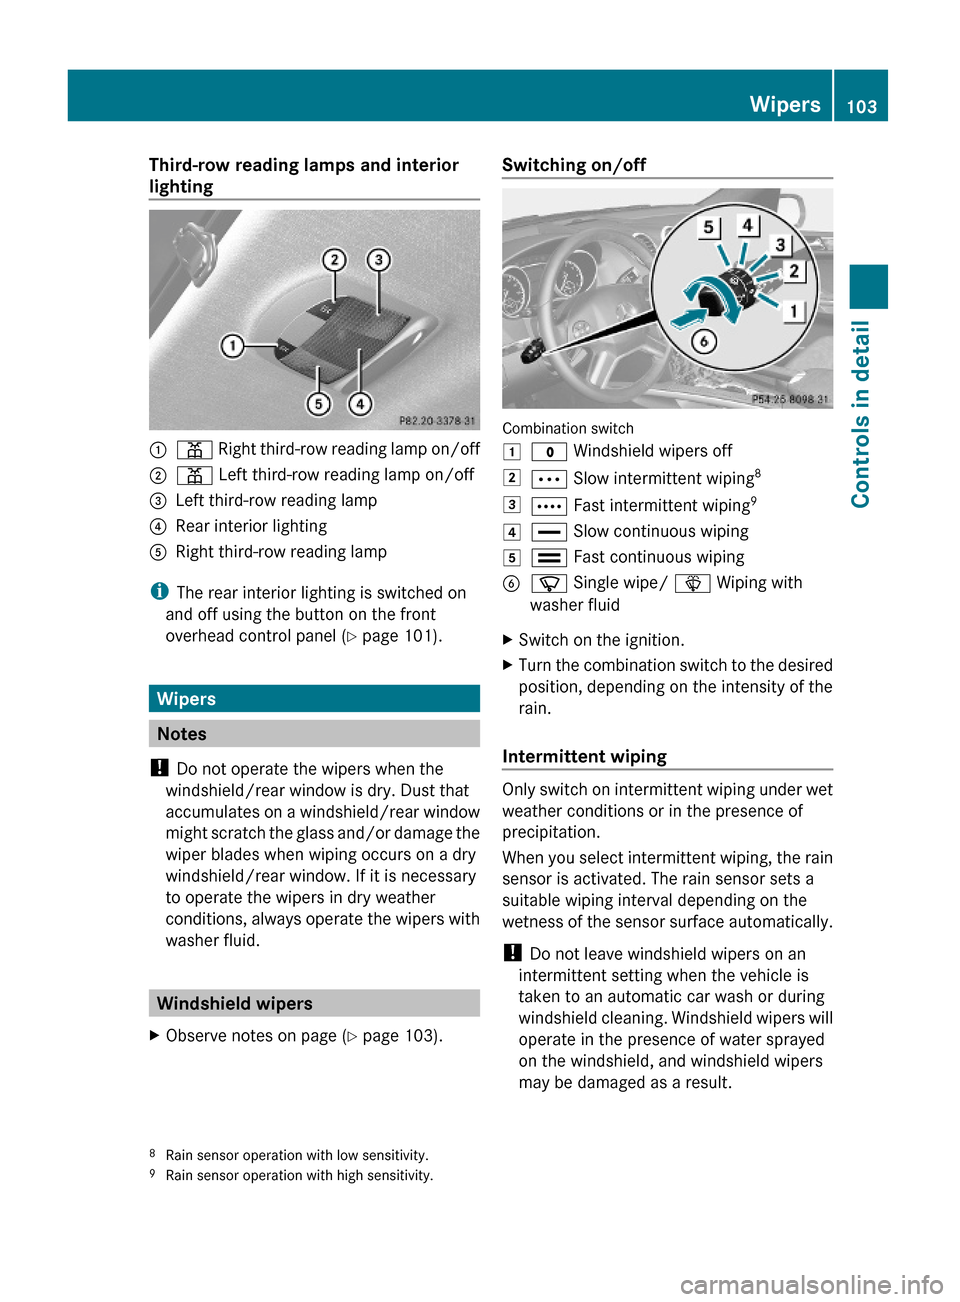
Third-row reading lamps and interior
lighting:p Right third-row reading lamp on/off;p Left third-row reading lamp on/off=Left third-row reading lamp?Rear interior lightingARight third-row reading lamp
iThe rear interior lighting is switched on
and off using the button on the front
overhead control panel (Y page 101).
Wipers
Notes
! Do not operate the wipers when the
windshield/rear window is dry. Dust that
accumulates on a windshield/rear window
might scratch the glass and/or damage the
wiper blades when wiping occurs on a dry
windshield/rear window. If it is necessary
to operate the wipers in dry weather
conditions, always operate the wipers with
washer fluid.
Windshield wipers
XObserve notes on page (Y page 103).Switching on/off
Combination switch
1$ Windshield wipers off2Ä Slow intermittent wiping83Å Fast intermittent wiping94° Slow continuous wiping5¯ Fast continuous wipingBí Single wipe/ î Wiping with
washer fluid
XSwitch on the ignition.XTurn the combination switch to the desired
position, depending on the intensity of the
rain.
Intermittent wiping
Only switch on intermittent wiping under wet
weather conditions or in the presence of
precipitation.
When you select intermittent wiping, the rain
sensor is activated. The rain sensor sets a
suitable wiping interval depending on the
wetness of the sensor surface automatically.
! Do not leave windshield wipers on an
intermittent setting when the vehicle is
taken to an automatic car wash or during
windshield cleaning. Windshield wipers will
operate in the presence of water sprayed
on the windshield, and windshield wipers
may be damaged as a result.
8Rain sensor operation with low sensitivity.9Rain sensor operation with high sensitivity.
Wipers103Controls in detailX164_AKB; 5; 31, en-USd2ureepe,Version: 2.11.8.12009-09-11T12:30:16+02:00 - Seite 103Z
Page 106 of 380
! If you have set intermittent wiping, dirt on
the surface of the rain sensor or optical
effects may cause the windshield wipers to
wipe in an undesired fashion. This could
then damage the windshield wiper blades
or scratch the windshield. You should
therefore switch off the windshield wipers
when weather conditions are dry.
XTurn the combination switch to position
Ä or Å.
After the initial wipe, pauses between
wipes are controlled by the rain sensor
automatically.
Intermittent wiping is interrupted when the
vehicle is at a standstill and a front door is
opened. This protects persons getting into or
out of the vehicle from being sprayed.
Intermittent wiping will be continued when all
doors are closed andRthe automatic transmission is in drive
position D or reverse gear R
or
Rthe wiper setting is changed using the
combination switch
Single wipe
XPress the combination switch briefly in
direction of arrow B to the resistance
point.
The windshield wipers wipe one time
without washer fluid.
Wiping with washer fluid
XPress the combination switch in direction
of arrow B past the resistance point.
The windshield wipers operate with washer
fluid.
iTo prevent smears on the windshield or
noisy/chattering wiper blades, wipe with
washer fluid every now and then even when
it is raining.
For information on filling up the washer
reservoir, see “Washer system and headlamp
cleaning system” (Y page 232).
For information on cleaning the headlamps
with washer fluid, see “Headlamp cleaning
system” (Y page 101).
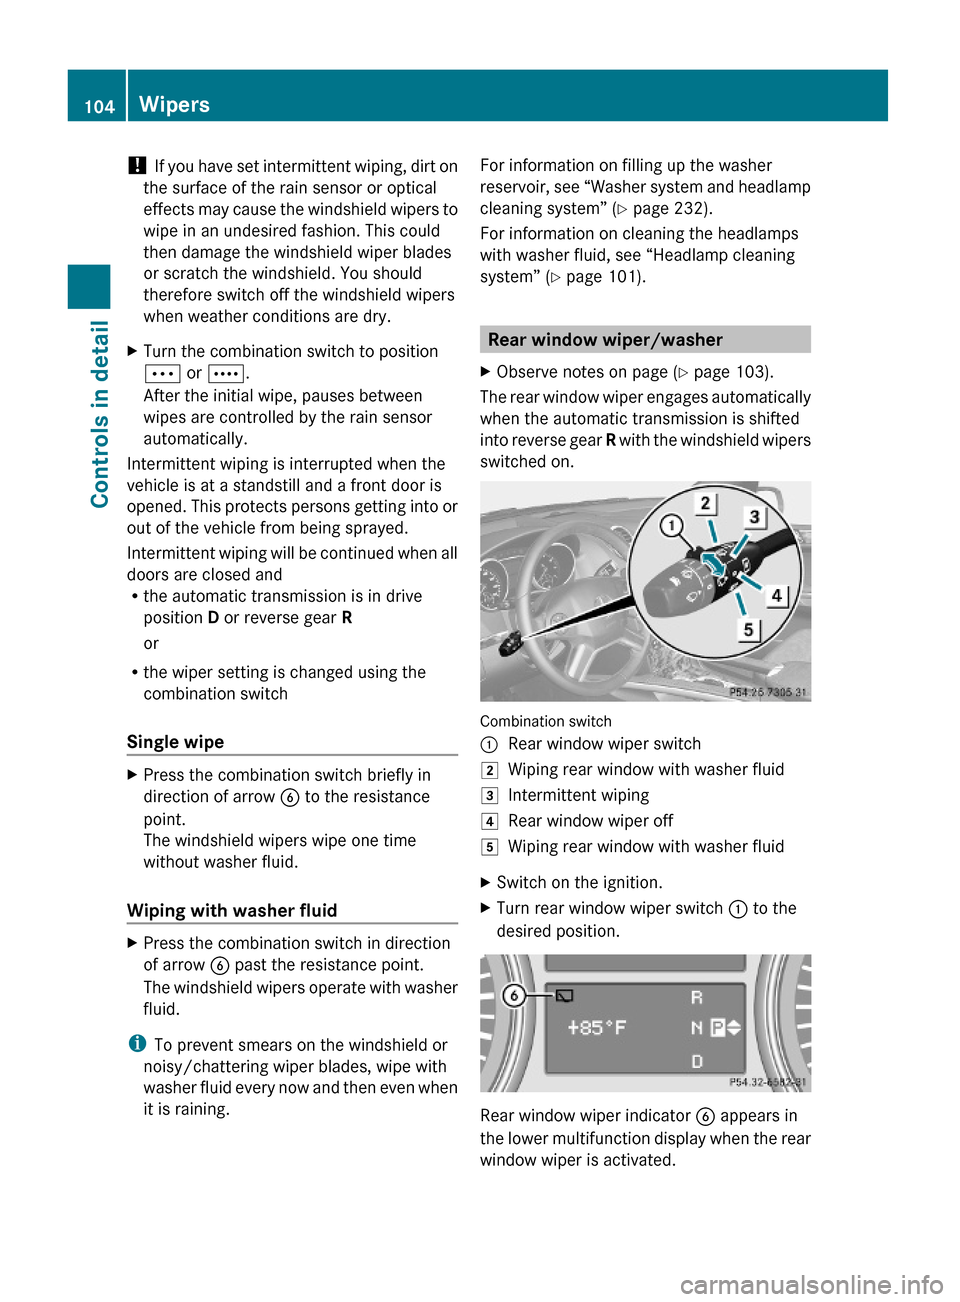
Rear window wiper/washer
XObserve notes on page (Y page 103).
The rear window wiper engages automatically
when the automatic transmission is shifted
into reverse gear R with the windshield wipers
switched on.
Combination switch
:Rear window wiper switch2Wiping rear window with washer fluid3Intermittent wiping4Rear window wiper off5Wiping rear window with washer fluidXSwitch on the ignition.XTurn rear window wiper switch : to the
desired position.
Rear window wiper indicator B appears in
the lower multifunction display when the rear
window wiper is activated.
104WipersControls in detail
X164_AKB; 5; 31, en-USd2ureepe,Version: 2.11.8.12009-09-11T12:30:16+02:00 - Seite 104
Page 109 of 380
XClosing: Pull switch A and release.
Both hinged quarter windows close
completely.
i When the obstruction sensor detects that
a hinged quarter windows is blocked during
the closing process, they will stop and open
slightly.
XHalting closing process: Press or pull
switch A once more during the closing
process.
The hinged quarter windows will stop and
open completely.
i For your safety, the hinged quarter
windows cannot be opened again until
4 seconds have passed.
Synchronizing door windows
The door windows must be synchronized after
the battery has been disconnected or if the
door windows cannot be fully closed (express
operation).
Each door window must be synchronized
separately.
XClose all doors.XSwitch on the ignition.XPull and hold switch :, ; , = or ?
( Y page 106) until the respective door
window is closed.
The door window opens again slightly.XPull and hold the respective switch once
more immediately until the door window is
closed completely.XHold the respective switch for
approximately 1 second.
The door window is synchronized.Summer opening feature
When the weather is warm, you can ventilate
the vehicle before driving off by
simultaneously
R opening the door windows
R opening the hinged quarter windows
R opening the tilt/sliding sunroof
R switching on the seat ventilation for the
driver’s seat
The summer opening feature can only be
activated via the remote control of the
SmartKey. The SmartKey must be in close
proximity to the driver’s outside door handle.XAim the transmitter eye of the SmartKey at
the driver’s outside door handle.XPress and hold button % on the
SmartKey until the windows and the tilt/
sliding sunroof have reached the desired
position.
The vehicle unlocks.XRelease button % on the SmartKey to
interrupt the opening procedure.
Convenience closing feature
When locking the vehicle, you can
simultaneously close
R the door windows
R the hinged quarter windows
R the tilt/sliding sunroof
GWarning!
When closing the windows and the tilt/sliding
sunroof, make sure there is no danger of
anyone being harmed by the closing
procedure.
If potential danger exists, proceed as follows:
R Release button & to stop the closing
procedure. To open, press and hold button
% . To continue the closing procedure
after making sure that there is no danger of
Power windows107Controls in detailX164_AKB; 5; 31, en-USd2ureepe,Version: 2.11.8.12009-09-11T12:30:16+02:00 - Seite 107Z
Page 149 of 380
XIncreasing: Briefly lift the cruise control
lever up past the resistance point in
direction of arrow :.XDecreasing: Briefly press the cruise
control lever down past the resistance
point in direction of arrow ;.XRelease the cruise control lever.
The new speed is set and the vehicle will
accelerate or decelerate. Keep in mind that
it may take a brief moment until the vehicle
has reached the set speed.
Setting stored speed (Resume
function)
GWarning!
The set speed stored in memory should only
be set again if prevailing road conditions and
legal speed limits permit. Possible
acceleration or deceleration differences
arising from returning to the preset speed
could cause an accident and/or serious injury
to you and others.
XBriefly pull the cruise control lever in
direction of arrow ?.
If no speed is stored, the current speed is
set and stored.XRemove your foot from the accelerator
pedal.
The last stored speed is deleted from memory
when the engine is turned off.
Distronic
Safety notes
When activated, the Distronic adaptive cruise
control increases the driving convenience
afforded by the cruise control while traveling
on expressways and other major roadways.
R If the Distronic distance sensor detects a
slower moving vehicle directly ahead, your
vehicle speed will be reduced so that you
follow that vehicle at your preset following
distance.
R If there is no vehicle directly ahead of you,
the Distronic will function in the same way
as standard cruise control ( Y page 144).GWarning!
The Distronic requires familiarity with its
operational characteristics. We strongly
recommend that you review the following
information carefully before operating the
system.
GWarning!
When the Distronic is braking, the brake pedal
is retracted (i.e. depressed automatically).
The pedals’ range of motion must not be
impeded by any obstacles:
R Do not place any objects in the footwell.
R Make sure that the floormats and carpets
are securely in place.
R Do not rest your foot underneath the brake
pedal, as it could otherwise be trapped.
You could otherwise cause an accident and
injure yourself and/or others.
GWarning!
The Distronic is a convenience system. Its
speed adjustment reduction capability is
intended to make cruise control more
effective and usable when traffic speeds vary.
It is not however, intended to, nor does it,
replace the need for extreme care.
The responsibility for the vehicle’s speed,
distance to the preceding vehicle and, most
importantly, brake operation to ensure a safe
stopping distance, always remains with the
driver.
The Distronic cannot take street and traffic
conditions into account. Complex driving
situations are not always fully recognized by
the Distronic. This could result in wrong or
missing distance warnings.
Driving systems147Controls in detailX164_AKB; 5; 31, en-USd2ureepe,Version: 2.11.8.12009-09-11T12:30:16+02:00 - Seite 147Z