2010 MERCEDES-BENZ GL550 ad blue
[x] Cancel search: ad bluePage 145 of 380

your safety and the safety of others, we
recommend that you pull over to a safe
location and stop before placing or taking a
telephone call. If you choose to use the
telephone while driving, please use the hands-
free device and only use the telephone when
weather, road and traffic conditions permit.
Some jurisdictions prohibit the driver from
using a mobile phone while driving a vehicle.
Bear in mind that at a speed of just 30 mph
(approximately 50 km/h), your vehicle is
covering a distance of 44 feet (approximately
14 m) every second.
You can connect your telephone to the
COMAND system via Bluetooth®, see
separate COMAND system operating
instructions.
XSwitch on the COMAND system.
Refer to separate COMAND system
operating instructions.
XPress button U or V repeatedly until
the message TEL appears in the
multifunction display.
One of the following messages will appear
in the multifunction display:
RNo Service: No network is available.
RBluetooth Ready: The telephone has
not been connected to the COMAND
system via Bluetooth® yet.
XConnect the telephone to the
COMAND system via Bluetooth®.
RReady or name of the network provider
(if available): The telephone has found a
network and is ready for use. You can
operate it using the control system.
Answering a call
When your telephone is ready to receive calls,
you can answer a call at any time. In the
multifunction display you will then see the
following message, or if available, the caller
ID (number or name):
XPress button 6.
You have answered the call.
Ending a call or rejecting an incoming
call
XPress button ~.
Dialing a number from the phone book
When your telephone is ready to receive calls,
you may select and dial a number from the
phone book at any time.
XPress button U or V repeatedly until
the message TEL appears in the
multifunction display.
XPress button & or * repeatedly until
the desired name appears in the
multifunction display.
If you press and hold button & or
* for longer than 1 second, the system
scrolls rapidly through the list of names
until you release the button again.
The stored names are displayed in
alphabetical order.
:Selected name from the phone bookXPress button 6.
The control system dials the selected
phone number.
Control system143Controls in detailX164_AKB; 5; 31, en-USd2ureepe,Version: 2.11.8.12009-09-11T12:30:16+02:00 - Seite 143Z
Page 173 of 380
GWarning!
Please note that objects which do not touch
the ground may appear to be further away
than they actually are, for example:
Rthe bumper of a vehicle parked behind you
Ra trailer hitch
Rthe back of a truck
In such cases, you should not use the
guidelines to judge the distance. You may
misjudge the distance which increases the
risk of impacting the objects.
Even when the object you approach is directly
on the ground do not approach the object any
closer than the red guideline.
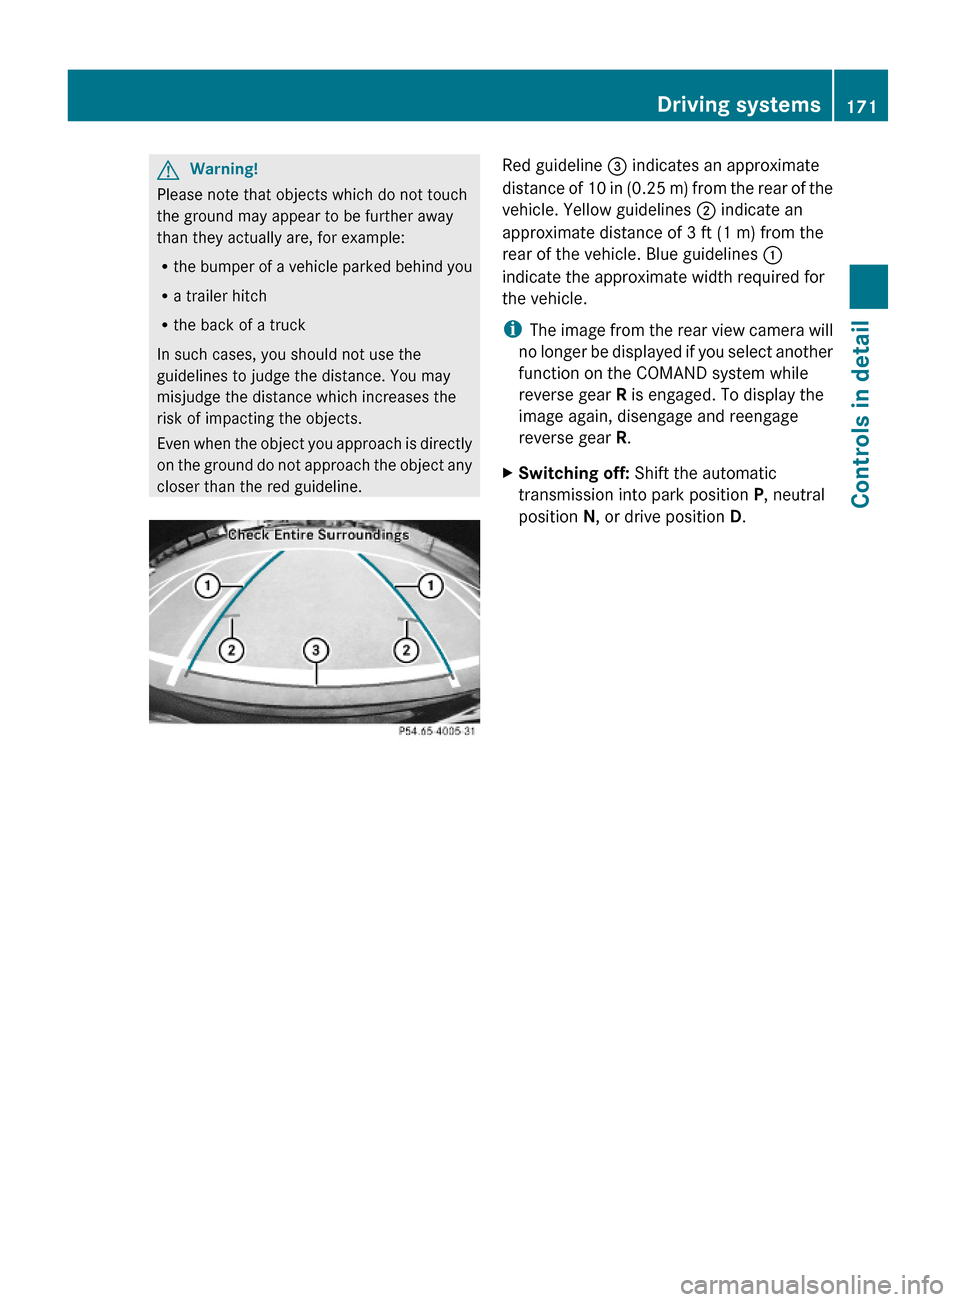
Red guideline = indicates an approximate
distance of 10 in (0.25 m) from the rear of the
vehicle. Yellow guidelines ; indicate an
approximate distance of 3 ft (1 m) from the
rear of the vehicle. Blue guidelines :
indicate the approximate width required for
the vehicle.
iThe image from the rear view camera will
no longer be displayed if you select another
function on the COMAND system while
reverse gear R is engaged. To display the
image again, disengage and reengage
reverse gear R.
XSwitching off: Shift the automatic
transmission into park position P, neutral
position N, or drive position D.
Driving systems171Controls in detailX164_AKB; 5; 31, en-USd2ureepe,Version: 2.11.8.12009-09-11T12:30:16+02:00 - Seite 171Z
Page 233 of 380
For more information on engine oil, see
“Fuels, coolants, lubricants etc.”
(Y page 368).
For information on messages in the
multifunction display concerning engine oil,
see the “Practical hints” section
(Y page 308).
Adding engine oil
! Only use approved engine oils and oil
filters required for vehicles with
Maintenance System. For a listing of
approved engine oils and oil filters, contact
an authorized Mercedes-Benz Center or
visit www.mbusa.com (USA only).
The following will result in engine or
emission control system damage not
covered by the Mercedes-Benz Limited
Warranty:
RUsing engine oils and oil filters of
specification other than those expressly
required for the Maintenance System.
RChanging of oil and oil filter at change
intervals longer than those called for by
the Maintenance System.
RUsing any oil additives.
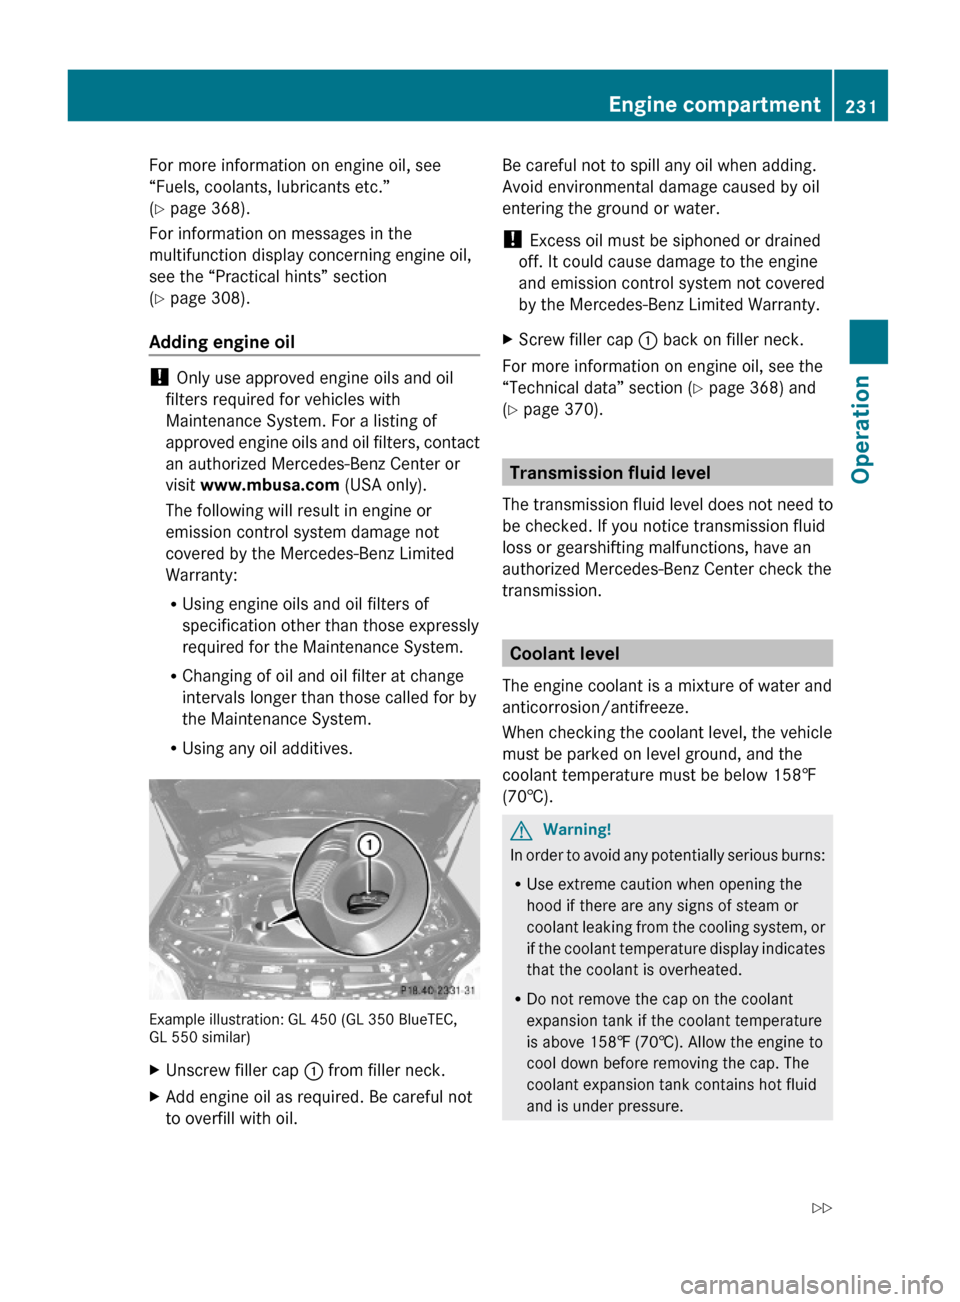
Example illustration: GL 450 (GL 350 BlueTEC,GL 550 similar)
XUnscrew filler cap : from filler neck.XAdd engine oil as required. Be careful not
to overfill with oil.
Be careful not to spill any oil when adding.
Avoid environmental damage caused by oil
entering the ground or water.
! Excess oil must be siphoned or drained
off. It could cause damage to the engine
and emission control system not covered
by the Mercedes-Benz Limited Warranty.
XScrew filler cap : back on filler neck.
For more information on engine oil, see the
“Technical data” section (Y page 368) and
(Y page 370).
Transmission fluid level
The transmission fluid level does not need to
be checked. If you notice transmission fluid
loss or gearshifting malfunctions, have an
authorized Mercedes-Benz Center check the
transmission.
Coolant level
The engine coolant is a mixture of water and
anticorrosion/antifreeze.
When checking the coolant level, the vehicle
must be parked on level ground, and the
coolant temperature must be below 158‡
(70†).
GWarning!
In order to avoid any potentially serious burns:
RUse extreme caution when opening the
hood if there are any signs of steam or
coolant leaking from the cooling system, or
if the coolant temperature display indicates
that the coolant is overheated.
RDo not remove the cap on the coolant
expansion tank if the coolant temperature
is above 158‡ (70†). Allow the engine to
cool down before removing the cap. The
coolant expansion tank contains hot fluid
and is under pressure.
Engine compartment231OperationX164_AKB; 5; 31, en-USd2ureepe,Version: 2.11.8.12009-09-11T12:30:16+02:00 - Seite 231Z
Page 266 of 380
Checklist before off-road driving
Engine oil level
RCheck the engine oil level (Y page 230).
Only with a proper oil level can the vehicle
obtain a trouble-free oil supply, even on
steep gradients.
! If the engine oil level warning lamp comes
on while driving, stop the vehicle in a safe
location or as soon at is safe to do so.
Check the engine oil level.
The engine oil level warnings should not be
ignored. Extended driving with the symbol
displayed could result in serious engine
damage that is not covered by the
Mercedes-Benz Limited Warranty.
Tires
RCheck the tread depth and maintain
specified tire inflation pressure. A placard
with the recommended tire inflation
pressures is located on the driver’s door B-
pillar (Y page 243).
RCheck tires for possible damage and
remove foreign objects.
RReplace missing valve caps.
Rims
RDented or bent rims can cause tire inflation
pressure loss and damage the tire beads.
For this reason, check and, if necessary,
change rims before driving off-road.
Vehicle tool kit
RCheck if the jack (Y page 286) is
functional.
RAlways take the vehicle tool kit, a strong
tow rope, a shovel and a small plank (to put
under the jack on sandy soil) with you.
Driving in steep terrain
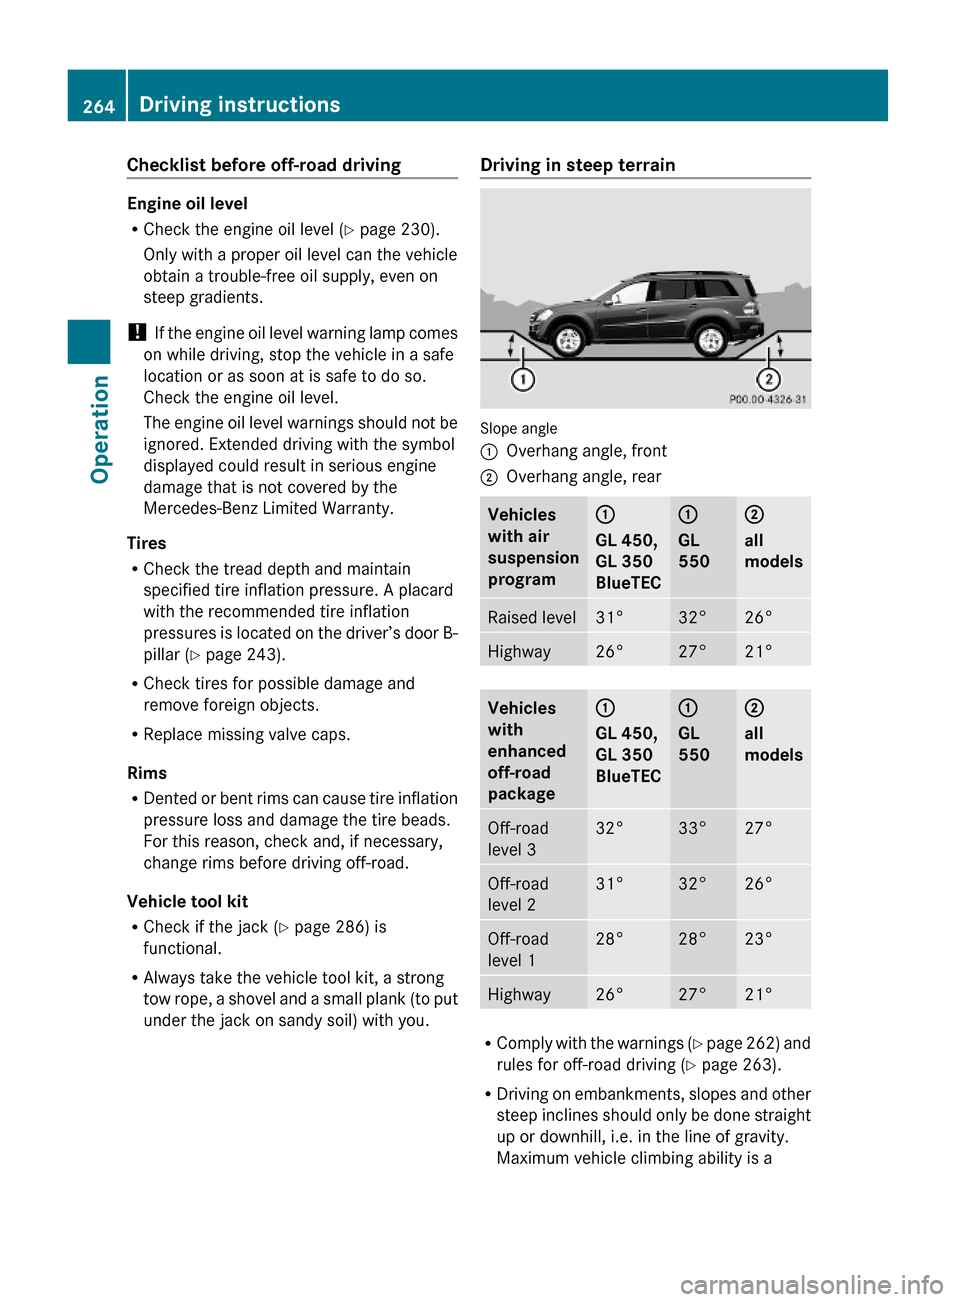
Slope angle
:Overhang angle, front;Overhang angle, rearVehicles
with air
suspension
program
:
GL 450,
GL 350
BlueTEC
:
GL
550
;
all
models
Raised level31°32°26°Highway26°27°21°Vehicles
with
enhanced
off-road
package
:
GL 450,
GL 350
BlueTEC
:
GL
550
;
all
models
Off-road
level 3
32°33°27°Off-road
level 2
31°32°26°Off-road
level 1
28°28°23°Highway26°27°21°
RComply with the warnings (Y page 262) and
rules for off-road driving (Y page 263).
RDriving on embankments, slopes and other
steep inclines should only be done straight
up or downhill, i.e. in the line of gravity.
Maximum vehicle climbing ability is a
264Driving instructionsOperation
X164_AKB; 5; 31, en-USd2ureepe,Version: 2.11.8.12009-09-11T12:30:16+02:00 - Seite 264
Page 285 of 380
Vehicle equipment ............................284
Where will I find ...? ..........................284
Vehicle status messages in the
multifunction display .......................287
What to do if … ..................................314
Unlocking/locking manually ...........323
Resetting activated NECK-PRO
active front head restraints .............325
Replacing SmartKey batteries .........326
Replacing bulbs .................................328
Replacing wiper blades ....................334
Flat tire ..............................................336
Bleeding the fuel system (diesel
engine only) .......................................345
AdBlue® (diesel engine only) ...........346
Battery ...............................................348
Jump starting ....................................350
Towing the vehicle ............................352
Fuses ..................................................355
283Practical hintsX164_AKB; 5; 31, en-USd2ureepe,Version: 2.11.8.12009-09-11T12:30:16+02:00 - Seite 283
Page 288 of 380
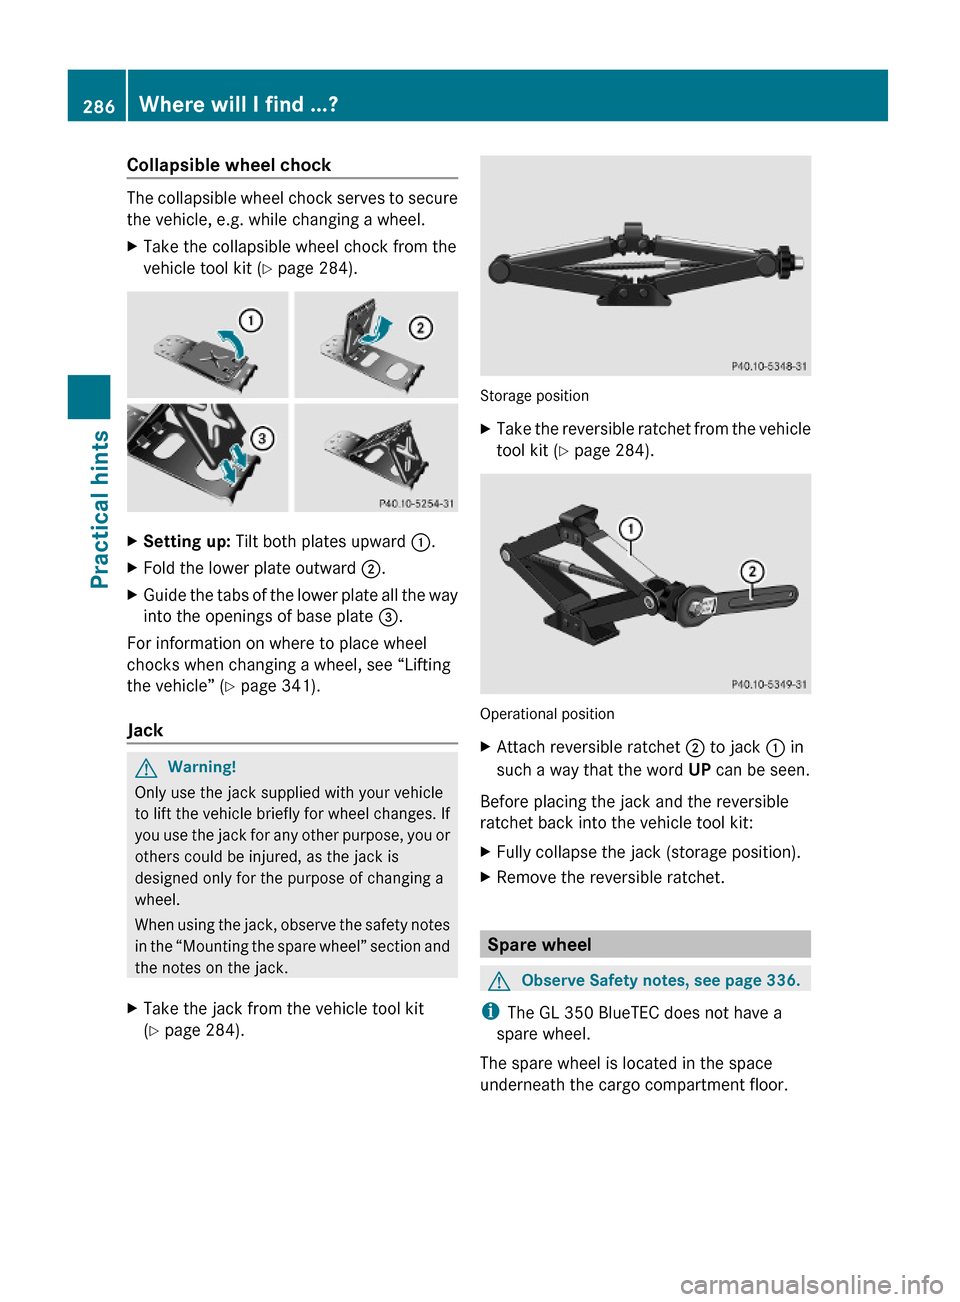
Collapsible wheel chock
The collapsible wheel chock serves to secure
the vehicle, e.g. while changing a wheel.
XTake the collapsible wheel chock from the
vehicle tool kit (Y page 284).
XSetting up: Tilt both plates upward :.XFold the lower plate outward ;.XGuide the tabs of the lower plate all the way
into the openings of base plate =.
For information on where to place wheel
chocks when changing a wheel, see “Lifting
the vehicle” (Y page 341).
Jack
GWarning!
Only use the jack supplied with your vehicle
to lift the vehicle briefly for wheel changes. If
you use the jack for any other purpose, you or
others could be injured, as the jack is
designed only for the purpose of changing a
wheel.
When using the jack, observe the safety notes
in the “Mounting the spare wheel” section and
the notes on the jack.
XTake the jack from the vehicle tool kit
(Y page 284).
Storage position
XTake the reversible ratchet from the vehicle
tool kit (Y page 284).
Operational position
XAttach reversible ratchet ; to jack : in
such a way that the word UP can be seen.
Before placing the jack and the reversible
ratchet back into the vehicle tool kit:
XFully collapse the jack (storage position).XRemove the reversible ratchet.
Spare wheel
GObserve Safety notes, see page 336.
iThe GL 350 BlueTEC does not have a
spare wheel.
The spare wheel is located in the space
underneath the cargo compartment floor.
286Where will I find ...?Practical hints
X164_AKB; 5; 31, en-USd2ureepe,Version: 2.11.8.12009-09-11T12:30:16+02:00 - Seite 286
Page 307 of 380
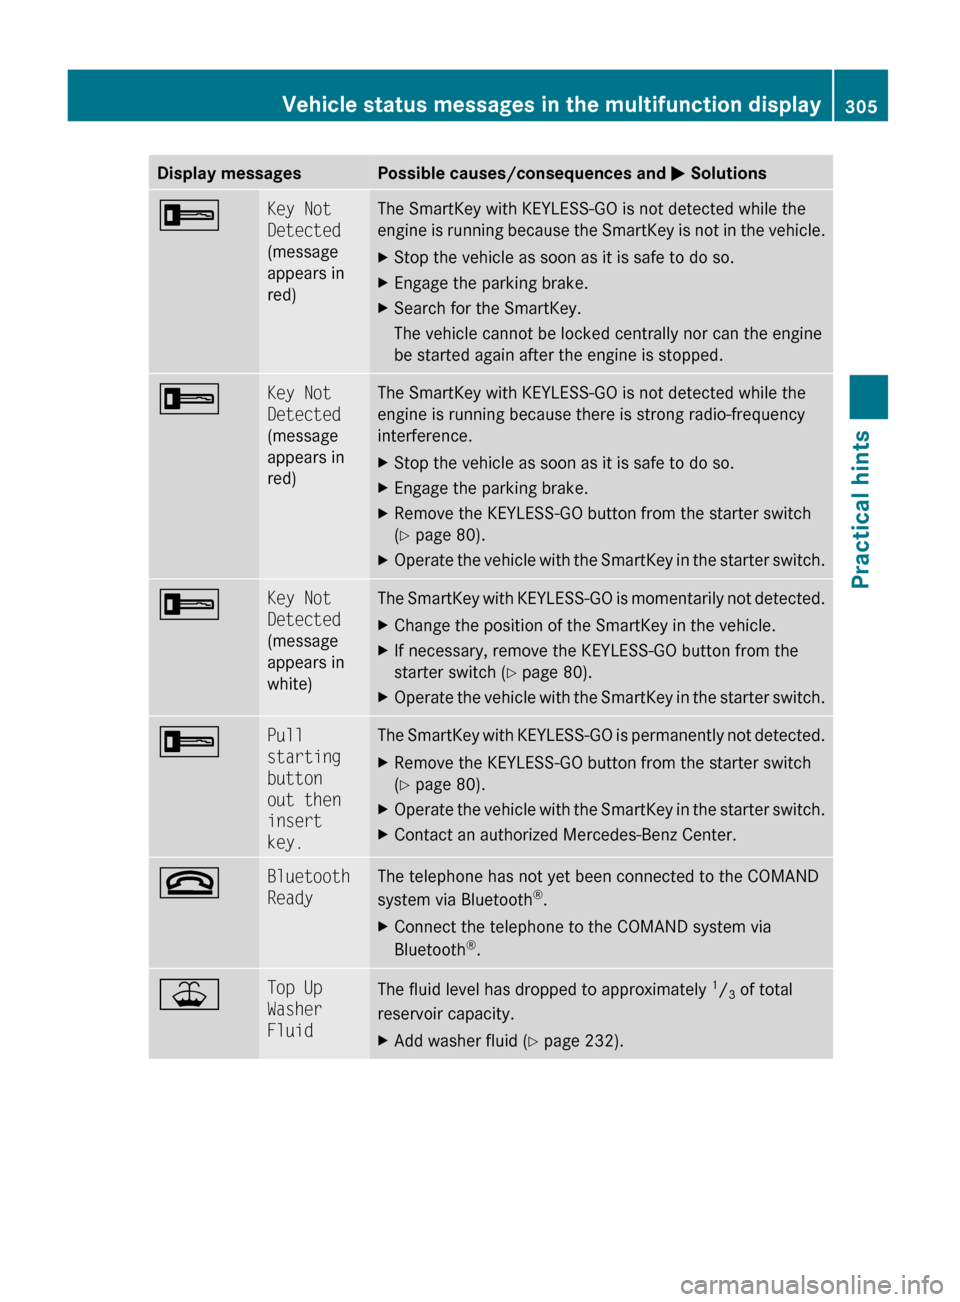
Display messagesPossible causes/consequences and M Solutions+Key Not
Detected
(message
appears in
red)The SmartKey with KEYLESS-GO is not detected while the
engine is running because the SmartKey is not in the vehicle.XStop the vehicle as soon as it is safe to do so.XEngage the parking brake.XSearch for the SmartKey.
The vehicle cannot be locked centrally nor can the engine
be started again after the engine is stopped.+Key Not
Detected
(message
appears in
red)The SmartKey with KEYLESS-GO is not detected while the
engine is running because there is strong radio-frequency
interference.XStop the vehicle as soon as it is safe to do so.XEngage the parking brake.XRemove the KEYLESS-GO button from the starter switch
( Y page 80).XOperate the vehicle with the SmartKey in the starter switch.+Key Not
Detected
(message
appears in
white)The SmartKey with KEYLESS-GO is momentarily not detected.XChange the position of the SmartKey in the vehicle.XIf necessary, remove the KEYLESS-GO button from the
starter switch ( Y page 80).XOperate the vehicle with the SmartKey in the starter switch.+Pull
starting
button
out then
insert
key.The SmartKey with KEYLESS-GO is permanently not detected.XRemove the KEYLESS-GO button from the starter switch
( Y page 80).XOperate the vehicle with the SmartKey in the starter switch.XContact an authorized Mercedes-Benz Center.~Bluetooth
ReadyThe telephone has not yet been connected to the COMAND
system via Bluetooth ®
.XConnect the telephone to the COMAND system via
Bluetooth ®
.¥Top Up
Washer
FluidThe fluid level has dropped to approximately 1
/ 3 of total
reservoir capacity.XAdd washer fluid ( Y page 232).Vehicle status messages in the multifunction display305Practical hintsX164_AKB; 5; 31, en-USd2ureepe,Version: 2.11.8.12009-09-11T12:30:16+02:00 - Seite 305Z
Page 311 of 380
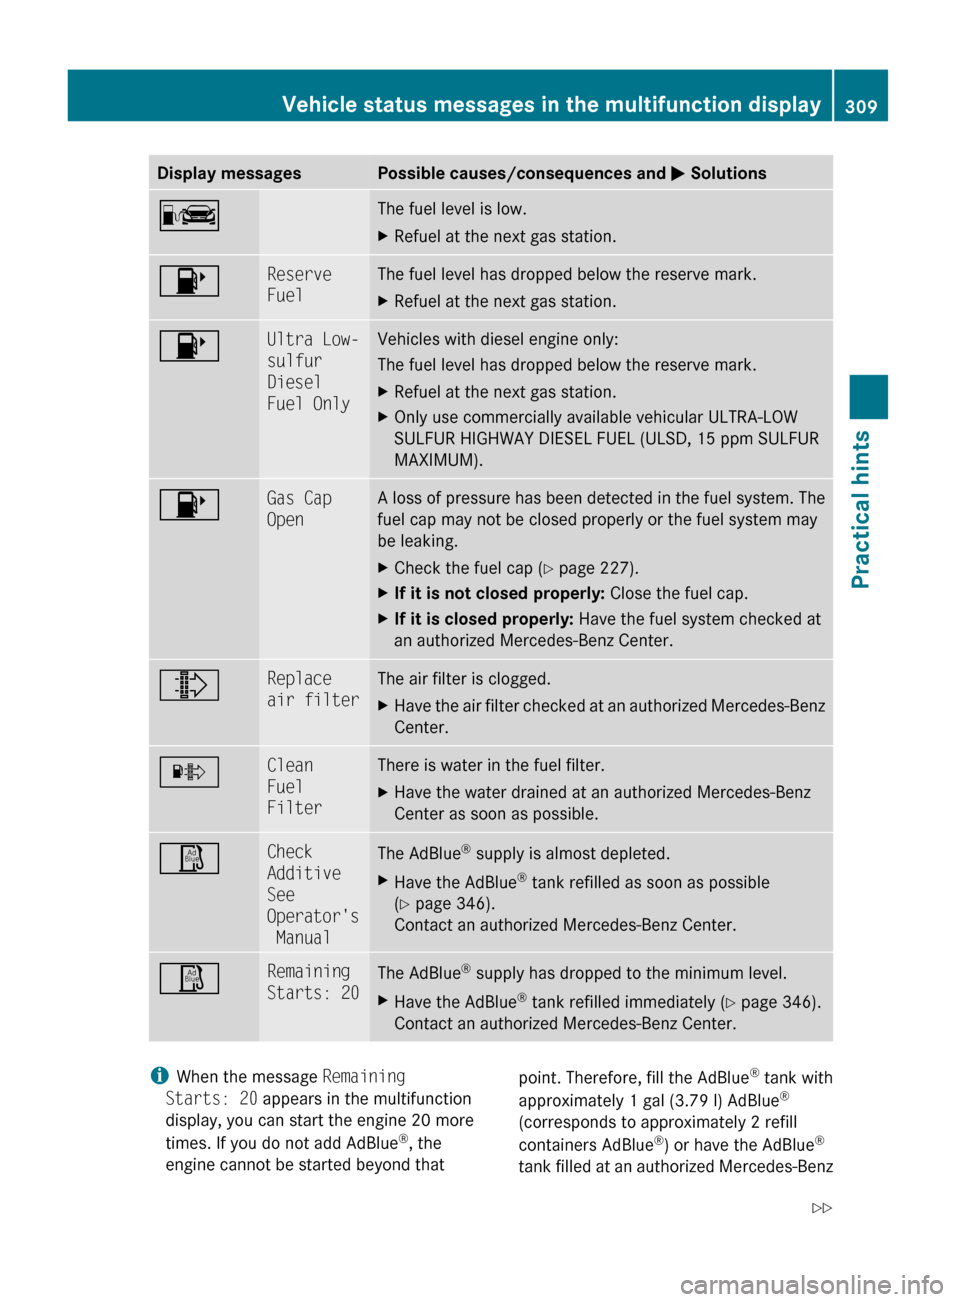
Display messagesPossible causes/consequences and M SolutionsCThe fuel level is low.XRefuel at the next gas station.8Reserve
FuelThe fuel level has dropped below the reserve mark.XRefuel at the next gas station.8Ultra Low-
sulfur
Diesel
Fuel OnlyVehicles with diesel engine only:
The fuel level has dropped below the reserve mark.XRefuel at the next gas station.XOnly use commercially available vehicular ULTRA-LOW
SULFUR HIGHWAY DIESEL FUEL (ULSD, 15 ppm SULFUR
MAXIMUM).8Gas Cap
OpenA loss of pressure has been detected in the fuel system. The
fuel cap may not be closed properly or the fuel system may
be leaking.XCheck the fuel cap ( Y page 227).XIf it is not closed properly: Close the fuel cap.XIf it is closed properly: Have the fuel system checked at
an authorized Mercedes-Benz Center.¸Replace
air filterThe air filter is clogged.XHave the air filter checked at an authorized Mercedes-Benz
Center.·Clean
Fuel
FilterThere is water in the fuel filter.XHave the water drained at an authorized Mercedes-Benz
Center as soon as possible.ØCheck
Additive
See
Operator's
ManualThe AdBlue ®
supply is almost depleted.XHave the AdBlue ®
tank refilled as soon as possible
( Y page 346).
Contact an authorized Mercedes-Benz Center.ØRemaining
Starts: 20The AdBlue ®
supply has dropped to the minimum level.XHave the AdBlue ®
tank refilled immediately ( Y page 346).
Contact an authorized Mercedes-Benz Center.i When the message Remaining
Starts: 20 appears in the multifunction
display, you can start the engine 20 more
times. If you do not add AdBlue ®
, the
engine cannot be started beyond thatpoint. Therefore, fill the AdBlue ®
tank with
approximately 1 gal (3.79 l) AdBlue ®
(corresponds to approximately 2 refill
containers AdBlue ®
) or have the AdBlue ®
tank filled at an authorized Mercedes-BenzVehicle status messages in the multifunction display309Practical hintsX164_AKB; 5; 31, en-USd2ureepe,Version: 2.11.8.12009-09-11T12:30:16+02:00 - Seite 309Z