2010 MERCEDES-BENZ GL550 height adjustment
[x] Cancel search: height adjustmentPage 12 of 380
Transmission position indicator .....116
Transmission positions ..................116
Generator
see Alternator
Global locking/unlocking
see Key, SmartKey
Glove box ........................................... 207
Gross Axle Weight Rating see GAWR
Gross Trailer Weight
see GTW
Gross Vehicle Weight
see GVW
Gross Vehicle Weight Rating
see GVWR
GTW (Gross Trailer Weight) .............. 255
GVW (Gross Vehicle Weight) ............ 255
GVWR (Gross Vehicle Weight
Rating) ................................................ 255
H
Halogen headlamps see Headlamps
Hard plastic trim items, cleaning .... 279
Hazard warning flasher .................... 101
Headlamp cleaning system .............. 101
Headlamps
Active Bi-Xenon headlamps .............97
Adjusting aim ................................. 333
Automatic headlamp mode ..............98
Bi-Xenon .................................. 97, 329
Cleaning lenses ............................. 277
Cleaning system ............................ 101
Daytime running lamp mode ............99
Delayed shut-off ............................ 137
Halogen ......................................... 329
High-beam flasher .........................101
High-beam headlamps ...................100
Low-beam headlamps ......................98
Replacing bulbs ............................. 328
Switch .............................................. 97
Headliner, cleaning and care of ....... 280
Head restraints .................................... 82
Adjustment ................................ 82, 84
Comfort head restraint ....................84
NECK-PRO active front head
restraints ......................................... 53
NECK-PRO active front head
restraints, resetting .......................325
Heated steering wheel ........................ 93
Height adjustment
Seat belt outlet ................................ 51
Seats ............................................... 82
Vehicle level control ......................159
High-beam flasher ............................. 101
High-beam headlamps .............. 100, 329
Indicator lamp .................................. 29
Hill-start assist system ..................... 155
Hinged quarter windows .................. 106
Hood ................................................... 228
Messages in the multifunction
display ........................................... 304
Hooks ................................................. 201
Horn ...................................................... 27
HVAC see Climate control system
Hydroplaning ..................................... 262
I
Identification labels .......................... 360
Identification number, vehicle
(VIN) ................................................... 361
Ignition ......................................... 80, 109
Immobilizer .......................................... 66
Indicator lamps see Lamps, indicator and warning
Infant and child restraint systems
see Children in the vehicle
Inflation pressure
see Tires, Inflation pressure
Infrared reflecting windshield ......... 223
Inside door handle .............................. 74
Instrument cluster ............................ 124
Illumination .................................... 124
Lamps ............................................ 314
Multifunction display .....................127
Instrument lighting
see Instrument cluster, Illumination
Instrument panel
see Instrument cluster
Instruments and controls
see Cockpit
10IndexX164_AKB; 5; 31, en-USd2ureepe,Version: 2.11.8.12009-09-11T12:30:16+02:00 - Seite 10
Page 17 of 380

R
Radiator ..................................... 230, 257
Radio
Selecting stations ..........................129
Radio transmitters ............................ 272
Rain sensor see Intermittent wiping
Rear axle oil ....................................... 369
Rear center console ashtray see Ashtrays
Rear doors
Child safety locks ............................ 60
Rear door window
Override switch ................................ 60
Rear fog lamp
see Fog lamps
Rear lamps
see Tail lamps
Rear seats
see Seats
Rear view camera .............................. 169
Cleaning the camera lens ..............278
Rear window defroster ..................... 191
Rear window wiper/washer ............. 104
Recommended tire inflation
pressure ..................................... 234, 256
Refilling
AdBlue ®
......................................... 347
Refrigerant, air conditioning ............ 371
Refueling ............................................ 226
Regular checks .................................. 228
Reminder, Seat belt see Seat belts, Telltale
Remote control
see Key, SmartKey
Remote door unlock (Tele Aid) ......... 219
Replacing
Key .................................................. 74
Replacing bulbs ................................. 328
Reporting safety defects .................... 24
Research Octane Number see RON
Reserve fuel
Messages in the multifunction
display ........................................... 309
Warning lamp ................................... 29
Reset button ................................ 28, 124Reset tool (NECK-PRO active front
head restraints) ................................. 325
Restraint systems see Occupant safety
Rims ........................................... 256, 365
Roadside Assistance ................... 21, 216
RON (Research Octane Number) ..... 371
Rubber parts, cleaning ...................... 279
Run-flat tires see MOExtended tires
S
Safety
Driving safety systems .....................61
Occupant safety ............................... 36
Reporting defects ............................ 24
Safety belts
see Seat belts
Seat belt force limiter ......................... 52
Seat belts ............................................. 48
Adjustment function ........................51
Children in the vehicle .....................55
Cleaning ......................................... 280
Fastening ......................................... 50
Height adjustment ...........................51
Proper use of ................................... 49
Safety guidelines ............................. 39
Safety notes ..................................... 48
Telltale ..................................... 29, 317
Seat heating ......................................... 90
Seating capacity ................................ 243
Seats ..................................................... 82
Adjustment ...................................... 82
Easy-entry/exit feature ....................92
Folding (expanding cargo volume) . 201
Heating ............................................ 90
Memory function .............................. 96
Multicontour seat ............................ 90
Rear seats ........................................ 87
Ventilation ....................................... 90
Securing cargo
Cargo tie-down rings ...................... 200
Selective setting
see Key, SmartKey
Selector lever
see Gear selector lever
Index15X164_AKB; 5; 31, en-USd2ureepe,Version: 2.11.8.12009-09-11T12:30:16+02:00 - Seite 15
Page 52 of 380
GWarning!
Do not pass seat belts over sharp edges. They
could tear.
Do not allow the seat belt to get caught in the
door or in the seat adjustment mechanism.
This could damage the seat belt.
Never attempt to make modifications to seat
belts. This could impair the effectiveness of
the seat belts.
Fastening the seat belts
GWarning!
According to accident statistics, children are
safer when properly restrained in the rear
seating positions than in the front seating
position. Thus, we strongly recommend that
children be placed in the rear seats whenever
possible. Regardless of seating position,
children 12 years old and under must be
seated and properly secured in an
appropriately sized infant restraint, toddler
restraint, or booster seat recommended for
the size and weight of the child. For additional
information, see “Children in the vehicle”.
A child’s risk of serious or fatal injuries is
significantly increased if the child restraints
are not properly secured in the vehicle and/
or the child is not properly secured in the child
restraint.
GWarning!
Vehicles with BabySmart™ air bag
deactivation system, Canada only: Children
12 years old and under must never ride in the
front seat, except in a Mercedes-Benz
authorized BabySmart™ compatible child
seat, which operates with the BabySmart™
system installed in the vehicle to deactivate
the front passenger front air bag when it is
installed properly. Otherwise they will be
struck by the air bag when it inflates in a
crash. If this happens, serious or fatal injury
will result.
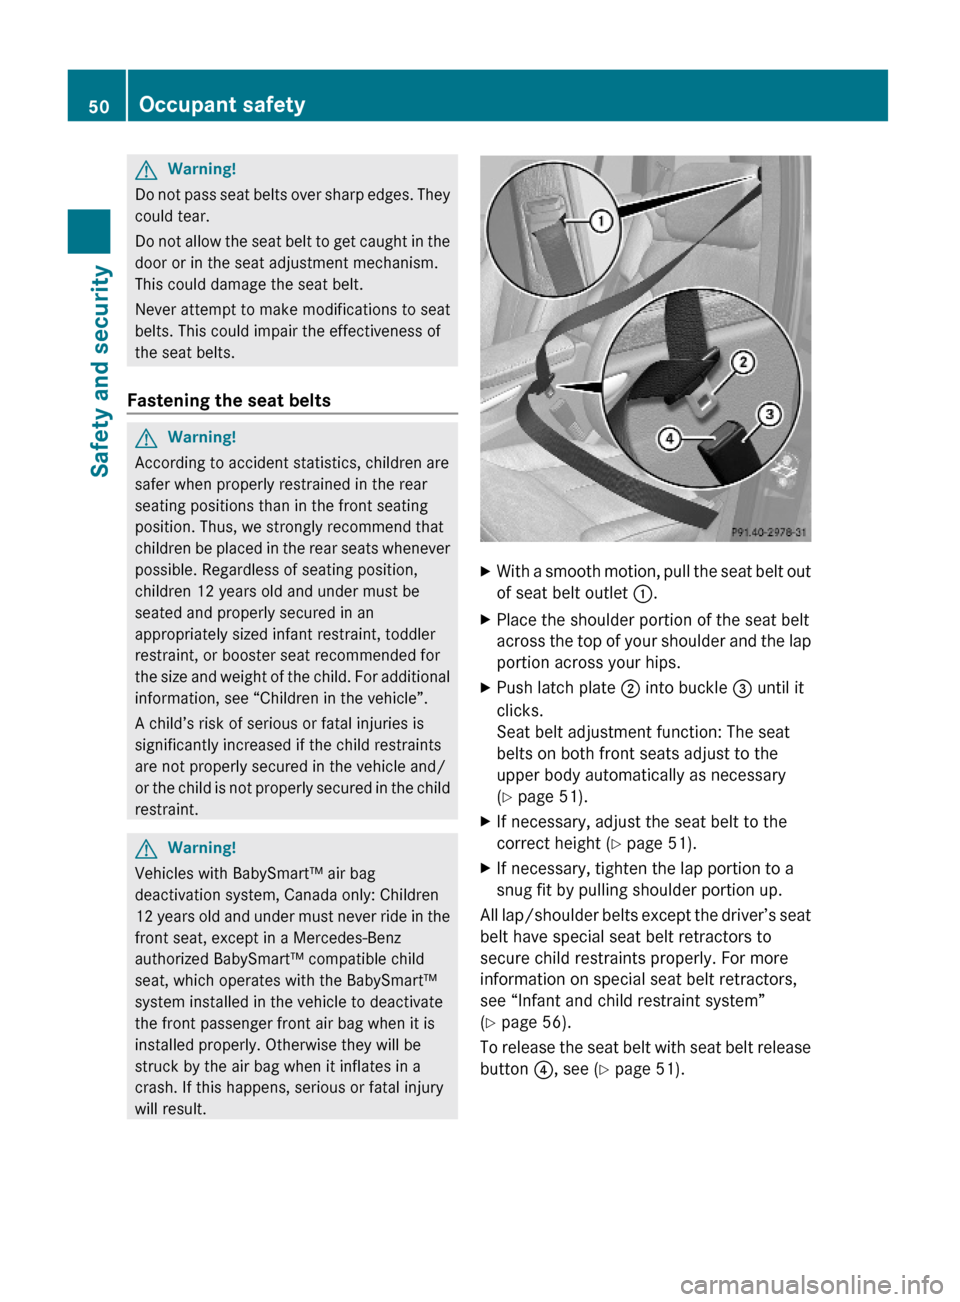
XWith a smooth motion, pull the seat belt out
of seat belt outlet :.
XPlace the shoulder portion of the seat belt
across the top of your shoulder and the lap
portion across your hips.
XPush latch plate ; into buckle = until it
clicks.
Seat belt adjustment function: The seat
belts on both front seats adjust to the
upper body automatically as necessary
(Y page 51).
XIf necessary, adjust the seat belt to the
correct height (Y page 51).
XIf necessary, tighten the lap portion to a
snug fit by pulling shoulder portion up.
All lap/shoulder belts except the driver’s seat
belt have special seat belt retractors to
secure child restraints properly. For more
information on special seat belt retractors,
see “Infant and child restraint system”
(Y page 56).
To release the seat belt with seat belt release
button ?, see (Y page 51).
50Occupant safetySafety and security
X164_AKB; 5; 31, en-USd2ureepe,Version: 2.11.8.12009-09-11T12:30:16+02:00 - Seite 50
Page 53 of 380
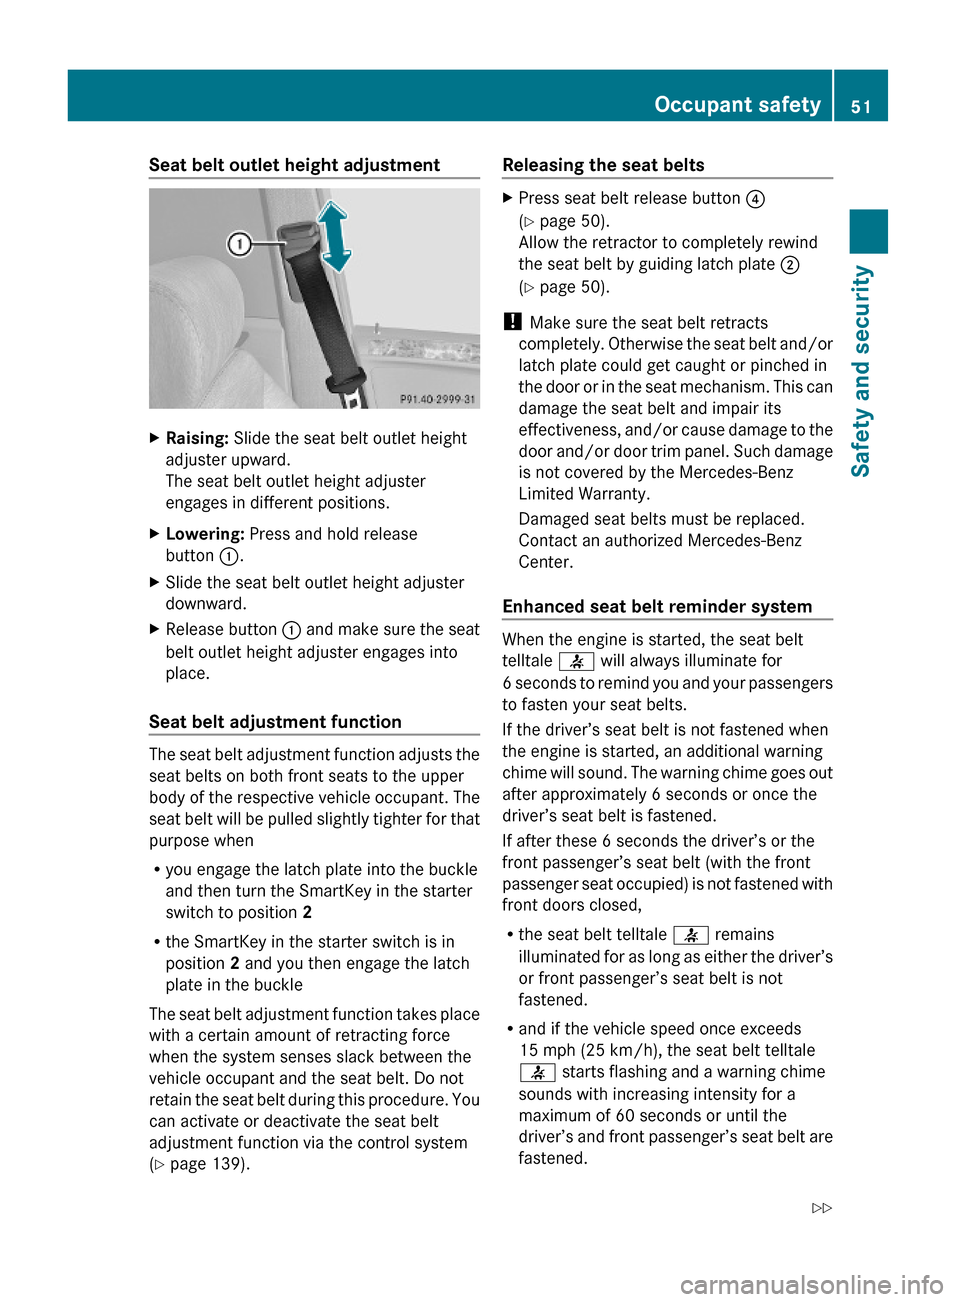
Seat belt outlet height adjustmentXRaising: Slide the seat belt outlet height
adjuster upward.
The seat belt outlet height adjuster
engages in different positions.
XLowering: Press and hold release
button :.
XSlide the seat belt outlet height adjuster
downward.
XRelease button : and make sure the seat
belt outlet height adjuster engages into
place.
Seat belt adjustment function
The seat belt adjustment function adjusts the
seat belts on both front seats to the upper
body of the respective vehicle occupant. The
seat belt will be pulled slightly tighter for that
purpose when
Ryou engage the latch plate into the buckle
and then turn the SmartKey in the starter
switch to position 2
Rthe SmartKey in the starter switch is in
position 2 and you then engage the latch
plate in the buckle
The seat belt adjustment function takes place
with a certain amount of retracting force
when the system senses slack between the
vehicle occupant and the seat belt. Do not
retain the seat belt during this procedure. You
can activate or deactivate the seat belt
adjustment function via the control system
(Y page 139).
Releasing the seat beltsXPress seat belt release button ?
(Y page 50).
Allow the retractor to completely rewind
the seat belt by guiding latch plate ;
(Y page 50).
! Make sure the seat belt retracts
completely. Otherwise the seat belt and/or
latch plate could get caught or pinched in
the door or in the seat mechanism. This can
damage the seat belt and impair its
effectiveness, and/or cause damage to the
door and/or door trim panel. Such damage
is not covered by the Mercedes-Benz
Limited Warranty.
Damaged seat belts must be replaced.
Contact an authorized Mercedes-Benz
Center.
Enhanced seat belt reminder system
When the engine is started, the seat belt
telltale 7 will always illuminate for
6 seconds to remind you and your passengers
to fasten your seat belts.
If the driver’s seat belt is not fastened when
the engine is started, an additional warning
chime will sound. The warning chime goes out
after approximately 6 seconds or once the
driver’s seat belt is fastened.
If after these 6 seconds the driver’s or the
front passenger’s seat belt (with the front
passenger seat occupied) is not fastened with
front doors closed,
Rthe seat belt telltale 7 remains
illuminated for as long as either the driver’s
or front passenger’s seat belt is not
fastened.
Rand if the vehicle speed once exceeds
15 mph (25 km/h), the seat belt telltale
7 starts flashing and a warning chime
sounds with increasing intensity for a
maximum of 60 seconds or until the
driver’s and front passenger’s seat belt are
fastened.
Occupant safety51Safety and securityX164_AKB; 5; 31, en-USd2ureepe,Version: 2.11.8.12009-09-11T12:30:16+02:00 - Seite 51Z
Page 56 of 380
must be reset. Otherwise, the NECK-PRO
active front head restraints cannot offer any
additional protection in the event of another
rear-end collision.
For information on resetting the activated
NECK-PRO active front head restraints, see
“Resetting activated head restraints”
(Y page 325).
You cannot remove the NECK-PRO active
front head restraints.
GWarning!
For your protection, drive only with properly
positioned head restraints.
Adjust the head restraint so that it is as close
to the head as possible and the center of the
head restraint supports the back of the head
at eye level. This will reduce the potential for
injury to the head and neck in the event of an
accident or similar situation.
For information on head restraint adjustment,
see “Head restraint height” (Y page 83), or
see “Head restraint fore and aft adjustment”
(Y page 84).
Correct driver seat adjustment
GWarning!
In order to avoid possible loss of vehicle
control the following must be done before the
vehicle is put into motion:
Rseat adjustment
Rhead restraint adjustment
Rsteering wheel adjustment
Rrear view mirror adjustment
Rfastening of seat belts
Steering wheel
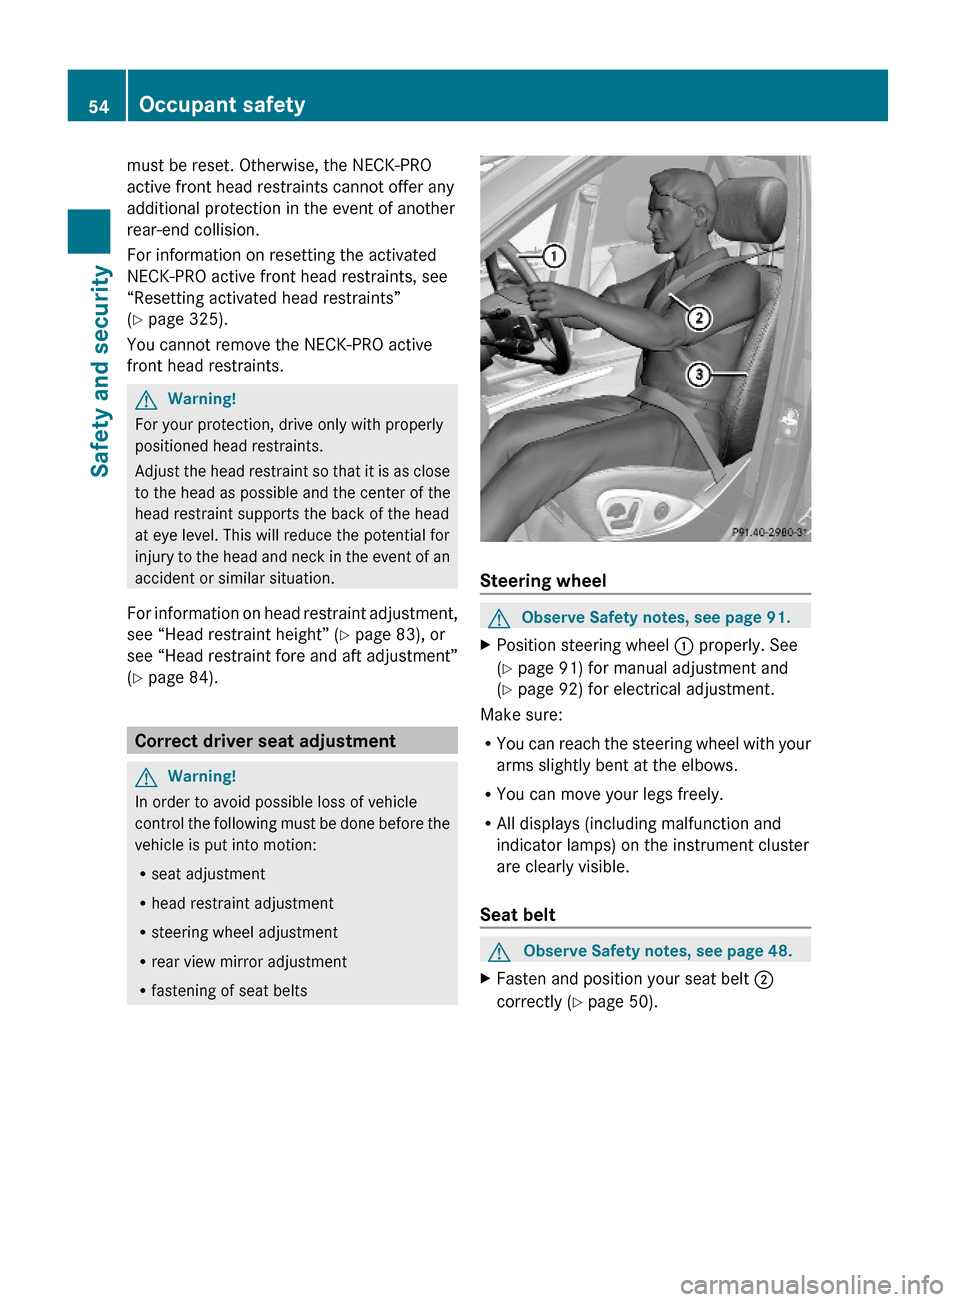
GObserve Safety notes, see page 91.XPosition steering wheel : properly. See
(Y page 91) for manual adjustment and
(Y page 92) for electrical adjustment.
Make sure:
RYou can reach the steering wheel with your
arms slightly bent at the elbows.
RYou can move your legs freely.
RAll displays (including malfunction and
indicator lamps) on the instrument cluster
are clearly visible.
Seat belt
GObserve Safety notes, see page 48.XFasten and position your seat belt ;
correctly (Y page 50).
54Occupant safetySafety and security
X164_AKB; 5; 31, en-USd2ureepe,Version: 2.11.8.12009-09-11T12:30:16+02:00 - Seite 54
Page 85 of 380
Do not drive the vehicle without the seat head
restraints. Head restraints are intended to
help reduce injuries during an accident.
Seat adjustment
! When moving the seats, make sure there
are no items in the footwell or behind the
seats. Otherwise, you could damage the
seats and/or the items.
Power seats
! When the second-row seats are folded
forward, e.g. for cargo volume expansion,
the front seats may not be moved to the
rearmost position. Otherwise you could
damage the front and second-row seats.
! When adjusting the seat backrest tilt and
head restraint height, make sure the sun
visor is folded up. If the head restraint is in
the uppermost position, it could hit and
damage the sun visor.
iVehicles without memory function:
The seats can be adjusted within 5 minutes
after either front door has been opened.
The counter resets each time
Ryou open or close a front door
Ryou insert the SmartKey into the starter
switch
Ryou remove the SmartKey from the
starter switch
Ryou switch the ignition on or off
Just like in vehicles with memory function,
the power seats can be operated at any
time when the ignition is switched on.
iThe memory function (Y page 96) lets
you store the settings for the seat position
together with the settings for the steering
wheel (electrical) and exterior rear view
mirrors.
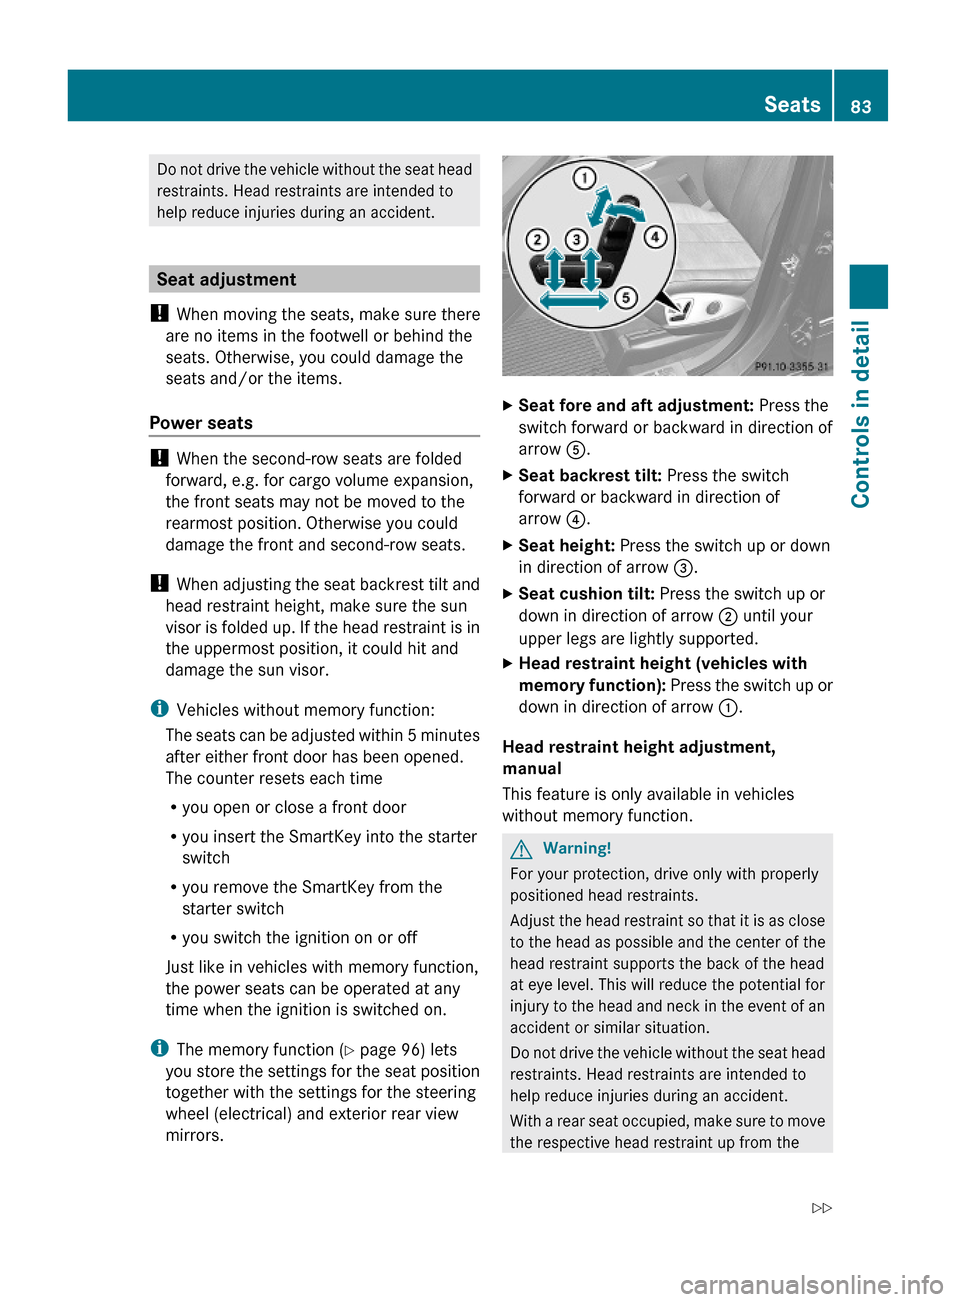
XSeat fore and aft adjustment: Press the
switch forward or backward in direction of
arrow A.
XSeat backrest tilt: Press the switch
forward or backward in direction of
arrow ?.
XSeat height: Press the switch up or down
in direction of arrow =.
XSeat cushion tilt: Press the switch up or
down in direction of arrow ; until your
upper legs are lightly supported.
XHead restraint height (vehicles with
memory function): Press the switch up or
down in direction of arrow :.
Head restraint height adjustment,
manual
This feature is only available in vehicles
without memory function.
GWarning!
For your protection, drive only with properly
positioned head restraints.
Adjust the head restraint so that it is as close
to the head as possible and the center of the
head restraint supports the back of the head
at eye level. This will reduce the potential for
injury to the head and neck in the event of an
accident or similar situation.
Do not drive the vehicle without the seat head
restraints. Head restraints are intended to
help reduce injuries during an accident.
With a rear seat occupied, make sure to move
the respective head restraint up from the
Seats83Controls in detailX164_AKB; 5; 31, en-USd2ureepe,Version: 2.11.8.12009-09-11T12:30:16+02:00 - Seite 83Z
Page 86 of 380
lowest non-use position and have the
occupant adjust the head restraint properly.
! Do not attempt to remove front seat head
restraints. They can only be removed by
qualified technicians. We recommend that
you have this work carried out by an
authorized Mercedes-Benz Center.
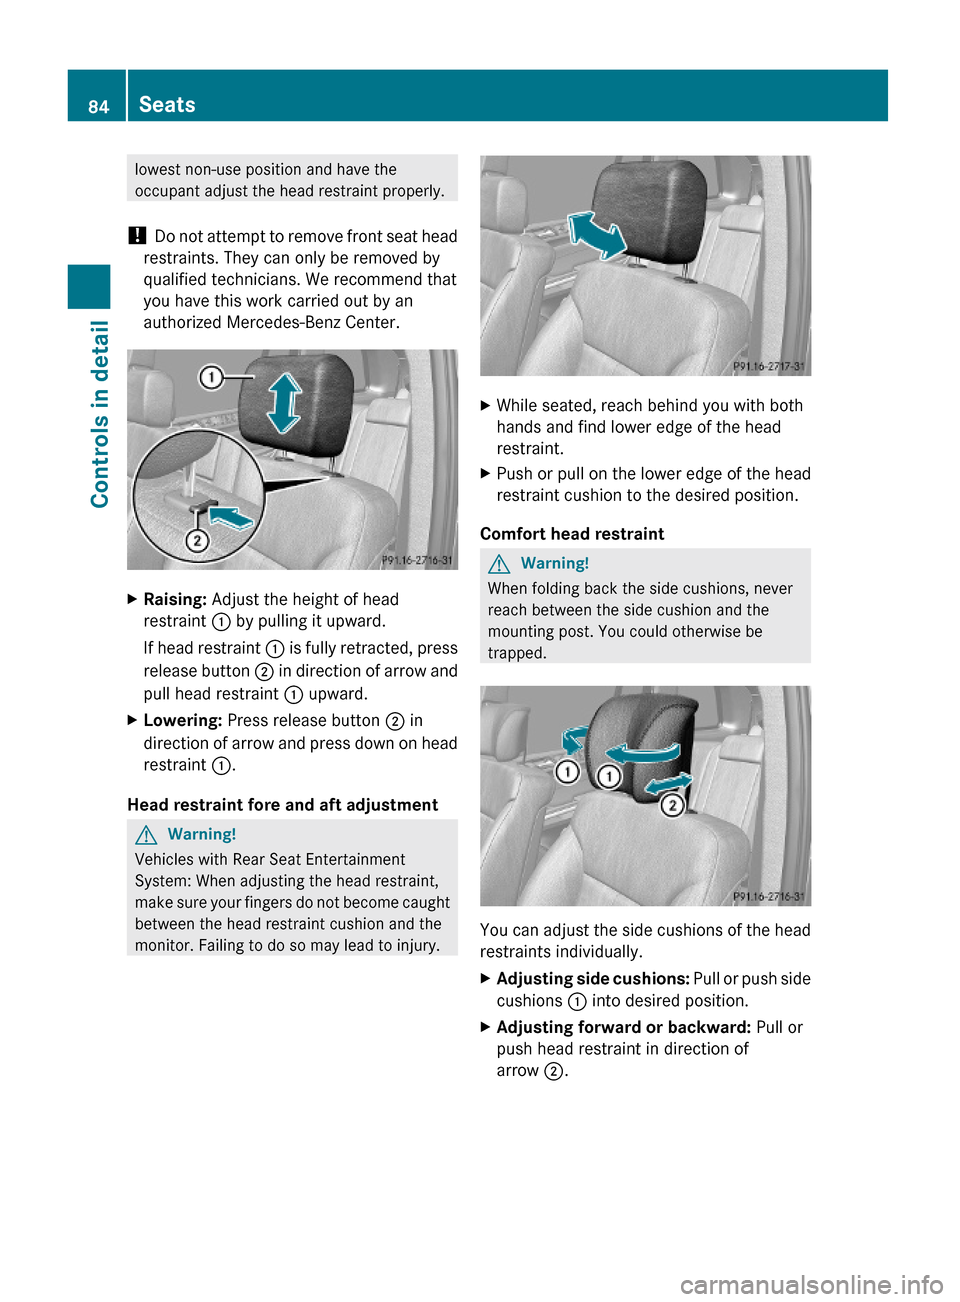
XRaising: Adjust the height of head
restraint : by pulling it upward.
If head restraint : is fully retracted, press
release button ; in direction of arrow and
pull head restraint : upward.
XLowering: Press release button ; in
direction of arrow and press down on head
restraint :.
Head restraint fore and aft adjustment
GWarning!
Vehicles with Rear Seat Entertainment
System: When adjusting the head restraint,
make sure your fingers do not become caught
between the head restraint cushion and the
monitor. Failing to do so may lead to injury.
XWhile seated, reach behind you with both
hands and find lower edge of the head
restraint.
XPush or pull on the lower edge of the head
restraint cushion to the desired position.
Comfort head restraint
GWarning!
When folding back the side cushions, never
reach between the side cushion and the
mounting post. You could otherwise be
trapped.
You can adjust the side cushions of the head
restraints individually.
XAdjusting side cushions: Pull or push side
cushions : into desired position.
XAdjusting forward or backward: Pull or
push head restraint in direction of
arrow ;.
84SeatsControls in detail
X164_AKB; 5; 31, en-USd2ureepe,Version: 2.11.8.12009-09-11T12:30:16+02:00 - Seite 84
Page 90 of 380
backrest could fold. The child seat would no
longer be properly supported or positioned to
provide its intended benefit.
Seat backrest tilt (second-row seats)
GWarning!
The seat belt only offers its intended
protection when the seat backrest is in a
nearly vertical position and the occupant is
sitting upright. Avoid sitting in positions that
prevent the seat belt from being properly
positioned against the body. You should
therefore adjust the seat backrest to a
position as upright as possible.
The seat backrest tilt can be set to five
different positions.
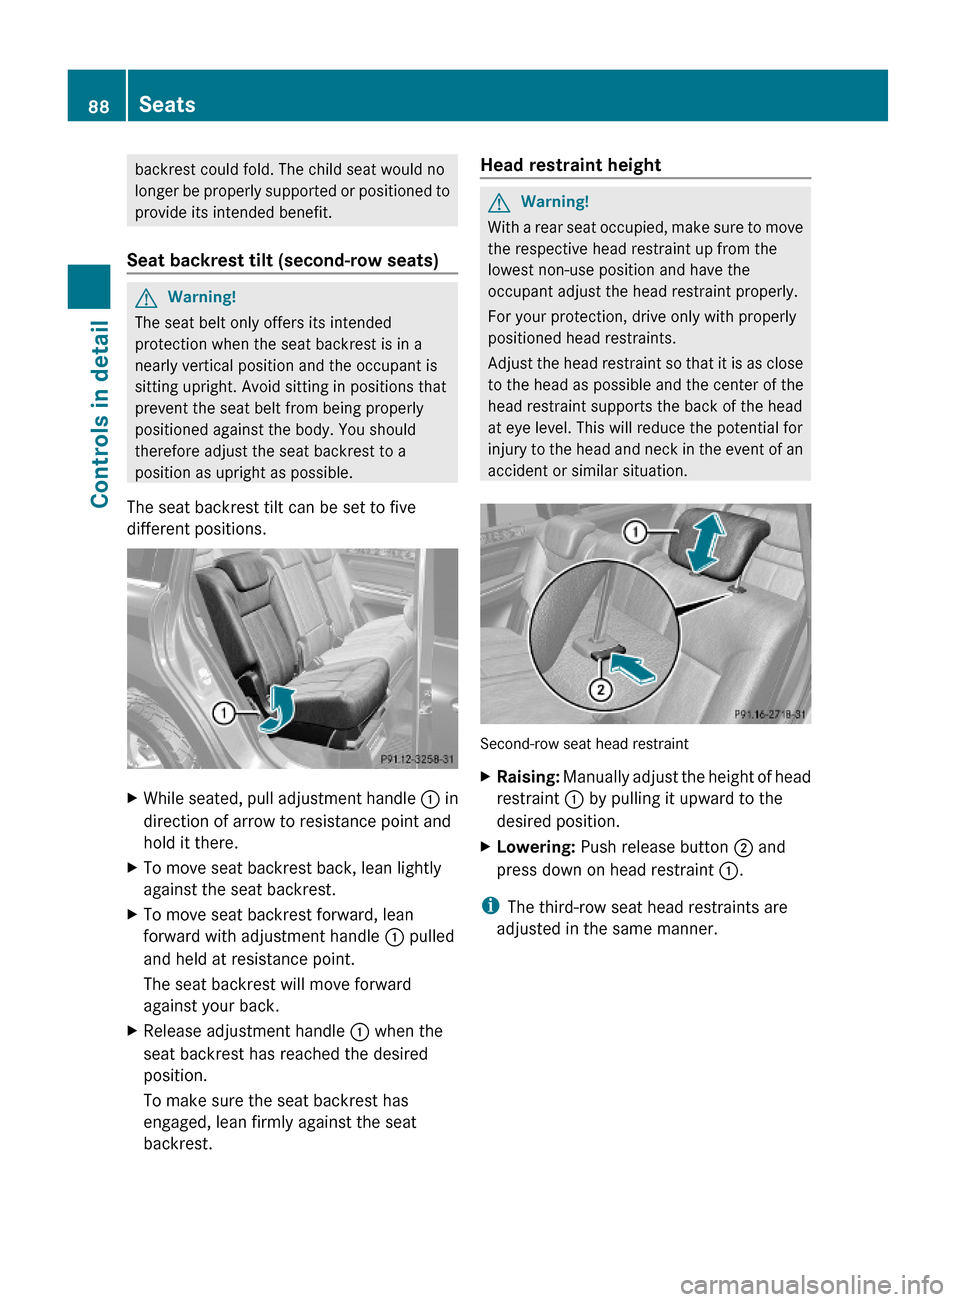
XWhile seated, pull adjustment handle : in
direction of arrow to resistance point and
hold it there.
XTo move seat backrest back, lean lightly
against the seat backrest.
XTo move seat backrest forward, lean
forward with adjustment handle : pulled
and held at resistance point.
The seat backrest will move forward
against your back.
XRelease adjustment handle : when the
seat backrest has reached the desired
position.
To make sure the seat backrest has
engaged, lean firmly against the seat
backrest.
Head restraint heightGWarning!
With a rear seat occupied, make sure to move
the respective head restraint up from the
lowest non-use position and have the
occupant adjust the head restraint properly.
For your protection, drive only with properly
positioned head restraints.
Adjust the head restraint so that it is as close
to the head as possible and the center of the
head restraint supports the back of the head
at eye level. This will reduce the potential for
injury to the head and neck in the event of an
accident or similar situation.
Second-row seat head restraint
XRaising: Manually adjust the height of head
restraint : by pulling it upward to the
desired position.
XLowering: Push release button ; and
press down on head restraint :.
iThe third-row seat head restraints are
adjusted in the same manner.
88SeatsControls in detail
X164_AKB; 5; 31, en-USd2ureepe,Version: 2.11.8.12009-09-11T12:30:16+02:00 - Seite 88