2010 MERCEDES-BENZ GL450 tow
[x] Cancel search: towPage 229 of 380
drained completely. Contact an authorized
Mercedes-Benz Center to have the fuel
system drained completely.
! Gasoline engine:
To prevent damage to the catalytic
converters, only use premium unleaded
gasoline in this vehicle.
Any noticeable irregularities in engine
operation should be repaired promptly.
Otherwise, excessive unburned fuel may
reach the catalytic converter, causing it to
overheat and potentially start a fire.
! Diesel engine:
When filling the diesel fuel tank using fuel
containers, place a filling filter, a suede
cloth or a clean flannel cloth as a filter.
Otherwise, particles from the fuel container
could clog the fuel lines and/or the diesel
injection system.
! Diesel engine:
The engine is more susceptible to wear and
damage if you use
Rmarine diesel fuel
Rheating oil
Radditives
The exhaust aftertreatment device will be
seriously damaged if you use any other
diesel fuel than ULTRA-LOW SULFUR
HIGHWAY DIESEL FUEL (ULSD, 15 ppm
SULFUR MAXIMUM).
The use of such non-approved fuels and/or
special additives is not covered by the
Mercedes-Benz Limited Warranty.
i Gasoline engine:
Only use premium unleaded gasoline with
a minimum Posted Octane Rating of 91
(average of 96 RON/86 MON).
Information on gasoline quality can
normally be found on the fuel pump. Please
contact gas station personnel in case
labels on the pump cannot be found.
For more information on gasoline, see
“Premium unleaded gasoline (gasoline
engine)” (Y page 371), see “Fuel
requirements” (Y page 371), or contact an
authorized Mercedes-Benz Center, or visit
www.mbusa.com (USA only).
i Diesel engine:
Only use commercially available vehicular
ULTRA-LOW SULFUR HIGHWAY DIESEL
FUEL (ULSD, 15 ppm SULFUR MAXIMUM).
Information on diesel quality can normally
be found on the fuel pump. Please contact
gas station personnel in case labels on the
pump cannot be found.
For more information on diesel fuels, see
“Fuel requirements” (Y page 371), or
contact an authorized Mercedes-Benz
Center, or visit www.mbusa.com (USA
only).
iDiesel engine:
If you have driven the vehicle until the tank
is empty, the fuel system needs to be bled
(Y page 345).
Locking/unlocking the vehicle with the
SmartKey or KEYLESS-GO automatically
locks/unlocks the fuel filler flap.
iIn case the central locking system does
not release the fuel filler flap, see “Fuel filler
flap” (Y page 324).
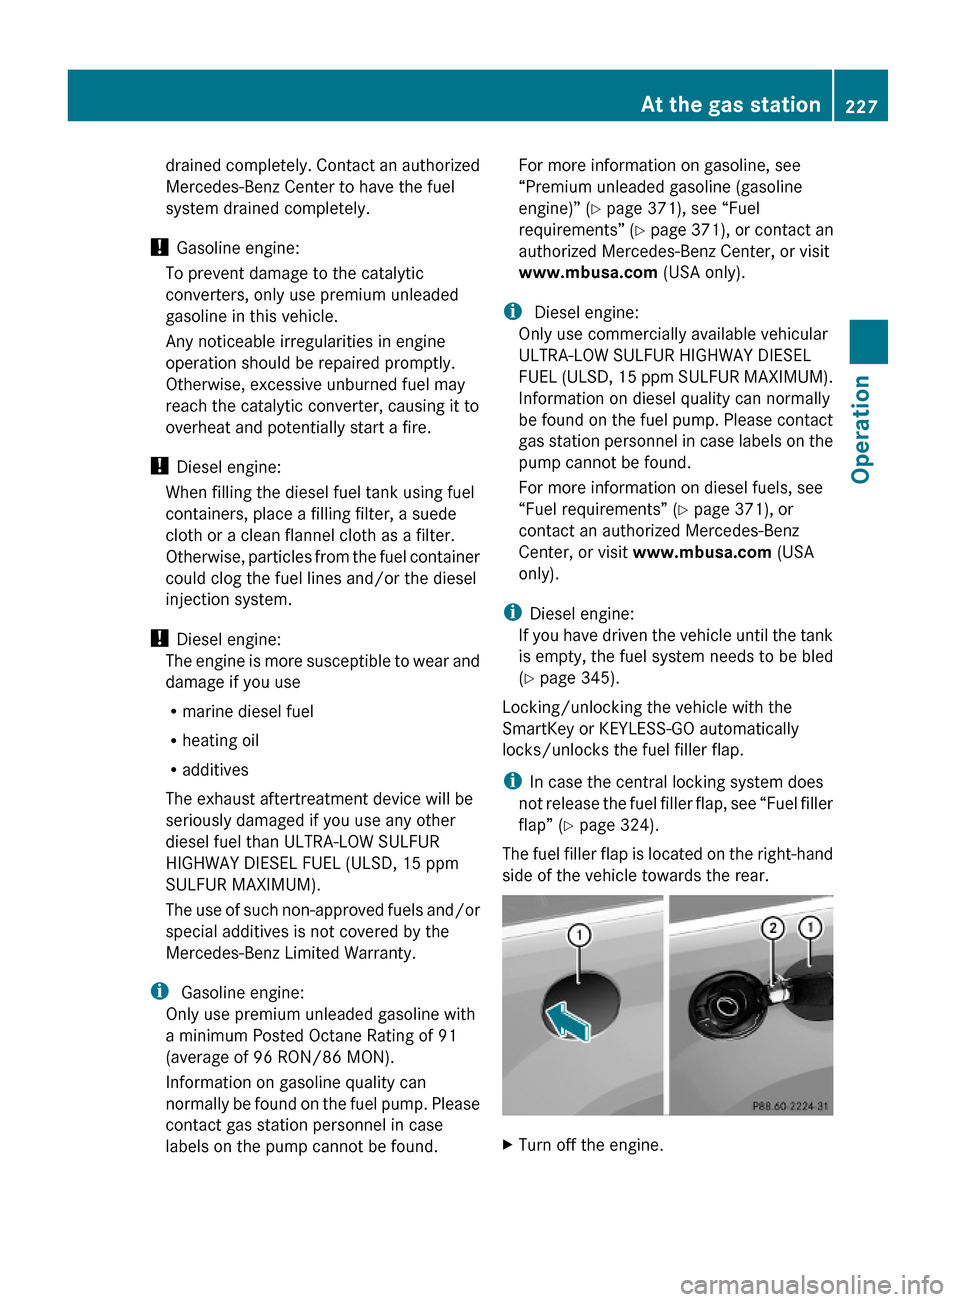
The fuel filler flap is located on the right-hand
side of the vehicle towards the rear.
XTurn off the engine.At the gas station227OperationX164_AKB; 5; 31, en-USd2ureepe,Version: 2.11.8.12009-09-11T12:30:16+02:00 - Seite 227Z
Page 235 of 380
For more information, see “Washer system
and headlamp cleaning system”
(Y page 370).
Brake fluid level
! If you find that the brake fluid in the brake
fluid reservoir has fallen to the minimum
mark or below, have the brake system
checked for brake pad thickness and leaks
immediately. Contact an authorized
Mercedes-Benz Center immediately. Do
not add brake fluid as this will not solve the
problem. For more information, see
“Practical hints”.
When checking the brake fluid level, the
vehicle must be parked on level ground.
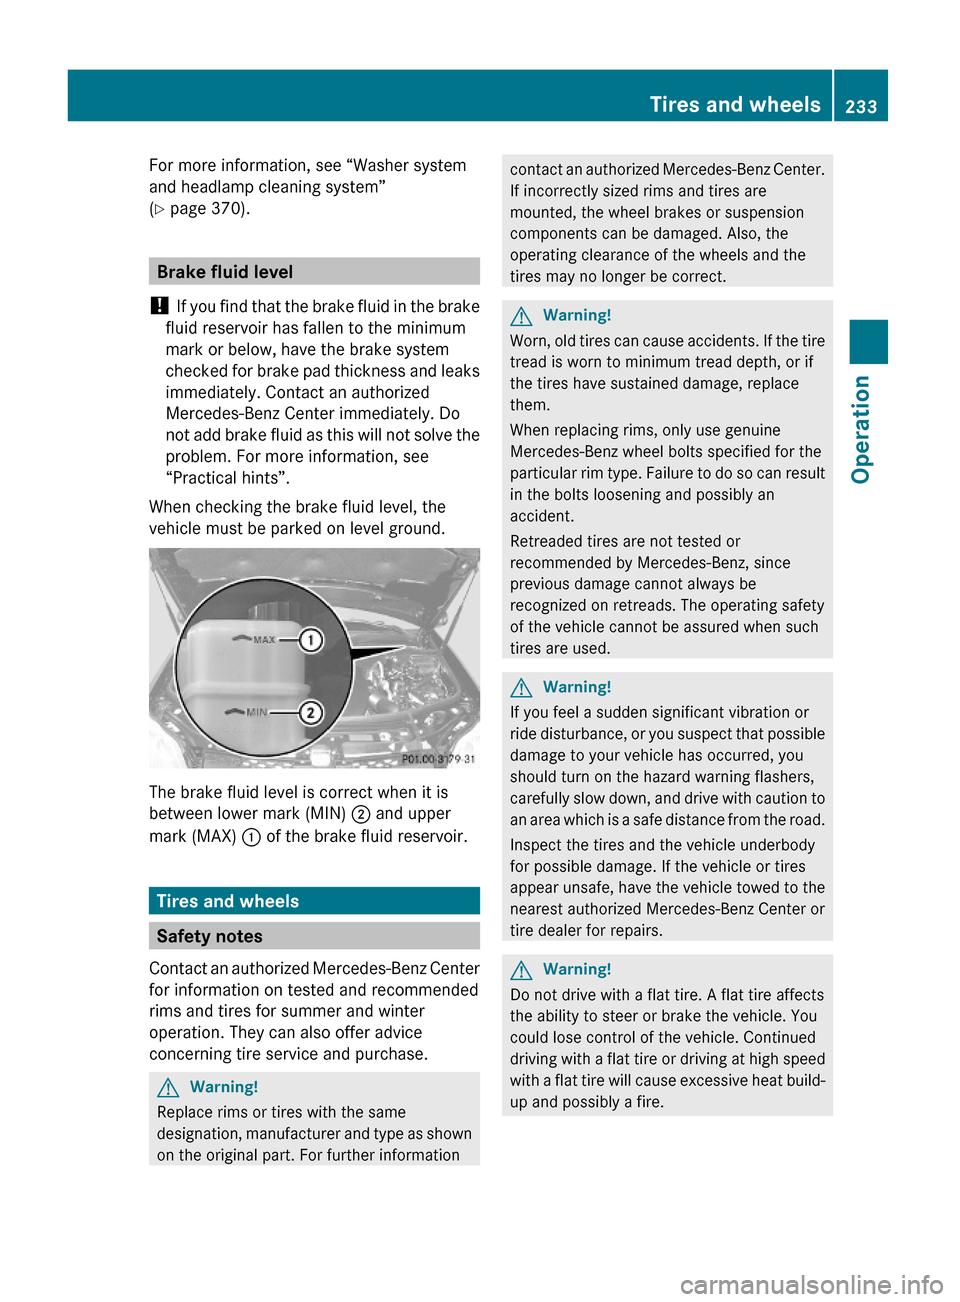
The brake fluid level is correct when it is
between lower mark (MIN) ; and upper
mark (MAX) : of the brake fluid reservoir.
Tires and wheels
Safety notes
Contact an authorized Mercedes-Benz Center
for information on tested and recommended
rims and tires for summer and winter
operation. They can also offer advice
concerning tire service and purchase.
GWarning!
Replace rims or tires with the same
designation, manufacturer and type as shown
on the original part. For further information
contact an authorized Mercedes-Benz Center.
If incorrectly sized rims and tires are
mounted, the wheel brakes or suspension
components can be damaged. Also, the
operating clearance of the wheels and the
tires may no longer be correct.
GWarning!
Worn, old tires can cause accidents. If the tire
tread is worn to minimum tread depth, or if
the tires have sustained damage, replace
them.
When replacing rims, only use genuine
Mercedes-Benz wheel bolts specified for the
particular rim type. Failure to do so can result
in the bolts loosening and possibly an
accident.
Retreaded tires are not tested or
recommended by Mercedes-Benz, since
previous damage cannot always be
recognized on retreads. The operating safety
of the vehicle cannot be assured when such
tires are used.
GWarning!
If you feel a sudden significant vibration or
ride disturbance, or you suspect that possible
damage to your vehicle has occurred, you
should turn on the hazard warning flashers,
carefully slow down, and drive with caution to
an area which is a safe distance from the road.
Inspect the tires and the vehicle underbody
for possible damage. If the vehicle or tires
appear unsafe, have the vehicle towed to the
nearest authorized Mercedes-Benz Center or
tire dealer for repairs.
GWarning!
Do not drive with a flat tire. A flat tire affects
the ability to steer or brake the vehicle. You
could lose control of the vehicle. Continued
driving with a flat tire or driving at high speed
with a flat tire will cause excessive heat build-
up and possibly a fire.
Tires and wheels233OperationX164_AKB; 5; 31, en-USd2ureepe,Version: 2.11.8.12009-09-11T12:30:16+02:00 - Seite 233Z
Page 238 of 380
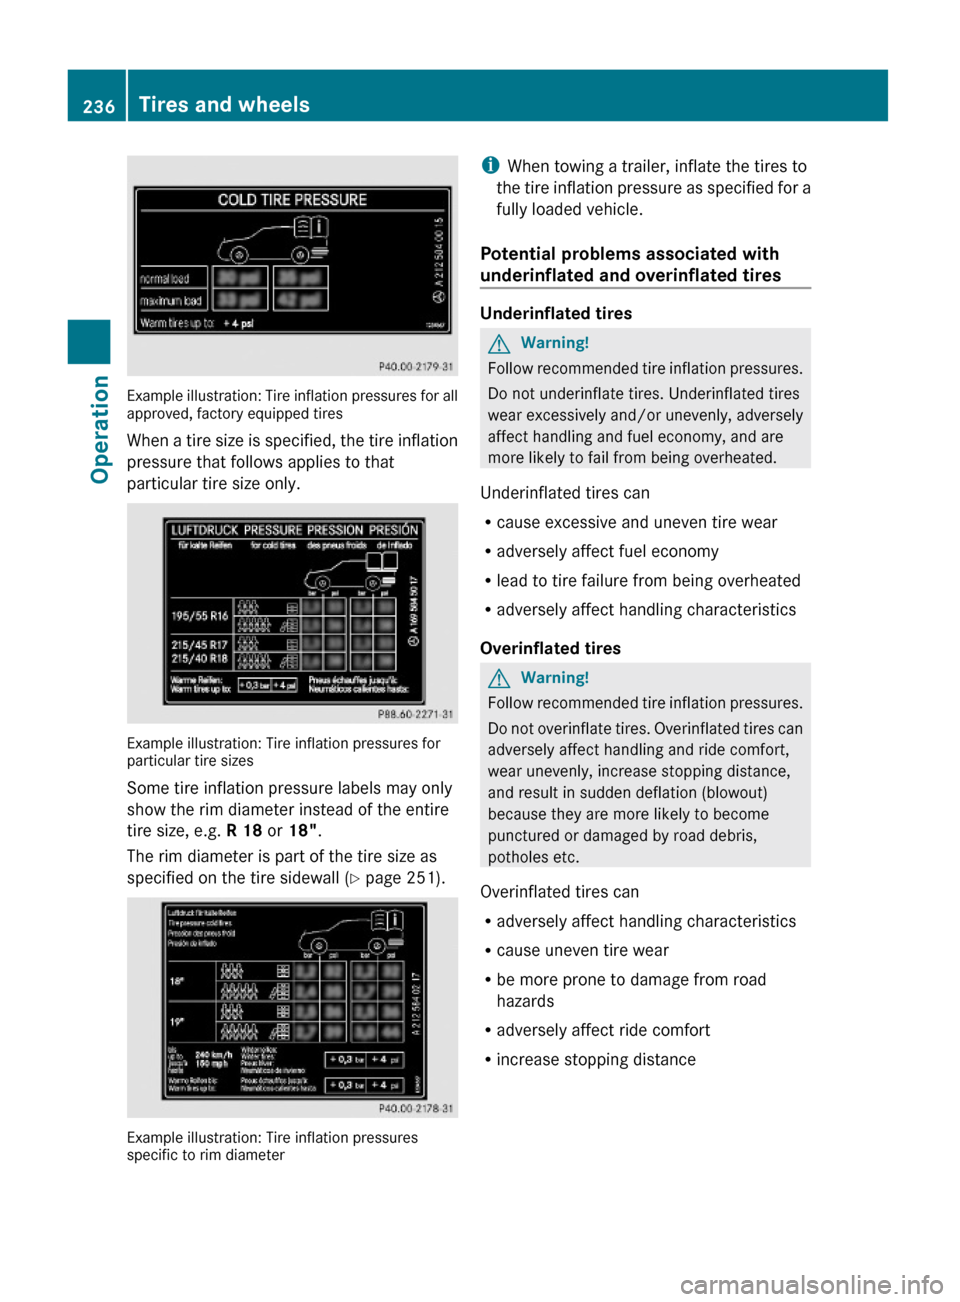
Example illustration: Tire inflation pressures for allapproved, factory equipped tires
When a tire size is specified, the tire inflation
pressure that follows applies to that
particular tire size only.
Example illustration: Tire inflation pressures forparticular tire sizes
Some tire inflation pressure labels may only
show the rim diameter instead of the entire
tire size, e.g. R 18 or 18".
The rim diameter is part of the tire size as
specified on the tire sidewall (Y page 251).
Example illustration: Tire inflation pressuresspecific to rim diameter
iWhen towing a trailer, inflate the tires to
the tire inflation pressure as specified for a
fully loaded vehicle.
Potential problems associated with
underinflated and overinflated tires
Underinflated tires
GWarning!
Follow recommended tire inflation pressures.
Do not underinflate tires. Underinflated tires
wear excessively and/or unevenly, adversely
affect handling and fuel economy, and are
more likely to fail from being overheated.
Underinflated tires can
Rcause excessive and uneven tire wear
Radversely affect fuel economy
Rlead to tire failure from being overheated
Radversely affect handling characteristics
Overinflated tires
GWarning!
Follow recommended tire inflation pressures.
Do not overinflate tires. Overinflated tires can
adversely affect handling and ride comfort,
wear unevenly, increase stopping distance,
and result in sudden deflation (blowout)
because they are more likely to become
punctured or damaged by road debris,
potholes etc.
Overinflated tires can
Radversely affect handling characteristics
Rcause uneven tire wear
Rbe more prone to damage from road
hazards
Radversely affect ride comfort
Rincrease stopping distance
236Tires and wheelsOperation
X164_AKB; 5; 31, en-USd2ureepe,Version: 2.11.8.12009-09-11T12:30:16+02:00 - Seite 236
Page 246 of 380
XStep 3: Subtract the combined weight of
the driver and passengers from
XXX kilograms or XXX lbs.XStep 4: The resulting figure equals the
available amount of cargo and luggage load
capacity. For example, if the “XXX” amount
equals 1 400 lbs and there will be five
150 lbs passengers in your vehicle, the
amount of available cargo and luggage load
capacity is 650 lbs
(1 400 - 750 (5 x 150) = 650 lbs).XStep 5: Determine the combined weight of
luggage and cargo being loaded on the
vehicle. That weight may not safely exceed
the available cargo and luggage load
capacity calculated in step 4.XStep 6 (if applicable): If your vehicle will
be towing a trailer, load from your trailer
will be transferred to your vehicle. Consult
this manual to determine how this reduces
the available cargo and luggage load
capacity of your vehicle ( Y page 246).
The following table shows examples on how
to calculate total and cargo load capacities
with varying seating configurations and
number and size of occupants. The following
examples use a load limit of 1 500 lbs. This
is for illustration purposes only. Make sure
you are using the actual load limit for your
vehicle stated on the vehicle’s Tire and
Loading Information placard ( Y page 243).
244Tires and wheelsOperation
X164_AKB; 5; 31, en-USd2ureepe,Version: 2.11.8.12009-09-11T12:30:16+02:00 - Seite 244
Page 248 of 380

Weight Rating (GVWR) and the Gross Axle
Weight Rating (GAWR) for either the front or
rear axle. You can obtain the GVWR and
GAWR from the certification label. The
certification label can be found on the driver’s
door B-pillar, see the “Technical data” section
(Y page 360).
Gross Vehicle Weight Rating (GVWR): The
total weight of the vehicle, all occupants, all
cargo, and the trailer tongue load (if
applicable) must never exceed the GVWR.
Gross Axle Weight Rating (GAWR): The total
allowable weight that can be carried by a
single axle (front or rear).
To assure that your vehicle does not exceed
the maximum permissible weight limits
(GVWR and GAWR for front and rear axle),
have the loaded vehicle (including driver,
passengers and all cargo and, if applicable,
trailer fully loaded) weighed on a suitable
commercial scale.
Trailer tongue load
The tongue load of any trailer is an important
weight to measure because it affects the load
you can carry in your vehicle. If a trailer is
towed, the tongue load must be added to the
weight of all occupants riding and any cargo
you are carrying in the vehicle. The tongue
load typically is between 8% and 15% of the
trailer weight and everything loaded in it.
Maximum tire load
GWarning!
Do not overload the tires by exceeding the
specified load limit as indicated on the Tire
and Loading Information placard on the
driver’s door B-pillar. Overloading the tires
can overheat them, possibly causing a
blowout. Overloading the tires can also result
in handling or steering problems, or brake
failure.
iFor illustration purposes only. Actual data
on tires are specific to each vehicle and
may vary from data shown in above
illustration.
The maximum tire load rating : is the
maximum weight the tires are designed to
support.
For more information on tire load rating, see
(Y page 251).
For information on calculating total and cargo
load capacities, see (Y page 243).
Direction of rotation
Unidirectional tires offer added advantages,
such as better hydroplaning performance. To
benefit, however, you must make sure the
tires rotate in the direction specified.
An arrow on the sidewall indicates the
intended direction of rotation of the tire.
Spare wheels may be mounted against the
direction of rotation (spinning) even with a
unidirectional tire for temporary use only until
the regular drive wheel has been repaired or
replaced. Always observe and follow
applicable temporary use restrictions and
speed limitations indicated on the spare
wheel.
MOExtended system
The MOExtended system allows you to
continue driving your vehicle even if there is
a total loss of pressure in one or more tires.
246Tires and wheelsOperation
X164_AKB; 5; 31, en-USd2ureepe,Version: 2.11.8.12009-09-11T12:30:16+02:00 - Seite 246
Page 266 of 380
Checklist before off-road driving
Engine oil level
RCheck the engine oil level (Y page 230).
Only with a proper oil level can the vehicle
obtain a trouble-free oil supply, even on
steep gradients.
! If the engine oil level warning lamp comes
on while driving, stop the vehicle in a safe
location or as soon at is safe to do so.
Check the engine oil level.
The engine oil level warnings should not be
ignored. Extended driving with the symbol
displayed could result in serious engine
damage that is not covered by the
Mercedes-Benz Limited Warranty.
Tires
RCheck the tread depth and maintain
specified tire inflation pressure. A placard
with the recommended tire inflation
pressures is located on the driver’s door B-
pillar (Y page 243).
RCheck tires for possible damage and
remove foreign objects.
RReplace missing valve caps.
Rims
RDented or bent rims can cause tire inflation
pressure loss and damage the tire beads.
For this reason, check and, if necessary,
change rims before driving off-road.
Vehicle tool kit
RCheck if the jack (Y page 286) is
functional.
RAlways take the vehicle tool kit, a strong
tow rope, a shovel and a small plank (to put
under the jack on sandy soil) with you.
Driving in steep terrain
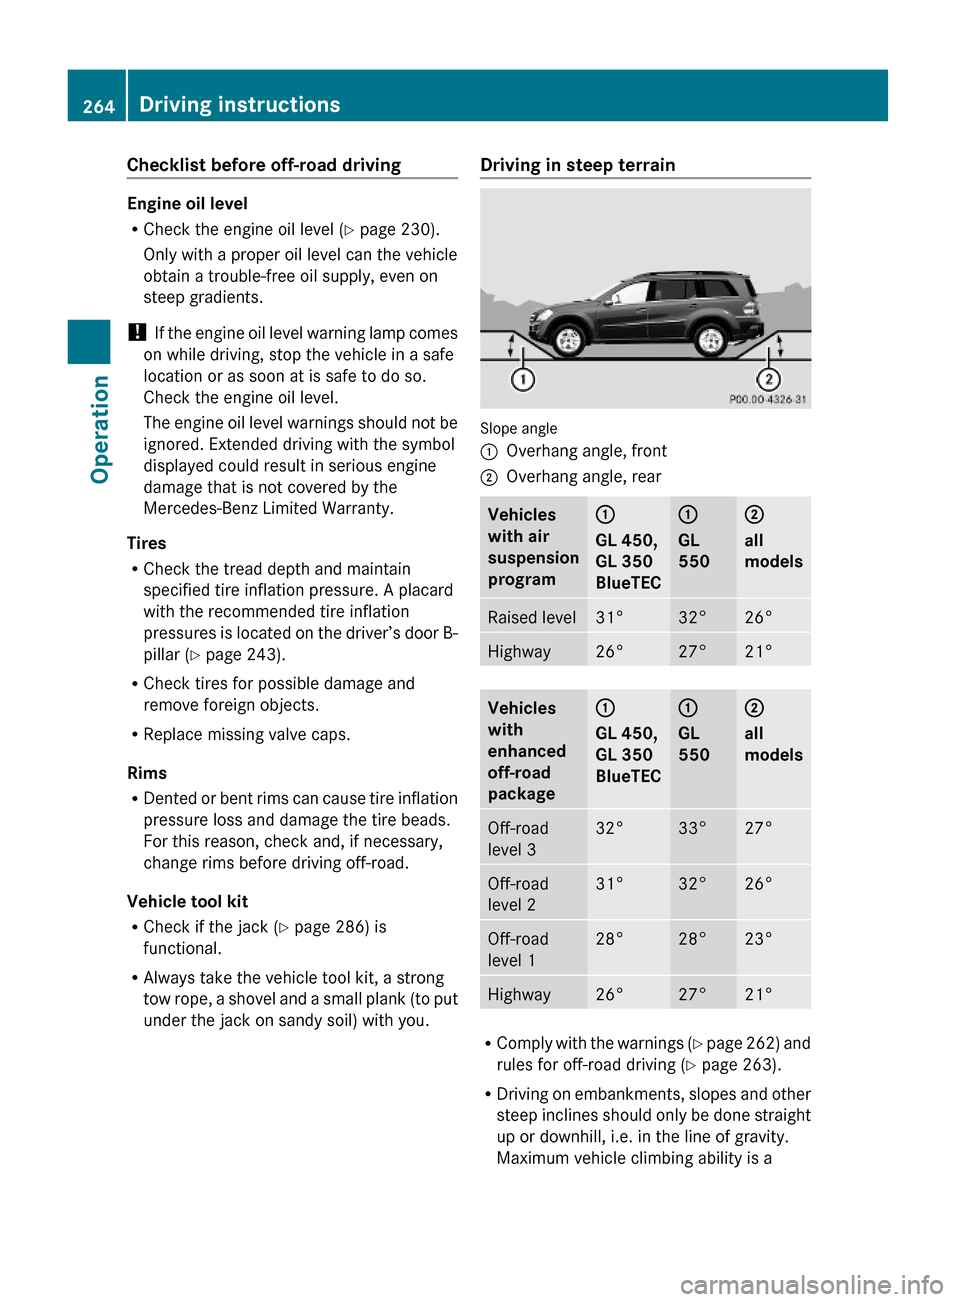
Slope angle
:Overhang angle, front;Overhang angle, rearVehicles
with air
suspension
program
:
GL 450,
GL 350
BlueTEC
:
GL
550
;
all
models
Raised level31°32°26°Highway26°27°21°Vehicles
with
enhanced
off-road
package
:
GL 450,
GL 350
BlueTEC
:
GL
550
;
all
models
Off-road
level 3
32°33°27°Off-road
level 2
31°32°26°Off-road
level 1
28°28°23°Highway26°27°21°
RComply with the warnings (Y page 262) and
rules for off-road driving (Y page 263).
RDriving on embankments, slopes and other
steep inclines should only be done straight
up or downhill, i.e. in the line of gravity.
Maximum vehicle climbing ability is a
264Driving instructionsOperation
X164_AKB; 5; 31, en-USd2ureepe,Version: 2.11.8.12009-09-11T12:30:16+02:00 - Seite 264
Page 267 of 380
100% grade which is equivalent to a slope
angle of 45°. Keep in mind that the
climbing ability of the vehicle depends on
terrain conditions.
R Shift automatic transmission into gear
range 1 (Y page 118).
R Drive slowly.
R Avoid excessive engine speeds – drive with
moderate engine speeds (max. 3 000 rpm).
R Utilize the engine’s braking power when
descending a slope, observe the engine
speed (do not overrev the engine). Apply
the service brake as needed.
i For maximum engine speed, see
“Tachometer” (Y page 125) and see vehicle
specification for your vehicle
( Y page 362).
R Check the brakes after a lengthy
downgrade drive.GWarning!
Never turn the vehicle around on steep
inclines. The vehicle might roll over. If the
vehicle cannot complete the attempted climb,
back it down in reverse gear.
i The hill-start assist system supports you
when driving uphill.
For more information, see “Hill-start assist
system” ( Y page 155).
Traction in steep terrain
The maximum vehicle climbing ability is a
100% grade which is equivalent to a slope
angle of 45°. Keep in mind that the climbing
ability of the vehicle depends on terrain
conditions.
Be easy on the accelerator and watch for
continuous wheel traction when driving in
steep terrain.
i The 4-ETS helps greatly when starting out
on a steep incline when the front wheels
have then the tendency to slip due to the
weight shifting towards the rear axle.
The 4-ETS recognizes the situation and
limits the torque for the front wheels by
braking them.
Simultaneously the torque for the rear
wheels is increased.
i Vehicles with enhanced off-road package
are equipped with automatic locks for the
center and rear axle differential to improve
vehicle traction.
Driving across a hilltop
Decelerate just ahead of a hilltop (do not shift
automatic transmission into neutral position
N ), to prevent the vehicle from speeding up
too much after climbing a hill.
Use the momentum of the vehicle to drive
across the hilltop.
After climbing a hill, driving in this manner
prevents the vehicle from:
R losing ground contact when cresting hills
R losing its forward momentum
R speeding up too much after climbing the hill
Driving downhill
R Drive slowly.
R Do not drive at an angle to the incline. Steer
into the line of gravity and drive with the
front wheels pointing straight downhill.
Otherwise, the vehicle may slide sideways
off the path and roll over.
R Shift automatic transmission into gear
range 1 (Y page 118).
R On steep inclines, use the Downhill Speed
Regulation ( Y page 155).
R Utilize the engine’s braking power to
reduce vehicle speed.
If this is insufficient, apply the brakes
gently. Make sure the vehicle is moving in
the line of gravity.
R Check the brakes after a lengthy
downgrade drive.
Driving instructions265OperationX164_AKB; 5; 31, en-USd2ureepe,Version: 2.11.8.12009-09-11T12:30:16+02:00 - Seite 265Z
Page 270 of 380
LOW RANGE mode (Y page 120) is
switched on.
R Set the raised level ( Y page 159).
! Check that the ruts are not too deep and
your vehicle’s clearance is sufficient.
Otherwise:
R your vehicle may be damaged
R the underbody of the vehicle may come
in contact with the ground and you may
get stuck
R Avoid high engine speeds.
R Shift automatic transmission into gear
range 1 (Y page 118).
R Drive next to the ruts rather than through
them if at all possible.
R If the ruts are too deep to drive in, drive with
one side of the vehicle on the grassy center
strip if the route permits.
Returning from off-road driving GWarning!
If you feel a sudden significant vibration or
ride disturbance, or you suspect that possible
damage to your vehicle has occurred, you
should turn on the hazard warning flashers,
carefully slow down, and drive with caution to
an area which is a safe distance from the road.
Inspect the tires and the vehicle underbody
for possible damage. If the vehicle or tires
appear unsafe, have the vehicle towed to the
nearest authorized Mercedes-Benz Center or
tire dealer for repairs.
Off-road driving increases strain on the
vehicle.
We recommend that you inspect the vehicle
for possible damage after each off-road trip.
Recognizing any damage and a subsequent
timely repair reduces the chance of a possible
breakdown or accident later on.
Proceed as follows:
R Switch off the off-road driving program
( Y page 158) or the LOW RANGE mode
( Y page 120).
R Switch off the DSR ( Y page 156).
R Set the differential locks to AUTO
( Y page 122).
R Lower the vehicle back to a level suitable
for road conditions, e.g. highway/high-
speed level ( Y page 159).
R Clean all exterior lamps and check for
possible damage.
R Clean the front and rear license plate.
R Remove excessive dirt from tires, wheels,
wheel housings, and underbody.
For instance, after driving in mud, clean the
radiator, chassis, engine, brakes, and
wheels from extreme dirt using a strong jet
of water.
R Check tires for possible damage.
R Inspect vehicle underbody, oil pan, brake
hoses, etc., as well as vehicle underbody
for possible damage.
R Check for brush or branches caught in the
underbody.
! Brush or branches could increase the
possibility of a fire, as well as cut fuel and/
or brake lines, puncture rubber bellows of
the axles or drive shafts.
R After continued operation in mud, sand,
water or other dirty conditions clean the
brake discs, wheels, brake pads and check
and clean axle joints.
R Conduct a brake test.268Driving instructionsOperation
X164_AKB; 5; 31, en-USd2ureepe,Version: 2.11.8.12009-09-11T12:30:16+02:00 - Seite 268