2010 MERCEDES-BENZ GL450 reset
[x] Cancel search: resetPage 45 of 380
GWarning!
If the 42 indicator lamp
illuminates when an adult or someone larger
than a small individual is in the front
passenger seat, have the front passenger
reposition himself or herself in the seat until
the 42 indicator lamp goes out,
or check whether objects are caught under or
around the seat.
In the event of a collision, the air bag control
unit will not allow front passenger front air bag
deployment when the OCS has classified the
front passenger seat occupant as weighting
as much as or less than a typical 12-month-
old child in a standard child restraint or if the
front passenger seat is classified as being
empty.
When the OCS senses that the front
passenger seat occupant is classified as
being up to or less than the weight of a typical
12-month-old child in a standard child
restraint, the 42 indicator lamp
will illuminate when the engine is started and
remain illuminated, indicating that the front
passenger front air bag is deactivated.
When the OCS senses that the front
passenger seat is classified as being empty,
the 42 indicator lamp will
illuminate when the engine is started and
remain illuminated, indicating that the front
passenger front air bag is deactivated.
When the OCS senses that the front
passenger seat occupant is classified as
being heavier than the weight of a typical
12-month-old child seated in a standard child
restraint or as being a small individual (such
as a young teenager or a small adult), the
42 indicator lamp will illuminate
for approximately 6 seconds when the engine
is started and then, depending on occupant
weight sensor readings from the seat, remain
illuminated or go out. With the
42 indicator lamp illuminated,
the front passenger front air bag is
deactivated. With the 42
indicator lamp out, the front passenger front
air bag is activated.
When the OCS senses that the front
passenger seat occupant is classified as an
adult or someone larger than a small
individual, the 42 indicator lamp
will illuminate for approximately 6 seconds
when the engine is started and then goes out,
indicating that the front passenger front air
bag is activated.
If the 42 indicator lamp is
illuminated, the front passenger front air bag
is deactivated and will not be deployed.
If the 42 indicator lamp is not
illuminated, the front passenger front air bag
is activated and will be deployed
R in the event of certain frontal impacts
R if impact exceeds a preset deployment
threshold
R independently of the side impact air bags
If the front passenger front air bag is
deployed, the rate of inflation will be
influenced by
R the rate of relevant vehicle deceleration as
assessed by the air bag control unit
R the front passenger’s weight category as
identified by the OCS
For more information on air bag display
messages in the multifunction display, see
( Y page 291).GWarning!
According to accident statistics, children are
safer when properly restrained in the rear
seating positions than in the front seating
position. Thus, we strongly recommend that
children be placed in the rear seats whenever
possible. Regardless of seating position,
children 12 years old and under must be
seated and properly secured in an appropriate
infant restraint, toddler restraint, or booster
seat recommended for the size and weight of
the child.
Occupant safety43Safety and securityX164_AKB; 5; 31, en-USd2ureepe,Version: 2.11.8.12009-09-11T12:30:16+02:00 - Seite 43Z
Page 51 of 380
Have all work carried out only by qualified
technicians. Contact an authorized
Mercedes-Benz Center.
Proper use of seat beltsGWarning!
USE SEAT BELTS PROPERLY
R Seat belts can only protect when used
properly. Never wear seat belts in any other
way than as described in this section, as
that could result in serious injuries in case
of an accident.
R Each occupant should wear their seat belt
at all times, because seat belts help reduce
the likelihood of and potential severity of
injuries in accidents, including rollovers.
The integrated restraint system includes
SRS (driver front air bag, driver side knee
bag, front passenger front air bag, side
impact air bags, window curtain air bags for
door windows), Emergency Tensioning
Devices (ETDs), seat belt force limiters, and
front seat knee bolsters.
The system is designed to enhance the
protection offered to properly belted
occupants in certain frontal (front air bags,
driver side knee bag and ETDs) and side
(side impact air bags, window curtain air
bags, and ETDs) impacts which exceed
preset deployment thresholds and in
certain rollovers (window curtain air bags
and ETDs).
R Never wear the shoulder belt under your
arm, against your neck or off your shoulder.
In a frontal crash, your body would move
too far forward. That would increase the
chance of head and neck injuries. The seat
belt would also apply too much force to the
ribs or abdomen, which could severely
injure internal organs such as your liver or
spleen.
Adjust the seat belt so that the shoulder
section is located as close as possible to
the middle of the shoulder. It should not
touch the neck. Never pass the shoulder
portion of the seat belt under your arm. For
this purpose, you can adjust the height of
the seat belt outlet.
R Position the lap belt as low as possible on
your hips and not across the abdomen. If
the lap belt is positioned across your
abdomen, it could cause serious injuries in
a crash.
R Never wear seat belts over rigid or
breakable objects in or on your clothing,
such as eyeglasses, pens, keys etc., as
these might cause injuries.
R Make sure the seat belt is always fitted
snugly. Take special care of this when
wearing loose clothing.
R Never use a seat belt for more than one
person at a time. Do not fasten a seat belt
around a person and another person or
other objects at the same time.
R Seat belts should not be worn twisted. In a
crash, you would not have the full width of
the seat belt to distribute impact forces.
The twisted seat belt against your body
could cause injuries.
R Pregnant women should also always use a
lap/shoulder belt. The lap belt portion
should be positioned as low as possible on
the hips to avoid any possible pressure on
the abdomen.
R Place the seat backrest in a position that is
as upright as possible.
R Check your seat belt during travel to make
sure it is properly positioned.
R Never place your feet on the instrument
panel, dashboard, or on the seat. Always
keep both feet on the floor in front of the
seat.
R When using a seat belt to secure infant
restraints, toddler restraints, or children in
booster seats, always follow the child seat
manufacturer’s instructions.Occupant safety49Safety and securityX164_AKB; 5; 31, en-USd2ureepe,Version: 2.11.8.12009-09-11T12:30:16+02:00 - Seite 49Z
Page 54 of 380
If you and/or your passenger release the
seat belt during driving, the seat belt
telltale 7 starts flashing and the
warning chime sounds as described before.
If the driver’s or the front passenger’s seat
belt remains unfastened after 60 seconds,
the warning chime stops sounding, the seat
belt telltale 7 stops flashing but
continues to be illuminated.
After a vehicle standstill, the warning chime
is reactivated and the seat belt telltale
7 is flashing again if the vehicle speed
once exceeds 15 mph (25 km/h).
The seat belt telltale 7 will only go out if
both the driver’s and the front passenger’s
seat belt (with the front passenger seat
occupied) are fastened, or the vehicle is
standing still and a front door is opened.
For more information, see “Practical hints”
( Y page 317).
Emergency Tensioning Device (ETD),
seat belt force limiter
The seat belts for the front seats and second
row outer seats are equipped with ETDs and
seat belt force limiters. The seat belts for the
third-row seats are equipped with ETDs.
The ETDs are designed to activate in the
following cases:
R in frontal or rear-end impacts exceeding
the system’s preset deployment threshold
R in side impacts exceeding the system’s
preset deployment threshold on the far
side of the impact
R in certain vehicle rollovers
R if the restraint systems are operational and
functioning correctly, see “SRS indicator
lamp” ( Y page 36)
The ETDs for the front seats will only activate
if the front seat belts are fastened (latch plate
properly inserted into buckle).
The ETDs for the rear outer seats (second-row
seats) or rear seats (third-row seats) will
activate with or without the respective seat
belts fastened.
In an impact, the ETDs remove slack from the
seat belts in such a way that the seat belts fit
more snugly against the body. Seat belt force
limiters, when activated, are employed to
help reduce the peak force exerted by the
seat belts on occupants during a crash.
i The ETDs do not correct an incorrect seat
position or incorrectly worn seat belts.
The ETDs do not pull occupants back
toward the seat backrest.GWarning!
Pyrotechnic ETDs that were activated must be
replaced.
For your safety, when disposing of the
pyrotechnic ETDs always follow our safety
instructions. These are available at any
authorized Mercedes-Benz Center.
The PRE-SAFE ®
system has electrically
operated reversible pre-tensioners that do
not require replacement after activation.
Preventive occupant safety (PRE-
SAFE ®
)
GWarning!
The PRE-SAFE ®
system is intended to reduce
the effects of an accident on vehicle
occupants who are wearing their seat belt
properly. Despite your vehicle being equipped
with the PRE-SAFE ®
system, the possibility of
personal injuries occurring as a result of an
accident cannot be eliminated. Therefore,
always drive carefully and adjust your driving
to the prevailing road, weather, and traffic
conditions.
52Occupant safetySafety and security
X164_AKB; 5; 31, en-USd2ureepe,Version: 2.11.8.12009-09-11T12:30:16+02:00 - Seite 52
Page 56 of 380
must be reset. Otherwise, the NECK-PRO
active front head restraints cannot offer any
additional protection in the event of another
rear-end collision.
For information on resetting the activated
NECK-PRO active front head restraints, see
“Resetting activated head restraints”
(Y page 325).
You cannot remove the NECK-PRO active
front head restraints.
GWarning!
For your protection, drive only with properly
positioned head restraints.
Adjust the head restraint so that it is as close
to the head as possible and the center of the
head restraint supports the back of the head
at eye level. This will reduce the potential for
injury to the head and neck in the event of an
accident or similar situation.
For information on head restraint adjustment,
see “Head restraint height” (Y page 83), or
see “Head restraint fore and aft adjustment”
(Y page 84).
Correct driver seat adjustment
GWarning!
In order to avoid possible loss of vehicle
control the following must be done before the
vehicle is put into motion:
Rseat adjustment
Rhead restraint adjustment
Rsteering wheel adjustment
Rrear view mirror adjustment
Rfastening of seat belts
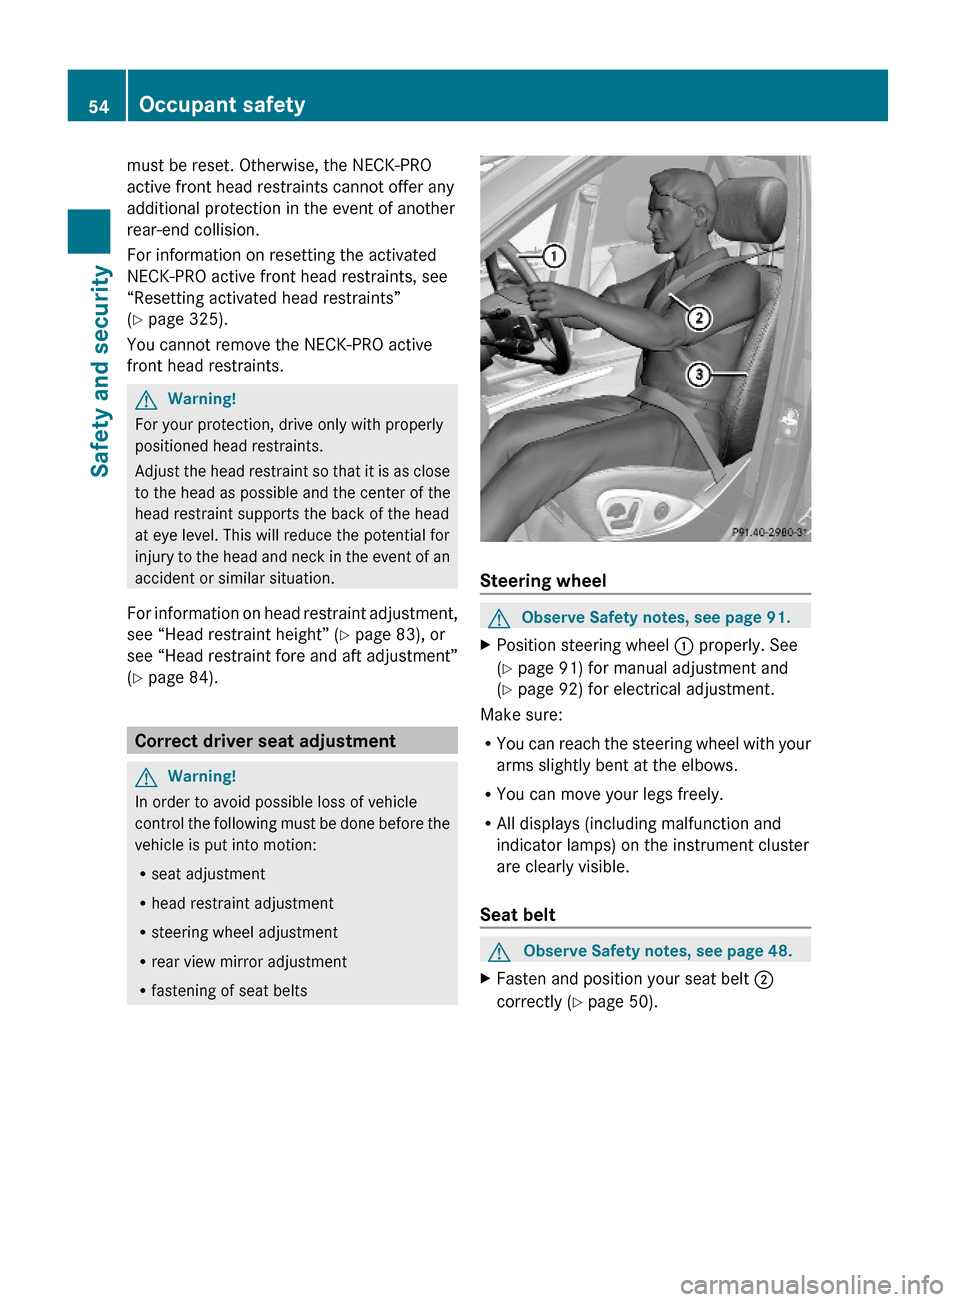
Steering wheel
GObserve Safety notes, see page 91.XPosition steering wheel : properly. See
(Y page 91) for manual adjustment and
(Y page 92) for electrical adjustment.
Make sure:
RYou can reach the steering wheel with your
arms slightly bent at the elbows.
RYou can move your legs freely.
RAll displays (including malfunction and
indicator lamps) on the instrument cluster
are clearly visible.
Seat belt
GObserve Safety notes, see page 48.XFasten and position your seat belt ;
correctly (Y page 50).
54Occupant safetySafety and security
X164_AKB; 5; 31, en-USd2ureepe,Version: 2.11.8.12009-09-11T12:30:16+02:00 - Seite 54
Page 76 of 380
information on replacing the SmartKey, see
“Replacing the SmartKey” (Y page 74).
Replacing the SmartKey
Only you, or someone authorized by you can
order a replacement key from any Mercedes-
Benz Center. In order to do so, the Mercedes-
Benz Center will require proof of identity and
vehicle ownership with original documents,
including the following:
If you are the current owner of the vehicle:
Rthe vehicle’s current state registration
Ra current identity card, passport, or drivers
license
If you are an authorized person:
Rthe vehicle’s current state registration
Ra current identity card, passport, or drivers
license for the authorized individual
Rsigned and dated authorization from the
owner of the vehicle for which the key is
being requested
iDuplicated or photocopied
documentation will not be accepted.
Activating the key
Once you, or an authorized person, has
provided the appropriate documents, the
Mercedes-Benz Center will need to
synchronize the key to your vehicle before it
can be used. In order to do so, the Mercedes-
Benz Center need access to your vehicle.
Opening the doors from the inside
You can open a door from the inside even
when it is locked unless it is secured with the
child safety lock (Y page 60).
Open door only when conditions are safe to
do so.
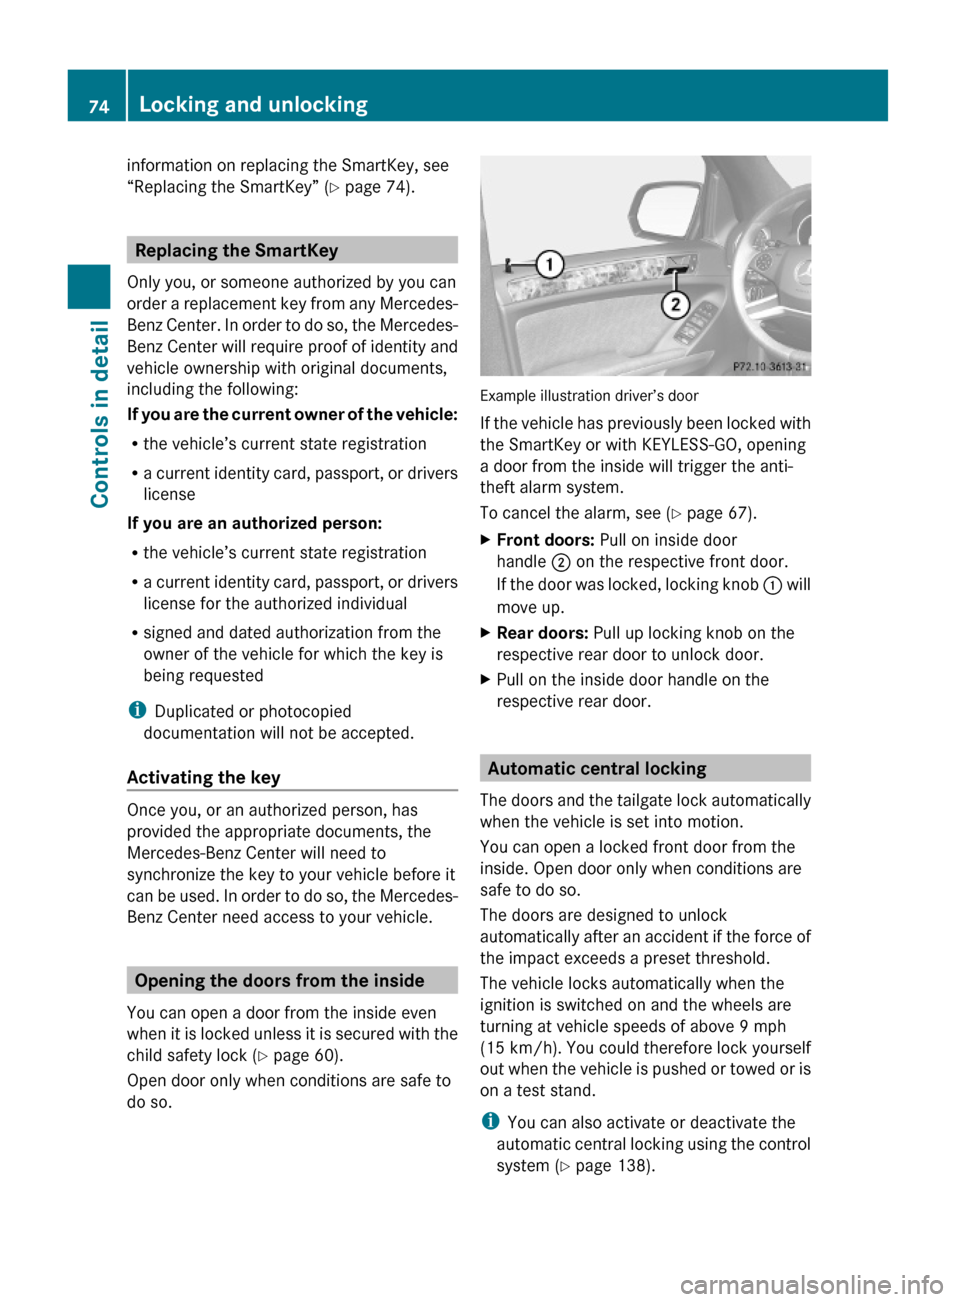
Example illustration driver’s door
If the vehicle has previously been locked with
the SmartKey or with KEYLESS-GO, opening
a door from the inside will trigger the anti-
theft alarm system.
To cancel the alarm, see (Y page 67).
XFront doors: Pull on inside door
handle ; on the respective front door.
If the door was locked, locking knob : will
move up.
XRear doors: Pull up locking knob on the
respective rear door to unlock door.
XPull on the inside door handle on the
respective rear door.
Automatic central locking
The doors and the tailgate lock automatically
when the vehicle is set into motion.
You can open a locked front door from the
inside. Open door only when conditions are
safe to do so.
The doors are designed to unlock
automatically after an accident if the force of
the impact exceeds a preset threshold.
The vehicle locks automatically when the
ignition is switched on and the wheels are
turning at vehicle speeds of above 9 mph
(15 km/h). You could therefore lock yourself
out when the vehicle is pushed or towed or is
on a test stand.
iYou can also activate or deactivate the
automatic central locking using the control
system (Y page 138).
74Locking and unlockingControls in detail
X164_AKB; 5; 31, en-USd2ureepe,Version: 2.11.8.12009-09-11T12:30:16+02:00 - Seite 74
Page 85 of 380
Do not drive the vehicle without the seat head
restraints. Head restraints are intended to
help reduce injuries during an accident.
Seat adjustment
! When moving the seats, make sure there
are no items in the footwell or behind the
seats. Otherwise, you could damage the
seats and/or the items.
Power seats
! When the second-row seats are folded
forward, e.g. for cargo volume expansion,
the front seats may not be moved to the
rearmost position. Otherwise you could
damage the front and second-row seats.
! When adjusting the seat backrest tilt and
head restraint height, make sure the sun
visor is folded up. If the head restraint is in
the uppermost position, it could hit and
damage the sun visor.
iVehicles without memory function:
The seats can be adjusted within 5 minutes
after either front door has been opened.
The counter resets each time
Ryou open or close a front door
Ryou insert the SmartKey into the starter
switch
Ryou remove the SmartKey from the
starter switch
Ryou switch the ignition on or off
Just like in vehicles with memory function,
the power seats can be operated at any
time when the ignition is switched on.
iThe memory function (Y page 96) lets
you store the settings for the seat position
together with the settings for the steering
wheel (electrical) and exterior rear view
mirrors.
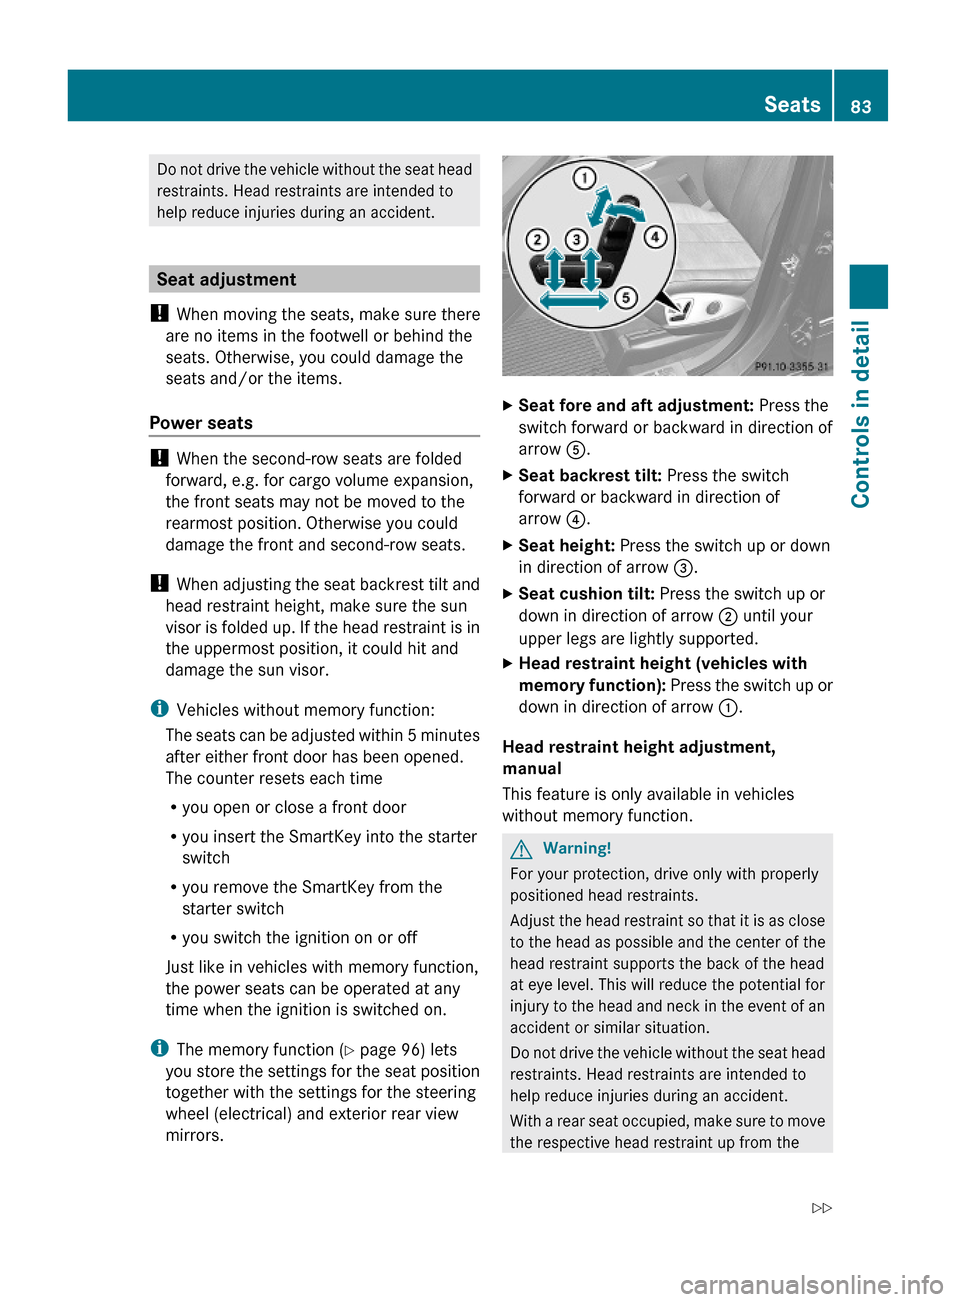
XSeat fore and aft adjustment: Press the
switch forward or backward in direction of
arrow A.
XSeat backrest tilt: Press the switch
forward or backward in direction of
arrow ?.
XSeat height: Press the switch up or down
in direction of arrow =.
XSeat cushion tilt: Press the switch up or
down in direction of arrow ; until your
upper legs are lightly supported.
XHead restraint height (vehicles with
memory function): Press the switch up or
down in direction of arrow :.
Head restraint height adjustment,
manual
This feature is only available in vehicles
without memory function.
GWarning!
For your protection, drive only with properly
positioned head restraints.
Adjust the head restraint so that it is as close
to the head as possible and the center of the
head restraint supports the back of the head
at eye level. This will reduce the potential for
injury to the head and neck in the event of an
accident or similar situation.
Do not drive the vehicle without the seat head
restraints. Head restraints are intended to
help reduce injuries during an accident.
With a rear seat occupied, make sure to move
the respective head restraint up from the
Seats83Controls in detailX164_AKB; 5; 31, en-USd2ureepe,Version: 2.11.8.12009-09-11T12:30:16+02:00 - Seite 83Z
Page 97 of 380
The rear view mirrors will not react if the
automatic transmission is set to reverse gear
R or the interior lighting is switched on.
GWarning!
The auto-dimming function does not react if
incoming light is not aimed directly at sensors
in the interior rear view mirror.
The interior rear view mirror and the exterior
rear view mirror on the driver’s side do not
react, for example, when transporting cargo
which covers the rear window.
Light hitting the mirror(s) at certain angles
(incident light) could blind you. As a result,
you may not be able to observe traffic
conditions and could cause an accident.
Exterior rear view mirror parking
position
For more convenient parking, you can set the
passenger-side exterior rear view mirror so
that you can see the rear wheel and the road
curb.
Setting and storing the parking position
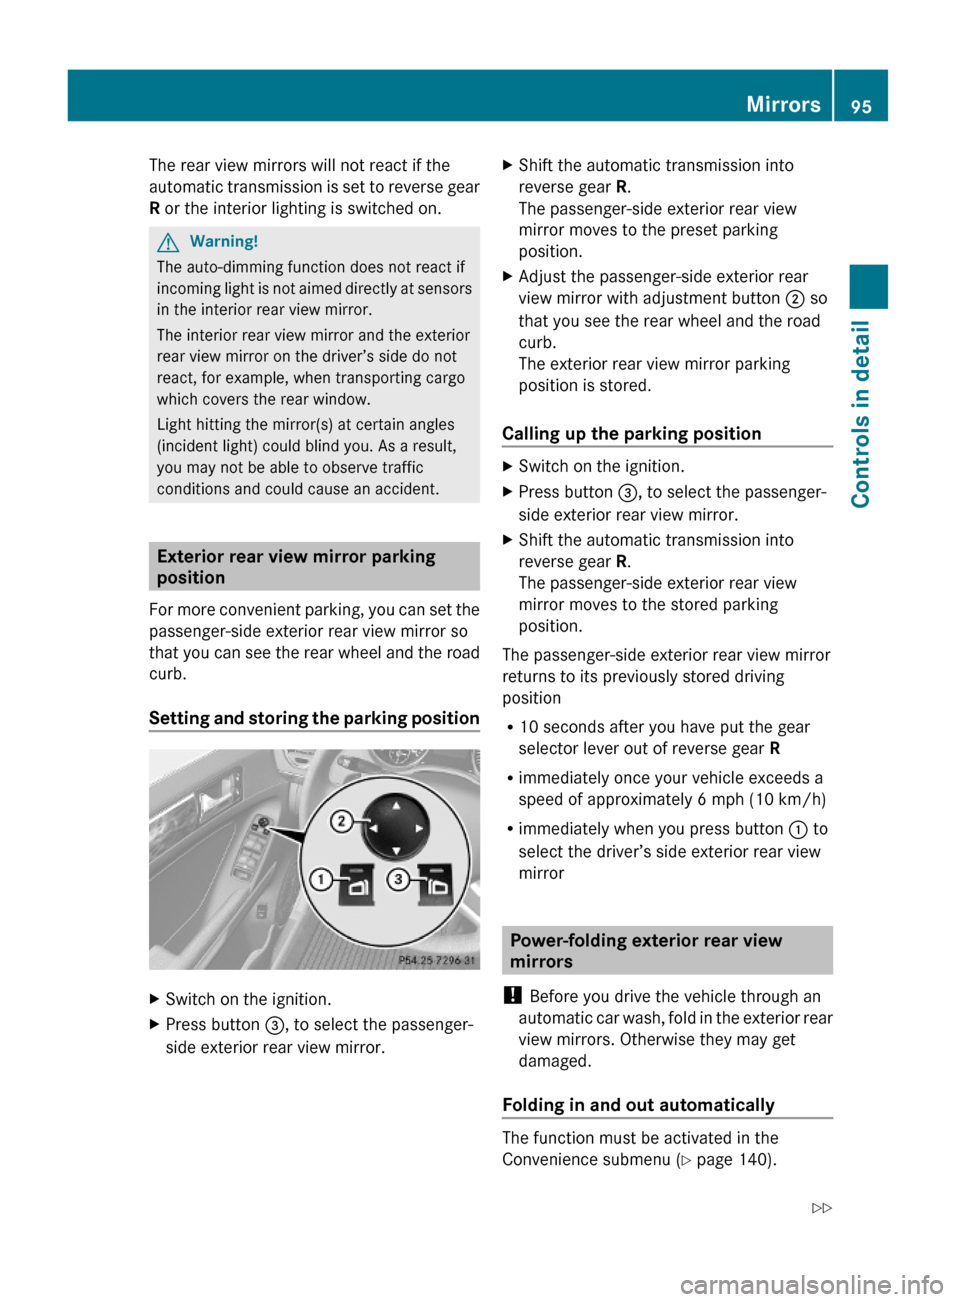
XSwitch on the ignition.XPress button =, to select the passenger-
side exterior rear view mirror.
XShift the automatic transmission into
reverse gear R.
The passenger-side exterior rear view
mirror moves to the preset parking
position.
XAdjust the passenger-side exterior rear
view mirror with adjustment button ; so
that you see the rear wheel and the road
curb.
The exterior rear view mirror parking
position is stored.
Calling up the parking position
XSwitch on the ignition.XPress button =, to select the passenger-
side exterior rear view mirror.
XShift the automatic transmission into
reverse gear R.
The passenger-side exterior rear view
mirror moves to the stored parking
position.
The passenger-side exterior rear view mirror
returns to its previously stored driving
position
R10 seconds after you have put the gear
selector lever out of reverse gear R
Rimmediately once your vehicle exceeds a
speed of approximately 6 mph (10 km/h)
Rimmediately when you press button : to
select the driver’s side exterior rear view
mirror
Power-folding exterior rear view
mirrors
! Before you drive the vehicle through an
automatic car wash, fold in the exterior rear
view mirrors. Otherwise they may get
damaged.
Folding in and out automatically
The function must be activated in the
Convenience submenu (Y page 140).
Mirrors95Controls in detailX164_AKB; 5; 31, en-USd2ureepe,Version: 2.11.8.12009-09-11T12:30:16+02:00 - Seite 95Z
Page 102 of 380
Vehicles with front fog lampsXSwitching on front fog lamps: Pull out the
exterior lamp switch to first stop.
The green indicator lamp N in the
exterior lamp switch comes on.
XSwitching on rear fog lamp: Pull out the
exterior lamp switch to second stop.
The rear fog lamp, the front fog lamps, the
green and the yellow indicator lamp R
in the exterior lamp switch come on.
XSwitching off front fog lamps/rear fog
lamp: Push in the exterior lamp switch to
its stop.
Vehicles without front fog lamps
XSwitching on rear fog lamp: Pull out the
exterior lamp switch to its stop.
The rear fog lamp and the yellow indicator
lamp R in the exterior lamp switch
come on.
XSwitching off rear fog lamp: Push in the
exterior lamp switch to its stop.
Locator lighting and night security
illumination
Locator lighting and night security
illumination are described in the “Control
system” section, see “Switching locator
lighting on or off” (Y page 136) and
“Switching night security illumination
(Headlamps delayed shut-off feature) on or
off” (Y page 137).
Combination switch
Turn signals
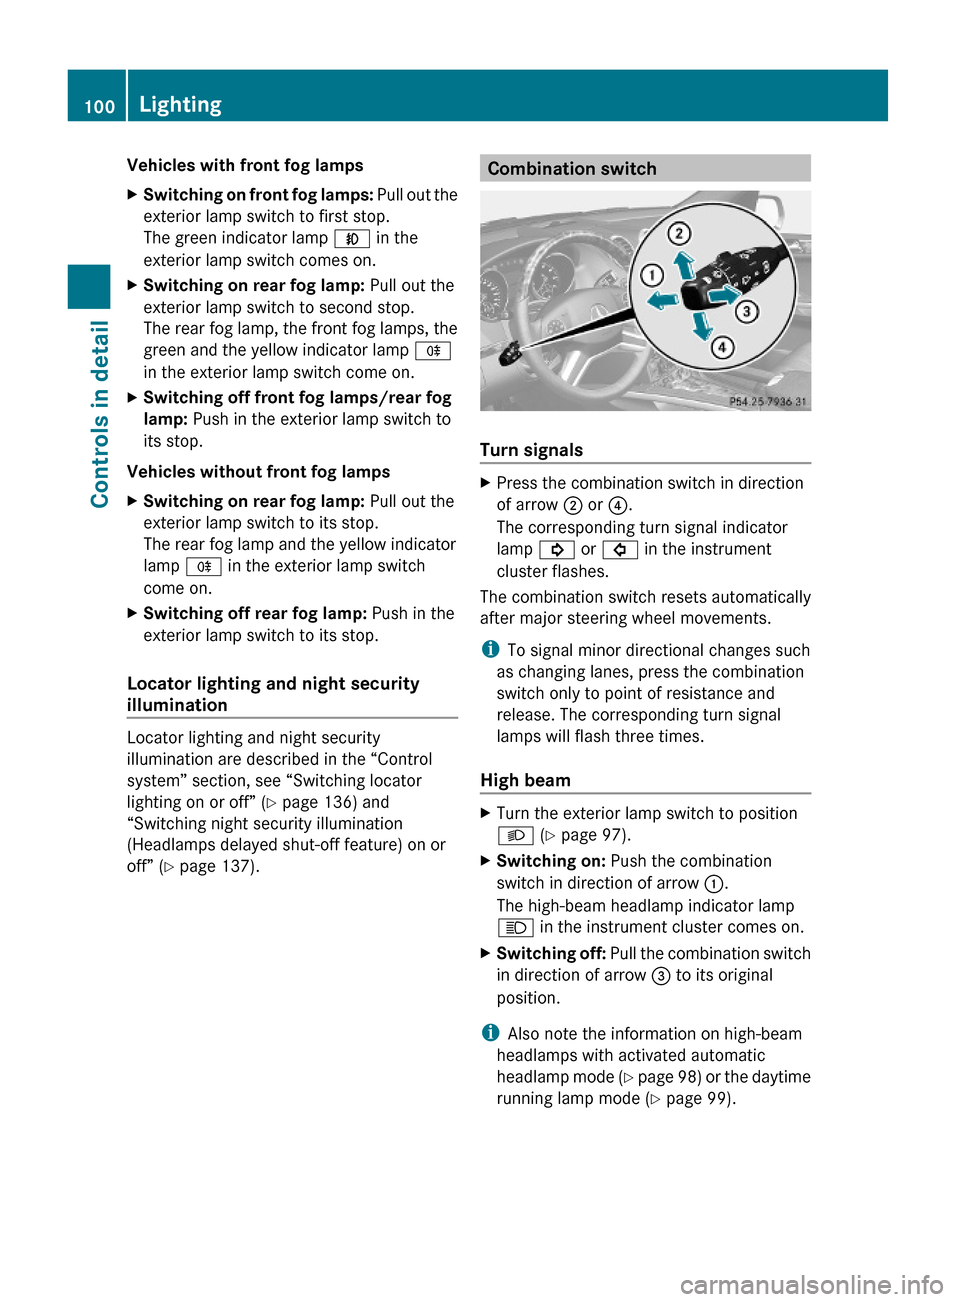
XPress the combination switch in direction
of arrow ; or ?.
The corresponding turn signal indicator
lamp ! or # in the instrument
cluster flashes.
The combination switch resets automatically
after major steering wheel movements.
iTo signal minor directional changes such
as changing lanes, press the combination
switch only to point of resistance and
release. The corresponding turn signal
lamps will flash three times.
High beam
XTurn the exterior lamp switch to position
L (Y page 97).
XSwitching on: Push the combination
switch in direction of arrow :.
The high-beam headlamp indicator lamp
K in the instrument cluster comes on.
XSwitching off: Pull the combination switch
in direction of arrow = to its original
position.
iAlso note the information on high-beam
headlamps with activated automatic
headlamp mode (Y page 98) or the daytime
running lamp mode (Y page 99).
100LightingControls in detail
X164_AKB; 5; 31, en-USd2ureepe,Version: 2.11.8.12009-09-11T12:30:16+02:00 - Seite 100