2010 MERCEDES-BENZ GL450 buttons
[x] Cancel search: buttonsPage 141 of 380
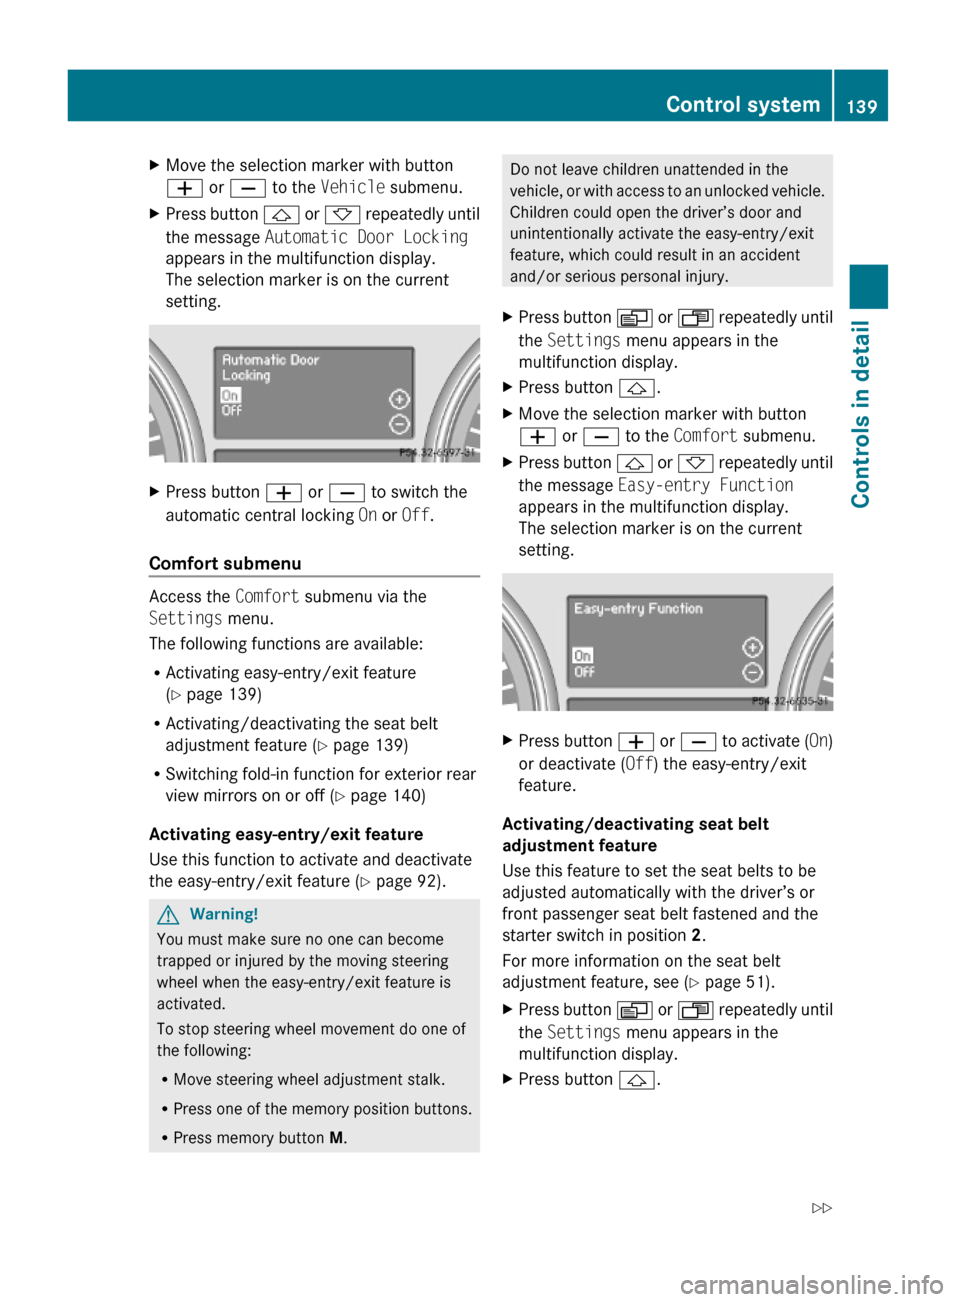
XMove the selection marker with button
W or X to the Vehicle submenu.
XPress button & or * repeatedly until
the message Automatic Door Locking
appears in the multifunction display.
The selection marker is on the current
setting.
XPress button W or X to switch the
automatic central locking On or Off.
Comfort submenu
Access the Comfort submenu via the
Settings menu.
The following functions are available:
RActivating easy-entry/exit feature
(Y page 139)
RActivating/deactivating the seat belt
adjustment feature (Y page 139)
RSwitching fold-in function for exterior rear
view mirrors on or off (Y page 140)
Activating easy-entry/exit feature
Use this function to activate and deactivate
the easy-entry/exit feature (Y page 92).
GWarning!
You must make sure no one can become
trapped or injured by the moving steering
wheel when the easy-entry/exit feature is
activated.
To stop steering wheel movement do one of
the following:
RMove steering wheel adjustment stalk.
RPress one of the memory position buttons.
RPress memory button M.
Do not leave children unattended in the
vehicle, or with access to an unlocked vehicle.
Children could open the driver’s door and
unintentionally activate the easy-entry/exit
feature, which could result in an accident
and/or serious personal injury.
XPress button V or U repeatedly until
the Settings menu appears in the
multifunction display.
XPress button &.XMove the selection marker with button
W or X to the Comfort submenu.
XPress button & or * repeatedly until
the message Easy-entry Function
appears in the multifunction display.
The selection marker is on the current
setting.
XPress button W or X to activate (On)
or deactivate (Off) the easy-entry/exit
feature.
Activating/deactivating seat belt
adjustment feature
Use this feature to set the seat belts to be
adjusted automatically with the driver’s or
front passenger seat belt fastened and the
starter switch in position 2.
For more information on the seat belt
adjustment feature, see (Y page 51).
XPress button V or U repeatedly until
the Settings menu appears in the
multifunction display.
XPress button &.Control system139Controls in detailX164_AKB; 5; 31, en-USd2ureepe,Version: 2.11.8.12009-09-11T12:30:16+02:00 - Seite 139Z
Page 180 of 380
The air conditioning uses the refrigerant
R134a. This refrigerant is free of CFCs which
are harmful to the ozone layer.
! If the air conditioning cannot be activated
again, this indicates that the air
conditioning is losing refrigerant. The
compressor has turned off.
Have the air conditioning checked at the
nearest authorized Mercedes-Benz Center.
Automatic mode
When operating the climate control system in
automatic mode, the interior air temperature,
air volume and air distribution are adjusted
automatically.
In automatic mode, cooling with
dehumidification is switched on. This function
can be switched off if necessary.
GWarning!
If you switch off the air conditioning, the
vehicle will not be cooled when weather
conditions are warm. The windows can fog up
more quickly. Window fogging may impair
visibility and endanger you and others.
XSet the desired temperature
( Y page 178).XActivating: Press button Ã.
The indicator lamp in the button comes on.
The air volume and air distribution are
adjusted automatically.
i The settings for the passenger side are
also used for the rear passenger
compartment.
XDeactivating: Press button I or K .
The indicator lamp in button à goes out.
The automatic operation of air volume
switches off. The selected blower speed isshown in air volume display G
( Y page 175).
or
XPress air distribution button ¯, P , or
O .
The indicator lamp in button à goes out.
The automatic operation of air distribution
switches off.
Setting the temperature
You can adjust the air temperature on each
side of the passenger compartment. You
should raise or lower the temperature setting
in small increments, preferably starting at
72‡ (22†).
XIncreasing/decreasing: Turn
temperature control : and/or C
( Y page 175) slightly clockwise or
counterclockwise.
Adjusting air distribution
The air distribution can be adjusted manually.
The symbols on the buttons represent the
following functions:
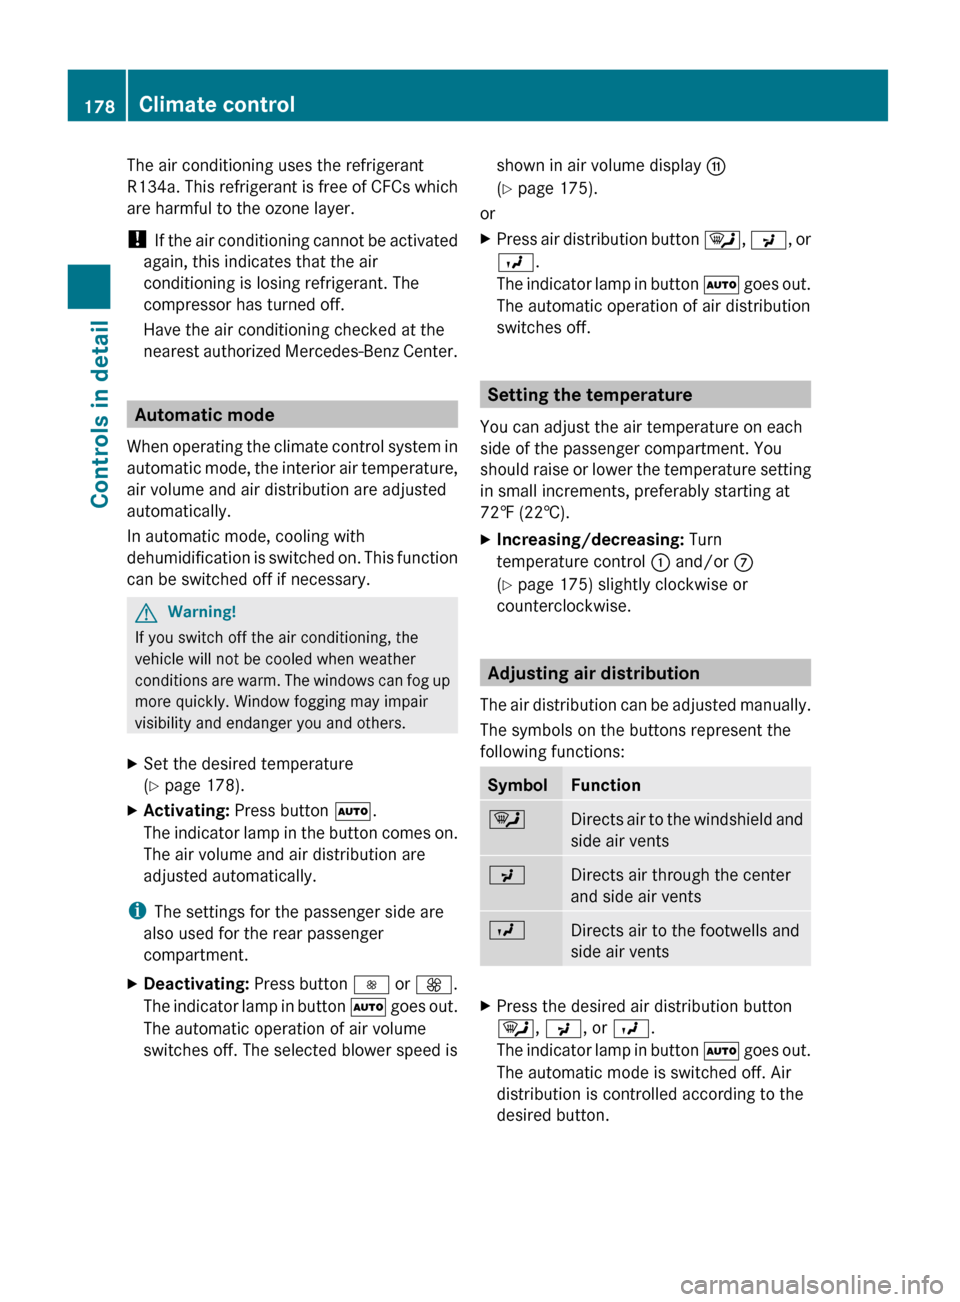
SymbolFunction¯Directs air to the windshield and
side air ventsPDirects air through the center
and side air ventsODirects air to the footwells and
side air ventsXPress the desired air distribution button
¯ , P , or O .
The indicator lamp in button à goes out.
The automatic mode is switched off. Air
distribution is controlled according to the
desired button.178Climate controlControls in detail
X164_AKB; 5; 31, en-USd2ureepe,Version: 2.11.8.12009-09-11T12:30:16+02:00 - Seite 178
Page 190 of 380
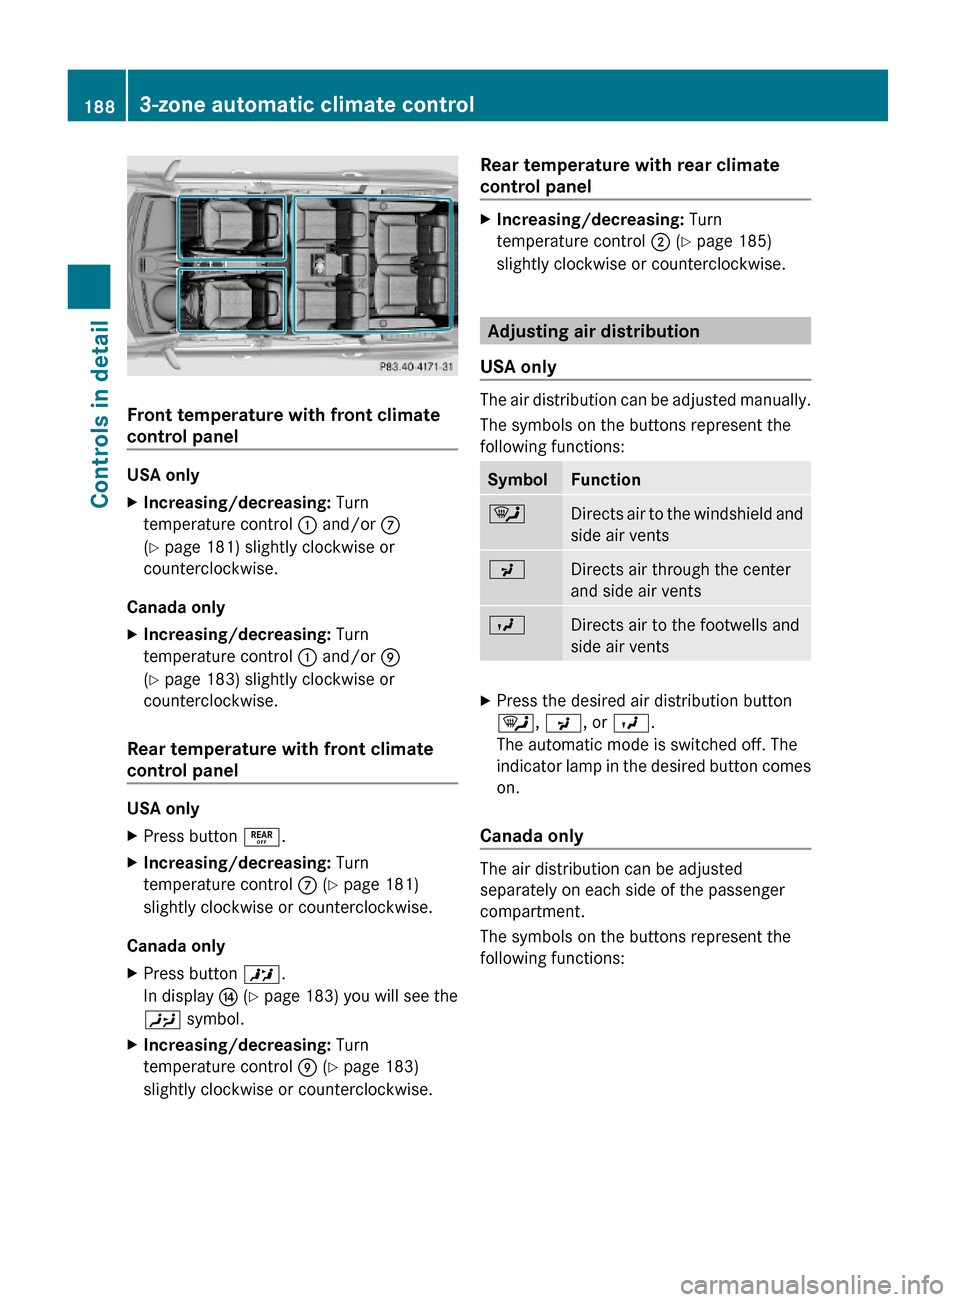
Front temperature with front climate
control panel
USA only
XIncreasing/decreasing: Turn
temperature control : and/or C
(Y page 181) slightly clockwise or
counterclockwise.
Canada only
XIncreasing/decreasing: Turn
temperature control : and/or E
(Y page 183) slightly clockwise or
counterclockwise.
Rear temperature with front climate
control panel
USA only
XPress button ±.XIncreasing/decreasing: Turn
temperature control C (Y page 181)
slightly clockwise or counterclockwise.
Canada only
XPress button X.
In display J (Y page 183) you will see the
Y symbol.
XIncreasing/decreasing: Turn
temperature control E (Y page 183)
slightly clockwise or counterclockwise.
Rear temperature with rear climate
control panel
XIncreasing/decreasing: Turn
temperature control ; (Y page 185)
slightly clockwise or counterclockwise.
Adjusting air distribution
USA only
The air distribution can be adjusted manually.
The symbols on the buttons represent the
following functions:
SymbolFunction¯Directs air to the windshield and
side air vents
PDirects air through the center
and side air vents
ODirects air to the footwells and
side air vents
XPress the desired air distribution button
¯, P, or O.
The automatic mode is switched off. The
indicator lamp in the desired button comes
on.
Canada only
The air distribution can be adjusted
separately on each side of the passenger
compartment.
The symbols on the buttons represent the
following functions:
1883-zone automatic climate controlControls in detail
X164_AKB; 5; 31, en-USd2ureepe,Version: 2.11.8.12009-09-11T12:30:16+02:00 - Seite 188
Page 192 of 380

was set before the front defroster was
switched on.
The indicator lamp in button ¦ goes out.
The indicator lamp in button Á comes
on.
or
XTurn temperature control : and/or C
(USA only) ( Y page 181) or : and/or E
(Canada only) ( Y page 183) slightly in any
direction.
Heating switches to the temperature that
was set before the front defroster was
switched on.
The indicator lamp in button ¦ goes out.
The indicator lamp in button Á comes
on.
i The air conditioning compressor remains
on even if the indicator lamp in button
¦ goes out. This helps to prevent the
windshield from fogging.
Deactivating
XPress button ¦ once more.
The indicator lamp in the button goes out.
Defrosting is turned off.
The previous settings are once again in
effect. The air conditioning compressor
remains switched on.
i To deactivate, you can also press button
^ or à .
Windshield fogged on the outside
XSwitch the windshield wipers on
( Y page 103).XPress button Ã.
The indicator lamp in the button goes out.
Air volume and air distribution are
controlled separately for each zone.
If the automatic air volume and air
distribution are switched off:
XPress buttons O/c 16
and P /
\ 16
.
Air recirculation mode
Switch to air recirculation mode to prevent
unpleasant odors from entering the vehicle
from the outside (e. g. before driving through
a tunnel). This setting cuts off the intake of
outside air and recirculates the air in the
passenger compartment.
GWarning!
Fogged windows impair visibility,
endangering you and others. If the windows
begin to fog on the inside, switching off the
air recirculation mode immediately should
clear interior window fogging. If interior
window fogging persists, make sure the air
conditioning is activated, or press button
¦ .
XActivating: Press button d.
The indicator lamp in the button comes on.
i The air recirculation mode is activated
automatically at high outside
temperatures.
The indicator lamp in button d is not lit
when the air recirculation mode is switched
on automatically.
A quantity of outside air is added after
approximately 30 minutes.
If you have turned off the air conditioning
or the outside temperature is below 41‡
(5†), the air recirculation mode will not
switch on automatically.
XDeactivating: Press button d.
The indicator lamp in the button goes out.16 Canada only1903-zone automatic climate controlControls in detail
X164_AKB; 5; 31, en-USd2ureepe,Version: 2.11.8.12009-09-11T12:30:16+02:00 - Seite 190
Page 204 of 380
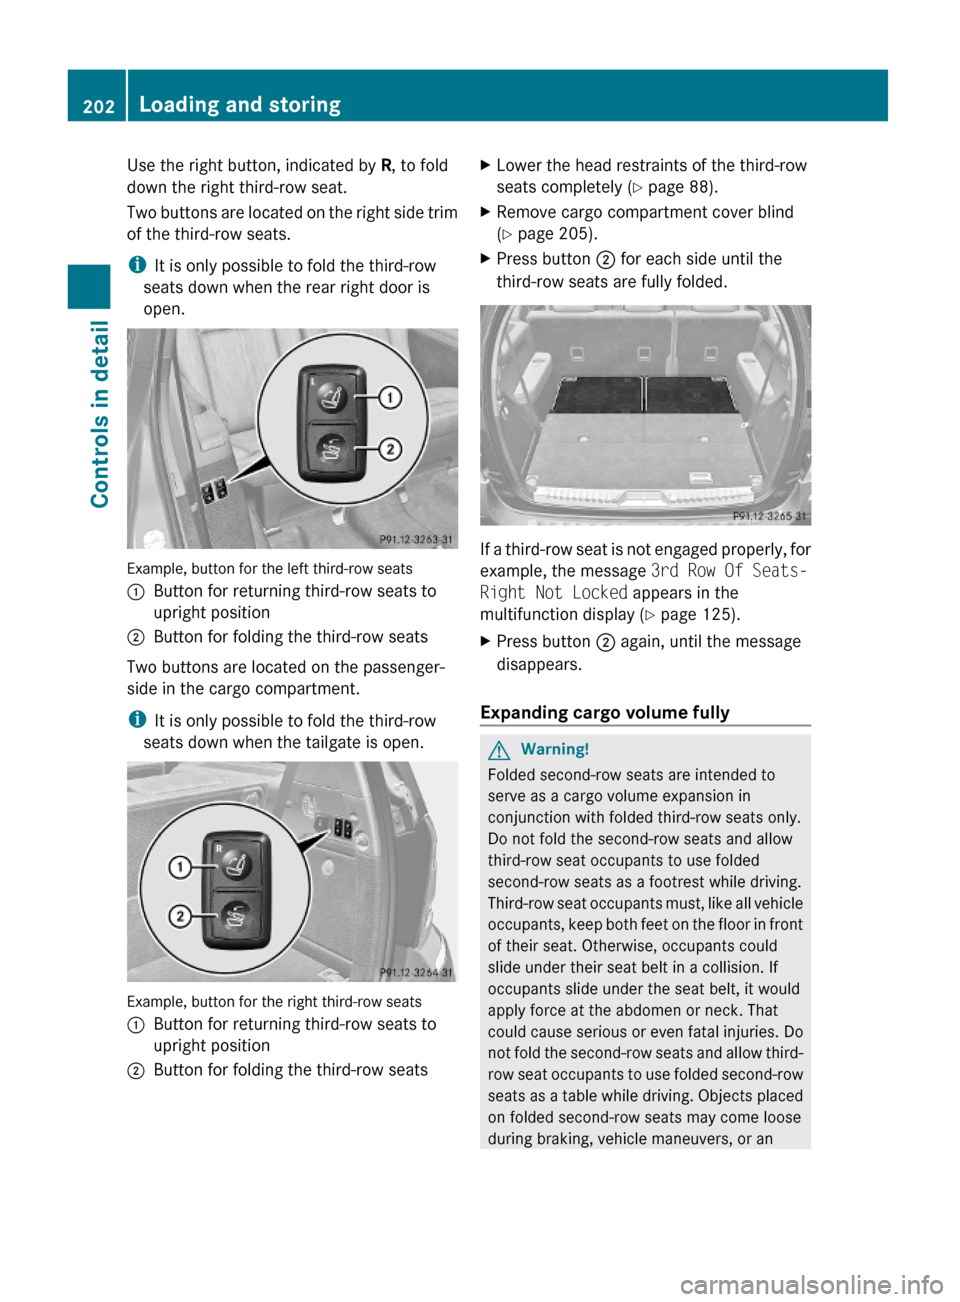
Use the right button, indicated by R, to fold
down the right third-row seat.
Two buttons are located on the right side trim
of the third-row seats.
iIt is only possible to fold the third-row
seats down when the rear right door is
open.
Example, button for the left third-row seats
:Button for returning third-row seats to
upright position
;Button for folding the third-row seats
Two buttons are located on the passenger-
side in the cargo compartment.
iIt is only possible to fold the third-row
seats down when the tailgate is open.
Example, button for the right third-row seats
:Button for returning third-row seats to
upright position
;Button for folding the third-row seatsXLower the head restraints of the third-row
seats completely (Y page 88).
XRemove cargo compartment cover blind
(Y page 205).
XPress button ; for each side until the
third-row seats are fully folded.
If a third-row seat is not engaged properly, for
example, the message 3rd Row Of Seats-
Right Not Locked appears in the
multifunction display (Y page 125).
XPress button ; again, until the message
disappears.
Expanding cargo volume fully
GWarning!
Folded second-row seats are intended to
serve as a cargo volume expansion in
conjunction with folded third-row seats only.
Do not fold the second-row seats and allow
third-row seat occupants to use folded
second-row seats as a footrest while driving.
Third-row seat occupants must, like all vehicle
occupants, keep both feet on the floor in front
of their seat. Otherwise, occupants could
slide under their seat belt in a collision. If
occupants slide under the seat belt, it would
apply force at the abdomen or neck. That
could cause serious or even fatal injuries. Do
not fold the second-row seats and allow third-
row seat occupants to use folded second-row
seats as a table while driving. Objects placed
on folded second-row seats may come loose
during braking, vehicle maneuvers, or an
202Loading and storingControls in detail
X164_AKB; 5; 31, en-USd2ureepe,Version: 2.11.8.12009-09-11T12:30:16+02:00 - Seite 202
Page 205 of 380
accident and be thrown around the vehicle
interior. Objects thrown around the vehicle
interior may cause an accident and/or
serious personal injury.
Folding second-row seats
! When the second-row seats are folded
forward, the front seats may not be moved
to the rearmost position. Otherwise you
could damage the front and second-row
seats.
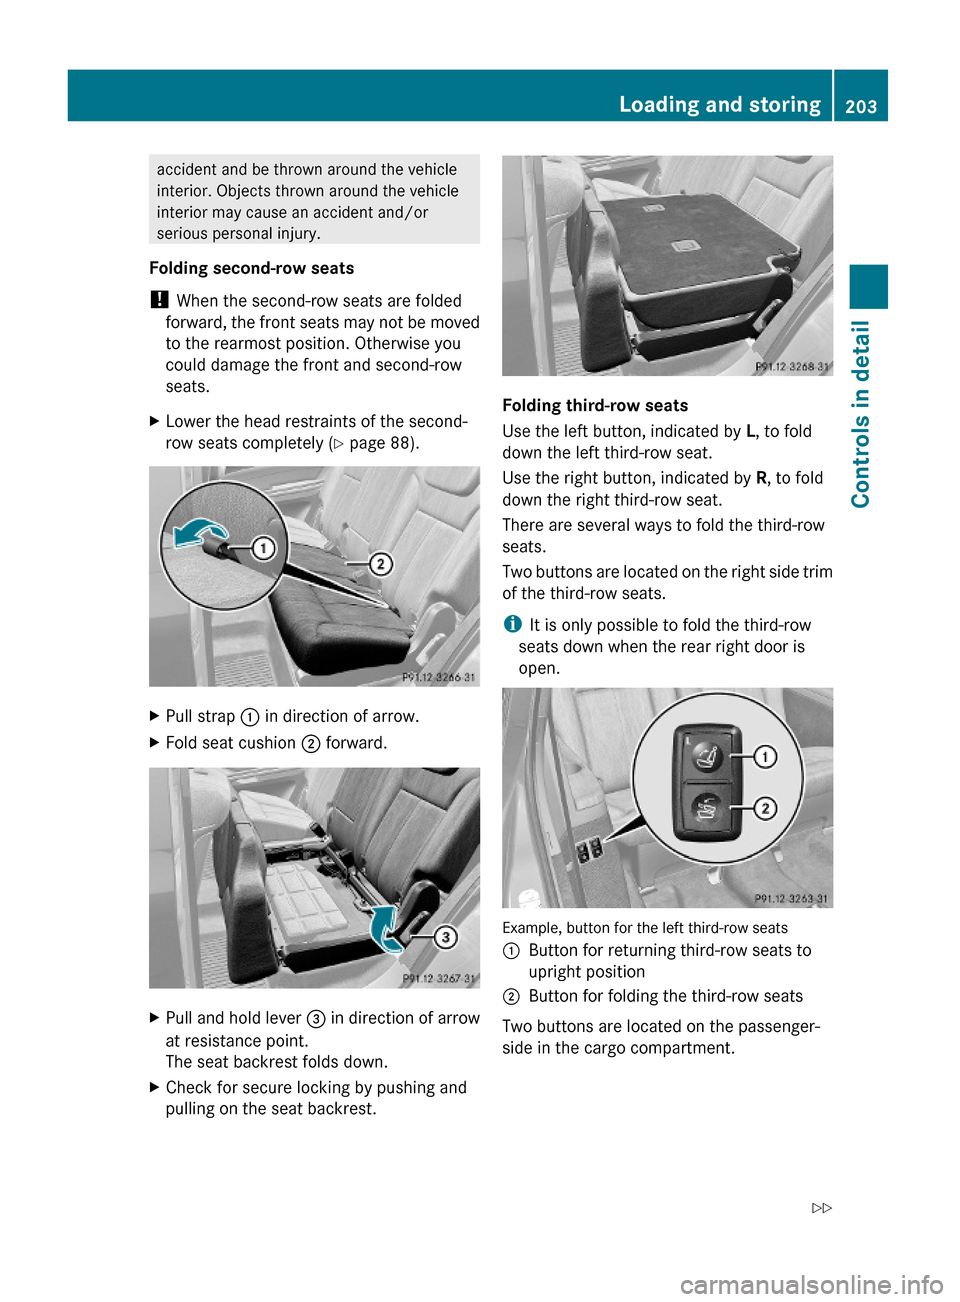
XLower the head restraints of the second-
row seats completely (Y page 88).
XPull strap : in direction of arrow.XFold seat cushion ; forward.XPull and hold lever = in direction of arrow
at resistance point.
The seat backrest folds down.
XCheck for secure locking by pushing and
pulling on the seat backrest.
Folding third-row seats
Use the left button, indicated by L, to fold
down the left third-row seat.
Use the right button, indicated by R, to fold
down the right third-row seat.
There are several ways to fold the third-row
seats.
Two buttons are located on the right side trim
of the third-row seats.
iIt is only possible to fold the third-row
seats down when the rear right door is
open.
Example, button for the left third-row seats
:Button for returning third-row seats to
upright position
;Button for folding the third-row seats
Two buttons are located on the passenger-
side in the cargo compartment.
Loading and storing203Controls in detailX164_AKB; 5; 31, en-USd2ureepe,Version: 2.11.8.12009-09-11T12:30:16+02:00 - Seite 203Z
Page 222 of 380
When programming a garage door opener,
park vehicle outside the garage.
Do not run the engine while programming the
integrated remote control. Inhalation of
exhaust gas is hazardous to your health. All
exhaust gas contains carbon monoxide (CO),
and inhaling it can cause unconsciousness
and possible death.
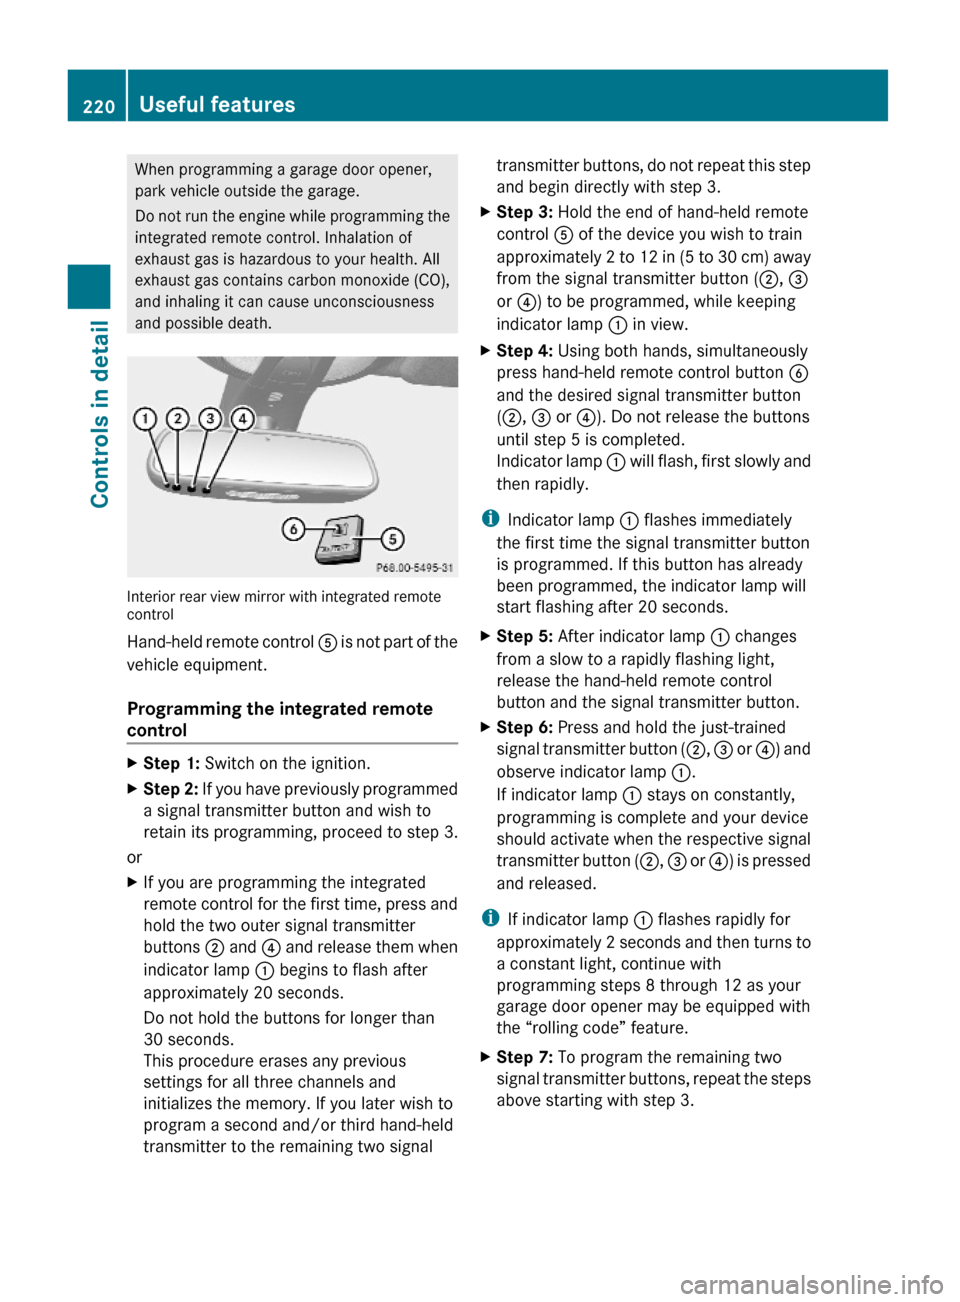
Interior rear view mirror with integrated remotecontrol
Hand-held remote control A is not part of the
vehicle equipment.
Programming the integrated remote
control
XStep 1: Switch on the ignition.XStep 2: If you have previously programmed
a signal transmitter button and wish to
retain its programming, proceed to step 3.
or
XIf you are programming the integrated
remote control for the first time, press and
hold the two outer signal transmitter
buttons ; and ? and release them when
indicator lamp : begins to flash after
approximately 20 seconds.
Do not hold the buttons for longer than
30 seconds.
This procedure erases any previous
settings for all three channels and
initializes the memory. If you later wish to
program a second and/or third hand-held
transmitter to the remaining two signal
transmitter buttons, do not repeat this step
and begin directly with step 3.
XStep 3: Hold the end of hand-held remote
control A of the device you wish to train
approximately 2 to 12 in (5 to 30 cm) away
from the signal transmitter button (;, =
or ?) to be programmed, while keeping
indicator lamp : in view.
XStep 4: Using both hands, simultaneously
press hand-held remote control button B
and the desired signal transmitter button
(;, = or ?). Do not release the buttons
until step 5 is completed.
Indicator lamp : will flash, first slowly and
then rapidly.
iIndicator lamp : flashes immediately
the first time the signal transmitter button
is programmed. If this button has already
been programmed, the indicator lamp will
start flashing after 20 seconds.
XStep 5: After indicator lamp : changes
from a slow to a rapidly flashing light,
release the hand-held remote control
button and the signal transmitter button.
XStep 6: Press and hold the just-trained
signal transmitter button (;, = or ?) and
observe indicator lamp :.
If indicator lamp : stays on constantly,
programming is complete and your device
should activate when the respective signal
transmitter button (;, = or ?) is pressed
and released.
iIf indicator lamp : flashes rapidly for
approximately 2 seconds and then turns to
a constant light, continue with
programming steps 8 through 12 as your
garage door opener may be equipped with
the “rolling code” feature.
XStep 7: To program the remaining two
signal transmitter buttons, repeat the steps
above starting with step 3.
220Useful featuresControls in detail
X164_AKB; 5; 31, en-USd2ureepe,Version: 2.11.8.12009-09-11T12:30:16+02:00 - Seite 220
Page 223 of 380
Rolling code programming
To train a garage door opener (or other rolling
code devices) with the rolling code feature,
follow these instructions after completing the
“Programming” portion (steps 1 through 6) of
this text. For your convenience and to
complete the procedure faster, you might
want to have someone assist you.XStep 8: Locate the “training” button on the
garage door opener motor head unit.
i Exact location and color of the button may
vary by garage door opener brand.
Depending on manufacturer, the “training”
button may also be referred to as “learn” or
“smart” button. If there is difficulty locating
the transmitting button, refer to the garage
door opener Operator’s Manual.
XStep 9: Press the “training” button on the
garage door opener motor head unit.
The “training light” is activated.
You have 30 seconds to initiate the
following two steps.XStep 10: Return to the vehicle and firmly
press, hold for 2 seconds and release the
programmed signal transmitter button ( ;,
= or ?).XStep 11: Press, hold for 2 seconds and
release same signal transmitter button a
second time to complete the training
process.
i Some garage door openers (or other
rolling code equipped devices) may require
you to press, hold for 2 seconds and
release the same signal transmitter button
a third time to complete the training
process.
XStep 12: Confirm the garage door
operation by pressing the programmed
signal transmitter button ( ;, = or ?).XStep 13: To program the remaining two
signal transmitter buttons, repeat the steps
above starting with step 3.Gate operator/Canadian programming
Canadian radio-frequency laws require
transmitter signals to “time-out” (or quit)
after several seconds of transmission which
may not be long enough for the integrated
signal transmitter to pick up the signal during
programming. Similar to this Canadian law,
some U.S. gate operators are designed to
“time-out” in the same manner.
If you live in Canada or if you are having
difficulties programming a gate operator
(regardless of where you live) by using the
programming procedures, replace step 4 with
the following:XStep 4: Press and hold the signal
transmitter button ( ;, = or ?). Do not
release this button until it has been
successfully trained.XWhile still holding down the signal
transmitter button ( ;, = or ?), “cycle”
your hand-held remote control button B
as follows: Press and hold button B for
2 seconds, then release it for 2 seconds,
and again press and hold it for 2 seconds.
Repeat this sequence on the hand-held
remote control until the frequency signal
has been learned.
Upon successful training, indicator
lamp : will flash slowly and then rapidly
after several seconds.XProceed with programming step 5 and
step 6 to complete.
i Upon completion of programming the
integrated remote control, make sure you
retain the hand-held remote control that
came with the garage door opener, gate
operator or other device. You may need it
for use in other vehicles, for future
programming of an integrated remote
control, or simply for continued use as a
hand-held remote control to operate the
respective device in other situations.
Useful features221Controls in detailX164_AKB; 5; 31, en-USd2ureepe,Version: 2.11.8.12009-09-11T12:30:16+02:00 - Seite 221Z