2010 MERCEDES-BENZ GL remote start
[x] Cancel search: remote startPage 9 of 380

Resume function ............................ 147
Setting current speed ....................145
Cup holders ........................................ 209
Curb weight ....................................... 255
Customer Assistance Center (CAC) ... 23
Customer Relations Department ....... 23
D
Dashboard see Instrument cluster
Data recording ..................................... 24
Date, Setting ...................................... 135
Daytime running lamp mode .............. 99
Switching on or off ......................... 136
Deep water
see Standing water
Defroster
Rear window .................................. 191
Windshield ............................. 179, 189
Delayed shut-off
Exterior lamps ................................ 137
Interior lighting .............................. 138
Department of Transportation
see DOT
Diesel engine
Preglow indicator lamp ....................29
Diesel fuel
see Fuel
Differential locks ............................... 121
A few words about .........................122
Messages in the multifunction
display ................................... 123, 302
Switching ....................................... 122
Difficulties
While driving .................................. 111
With starting .................................. 110
Digital clock
see Clock
Digital speedometer ......................... 129
Dimensions (vehicle) see Vehicle specification
Direction of rotation (tires) .............. 246
Displays
Digital speedometer ......................129
Distronic ........................................ 149
Maintenance service indicator .......273
Messages in the multifunction
display ........................................... 287
Multifunction display .....................127
Outside temperature .............129, 135
Symbol messages ..........................299
Text messages ............................... 288
Trip computer ................................ 141
Vehicle status message memory ...131
Vehicle system settings .................132
Distronic ............................................ 147
Cleaning system sensor cover .......278
Control system .............................. 131
Distance warning function .............155
Distance warning
lamp ...................................... 149, 319
Driving with .................................... 153
Menu ............................................. 150
Messages in the multifunction
display ........................................... 294
Resume function ............................ 152
Sensor cover .................................. 278
Speed settings ............................... 151
Door control panel .............................. 34
Door handles ........................................ 34
Doors
Child safety locks ............................ 60
Locking/unlocking (KEYLESS-GO) ...71
Locking/unlocking (SmartKey) ........70
Messages in the multifunction
display ........................................... 304
Opening from inside ......................... 74
Remote door unlock (Tele Aid) .......219
Unlocking (Mechanical key) ...........323
DOT (Department of
Transportation) .................................. 255
Downhill Speed Regulation see DSR
Drinking and driving ......................... 259
Driving
Abroad ........................................... 272
Hydroplaning ................................. 262
Instructions ........................... 108, 259
In winter ........................................ 258
Off-road ......................................... 262
Problems ....................................... 111
Safety systems ................................ 61
Systems ......................................... 144Index7X164_AKB; 5; 31, en-USd2ureepe,Version: 2.11.8.12009-09-11T12:30:16+02:00 - Seite 7
Page 10 of 380

Through standing water .................262
With Distronic ................................ 153
Driving and parking
Safety notes .................................. 108
Driving off .................................. 110, 261
Driving safety systems ....................... 61
4-ETS ............................................... 64
ABS .................................................. 62
BAS .................................................. 63
EBP .................................................. 63
ESP ®
................................................ 63
Driving systems
Air suspension program .................159
All-wheel drive (4MATIC) ................ 166
Cruise control ................................ 144
Distronic ........................................ 147
Downhill Speed Regulation (DSR) ..155
Hill-start assist system ..................155
Off-road driving program ...............158
Parktronic system ..........................166
Rear view camera .......................... 169
Driving tips, automatic
transmission ...................................... 117
DSR (Downhill Speed Regulation) .... 155
Messages in the multifunction
display ........................................... 303
E
Easy-entry/exit feature .............. 92, 139
EBP (Electronic Brake
Proportioning) ...................................... 63
Electrical system
Improper work on or
modifications ................................... 23
Power outlets ................................. 212
Electrical system (Technical data)
see Vehicle specification
Electronic Stability Program
see ESP ®
Electronic Traction System
see 4-ETS
Emergency, in case of
First aid kit ..................................... 284
Flat tire .......................................... 336
Hazard warning flasher ..................101
Roadside Assistance ................ 21, 216
Towing the vehicle .........................352
Emergency calls
Tele Aid .......................................... 215
Emergency engine shutdown ........... 357
Emergency operations
Limp-home mode ........................... 119
Remote door unlock (Tele Aid) .......219
Emergency Tensioning Device
see ETD
Emission control ............................... 272
Information label ............................ 361
System warranties ...........................20
Engine
Break-in recommendations ............226
Cleaning ......................................... 276
Compartment ................................ 228
Malfunction indicator
lamp ........................................ 29, 320
Messages in the multifunction
display ........................................... 306
Number .......................................... 361
Starting .......................................... 108
Turning off ..................................... 113
Engine (Technical data)
see Vehicle specification
Engine compartment
Radiator ......................................... 230
Engine coolant
see Coolant
Engine oil
Adding ........................................... 231
Additives ........................................ 371
Checking level ............................... 230
Consumption ................................. 230
Messages in the multifunction
display ........................................... 308
Oil dipstick ..................................... 230
Recommended engine oils and oil
filter ............................................... 370
ESP ®
(Electronic Stability
Program) .............................................. 63
4-ETS ............................................... 64
Messages in the multifunction
display ................................... 289, 300
Off-road ESP ®
.................................. 65
Trailer stabilization ........................... 65
Warning lamp ................................. 3188IndexX164_AKB; 5; 31, en-USd2ureepe,Version: 2.11.8.12009-09-11T12:30:16+02:00 - Seite 8
Page 13 of 380

Interior lighting
Delayed shut-off ............................ 138
Emergency lighting ........................102
Front .............................................. 101
Front reading lamps .......................101
Rear ............................................... 102
Rear reading lamps ........................102
Interior rear view mirror ..................... 93
Auto-dimming rear view mirrors ....... 94
Interior storage spaces
see Storage compartments
Intermittent wiping
Rain sensor .................................... 103
J
Jack ..................................................... 286
Jump starting ..................................... 350
K
Key, Mechanical
Loss of ............................................. 73
Replacing ......................................... 74
Unlocking/locking manually ..........323
Key, SmartKey
Battery check lamp ..........................73
Checking batteries ...........................73
Factory setting ........................... 71, 72
Global locking (KEYLESS-
GO) .................................................. 73
Global locking (SmartKey) ................ 71
Global unlocking (KEYLESS-
GO) ............................................ 72, 73
Global unlocking
(SmartKey) ....................................... 71
Important notes on KEYLESS-GO .....72
Locking/unlocking ........................... 70
Loss of ............................................. 73
Messages in the multifunction
display ........................................... 304
Opening and closing the power
tilt/sliding sunroof .........................107
Opening and closing the windows . 107
Remote control ................................ 70
Replacing ......................................... 74
Replacing batteries ........................326
Restoring to factory setting .......71, 73
Selective setting ........................71, 73
Starter switch positions ...................80
KEYLESS-GO
Starter switch positions ...................80
Kickdown ........................................... 117
Kilopascal (air pressure unit) ........... 255
Knee bag .............................................. 40
L
Labels
Certification ................................... 360
Emission control information .........361
Tire and Loading Information
placard ........................................... 242
Tire inflation pressure ....................236
Lamps, exterior
Exterior lamp switch ........................97
Front .............................................. 329
Messages in the multifunction
display ........................................... 310
Rear ............................................... 329
Switching on/off .............................. 97
Lamps, indicator and warning
ABS .......................................... 28, 315
Brakes ..................................... 28, 316
Center console ................................ 31
Differential locks ............................ 123
Distance warning
lamp .............................. 149, 155, 319
Engine malfunction ..................29, 320
ESP ®
........................................ 28, 318
Fog lamps ........................................ 99
Front passenger front air bag off
(Canada only) .......................... 46, 322
Front passenger front air bag off
(USA only) ................................ 42, 322
Fuel tank reserve .....................29, 320
High-beam headlamps .............29, 100
Instrument cluster ...................28, 314
Low-beam headlamps ................29, 98
Low tire pressure/TPMS
malfunction telltale ..................28, 321
Seat belt telltale ................29, 51, 317
SRS .................................... 29, 36, 318
Turn signals ..................................... 28
Language, selecting .......................... 134
Index11X164_AKB; 5; 31, en-USd2ureepe,Version: 2.11.8.12009-09-11T12:30:16+02:00 - Seite 11
Page 79 of 380

-pressing the tailgate closing switch
-pressing the KEYLESS-GO locking/
closing switch
Notes for operating the tailgate with the
SmartKey:
You can also open, close, and stop the
tailgate by pressing button F on the
SmartKey.
The prerequisites for this are:RNo SmartKey is inserted in the starter
switch.
RKEYLESS-GO: The vehicle’s on-board
electronics must have status 0
(Y page 80).
Opening the tailgate from the outside
You can unlock and open the tailgate
simultaneously from the outside when the
vehicle is stationary.
XPress and hold button F on the
SmartKey until the tailgate unlocks and
begins to open.
While the tailgate is opening, an acoustic
warning sounds.
or
XVehicles with KEYLESS-GO: Pull on the
handle (Y page 75).
Closing the tailgate from the outside
GObserve Safety notes, see page 55.GWarning!
Monitor the closing procedure carefully to
make sure no one is in danger of being
injured. To prevent possible personal injury,
always keep hands and fingers away from the
cargo compartment opening when closing the
tailgate. Be especially careful when small
children are around. To stop the closing
procedure, do one of the following:
RPress or pull the remote tailgate opening/
closing switch on the driver’s door.
RPress the tailgate closing switch.
RPress the KEYLESS-GO locking/closing
switch.
RPull outside handle on the tailgate.
RWhen no SmartKey is inserted in the starter
switch (vehicles with KEYLESS-GO: Make
sure the vehicle’s on-board electronics
have status 0): Press button F on the
SmartKey.
Do not leave the SmartKey in the vehicle. You
may lock yourself out.
If the vehicle was previously centrally locked
with the SmartKey or KEYLESS-GO, the
tailgate will lock automatically when it is
closed. The turn signal lamps flash three
times to confirm locking.
Vehicles without KEYLESS-GO
Vehicles with KEYLESS-GO
Locking and unlocking77Controls in detailX164_AKB; 5; 31, en-USd2ureepe,Version: 2.11.8.12009-09-11T12:30:16+02:00 - Seite 77Z
Page 80 of 380

XPress tailgate closing switch : or press
and hold button F on the SmartKey until
the tailgate begins to close.
If the tailgate comes into contact with an
object while closing, the closing procedure is
stopped and the tailgate reopens. This may
happen if luggage has been piled too high, for
example.
Closing the tailgate and locking the
vehicle from the outside (vehicles with
KEYLESS-GO)
GObserve Safety notes, see page 55.GWarning!
Monitor the closing procedure carefully to
make sure no one is in danger of being
injured. To prevent possible personal injury,
always keep hands and fingers away from the
cargo compartment opening when closing the
tailgate. Be especially careful when small
children are around. To stop the closing
procedure, do one of the following:
RPress or pull the remote tailgate opening/
closing switch on the driver’s door.
RPress the tailgate closing switch.
RPress the KEYLESS-GO locking/closing
switch.
RPull outside handle on the tailgate.
RWhen no SmartKey is inserted in the starter
switch (vehicles with KEYLESS-GO: Make
sure the vehicle’s on-board electronics
have status 0): Press button F on the
SmartKey.
You can close the tailgate and lock the vehicle
simultaneously from the outside using the
KEYLESS-GO locking/closing switch.
XMake sure you have the SmartKey with you.XPress KEYLESS-GO locking/closing
switch : briefly.
The tailgate closes.
Once the tailgate and all doors are closed:
RThe vehicle locks.
RThe turn signals flash three times to
confirm locking.
RThe locking knobs in the doors move
down.
RThe anti-theft alarm system is armed.
If the tailgate comes into contact with an
object while closing, the closing procedure is
stopped and the tailgate reopens. This may
happen if luggage has been piled too high, for
example.
The closing process is stopped if the system
cannot recognize a SmartKey with KEYLESS-
GO anymore. Make sure the SmartKey with
KEYLESS-GO is within approximately 3 ft
(1 m) of the tailgate. Repeat the closing
procedure if necessary.
The tailgate remains unlocked when a
SmartKey with KEYLESS-GO is recognized
inside the vehicle to prevent a possible
inadvertent lockout. In this case, the turn
signals will not flash and the anti-theft alarm
will be triggered when the tailgate is opened.
78Locking and unlockingControls in detail
X164_AKB; 5; 31, en-USd2ureepe,Version: 2.11.8.12009-09-11T12:30:16+02:00 - Seite 78
Page 81 of 380

Opening/closing the tailgate from the
inside
Opening
GObserve Safety notes, see page 76.GWarning!
Maintain sight of the area around the rear of
the vehicle while operating the tailgate with
the door-mounted remote tailgate switch.
Monitor the opening procedure carefully to
make sure no one is in danger of being
injured.
To interrupt the opening procedure, press or
pull the door-mounted remote tailgate switch.
When the SmartKey is not inserted in the
starter switch (vehicles with KEYLESS-GO:
Make sure the vehicle’s on-board electronics
have status 0): Press button F on the
SmartKey.
You can unlock and open the tailgate
simultaneously from the driver’s seat when
the vehicle is stationary.
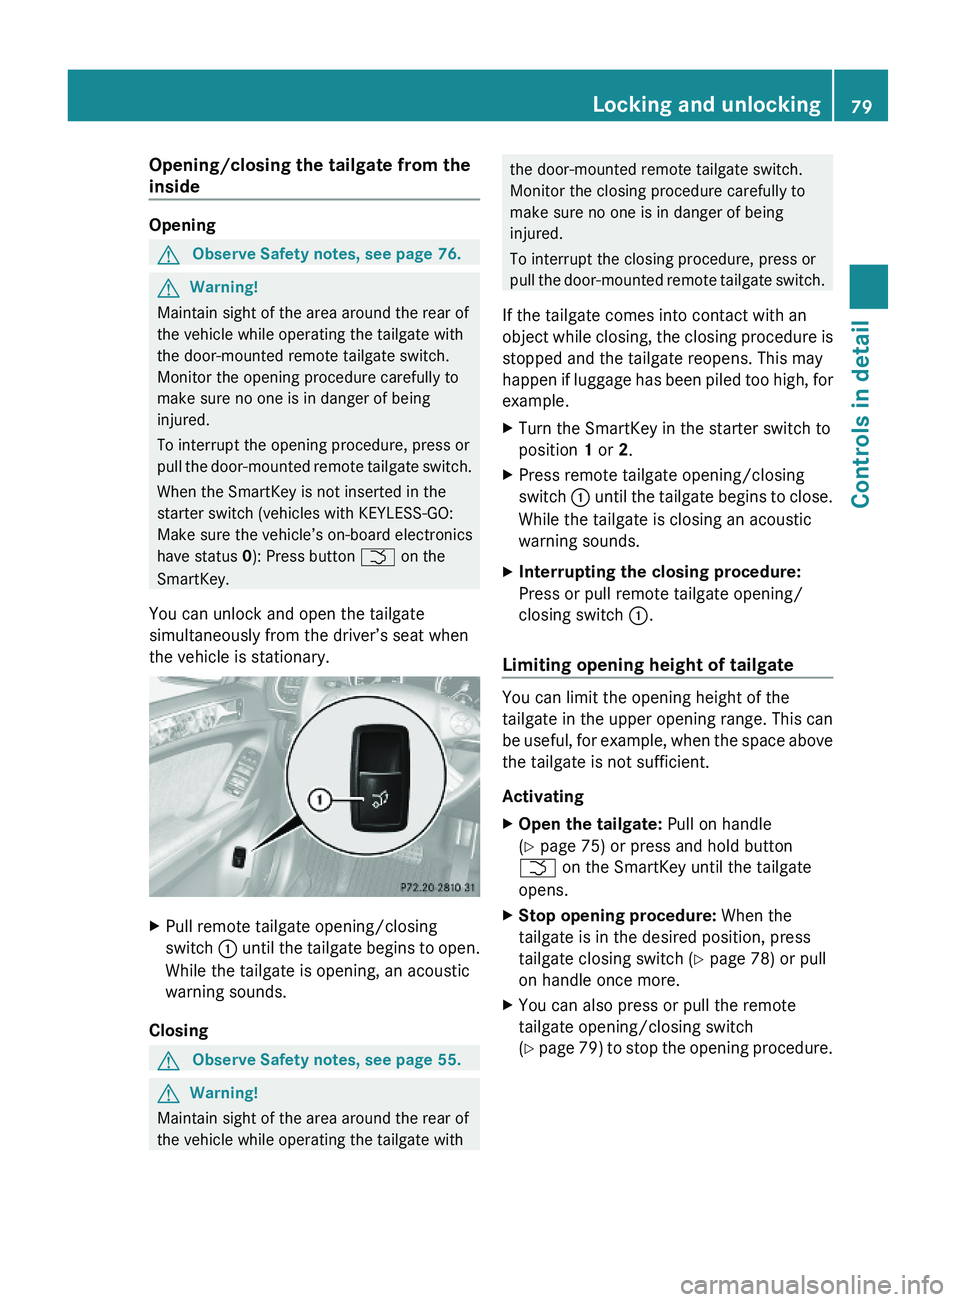
XPull remote tailgate opening/closing
switch : until the tailgate begins to open.
While the tailgate is opening, an acoustic
warning sounds.
Closing
GObserve Safety notes, see page 55.GWarning!
Maintain sight of the area around the rear of
the vehicle while operating the tailgate with
the door-mounted remote tailgate switch.
Monitor the closing procedure carefully to
make sure no one is in danger of being
injured.
To interrupt the closing procedure, press or
pull the door-mounted remote tailgate switch.
If the tailgate comes into contact with an
object while closing, the closing procedure is
stopped and the tailgate reopens. This may
happen if luggage has been piled too high, for
example.
XTurn the SmartKey in the starter switch to
position 1 or 2.
XPress remote tailgate opening/closing
switch : until the tailgate begins to close.
While the tailgate is closing an acoustic
warning sounds.
XInterrupting the closing procedure:
Press or pull remote tailgate opening/
closing switch :.
Limiting opening height of tailgate
You can limit the opening height of the
tailgate in the upper opening range. This can
be useful, for example, when the space above
the tailgate is not sufficient.
Activating
XOpen the tailgate: Pull on handle
(Y page 75) or press and hold button
F on the SmartKey until the tailgate
opens.
XStop opening procedure: When the
tailgate is in the desired position, press
tailgate closing switch (Y page 78) or pull
on handle once more.
XYou can also press or pull the remote
tailgate opening/closing switch
(Y page 79) to stop the opening procedure.
Locking and unlocking79Controls in detailX164_AKB; 5; 31, en-USd2ureepe,Version: 2.11.8.12009-09-11T12:30:16+02:00 - Seite 79Z
Page 216 of 380

Prerequisites for operation:
R The 12V power outlets in the second-row
footwell and cargo compartment
( Y page 212) are operational.
R The plug of the small device must be
inserted fully into 115V AC socket :.
R The on-board voltage of the vehicle is within
the permissible voltage range.
R The specified wattage of the small device
is identical or lower than the maximum
permissible wattage (150 W) of the 115V
AC socket :.XOperation: Open cover =.XInsert the plug of the small device into
115V AC socket :.
LED ; comes on.
If LED
; does not come on, refer to the
section on possible nonoperation causes.
XSwitching off: Pull the plug out of 115V AC
socket :.
Do not pull on the cable.XClose cover =.
Possible nonoperation causes:
R The on-board voltage of the vehicle is not
within the permissible voltage range.
XStart the engine.
R The temperature of the DC/AC inverter is
temporarily too high.
XPull the plug of the small device out of
115V AC socket : and plug it in again
after waiting a few minutes.
R Some small devices have a continuous
power rating of less than 150 W but a very
high switch-on current. Such devices will
not operate. When connecting such a
device, 115V AC socket : will not provide
power.
If LED ; still does not come on, contact an
authorized Mercedes-Benz Center.
Tele Aid
! In order to activate the Tele Aid system, a
subscriber agreement must be completed.
To ensure your system is activated and
operational, please press Information
button E to perform the acquaintance
call. Failure to complete either of these
steps may result in a system that is not
activated.
If you have any questions regarding
activation, please call the Customer
Assistance Center at
1-800-FOR-MERCedes (1-800-367-6372)
(USA only) or 1-888-923-8367 (Canada
only).
Shortly after the completion of your Tele Aid
acquaintance call, you will receive a user ID
and password in the mail. You may use this
password to access the Tele Aid section in
“Owner’s Online” at www.mbusa.com (USA
only). The “My Tele Aid” section will give you
access to account information, remote door
unlock and more.
The Tele Aid system is available if
R it has been activated and is operational.
Activation requires a subscription for
monitoring services, connection and
cellular air time
R vehicle battery power is available
R the relevant cellular phone network and
GPS signals are available and pass the
information on to the Customer Assistance
Center
i Location of the vehicle on a map is only
possible if the vehicle is able to receive
signals from the GPS satellite network and
pass the information on to the Customer
Assistance Center.
The Tele Aid system
(Telematic Alarm Identification on Demand)
214Useful featuresControls in detail
X164_AKB; 5; 31, en-USd2ureepe,Version: 2.11.8.12009-09-11T12:30:16+02:00 - Seite 214
Page 222 of 380

When programming a garage door opener,
park vehicle outside the garage.
Do not run the engine while programming the
integrated remote control. Inhalation of
exhaust gas is hazardous to your health. All
exhaust gas contains carbon monoxide (CO),
and inhaling it can cause unconsciousness
and possible death.
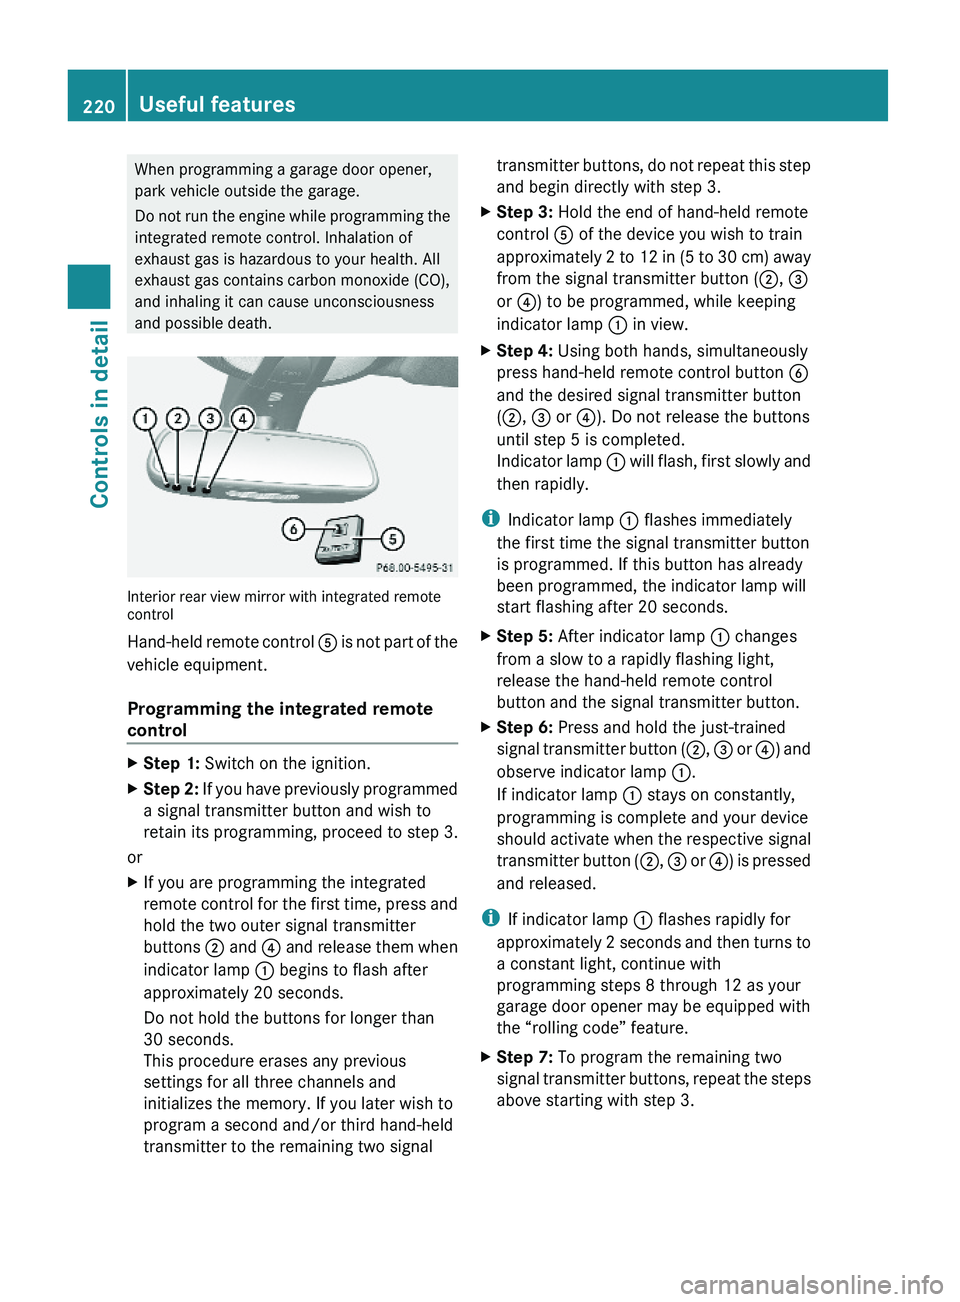
Interior rear view mirror with integrated remotecontrol
Hand-held remote control A is not part of the
vehicle equipment.
Programming the integrated remote
control
XStep 1: Switch on the ignition.XStep 2: If you have previously programmed
a signal transmitter button and wish to
retain its programming, proceed to step 3.
or
XIf you are programming the integrated
remote control for the first time, press and
hold the two outer signal transmitter
buttons ; and ? and release them when
indicator lamp : begins to flash after
approximately 20 seconds.
Do not hold the buttons for longer than
30 seconds.
This procedure erases any previous
settings for all three channels and
initializes the memory. If you later wish to
program a second and/or third hand-held
transmitter to the remaining two signal
transmitter buttons, do not repeat this step
and begin directly with step 3.
XStep 3: Hold the end of hand-held remote
control A of the device you wish to train
approximately 2 to 12 in (5 to 30 cm) away
from the signal transmitter button (;, =
or ?) to be programmed, while keeping
indicator lamp : in view.
XStep 4: Using both hands, simultaneously
press hand-held remote control button B
and the desired signal transmitter button
(;, = or ?). Do not release the buttons
until step 5 is completed.
Indicator lamp : will flash, first slowly and
then rapidly.
iIndicator lamp : flashes immediately
the first time the signal transmitter button
is programmed. If this button has already
been programmed, the indicator lamp will
start flashing after 20 seconds.
XStep 5: After indicator lamp : changes
from a slow to a rapidly flashing light,
release the hand-held remote control
button and the signal transmitter button.
XStep 6: Press and hold the just-trained
signal transmitter button (;, = or ?) and
observe indicator lamp :.
If indicator lamp : stays on constantly,
programming is complete and your device
should activate when the respective signal
transmitter button (;, = or ?) is pressed
and released.
iIf indicator lamp : flashes rapidly for
approximately 2 seconds and then turns to
a constant light, continue with
programming steps 8 through 12 as your
garage door opener may be equipped with
the “rolling code” feature.
XStep 7: To program the remaining two
signal transmitter buttons, repeat the steps
above starting with step 3.
220Useful featuresControls in detail
X164_AKB; 5; 31, en-USd2ureepe,Version: 2.11.8.12009-09-11T12:30:16+02:00 - Seite 220