2010 MERCEDES-BENZ GL warning light
[x] Cancel search: warning lightPage 107 of 380
For information on filling up the washer
reservoir, see “Washer system and headlamp
cleaning system” ( Y page 232).
Problems with wipers
! If anything blocks the wipers (leaves,
snow, etc.), switch them off immediately.
For safety reasons, do the following before
attempting to remove any blockage:
R Stop the vehicle in a safe location.
R Remove the SmartKey from the starter
switch.
or
R Turn off the engine by pressing the
KEYLESS-GO start/stop button and
open the driver’s door (with the driver’s
door open, starter switch is in position
0 , same as with SmartKey removed from
starter switch).
R Engage the parking brake.
R Remove blockage.
R Turn the wipers on again.
If the windshield wipers fail to function at
all with the combination switch in position
Ä or Å ,
R set the combination switch to the next
higher wiper speed
R have the windshield wipers checked at
the nearest authorized Mercedes-Benz
Center
Power windows
Opening and closing
The door windows and the hinged quarter
windows are opened and closed electrically.
The switches for all door windows and the
hinged quarter windows are located on the
driver’s door control panel. The switches for
the respective door windows are located on
the front passenger door and the rear doors.
The hinged quarter windows can be operated
from the driver’s seat only.
i Operating the rear door windows from
the rear is not possible when you activate
the override switch ( Y page 60).GObserve Safety notes, see page 55.GWarning!
When opening or closing the windows, make
sure there is no danger of anyone being
harmed by the opening/closing procedure.
The door windows are equipped with the
express operation and automatic reversal
function. If in express operation mode a door
window encounters an obstruction that
blocks its path, the automatic reversal
function will stop the door window and open
it slightly.
The door windows operate differently when
the switch is pulled and held. See the “Closing
when a door window is blocked” section in
this chapter for details.
The closing of a door window can be
immediately halted by releasing the switch or,
if the switch was pulled past the resistance
point and released, by either pressing or
pulling the respective switch.
The closing of the hinged quarter windows can
be immediately halted by pressing or pulling
the switch.
If a window encounters an obstruction that
blocks its path in a circumstance where you
are closing the windows by pressing and
holding button & on the SmartKey or by
pressing and holding the lock button (vehicles
with KEYLESS-GO) on an outside door handle,
the automatic reversal function will not
operate.
Activate the override switch when children
are riding in the back seats of the vehicle. The
children may otherwise injure themselves,
e.g. by becoming trapped in the window
opening.
Power windows105Controls in detailX164_AKB; 5; 31, en-USd2ureepe,Version: 2.11.8.12009-09-11T12:30:16+02:00 - Seite 105Z
Page 108 of 380
GWarning!
Do not keep any part of your body up against
the window pane when opening a window. The
downward motion of the pane may pull that
part of your body down between the window
pane and the door frame and trap it there. If
there is a risk of entrapment, release the
switch and pull it to close the window.
iYou can also open or close the windows
using the SmartKey, see “Summer opening
feature” (Y page 107) and “Convenience
closing feature” (Y page 107).
iAfter switching off the ignition or
removing the SmartKey from the starter
switch, you can operate the windows until
you open the driver’s or front passenger
door. If no door was opened you can
operate the windows for up to 5 minutes.
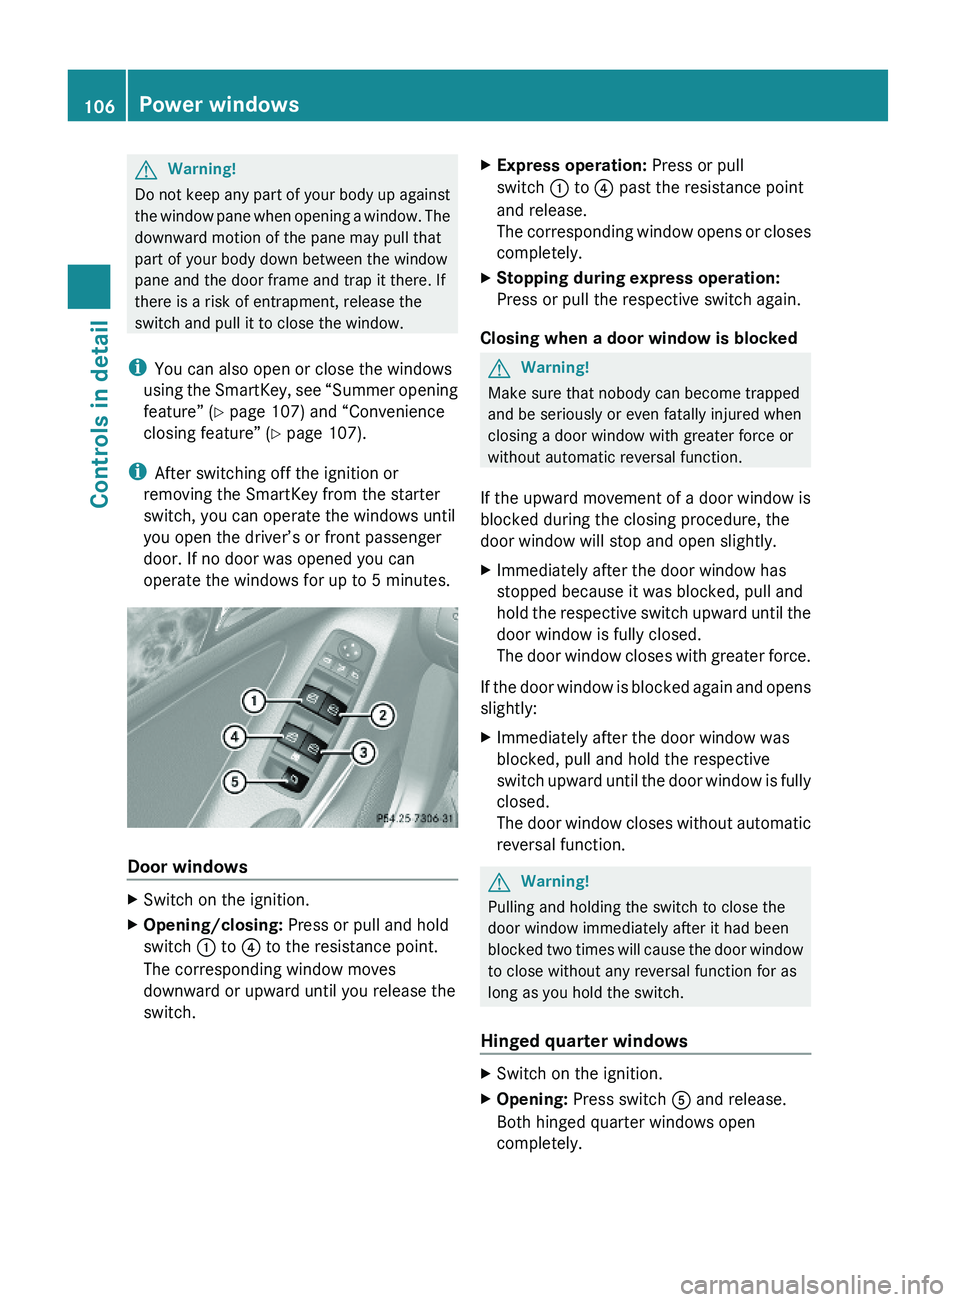
Door windows
XSwitch on the ignition.XOpening/closing: Press or pull and hold
switch : to ? to the resistance point.
The corresponding window moves
downward or upward until you release the
switch.
XExpress operation: Press or pull
switch : to ? past the resistance point
and release.
The corresponding window opens or closes
completely.
XStopping during express operation:
Press or pull the respective switch again.
Closing when a door window is blocked
GWarning!
Make sure that nobody can become trapped
and be seriously or even fatally injured when
closing a door window with greater force or
without automatic reversal function.
If the upward movement of a door window is
blocked during the closing procedure, the
door window will stop and open slightly.
XImmediately after the door window has
stopped because it was blocked, pull and
hold the respective switch upward until the
door window is fully closed.
The door window closes with greater force.
If the door window is blocked again and opens
slightly:
XImmediately after the door window was
blocked, pull and hold the respective
switch upward until the door window is fully
closed.
The door window closes without automatic
reversal function.
GWarning!
Pulling and holding the switch to close the
door window immediately after it had been
blocked two times will cause the door window
to close without any reversal function for as
long as you hold the switch.
Hinged quarter windows
XSwitch on the ignition.XOpening: Press switch A and release.
Both hinged quarter windows open
completely.
106Power windowsControls in detail
X164_AKB; 5; 31, en-USd2ureepe,Version: 2.11.8.12009-09-11T12:30:16+02:00 - Seite 106
Page 109 of 380
XClosing: Pull switch A and release.
Both hinged quarter windows close
completely.
i When the obstruction sensor detects that
a hinged quarter windows is blocked during
the closing process, they will stop and open
slightly.
XHalting closing process: Press or pull
switch A once more during the closing
process.
The hinged quarter windows will stop and
open completely.
i For your safety, the hinged quarter
windows cannot be opened again until
4 seconds have passed.
Synchronizing door windows
The door windows must be synchronized after
the battery has been disconnected or if the
door windows cannot be fully closed (express
operation).
Each door window must be synchronized
separately.
XClose all doors.XSwitch on the ignition.XPull and hold switch :, ; , = or ?
( Y page 106) until the respective door
window is closed.
The door window opens again slightly.XPull and hold the respective switch once
more immediately until the door window is
closed completely.XHold the respective switch for
approximately 1 second.
The door window is synchronized.Summer opening feature
When the weather is warm, you can ventilate
the vehicle before driving off by
simultaneously
R opening the door windows
R opening the hinged quarter windows
R opening the tilt/sliding sunroof
R switching on the seat ventilation for the
driver’s seat
The summer opening feature can only be
activated via the remote control of the
SmartKey. The SmartKey must be in close
proximity to the driver’s outside door handle.XAim the transmitter eye of the SmartKey at
the driver’s outside door handle.XPress and hold button % on the
SmartKey until the windows and the tilt/
sliding sunroof have reached the desired
position.
The vehicle unlocks.XRelease button % on the SmartKey to
interrupt the opening procedure.
Convenience closing feature
When locking the vehicle, you can
simultaneously close
R the door windows
R the hinged quarter windows
R the tilt/sliding sunroof
GWarning!
When closing the windows and the tilt/sliding
sunroof, make sure there is no danger of
anyone being harmed by the closing
procedure.
If potential danger exists, proceed as follows:
R Release button & to stop the closing
procedure. To open, press and hold button
% . To continue the closing procedure
after making sure that there is no danger of
Power windows107Controls in detailX164_AKB; 5; 31, en-USd2ureepe,Version: 2.11.8.12009-09-11T12:30:16+02:00 - Seite 107Z
Page 114 of 380
In case of accident
If the vehicle is leaking fuel:
XDo not start the engine under any
circumstances.
XExit the vehicle at a safe distance from the
roadway.
XNotify local fire and/or police authorities.
If the extent of the damage cannot be
determined:
XContact an authorized Mercedes-Benz
Center or call Roadside Assistance.
If no damage on major assemblies, fuel
system, and engine mount can be
determined:
XStart the engine in the usual manner.
Parking
GWarning!
Do not park this vehicle in areas where
combustible materials such as grass, hay or
leaves can come into contact with the hot
exhaust system. These materials could be
ignited and cause a vehicle fire.
Vehicle movement may result in serious
personal injury or damage to the vehicle or
vehicle drivetrain. Therefore, always do the
following before turning off the engine and
leaving the vehicle:
RKeep right foot on the brake pedal.
REngage the parking brake.
RShift the automatic transmission into park
position P.
RSlowly release the brake pedal.
RWhen parked on an incline, always turn the
front wheels towards the road curb.
RTurn the SmartKey in the starter switch to
position 0 and remove the SmartKey from
the starter switch, or press the KEYLESS-
GO start/stop button.
RTake the SmartKey with you and lock the
vehicle when leaving.
Parking brake
GWarning!
Engaging the parking brake while the vehicle
is in motion can cause the rear wheels to lock
up. You could lose control of the vehicle and
cause an accident. In addition, the vehicle’s
brake lights do not light up when the parking
brake is engaged.
GWarning!
When leaving the vehicle, always remove the
SmartKey from the starter switch, take it with
you, and lock the vehicle. Do not leave
children unattended in the vehicle, or with
access to an unlocked vehicle. Children could
release the parking brake and/or shift the
automatic transmission out of park position
P, either of which could result in an accident
and/or serious personal injury.
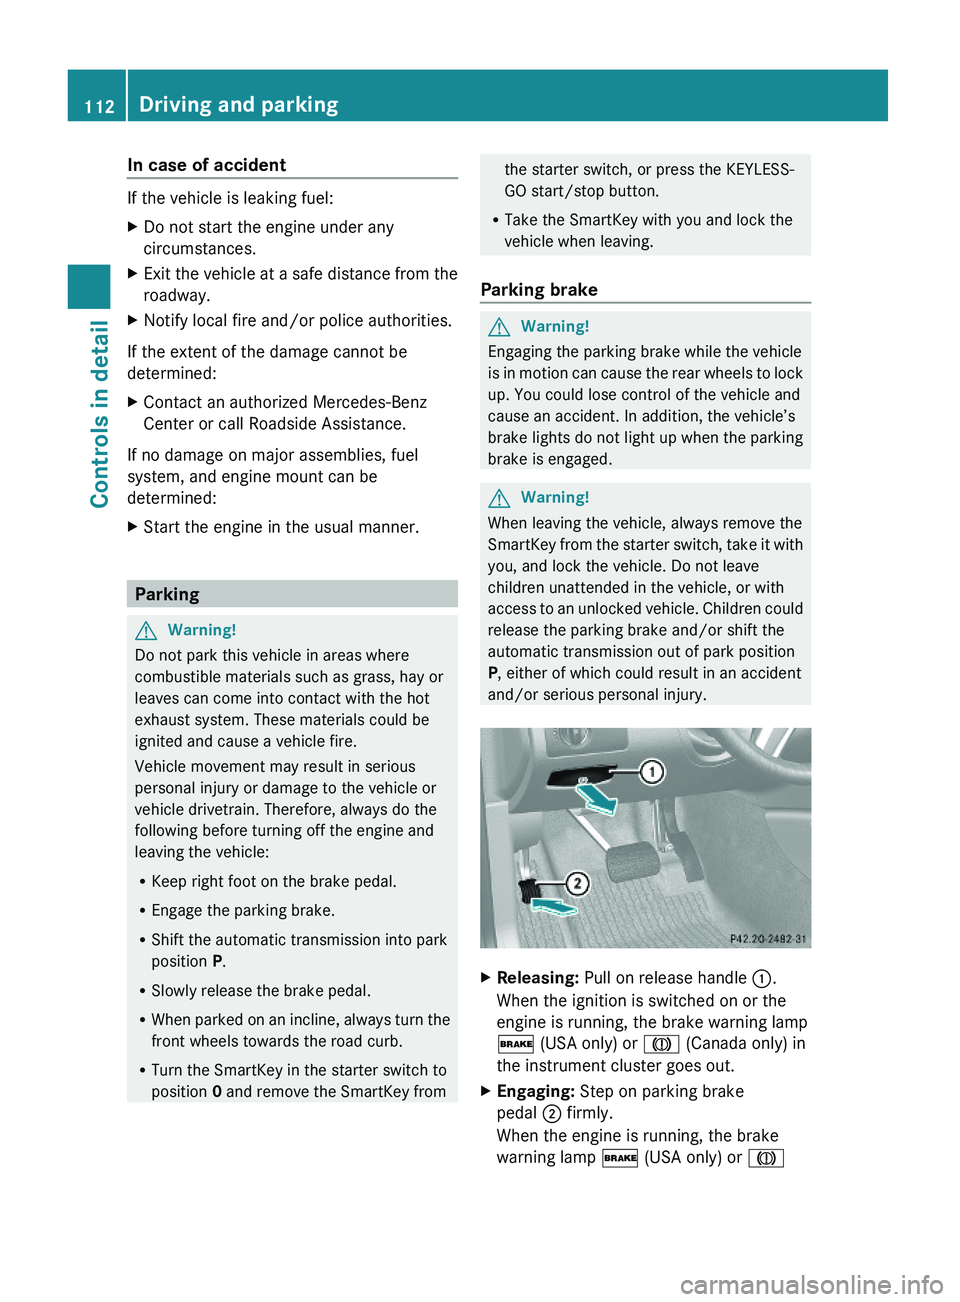
XReleasing: Pull on release handle :.
When the ignition is switched on or the
engine is running, the brake warning lamp
$ (USA only) or J (Canada only) in
the instrument cluster goes out.
XEngaging: Step on parking brake
pedal ; firmly.
When the engine is running, the brake
warning lamp $ (USA only) or J
112Driving and parkingControls in detail
X164_AKB; 5; 31, en-USd2ureepe,Version: 2.11.8.12009-09-11T12:30:16+02:00 - Seite 112
Page 127 of 380
iThe instrument cluster illumination is
dimmed or brightened automatically to suit
ambient light conditions.
The instrument cluster illumination will also
be adjusted automatically when you switch
on the vehicle’s exterior lamps.
iWith the exterior lighting switched on, the
brightness of the switches in the center
console will also be adjusted when using
button : or =.
Resetting trip odometer
XMake sure you are viewing the standard
display (Y page 128) in the multifunction
display.
XPress and hold the reset button in the
instrument cluster (Y page 124) until the
trip odometer is reset.
Tachometer
The red marking on the tachometer
(Y page 29) denotes excessive engine speed.
! Avoid driving at excessive engine speeds,
as it may result in serious engine damage
that is not covered by the Mercedes-Benz
Limited Warranty.
To help protect the engine, the fuel supply is
interrupted if the engine is operated within
the red marking.
Control system
Introduction
The control system is activated as soon as the
starter switch is in position 1 (Y page 80).
The control system enables you to call up
information about your vehicle and to change
vehicle settings.
For example, you can use the control system
to find out when your vehicle is next due for
maintenance service, to set the language for
messages in the instrument cluster display,
and much more.
GWarning!
A driver’s attention to the road and traffic
conditions must always be his/her primary
focus when driving.
For your safety and the safety of others,
selecting features through the multifunction
steering wheel should only be done by the
driver when traffic and road conditions permit
it to be done safely.
Bear in mind that at a speed of just 30 mph
(approximately 50 km/h), your vehicle is
covering a distance of 44 feet (approximately
14 m) every second.
The control system relays information to the
multifunction display.
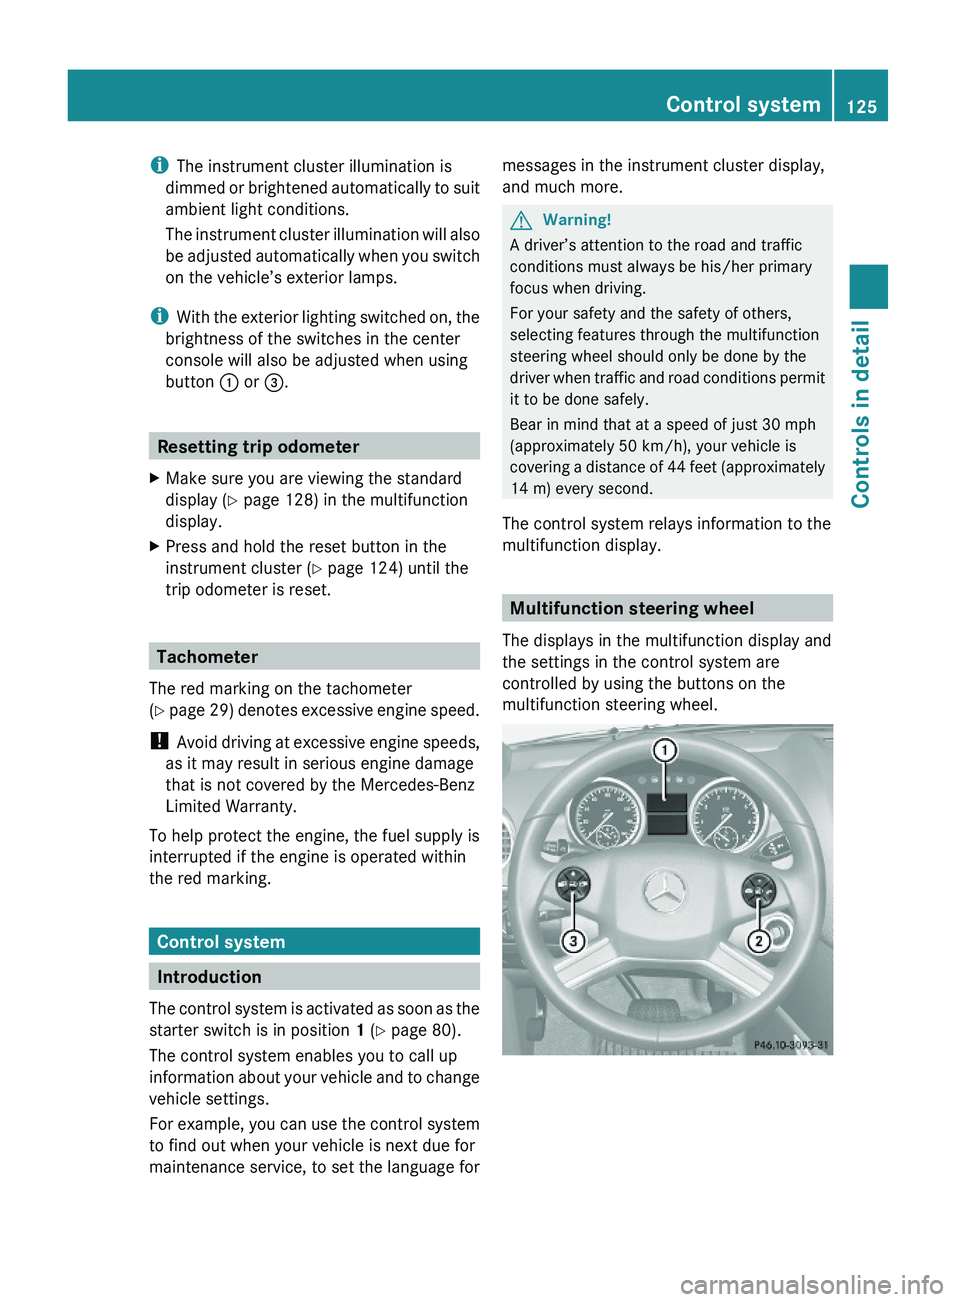
Multifunction steering wheel
The displays in the multifunction display and
the settings in the control system are
controlled by using the buttons on the
multifunction steering wheel.
Control system125Controls in detailX164_AKB; 5; 31, en-USd2ureepe,Version: 2.11.8.12009-09-11T12:30:16+02:00 - Seite 125Z
Page 134 of 380
XPress button & or *.
The stored messages will now be displayed
in the order in which they have occurred.
For malfunction and warning messages,
see “Vehicle status messages in the
multifunction display” (Y page 287).
iAfter you have scrolled through all
recorded status messages, the first
recorded message appears again.
Should the vehicle’s system record any
conditions while driving, the number of
messages will reappear in the multifunction
display when the SmartKey in the starter
switch is turned to position 0 or removed
from the starter switch. With KEYLESS-GO,
the number of messages will reappear when
you turn off the engine by pressing the
KEYLESS-GO start/stop button and open the
driver’s door.
Except for high-priority messages, the vehicle
status message memory will be cleared when
you switch off the ignition.
Settings menu
Introduction
In the Settings menu there are two
functions: The function To reset, press
reset button for 3 seconds, with which
you can reset all the settings to the original
factory settings and a collection of submenus
with which you can make individual settings
for your vehicle.
The following settings and submenus are
available in the Settings menu:
RResetting to factory settings
(Y page 132)
RSubmenus in the Settings menu
(Y page 133)
RInstrument cluster submenu
(Y page 133)
RTime/Date submenu (Y page 135)
RLighting submenu (Y page 136)
RVehicle submenu (Y page 138)
RComfort submenu (Y page 139)
Resetting to factory settings
You can reset the settings of all submenus to
the factory settings.
For safety reasons, the function Lamp
Circuit Headlamp in the Lighting
submenu cannot be reset while driving.
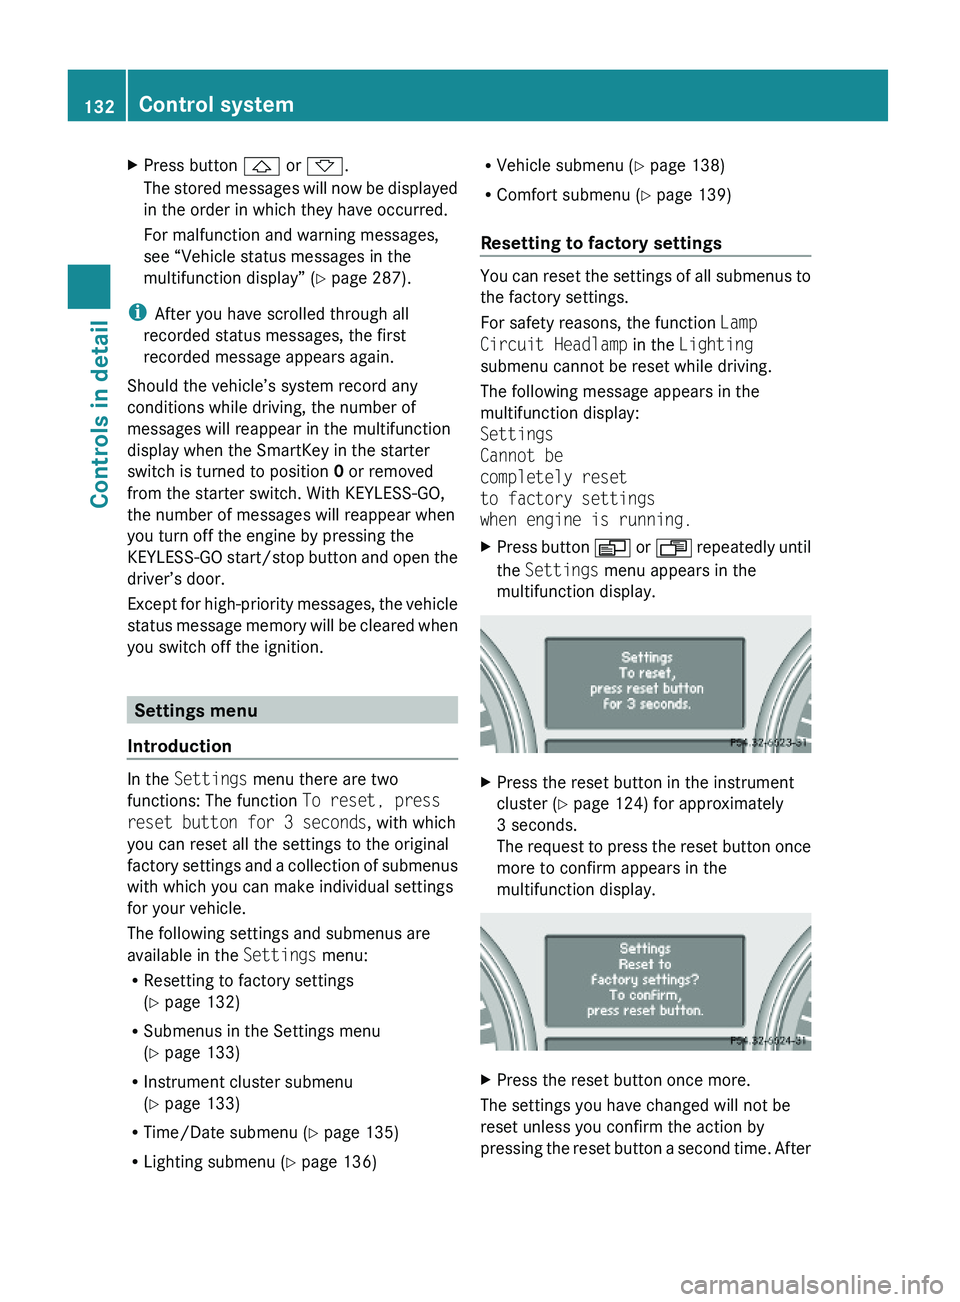
The following message appears in the
multifunction display:
Settings
Cannot be
completely reset
to factory settings
when engine is running.
XPress button V or U repeatedly until
the Settings menu appears in the
multifunction display.
XPress the reset button in the instrument
cluster (Y page 124) for approximately
3 seconds.
The request to press the reset button once
more to confirm appears in the
multifunction display.
XPress the reset button once more.
The settings you have changed will not be
reset unless you confirm the action by
pressing the reset button a second time. After
132Control systemControls in detail
X164_AKB; 5; 31, en-USd2ureepe,Version: 2.11.8.12009-09-11T12:30:16+02:00 - Seite 132
Page 158 of 380
The DSR is an aid for driving downhill. The
DSR regulates your vehicle’s speed when
driving downhill to the value set in the control
system (Y page 141). The steeper the
downhill gradient is, the greater the brake
application. On flat road surfaces, the DSR
brakes only slightly or not at all.
GWarning!
The Downhill Speed Regulation (DSR) is a
convenience system designed to assist the
driver during vehicle operation. The system
must be set to be appropriate for the
topographical and weather conditions
encountered which can change quickly. The
driver is and must remain at all times
responsible for the vehicle speed and for safe
brake operation.
Depending on the programmed speed, actual
vehicle speed and gradient, switching on the
DSR while driving can cause the vehicle to
slow down rapidly and you may hear a sound
which is caused by the activation of the
vehicle’s brake system through the DSR.
Sudden and unexpected deceleration can
result in loss of vehicle control, causing an
accident and/or serious personal injury to
you and others. Do not switch on the DSR in
a circumstance where rapid deceleration
could result in a loss of vehicle control.
The DSR regulates the vehicle’s speed in
automatic transmission positions D, or R.
iIn addition, make use of the engine’s
braking effect by shifting the automatic
transmission into a lower gear.
You can drive slower or faster than the set
speed at any time by braking the vehicle or
depressing the accelerator pedal.
iWhenever the DSR is switched on, the
DSR will use the programmed default
speed to regulate the vehicle’s speed. The
default speed programmed at the factory is
4 mph (Canada: 6 km/h). The default speed
can be reprogrammed using the control
system (Y page 141). The next time the
DSR is switched on, the DSR will use the
newly programmed default speed to
regulate the vehicle’s speed.
Once the DSR is switched on, you can
adjust the set speed using the cruise
control lever (Y page 145). Keep in mind
that adjusting the set speed using the
cruise control lever with the DSR switched
on will not change the programmed default
speed. If the DSR is switched off and then
switched on again, the DSR will use the
programmed default speed.
Depending on the road surface and level of
downhill grade, the DSR may not be able to
maintain the set speed. To maintain the set
speed, apply the brakes if necessary.
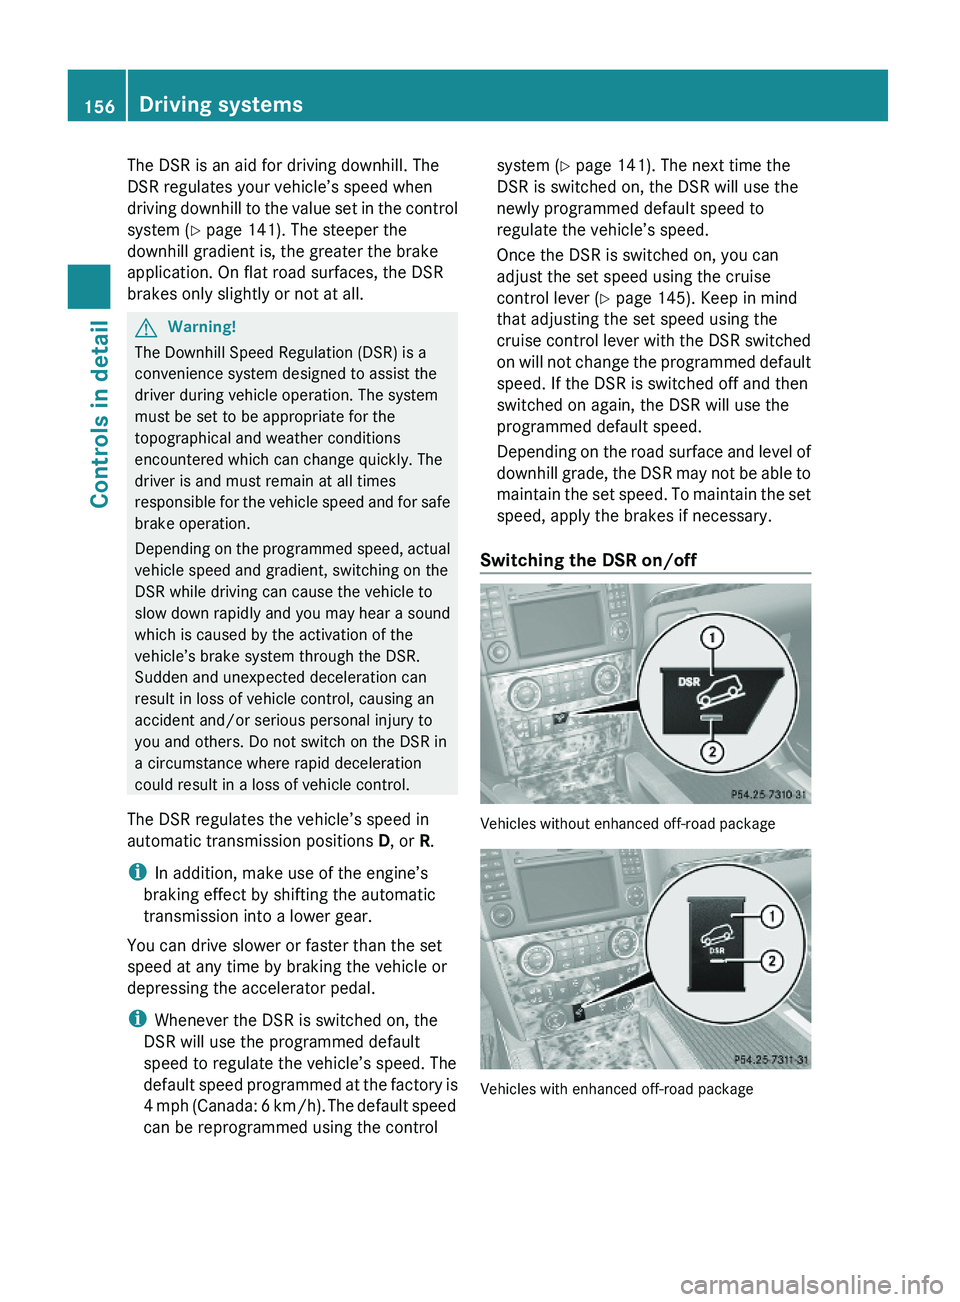
Switching the DSR on/off
Vehicles without enhanced off-road package
Vehicles with enhanced off-road package
156Driving systemsControls in detail
X164_AKB; 5; 31, en-USd2ureepe,Version: 2.11.8.12009-09-11T12:30:16+02:00 - Seite 156
Page 172 of 380
GWarning!
The rear view camera is only an aid and may
display obstacles
Rfrom a distorted perspective
Rinaccurately
Rmay not display obstacles at all
The rear view camera does not relieve you of
the responsibility to be cautious. Take care
and pay careful attention. The rear view
camera may not show objects which are
Rvery close to the rear bumper
Runder the rear bumper
Rabove the tailgate handle
You are responsible for safety at all times and
must continue to pay attention to the
immediate surroundings when parking and
maneuvering. This includes the area behind,
in front of, and beside the vehicle. Otherwise
you could endanger yourself and/or others.
GWarning!
The rear view camera either will not function
or will not function to its full capability if
Rthe tailgate is open
Rit is raining very hard, snowing or foggy
Rit is night or you are parking/maneuvering
your vehicle in an area where it is very dark
Rthe camera is exposed to a very bright white
light
Rthe immediate surroundings are
illuminated with fluorescent light (the
display may flicker)
Rthere is a sudden change in temperature,
e.g. if you drive into a heated garage from
the cold (lens condensation)
Rthe camera lens is dirty or covered
Rthe rear of your vehicle is damaged
In this case, have the position and setting
of the camera checked by a qualified
specialist workshop. Mercedes-Benz
recommends that you contact a Mercedes-
Benz Center for this purpose.
Do not use the rear view camera in these
situations. Otherwise you could injure
yourself or others and/or damage property
including your vehicle while parking/
maneuvering.
GWarning!
Use of rear view camera can be dangerous if
you are color-blind or have impaired color
vision.
Only use rear view camera if you can see and
distinguish all colored guidelines shown by
rear view camera on the COMAND system
display.
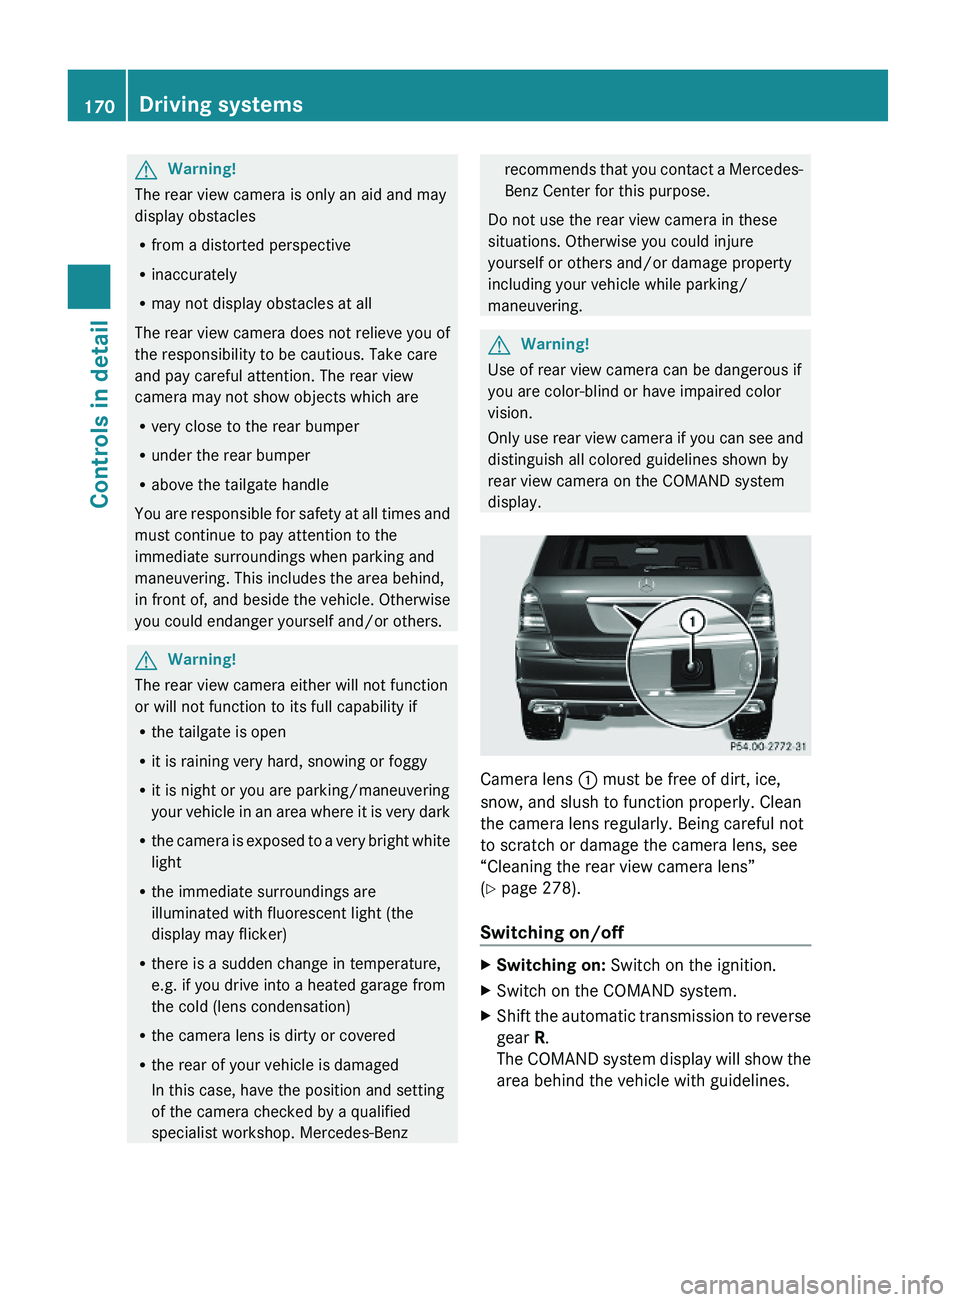
Camera lens : must be free of dirt, ice,
snow, and slush to function properly. Clean
the camera lens regularly. Being careful not
to scratch or damage the camera lens, see
“Cleaning the rear view camera lens”
(Y page 278).
Switching on/off
XSwitching on: Switch on the ignition.XSwitch on the COMAND system.XShift the automatic transmission to reverse
gear R.
The COMAND system display will show the
area behind the vehicle with guidelines.
170Driving systemsControls in detail
X164_AKB; 5; 31, en-USd2ureepe,Version: 2.11.8.12009-09-11T12:30:16+02:00 - Seite 170