2010 MERCEDES-BENZ GL mirror
[x] Cancel search: mirrorPage 98 of 380
The exterior rear view mirrors fold in
automatically as soon as the vehicle is locked
from the outside.
The exterior rear view mirrors fold out
automatically as soon as the vehicle is
unlocked and the driver’s or front passenger
door is subsequently opened.
Synchronizing
The power-folding rear view mirrors may have
to be synchronized after the vehicle battery
has been disconnected or discharged. If the
exterior rear view mirrors do not fold properly
upon locking or unlocking the vehicle, do the
following:
XMake sure the power-folding function in the
control system is activated (Y page 140).
XWhen the power-folding function is
activated and the exterior rear view
mirrors still do not fold properly: Fold
each exterior rear view mirror in completely
(Y page 96).
XFold each exterior rear view mirror out
completely (Y page 96).
When the exterior rear view mirrors fold
properly upon locking the vehicle, the exterior
mirrors are synchronized. Otherwise repeat
the above steps.
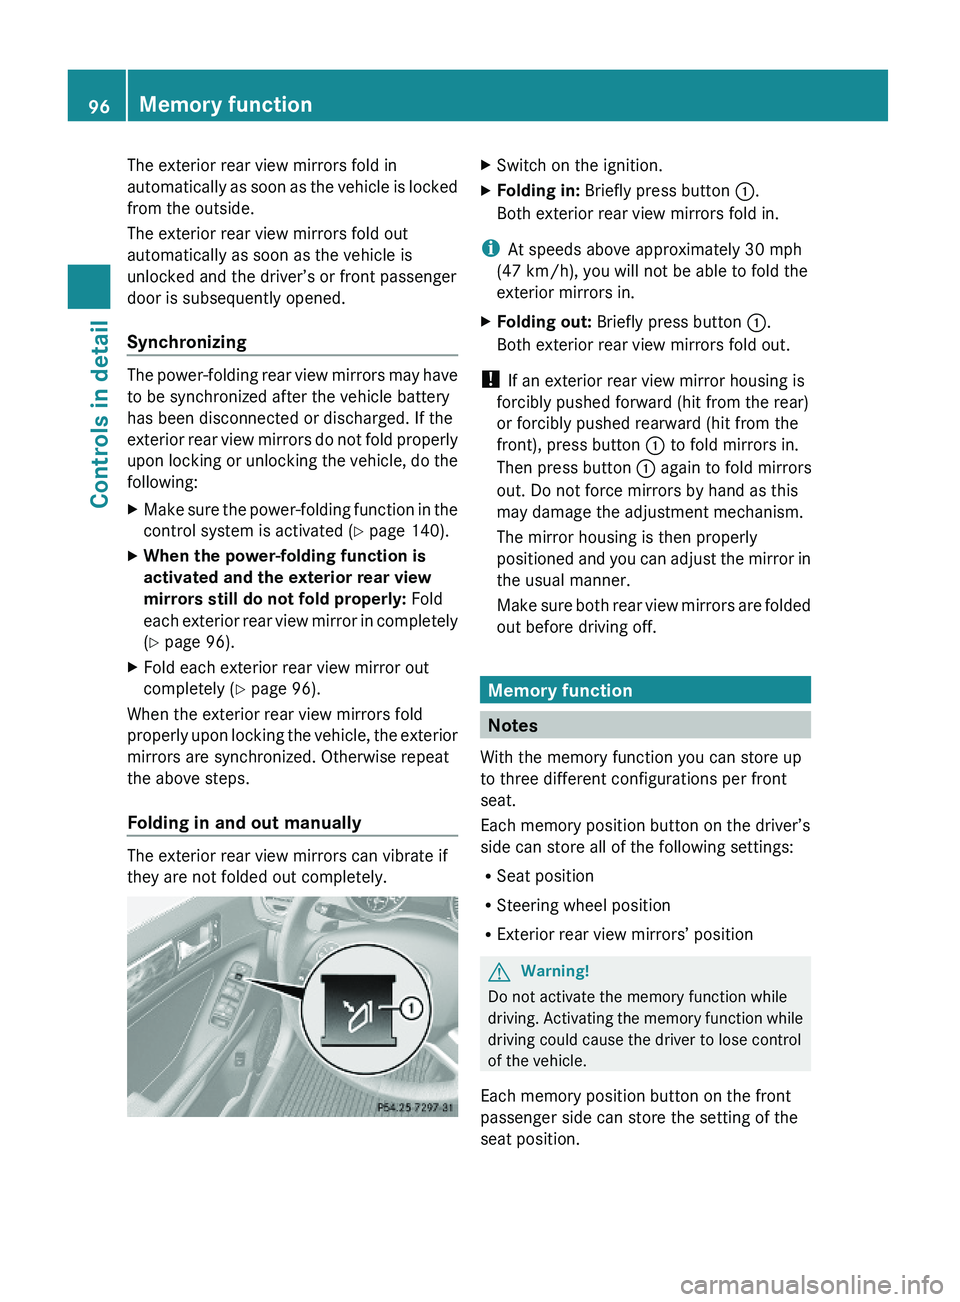
Folding in and out manually
The exterior rear view mirrors can vibrate if
they are not folded out completely.
XSwitch on the ignition.XFolding in: Briefly press button :.
Both exterior rear view mirrors fold in.
iAt speeds above approximately 30 mph
(47 km/h), you will not be able to fold the
exterior mirrors in.
XFolding out: Briefly press button :.
Both exterior rear view mirrors fold out.
! If an exterior rear view mirror housing is
forcibly pushed forward (hit from the rear)
or forcibly pushed rearward (hit from the
front), press button : to fold mirrors in.
Then press button : again to fold mirrors
out. Do not force mirrors by hand as this
may damage the adjustment mechanism.
The mirror housing is then properly
positioned and you can adjust the mirror in
the usual manner.
Make sure both rear view mirrors are folded
out before driving off.
Memory function
Notes
With the memory function you can store up
to three different configurations per front
seat.
Each memory position button on the driver’s
side can store all of the following settings:
RSeat position
RSteering wheel position
RExterior rear view mirrors’ position
GWarning!
Do not activate the memory function while
driving. Activating the memory function while
driving could cause the driver to lose control
of the vehicle.
Each memory position button on the front
passenger side can store the setting of the
seat position.
96Memory functionControls in detail
X164_AKB; 5; 31, en-USd2ureepe,Version: 2.11.8.12009-09-11T12:30:16+02:00 - Seite 96
Page 99 of 380
Storing positions into memory
XAdjust the seats.XOn the driver’s side, also adjust the
steering wheel and exterior rear view
mirrors to the desired positions.
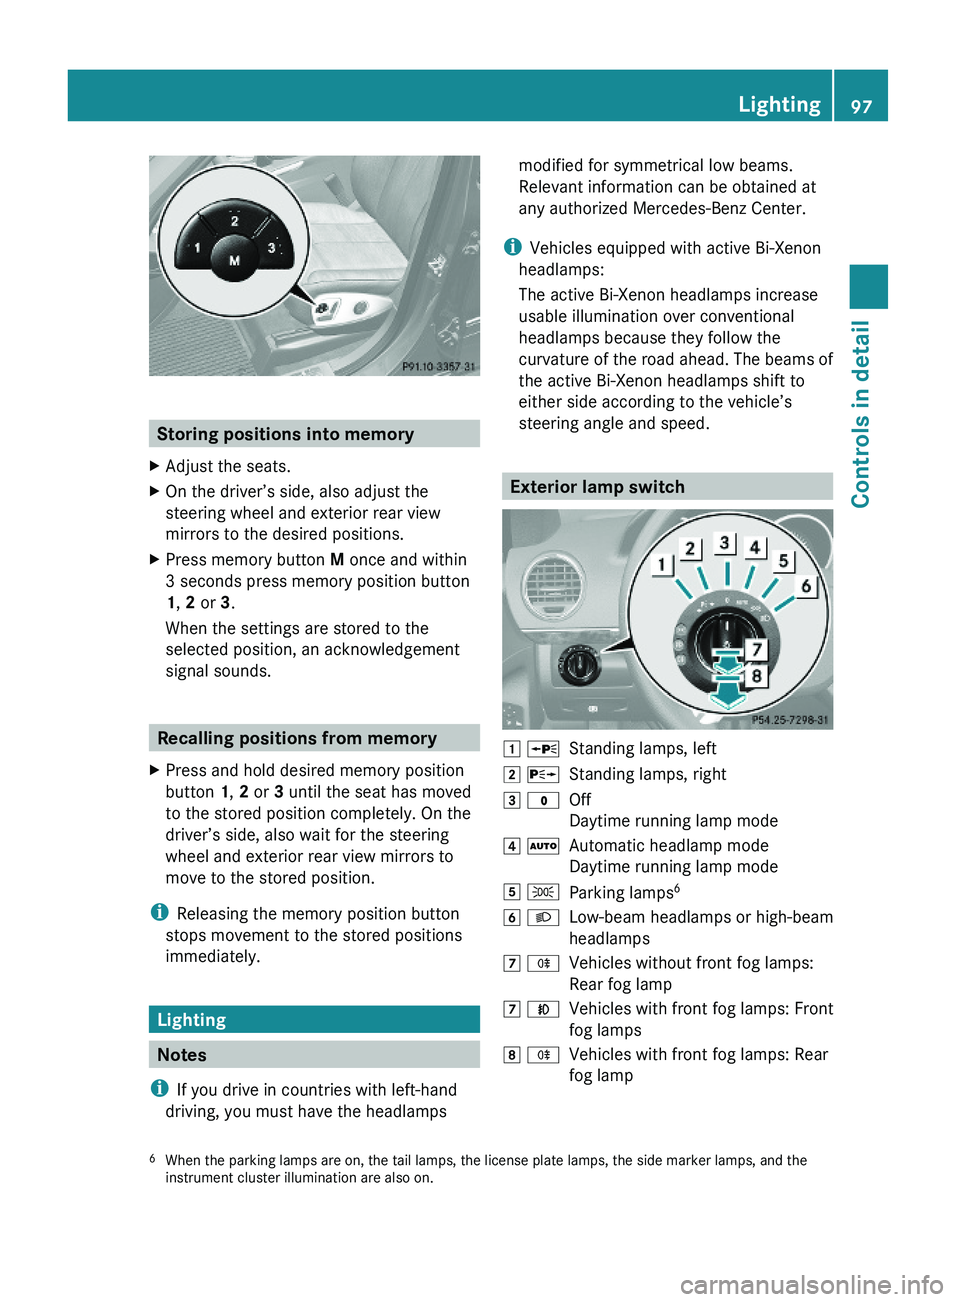
XPress memory button M once and within
3 seconds press memory position button
1, 2 or 3.
When the settings are stored to the
selected position, an acknowledgement
signal sounds.
Recalling positions from memory
XPress and hold desired memory position
button 1, 2 or 3 until the seat has moved
to the stored position completely. On the
driver’s side, also wait for the steering
wheel and exterior rear view mirrors to
move to the stored position.
iReleasing the memory position button
stops movement to the stored positions
immediately.
Lighting
Notes
iIf you drive in countries with left-hand
driving, you must have the headlamps
modified for symmetrical low beams.
Relevant information can be obtained at
any authorized Mercedes-Benz Center.
iVehicles equipped with active Bi-Xenon
headlamps:
The active Bi-Xenon headlamps increase
usable illumination over conventional
headlamps because they follow the
curvature of the road ahead. The beams of
the active Bi-Xenon headlamps shift to
either side according to the vehicle’s
steering angle and speed.
Exterior lamp switch
1 WStanding lamps, left2 XStanding lamps, right3 $Off
Daytime running lamp mode
4 ÃAutomatic headlamp mode
Daytime running lamp mode
5 TParking lamps66 LLow-beam headlamps or high-beam
headlamps
7 RVehicles without front fog lamps:
Rear fog lamp
7 NVehicles with front fog lamps: Front
fog lamps
8 RVehicles with front fog lamps: Rear
fog lamp6When the parking lamps are on, the tail lamps, the license plate lamps, the side marker lamps, and theinstrument cluster illumination are also on.
Lighting97Controls in detailX164_AKB; 5; 31, en-USd2ureepe,Version: 2.11.8.12009-09-11T12:30:16+02:00 - Seite 97Z
Page 135 of 380
approximately 5 seconds, the Settings
menu reappears in the multifunction display.
Submenus in the Settings menu
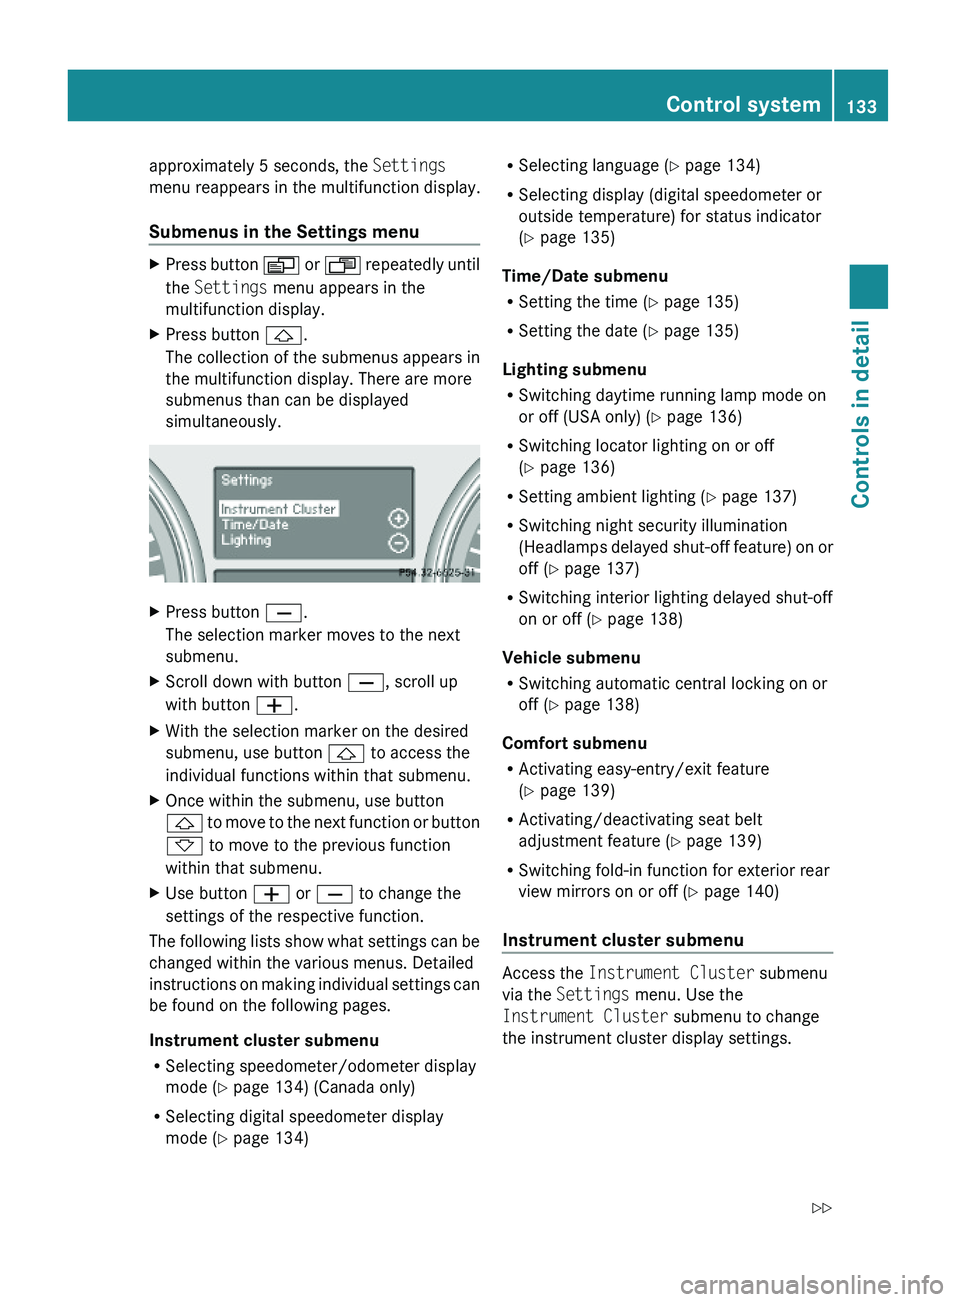
XPress button V or U repeatedly until
the Settings menu appears in the
multifunction display.
XPress button &.
The collection of the submenus appears in
the multifunction display. There are more
submenus than can be displayed
simultaneously.
XPress button X.
The selection marker moves to the next
submenu.
XScroll down with button X, scroll up
with button W.
XWith the selection marker on the desired
submenu, use button & to access the
individual functions within that submenu.
XOnce within the submenu, use button
& to move to the next function or button
* to move to the previous function
within that submenu.
XUse button W or X to change the
settings of the respective function.
The following lists show what settings can be
changed within the various menus. Detailed
instructions on making individual settings can
be found on the following pages.
Instrument cluster submenu
RSelecting speedometer/odometer display
mode (Y page 134) (Canada only)
RSelecting digital speedometer display
mode (Y page 134)
RSelecting language (Y page 134)
RSelecting display (digital speedometer or
outside temperature) for status indicator
(Y page 135)
Time/Date submenu
RSetting the time (Y page 135)
RSetting the date (Y page 135)
Lighting submenu
RSwitching daytime running lamp mode on
or off (USA only) (Y page 136)
RSwitching locator lighting on or off
(Y page 136)
RSetting ambient lighting (Y page 137)
RSwitching night security illumination
(Headlamps delayed shut-off feature) on or
off (Y page 137)
RSwitching interior lighting delayed shut-off
on or off (Y page 138)
Vehicle submenu
RSwitching automatic central locking on or
off (Y page 138)
Comfort submenu
RActivating easy-entry/exit feature
(Y page 139)
RActivating/deactivating seat belt
adjustment feature (Y page 139)
RSwitching fold-in function for exterior rear
view mirrors on or off (Y page 140)
Instrument cluster submenu
Access the Instrument Cluster submenu
via the Settings menu. Use the
Instrument Cluster submenu to change
the instrument cluster display settings.
Control system133Controls in detailX164_AKB; 5; 31, en-USd2ureepe,Version: 2.11.8.12009-09-11T12:30:16+02:00 - Seite 133Z
Page 141 of 380
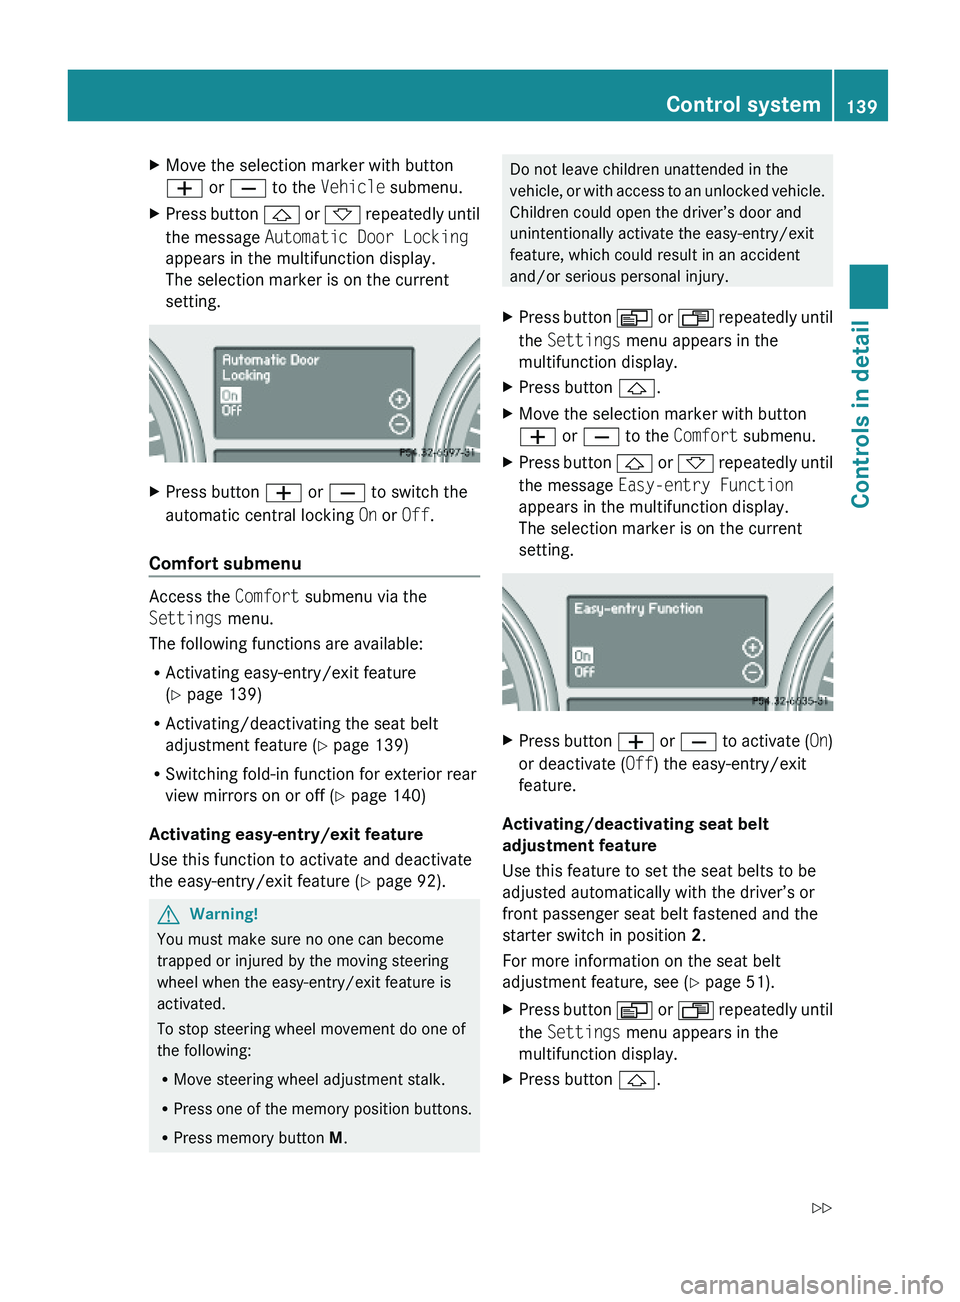
XMove the selection marker with button
W or X to the Vehicle submenu.
XPress button & or * repeatedly until
the message Automatic Door Locking
appears in the multifunction display.
The selection marker is on the current
setting.
XPress button W or X to switch the
automatic central locking On or Off.
Comfort submenu
Access the Comfort submenu via the
Settings menu.
The following functions are available:
RActivating easy-entry/exit feature
(Y page 139)
RActivating/deactivating the seat belt
adjustment feature (Y page 139)
RSwitching fold-in function for exterior rear
view mirrors on or off (Y page 140)
Activating easy-entry/exit feature
Use this function to activate and deactivate
the easy-entry/exit feature (Y page 92).
GWarning!
You must make sure no one can become
trapped or injured by the moving steering
wheel when the easy-entry/exit feature is
activated.
To stop steering wheel movement do one of
the following:
RMove steering wheel adjustment stalk.
RPress one of the memory position buttons.
RPress memory button M.
Do not leave children unattended in the
vehicle, or with access to an unlocked vehicle.
Children could open the driver’s door and
unintentionally activate the easy-entry/exit
feature, which could result in an accident
and/or serious personal injury.
XPress button V or U repeatedly until
the Settings menu appears in the
multifunction display.
XPress button &.XMove the selection marker with button
W or X to the Comfort submenu.
XPress button & or * repeatedly until
the message Easy-entry Function
appears in the multifunction display.
The selection marker is on the current
setting.
XPress button W or X to activate (On)
or deactivate (Off) the easy-entry/exit
feature.
Activating/deactivating seat belt
adjustment feature
Use this feature to set the seat belts to be
adjusted automatically with the driver’s or
front passenger seat belt fastened and the
starter switch in position 2.
For more information on the seat belt
adjustment feature, see (Y page 51).
XPress button V or U repeatedly until
the Settings menu appears in the
multifunction display.
XPress button &.Control system139Controls in detailX164_AKB; 5; 31, en-USd2ureepe,Version: 2.11.8.12009-09-11T12:30:16+02:00 - Seite 139Z
Page 142 of 380
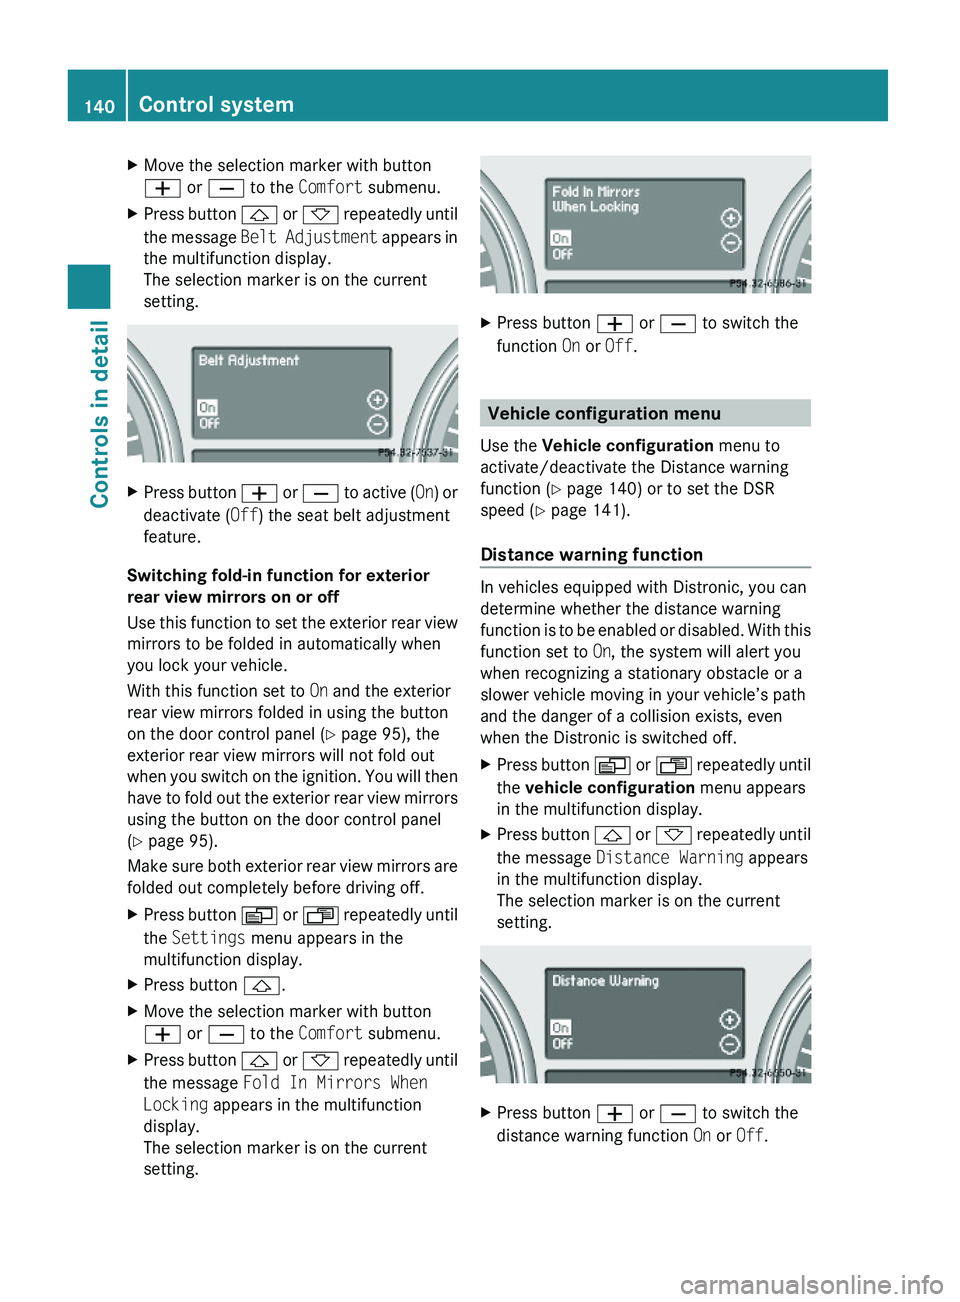
XMove the selection marker with button
W or X to the Comfort submenu.
XPress button & or * repeatedly until
the message Belt Adjustment appears in
the multifunction display.
The selection marker is on the current
setting.
XPress button W or X to active (On) or
deactivate (Off) the seat belt adjustment
feature.
Switching fold-in function for exterior
rear view mirrors on or off
Use this function to set the exterior rear view
mirrors to be folded in automatically when
you lock your vehicle.
With this function set to On and the exterior
rear view mirrors folded in using the button
on the door control panel (Y page 95), the
exterior rear view mirrors will not fold out
when you switch on the ignition. You will then
have to fold out the exterior rear view mirrors
using the button on the door control panel
(Y page 95).
Make sure both exterior rear view mirrors are
folded out completely before driving off.
XPress button V or U repeatedly until
the Settings menu appears in the
multifunction display.
XPress button &.XMove the selection marker with button
W or X to the Comfort submenu.
XPress button & or * repeatedly until
the message Fold In Mirrors When
Locking appears in the multifunction
display.
The selection marker is on the current
setting.
XPress button W or X to switch the
function On or Off.
Vehicle configuration menu
Use the Vehicle configuration menu to
activate/deactivate the Distance warning
function (Y page 140) or to set the DSR
speed (Y page 141).
Distance warning function
In vehicles equipped with Distronic, you can
determine whether the distance warning
function is to be enabled or disabled. With this
function set to On, the system will alert you
when recognizing a stationary obstacle or a
slower vehicle moving in your vehicle’s path
and the danger of a collision exists, even
when the Distronic is switched off.
XPress button V or U repeatedly until
the vehicle configuration menu appears
in the multifunction display.
XPress button & or * repeatedly until
the message Distance Warning appears
in the multifunction display.
The selection marker is on the current
setting.
XPress button W or X to switch the
distance warning function On or Off.
140Control systemControls in detail
X164_AKB; 5; 31, en-USd2ureepe,Version: 2.11.8.12009-09-11T12:30:16+02:00 - Seite 140
Page 171 of 380
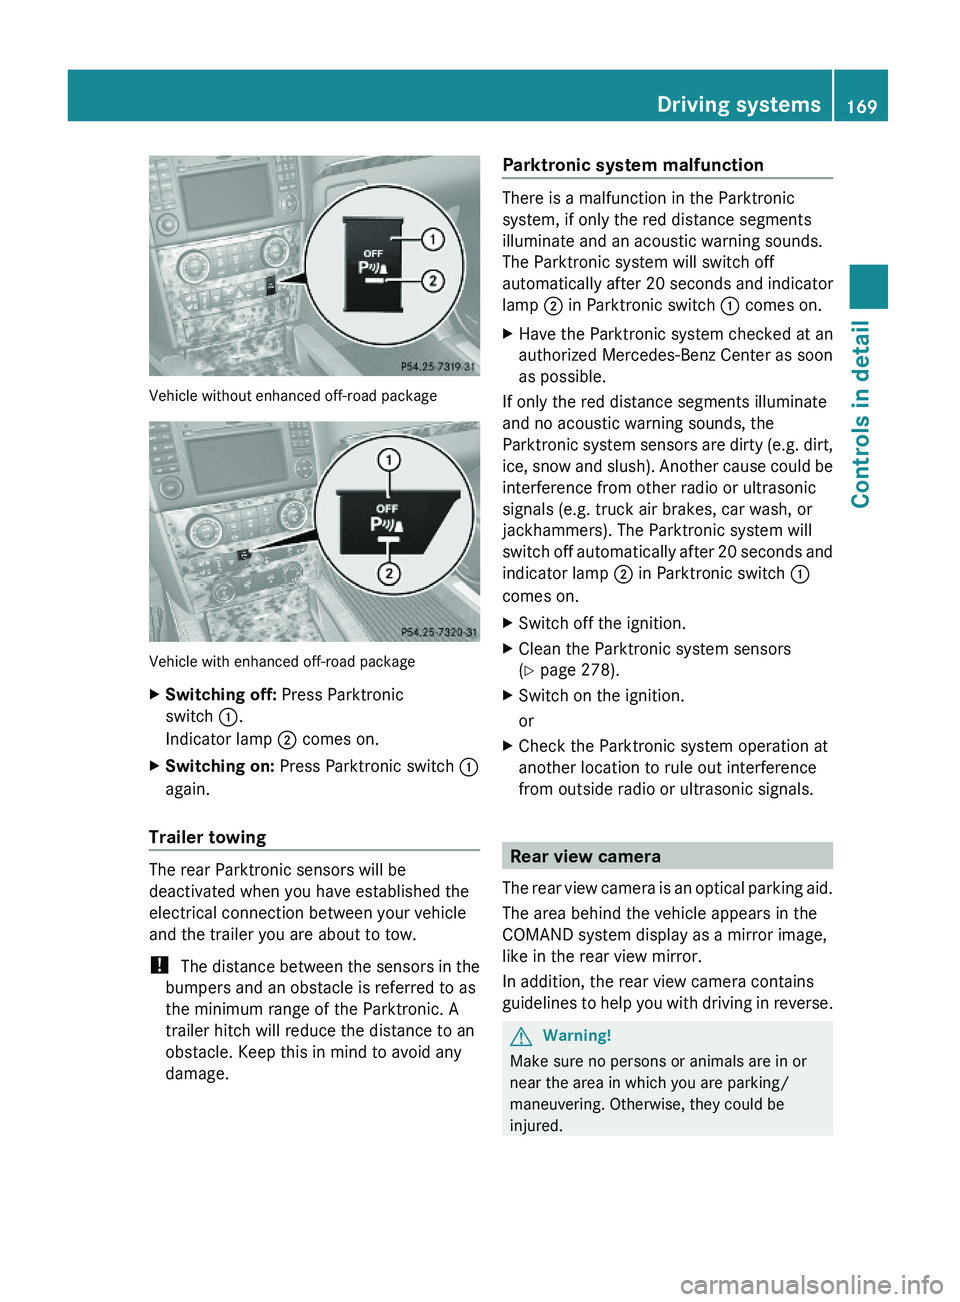
Vehicle without enhanced off-road package
Vehicle with enhanced off-road package
XSwitching off: Press Parktronic
switch :.
Indicator lamp ; comes on.
XSwitching on: Press Parktronic switch :
again.
Trailer towing
The rear Parktronic sensors will be
deactivated when you have established the
electrical connection between your vehicle
and the trailer you are about to tow.
! The distance between the sensors in the
bumpers and an obstacle is referred to as
the minimum range of the Parktronic. A
trailer hitch will reduce the distance to an
obstacle. Keep this in mind to avoid any
damage.
Parktronic system malfunction
There is a malfunction in the Parktronic
system, if only the red distance segments
illuminate and an acoustic warning sounds.
The Parktronic system will switch off
automatically after 20 seconds and indicator
lamp ; in Parktronic switch : comes on.
XHave the Parktronic system checked at an
authorized Mercedes-Benz Center as soon
as possible.
If only the red distance segments illuminate
and no acoustic warning sounds, the
Parktronic system sensors are dirty (e.g. dirt,
ice, snow and slush). Another cause could be
interference from other radio or ultrasonic
signals (e.g. truck air brakes, car wash, or
jackhammers). The Parktronic system will
switch off automatically after 20 seconds and
indicator lamp ; in Parktronic switch :
comes on.
XSwitch off the ignition.XClean the Parktronic system sensors
(Y page 278).
XSwitch on the ignition.
or
XCheck the Parktronic system operation at
another location to rule out interference
from outside radio or ultrasonic signals.
Rear view camera
The rear view camera is an optical parking aid.
The area behind the vehicle appears in the
COMAND system display as a mirror image,
like in the rear view mirror.
In addition, the rear view camera contains
guidelines to help you with driving in reverse.
GWarning!
Make sure no persons or animals are in or
near the area in which you are parking/
maneuvering. Otherwise, they could be
injured.
Driving systems169Controls in detailX164_AKB; 5; 31, en-USd2ureepe,Version: 2.11.8.12009-09-11T12:30:16+02:00 - Seite 169Z
Page 212 of 380
! Do not sit on or lean your body weight
against the armrest when it is folded down,
as you could otherwise damage it.
Cup holders in third-row side trims
Cup holders are located in the side trims of
the third-row seats.
Sun visors
GWarning!
Do not use the vanity mirror while driving.
Keep the vanity mirrors in the sun visors
closed while vehicle is in motion. Reflected
glare can endanger you and others.
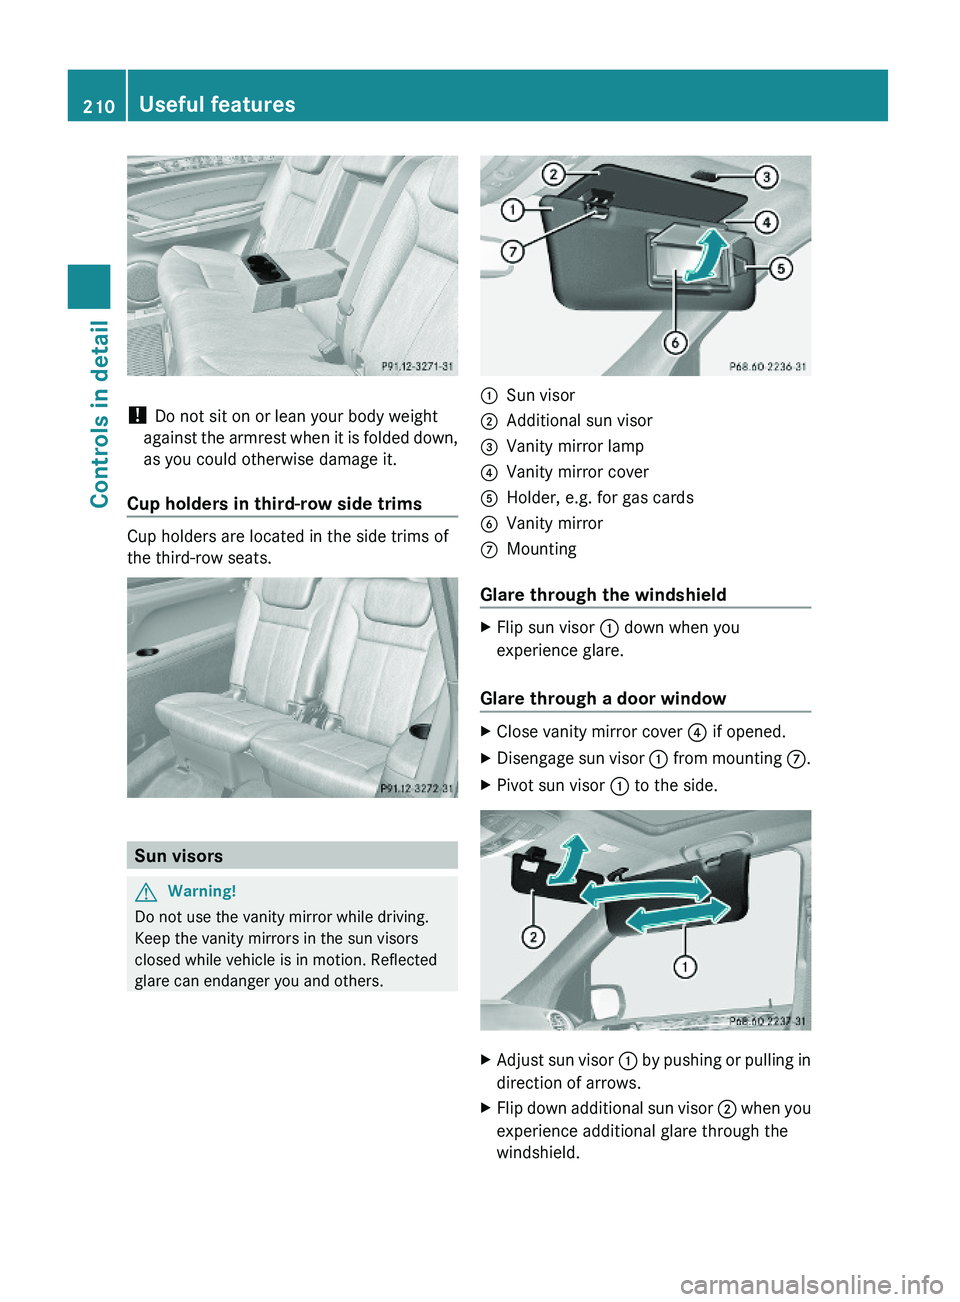
:Sun visor;Additional sun visor=Vanity mirror lamp?Vanity mirror coverAHolder, e.g. for gas cardsBVanity mirrorCMounting
Glare through the windshield
XFlip sun visor : down when you
experience glare.
Glare through a door window
XClose vanity mirror cover ? if opened.XDisengage sun visor : from mounting C.XPivot sun visor : to the side.XAdjust sun visor : by pushing or pulling in
direction of arrows.
XFlip down additional sun visor ; when you
experience additional glare through the
windshield.
210Useful featuresControls in detail
X164_AKB; 5; 31, en-USd2ureepe,Version: 2.11.8.12009-09-11T12:30:16+02:00 - Seite 210
Page 213 of 380
Vanity mirror
Vanity mirror lamp = only functions when
sun visor : is engaged in mounting C.
XFlip sun visor down.XLift up vanity mirror cover ?.
Vanity mirror lamp = comes on.
Rear panorama roof sunshade
The rear panorama roof sunshade over the
third-row seats prevents the sun from shining
directly into the vehicle.
You can open and close the sunshade by
hand.
! Always guide the sunshade. Do not let it
snap back abruptly, as it could be
damaged.
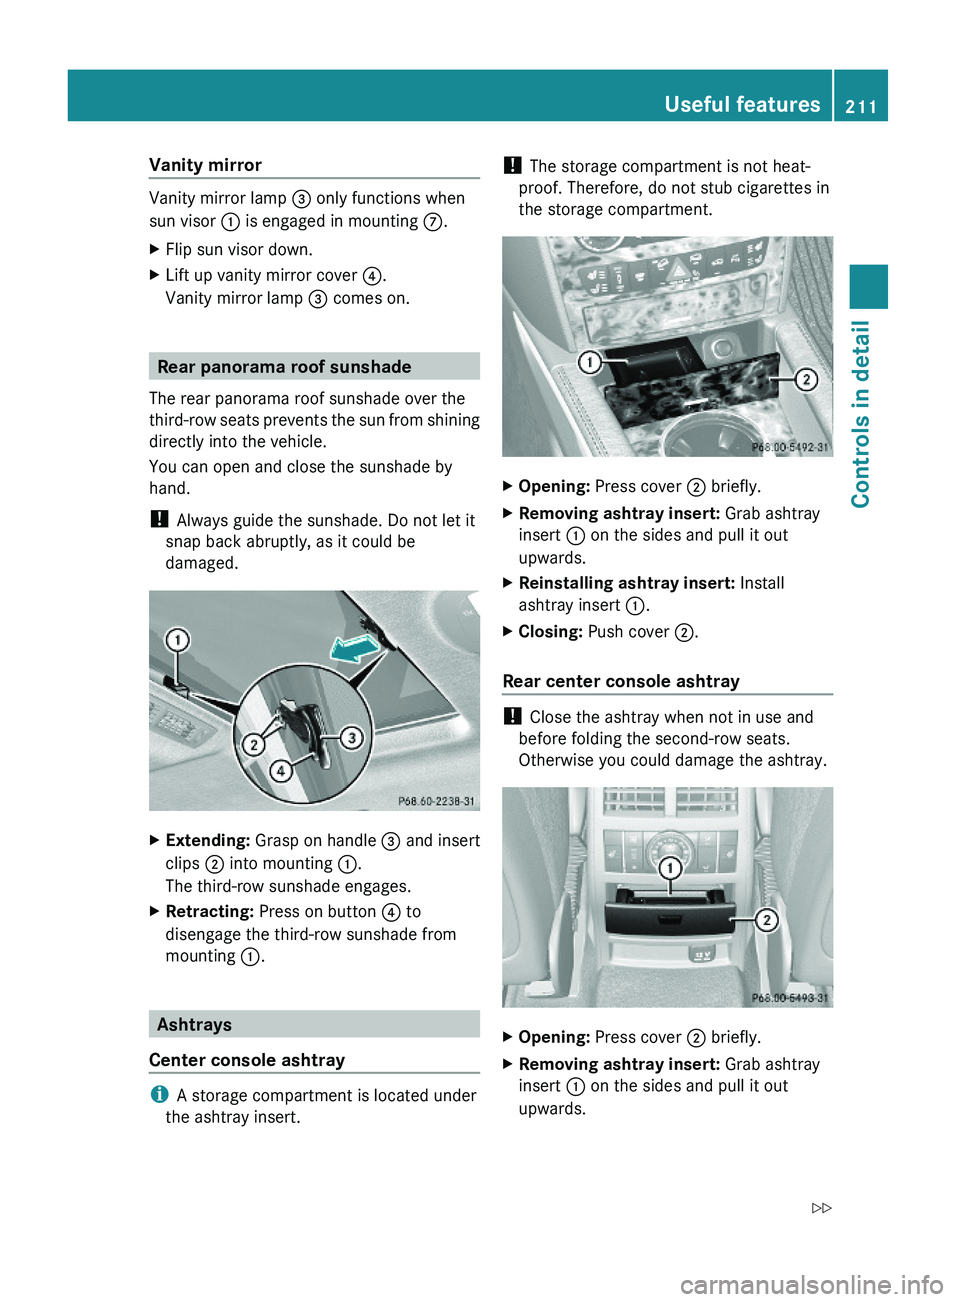
XExtending: Grasp on handle = and insert
clips ; into mounting :.
The third-row sunshade engages.
XRetracting: Press on button ? to
disengage the third-row sunshade from
mounting :.
Ashtrays
Center console ashtray
iA storage compartment is located under
the ashtray insert.
! The storage compartment is not heat-
proof. Therefore, do not stub cigarettes in
the storage compartment.
XOpening: Press cover ; briefly.XRemoving ashtray insert: Grab ashtray
insert : on the sides and pull it out
upwards.
XReinstalling ashtray insert: Install
ashtray insert :.
XClosing: Push cover ;.
Rear center console ashtray
! Close the ashtray when not in use and
before folding the second-row seats.
Otherwise you could damage the ashtray.
XOpening: Press cover ; briefly.XRemoving ashtray insert: Grab ashtray
insert : on the sides and pull it out
upwards.
Useful features211Controls in detailX164_AKB; 5; 31, en-USd2ureepe,Version: 2.11.8.12009-09-11T12:30:16+02:00 - Seite 211Z