2010 MERCEDES-BENZ GL transmission
[x] Cancel search: transmissionPage 65 of 380
If the ABS malfunctions, the wheels may lock
during hard braking, reducing steering
capability and extending the braking distance.
Off-road ABS
With the off-road driving program switched
on, or with the transmission in LOW RANGE
mode, the ABS designed for off-road driving
is activated automatically.
When applying the brakes at speeds below
18 mph (30 km/h), the front wheels are
locked cyclically to shorten the braking
distance (dig-in effect). This will restrict
steering the vehicle.
BAS
GObserve Safety notes, see page 62.
The Brake Assist System (BAS) operates in
emergency situations. If you apply the brakes
very quickly, the BAS provides full brake
boost automatically, thereby potentially
reducing the braking distance.
XApply continuous full braking pressure until
the emergency braking situation is over.
The ABS will prevent the wheels from
locking.
When you release the brake pedal, the brakes
function again as normal. The BAS is then
deactivated.
GWarning!
If the BAS malfunctions, the brake system still
functions, but without the additional brake
boost available that the BAS would normally
provide in an emergency braking maneuver.
Therefore, the braking distance may increase.
EBP
GObserve Safety notes, see page 62.
The Electronic Brake Proportioning (EBP)
enhances braking effectiveness by allowing
the rear brakes to supply a greater proportion
of the braking effort in straight-line braking
without a loss of vehicle stability.GWarning!
If the EBP malfunctions, the brake system will
still function with full brake boost. However,
the rear wheels could lock up during
emergency braking situations, for example.
You could lose control of the vehicle and
cause an accident.
Adapt your driving style to the changed
driving characteristics.
ESP ®
GObserve Safety notes, see page 62.
The Electronic Stability Program (ESP
®
) is
operational as soon as the engine is running.
It monitors the vehicle’s traction (force of
adhesive friction between the tires and the
road surface) and handling.
The ESP ®
recognizes that the vehicle deviates
from the direction of travel as intended by the
driver. By applying brakes to individual
wheels and by limiting the engine output, the
ESP ®
works to stabilize the vehicle. The
ESP ®
is especially useful while driving off and
on wet or slippery road surfaces. The ESP ®
also stabilizes the vehicle during braking and
steering maneuvers.
The ESP ®
warning lamp d in the
instrument cluster comes on when you switch
on the ignition. It goes out when the engine
is running.
The ESP ®
warning lamp d in the
instrument cluster flashes when the ESP ®
is
engaged.
Driving safety systems63Safety and securityX164_AKB; 5; 31, en-USd2ureepe,Version: 2.11.8.12009-09-11T12:30:16+02:00 - Seite 63Z
Page 66 of 380

GWarning!
Never switch off the ESP®
when you see the
ESP ®
warning lamp d flashing in the
instrument cluster. In this case proceed as
follows:
R When driving off, apply as little throttle as
possible.
R While driving, ease up on the accelerator
pedal.
R Adapt your speed and driving style to the
prevailing road conditions.
Failure to observe these guidelines could
cause the vehicle to skid. The ESP ®
cannot
prevent accidents resulting from excessive
speed.
! Only conduct operational or performance
tests on a two-axle dynamometer. If such
tests are necessary, contact an authorized
Mercedes-Benz Center. You could
otherwise seriously damage the brake
system or the transfer case which is not
covered by the Mercedes-Benz Limited
Warranty.
! Because the ESP ®
operates
automatically, the engine and ignition must
be shut off (SmartKey in starter switch
position 0 or 1 or KEYLESS-GO start/stop
button in position 0 or 1) when the parking
brake is being tested on a brake test
dynamometer. Such testing should be no
longer than 10 seconds.
Active braking action through the ESP ®
may otherwise seriously damage the brake
system which is not covered by the
Mercedes-Benz Limited Warranty.
! The ESP ®
will only function properly if you
use wheels of the recommended tire size
as specified in the “Technical data” section
of this Operator’s Manual.
i The Distronic system and cruise control
switch off automatically when the ESP ®
engages.
Electronic Traction System (4-ETS) GObserve Safety notes, see page 62.
The 4-ETS (four-wheel Electronic Traction
System) is a component of the ESP ®
. The
4-ETS improves the vehicle’s ability to utilize
available traction, especially under slippery
road conditions by applying the brakes to a
spinning wheel. In addition, more power is
transferred to the wheel(s) with traction.
When you switch off the ESP ®
, the 4-ETS is
still enabled.
XIf conditions require, switch on the off-road
driving program ( Y page 158) or the LOW
RANGE mode ( Y page 119).
Off-road 4-ETS
With the off-road driving program switched on
( Y page 158), or the transmission in LOW
RANGE mode ( Y page 120), the 4-ETS
designed for off-road use is activated
automatically.
Switching off the ESP ®
GWarning!
The ESP
®
should not be switched off during
normal driving other than in the
circumstances described below. Disabling
the system will reduce vehicle stability in
driving maneuvers.
Do not switch off the ESP ®
when a spare
wheel is mounted.
To improve the vehicle’s traction, switch off
the ESP ®
. This allows the drive wheels to spin
and thus cut into surfaces for better grip, for
example
R when driving with snow chains
R in deep snow
R in sand or gravel
64Driving safety systemsSafety and security
X164_AKB; 5; 31, en-USd2ureepe,Version: 2.11.8.12009-09-11T12:30:16+02:00 - Seite 64
Page 67 of 380
GWarning!
Switch on the ESP® immediately if the
aforementioned circumstances do not apply
anymore. Otherwise the ESP® will not
stabilize the vehicle when it is starting to skid
or a wheel is spinning.
When you switch off the ESP®,
Rthe ESP® does not stabilize the vehicle
Rthe engine output is not limited, which
allows the drive wheels to spin and thus cut
into surfaces for better grip
Rthe 4-ETS will still apply the brakes to a
spinning wheel
Rthe ESP® continues to operate when you
are braking
Rthe cruise control or the Distronic system
cannot be activated
Rthe cruise control or the Distronic system
switch off if activated
iWhen the ESP® is switched off and one or
more drive wheels are spinning, the ESP®
warning lamp d in the instrument
cluster flashes. However, the ESP® will
then not stabilize the vehicle.
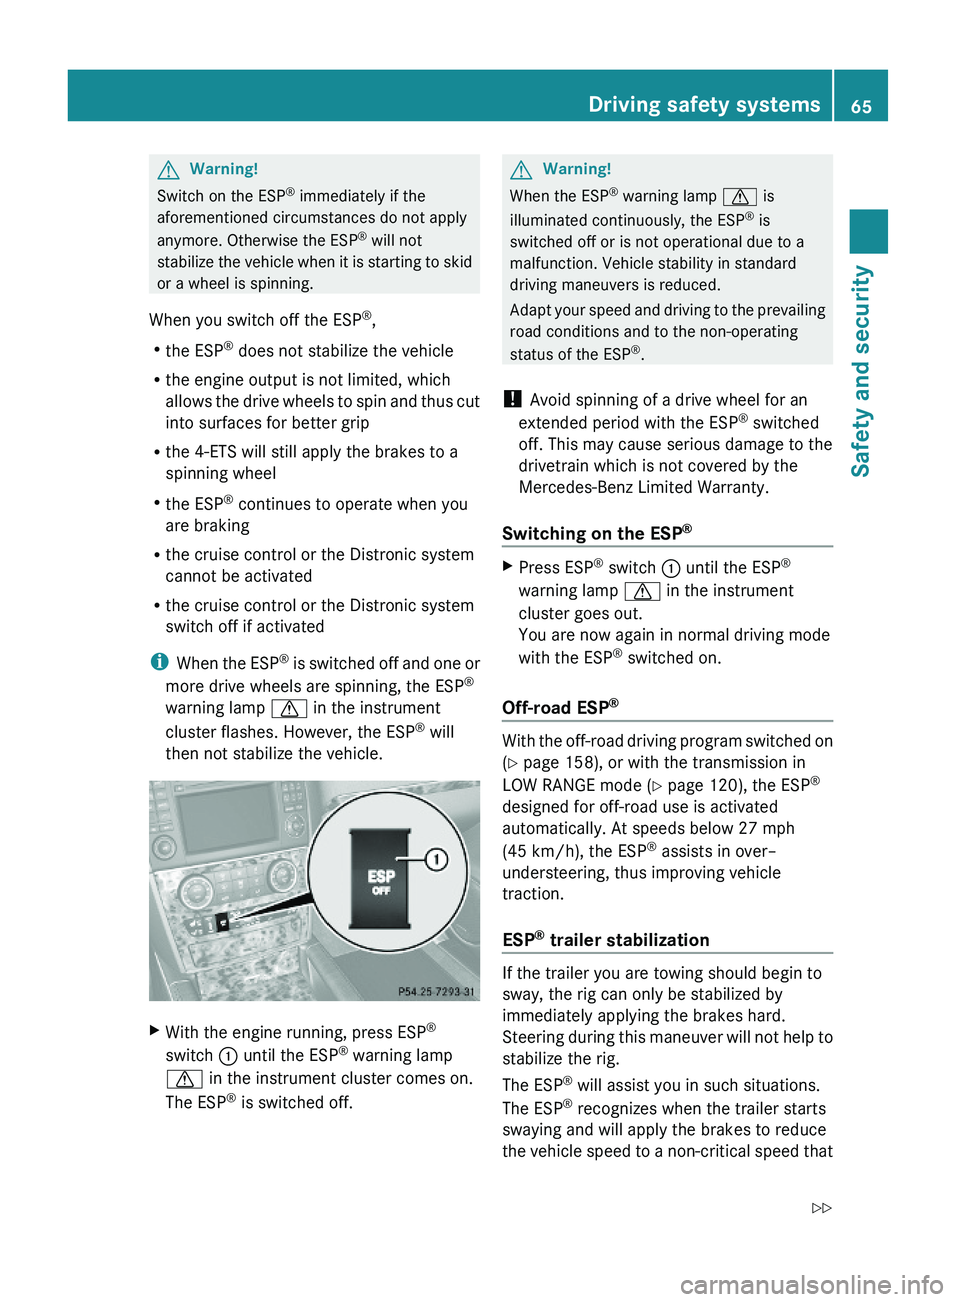
XWith the engine running, press ESP®
switch : until the ESP® warning lamp
d in the instrument cluster comes on.
The ESP® is switched off.
GWarning!
When the ESP® warning lamp d is
illuminated continuously, the ESP® is
switched off or is not operational due to a
malfunction. Vehicle stability in standard
driving maneuvers is reduced.
Adapt your speed and driving to the prevailing
road conditions and to the non-operating
status of the ESP®.
! Avoid spinning of a drive wheel for an
extended period with the ESP® switched
off. This may cause serious damage to the
drivetrain which is not covered by the
Mercedes-Benz Limited Warranty.
Switching on the ESP®
XPress ESP® switch : until the ESP®
warning lamp d in the instrument
cluster goes out.
You are now again in normal driving mode
with the ESP® switched on.
Off-road ESP®
With the off-road driving program switched on
(Y page 158), or with the transmission in
LOW RANGE mode (Y page 120), the ESP®
designed for off-road use is activated
automatically. At speeds below 27 mph
(45 km/h), the ESP® assists in over–
understeering, thus improving vehicle
traction.
ESP® trailer stabilization
If the trailer you are towing should begin to
sway, the rig can only be stabilized by
immediately applying the brakes hard.
Steering during this maneuver will not help to
stabilize the rig.
The ESP® will assist you in such situations.
The ESP® recognizes when the trailer starts
swaying and will apply the brakes to reduce
the vehicle speed to a non-critical speed that
Driving safety systems65Safety and securityX164_AKB; 5; 31, en-USd2ureepe,Version: 2.11.8.12009-09-11T12:30:16+02:00 - Seite 65Z
Page 71 of 380

Vehicle equipment ..............................70
Locking and unlocking .......................70
Starter switch positions .....................80
Seats ....................................................82
Multifunction steering wheel .............91
Mirrors .................................................93
Memory function .................................96
Lighting ................................................97
Wipers ................................................103
Power windows .................................105
Driving and parking ..........................108
Automatic transmission ...................114
Transfer case ....................................119
Differential locks ..............................121
Instrument cluster ............................124
Control system ..................................125
Driving systems ................................144
Overview of climate control sys-
tem functions and air vents .............172
Climate control .................................175
3-zone automatic climate control ...181
Rear window defroster .....................191
Power tilt/sliding sunroof ...............192
Loading and storing ..........................194
Useful features .................................209
69Controls in detailX164_AKB; 5; 31, en-USd2ureepe,Version: 2.11.8.12009-09-11T12:30:16+02:00 - Seite 69
Page 74 of 380

Important notes on using KEYLESS-GO
RYou can also use the SmartKey with
KEYLESS-GO like a normal SmartKey
( Y page 70).
R You can combine KEYLESS-GO functions
with normal SmartKey functions (e.g.
unlocking with KEYLESS-GO and locking
with button &).
R Always carry the SmartKey with you.
R Never store the SmartKey together with:
- Electronic items such as a mobile phone
or another SmartKey
- Metallic objects such as coins or metal
foil
Doing so could impair the function of the
KEYLESS-GO system.
R To lock or unlock the vehicle, the SmartKey
must be located outside the vehicle within
approximately 3 ft (1 m) of a door or the
tailgate.
R When the vehicle has been parked for more
than 72 hours, the KEYLESS-GO function is
deactivated. Pull an outside door handle
and switch on the ignition once to activate
the KEYLESS-GO function.
R If the SmartKey is positioned farther away
from the vehicle, the system may no longer
recognize the SmartKey. The vehicle
cannot be locked or the engine started via
the KEYLESS-GO system.
R If the SmartKey is removed from the vehicle
(e.g. if a passenger exits the vehicle with
the SmartKey)
- when pressing the KEYLESS-GO start/
stop button or trying to lock the vehicle
with the lock button on an outside door
handle the message Key Not
Detected appears in the multifunction
display
- with the engine running, the red message
Key Not Detected appears in the
multifunction display while driving off
Find the SmartKey or change its present
location immediately (e.g. place it on the
front passenger seat or insert it in shirt
pocket).
R If you have started the engine with the
KEYLESS-GO start/stop button, you can
turn it off again by
- pressing the KEYLESS-GO start/stop
button
- inserting the SmartKey into the starter
switch when the vehicle is at a standstill
and the automatic transmission is in park
position P
R The vehicle could be inadvertently
unlocked if the SmartKey is within 3 ft (1 m)
of the vehicle and
- an outside door handle is splashed with
water
or
- you attempt to clean an outside door
handle
R Remember that the engine can be started
by anyone with a SmartKey that is left
inside the vehicle.
Possibility 1 (One SmartKey in the vehicle,
one SmartKey outside the vehicle):
If you leave the SmartKey behind when
exiting and locking the vehicle, no message
appears in the multifunction display.
Possibility 2 (One SmartKey in the vehicle,
no SmartKey outside the vehicle):
When exiting and trying to lock the vehicle,
the message Key Detected In Vehicle
appears in the multifunction display. The
vehicle will not be locked.
Factory setting XGlobal unlocking: Grasp an outside door
handle.72Locking and unlockingControls in detail
X164_AKB; 5; 31, en-USd2ureepe,Version: 2.11.8.12009-09-11T12:30:16+02:00 - Seite 72
Page 83 of 380
the SmartKey is in the vehicle, the vehicle’s
electrical systems can be switched on or
the engine can be started using the
KEYLESS-GO start/stop button.
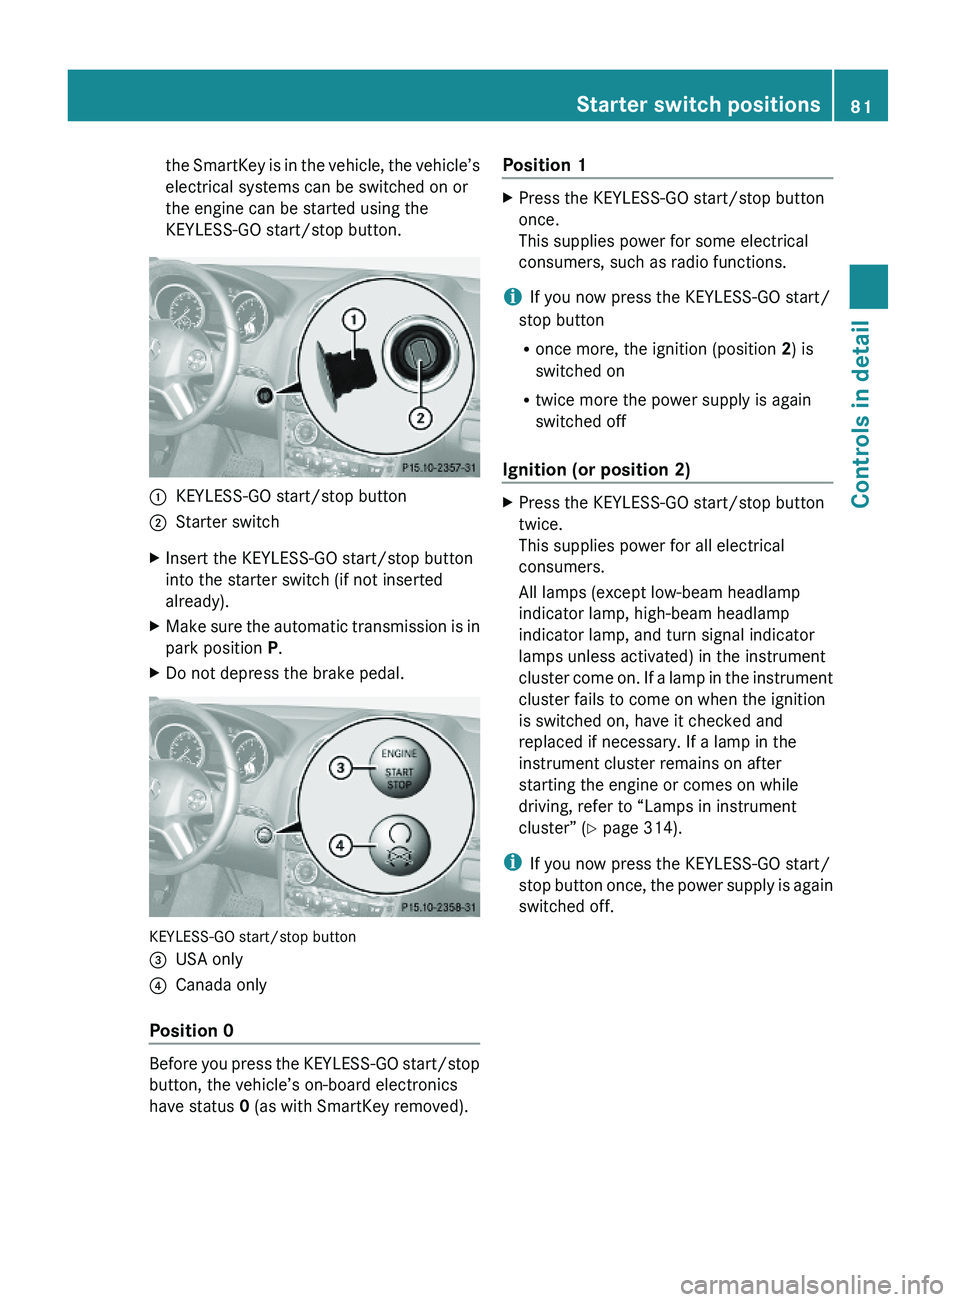
:KEYLESS-GO start/stop button;Starter switchXInsert the KEYLESS-GO start/stop button
into the starter switch (if not inserted
already).
XMake sure the automatic transmission is in
park position P.
XDo not depress the brake pedal.
KEYLESS-GO start/stop button
=USA only?Canada only
Position 0
Before you press the KEYLESS-GO start/stop
button, the vehicle’s on-board electronics
have status 0 (as with SmartKey removed).
Position 1XPress the KEYLESS-GO start/stop button
once.
This supplies power for some electrical
consumers, such as radio functions.
iIf you now press the KEYLESS-GO start/
stop button
Ronce more, the ignition (position 2) is
switched on
Rtwice more the power supply is again
switched off
Ignition (or position 2)
XPress the KEYLESS-GO start/stop button
twice.
This supplies power for all electrical
consumers.
All lamps (except low-beam headlamp
indicator lamp, high-beam headlamp
indicator lamp, and turn signal indicator
lamps unless activated) in the instrument
cluster come on. If a lamp in the instrument
cluster fails to come on when the ignition
is switched on, have it checked and
replaced if necessary. If a lamp in the
instrument cluster remains on after
starting the engine or comes on while
driving, refer to “Lamps in instrument
cluster” (Y page 314).
iIf you now press the KEYLESS-GO start/
stop button once, the power supply is again
switched off.
Starter switch positions81Controls in detailX164_AKB; 5; 31, en-USd2ureepe,Version: 2.11.8.12009-09-11T12:30:16+02:00 - Seite 81Z
Page 97 of 380
The rear view mirrors will not react if the
automatic transmission is set to reverse gear
R or the interior lighting is switched on.
GWarning!
The auto-dimming function does not react if
incoming light is not aimed directly at sensors
in the interior rear view mirror.
The interior rear view mirror and the exterior
rear view mirror on the driver’s side do not
react, for example, when transporting cargo
which covers the rear window.
Light hitting the mirror(s) at certain angles
(incident light) could blind you. As a result,
you may not be able to observe traffic
conditions and could cause an accident.
Exterior rear view mirror parking
position
For more convenient parking, you can set the
passenger-side exterior rear view mirror so
that you can see the rear wheel and the road
curb.
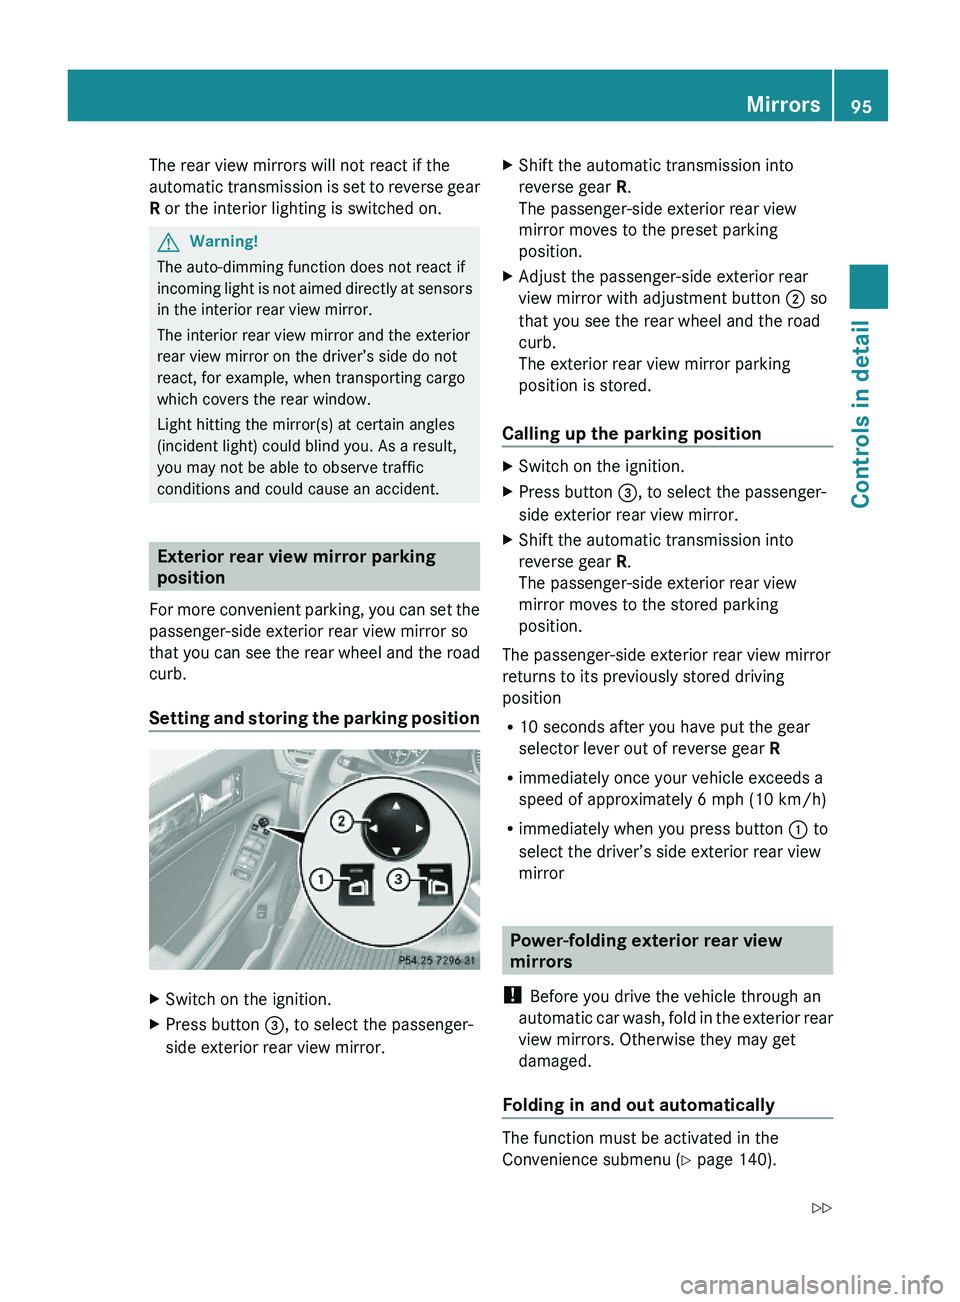
Setting and storing the parking position
XSwitch on the ignition.XPress button =, to select the passenger-
side exterior rear view mirror.
XShift the automatic transmission into
reverse gear R.
The passenger-side exterior rear view
mirror moves to the preset parking
position.
XAdjust the passenger-side exterior rear
view mirror with adjustment button ; so
that you see the rear wheel and the road
curb.
The exterior rear view mirror parking
position is stored.
Calling up the parking position
XSwitch on the ignition.XPress button =, to select the passenger-
side exterior rear view mirror.
XShift the automatic transmission into
reverse gear R.
The passenger-side exterior rear view
mirror moves to the stored parking
position.
The passenger-side exterior rear view mirror
returns to its previously stored driving
position
R10 seconds after you have put the gear
selector lever out of reverse gear R
Rimmediately once your vehicle exceeds a
speed of approximately 6 mph (10 km/h)
Rimmediately when you press button : to
select the driver’s side exterior rear view
mirror
Power-folding exterior rear view
mirrors
! Before you drive the vehicle through an
automatic car wash, fold in the exterior rear
view mirrors. Otherwise they may get
damaged.
Folding in and out automatically
The function must be activated in the
Convenience submenu (Y page 140).
Mirrors95Controls in detailX164_AKB; 5; 31, en-USd2ureepe,Version: 2.11.8.12009-09-11T12:30:16+02:00 - Seite 95Z
Page 106 of 380
! If you have set intermittent wiping, dirt on
the surface of the rain sensor or optical
effects may cause the windshield wipers to
wipe in an undesired fashion. This could
then damage the windshield wiper blades
or scratch the windshield. You should
therefore switch off the windshield wipers
when weather conditions are dry.
XTurn the combination switch to position
Ä or Å.
After the initial wipe, pauses between
wipes are controlled by the rain sensor
automatically.
Intermittent wiping is interrupted when the
vehicle is at a standstill and a front door is
opened. This protects persons getting into or
out of the vehicle from being sprayed.
Intermittent wiping will be continued when all
doors are closed andRthe automatic transmission is in drive
position D or reverse gear R
or
Rthe wiper setting is changed using the
combination switch
Single wipe
XPress the combination switch briefly in
direction of arrow B to the resistance
point.
The windshield wipers wipe one time
without washer fluid.
Wiping with washer fluid
XPress the combination switch in direction
of arrow B past the resistance point.
The windshield wipers operate with washer
fluid.
iTo prevent smears on the windshield or
noisy/chattering wiper blades, wipe with
washer fluid every now and then even when
it is raining.
For information on filling up the washer
reservoir, see “Washer system and headlamp
cleaning system” (Y page 232).
For information on cleaning the headlamps
with washer fluid, see “Headlamp cleaning
system” (Y page 101).
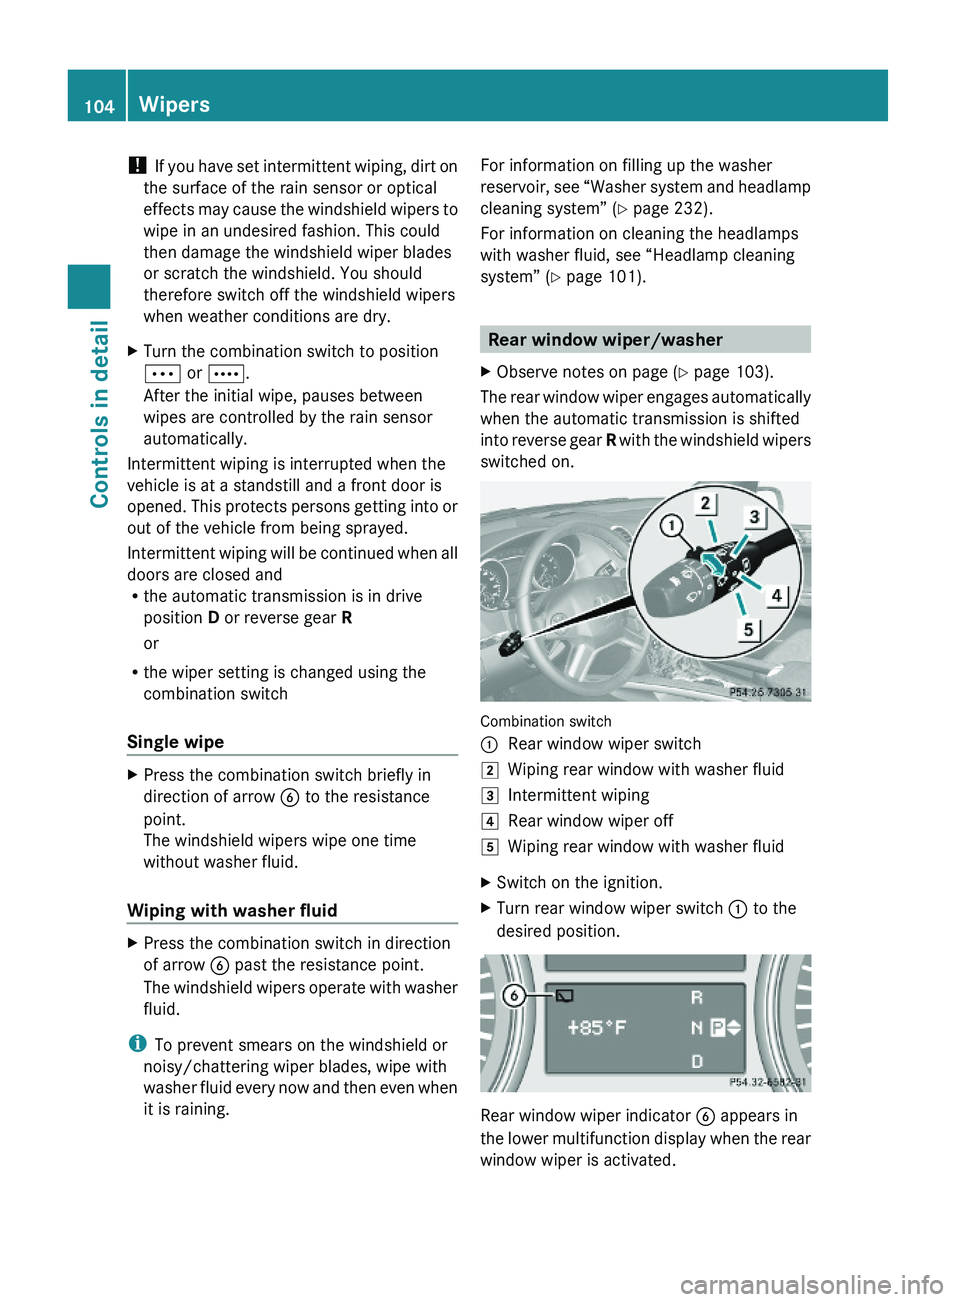
Rear window wiper/washer
XObserve notes on page (Y page 103).
The rear window wiper engages automatically
when the automatic transmission is shifted
into reverse gear R with the windshield wipers
switched on.
Combination switch
:Rear window wiper switch2Wiping rear window with washer fluid3Intermittent wiping4Rear window wiper off5Wiping rear window with washer fluidXSwitch on the ignition.XTurn rear window wiper switch : to the
desired position.
Rear window wiper indicator B appears in
the lower multifunction display when the rear
window wiper is activated.
104WipersControls in detail
X164_AKB; 5; 31, en-USd2ureepe,Version: 2.11.8.12009-09-11T12:30:16+02:00 - Seite 104