2010 MERCEDES-BENZ G55AMG light
[x] Cancel search: lightPage 198 of 272

containing solvents. Do not touch the
inside of the windows with hard objects
such as an ice scraper or ring. Doing so may
damage the windows.
Light alloy wheels
If possible, clean wheels once a week.
XUse Mercedes-Benz approved Wheel Care,
a soft bristle brush and a strong spray of
water for cleaning the light alloy wheels.
! Only use acid-free cleaning materials.
Acid may cause corrosion or damage the
clear coat.
! The vehicle should not be parked for an
extended period of time immediately after
it has been cleaned. This applies especially
after the wheel rims have been cleaned
with wheel rim cleaner. Wheel rim cleaners
can lead to increased corrosion of the
brake disks and brake pads. Non-approved
wheel cleaners may also damage the wheel
paint if the vehicle is not driven after
cleaning.
Therefore, the vehicle’s brake system
should always be warmed-up before it is
parked after cleaning. Drive your vehicle for
several minutes to allow the brakes to dry.
When applying Mercedes-Benz approved
Tire Care and Mercedes-Benz approved
Wheel Care products, take care not to
spray them on the brake disks.
Plastic and rubber parts
XUse a gentle dishwashing detergent or mild
detergent for delicate fabrics as a washing
solution.XWipe with a cloth moistened in a lukewarm
solution.
The surface may temporarily change color.
If this is the case, wait for it to dry.GWarning!
Do not use cleaners or cockpit care sprays
containing solvents to clean the cockpit or the
steering wheel. Cleaners containing solvents
will make the surface porous and vehicle
occupants could suffer serious injuries from
plastic parts coming loose in the event of air
bag deployment.
! Do not use oil, wax or scouring agents.
Otherwise you may scratch or damage the
surface.
Hard plastic trim items XUse Mercedes-Benz approved Interior Care
on a soft, lint-free cloth and apply with light
pressure.
COMAND display
! You must switch off the COMAND display
and allow it to cool prior to cleaning.
! Do not use any liquids or cleaning agents.
These can damage or even destroy the
COMAND display screen.
XUse a standard microfiber cloth and apply
with light pressure.
Steering wheel and gear selector lever
XWipe with a damp cloth and dry thoroughly
or clean with Mercedes-Benz approved
Leather Care.
Carpets
XUse Mercedes-Benz approved Carpet and
Fabric Care for cleaning the carpets.
Headliner
XUse a soft bristle brush or a dry-shampoo
cleaner in case of excessive dirt.
Seat belts
XOnly use clear, lukewarm water and soap.
! The seat belts must not be treated with
chemical cleaning agents. Do not dry the
196Vehicle careOperation
463_AKB; 3; 35, en-USd2ureepe,Version: 2.11.8.12009-07-16T20:59:56+02:00 - Seite 196
Page 199 of 272

seat belts at temperatures above 176‡
(80†) or in direct sunlight.GWarning!
Do not bleach or dye seat belts as this may
severely weaken them. In a crash they may
not be able to provide adequate protection.
Upholstery
Using aftermarket seat covers or wearing
clothing that have the tendency to give off
coloring (e.g. when wet, etc.) may cause the
upholstery to become permanently
discolored. By lining the seats with a proper
intermediate cover, contact-discoloration will
be prevented.
Leather upholstery
Please note that leather upholstery is a
natural product and is therefore subject to a
natural aging process. Leather upholstery
may also react to certain ambient influences
such as high humidity or high temperature by
showing wrinkles for example.
XWipe leather upholstery with a damp cloth
and dry thoroughly or clean with Mercedes-
Benz approved Leather Care.
! To avoid damage to leather upholstery:
R Wipe with light pressure only.
R Do not clean with abrasive cleaning
agents such as scouring milk or powder.
R Do not soak the leather upholstery.
As leather is a natural product, it could
otherwise harden or become porous.
R Exercise particular care when cleaning
perforated leather as its underside
should not become wet.
Wood trims
XOnly use water and a damp cloth to clean
wood trims in your vehicle.! Do not use solvents like tar remover or
wheel cleaner nor polishes or waxes as
these may be abrasive.
Chrome-plated exhaust tip
Regular cleaning and care of chrome-plated
exhaust tips will help to maintain their shine
and the classy appearance.
XUse Mercedes-Benz approved Chrome
Polishing Paste each time the vehicle has
been washed, especially during the winter.
! Do not use alkaline cleaners such as
wheel cleaners as they could cause
corrosion.
Vehicle care197Operation463_AKB; 3; 35, en-USd2ureepe,Version: 2.11.8.12009-07-16T20:59:56+02:00 - Seite 197Z
Page 204 of 272

XOpen lock : using the screwdriver.
iYou can also use a coin to open the lock.
XFold tab ; downwards.XPull cover ring = slightly outwards in
direction of arrows and remove.
XPull cover plate ? towards you.XRemove cover plate ?.XUnscrew mounting screws C.XRemove the spare wheel.GWarning!
Make sure no one is injured when removing
the spare wheel.
Grip wheel from the sides.
Keep hands from beneath the wheel.
After mounting the spare wheel:
XTransport the damaged wheel on the spare
wheel carrier, see “Storing the spare wheel
after use” for instructions.
XRepair or replace the damaged tire as soon
as possible and return the spare tire as
original spare.
For information on mounting the spare wheel,
see “Flat tire” (Y page 239).
Storing the spare wheel after use
XSecure the spare wheel with mounting
screws C on the spare wheel carrier
(Y page 202). Make sure the spare wheel
cannot come loose.
XMake sure catch B engages in recess A
when mounting cover plate 4
(Y page 202).
XMake sure tab ; (Y page 202) faces
downwards when mounting cover ring =
(Y page 202).
XFor safety reasons, check regularly that the
spare wheel is securely fastened.
202Where will I find ...?Practical hints
463_AKB; 3; 35, en-USd2ureepe,Version: 2.11.8.12009-07-16T20:59:56+02:00 - Seite 202
Page 218 of 272

Display messagesPossible causes/consequences and M SolutionsbParking
Lamp
Front
Left
Auxiliary
Bulb On
or
Parking
Lamp
Front
Right
Auxiliary
Bulb OnThe left or right front parking lamp is malfunctioning. A
substitute bulb is being used.XContact an authorized Mercedes-Benz Center as soon as
possible.bHigh Beam
Left
or
High Beam
RightThe left or right high-beam lamp is malfunctioning.XContact an authorized Mercedes-Benz Center as soon as
possible.bLicense
Plate
Lamp, Left
or
License
Plate
Lamp,
RightThe left or right license plate lamp is malfunctioning.XReplace the bulb as soon as possible ( Y page 233).bAUTO-
Light
Inoperativ
eThe light sensor is malfunctioning. The headlamps come on
automatically.XContact an authorized Mercedes-Benz Center as soon as
possible.
To switch off the headlamps (U.S. vehicles only):
XIn the control system, set daytime running lamp mode to
manual ( Y page 109).XSwitch off the headlamps using the exterior lamp switch
( Y page 74).bLow Beam
Left
or
Low Beam
RightThe left or right low-beam lamp is malfunctioning.XContact an authorized Mercedes-Benz Center as soon as
possible.216Vehicle status messages in the multifunction displayPractical hints
463_AKB; 3; 35, en-USd2ureepe,Version: 2.11.8.12009-07-16T20:59:56+02:00 - Seite 216
Page 219 of 272

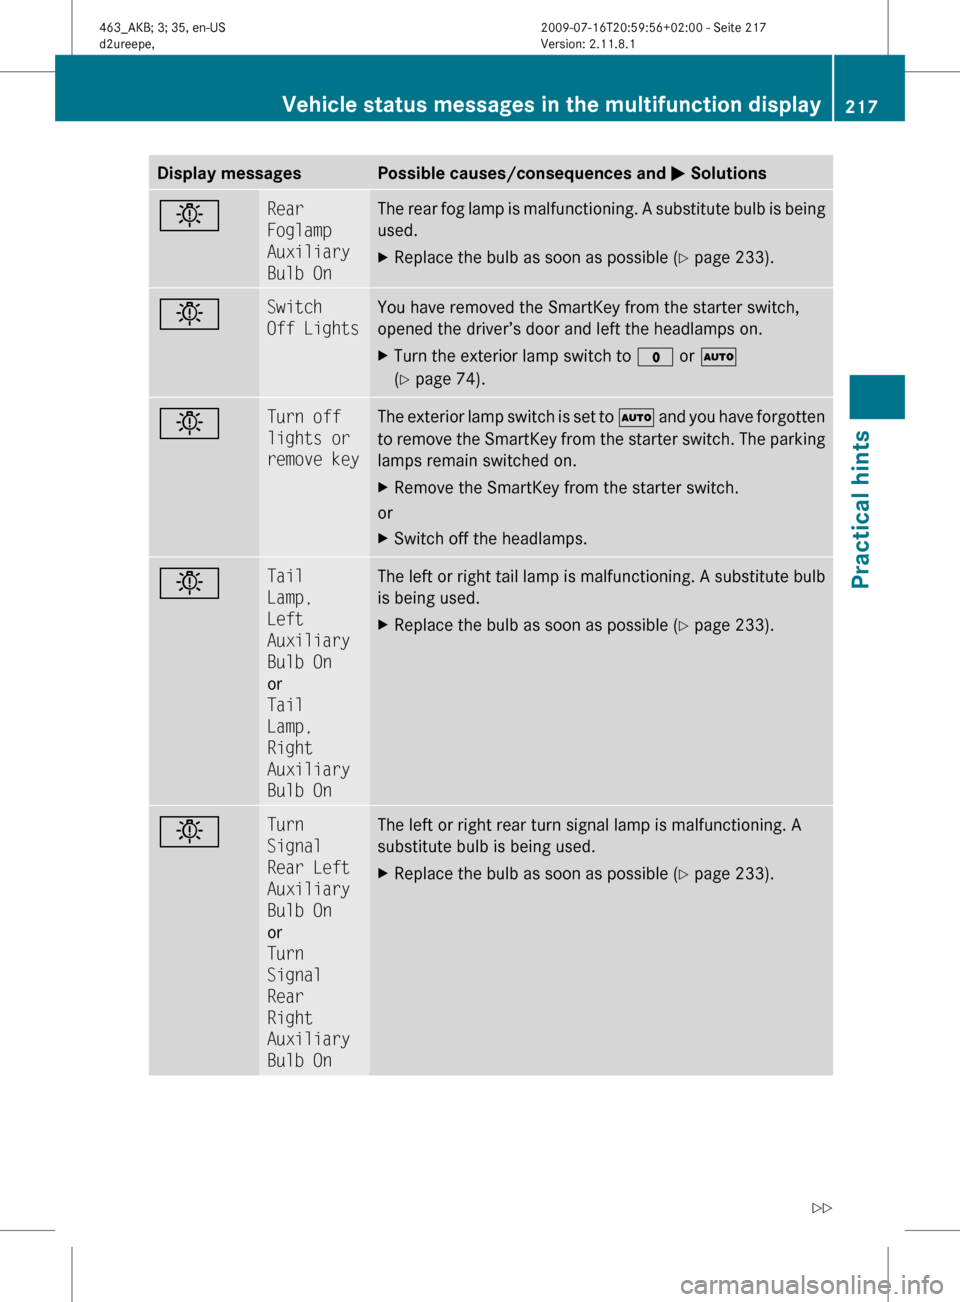
Display messagesPossible causes/consequences and M SolutionsbRear
Foglamp
Auxiliary
Bulb OnThe rear fog lamp is malfunctioning. A substitute bulb is being
used.XReplace the bulb as soon as possible ( Y page 233).bSwitch
Off LightsYou have removed the SmartKey from the starter switch,
opened the driver’s door and left the headlamps on.XTurn the exterior lamp switch to $ or Ã
( Y page 74).bTurn off
lights or
remove keyThe exterior lamp switch is set to à and you have forgotten
to remove the SmartKey from the starter switch. The parking
lamps remain switched on.XRemove the SmartKey from the starter switch.
or
XSwitch off the headlamps.bTail
Lamp,
Left
Auxiliary
Bulb On
or
Tail
Lamp,
Right
Auxiliary
Bulb OnThe left or right tail lamp is malfunctioning. A substitute bulb
is being used.XReplace the bulb as soon as possible ( Y page 233).bTurn
Signal
Rear Left
Auxiliary
Bulb On
or
Turn
Signal
Rear
Right
Auxiliary
Bulb OnThe left or right rear turn signal lamp is malfunctioning. A
substitute bulb is being used.XReplace the bulb as soon as possible ( Y page 233).Vehicle status messages in the multifunction display217Practical hints463_AKB; 3; 35, en-USd2ureepe,Version: 2.11.8.12009-07-16T20:59:56+02:00 - Seite 217Z
Page 234 of 272

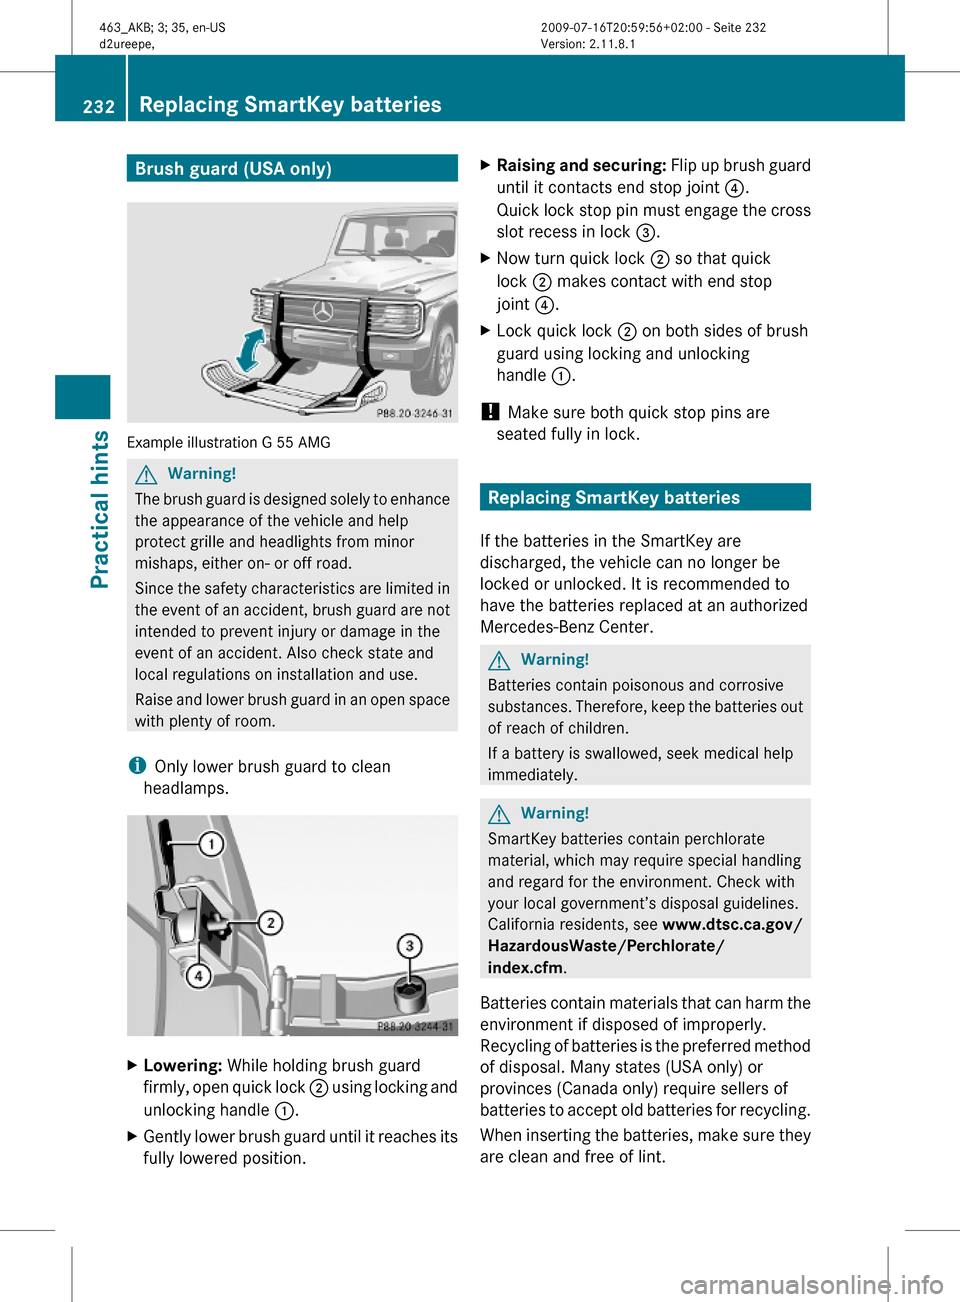
Brush guard (USA only)
Example illustration G 55 AMG
GWarning!
The brush guard is designed solely to enhance
the appearance of the vehicle and help
protect grille and headlights from minor
mishaps, either on- or off road.
Since the safety characteristics are limited in
the event of an accident, brush guard are not
intended to prevent injury or damage in the
event of an accident. Also check state and
local regulations on installation and use.
Raise and lower brush guard in an open space
with plenty of room.
iOnly lower brush guard to clean
headlamps.
XLowering: While holding brush guard
firmly, open quick lock ; using locking and
unlocking handle :.
XGently lower brush guard until it reaches its
fully lowered position.
XRaising and securing: Flip up brush guard
until it contacts end stop joint ?.
Quick lock stop pin must engage the cross
slot recess in lock =.
XNow turn quick lock ; so that quick
lock ; makes contact with end stop
joint ?.
XLock quick lock ; on both sides of brush
guard using locking and unlocking
handle :.
! Make sure both quick stop pins are
seated fully in lock.
Replacing SmartKey batteries
If the batteries in the SmartKey are
discharged, the vehicle can no longer be
locked or unlocked. It is recommended to
have the batteries replaced at an authorized
Mercedes-Benz Center.
GWarning!
Batteries contain poisonous and corrosive
substances. Therefore, keep the batteries out
of reach of children.
If a battery is swallowed, seek medical help
immediately.
GWarning!
SmartKey batteries contain perchlorate
material, which may require special handling
and regard for the environment. Check with
your local government’s disposal guidelines.
California residents, see www.dtsc.ca.gov/
HazardousWaste/Perchlorate/
index.cfm.
Batteries contain materials that can harm the
environment if disposed of improperly.
Recycling of batteries is the preferred method
of disposal. Many states (USA only) or
provinces (Canada only) require sellers of
batteries to accept old batteries for recycling.
When inserting the batteries, make sure they
are clean and free of lint.
232Replacing SmartKey batteriesPractical hints
463_AKB; 3; 35, en-USd2ureepe,Version: 2.11.8.12009-07-16T20:59:56+02:00 - Seite 232
Page 235 of 272

When replacing batteries, always replace
both batteries.
iThe required replacement batteries are
available at any authorized Mercedes-Benz
Center.
Replacement batteries: Lithium, type
CR 2025 or equivalent.
XRemove the mechanical key from the
SmartKey (Y page 228).
XPress mechanical key ; into the SmartKey
opening until battery compartment
cover : opens. Do not keep the cover
shut.
XRemove the battery compartment cover.XPat the SmartKey against the palm of your
hand until battery = falls out.
XInsert the new battery with the positive
terminal (+) facing up. Use a lint-free cloth.
XInsert the tabs of the battery compartment
cover into the housing and press the cover
closed.
XCheck the operation of the SmartKey.
Replacing bulbs
Safety notes
Safe vehicle operation depends on proper
exterior lighting and signaling to a large
degree.
Correct headlamp adjustment is extremely
important. Have headlamps checked and
readjusted at regular intervals and when a
bulb has been replaced. Contact an
authorized Mercedes-Benz Center for
headlamp adjustment.
GWarning!
Bulbs and bulb sockets can be very hot. Allow
the lamp to cool down before changing a bulb.
Keep bulbs out of reach of children.
Halogen lamps contain pressurized gas. A
bulb can explode if you
Rtouch or move it when hot
Rdrop the bulb
Rscratch the bulb
Wear eye and hand protection.
Because of high voltage in Xenon lamps, it is
dangerous to replace the bulb or repair the
lamp and its components. We recommend
that you have such work done by a qualified
technician.
iSince replacing bulbs is a technically
highly demanding process, we recommend
to have them replaced at an authorized
Mercedes-Benz Center.
iIf the headlamps or front fog lamps are
fogged up on the inside as a result of high
humidity, driving the vehicle a distance with
the lights on should clear up the fogging.
Replacing bulbs233Practical hints463_AKB; 3; 35, en-USd2ureepe,Version: 2.11.8.12009-07-16T20:59:56+02:00 - Seite 233Z
Page 236 of 272

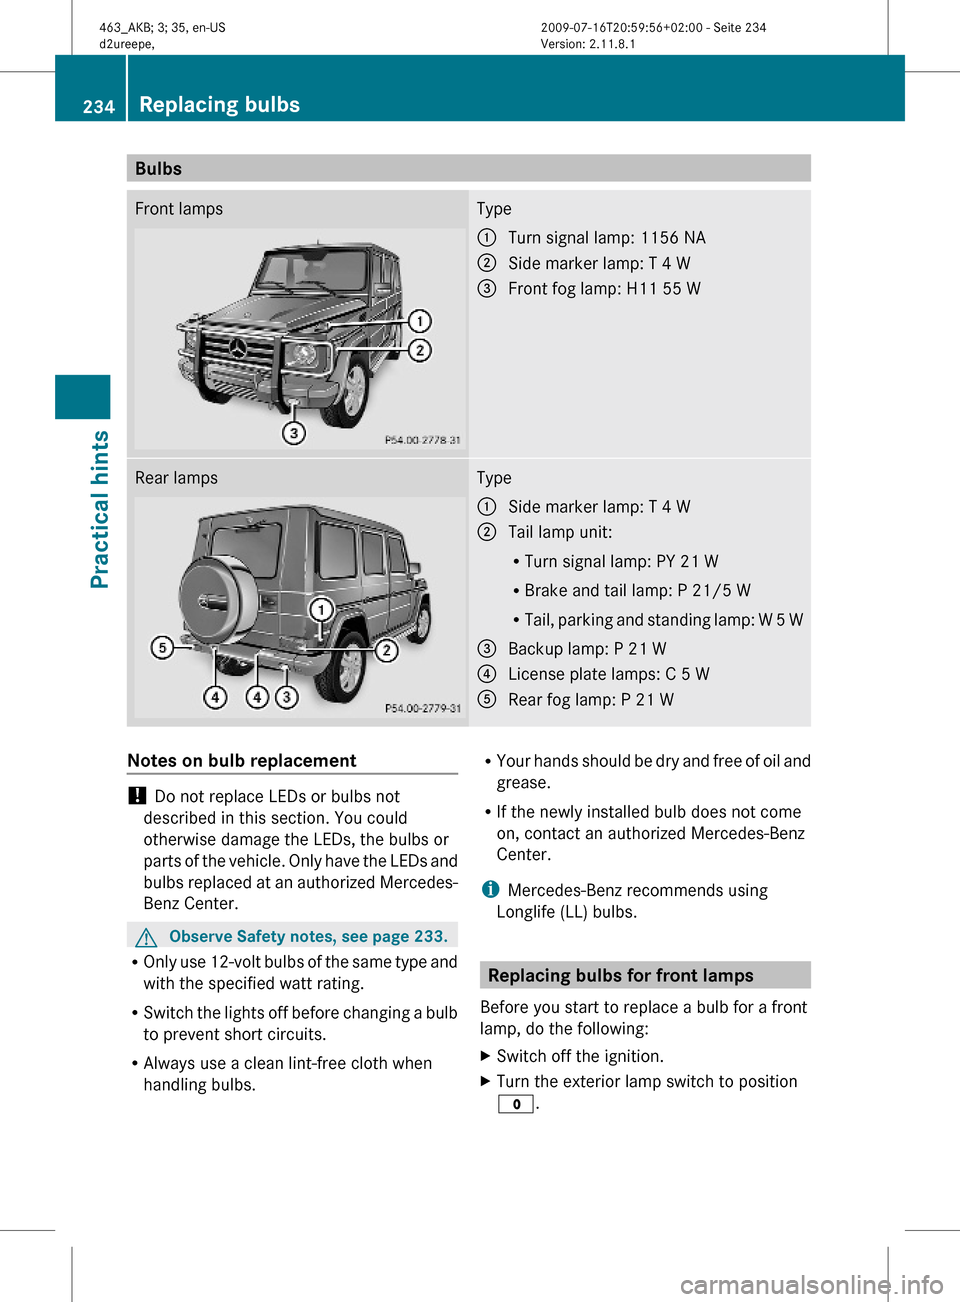
BulbsFront lampsType:Turn signal lamp: 1156 NA;Side marker lamp: T 4 W=Front fog lamp: H11 55 WRear lampsType:Side marker lamp: T 4 W;Tail lamp unit:
RTurn signal lamp: PY 21 W
RBrake and tail lamp: P 21/5 W
RTail, parking and standing lamp: W 5 W
=Backup lamp: P 21 W?License plate lamps: C 5 WARear fog lamp: P 21 WNotes on bulb replacement
! Do not replace LEDs or bulbs not
described in this section. You could
otherwise damage the LEDs, the bulbs or
parts of the vehicle. Only have the LEDs and
bulbs replaced at an authorized Mercedes-
Benz Center.
GObserve Safety notes, see page 233.
ROnly use 12-volt bulbs of the same type and
with the specified watt rating.
RSwitch the lights off before changing a bulb
to prevent short circuits.
RAlways use a clean lint-free cloth when
handling bulbs.
RYour hands should be dry and free of oil and
grease.
RIf the newly installed bulb does not come
on, contact an authorized Mercedes-Benz
Center.
iMercedes-Benz recommends using
Longlife (LL) bulbs.
Replacing bulbs for front lamps
Before you start to replace a bulb for a front
lamp, do the following:
XSwitch off the ignition.XTurn the exterior lamp switch to position
$.
234Replacing bulbsPractical hints
463_AKB; 3; 35, en-USd2ureepe,Version: 2.11.8.12009-07-16T20:59:56+02:00 - Seite 234