2010 MERCEDES-BENZ G55AMG roof
[x] Cancel search: roofPage 132 of 272

for items which do not fit in the cargo
compartment alone.
Please pay attention to and comply with the
following instructions when loading the
vehicle and transporting cargo:
RAlways pad off sharp edges.
RAlways place items being carried against
front or rear seat backrests, and fasten
them as securely as possible.
RThe heaviest portion of the cargo should
always be kept as low as possible against
front or rear seat backrests.
For additional safety when transporting cargo
while the rear seats are unoccupied, fasten
the outer seat belts crosswise into the
opposite side buckles :.
Roof rack
This vehicle is not intended to carry items on
its roof. Thus roof rails and any roof-mounted
devices must not be used.
GWarning!
Do not load items on the roof. It may cause
instability during some maneuvers which
could result in an accident.
Parcel netGWarning!
Parcel nets are intended for storing light-
weight items only, such as road maps, mail,
etc.
Heavy objects, objects with sharp edges, or
fragile objects may not be transported in the
parcel nets. In an accident, during hard
braking, or sudden maneuvers, they could be
thrown around inside the vehicle and cause
injury to vehicle occupants.
Parcel nets cannot protect transported goods
in the event of an accident.
A parcel net is located in the front passenger
footwell.
Cargo tie-down rings
Your vehicle is equipped with four cargo tie-
down rings.
Always follow loading instructions
(Y page 129).
Carefully secure cargo by applying even load
on all the cargo tie-down rings with a rope of
sufficient strength to hold down the cargo.
Expanding cargo volume
To expand the cargo volume, you can fold the
left and right rear seat backrests and the rear
seat bench forward.
130Loading and storingControls in detail
463_AKB; 3; 35, en-USd2ureepe,Version: 2.11.8.12009-07-16T20:59:56+02:00 - Seite 130
Page 134 of 272

Cargo compartment cover blind
The cargo compartment cover blind can be
installed behind the rear seat bench.
! With the cargo compartment cover blind
installed, do not pile luggage higher than
the lower edges of the rear side windows.
XRolling out: Grip the blind strap and pull
cargo compartment cover blind :
rearward across the cargo compartment.
XEngage cargo compartment cover
blind : into the mounts to the left and
right of the tailgate.
XRolling up: Disengage cargo compartment
cover blind : from the mounts and guide
retraction.
XRemoving: Roll up cargo compartment
cover blind =.
XOpen latch ; on the right and left side of
cargo compartment cover blind = in
direction of the arrow.
XPull cargo compartment cover blind = out
upwards.
XInstalling: Open latch ; on the right and
left side.
XPlace cargo compartment cover blind =
into recesses.
XPress the right and left side of cargo
compartment cover blind = down until it
locks into place.
XClose latch ; on the right and left side.
Front storage compartments
GWarning!
To help avoid personal injury during a collision
or sudden maneuver, exercise care when
storing objects in the vehicle. Put luggage or
cargo in the cargo compartment if possible.
Do not pile luggage or cargo higher than the
seat backrests.
Keep compartment lids closed. This will help
to prevent stored objects from being thrown
about and injuring vehicle occupants during
Rbraking
Rvehicle maneuvers
Ran accident
GWarning!
Do not load items on the roof. It may cause
instability during some maneuvers which
could result in an accident.
Glove box
An media interface is located in the glove box.
For information on media interface, see
separate COMAND system operating
instructions.
132Loading and storingControls in detail
463_AKB; 3; 35, en-USd2ureepe,Version: 2.11.8.12009-07-16T20:59:56+02:00 - Seite 132
Page 180 of 272

GAWR (Gross Axle Weight Rating)
The GAWR is the maximum permissible axle
weight. The gross vehicle weight on each axle
must never exceed the GAWR for the front
and rear axle indicated on the certification
label located on the driver’s door B-pillar.
GTW (Gross Trailer Weight)
The GTW is the weight of the trailer plus the
weight of all cargo, equipment, luggage etc.
loaded on the trailer.
GVW (Gross Vehicle Weight)
The GVW comprises the weight of the vehicle
including fuel, tools, spare wheel, installed
accessories, passengers and cargo and, if
applicable, trailer tongue load. The GVW must
never exceed the GVWR indicated on the
certification label located on the driver’s door
B-pillar.
GVWR (Gross Vehicle Weight Rating)
This is the maximum permissible vehicle
weight of the fully loaded vehicle (weight of
the vehicle including all options, passengers,
fuel, and cargo and, if applicable, trailer
tongue load). It is indicated on the
certification label located on the driver’s door
B-pillar.
Kilopascal (kPa)
Metric unit for air pressure. There are 6.9 kPa
to 1 psi; another metric unit for air pressure
is bar. There are 100 kilopascals (kPa) to
1 bar.
Load index
Numerical code associated with the
maximum load a tire can support.
Maximum load rating
The maximum load in kilograms and pounds
that can be carried by the tire.
Maximum loaded vehicle weight
The sum of curb weight, accessory weight,
total load limit, and production options
weight.
Maximum permissible tire inflation
pressure
This number is the greatest amount of air
pressure that should ever be put in the tire.
Normal occupant weight
The number of occupants the vehicle is
designed to seat, multiplied by 68 kilograms
(150 lb).
Occupant distribution
The distribution of occupants in a vehicle at
their designated seating positions.
Production options weight
The combined weight of those installed
regular production options weighing over
5 lbs (2.3 kilograms) in excess of those
standard items which they replace, not
previously considered in curb weight or
accessory weight, including heavy duty
brakes, ride levelers, roof rack, heavy duty
battery, and special trim.
PSI (Pounds per square inch)
A standard unit of measure for air pressure.
Recommended tire inflation pressure
The recommended tire inflation pressure for
normal driving conditions is listed on the Tire
and Loading Information placard located on
the driver’s door B-pillar. It provides best
handling, tread life and riding comfort.
Supplemental information pertaining to
special driving situations can be found on the
tire inflation pressure label on the inside of
the fuel filler flap.
178Tires and wheelsOperation
463_AKB; 3; 35, en-USd2ureepe,Version: 2.11.8.12009-07-16T20:59:56+02:00 - Seite 178
Page 186 of 272

Hydroplaning
Depending on the depth of the water layer on
the road, hydroplaning may occur, even at low
speeds and with new tires. In heavy rain or
when conditions indicate possible
hydroplaning:XReduce vehicle speed.XAvoid track grooves in the road.XApply brakes cautiously.
Standing water
! Do not drive through flooded areas.
Before driving through water, determine its
depth.
If you must drive through standing water,
drive slowly to prevent water from entering
the passenger compartment or the engine
compartment. Water in these areas could
cause damage to electrical components or
wiring of the engine or transmission, or
could result in water being ingested by the
engine through the air intake causing
severe internal engine damage. Any such
damage is not covered by the Mercedes-
Benz Limited Warranty.
Prevent water from entering the passenger
compartment or the engine compartment. If
you must drive through standing water, keep
in mind that
R the maximum depth of the water may not
exceed 19 in (48 cm)
R you must drive slowly
For more information, see “Driving through
water” ( Y page 187).
Off-road driving
GWarning!
Do not load items on the roof. It may cause
instability during some maneuvers which
could result in an accident.
Drive slowly in unknown terrain. This will
make it easier to recognize unexpected
obstacles and avoid damage to the vehicle.
To help avoid the vehicle rolling over, never
turn it around on steep inclines. If the vehicle
cannot complete the attempted climb, back it
down in reverse gear.
Do not drive along the side of a slope. The
vehicle might otherwise rollover. If in doing so
the vehicle begins to show a tendency to roll,
immediately steer into a line of gravity
(straight up or downhill).
Never let the vehicle roll backwards in idle.
You may lose control of the vehicle if you use
only the service brake. For information on
driving downhill, see “Driving downhill”.GWarning!
Sand, dirt, mud and other material having
friction property can cause exceptional wear
and tear as well as brake failure.
Have the brakes checked for dirt build-up and
cleaned. There is otherwise a risk that full
braking power may not be available in an
emergency.
Read this chapter carefully before you begin
off-road travel.
Familiarize yourself with the vehicle
characteristics and gear changing before you
attempt any difficult terrain off-road driving.
We recommend that you start out with easy
off-road travel.
Special driving features for off-road
driving
The following driving features are available for
specific kind of operation:
R ABS ( Y page 52)
R ESP ®
(Y page 54)
R 4-ETS ( Y page 54)
R Differential locks ( Y page 95)
R Transfer case ( Y page 93)
184Driving instructionsOperation
463_AKB; 3; 35, en-USd2ureepe,Version: 2.11.8.12009-07-16T20:59:56+02:00 - Seite 184
Page 187 of 272

Off-road driving rules
REngage the transfer case in position LOW
before driving under off-road conditions
( Y page 93).
R If necessary, activate differential locks
( Y page 95).
The ABS, BAS and ESP ®
are switched off
automatically when the differential locks
are activated.
R Fasten items being carried as securely as
possible ( Y page 129).
! Observe the following during off-road
driving:
R Keep doors, tailgate, windows, and tilt/
sliding sunroof closed whenever driving
off-road.
R Switch the cruise control off.
R Adjust vehicle speed to condition of
terrain. The more uneven, rutty and
steeper the terrain, the lower the speed
should be. Drive through water slowly at
an even speed, avoiding a bow wave.
R Be especially careful when driving in
unknown territory. It may be necessary
to get out of the vehicle and scout the
path you intend to take.
R Watch out for obstacles, such as rocks,
holes, tree stumps and ruts.
R Avoid excessive engine speeds – drive at
moderate engine speeds (max. 3 000
rpm).
R Before driving through water, determine
its depth.
R Do not stop vehicle while immersed in
water, and do not shut off the engine.
R In sandy soil, drive at a steady speed as
allowed by conditions. This helps
overcome the vehicle rolling resistance
and reduces the likelihood of the vehicle
sinking into the ground.
R Do not initiate jumps with the vehicle. It
interrupts the forward momentum of the
vehicle.
R Always drive onto slopes with the engine
running and the vehicle in gear.
R Do not shift automatic transmission into
neutral position N.
R Inspect the vehicle for possible damage
after each off-road trip.GWarning!
Do not reduce the tire inflation pressure
before driving through sand. However, if you
do so, remember to correct the tire inflation
pressure before continuing your trip. Driving
with reduced tire inflation pressure increases
the risk of losing control of the vehicle and
rolling over.
Checklist before off-road driving
Engine oil level
R Check the engine oil level ( Y page 153).
Only with a proper oil level can the vehicle
obtain a trouble-free oil supply, even on
steep gradients.
! If an engine oil level warning message
appears in the multifunction display while
driving, stop the vehicle in a safe location
or as soon at is safe to do so. Check the
engine oil level.
The engine oil level warning messages
should not be ignored. Extended driving
with the message displayed could result in
serious engine damage that is not covered
by the Mercedes-Benz Limited Warranty.
Tires
R Check the tread depth and maintain
specified tire inflation pressure. A placard
with the recommended tire inflation
Driving instructions185Operation463_AKB; 3; 35, en-USd2ureepe,Version: 2.11.8.12009-07-16T20:59:56+02:00 - Seite 185Z
Page 195 of 272

damage should be repaired as soon as
possible to prevent corrosion.
In doing so, do not neglect the underbody of
the vehicle. A prerequisite for a thorough
check is a washing of the underbody followed
by a thorough inspection. Damaged areas
need to be re-undercoated.
Your vehicle has been treated at the factory
with a wax-base rustproofing in the body
cavities which will last for the lifetime of the
vehicle. Post-production treatment is neither
necessary nor recommended by Mercedes-
Benz because of the possibility of
incompatibility between materials used in the
production process and others applied later.
We have selected vehicle-care products and
compiled recommendations which are
specially matched to our vehicles and which
always reflect the latest technology. You can
obtain Mercedes-Benz approved vehicle-care
products at an authorized Mercedes-Benz
Center.
Scratches, corrosive deposits, corrosion or
damage due to negligent or incorrect care
cannot always be removed or repaired with
the vehicle-care products recommended
here. In such cases it is best to seek aid at an
authorized Mercedes-Benz Center.
The following topics deal with the cleaning
and care of your vehicle and give important
“how-to” information as well as references to
Mercedes-Benz approved vehicle-care
products.
Power washer
! Follow the instructions provided by the
power washer manufacturer on
maintaining a distance between the vehicle
and the nozzle of the power washer.
Never use a round nozzle to power-wash
tires. The intense jet of water can result in
damage to the tire.
Always replace a damaged tire.
Always keep the jet of water moving across
the surface. Do not aim directly at electrical
parts, electrical connectors, seals, or other
rubber parts.
Tar stains
Quickly remove tar stains before they dry and
become more difficult to remove. A tar
remover is recommended.
Paintwork, painted body components
! Affixing stickers, magnets, adhesive tape
or similar materials to painted body
components may damage the paintwork.
Mercedes-Benz approved Paint Care should
be applied when water drops on the paint
surface do not “bead up”. This should
normally be done every 3 to 5 months,
depending on the climate and washing
detergent used.
Mercedes-Benz approved Paint Cleaner
should be applied if the paint surface shows
signs of embedded dirt (i.e. loss of gloss).
Do not apply any of these products or wax if
your vehicle is parked in the sun or if the hood
is still hot.
XUse the appropriate MB-Touch-Up Stick for
quick and provisional repairs of minor paint
damage (i.e. chips from stones, vehicle
doors, etc.).
Engine cleaning
Prior to cleaning the engine compartment,
make sure to protect electrical components
and connectors from contact with water and
cleaning agents.
Corrosion protection, such as MB
Anticorrosion Wax should be applied to the
engine compartment after every engine
cleaning. Before applying, all control linkage
bushings and joints should be lubricated. The
poly-V-belt and all pulleys should be
protected from any wax.
Vehicle care193Operation463_AKB; 3; 35, en-USd2ureepe,Version: 2.11.8.12009-07-16T20:59:56+02:00 - Seite 193Z
Page 202 of 272

Vehicle equipment
iThis Operator’s Manual describes all
features, standard or optional, potentially
available for your vehicle at the time of
purchase. Please be aware that your
vehicle might not be equipped with all
features described in this manual.
Where will I find ...?
First aid kit
iCheck expiration dates and contents for
completeness at least once a year and
replace missing/expired items.
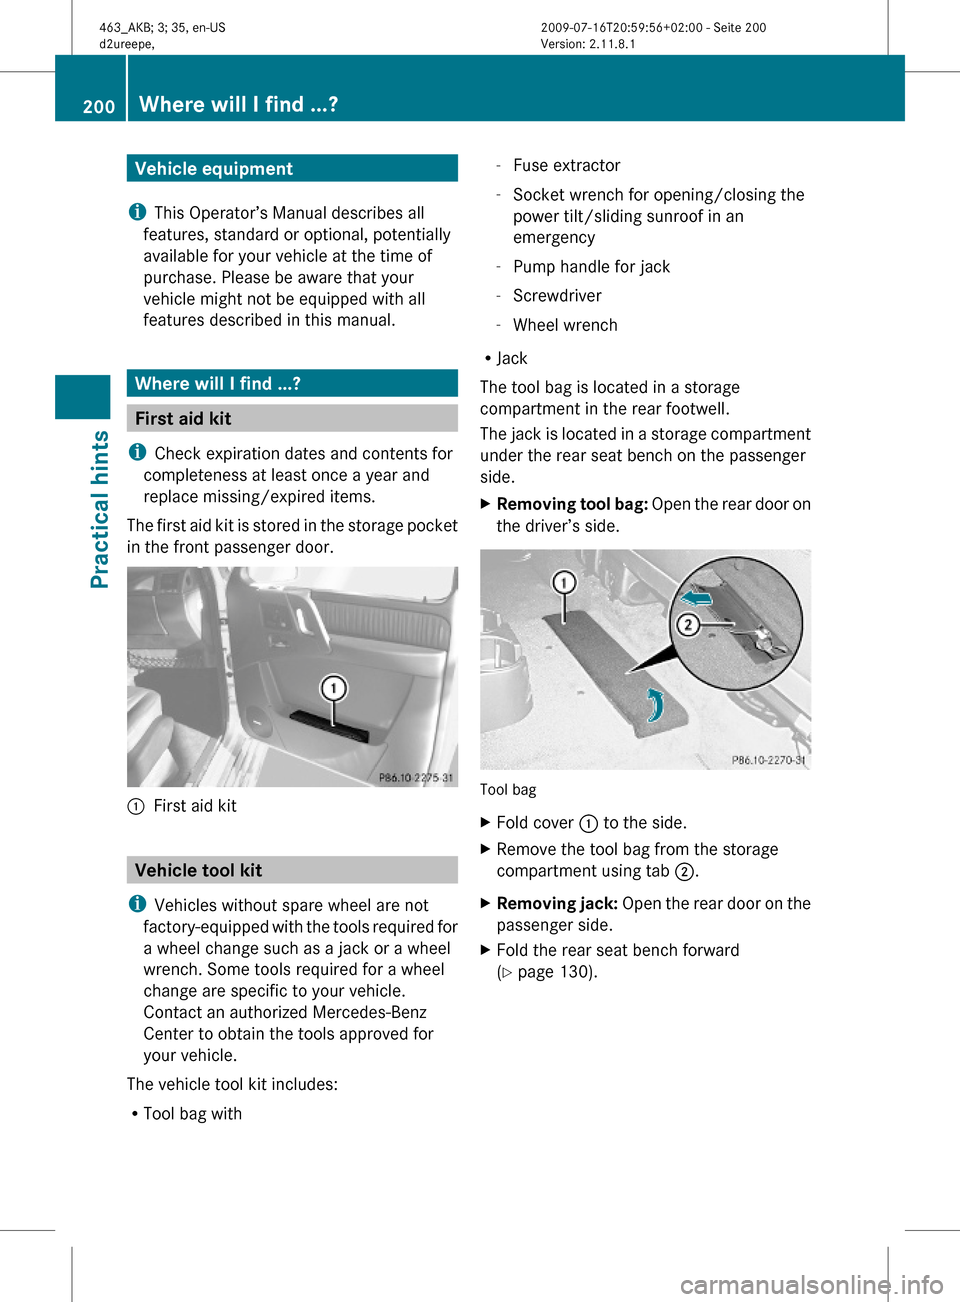
The first aid kit is stored in the storage pocket
in the front passenger door.
:First aid kit
Vehicle tool kit
iVehicles without spare wheel are not
factory-equipped with the tools required for
a wheel change such as a jack or a wheel
wrench. Some tools required for a wheel
change are specific to your vehicle.
Contact an authorized Mercedes-Benz
Center to obtain the tools approved for
your vehicle.
The vehicle tool kit includes:
RTool bag with
-Fuse extractor
-Socket wrench for opening/closing the
power tilt/sliding sunroof in an
emergency
-Pump handle for jack
-Screwdriver
-Wheel wrench
RJack
The tool bag is located in a storage
compartment in the rear footwell.
The jack is located in a storage compartment
under the rear seat bench on the passenger
side.
XRemoving tool bag: Open the rear door on
the driver’s side.
Tool bag
XFold cover : to the side.XRemove the tool bag from the storage
compartment using tab ;.
XRemoving jack: Open the rear door on the
passenger side.
XFold the rear seat bench forward
(Y page 130).
200Where will I find ...?Practical hints
463_AKB; 3; 35, en-USd2ureepe,Version: 2.11.8.12009-07-16T20:59:56+02:00 - Seite 200
Page 233 of 272

XReinstall edge protection :.XClose the tailgate.
Opening/closing manually
Power tilt/sliding sunroof
You can open or close the power tilt/sliding
sunroof manually should an electrical
malfunction occur.
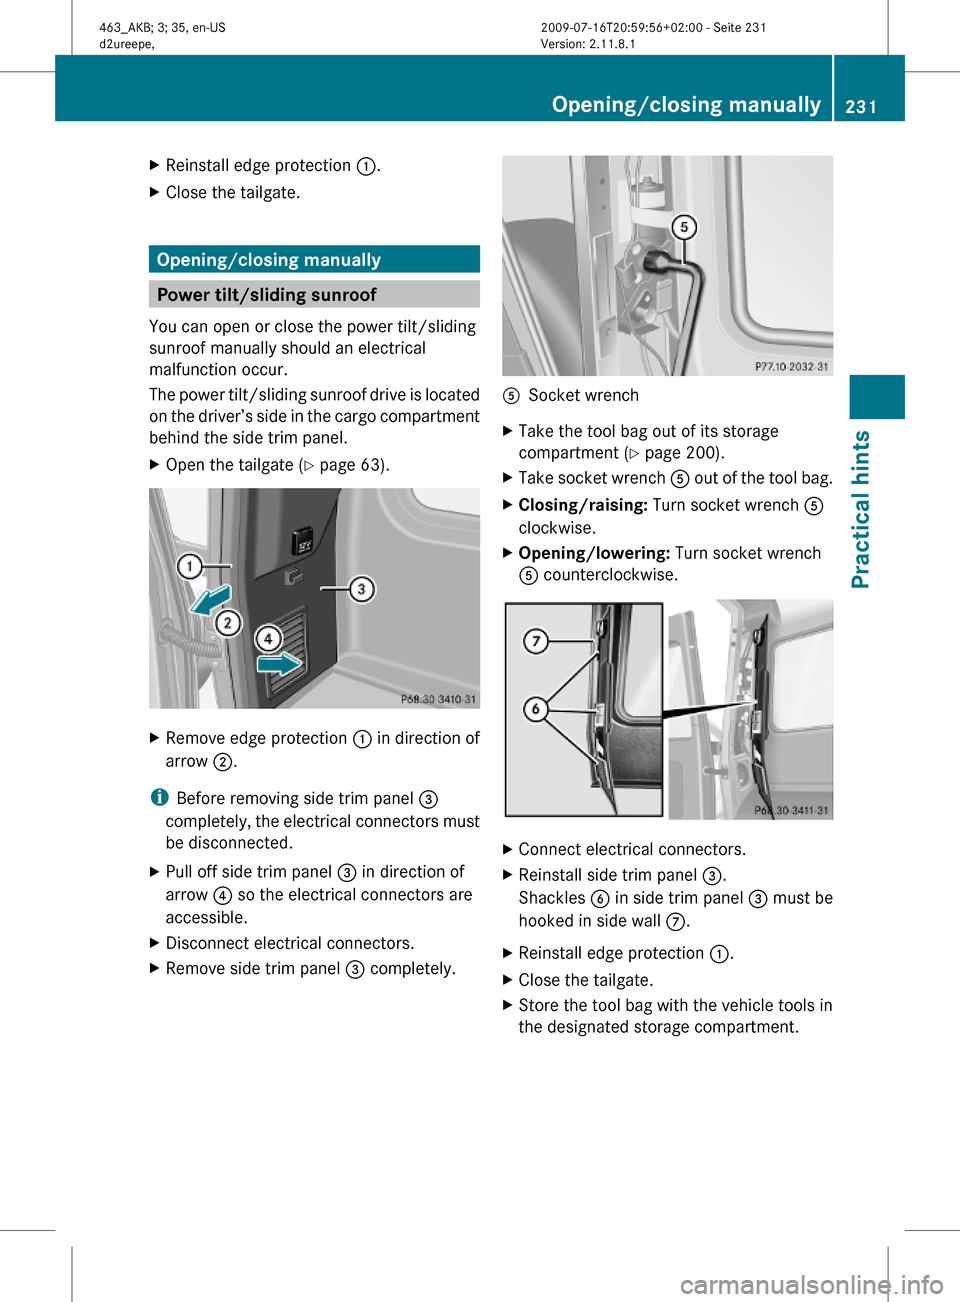
The power tilt/sliding sunroof drive is located
on the driver’s side in the cargo compartment
behind the side trim panel.
XOpen the tailgate (Y page 63).XRemove edge protection : in direction of
arrow ;.
iBefore removing side trim panel =
completely, the electrical connectors must
be disconnected.
XPull off side trim panel = in direction of
arrow ? so the electrical connectors are
accessible.
XDisconnect electrical connectors.XRemove side trim panel = completely.ASocket wrenchXTake the tool bag out of its storage
compartment (Y page 200).
XTake socket wrench A out of the tool bag.XClosing/raising: Turn socket wrench A
clockwise.
XOpening/lowering: Turn socket wrench
A counterclockwise.
XConnect electrical connectors.XReinstall side trim panel =.
Shackles B in side trim panel = must be
hooked in side wall C.
XReinstall edge protection :.XClose the tailgate.XStore the tool bag with the vehicle tools in
the designated storage compartment.
Opening/closing manually231Practical hints463_AKB; 3; 35, en-USd2ureepe,Version: 2.11.8.12009-07-16T20:59:56+02:00 - Seite 231Z