2010 MERCEDES-BENZ G550 key
[x] Cancel search: keyPage 153 of 272

switch on the ignition. Otherwise the
incorrect or non-approved fuel will get into
the fuel lines. The fuel system must be
drained completely. Contact an authorized
Mercedes-Benz Center to have the fuel
system drained completely.
! To prevent damage to the catalytic
converters, only use premium unleaded
gasoline in this vehicle.
Any noticeable irregularities in engine
operation should be repaired promptly.
Otherwise, excessive unburned fuel may
reach the catalytic converter, causing it to
overheat and potentially start a fire.
i Only use premium unleaded gasoline with
a minimum Posted Octane Rating of 91
(average of 96 RON/86 MON).
Information on gasoline quality can
normally be found on the fuel pump. Please
contact gas station personnel in case
labels on the pump cannot be found.
For more information on gasoline, see
“Premium unleaded gasoline”
(Y page 262), see “Fuel requirements”
(Y page 263), or contact an authorized
Mercedes-Benz Center, or visit
www.mbusa.com (USA only).
Locking/unlocking the vehicle with the
SmartKey automatically locks/unlocks the
fuel filler flap.
iIn case the central locking system does
not release the fuel filler flap, see “Fuel filler
flap” (Y page 230).
The fuel filler flap is located on the right-hand
side of the vehicle towards the rear.
XTurn off the engine.
iLeaving the engine running and the fuel
filler cap open can cause the yellow fuel
tank reserve warning lamp to flash and the
malfunction indicator lamp = (USA
only) or ; (Canada only) to illuminate.
For more information, see also “Practical
hints” (Y page 225).
XRemove the SmartKey from the starter
switch.
XOpening: Press fuel filler flap : at the
point indicated by the arrow.
XTurn fuel filler cap ; counterclockwise.XTake off fuel filler cap ;.
! The fuel filler cap is tethered to the fuel
filler neck. Do not drop the cap. It could
damage the vehicle paint finish.
XPlace fuel filler cap ; in direction of arrow
into the holder.
XFully insert filler nozzle unit and refuel.XOnly fill your tank until the filler nozzle unit
cuts out – do not top off or overfill.
! When refueling the vehicle, make certain
that no gasoline comes into contact with
the rear side marker to prevent damaging
the lens.
At the gas station151Operation463_AKB; 3; 35, en-USd2ureepe,Version: 2.11.8.12009-07-16T20:59:56+02:00 - Seite 151Z
Page 185 of 272

brake discs and the brake linings is
removed without putting other road users
at risk
R maintain a greater distance to the vehicle
ahead and drive with particular care
R carefully apply the brakes at the end of a
trip and immediately after commencing a
new trip, so that salt residues are removed
from the brake disc
Brake service
! The brake fluid level in the reservoir may
be too low if the brake warning lamp in the
instrument cluster comes on although the
parking brake is released. Observe
additional messages in the multifunction
display that may appear.
Brake pad wear or a leak in the system may
be the reason for low brake fluid in the
reservoir.
Have the brake system inspected
immediately. Contact an authorized
Mercedes-Benz Center.
All checks and service work on the brake
system should be carried out by qualified
technicians only. Contact an authorized
Mercedes-Benz Center.
Only install brake pads and use brake fluid
recommended by Mercedes-Benz.
GWarning!
If other than recommended brake pads are
installed, or other than recommended brake
fluid is used, the braking properties of the
vehicle can be degraded to an extent that safe
braking is substantially impaired. This could
result in an accident.
! Only conduct operational or performance
tests on a two-axle dynamometer. If such
tests are necessary, contact an authorized
Mercedes-Benz Center. You could
otherwise seriously damage the brake
system or the transfer case which is not
covered by the Mercedes-Benz Limited
Warranty.
! Because the ESP ®
operates
automatically, the engine and ignition must
be shut off (SmartKey in starter switch
position 0 or 1) when the parking brake is
being tested on a brake test dynamometer.
Such testing should be no longer than 10
seconds.
Active braking action through the ESP ®
may otherwise seriously damage the brake
system which is not covered by the
Mercedes-Benz Limited Warranty.
If your brake system is only subjected to
moderate loads, you should occasionally test
the effectiveness of the brakes by applying
above-normal braking pressure at higher
speeds. This will also enhance the grip of the
brake pads.GWarning!
Make sure not to endanger any other road
users when carrying out these braking
maneuvers.
Driving off
Warm up the engine smoothly. Do not place
full load on the engine until the operating
temperature has been reached.
! When driving off on a slippery surface, do
not allow a drive wheel to spin for an
extended period with the ESP ®
switched
off. Doing so may cause serious damage to
the drivetrain which is not covered by the
Mercedes-Benz Limited Warranty.
! Simultaneously depressing the
accelerator pedal and applying the brakes
reduces engine performance and causes
premature brake and drivetrain wear which
is not covered by the Mercedes-Benz
Limited Warranty.
Driving instructions183Operation463_AKB; 3; 35, en-USd2ureepe,Version: 2.11.8.12009-07-16T20:59:56+02:00 - Seite 183Z
Page 197 of 272

use abrasives, solvents or cleaners that
contain solvents.
Cleaning the Rear Parking Assist
system sensors
Rear Parking Assist system sensors are
located in the rear bumper.
XOnly clean Rear Parking Assist system
sensors : by hand.
XUse a mild vehicle wash detergent, such as
Mercedes-Benz approved Car Shampoo,
with plenty of water and a soft, non-
scratching cloth to clean Rear Parking
Assist system sensors : on the bumper.
! Applying strong pressure may damage
the sensor covers.
Cleaning the rear view camera lens
XOnly use clean water and a soft, non-
scratching cloth to clean rear view camera
lens :.
Be careful not to apply wax to rear view
camera lens : when waxing the vehicle. If
necessary, remove the wax using the
Mercedes-Benz approved Car Shampoo with
plenty of water.
! Do not clean the camera and the area
around the camera
Rwith a high-pressure cleaner
Rwith a dry cloth and strong pressure
Rwith aggressive cleaning agents
You could otherwise damage the camera.
Cleaning the windows and the wiper
blades
GWarning!
For safety reasons, switch off wipers and
remove SmartKey from starter switch before
cleaning the windshield and/or the wiper
blades. Otherwise, the wiper motor could
suddenly turn on and cause injury.
! Do not pull on the wiper blade inserts.
They could tear.
XFold the wiper arms forward until they snap
into place.
XClean the windshield and the wiper blade
inserts with a clean cloth and mild
detergent solution.
XUse a soft, clean cloth and a mild window
cleaning solution on all outside and inside
glass surfaces.
An automotive glass cleaner is
recommended.
! Fold the windshield wiper arms back onto
the windshield before turning the SmartKey
in the starter switch.
Hold on to the wiper when folding the wiper
arm back. If released, the force of the
impact from the tensioning spring could
crack the windshield.
! To clean the window interior, do not use
a dry cloth, abrasives, solvents or cleaners
Vehicle care195Operation463_AKB; 3; 35, en-USd2ureepe,Version: 2.11.8.12009-07-16T20:59:56+02:00 - Seite 195Z
Page 201 of 272

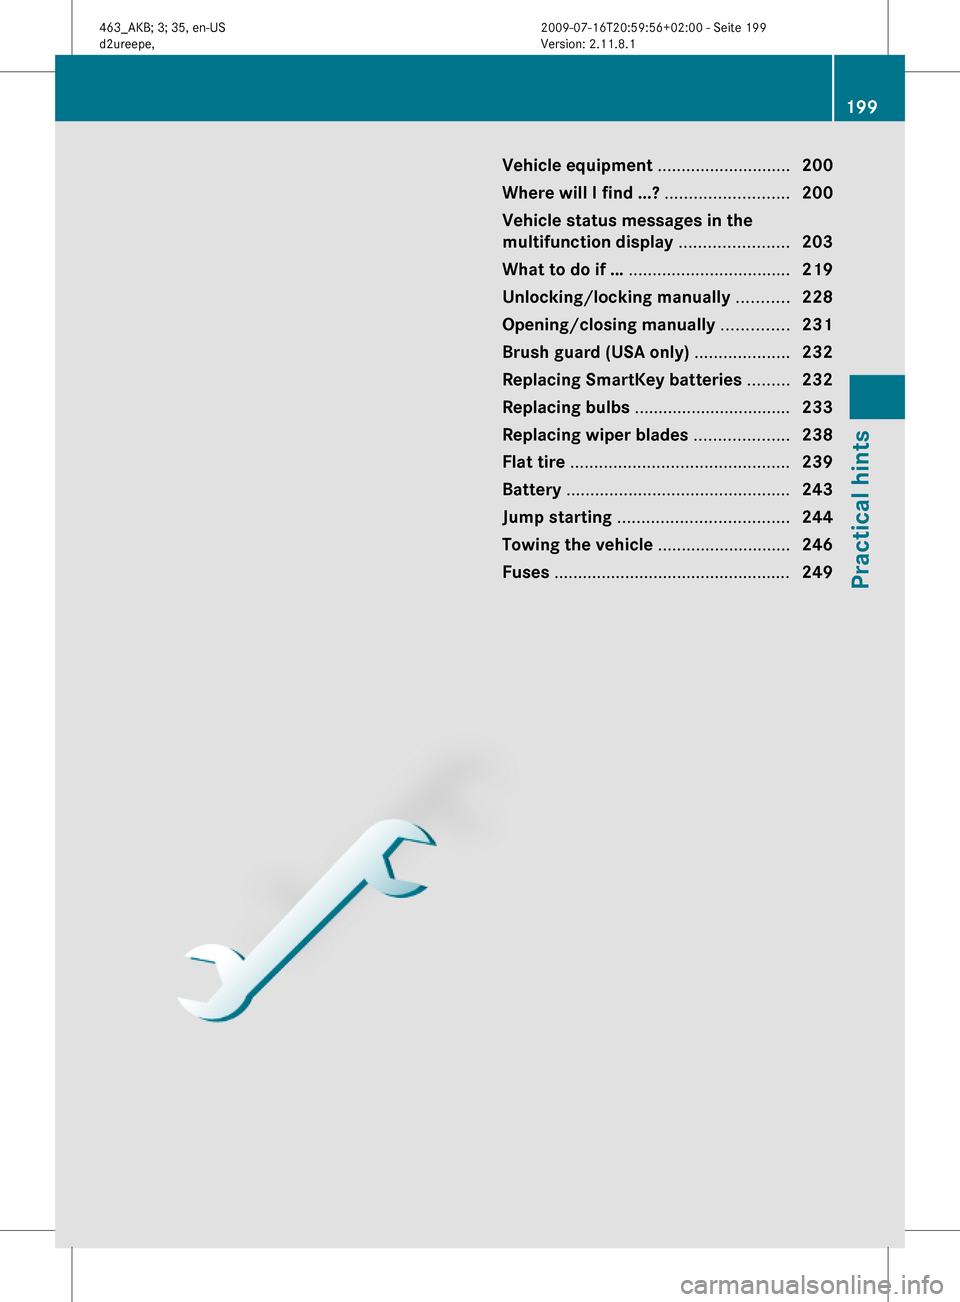
Vehicle equipment ............................200
Where will I find ...? ..........................200
Vehicle status messages in the
multifunction display .......................203
What to do if … ..................................219
Unlocking/locking manually ...........228
Opening/closing manually ..............231
Brush guard (USA only) ....................232
Replacing SmartKey batteries .........232
Replacing bulbs .................................233
Replacing wiper blades ....................238
Flat tire ..............................................239
Battery ...............................................243
Jump starting ....................................244
Towing the vehicle ............................246
Fuses ..................................................249
199Practical hints463_AKB; 3; 35, en-USd2ureepe,Version: 2.11.8.12009-07-16T20:59:56+02:00 - Seite 199
Page 210 of 272

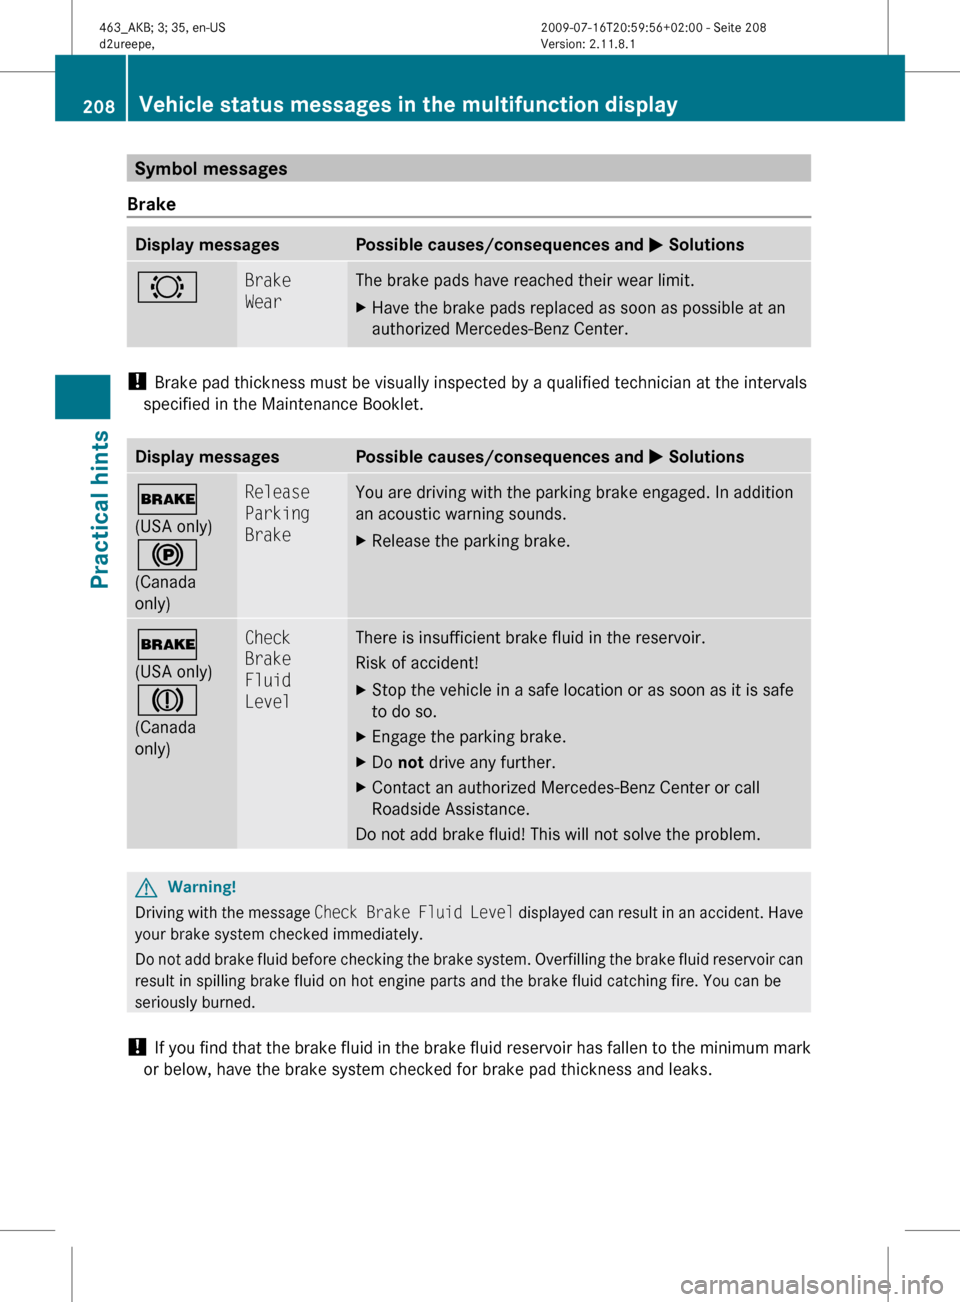
Symbol messages
BrakeDisplay messagesPossible causes/consequences and M Solutions#Brake
WearThe brake pads have reached their wear limit.XHave the brake pads replaced as soon as possible at an
authorized Mercedes-Benz Center.
! Brake pad thickness must be visually inspected by a qualified technician at the intervals
specified in the Maintenance Booklet.
Display messagesPossible causes/consequences and M Solutions$
(USA only)
!
(Canada
only)Release
Parking
BrakeYou are driving with the parking brake engaged. In addition
an acoustic warning sounds.XRelease the parking brake.$
(USA only)
J
(Canada
only)Check
Brake
Fluid
LevelThere is insufficient brake fluid in the reservoir.
Risk of accident!XStop the vehicle in a safe location or as soon as it is safe
to do so.XEngage the parking brake.XDo not drive any further.XContact an authorized Mercedes-Benz Center or call
Roadside Assistance.
Do not add brake fluid! This will not solve the problem.
GWarning!
Driving with the message Check Brake Fluid Level displayed can result in an accident. Have
your brake system checked immediately.
Do not add brake fluid before checking the brake system. Overfilling the brake fluid reservoir can
result in spilling brake fluid on hot engine parts and the brake fluid catching fire. You can be
seriously burned.
! If you find that the brake fluid in the brake fluid reservoir has fallen to the minimum mark
or below, have the brake system checked for brake pad thickness and leaks.
208Vehicle status messages in the multifunction displayPractical hints
463_AKB; 3; 35, en-USd2ureepe,Version: 2.11.8.12009-07-16T20:59:56+02:00 - Seite 208
Page 212 of 272

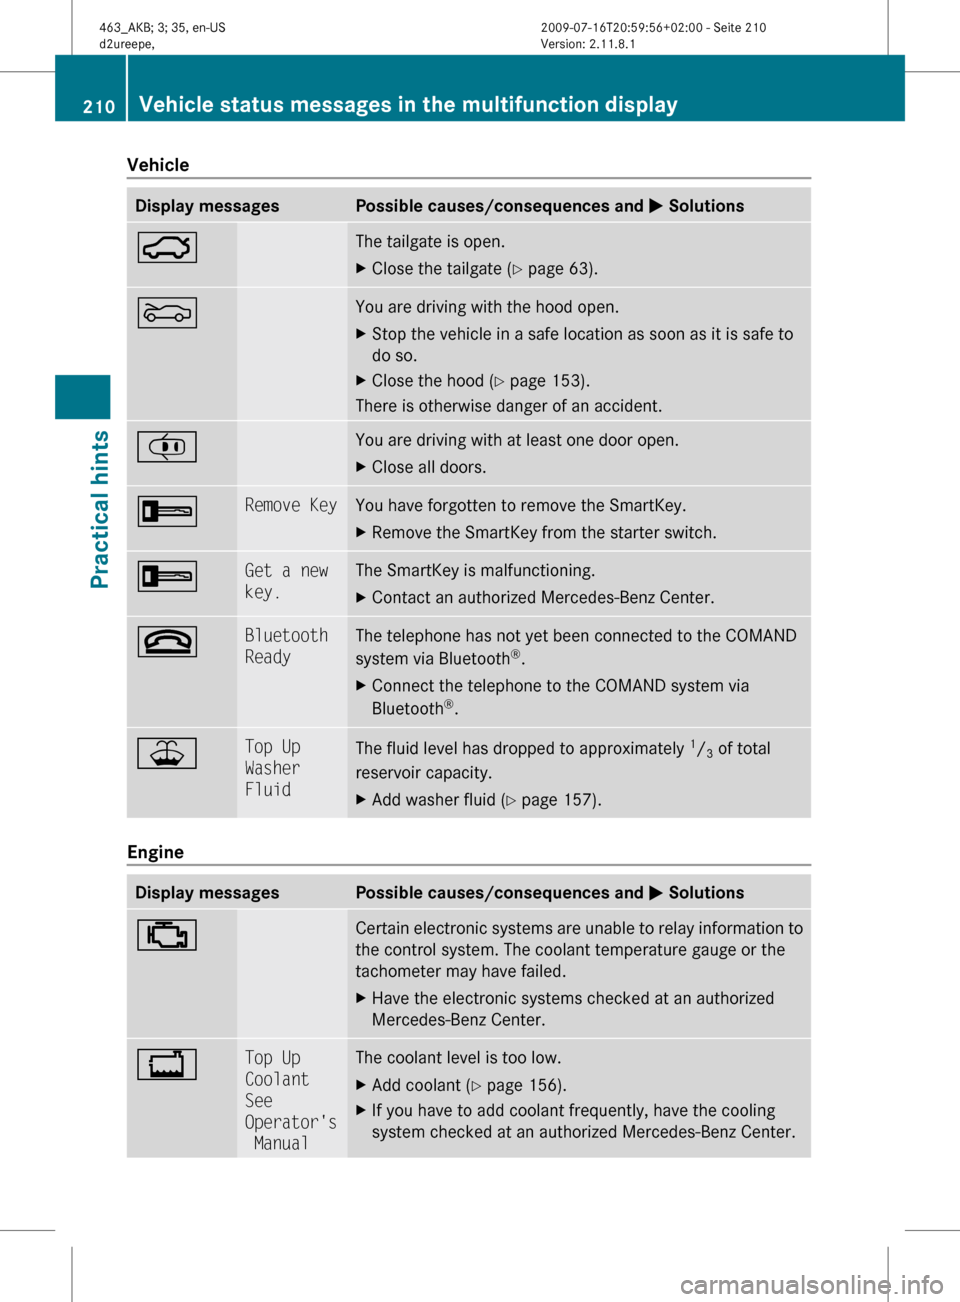
VehicleDisplay messagesPossible causes/consequences and M Solutions:The tailgate is open.XClose the tailgate ( Y page 63).MYou are driving with the hood open.XStop the vehicle in a safe location as soon as it is safe to
do so.XClose the hood ( Y page 153).
There is otherwise danger of an accident.
¡You are driving with at least one door open.XClose all doors.+Remove KeyYou have forgotten to remove the SmartKey.XRemove the SmartKey from the starter switch.+Get a new
key.The SmartKey is malfunctioning.XContact an authorized Mercedes-Benz Center.~Bluetooth
ReadyThe telephone has not yet been connected to the COMAND
system via Bluetooth ®
.XConnect the telephone to the COMAND system via
Bluetooth ®
.¥Top Up
Washer
FluidThe fluid level has dropped to approximately 1
/ 3 of total
reservoir capacity.XAdd washer fluid ( Y page 157).
Engine
Display messagesPossible causes/consequences and M Solutions;Certain electronic systems are unable to relay information to
the control system. The coolant temperature gauge or the
tachometer may have failed.XHave the electronic systems checked at an authorized
Mercedes-Benz Center.+Top Up
Coolant
See
Operator's
ManualThe coolant level is too low.XAdd coolant ( Y page 156).XIf you have to add coolant frequently, have the cooling
system checked at an authorized Mercedes-Benz Center.210Vehicle status messages in the multifunction displayPractical hints
463_AKB; 3; 35, en-USd2ureepe,Version: 2.11.8.12009-07-16T20:59:56+02:00 - Seite 210
Page 219 of 272

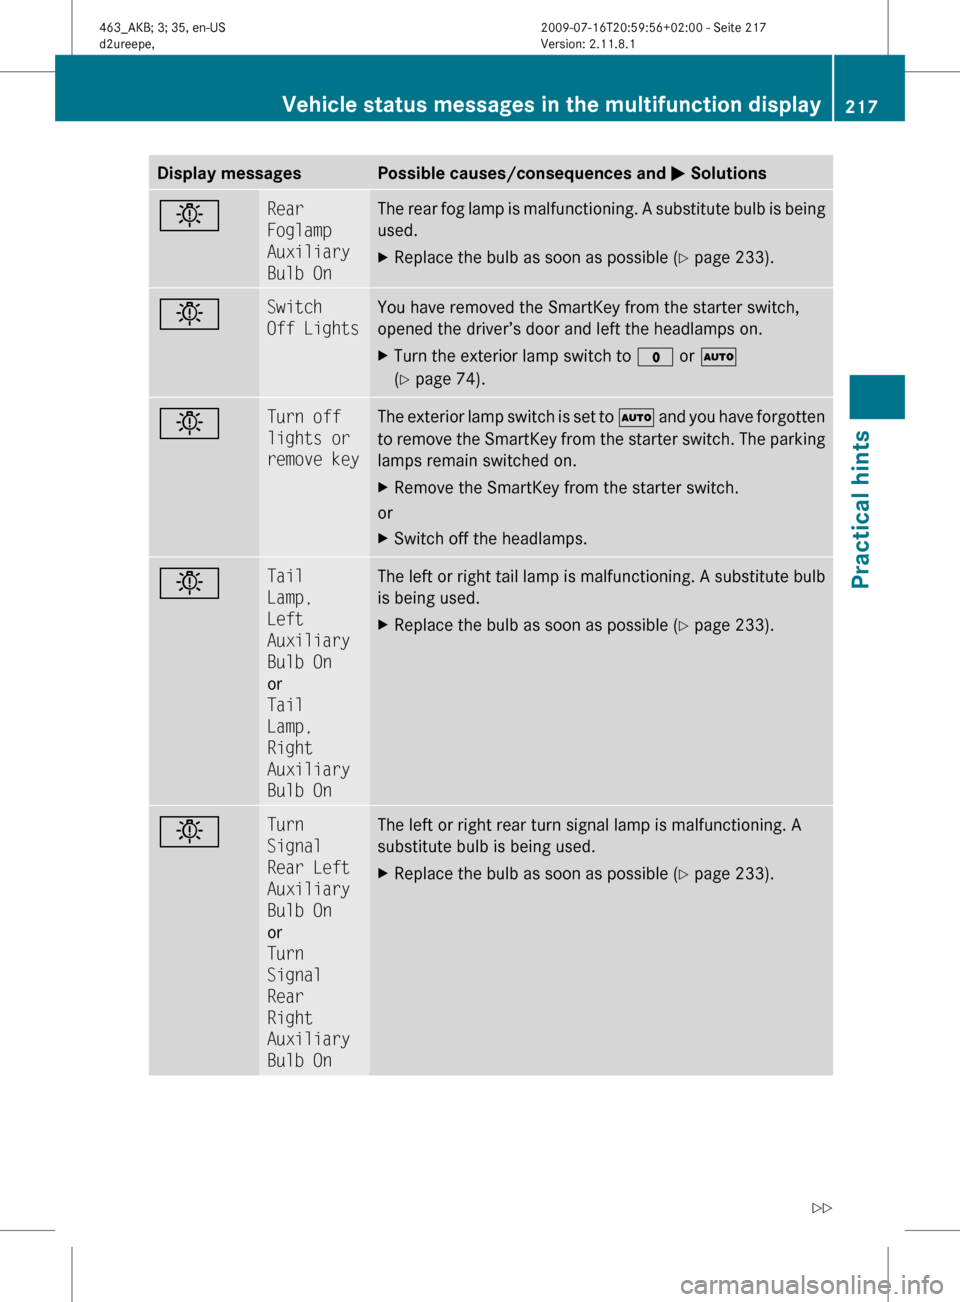
Display messagesPossible causes/consequences and M SolutionsbRear
Foglamp
Auxiliary
Bulb OnThe rear fog lamp is malfunctioning. A substitute bulb is being
used.XReplace the bulb as soon as possible ( Y page 233).bSwitch
Off LightsYou have removed the SmartKey from the starter switch,
opened the driver’s door and left the headlamps on.XTurn the exterior lamp switch to $ or Ã
( Y page 74).bTurn off
lights or
remove keyThe exterior lamp switch is set to à and you have forgotten
to remove the SmartKey from the starter switch. The parking
lamps remain switched on.XRemove the SmartKey from the starter switch.
or
XSwitch off the headlamps.bTail
Lamp,
Left
Auxiliary
Bulb On
or
Tail
Lamp,
Right
Auxiliary
Bulb OnThe left or right tail lamp is malfunctioning. A substitute bulb
is being used.XReplace the bulb as soon as possible ( Y page 233).bTurn
Signal
Rear Left
Auxiliary
Bulb On
or
Turn
Signal
Rear
Right
Auxiliary
Bulb OnThe left or right rear turn signal lamp is malfunctioning. A
substitute bulb is being used.XReplace the bulb as soon as possible ( Y page 233).Vehicle status messages in the multifunction display217Practical hints463_AKB; 3; 35, en-USd2ureepe,Version: 2.11.8.12009-07-16T20:59:56+02:00 - Seite 217Z
Page 230 of 272

ProblemPossible causes/consequences and M Solutions4/
The front passenger
front air bag off
indicator lamp does not
illuminate or does not
remain illuminated with
a BabySmart™ child
seat properly installed
on the front passenger
seat or with an empty
front passenger seat.
The system is malfunctioning.XMake sure there is nothing between seat cushion and child seat.XCheck installation of the child seat (Y page 48).
If the front passenger front air bag off indicator lamp remains out:
XHave the system checked as soon as possible at an authorized
Mercedes-Benz Center.
Do not use the BabySmart™ restraint to transport children on the
front passenger seat until the system has been repaired.
GWarning!
If the 4/ indicator lamp does not
illuminate or remains out with a BabySmart™
child seat properly installed on the front
passenger seat or with an empty front
passenger seat, do not transport a child or a
passenger on the front passenger seat until
the system has been repaired.
Unlocking/locking manually
Unlocking the vehicle
If you cannot unlock the vehicle with the
SmartKey, unlock the driver’s door and the
tailgate using the mechanical key.
The anti-theft alarm system will trigger when
you
Runlock the driver’s door or the tailgate with
the mechanical key
and
Ropen the driver’s door or the tailgate
To cancel the alarm, insert the SmartKey into
the starter switch.
Removing the mechanical key XMove locking tab : in the direction of
arrow.
XSlide mechanical key ; out of the housing.
Unlocking the driver’s door
228Unlocking/locking manuallyPractical hints
463_AKB; 3; 35, en-USd2ureepe,Version: 2.11.8.12009-07-16T20:59:56+02:00 - Seite 228