2010 MERCEDES-BENZ E63AMG length
[x] Cancel search: lengthPage 93 of 372
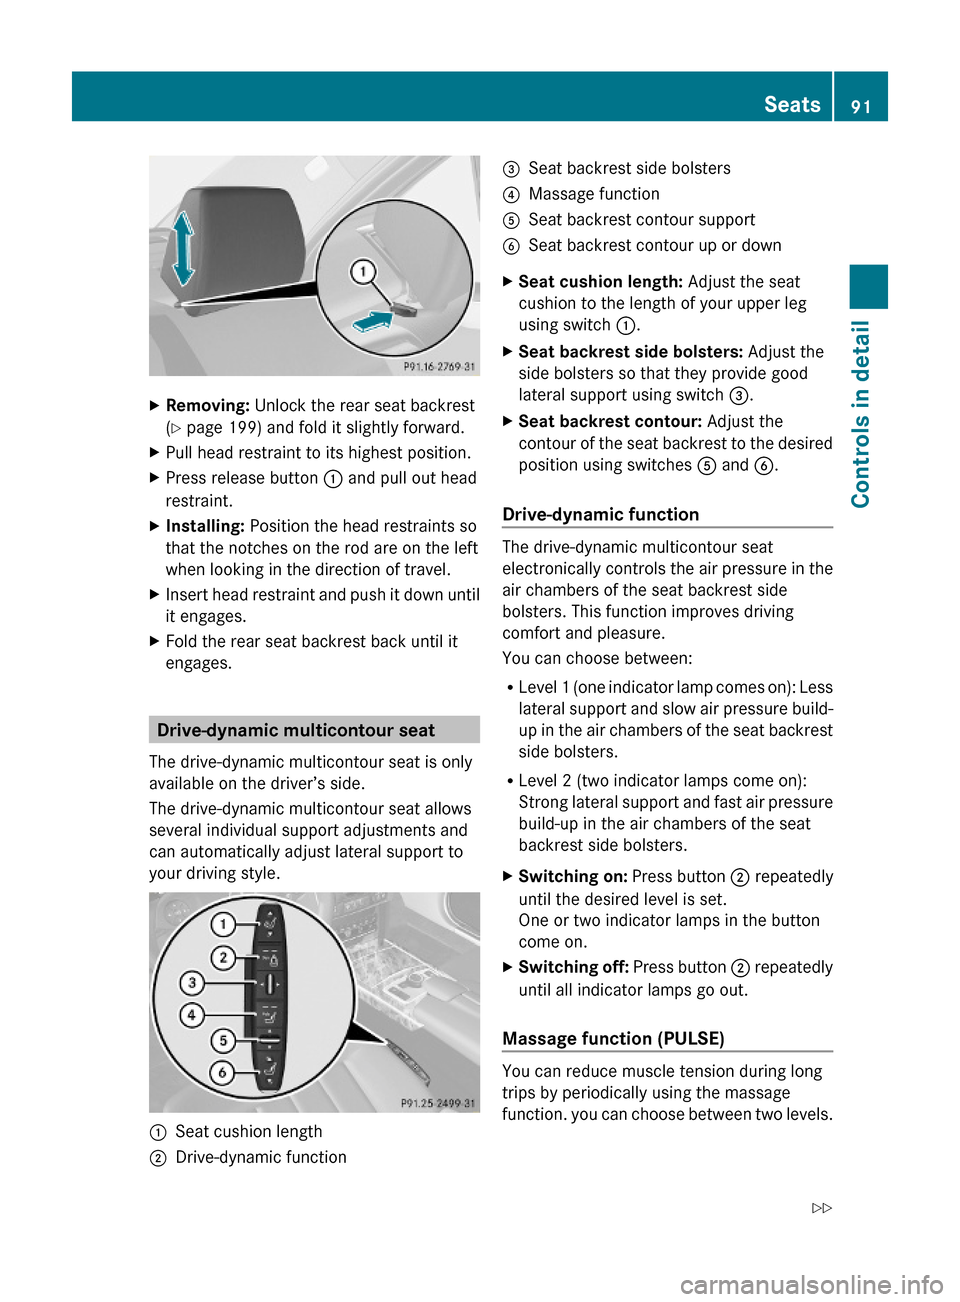
XRemoving: Unlock the rear seat backrest
(Y page 199) and fold it slightly forward.
XPull head restraint to its highest position.XPress release button : and pull out head
restraint.
XInstalling: Position the head restraints so
that the notches on the rod are on the left
when looking in the direction of travel.
XInsert head restraint and push it down until
it engages.
XFold the rear seat backrest back until it
engages.
Drive-dynamic multicontour seat
The drive-dynamic multicontour seat is only
available on the driver’s side.
The drive-dynamic multicontour seat allows
several individual support adjustments and
can automatically adjust lateral support to
your driving style.
:Seat cushion length;Drive-dynamic function=Seat backrest side bolsters?Massage functionASeat backrest contour supportBSeat backrest contour up or downXSeat cushion length: Adjust the seat
cushion to the length of your upper leg
using switch :.
XSeat backrest side bolsters: Adjust the
side bolsters so that they provide good
lateral support using switch =.
XSeat backrest contour: Adjust the
contour of the seat backrest to the desired
position using switches A and B.
Drive-dynamic function
The drive-dynamic multicontour seat
electronically controls the air pressure in the
air chambers of the seat backrest side
bolsters. This function improves driving
comfort and pleasure.
You can choose between:
RLevel 1 (one indicator lamp comes on): Less
lateral support and slow air pressure build-
up in the air chambers of the seat backrest
side bolsters.
RLevel 2 (two indicator lamps come on):
Strong lateral support and fast air pressure
build-up in the air chambers of the seat
backrest side bolsters.
XSwitching on: Press button ; repeatedly
until the desired level is set.
One or two indicator lamps in the button
come on.
XSwitching off: Press button ; repeatedly
until all indicator lamps go out.
Massage function (PULSE)
You can reduce muscle tension during long
trips by periodically using the massage
function. you can choose between two levels.
Seats91Controls in detail212_AKB; 2; 41, en-USd2ureepe,Version: 2.11.8.12009-07-17T09:14:21+02:00 - Seite 91Z
Page 122 of 372
Rocking the vehicle
Rocking the vehicle by shifting the automatic
transmission directly between drive position
D and reverse gear R can help free a vehicle
stuck in mud or snow. The engine control
system of this vehicle electronically limits
directly shifting the automatic transmission
between drive position D and reverse gear R
to very low speeds, i.e. approximately 5 mph
(9 km/h). To shift the automatic transmission
directly between drive position D and reverse
gear R, move the gear selector lever up or
down past the resistance point.
Working on the vehicle
GWarning!
When working on the vehicle, engage the
parking brake and shift the automatic
transmission into park position P. Otherwise
the vehicle could roll away which could result
in an accident and/or serious personal injury.
Gear ranges
With the automatic transmission in drive
position D, you can limit or extend the gear
range, see “One-touch gearshifting”
(Y page 121).
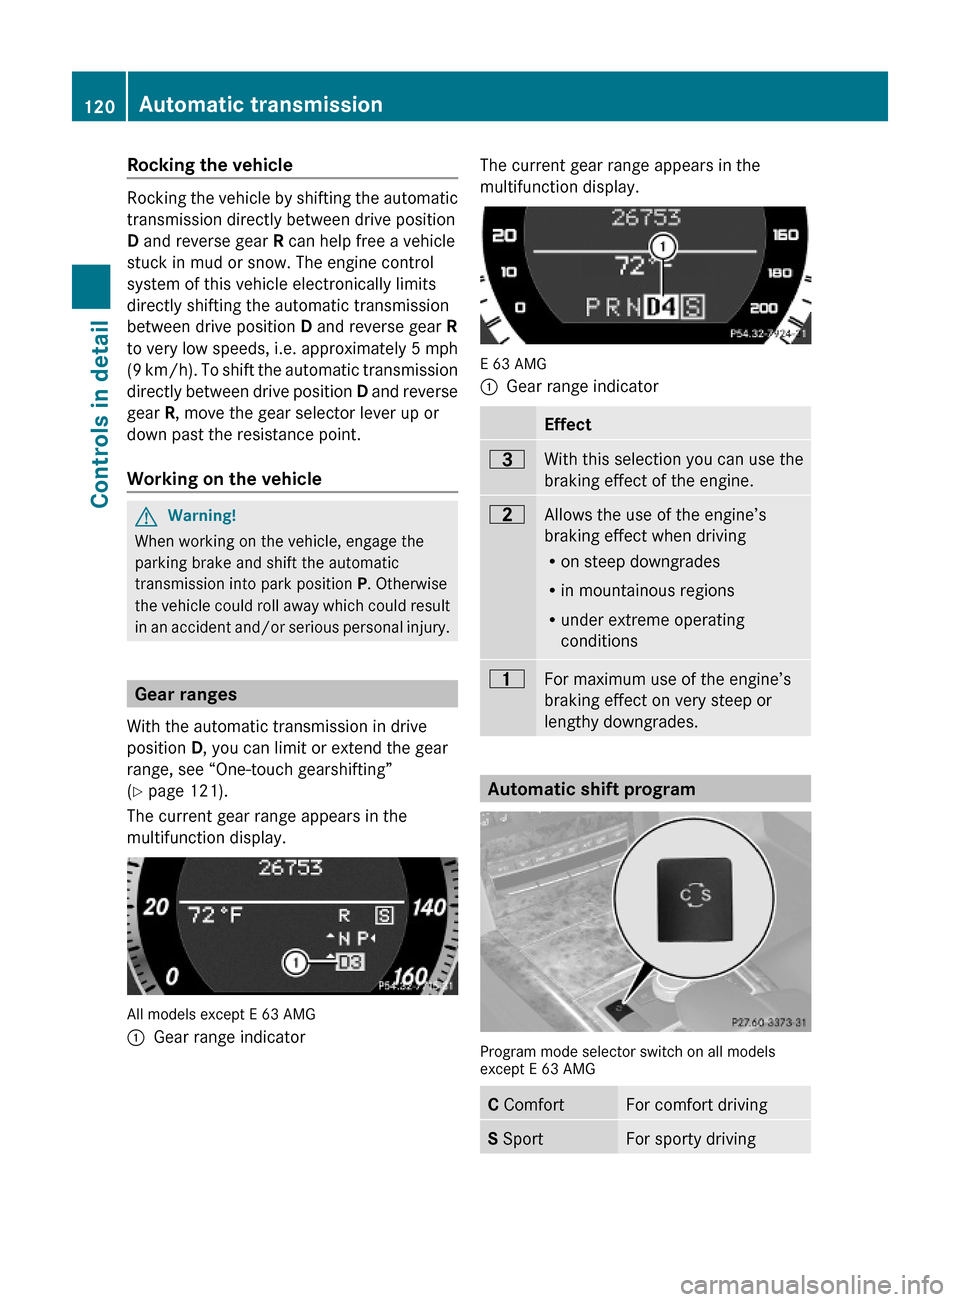
The current gear range appears in the
multifunction display.
All models except E 63 AMG
:Gear range indicator The current gear range appears in the
multifunction display.
E 63 AMG
:Gear range indicatorEffect=With this selection you can use the
braking effect of the engine.
5Allows the use of the engine’s
braking effect when driving
Ron steep downgrades
Rin mountainous regions
Runder extreme operating
conditions
4For maximum use of the engine’s
braking effect on very steep or
lengthy downgrades.
Automatic shift program
Program mode selector switch on all modelsexcept E 63 AMG
C ComfortFor comfort drivingS SportFor sporty driving120Automatic transmissionControls in detail
212_AKB; 2; 41, en-USd2ureepe,Version: 2.11.8.12009-07-17T09:14:21+02:00 - Seite 120
Page 136 of 372
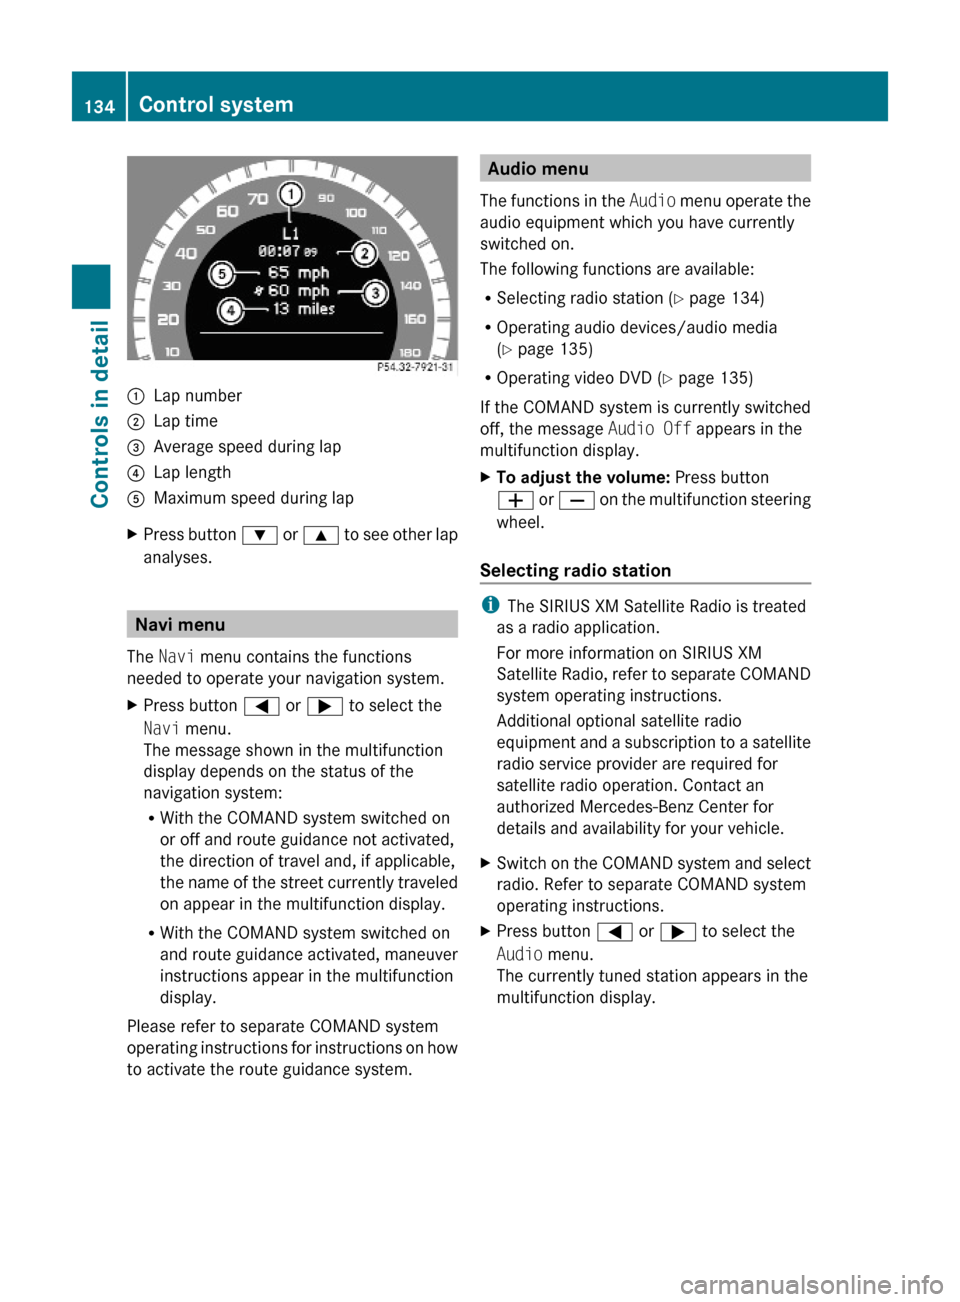
:Lap number;Lap time=Average speed during lap?Lap lengthAMaximum speed during lapXPress button : or 9 to see other lap
analyses.
Navi menu
The Navi menu contains the functions
needed to operate your navigation system.
XPress button = or ; to select the
Navi menu.
The message shown in the multifunction
display depends on the status of the
navigation system:
RWith the COMAND system switched on
or off and route guidance not activated,
the direction of travel and, if applicable,
the name of the street currently traveled
on appear in the multifunction display.
RWith the COMAND system switched on
and route guidance activated, maneuver
instructions appear in the multifunction
display.
Please refer to separate COMAND system
operating instructions for instructions on how
to activate the route guidance system.
Audio menu
The functions in the Audio menu operate the
audio equipment which you have currently
switched on.
The following functions are available:
RSelecting radio station (Y page 134)
ROperating audio devices/audio media
(Y page 135)
ROperating video DVD (Y page 135)
If the COMAND system is currently switched
off, the message Audio Off appears in the
multifunction display.
XTo adjust the volume: Press button
W or X on the multifunction steering
wheel.
Selecting radio station
iThe SIRIUS XM Satellite Radio is treated
as a radio application.
For more information on SIRIUS XM
Satellite Radio, refer to separate COMAND
system operating instructions.
Additional optional satellite radio
equipment and a subscription to a satellite
radio service provider are required for
satellite radio operation. Contact an
authorized Mercedes-Benz Center for
details and availability for your vehicle.
XSwitch on the COMAND system and select
radio. Refer to separate COMAND system
operating instructions.
XPress button = or ; to select the
Audio menu.
The currently tuned station appears in the
multifunction display.
134Control systemControls in detail
212_AKB; 2; 41, en-USd2ureepe,Version: 2.11.8.12009-07-17T09:14:21+02:00 - Seite 134
Page 217 of 372
Reprogramming a single signal
transmitter button
To program a device using a signal
transmitter button previously trained, follow
these steps:
XSwitch on the ignition.XPress and hold the desired signal
transmitter button ( ;, = or ?). Do not
release the button.
Indicator lamp : will begin to flash after
20 seconds.XWithout releasing the signal transmitter
button, proceed with programming starting
with step 3.
Operation of integrated remote control
XSwitch on the ignition.XSelect and press the appropriate
integrated signal transmitter button ( ;,
= or ?) to activate the remote controlled
device.
The integrated remote control transmitter
continues to send the signal as long as the
button is pressed – up to 20 seconds.
Erasing the integrated remote control
memory
i If you sell your vehicle, erase the codes of
all three channels.
XSwitch on the ignition.XSimultaneously press and hold outer signal
transmitter buttons ; and ?, for
approximately 20 seconds, until indicator
lamp : flashes rapidly. Do not hold for
longer than 30 seconds.
The codes of all three channels are erased.Programming tips
If you are having difficulty programming the
integrated remote control, here are some
helpful tips:
R Check the frequency of hand-held remote
control A (typically located on the reverse
side of the remote). The integrated remote
control is compatible with radio-frequency
devices operating between 280-390 MHz.
R Put a new battery in hand-held remote
control A. This will increase the likelihood
of the hand-held remote control sending a
stronger and more accurate signal to the
integrated remote control.
R While performing step 3, hold hand-held
remote control A at different lengths and
angles from the signal transmitter button
( ; , = or ?) you are programming.
Attempt varying angles at the distance of 2
to 12 inches (5 to 30 cm) away or the same
angle at varying distances.
R If another hand-held remote control is
available for the same device, try the
programming steps again using that other
hand-held remote control. Make sure new
batteries are in the hand-held remote
control before beginning the procedure.
R Straighten the antenna wire from the
garage door opener assembly. This may
help improve transmitting and/or receiving
signals.
i Certain types of garage door openers are
incompatible with the integrated remote
control. If you should experience further
difficulties with programming the
integrated remote control, contact an
authorized Mercedes-Benz Center, or call
the Mercedes-Benz Customer Assistance
Center (USA only) at
1-800-FOR-MERCedes (1-800-367-6372),
or the HomeLink ®
Hotline (USA only) at
1-800-355-3515, or the Customer Service
(Canada only) at 1-800-387-0100.
Useful features215Controls in detail212_AKB; 2; 41, en-USd2ureepe,Version: 2.11.8.12009-07-17T09:14:21+02:00 - Seite 215Z
Page 256 of 372
Depressing the brake pedal periodically when
traveling at length on salt-strewn roads can
bring road-salt-impaired braking efficiency
back to normal.
If the vehicle is parked after being driven on
salt-treated roads, the braking efficiency
should be tested as soon as possible after
driving is resumed.GWarning!
Make sure not to endanger any other road
users when carrying out these braking
maneuvers.
Driving instructions
Drive sensibly – save fuel
To save fuel you should:
R Keep tires at the recommended inflation
pressures.
R Remove unnecessary loads.
R Remove roof rack when not in use.
R Allow engine to warm up under low load
use.
R Avoid frequent acceleration and
deceleration.
R Have all maintenance work performed at
the intervals specified in the Maintenance
Booklet and as required by the
Maintenance system. Contact an
authorized Mercedes-Benz Center.
Fuel consumption is also increased by driving
in cold weather, in stop-and-go traffic, on
short trips and in mountainous areas.
Drinking and driving
GWarning!
Drinking and driving and/or taking drugs and
driving are very dangerous combinations.
Even a small amount of alcohol or drugs can
affect your reflexes, perceptions and
judgment.
The possibility of a serious or even fatal
accident are greatly increased when you drink
or take drugs and drive.
Do not drink or take drugs and drive or allow
anyone to drive who has been drinking or
taking drugs.
Pedals
GWarning!
Make sure absolutely no objects are
obstructing the pedals’ range of movement.
Keep the driver’s footwell clear of all
obstacles. If there are any floormats or
carpets in the footwell, make sure that the
pedals still have sufficient clearance.
During sudden driving or braking maneuvers,
the objects could get caught between the
pedals. You could then no longer brake or
accelerate. This could lead to accidents and
injury.
Power assistance
GWarning!
There is no power assistance for the steering
and the brake when the engine is not running.
Steering and braking requires significantly
more effort and you could lose control of the
vehicle and cause an accident as a result.
Do not turn off the engine while the vehicle is
in motion.
Brakes
Downhill grades
! When driving down long and steep
grades, relieve the load on the brakes by
shifting into a lower gear to use the
engine’s braking power. This helps prevent
overheating of the brakes and reduces
wear.
254Driving instructionsOperation
212_AKB; 2; 41, en-USd2ureepe,Version: 2.11.8.12009-07-17T09:14:21+02:00 - Seite 254
Page 340 of 372
charging and could cause an explosion that
may result in personal injury, paint damage or
corrosion.
An accessory battery charge unit specially
adapted for Mercedes-Benz vehicles and
tested and approved by Mercedes-Benz is
available. It permits the charging of the
battery in its installed position. Contact an
authorized Mercedes-Benz Center for
information and availability.
Charge battery in accordance with the
separate instructions for the accessory
battery charger.
Have the battery charged at an authorized
Mercedes-Benz Center. If you charge the
battery yourself, follow the operating
instructions for your charging device.
Only use a battery charge unit with a
maximum charging voltage of 14.8 V.XCharge battery in accordance with the
instructions of the battery charger
manufacturer.
Jump starting
GWarning!
Failure to follow these directions will cause
damage to the electronic components, and
can lead to a battery explosion and severe
injury or death.
Never lean over batteries while connecting or
jump starting. You might get injured.
Battery fluid contains sulfuric acid. Do not
allow this fluid to come in contact with eyes,
skin or clothing. In case it does, immediately
flush affected area with water, and seek
medical help if necessary.
A battery will also produce hydrogen gas,
which is flammable and explosive. Keep
flames or sparks away from battery, avoid
improper connection of jumper cables,
smoking, etc.
Attempting to jump start a frozen battery can
result in it exploding, causing personal injury.
Read all instructions before proceeding.
! Do not tow-start the vehicle. You could
otherwise seriously damage the automatic
transmission which is not covered by the
Mercedes-Benz Limited Warranty.
! Jump starting should only be performed
using the jump-start terminals located in
the engine compartment.
Avoid repeated and lengthy starting
attempts.
Do not attempt to start the engine using a
battery quick-charge unit.
If the engine does not run after several
unsuccessful starting attempts, have it
checked at the nearest authorized
Mercedes-Benz Center.
Excessive unburned fuel generated by
repeated failed starting attempts may
damage the catalytic converter 21
and may
present a fire risk.
Make sure the jumper cables do not have
loose or missing insulation.
Make sure the cable clamps do not touch
any other metal part while the other end is
still attached to a battery.
If the battery is discharged, the engine can be
started with jumper cables and the fully
charged battery of another vehicle or an
equivalent starter pack. Observe the
following:
R Access to the battery is not possible on all
vehicles. If you cannot access the battery
of the other vehicle, provide jump start21 Vehicles with gasoline engine only.338Jump startingPractical hints
212_AKB; 2; 41, en-USd2ureepe,Version: 2.11.8.12009-07-17T09:14:21+02:00 - Seite 338
Page 350 of 372

Vehicle specification E 350 (212.056)
The quoted data apply only to the standard
vehicle. Contact an authorized Mercedes-
Benz Center for the corresponding data of all
special bodies and special equipment.Engine E 350Engine, type272Mode of operation4-stroke engine,
gasoline injectionNo. of cylinders6Bore3.66 in (92.90 mm)Stroke3.39 in (86.00 mm)Total piston
displacement213.5 cu in
(3 498 cm 3
)Compression
ratio10.7:1Output acc. to
SAE J 1349 23268 hp/6
000 rpm
(200 kW/6 000 rpm)Maximum torque
acc. to SAE J 1349258 lb-ft/
2 400 - 5 000 rpm
(350 Nm/
2 400 - 5 000 rpm)Maximum engine
speed6 500 rpmFiring order1-4-3-6-2-5Poly-V-belt2 392 mmElectrical system E 350Alternator14 V/180 AStarter motor12 V/1.4 kWBattery12 V/70 AhSpark plugs, typeBosch Y 7 MPP33Electrical system E 350Spark plugs,
electrode gap0.031 in (0.8 mm)Spark plugs,
tightening torque15 - 18 lb-ft
(20 - 25 Nm)Main dimensions E 350Overall vehicle
length191.9 in (4 874 mm)Overall vehicle
width 2481.5 in (2
071 mm)Overall vehicle
height57.8 in (1 467 mm)Wheelbase113.1 in (2 874 mm)Track, front62.2 in (1 580 mm)Track, rear63.0 in (1 599 mm)Ground clearance4.1 in (104 mm)Turning circle36.9 ft (11.3 m)Weights E 350Roof loadmax. 220 lb (100 kg)Trunk loadmax. 220 lb (100 kg)
Vehicle specification E 350 BlueTEC
(212.024)
The quoted data apply only to the standard
vehicle. Contact an authorized Mercedes-
Benz Center for the corresponding data of all
special bodies and special equipment.
23 Premium fuel required. Performance may vary with fuel octane rating.
24 Exterior rear view mirrors folded out.348Vehicle specification E 350 BlueTEC (212.024)Technical data
212_AKB; 2; 41, en-USd2ureepe,Version: 2.11.8.12009-07-17T09:14:21+02:00 - Seite 348
Page 351 of 372

Engine E 350 BlueTECEngine, type642Mode of operationDiesel 4-strokeengineNo. of cylinders6Bore3.27 in (83.00 mm)Stroke3.62 in (92.00 mm)Total piston
displacement182.3 cu in
(2 987 cm 3
)Compression
ratio16.5:1Output acc. to
SAE J 1349210 hp/3 400 rpm
(157 kW/3 400 rpm)Maximum torque
acc. to SAE J 1349400 lb-ft/
1 600 - 2 400 rpm
(543 Nm/
1 600 - 2 400 rpm)Maximum engine
speed4 500 rpmFiring order1-4-2-5-3-6Poly-V-belt2 035 mmElectrical system E 350 BlueTECAlternator14 V/180 AStarter motor12 V/2.0 kWBattery12 V/95 AhMain dimensions E 350 BlueTECOverall vehicle
length191.9 in (4 874 mm)Overall vehicle
width 2581.5 in (2
071 mm)Main dimensions E 350 BlueTECOverall vehicle
height 2657.8 in (1
467 mm)Wheelbase113.1 in (2 874 mm)Track, front62.2 in (1 580 mm)Track, rear63.0 in (1 599 mm)Ground
clearance 263.5 in (89 mm)Turning circle36.9 ft (11.3 m)Weights E 350 BlueTECRoof loadmax. 220 lb (100 kg)Trunk loadmax. 220 lb (100 kg)
Vehicle specification E 350 4MATIC
(212.087)
The quoted data apply only to the standard
vehicle. Contact an authorized Mercedes-
Benz Center for the corresponding data of all
special bodies and special equipment.
Engine E 350 4MATICEngine, type272Mode of operation4-stroke engine,
gasoline injectionNo. of cylinders6Bore3.66 in (92.90 mm)Stroke3.39 in (86.00 mm)Total piston
displacement213.5 cu in
(3 498 cm 3
)Compression
ratio10.7:125 Exterior rear view mirrors folded out.
26 Data apply to unladen vehicle with standard equipment. Data may vary in vehicles equipped with AIRMATIC
depending on the selected damping settings and the current vehicle level.Vehicle specification E 350 4MATIC (212.087)349Technical data212_AKB; 2; 41, en-USd2ureepe,Version: 2.11.8.12009-07-17T09:14:21+02:00 - Seite 349Z