2010 MERCEDES-BENZ E63AMG window
[x] Cancel search: windowPage 194 of 372

some time of operation depending on the
outside temperature.XSwitch on the ignition.XSwitching on: Press button ¤.
The indicator lamp above the button comes
on.XSwitching off: Press button ¤ again.
The rear window defroster switches off when
the battery voltage is too low. Too many
electrical consumers may be operating
simultaneously.
XSwitch off consumers that are currently not
needed if required.
Power tilt/sliding sunroof
Opening and closing
GObserve Safety notes, see page 56.GWarning!
When opening or closing the tilt/sliding
sunroof, make sure there is no danger of
anyone being harmed by the opening/closing
procedure.
The tilt/sliding sunroof is equipped with the
express operation and automatic reversal
function. If the movement of the tilt/sliding
sunroof is blocked during the closing
procedure, the tilt/sliding sunroof will stop
and open slightly.
The tilt/sliding sunroof operates differently
when the sunroof switch is pressed and held.
See the “Closing when the tilt/sliding sunroof
is blocked” section for details.
The opening/closing procedure of the tilt/
sliding sunroof can be immediately halted by
releasing the sunroof switch or, if the sunroof
switch was moved past the resistance point
and released, by moving the sunroof switch in
any direction.
GWarning!
The tilt/sliding sunroof is made out of glass.
In the event of an accident, the glass may
shatter. This may result in an opening in the
roof.
In a vehicle rollover, occupants not wearing
their seat belts or not wearing them properly
may be thrown out of the opening. Such an
opening also presents a potential for injury for
occupants wearing their seat belts properly as
entire body parts or portions of them may
protrude from the passenger compartment.
! To avoid damaging the seals, do not
transport any objects with sharp edges
which can stick out of the tilt/sliding
sunroof.
Do not open the tilt/sliding sunroof if there
is snow or ice on the roof, as this could
result in malfunctions.
If you cannot open or close the tilt/sliding
sunroof due to a malfunction contact
Roadside Assistance or an authorized
Mercedes-Benz Center.
! Please keep in mind that weather
conditions can sometimes change rapidly.
Make sure to close the tilt/sliding sunroof
when leaving the vehicle. If water enters
the vehicle interior, vehicle electronics
could be damaged which is not covered by
the Mercedes-Benz Limited Warranty.
i You can also open or close the tilt/sliding
sunroof using the SmartKey or the
KEYLESS-GO function, see “Summer
opening feature” ( Y page 107) and
“Convenience closing feature”
( Y page 108).
i After switching off the ignition or
removing the SmartKey from the starter
switch, you can operate the tilt/sliding
sunroof until you open the driver’s or front
passenger door. If no door was opened you
can operate the tilt/sliding sunroof for up
to 5 minutes.192Power tilt/sliding sunroofControls in detail
212_AKB; 2; 41, en-USd2ureepe,Version: 2.11.8.12009-07-17T09:14:21+02:00 - Seite 192
Page 195 of 372
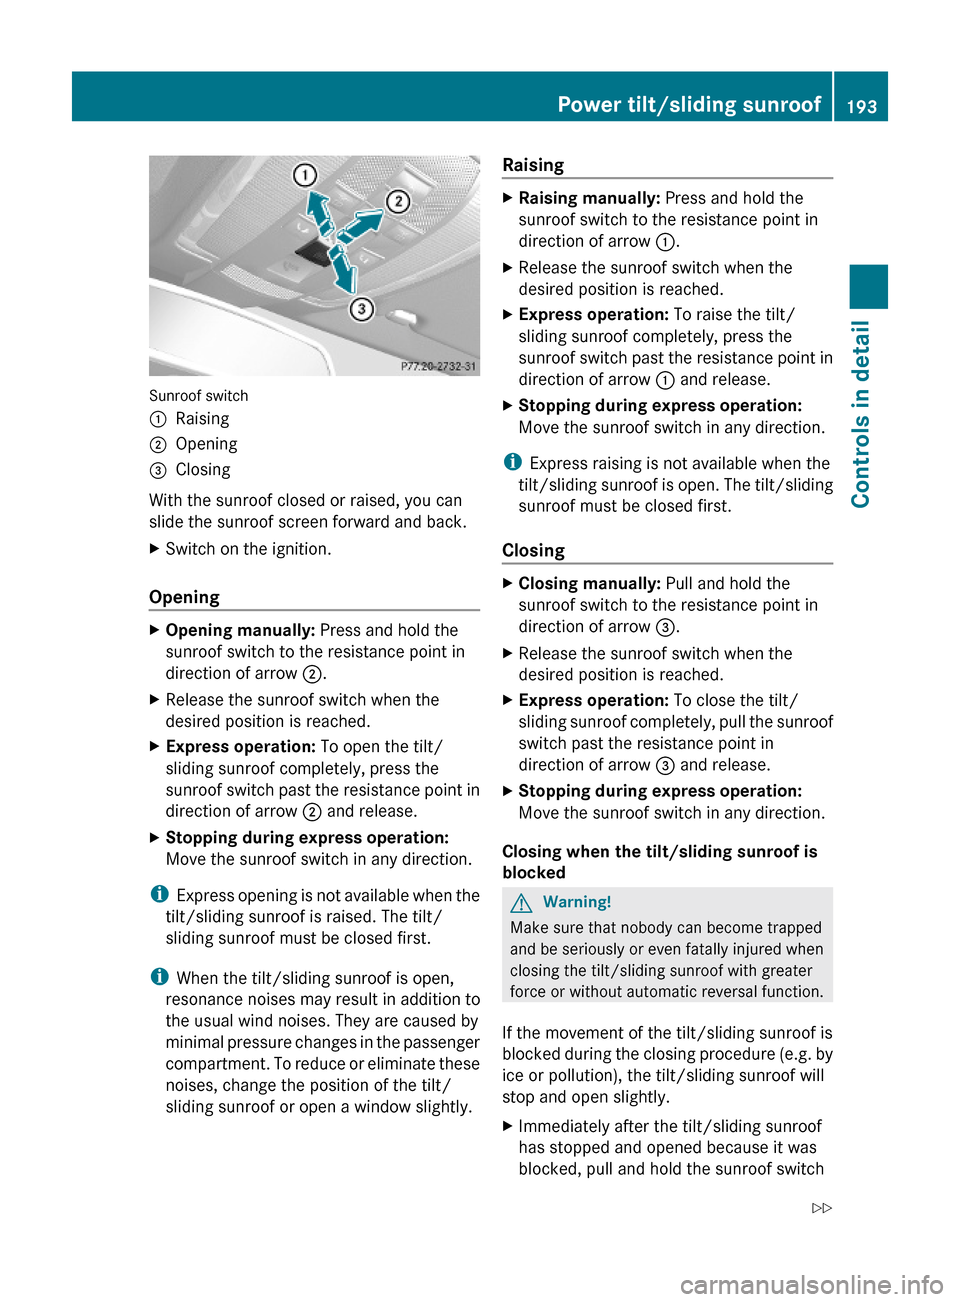
Sunroof switch
:Raising;Opening=Closing
With the sunroof closed or raised, you can
slide the sunroof screen forward and back.
XSwitch on the ignition.
Opening
XOpening manually: Press and hold the
sunroof switch to the resistance point in
direction of arrow ;.
XRelease the sunroof switch when the
desired position is reached.
XExpress operation: To open the tilt/
sliding sunroof completely, press the
sunroof switch past the resistance point in
direction of arrow ; and release.
XStopping during express operation:
Move the sunroof switch in any direction.
iExpress opening is not available when the
tilt/sliding sunroof is raised. The tilt/
sliding sunroof must be closed first.
iWhen the tilt/sliding sunroof is open,
resonance noises may result in addition to
the usual wind noises. They are caused by
minimal pressure changes in the passenger
compartment. To reduce or eliminate these
noises, change the position of the tilt/
sliding sunroof or open a window slightly.
RaisingXRaising manually: Press and hold the
sunroof switch to the resistance point in
direction of arrow :.
XRelease the sunroof switch when the
desired position is reached.
XExpress operation: To raise the tilt/
sliding sunroof completely, press the
sunroof switch past the resistance point in
direction of arrow : and release.
XStopping during express operation:
Move the sunroof switch in any direction.
iExpress raising is not available when the
tilt/sliding sunroof is open. The tilt/sliding
sunroof must be closed first.
Closing
XClosing manually: Pull and hold the
sunroof switch to the resistance point in
direction of arrow =.
XRelease the sunroof switch when the
desired position is reached.
XExpress operation: To close the tilt/
sliding sunroof completely, pull the sunroof
switch past the resistance point in
direction of arrow = and release.
XStopping during express operation:
Move the sunroof switch in any direction.
Closing when the tilt/sliding sunroof is
blocked
GWarning!
Make sure that nobody can become trapped
and be seriously or even fatally injured when
closing the tilt/sliding sunroof with greater
force or without automatic reversal function.
If the movement of the tilt/sliding sunroof is
blocked during the closing procedure (e.g. by
ice or pollution), the tilt/sliding sunroof will
stop and open slightly.
XImmediately after the tilt/sliding sunroof
has stopped and opened because it was
blocked, pull and hold the sunroof switch
Power tilt/sliding sunroof193Controls in detail212_AKB; 2; 41, en-USd2ureepe,Version: 2.11.8.12009-07-17T09:14:21+02:00 - Seite 193Z
Page 198 of 372
OpeningXOpening manually: Press and hold the
roof panel switch to the resistance point in
direction of arrow ;.XRelease the roof panel switch when the
desired position is reached.XExpress operation: To open the tilt/
sliding panel completely, press the roof
panel switch past the resistance point in
direction of arrow ; and release.XStopping during express operation:
Move the roof panel switch in any direction.
i When the tilt/sliding panel is open,
resonance noises may result in addition to
the usual wind noises. They are caused by
minimal pressure changes in the passenger
compartment. To reduce or eliminate these
noises, change the position of the tilt/
sliding panel or open a window slightly.
Raising
XRaising manually: Press and hold the roof
panel switch to the resistance point in
direction of arrow :.XRelease the roof panel switch when the
desired position is reached.XExpress operation: To raise the tilt/
sliding panel completely, press the roof
panel switch past the resistance point in
direction of arrow : and release.XStopping during express operation:
Move the roof panel switch in any direction.
i Express raising is not available when the
tilt/sliding panel is open. The tilt/sliding
panel must be closed first.
Closing
XClosing manually: Pull and hold the roof
panel switch to the resistance point in
direction of arrow =.XRelease the roof panel switch when the
desired position is reached.XExpress operation: To close the tilt/
sliding panel completely, pull the roof panel
switch past the resistance point in
direction of arrow = and release.XStopping during express operation:
Move the roof panel switch in any direction.
Closing when the tilt/sliding panel is
blocked
GWarning!
Make sure that nobody can become trapped
and be seriously or even fatally injured when
closing the tilt/sliding panel without
automatic reversal function.
If the movement of the tilt/sliding panel is
blocked during the closing procedure (e.g. by
ice or pollution), the tilt/sliding panel will stop
and open slightly.
XImmediately after the tilt/sliding panel has
stopped and opened because it was
blocked, pull and hold the roof panel switch
in direction of arrow = until the tilt/sliding
panel is fully closed.
If the tilt/sliding panel is blocked again and
opens slightly:
XImmediately after the tilt/sliding panel was
blocked and has opened, pull and hold the
roof panel switch in direction of arrow =
until the tilt/sliding panel is fully closed.
The tilt sliding panel closes without
automatic reversal function.GWarning!
Pulling and holding the roof panel switch to
close the tilt/sliding panel immediately after
it had been blocked two times will cause the
tilt/sliding panel to close without any reversal
function for as long as you hold the roof panel
switch.
Synchronizing
The tilt/sliding panel and roller sunblinds
must be synchronized after a malfunction or
196Panorama roof with power tilt/sliding panelControls in detail
212_AKB; 2; 41, en-USd2ureepe,Version: 2.11.8.12009-07-17T09:14:21+02:00 - Seite 196
Page 207 of 372

closed while vehicle is in motion. Reflected
glare can endanger you and others.
:Sun visor;Additional sun visor=Mounting?Holder, e.g. for gas cardsAVanity mirrorBVanity mirror cover
Glare through the windshield
XFlip sun visor : down when you
experience glare.
Glare through a door window
XClose vanity mirror cover B if opened.XDisengage sun visor : from mounting =.XPivot sun visor to the side.XAdjust sun visor : by pushing or pulling in
direction of arrows.
XFlip down additional sun visor ; when you
experience additional glare through the
windshield.
Vanity mirror
The vanity mirror lamp only functions when
the sun visor : is engaged in mounting =.
XFlip sun visor : down.XLift up vanity mirror cover B.
Vanity mirror lamp comes on.
Rear window sunshade
GWarning!
When operating the rear window sunshade
make sure there is no danger of anyone being
harmed by the extending or retracting
procedure.
The extending or retracting procedure can be
immediately halted by briefly pressing rear
window sunshade switch. To reverse direction
of movement, press rear window sunshade
switch again.
GObserve Safety notes, see page 56.XSwitch on the ignition.XExtending/Retracting: Press rear
window sunshade switch : briefly.
Useful features205Controls in detail212_AKB; 2; 41, en-USd2ureepe,Version: 2.11.8.12009-07-17T09:14:21+02:00 - Seite 205Z
Page 219 of 372
XPress button = approximately 3 seconds.
The currently selected zone appears in
compass display ;.
XSelecting zone: Press button = until the
desired zone is selected.
Do not press the button again until the
direction is indicated.
XCompass calibration: Make sure you are
in an area where you can drive a full circle
with your vehicle without disturbing traffic
in order to calibrate the compass.
In order to calibrate the compass properly,
mind the following:
RCalibrate the compass in open terrain.
Nearby buildings, bridges, power lines and
large antenna masts, for example, could
impair compass calibration.
RSwitch off electrical consumers (e.g.
climate control, windshield wipers, or rear
window defroster).
RClose all doors and the trunk.
XStart the engine.XPress button = approximately 6 seconds
until symbol C appears in compass
display ;.
XDrive a full circle at a vehicle speed of
between 3 mph (5 km/h) and 6 mph
(10 km/h).
When calibration was successful, the
current direction appears in compass
display ;.
Floormat (driver’s side only)
GWarning!
Whenever you are using a floormat, make sure
there is enough clearance and that the
floormat is securely fastened.
The floormat should always be securely
fastened using the fastening equipment.
Before driving off, check that the floormat is
securely in place and adjust it if necessary. A
loose floormat could slip and hinder proper
functioning of the pedals.
Do not place several floormats on top of each
other as this may impair pedal movement.
XMove the driver’s seat as far to the rear as
possible.
XRemoving: Pull floormat off of retainer
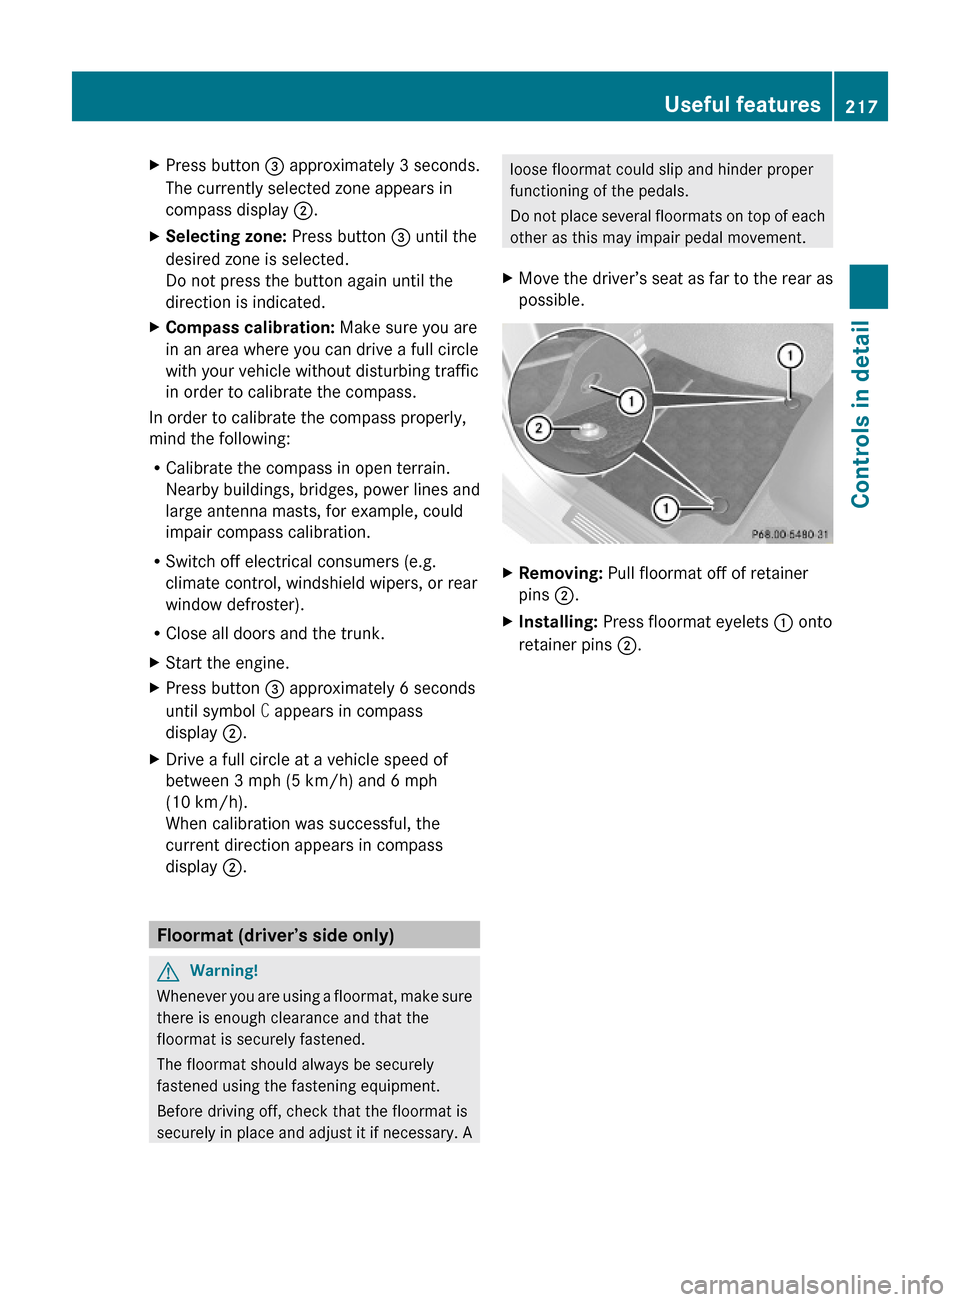
pins ;.
XInstalling: Press floormat eyelets : onto
retainer pins ;.
Useful features217Controls in detail212_AKB; 2; 41, en-USd2ureepe,Version: 2.11.8.12009-07-17T09:14:21+02:00 - Seite 217Z
Page 251 of 372
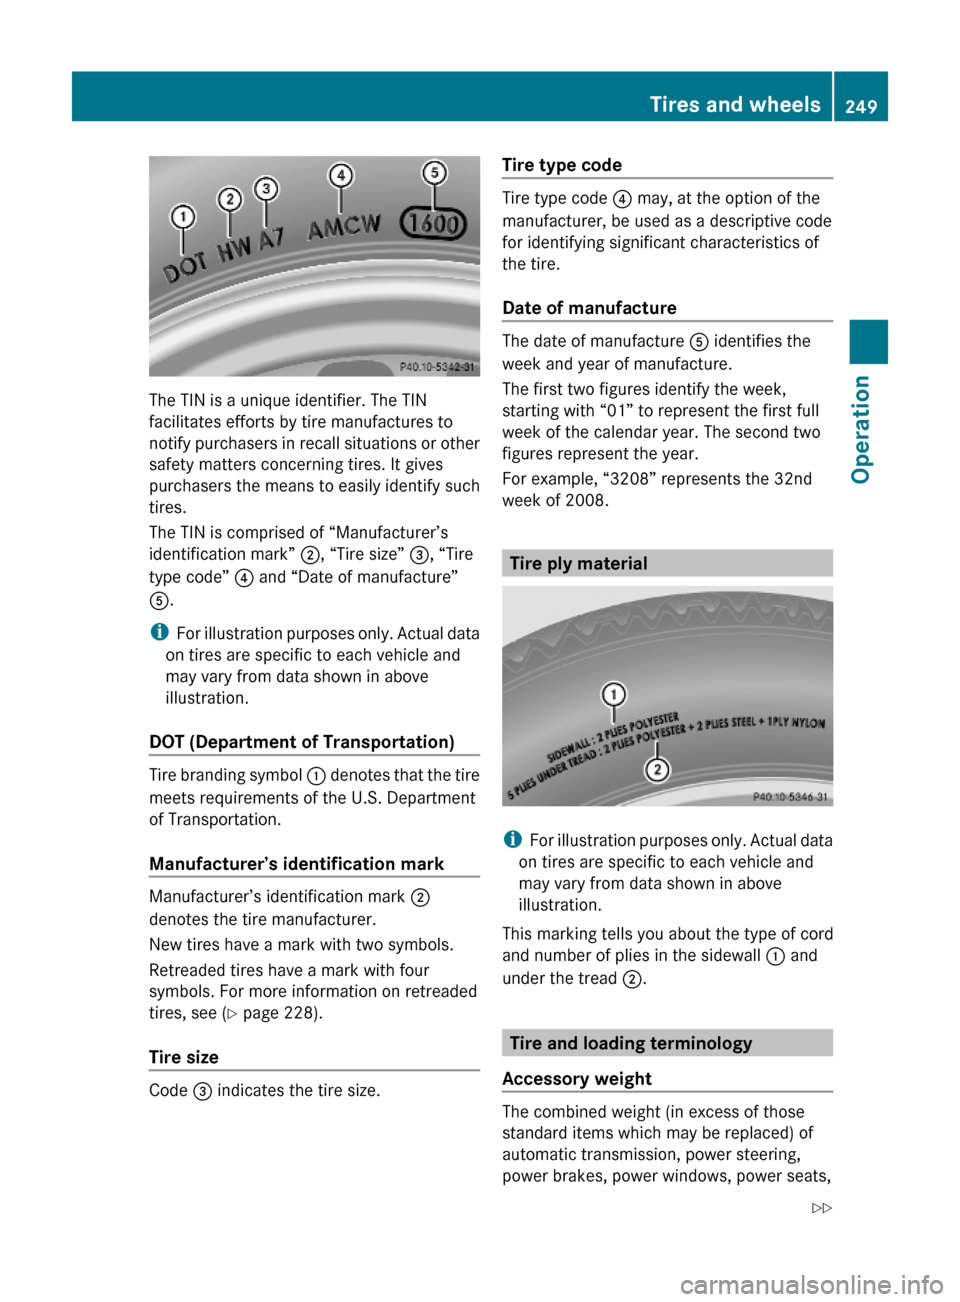
The TIN is a unique identifier. The TIN
facilitates efforts by tire manufactures to
notify purchasers in recall situations or other
safety matters concerning tires. It gives
purchasers the means to easily identify such
tires.
The TIN is comprised of “Manufacturer’s
identification mark” ;, “Tire size” =, “Tire
type code” ? and “Date of manufacture”
A.
iFor illustration purposes only. Actual data
on tires are specific to each vehicle and
may vary from data shown in above
illustration.
DOT (Department of Transportation)
Tire branding symbol : denotes that the tire
meets requirements of the U.S. Department
of Transportation.
Manufacturer’s identification mark
Manufacturer’s identification mark ;
denotes the tire manufacturer.
New tires have a mark with two symbols.
Retreaded tires have a mark with four
symbols. For more information on retreaded
tires, see (Y page 228).
Tire size
Code = indicates the tire size.
Tire type code
Tire type code ? may, at the option of the
manufacturer, be used as a descriptive code
for identifying significant characteristics of
the tire.
Date of manufacture
The date of manufacture A identifies the
week and year of manufacture.
The first two figures identify the week,
starting with “01” to represent the first full
week of the calendar year. The second two
figures represent the year.
For example, “3208” represents the 32nd
week of 2008.
Tire ply material
iFor illustration purposes only. Actual data
on tires are specific to each vehicle and
may vary from data shown in above
illustration.
This marking tells you about the type of cord
and number of plies in the sidewall : and
under the tread ;.
Tire and loading terminology
Accessory weight
The combined weight (in excess of those
standard items which may be replaced) of
automatic transmission, power steering,
power brakes, power windows, power seats,
Tires and wheels249Operation212_AKB; 2; 41, en-USd2ureepe,Version: 2.11.8.12009-07-17T09:14:21+02:00 - Seite 249Z
Page 255 of 372
control. Other settings may result in
damage to your vehicle.
! Some tire sizes do not leave adequate
clearance for snow chains. To help avoid
serious damage to your vehicle or tires,
make sure the use of snow chains is
permissible as specified in the “Technical
data” section of this Operator’s Manual.
Snow chains should only be driven on snow-
covered roads at speeds not to exceed
30 mph (50 km/h). Remove chains as soon
as possible when driving on roads without
snow.
Observe the following guidelines when using
snow chains:
R Use of snow chains is not permissible with
all wheel/tire combinations ( Y page 353).
R Use snow chains in pairs and on rear
wheels only. Follow the manufacturer’s
mounting instructions.
! If snow chains are mounted to the front
wheels, they may scrape against the body
or axle components. The tires or the vehicle
could be damaged as a result.
R Only use snow chains that are approved by
Mercedes-Benz. Any authorized Mercedes-
Benz Center will be glad to advise you on
this subject.
R Use of snow chains may be prohibited
depending on location. Always check local
and state laws before installing snow
chains.
R Do not use snow chains on the spare wheel.
i When driving with snow chains, you may
wish to switch off the ESC ( Y page 66)
before setting the vehicle in motion. This
will improve the vehicle’s traction.Winter driving instructionsGWarning!
If the vehicle becomes stuck in snow, make
sure snow is kept clear of the exhaust pipe
and from around the vehicle with the engine
running. Otherwise, deadly carbon monoxide
(CO) gases may enter vehicle interior
resulting in unconsciousness and death.
To assure sufficient fresh air ventilation, open
a window slightly on the side of the vehicle
not facing the wind.
GWarning!
The outside temperature indicator is not
designed to serve as an ice-warning device
and is therefore unsuitable for that purpose.
Indicated temperatures just above the
freezing point do not guarantee that the road
surface is free of ice. The road may still be icy,
especially in wooded areas or on bridges.
GWarning!
On slippery road surfaces, never downshift in
order to obtain braking action. This could
result in drive wheel slip and reduced vehicle
control. Your vehicle’s ABS will not prevent
this type of loss of control.
The most important rule for slippery or icy
roads is to drive sensibly and to avoid abrupt
acceleration, braking and steering
maneuvers. Do not use the cruise control or
DISTRONIC PLUS system under such
conditions.
When the vehicle is in danger of skidding, shift
the automatic transmission to neutral
position N. Try to keep the vehicle under
control by corrective steering action.
i For information on driving with snow
chains, see “Snow chains” ( Y page 252).
Road salts and chemicals can adversely
affect braking efficiency. Increased pedal
force may become necessary to produce the
normal brake effect.
Winter driving253Operation212_AKB; 2; 41, en-USd2ureepe,Version: 2.11.8.12009-07-17T09:14:21+02:00 - Seite 253Z
Page 260 of 372

Emission control
Certain systems of the engine serve to keep
the toxic components of the exhaust gases
within permissible limits required by law.
These systems will function properly only
when maintained strictly according to factory
specifications. Any adjustments on the
engine should, therefore, be carried out only
by qualified Mercedes-Benz Center
authorized technicians.
Engine adjustments should not be altered in
any way. Moreover, the specified service
procedures must be carried out regularly
according to Mercedes-Benz servicing
requirements. For details refer to the
Maintenance Booklet.
GWarning!
Inhalation of exhaust gas is hazardous to your
health. All exhaust gas contains carbon
monoxide (CO), and inhaling it can cause
unconsciousness and possible death.
Do not run the engine in confined areas (such
as a garage) which are not properly ventilated.
If you think that exhaust gas fumes are
entering the vehicle while driving, have the
cause determined and corrected
immediately. If you must drive under these
conditions, drive only with at least one
window fully open at all times.
Maintenance
Notes
The Maintenance System in your vehicle
tracks the distance driven and the time
elapsed since the last maintenance service.
It calculates other maintenance service work
required, and calls for the next maintenance
service accordingly.
We strongly recommend that you have your
vehicle serviced at an authorized Mercedes-
Benz Center. Have it serviced in accordance
with the Maintenance Booklet at the times
called for by the maintenance service
indicator.
iFailure to have the vehicle maintained in
accordance with the Maintenance Booklet
and maintenance service indicator at the
designated times/mileage will result in
vehicle damage not covered by the
Mercedes-Benz Limited Warranty.
Maintenance service indicator
message
Information on maintenance work and
maintenance intervals are specified in the
Maintenance Booklet. Contact an authorized
Mercedes-Benz Center, or visit
www.mbusa.com (USA only) for additional
information.
The maintenance service indicator message
will notify you when the next maintenance
service is required.
Starting approximately 1 month before the
next maintenance service is required, one of
the following messages will appear in the
multifunction display. The messages will
appear while you are driving or when you
switch on the ignition (example service A):
Next Service A in XXXX miles (km)
Next Service A in XX days
Service A Due
An additional number or a further letter in
combination with the maintenance type can
be indicated. This indicates that further
auxiliary maintenance work is required.
Contact an authorized Mercedes-Benz Center
for more information.
258MaintenanceOperation
212_AKB; 2; 41, en-USd2ureepe,Version: 2.11.8.12009-07-17T09:14:21+02:00 - Seite 258