2010 MERCEDES-BENZ E63AMG headlamp
[x] Cancel search: headlampPage 175 of 372

A camera at the top of the windshield
measures the infrared light and shows a
black-and-white image in the COMAND
system display. The image in the COMAND
system display corresponds to a road lit up
by high-beam headlamps.
GWarning!
The Night View Assist Plus is only an aid to
support you while driving and cannot
substitute your careful attention. Do not rely
on the display of the Night View Assist Plus;
instead, continue to look through the
windshield. You are always responsible for
safety and must drive in accordance with
traffic conditions. Otherwise, you could
endanger yourself and others.
The system may be impaired or unavailable
when
Rvisibility is poor, e.g. due to snow, rain, fog,
or heavy spray
Rthe camera area of the windshield is dirty,
fogged up or covered by a sticker for
example
Rdriving through curves or on inclines or
declines
GWarning!
The Night View Assist Plus cannot record
objects immediately in front of or next to the
vehicle. When maneuvering, continue to look
through the windshield. Make sure no
persons or animals are in the area in which
you are maneuvering. You could otherwise
injure them.
The Night View Assist Plus image in the
COMAND system display is not impaired by
the headlamps of approaching vehicles.
As a result, you can better follow the course
of the road and detect obstacles earlier on.
iInfrared light is invisible to the human eye
and thus does not blind. The Night View
Assist Plus can remain switched on
permanently even with oncoming traffic
present.
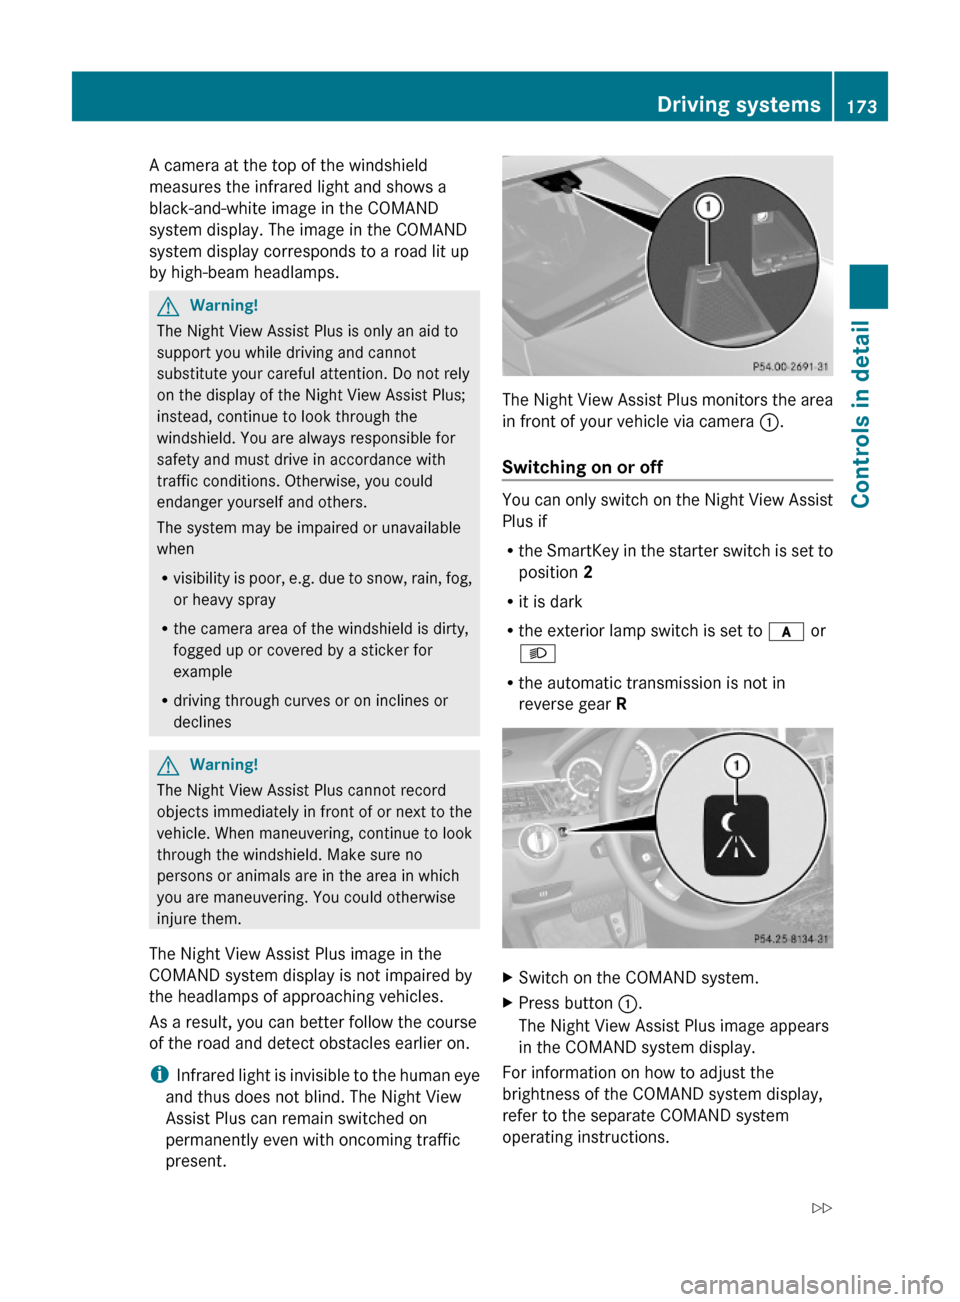
The Night View Assist Plus monitors the area
in front of your vehicle via camera :.
Switching on or off
You can only switch on the Night View Assist
Plus if
Rthe SmartKey in the starter switch is set to
position 2
Rit is dark
Rthe exterior lamp switch is set to c or
L
Rthe automatic transmission is not in
reverse gear R
XSwitch on the COMAND system.XPress button :.
The Night View Assist Plus image appears
in the COMAND system display.
For information on how to adjust the
brightness of the COMAND system display,
refer to the separate COMAND system
operating instructions.
Driving systems173Controls in detail212_AKB; 2; 41, en-USd2ureepe,Version: 2.11.8.12009-07-17T09:14:21+02:00 - Seite 173Z
Page 176 of 372

iThe infrared headlamps only come on
above a speed of approximately 6 mph
(10 km/h). Therefore, when you are at a
standstill, you do not have a complete view
and cannot check the function of the Night
View Assist Plus.
Pedestrian detection
The Night View Assist Plus detects
pedestrians by means of specific
characteristics, e.g. a human silhouette.
Pedestrian detection is activated when
Rthe Night View Assist Plus is switched on
Rthe vehicle speed is above approximately
6 mph (10 km/h)
Rdriving in darkness, e.g. on highways
without road lighting
:Night View Assist Plus image;Detected pedestrian=Frame?Symbol for active pedestrian detection
When pedestrian detection is active,
symbol ? appears in the Night View Assist
Plus image. Once a pedestrian is detected,
that pedestrian is highlighted by frame =.
When you have been made aware of a
pedestrian, assess the situation by looking
through the windshield. The actual distance
between your vehicle and objects or
pedestrians cannot be assessed properly via
a screen display.
Other objects apart from pedestrians may
also be highlighted.
GWarning!
The pedestrian detection may be impaired or
unavailable when
Rpedestrians are obstructed fully or in part
by other objects such as parking vehicles
Rthe silhouette in the Night View Assist Plus
image is displayed incomplete or
interrupted, e.g. by significant light
reflection
Ra pedestrian’s silhouette is not rich enough
in contrast compared to the background
Rpedestrians are not in erected position but,
for example, sit, crouch down, or lie
iAnimals cannot be detected.
Dirty or fogged-up windshield
The Night View Assist Plus image is
diminished when the windshield in front of the
camera is
Rdirty
Rfogged up on the outside
Rfogged up on the inside
GWarning!
Please do not forget that your primary
responsibility is to drive the vehicle. A driver’s
attention to the road must always be his/her
primary focus when driving. For your safety
and the safety of others, stop before trying to
remove window fogging or cleaning the
windshield in front of the Night View Assist
Plus camera.
Bear in mind that at a speed of just 30 mph
(approximately 50 km/h), your vehicle is
covering a distance of 44 feet
(approximately 14 m) every second.
XRemoving condensation: Check settings
of the climate control and change them, if
necessary (Y page 181).
XSwing the camera cover downward
(Y page 263).
174Driving systemsControls in detail
212_AKB; 2; 41, en-USd2ureepe,Version: 2.11.8.12009-07-17T09:14:21+02:00 - Seite 174
Page 224 of 372

The fuel filler flap is located on the right-hand
side of the vehicle towards the rear.
XTurn off the engine.
iLeaving the engine running and the fuel
filler cap open can cause the yellow engine
malfunction indicator lamp ; to
illuminate.
For more information, see also “Practical
hints” (Y page 310).
XRemove the SmartKey from the starter
switch.
KEYLESS-GO: Open the driver’s door. This
puts the starter switch in position 0, same
as with the SmartKey removed from the
starter switch. The driver’s door then can
be closed again.
XOpening: Press fuel filler flap : at the
point indicated by the arrow.
XTurn fuel filler cap ; counterclockwise.XTake off fuel filler cap ;.
! The fuel filler cap is tethered to the fuel
filler neck. Do not drop the cap. It could
damage the vehicle paint finish.
XPlace fuel filler cap ; in direction of arrow
into holder =.
XFully insert filler nozzle unit and refuel.XOnly fill your tank until the filler nozzle unit
cuts out – do not top off or overfill.
XClosing: Turn fuel filler cap ; clockwise
until it audibly engages.
iClose the fuel filler flap before locking the
vehicle. Otherwise the flap locking pin will
prevent closing the fuel filler flap.
XClose fuel filler flap :.
Low outside temperatures (diesel
engine)
! Do not fill the tank with gasoline. Do not
blend diesel fuel with gasoline or kerosene.
The fuel system and engine will otherwise
be damaged, which is not covered by the
Mercedes-Benz Limited Warranty.
To prevent malfunctions, diesel fuel with
improved cold flow characteristics is offered
in the winter months. Check with your fuel
retailer.
Check regularly and before a long trip
For information on quantities and
requirements of operating agents, see “Fuels,
coolants, lubricants, etc.” (Y page 359).
Check the following:
REngine oil level (Y page 224)
RTire inflation pressure (Y page 231)
RCoolant level (Y page 226)
RVehicle lighting (Y page 318)
RWasher system and headlamp cleaning
system (Y page 227)
RBrake fluid (Y page 227)
222At the gas stationOperation
212_AKB; 2; 41, en-USd2ureepe,Version: 2.11.8.12009-07-17T09:14:21+02:00 - Seite 222
Page 226 of 372

XPush handle ; under the hood upwards.XPull up on the hood and then release it.
The hood will be held open at shoulder
height by gas-filled struts automatically.
Closing
GWarning!
When closing the hood, use extreme caution
not to catch hands or fingers. Be careful that
you do not close the hood on anyone.
Make sure the hood is securely engaged
before driving off. Do not continue driving if
the hood can no longer engage after an
accident, for example. The hood could
otherwise come loose while the vehicle is in
motion and injure you and/or others.
XLet the hood drop from a height of
approximately 8 in (20 cm).
XCheck to make sure the hood is fully
closed.
If you can raise the hood at a point above
the headlamps, then it is not properly
closed. Open it again and let it drop with
somewhat greater force.
Radiator
iVehicles with diesel engine:
Do not cover the radiator, for example with
a winter front or bug cover. Otherwise the
readings of the on-board diagnostic system
may be inaccurate. Some of theses
readings are required by law and must be
accurate at all times.
Engine oil
The amount of oil your engine consumes will
depend on a number of factors, including
driving style. Increased oil consumption can
occur when the vehicle is new or the vehicle
is driven frequently at higher engine speeds.
Engine oil consumption checks should only
be made after the vehicle break-in period.
! Do not use any special lubricant additives,
as these may damage the drive assemblies.
Using special additives not approved by
Mercedes-Benz may cause damage not
covered by the Mercedes-Benz Limited
Warranty.
For further information contact an
authorized Mercedes-Benz Center.
Notes on checking engine oil level
When checking the oil level
Rthe vehicle must be parked on level ground
Rwith the engine at operating temperature,
the vehicle must have been stationary for
at least 5 minutes with the engine turned
off
Rwith the engine not at operating
temperature, the vehicle must have been
stationary for at least 30 minutes with the
engine turned off
Checking engine oil level
XOpen the hood (Y page 223).224Engine compartmentOperation
212_AKB; 2; 41, en-USd2ureepe,Version: 2.11.8.12009-07-17T09:14:21+02:00 - Seite 224
Page 229 of 372

The coolant level is correct if the level
Rfor cold coolant: reaches marking bar
= in coolant expansion tank ;
Rfor warm coolant: is approximately 0.6 in
(1.5 cm) higher
XAdd coolant as required.XScrew cap : back on and tighten it.
For more information on coolant, see the
“Technical data” section (Y page 361) and
(Y page 365).
Washer system and headlamp
cleaning system
GWarning!
Washer solvent/antifreeze is highly
flammable. Do not spill washer solvent/
antifreeze on hot engine parts, because it may
ignite and burn. You could be seriously
burned.
! Always use washer solvent/antifreeze
where temperatures may fall below
freezing point. Failure to do so could result
in damage to the washer system/fluid
reservoir.
! Only use washer fluid which is suitable for
plastic lenses. Improper washer fluid can
damage the plastic lenses of the
headlamps.
! Do not use distilled or deionized water in
the washer fluid reservoir. Otherwise, the
washer fluid level sensor could be
damaged.
Fluid for the washer system and the headlamp
cleaning system is supplied from the washer
fluid reservoir.
During all seasons, use MB Windshield
Washer Concentrate “MB SummerFit”. Mix it
with water or premixed washer solvent/
antifreeze depending on the ambient
temperature (Y page 367).
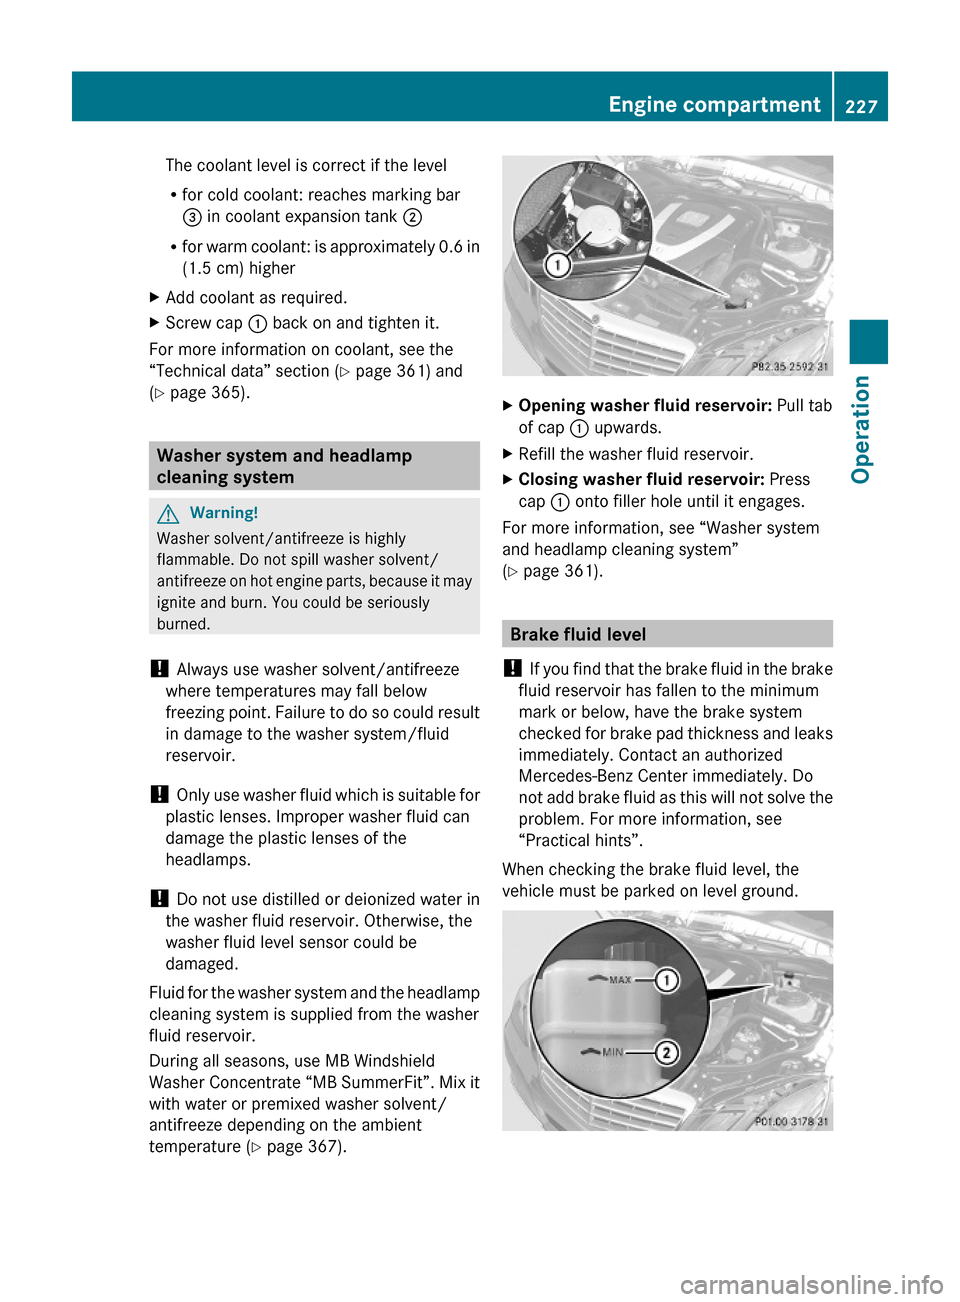
XOpening washer fluid reservoir: Pull tab
of cap : upwards.
XRefill the washer fluid reservoir.XClosing washer fluid reservoir: Press
cap : onto filler hole until it engages.
For more information, see “Washer system
and headlamp cleaning system”
(Y page 361).
Brake fluid level
! If you find that the brake fluid in the brake
fluid reservoir has fallen to the minimum
mark or below, have the brake system
checked for brake pad thickness and leaks
immediately. Contact an authorized
Mercedes-Benz Center immediately. Do
not add brake fluid as this will not solve the
problem. For more information, see
“Practical hints”.
When checking the brake fluid level, the
vehicle must be parked on level ground.
Engine compartment227Operation212_AKB; 2; 41, en-USd2ureepe,Version: 2.11.8.12009-07-17T09:14:21+02:00 - Seite 227Z
Page 264 of 372

XOnly use a mild vehicle wash detergent,
such as Mercedes-Benz approved Car
Shampoo.XThoroughly spray the vehicle with a
diffused jet of water.XDo not spray directly towards the
ventilation intake.XUse plenty of water and rinse the sponge
and chamois frequently.XRinse with clean water and dry with a
chamois thoroughly.
Do not allow cleaning agents to dry on the
finish.
Automatic car wash
GWarning!
The vehicle is braked when the HOLD function
or DISTRONIC PLUS is activated. Therefore,
deactivate the HOLD function or DISTRONIC
PLUS before the vehicle is washed in an
automatic car wash.
You can have your vehicle washed in an
automatic car wash from the start. Brushless
car washes are preferable.
XTo protect the filter system, activate the air
recirculation mode using button g on
the climate control panel.
! Do not clean your vehicle in an automatic
touchless car wash which uses caustic
spray. Caustic spray will damage the paint
or ornamental moldings.
If the vehicle is very dirty, prewash it before
running it through the automatic car wash.
! Make sure the combination switch is set
to wiper setting $. Otherwise, the rain
sensor could activate and cause the wipers
to move unintentionally. This may lead to
vehicle damage.
Due to the width of the vehicle, fold in
exterior rear view mirrors prior to running
the vehicle through an automatic car wash
to prevent damage to the mirrors.
XWhen taking the vehicle through an
automatic conveyor-type car wash:
Make sure the automatic transmission
remains in neutral position N. Observe
instructions, see “Remaining in neutral
position N” ( Y page 117).
When leaving the automatic car wash, make
sure the mirrors are folded out.
After running the vehicle through an
automatic car wash, wipe any wax off of the
windshield and the wiper blade inserts. This
will prevent smears and reduce wiping noise
which can be caused by residual wax on the
windshield.
Ornamental moldings
XFor regular cleaning and care of ornamental
moldings, use a damp cloth.
! Do not use chrome cleaner on ornamental
moldings. Although ornamental moldings
may have chrome appearance, they could
be made of anodized aluminum that will be
damaged when cleaned with chrome
cleaner. Instead, use a damp cloth to clean
those ornamental moldings.
For very dirty ornamental moldings of
which you are sure are chrome-plated, use
a chrome cleaner. If in doubt whether an
ornamental molding is chrome-plated,
contact an authorized Mercedes-Benz
Center.
Headlamps, brake lamps, tail lamps,
side markers, turn signal lenses
XUse a mild vehicle wash detergent, such as
Mercedes-Benz approved Car Shampoo,
with plenty of water.
! Only use window cleaning solutions that
are suitable for plastic lamp lenses.
Window cleaning solutions which are not
suitable may damage the plastic lamp
lenses of the headlamps. Therefore, do not
use abrasives, solvents or cleaners that
contain solvents.
262Vehicle careOperation
212_AKB; 2; 41, en-USd2ureepe,Version: 2.11.8.12009-07-17T09:14:21+02:00 - Seite 262
Page 301 of 372

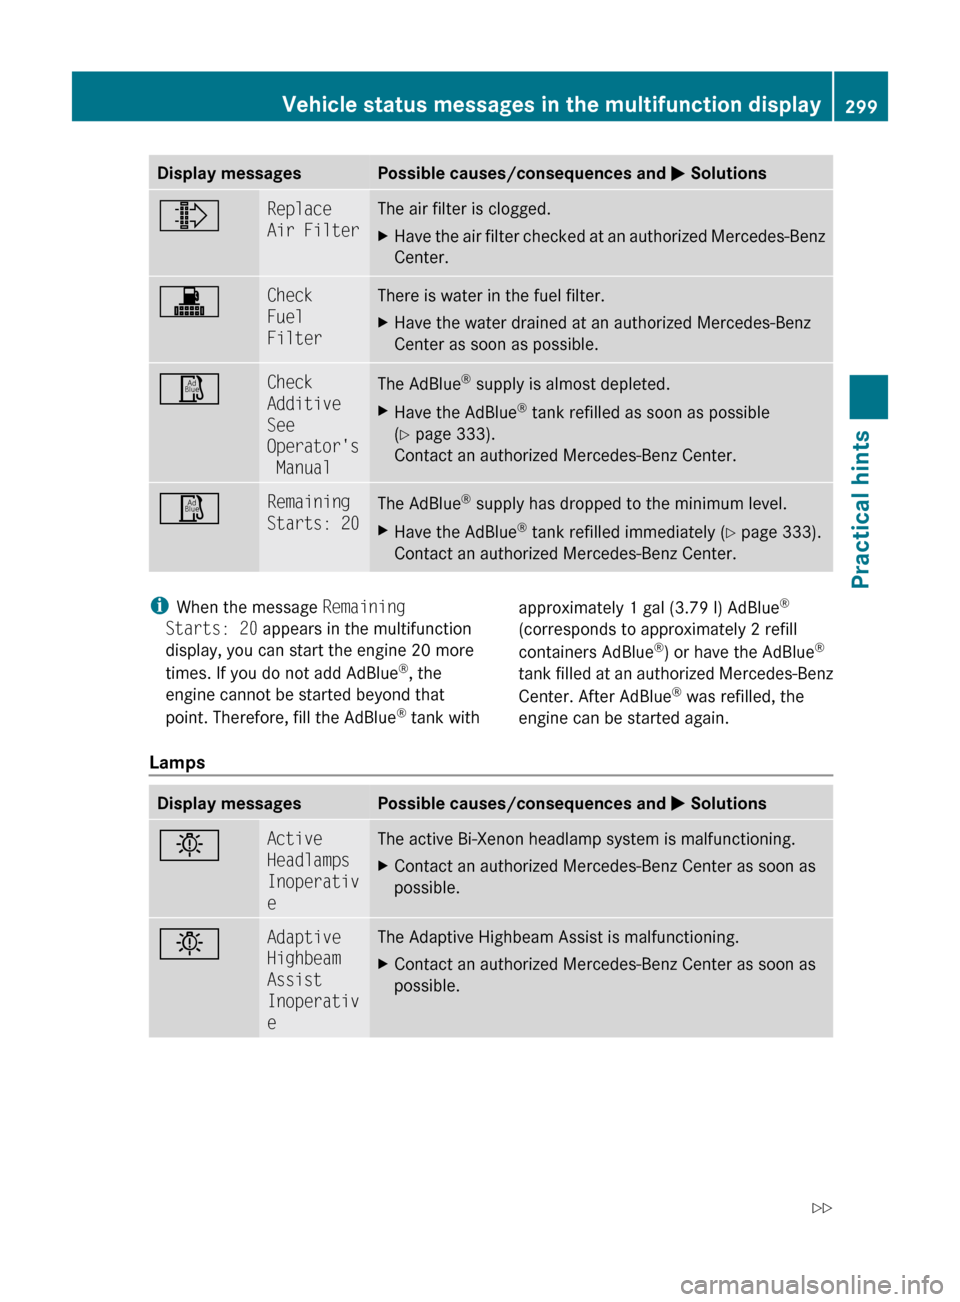
Display messagesPossible causes/consequences and M Solutions¸Replace
Air FilterThe air filter is clogged.XHave the air filter checked at an authorized Mercedes-Benz
Center.!Check
Fuel
FilterThere is water in the fuel filter.XHave the water drained at an authorized Mercedes-Benz
Center as soon as possible.ØCheck
Additive
See
Operator's
ManualThe AdBlue ®
supply is almost depleted.XHave the AdBlue ®
tank refilled as soon as possible
( Y page 333).
Contact an authorized Mercedes-Benz Center.ØRemaining
Starts: 20The AdBlue ®
supply has dropped to the minimum level.XHave the AdBlue ®
tank refilled immediately ( Y page 333).
Contact an authorized Mercedes-Benz Center.i When the message Remaining
Starts: 20 appears in the multifunction
display, you can start the engine 20 more
times. If you do not add AdBlue ®
, the
engine cannot be started beyond that
point. Therefore, fill the AdBlue ®
tank withapproximately 1 gal (3.79 l) AdBlue ®
(corresponds to approximately 2 refill
containers AdBlue ®
) or have the AdBlue ®
tank filled at an authorized Mercedes-Benz
Center. After AdBlue ®
was refilled, the
engine can be started again.
Lamps
Display messagesPossible causes/consequences and M SolutionsbActive
Headlamps
Inoperativ
eThe active Bi-Xenon headlamp system is malfunctioning.XContact an authorized Mercedes-Benz Center as soon as
possible.bAdaptive
Highbeam
Assist
Inoperativ
eThe Adaptive Highbeam Assist is malfunctioning.XContact an authorized Mercedes-Benz Center as soon as
possible.Vehicle status messages in the multifunction display299Practical hints212_AKB; 2; 41, en-USd2ureepe,Version: 2.11.8.12009-07-17T09:14:21+02:00 - Seite 299Z
Page 303 of 372

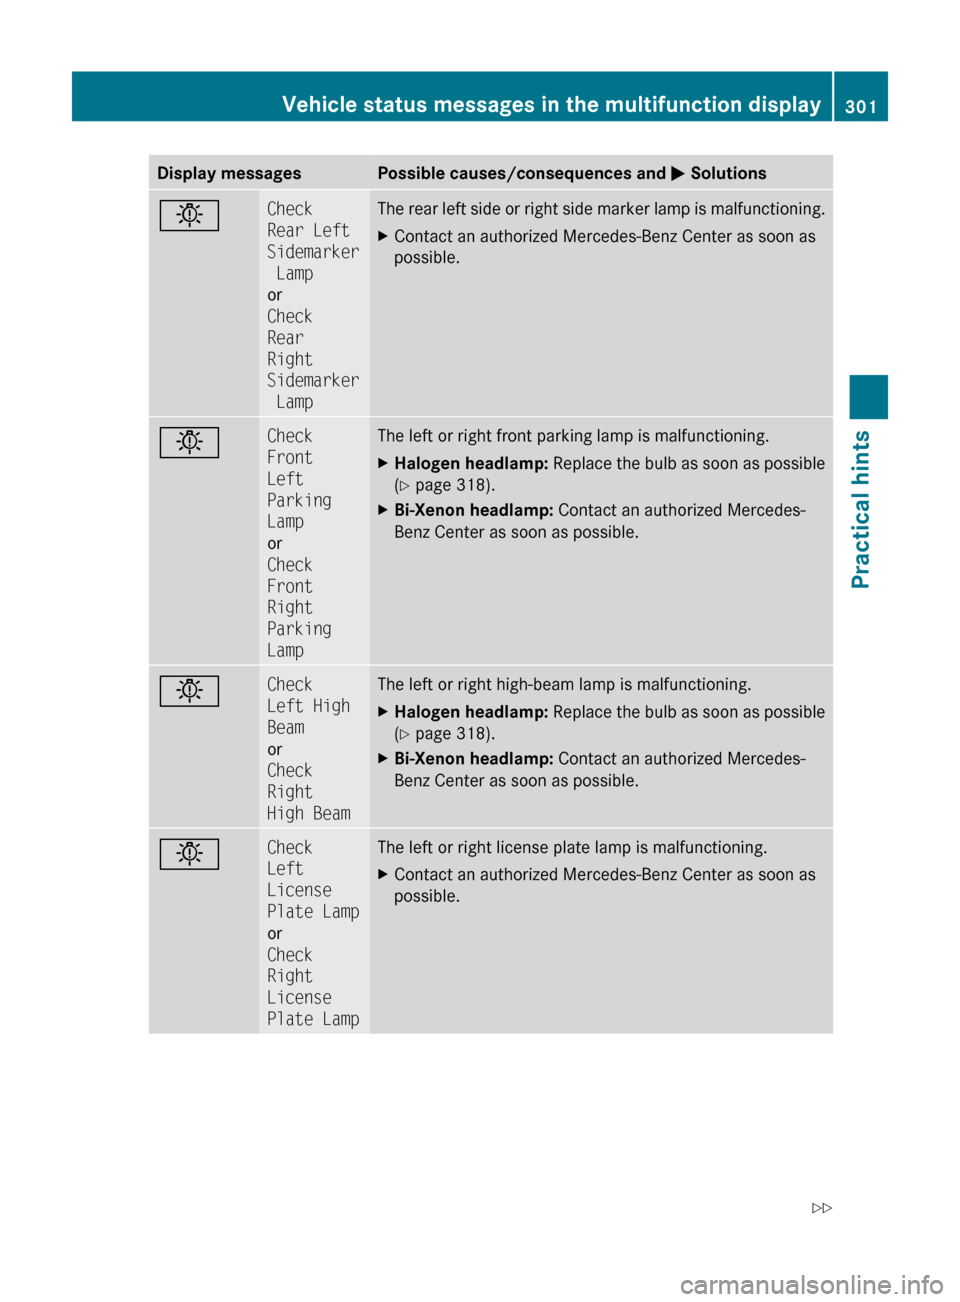
Display messagesPossible causes/consequences and M SolutionsbCheck
Rear Left
Sidemarker
Lamp
or
Check
Rear
Right
Sidemarker
LampThe rear left side or right side marker lamp is malfunctioning.XContact an authorized Mercedes-Benz Center as soon as
possible.bCheck
Front
Left
Parking
Lamp
or
Check
Front
Right
Parking
LampThe left or right front parking lamp is malfunctioning.XHalogen headlamp: Replace the bulb as soon as possible
( Y page 318).XBi-Xenon headlamp: Contact an authorized Mercedes-
Benz Center as soon as possible.bCheck
Left High
Beam
or
Check
Right
High BeamThe left or right high-beam lamp is malfunctioning.XHalogen headlamp: Replace the bulb as soon as possible
( Y page 318).XBi-Xenon headlamp: Contact an authorized Mercedes-
Benz Center as soon as possible.bCheck
Left
License
Plate Lamp
or
Check
Right
License
Plate LampThe left or right license plate lamp is malfunctioning.XContact an authorized Mercedes-Benz Center as soon as
possible.Vehicle status messages in the multifunction display301Practical hints212_AKB; 2; 41, en-USd2ureepe,Version: 2.11.8.12009-07-17T09:14:21+02:00 - Seite 301Z