2010 MERCEDES-BENZ E63AMG snow chains
[x] Cancel search: snow chainsPage 166 of 372

iThese height adjustments are so small
that you may not notice any change.
Adjusting vehicle level manually
GWarning!
To help avoid personal injury, keep hands and
feet away from wheel housing area, and stay
away from under the vehicle when lowering
the vehicle chassis.
Select the normal level for driving on normal
roads. Select the raised level for driving on
rough roads or with snow chains. Select the
raised level only when required by current
driving conditions. Otherwise, the handling
may be impaired and the fuel consumption
may increase.
The selected vehicle level setting remains
stored in memory even if the SmartKey is
removed from the starter switch.
Selecting raised level
XStart the engine.
When indicator lamp ; is off:
XBriefly press vehicle level control
switch :.
Indicator lamp ; comes on. The vehicle
adjusts from normal level to raised level.
The message: Vehicle Rising appears in
the multifunction display when adjusting
from normal level to raised level. The
message disappears when the vehicle is
raised. Indicator lamp ; is then lit.
When the vehicle is in raised level, pressing
vehicle level control switch : will return
the vehicle to normal level.
The vehicle is lowered to the normal level
automatically when
Rthe vehicle speed is above 75 mph
(120 km/h)
Rthe vehicle speed stays between 50 mph
(80 km/h) and 75 mph (120 km/h) for
approximately 3 minutes.
Indicator lamp ; in
vehicle level control switch : goes out.
If you do not drive in this speed range, the
selected vehicle level setting remains stored
in memory even if the SmartKey is removed
from the starter switch.
Selecting normal level
XStart the engine.
When indicator lamp ; is on:
XBriefly press vehicle level control
switch :.
Indicator lamp ; goes out. The vehicle
adjusts from raised level to normal level.
AMG adaptive sport suspension
system (E 63 AMG)
Rear-axle level control
The rear-axle level control adjusts the vehicle
level for the rear axle. The rear-axle level
control is beneficial because it keeps the
vehicle level at the rear axle constant,
independent of the load. Your vehicle adjusts
its ride height automatically to increase
vehicle safety and to reduce fuel
consumption.
Damping system
The damping system is controlled
electronically and operates continuously. It
adjusts the damping characteristics to the
current operating and driving conditions. The
164Driving systemsControls in detail
212_AKB; 2; 41, en-USd2ureepe,Version: 2.11.8.12009-07-17T09:14:21+02:00 - Seite 164
Page 171 of 372
GWarning!
The Parking Guidance is only an aid and may
display parking spaces that are not suitable
for parking such as
R no-parking zones
R parking space with unsuitable road/ground
surface
R driveways
R entrances/exits
The Parking Guidance scans for and measures
potential parking spaces when driving past.
Subsequent changes to the parking space are
not taken into account. This may be the case
if the position of the vehicle parked in front or
behind the space changes or obstacles in the
parking space are moved.
The Parking Guidance does not relieve you of
the responsibility to pay attention. If you only
rely on the Parking Guidance, you may cause
an accident and injure yourself and others.
You are always responsible for safety and
must continue to pay attention to your
immediate surroundings when parking and
maneuvering.
GWarning!
The system cannot detect objects located
above the area that the sensors scan. These
objects, e.g. protruding load, overhang, or
truck tail lifts, will be ignored when computing
the parking procedure. The Parking Guidance
might therefore provide untimely steering
instructions. This could cause a collision.
Thus, do not use the Parking Guidance in such
situations.
GWarning!
Make sure no persons or animals are in the
area in which you are maneuvering. You could
otherwise injure them.
! Special attention must be paid to objects
with smooth surfaces or low silhouettes
(e.g. trailer couplings, painted posts,
elevated crossbars or road curbs). Such
objects may not be detected by the system
and can damage the vehicle.
Use the Parking Guidance for parking spaces
that are
R parallel to the direction of travel
R located on straight streets, i.e. not in
curves
R on the same level as the street, i.e. not on
sidewalks, for example.
Parking instructions:
R On narrow streets, drive by the parking
space as close as possible.
R Parking spaces that are dirty, overgrown or
located in front of trailers may not be
detected correctly.
R Snowfall or heavy rain may cause imprecise
measurement of the parking space.
R Also observe the Parktronic system
warning indicator ( Y page 167) while the
Parking Guidance is active.
R You may not use the Parking Guidance
when transporting cargo that protrudes the
vehicle.
R Do not use the Parking Guidance when
driving with snow chains or when a spare
wheel is mounted.
R How well your vehicle will be parked after
completion of the Parking Guidance
depends on the position and shape of the
vehicles parked in front of and behind the
parking space as well as the conditions of
the immediate surroundings. In certain
cases, the Parking Guidance may guide you
too far into the parking space or not far
enough. If this is the case, cancel the
parking procedure with the Parking
Guidance and correct the vehicle position
yourself.
Detecting a parking space
The Parking Guidance is active when driving
forward. The system operates at a vehicle
Driving systems169Controls in detail212_AKB; 2; 41, en-USd2ureepe,Version: 2.11.8.12009-07-17T09:14:21+02:00 - Seite 169Z
Page 234 of 372
Tire and Loading Information placard on the
driver’s door B-pillar ( Y page 237). If
necessary, add air to achieve the
recommended tire inflation pressure.XIf you have overfilled the tire, release tire
inflation pressure by pushing the metal
stem of the valve with e.g. a tip of a pen.
Then recheck the tire inflation pressure
with the tire gauge.XInstall the valve cap.XRepeat this procedure for each tire.
Tire pressure loss warning system
(Canada only)
While the vehicle is being driven, the tire
pressure loss warning system monitors the
set tire inflation pressures by evaluating each
wheel’s rotational speed. This allows the
system to detect a significant loss of pressure
in a tire. If a wheel’s rotational speed changes
due to falling tire inflation pressure, you will
see a corresponding warning message in the
multifunction display.
The tire pressure loss warning system may
function in a restricted manner or with a delay
R when snow chains are mounted to the
vehicle
R in the presence of ice and snow
R when you are driving on a loose surface
(e.g. sand or gravel)
R when you are driving in a very sporty
manner (involving rapid acceleration or
high speeds in curves)
GWarning!
When the multifunction display shows the
message Check Tire Pressure Soon , one
or more of your tires are significantly
underinflated. You should stop and check
your tires as soon as possible, and inflate
them to the proper tire inflation pressure as
indicated on the vehicle’s Tire and Loading
Information placard or, if available, on the tire
inflation pressure label.
Driving on a significantly underinflated tire
causes the tire to overheat and can lead to
tire failure. Underinflation also reduces fuel
efficiency and tire tread life, and may affect
the vehicle’s handling and stopping ability.
Each tire, including the spare, should be
checked at least once a month when cold.
Inflate the tires to the recommended tire
inflation pressure as specified on
R the Tire and Loading Information placard on
the driver’s door B-pillar
or
R the tire inflation pressure label located on
the inside of the fuel filler flap
i The recommended tire inflation pressures
for your vehicle can be found on
R the Tire and Loading Information placard
located on the driver’s door B-pillar
( Y page 237)
R the tire inflation pressure label on the
inside of the fuel filler flap
The tire inflation pressures are not listed in
the Operator’s Manual.GWarning!
The tire pressure loss warning system does
not provide a warning for wrongly selected tire
inflation pressures. Always adjust tire
inflation pressure according to the Tire and
Loading Information placard on the driver’s
door B-pillar or on the tire inflation pressure
label located on the inside of the fuel filler flap.
The tire pressure loss warning system does
not replace regular checks of the tire inflation
pressures since a gradual pressure loss in
more than one tire cannot be detected by the
tire pressure loss warning system.
The tire pressure loss warning system is not
able to issue a warning due to a sudden
dramatic loss of tire inflation pressure (e.g.
tire blowout caused by a foreign object). In
this case bring the vehicle to a halt by carefully
232Tires and wheelsOperation
212_AKB; 2; 41, en-USd2ureepe,Version: 2.11.8.12009-07-17T09:14:21+02:00 - Seite 232
Page 254 of 372
Treadwear indicators
Narrow bands, sometimes called “wear bars”
that show across the tread of a tire when only
1 / 16 in (1.6 mm) of tread remains.
Uniform Tire Quality Grading Standards
A tire information system that provides
consumers with ratings for a tire’s traction,
temperature and treadwear. Ratings are
determined by tire manufacturers using U.S.
government testing procedures. The ratings
are molded into the sidewall of the tire.
Vehicle maximum load on the tire
Load on an individual tire that is determined
by distributing to each axle its share of the
maximum loaded vehicle weight and dividing
it by two.
Winter driving
General information
Have your vehicle winterized at an authorized
Mercedes-Benz Center.
i Vehicles with diesel engine:
Do not cover the radiator, for example with
a winter front. Otherwise the readings of
the on-board diagnostic system may be
inaccurate. Some of theses readings are
required by law and must be accurate at all
times.
Winter tires
GWarning!
Winter tires with a tread depth of less than
1 / 6 in (4 mm) must be replaced. They are no
longer suitable for winter operation.
GWarning!
If you use your spare wheel when winter tires
are fitted on the other wheels, be aware that
the difference in tire characteristics may very
well impair turning stability and that overall
driving stability may be reduced. Adapt your
driving style accordingly.
Have the spare wheel replaced by a regular
road wheel with a winter tire at the nearest
authorized Mercedes-Benz Center.
Always use winter tires at temperatures
below 45‡ (7†) and whenever wintry road
conditions prevail. Not all M+S rated tires
provide special winter performance. Make
sure the tires you use show the mountain/
snowflake imarking on the tire sidewall.
These tires meet specific snow traction
performance requirements of the Rubber
Manufacturers Association (RMA) and the
Rubber Association of Canada (RAC) and
have been designed specifically for use in
snow conditions. Use of winter tires is the
only way to achieve the maximum
effectiveness of your vehicle’s driving safety
systems such as the ABS and the ESC in
winter operation.
For safe handling, make sure all mounted
winter tires are of the same make and have
the same tread design.
For information on winter tires for your
vehicle model, see the “Technical data”
section ( Y page 353).
Always observe the speed rating of the winter
tires installed on your vehicle.
After installing winter tires:XCheck the tire inflation pressure and adjust
it if necessary ( Y page 231).XRestart the tire pressure loss warning
system ( Y page 232) or the Advanced Tire
Pressure Monitoring System (Y page 233).
Snow chains
! Vehicles with AIRMAITC:
When driving with snow chains, always
select the raised level of the vehicle level
252Winter drivingOperation
212_AKB; 2; 41, en-USd2ureepe,Version: 2.11.8.12009-07-17T09:14:21+02:00 - Seite 252
Page 255 of 372
control. Other settings may result in
damage to your vehicle.
! Some tire sizes do not leave adequate
clearance for snow chains. To help avoid
serious damage to your vehicle or tires,
make sure the use of snow chains is
permissible as specified in the “Technical
data” section of this Operator’s Manual.
Snow chains should only be driven on snow-
covered roads at speeds not to exceed
30 mph (50 km/h). Remove chains as soon
as possible when driving on roads without
snow.
Observe the following guidelines when using
snow chains:
R Use of snow chains is not permissible with
all wheel/tire combinations ( Y page 353).
R Use snow chains in pairs and on rear
wheels only. Follow the manufacturer’s
mounting instructions.
! If snow chains are mounted to the front
wheels, they may scrape against the body
or axle components. The tires or the vehicle
could be damaged as a result.
R Only use snow chains that are approved by
Mercedes-Benz. Any authorized Mercedes-
Benz Center will be glad to advise you on
this subject.
R Use of snow chains may be prohibited
depending on location. Always check local
and state laws before installing snow
chains.
R Do not use snow chains on the spare wheel.
i When driving with snow chains, you may
wish to switch off the ESC ( Y page 66)
before setting the vehicle in motion. This
will improve the vehicle’s traction.Winter driving instructionsGWarning!
If the vehicle becomes stuck in snow, make
sure snow is kept clear of the exhaust pipe
and from around the vehicle with the engine
running. Otherwise, deadly carbon monoxide
(CO) gases may enter vehicle interior
resulting in unconsciousness and death.
To assure sufficient fresh air ventilation, open
a window slightly on the side of the vehicle
not facing the wind.
GWarning!
The outside temperature indicator is not
designed to serve as an ice-warning device
and is therefore unsuitable for that purpose.
Indicated temperatures just above the
freezing point do not guarantee that the road
surface is free of ice. The road may still be icy,
especially in wooded areas or on bridges.
GWarning!
On slippery road surfaces, never downshift in
order to obtain braking action. This could
result in drive wheel slip and reduced vehicle
control. Your vehicle’s ABS will not prevent
this type of loss of control.
The most important rule for slippery or icy
roads is to drive sensibly and to avoid abrupt
acceleration, braking and steering
maneuvers. Do not use the cruise control or
DISTRONIC PLUS system under such
conditions.
When the vehicle is in danger of skidding, shift
the automatic transmission to neutral
position N. Try to keep the vehicle under
control by corrective steering action.
i For information on driving with snow
chains, see “Snow chains” ( Y page 252).
Road salts and chemicals can adversely
affect braking efficiency. Increased pedal
force may become necessary to produce the
normal brake effect.
Winter driving253Operation212_AKB; 2; 41, en-USd2ureepe,Version: 2.11.8.12009-07-17T09:14:21+02:00 - Seite 253Z
Page 358 of 372
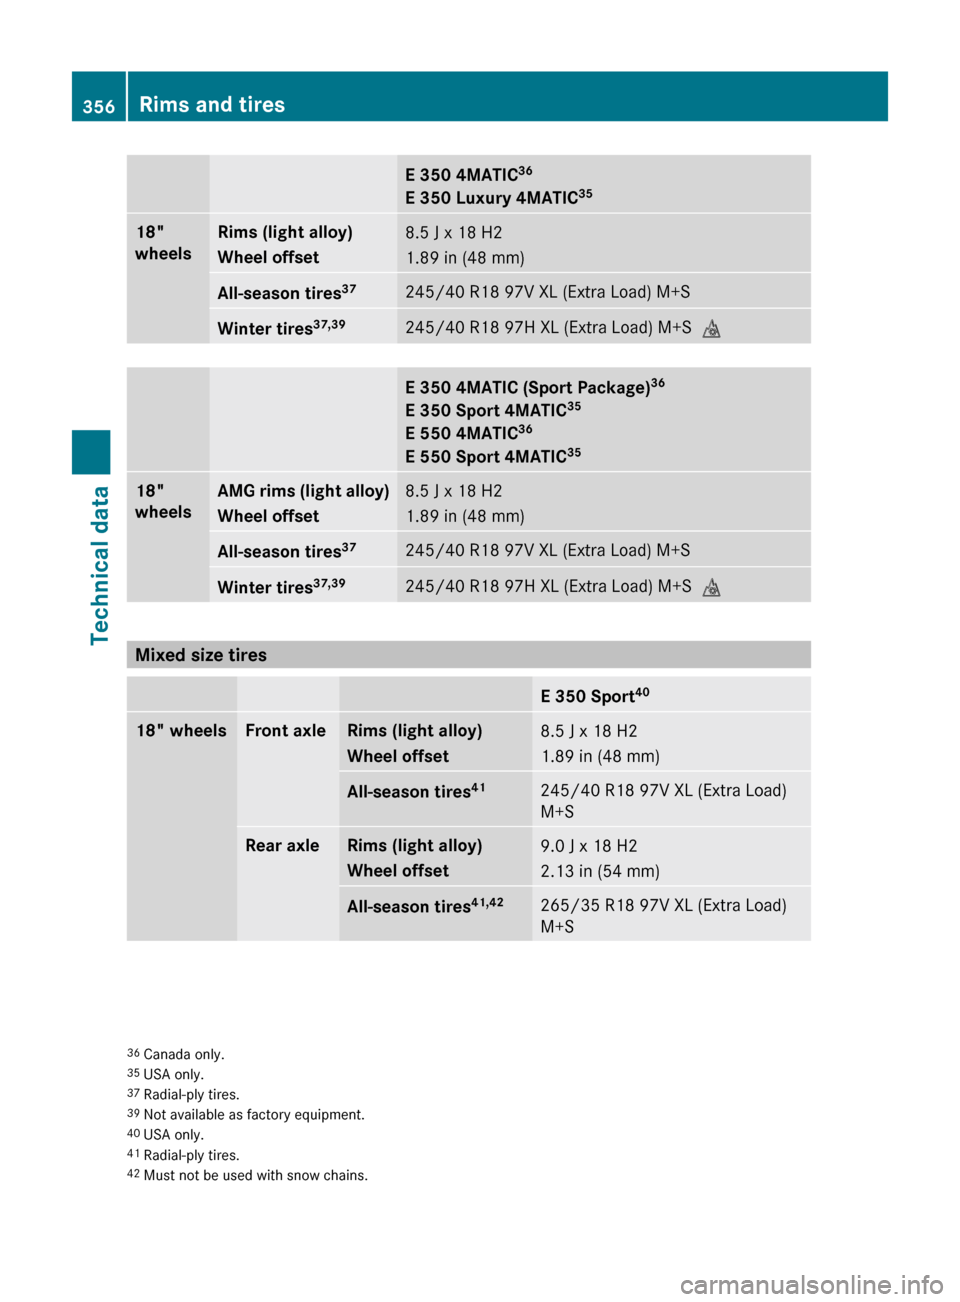
E 350 4MATIC36
E 350 Luxury 4MATIC 3518"
wheelsRims (light alloy)
Wheel offset8.5 J x 18 H2
1.89 in (48 mm)All-season tires 37245/40 R18 97V XL (Extra Load) M+SWinter tires37,39245/40 R18 97H XL (Extra Load) M+S
iE 350 4MATIC (Sport Package)36
E 350 Sport 4MATIC 35
E 550 4MATIC 36
E 550 Sport 4MATIC 3518"
wheelsAMG rims (light alloy)
Wheel offset8.5 J x 18 H2
1.89 in (48 mm)All-season tires 37245/40 R18 97V XL (Extra Load) M+SWinter tires37,39245/40 R18 97H XL (Extra Load) M+S
i
Mixed size tires
E 350 Sport4018" wheelsFront axleRims (light alloy)
Wheel offset8.5 J x 18 H2
1.89 in (48 mm)All-season tires 41245/40 R18 97V XL (Extra Load)
M+SRear axleRims (light alloy)
Wheel offset9.0 J x 18 H2
2.13 in (54 mm)All-season tires 41,42265/35 R18 97V XL (Extra Load)
M+S36 Canada only.
35 USA only.
37 Radial-ply tires.
39 Not available as factory equipment.
40 USA only.
41 Radial-ply tires.
42 Must not be used with snow chains.356Rims and tiresTechnical data
212_AKB; 2; 41, en-USd2ureepe,Version: 2.11.8.12009-07-17T09:14:21+02:00 - Seite 356
Page 359 of 372
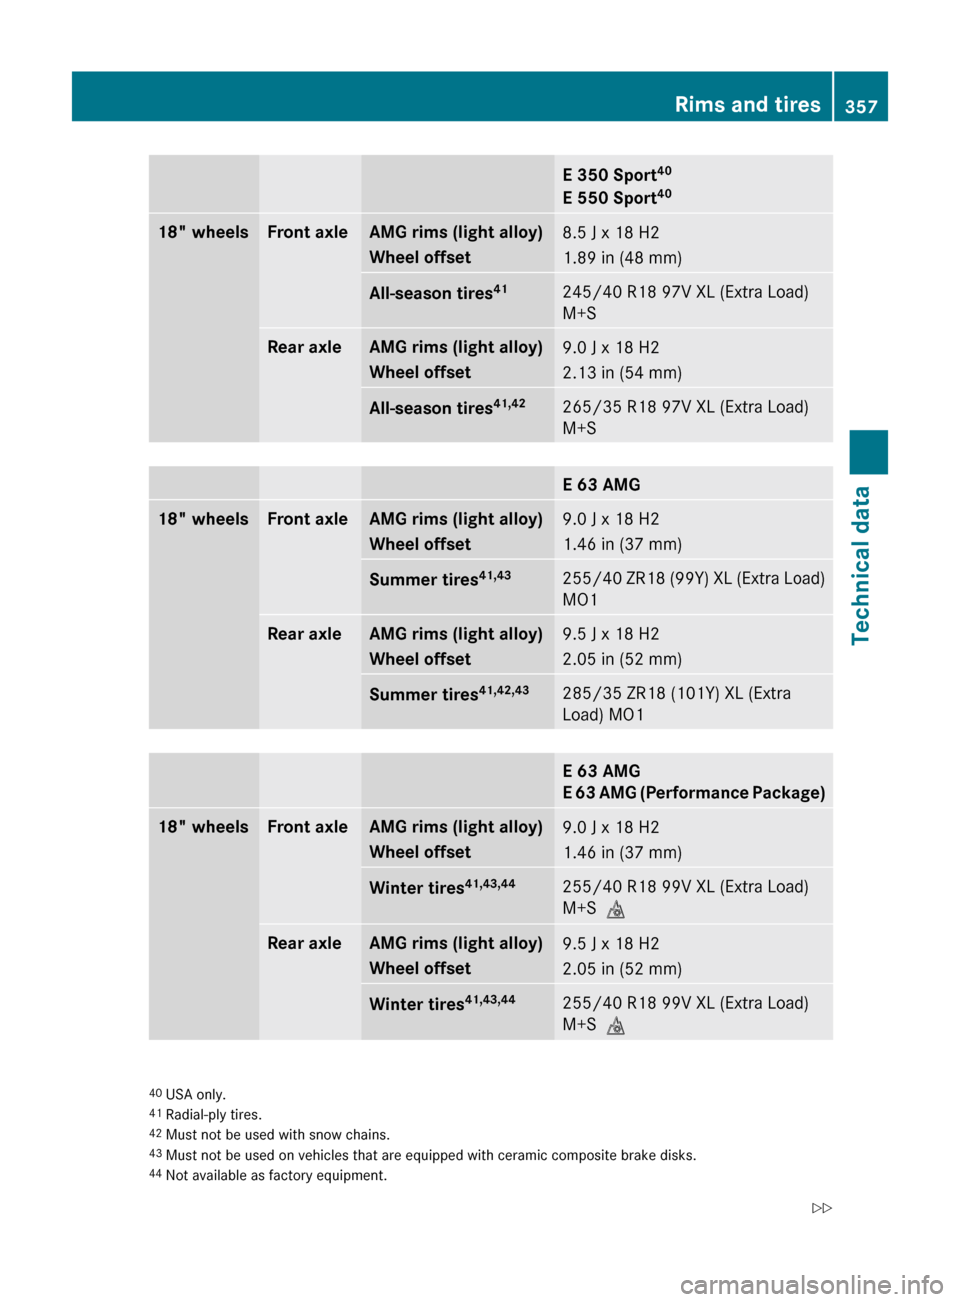
E 350 Sport40
E 550 Sport 4018" wheelsFront axleAMG rims (light alloy)
Wheel offset8.5 J x 18 H2
1.89 in (48 mm)All-season tires 41245/40 R18 97V XL (Extra Load)
M+SRear axleAMG rims (light alloy)
Wheel offset9.0 J x 18 H2
2.13 in (54 mm)All-season tires 41,42265/35 R18 97V XL (Extra Load)
M+SE 63 AMG18" wheelsFront axleAMG rims (light alloy)
Wheel offset9.0 J x 18 H2
1.46 in (37 mm)Summer tires 41,43255/40 ZR18 (99Y) XL (Extra Load)
MO1Rear axleAMG rims (light alloy)
Wheel offset9.5 J x 18 H2
2.05 in (52 mm)Summer tires 41,42,43285/35 ZR18 (101Y) XL (Extra
Load) MO1E 63 AMG
E 63 AMG (Performance Package)18" wheelsFront axleAMG rims (light alloy)
Wheel offset9.0 J x 18 H2
1.46 in (37 mm)Winter tires 41,43,44255/40 R18 99V XL (Extra Load)
M+S iRear axleAMG rims (light alloy)
Wheel offset9.5 J x 18 H2
2.05 in (52 mm)Winter tires 41,43,44255/40 R18 99V XL (Extra Load)
M+S i40
USA only.
41 Radial-ply tires.
42 Must not be used with snow chains.
43 Must not be used on vehicles that are equipped with ceramic composite brake disks.
44 Not available as factory equipment.Rims and tires357Technical data212_AKB; 2; 41, en-USd2ureepe,Version: 2.11.8.12009-07-17T09:14:21+02:00 - Seite 357Z
Page 360 of 372
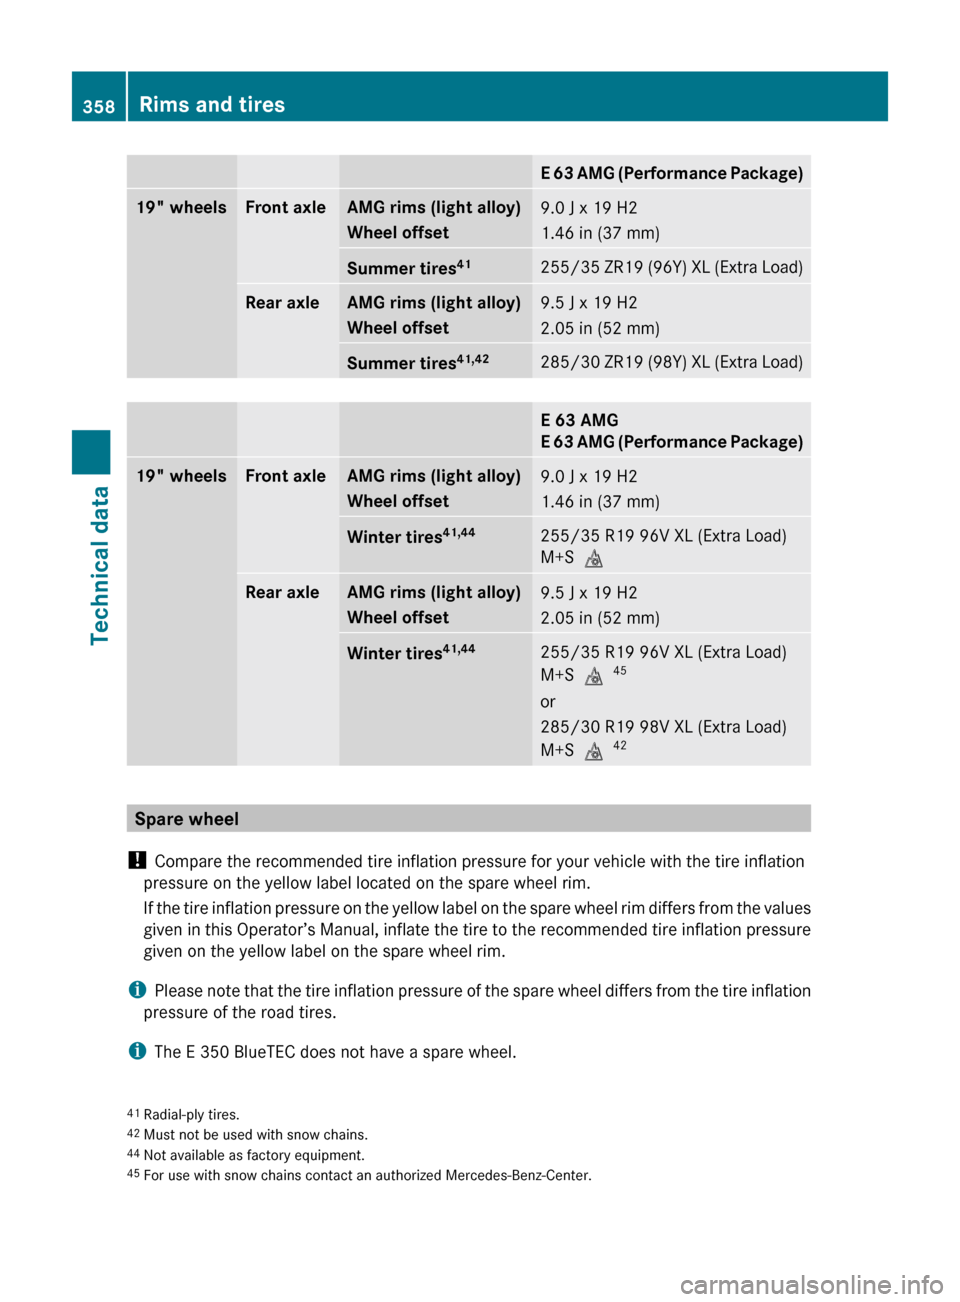
E 63 AMG (Performance Package)19" wheelsFront axleAMG rims (light alloy)
Wheel offset9.0 J x 19 H2
1.46 in (37 mm)Summer tires 41255/35 ZR19 (96Y) XL (Extra Load)Rear axleAMG rims (light alloy)
Wheel offset9.5 J x 19 H2
2.05 in (52 mm)Summer tires 41,42285/30 ZR19 (98Y) XL (Extra Load)E 63 AMG
E 63 AMG (Performance Package)19" wheelsFront axleAMG rims (light alloy)
Wheel offset9.0 J x 19 H2
1.46 in (37 mm)Winter tires 41,44255/35 R19 96V XL (Extra Load)
M+S iRear axleAMG rims (light alloy)
Wheel offset9.5 J x 19 H2
2.05 in (52 mm)Winter tires 41,44255/35 R19 96V XL (Extra Load)
M+S i 45
or
285/30 R19 98V XL (Extra Load)
M+S i 42
Spare wheel
! Compare the recommended tire inflation pressure for your vehicle with the tire inflation
pressure on the yellow label located on the spare wheel rim.
If the tire inflation pressure on the yellow label on the spare wheel rim differs from the values
given in this Operator’s Manual, inflate the tire to the recommended tire inflation pressure
given on the yellow label on the spare wheel rim.
i Please note that the tire inflation pressure of the spare wheel differs from the tire inflation
pressure of the road tires.
i The E 350 BlueTEC does not have a spare wheel.
41
Radial-ply tires.
42 Must not be used with snow chains.
44 Not available as factory equipment.
45 For use with snow chains contact an authorized Mercedes-Benz-Center.358Rims and tiresTechnical data
212_AKB; 2; 41, en-USd2ureepe,Version: 2.11.8.12009-07-17T09:14:21+02:00 - Seite 358