2010 MERCEDES-BENZ E550 garage
[x] Cancel search: garagePage 11 of 372

ESC (Electronic Stability Control) ...... 65
ETS/4-ETS ....................................... 65
Messages in the multifunction
display ........................... 288, 289, 290
Warning lamp ................................. 309
ETD (Emergency Tensioning
Device) ................................................. 52
Safety guidelines ............................. 39
ETS/4-ETS (Electronic Traction
System) ................................................ 65
Express operation
Panorama roof ............................... 195
Power windows .............................. 105
Tilt/sliding sunroof ........................192
Exterior lamp switch ........................... 97
Exterior rear view mirrors .................. 95
Parking position ............................... 95
Exterior view of vehicle ...................... 26
F
Fastening the seat belts ..................... 50
First aid kit ......................................... 268
Flat tire ............................................... 323
Lowering the vehicle ......................328
Mounting the spare wheel .............323
Preparing the vehicle .....................323
Spare wheel ........................... 323, 358
TIREFIT (tire repair kit) ...................329
Floormats ........................................... 217
Fluids
Automatic transmission fluid .........360
Brake fluid ..................................... 361
Capacities ...................................... 359
Engine coolant ............................... 361
Engine oil ....................................... 360
Power steering fluid .......................360
Washer and headlamp cleaning
system ........................................... 361
Fog lamps ............................................. 99
Messages in the multifunction
display ................................... 300, 302
Four-wheel drive
see All-wheel drive (4MATIC)
Front air bags
see Air bags
Front axle oil ...................................... 360
Front lamps
see Headlamps
Front passenger front air bag ............ 40
Messages in the multifunction
display ........................................... 276
Front passenger front air bag off
indicator lamp (Canada only) ..... 46, 313
Front passenger front air bag off
indicator lamp (USA only) .......... 43, 314
Fuel ..................................................... 220
Additives ........................................ 364
Capacity, fuel tank .........................361
Diesel fuel ...................................... 363
Drive sensibly–safe fuel .................254
Fuel consumption statistics ...........130
Fuel filler flap and cap ...................222
Fuel tank reserve warning lamp .....310
Premium unleaded gasoline ...........362
Refueling ........................................ 220
Requirements ................................ 363
Fuel filler flap ..................................... 222
Opening manually ..........................316
Fuel gauge ......................................... 126
Fuels, coolants, lubricants etc. ........ 359
Fuel system, bleeding (diesel
engine) ............................................... 333
Fuel tank
Capacity ........................................ 361
Fuel filler flap and cap ...................222
Refueling ........................................ 220
Fuses .................................................. 343
G
Garage door opener .................... 33, 212
Gasoline see Fuel
GAWR (Gross Axle Weight Rating) ... 250
Gear range ......................................... 120
Indicator ........................................ 120
Limiting .......................................... 122
Shifting into optimal ......................122
Gear selector lever ............................ 115
Cleaning ......................................... 265
Gearshift pattern ........................... 115
Shifting procedure .........................118
Transmission position indicator .....118
Transmission positions ..................118
Index9212_AKB; 2; 41, en-USd2ureepe,Version: 2.11.8.12009-07-17T09:14:21+02:00 - Seite 9
Page 35 of 372
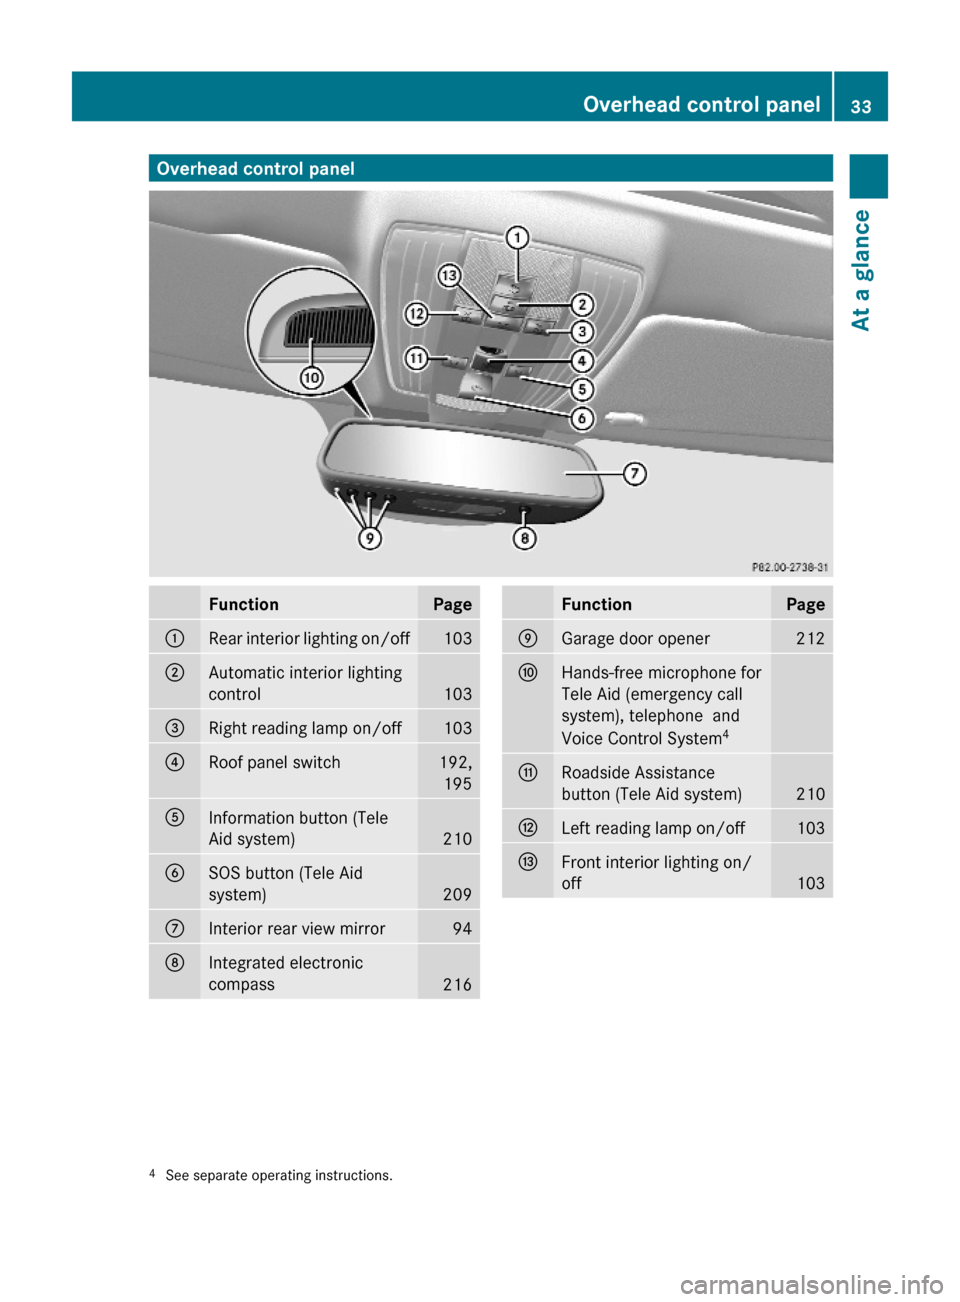
Overhead control panelFunctionPage:Rear interior lighting on/off103;Automatic interior lighting
control103
=Right reading lamp on/off103?Roof panel switch192,
195
AInformation button (Tele
Aid system)210
BSOS button (Tele Aid
system)209
CInterior rear view mirror94DIntegrated electronic
compass216
FunctionPageEGarage door opener 212FHands-free microphone for
Tele Aid (emergency call
system), telephone and
Voice Control System4
GRoadside Assistance
button (Tele Aid system)210
HLeft reading lamp on/off103IFront interior lighting on/
off1034See separate operating instructions.Overhead control panel33At a glance212_AKB; 2; 41, en-USd2ureepe,Version: 2.11.8.12009-07-17T09:14:21+02:00 - Seite 33Z
Page 66 of 372

boost to a level that is suitable for the traffic
situation.
If BAS PLUS requires a particularly high brake
power boost, PRE-SAFE ®
is activated at the
same time.XKeep constant pressure on the brake pedal
until the emergency braking situation is
over.
During this process, the ABS prevents the
wheels from locking up.
The brakes will resume normal operation
after
R the brake pedal is released
R no obstacles are detected in your path
R the system no longer senses a risk of a
collision
BAS PLUS is then deactivated.
BAS PLUS can react to stationary obstacles
such as standing or parked vehicles at road
speeds of up to approximately 40 mph
(70 km/h).
BAS PLUS can only assist you when the radar
sensors are switched on and functional. You
can check whether the sensors are active by
switching on DISTRONIC PLUS
( Y page 149) or using the Radar sensors
function in the instrument cluster control
system.
GWarning!
BAS PLUS will only respond with brake
assistance if it has clearly detected an object.
Detection can be impeded by
R dirty or covered sensors
R snowfall or heavy rain
R disturbance from other radar sources
R strong radar reflection such as in parking
garages
BAS PLUS uses radar signals that are not
reflected well by narrow objects and
absorptive materials. For this reason BAS
PLUS will not react to persons, animals, and
approaching traffic or cross-traffic.
BAS PLUS may not detect narrow vehicles
driving in front of you, such as motorcycles
and vehicles driving offset from your vehicle
center.
After a hard collision or damage to the front
of the vehicle from an accident, have the
adjustment and operation of the radar
sensors checked by an authorized Mercedes-
Benz Center.
If BAS PLUS is not available due to a radar
sensor malfunction, the braking system will
continue to function normally with full brake
boost and full standard BAS function.
Adaptive Brake
Adaptive Brake provides a high level of
braking safety as well as increased braking
comfort. Adaptive Brake takes driver and
vehicle characteristics into consideration,
thus achieving an optimal braking effect.
In addiditon, Adaptive Brake provides the
HOLD function (Y page 161) and the hill-start
assist system ( Y page 160).
For more information on the brake system,
see ( Y page 254).
EBP
GObserve Safety notes, see page 62.
The Electronic Brake Proportioning (EBP)
enhances braking effectiveness by allowing
the rear brakes to supply a greater proportion
of the braking effort in straight-line braking
without a loss of vehicle stability.
GWarning!
If the EBP malfunctions, the brake system will
still function with full brake boost. However,
the rear wheels could lock up during
emergency braking situations, for example.
You could lose control of the vehicle and
cause an accident.
Adapt your driving style to the changed
driving characteristics.
64Driving safety systemsSafety and security
212_AKB; 2; 41, en-USd2ureepe,Version: 2.11.8.12009-07-17T09:14:21+02:00 - Seite 64
Page 72 of 372

iUSA only:
This device has been approved by the FCC
as a “Vehicular Radar System”. The radar
sensor is intended for use in an automotive
radar system only. Removal, tampering, or
altering of the device will void any
warranties, and is not permitted by the
FCC. Do not tamper with, alter, or use in
any non-approved way.
Any unauthorized modification to this
device could void the user’s authority to
operate the equipment.
i Canada only:
This device complies with RSS-210 of
Industry Canada. Operation is subject to
the following two conditions:
1. This device may not cause interference,
and
2. this device must accept any interference received, including
interference that may cause undesired
operation of the device.
Removal, tampering, or altering of the
device will void any warranties, and is not
permitted. Do not tamper with, alter, or use
in any non-approved way.
Any unauthorized modification to this
device could void the user’s authority to
operate the equipment.
Using the radar sensors, the PRE-SAFE ®
Brake detects obstacles that are in your
driving path for a sufficient period of time for
the system to recognize it. If you approach a
vehicle and the PRE-SAFE ®
Brake has
established that the distance to the vehicle
ahead at your current speed is so close that
the PRE-SAFE ®
Brake will not be capable of
slowing the vehicle sufficiently, the system
will initially warn you visually and acoustically.
If you do not apply the brakes yourself or
maneuver around a sensed obstacle, the
vehicle will brake lightly automatically. The
PRE-SAFE ®
system ( Y page 53) is activated
when the distance to the vehicle ahead atyour current speed is so close that the PRE-
SAFE ®
Brake will not be capable of slowing
the vehicle sufficiently.
When the danger of a collision still persists
and you do not brake or accelerate
significantly, the PRE-SAFE ®
Brake may
initiate full application of the brakes
automatically.GWarning!
The PRE-SAFE ®
Brake will only respond with
brake assistance if it has clearly detected an
object. Detection can be impeded by
R dirty or covered sensors
R snowfall or heavy rain
R disturbance from other radar sources
R strong radar reflection such as in parking
garages
The PRE-SAFE ®
Brake uses radar signals that
are not reflected well by narrow objects and
absorptive materials. For this reason the PRE-
SAFE ®
Brake will not react to persons,
animals, and approaching traffic or cross-
traffic.
The PRE-SAFE ®
Brake may not detect narrow
vehicles driving in front of you, such as
motorcycles and vehicles driving offset from
your vehicle center.
GWarning!
Depending on the vehicle speed, the
PRE-SAFE ®
Brake brakes your vehicle with a
maximum of 13 ft/s 2
(4 m/s 2
) before a
possible hard stop. This corresponds to about
40% of the maximum deceleration ability of
your vehicle. The driver must apply the brakes
additionally in order to prevent a collision. The
self-acting hard stop will be initiated when the
imminent danger of a collision exists, e.g.
when an evasive driving maneuver cannot
avoid an accident.
70Driving safety systemsSafety and security
212_AKB; 2; 41, en-USd2ureepe,Version: 2.11.8.12009-07-17T09:14:21+02:00 - Seite 70
Page 111 of 372
sensor surface : on an outside door
handle once more.
The roller sunblinds extend.
XRelease sensor surface : on the outside
door handle to interrupt the extending
procedure.
Driving and parking
Safety notes
GWarning!
Make sure absolutely no objects are
obstructing the pedals’ range of movement.
Keep the driver’s footwell clear of all
obstacles. If there are any floormats or
carpets in the footwell, make sure the pedals
still have sufficient clearance.
During sudden driving or braking maneuvers
the objects could get caught between or
under the pedals. You could then no longer
brake or accelerate. This could lead to
accidents and injury.
GWarning!
With the engine not running, there is no power
assistance for the brake and steering
systems. In this case, it is important to keep
in mind that a considerably higher degree of
effort is necessary to brake and steer the
vehicle. Adapt your driving accordingly.
Starting the engine
GWarning!
Inhalation of exhaust gas is hazardous to your
health. All exhaust gas contains carbon
monoxide (CO), and inhaling it can cause
unconsciousness and possible death.
Do not run the engine in confined areas (such
as a garage) which are not properly ventilated.
If you think that exhaust gas fumes are
entering the vehicle while driving, have the
cause determined and corrected
immediately. If you must drive under these
conditions, drive only with at least one
window fully open at all times.
Automatic transmission
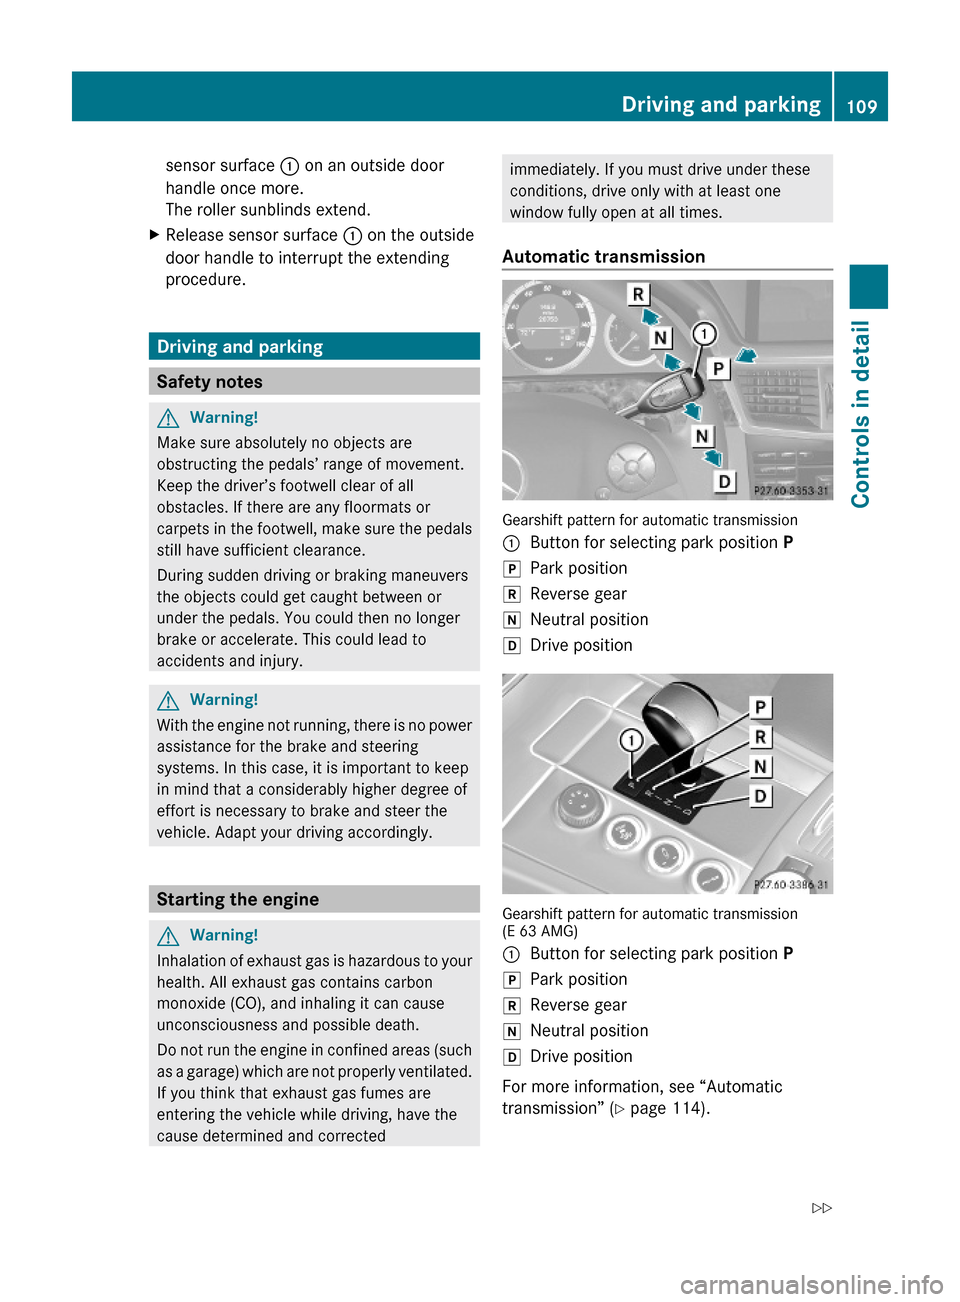
Gearshift pattern for automatic transmission
:Button for selecting park position PjPark positionkReverse geariNeutral positionhDrive position
Gearshift pattern for automatic transmission(E 63 AMG)
:Button for selecting park position PjPark positionkReverse geariNeutral positionhDrive position
For more information, see “Automatic
transmission” (Y page 114).
Driving and parking109Controls in detail212_AKB; 2; 41, en-USd2ureepe,Version: 2.11.8.12009-07-17T09:14:21+02:00 - Seite 109Z
Page 174 of 372
The rear view camera does not relieve you of
the responsibility to be cautious. Take care
and pay careful attention. The rear view
camera may not show objects which are
Rvery close to the rear bumper
Runder the rear bumper
Rabove the trunk handle
You are responsible for safety at all times and
must continue to pay attention to the
immediate surroundings when parking and
maneuvering. This includes the area behind,
in front of, and beside the vehicle. Otherwise
you could endanger yourself and/or others.
GWarning!
The rear view camera either will not function
or will not function to its full capability if
Rthe trunk lid is open
Rit is raining very hard, snowing or foggy
Rit is night or you are parking/maneuvering
your vehicle in an area where it is very dark
Rthe camera is exposed to a very bright white
light
Rthe immediate surroundings are
illuminated with fluorescent light (the
COMAND system display can flicker)
Rthere is a sudden change in temperature,
e.g. if you drive into a heated garage from
the cold (lens condensation)
Rthe camera lens is dirty or covered
Rthe rear of your vehicle is damaged
In this case, have the position and setting
of the camera checked by a qualified
specialist workshop. Mercedes-Benz
recommends that you contact a Mercedes-
Benz Center for this purpose.
Do not use the rear view camera in these
situations. Otherwise you could injure
yourself or others and/or damage property
including your vehicle while parking/
maneuvering.
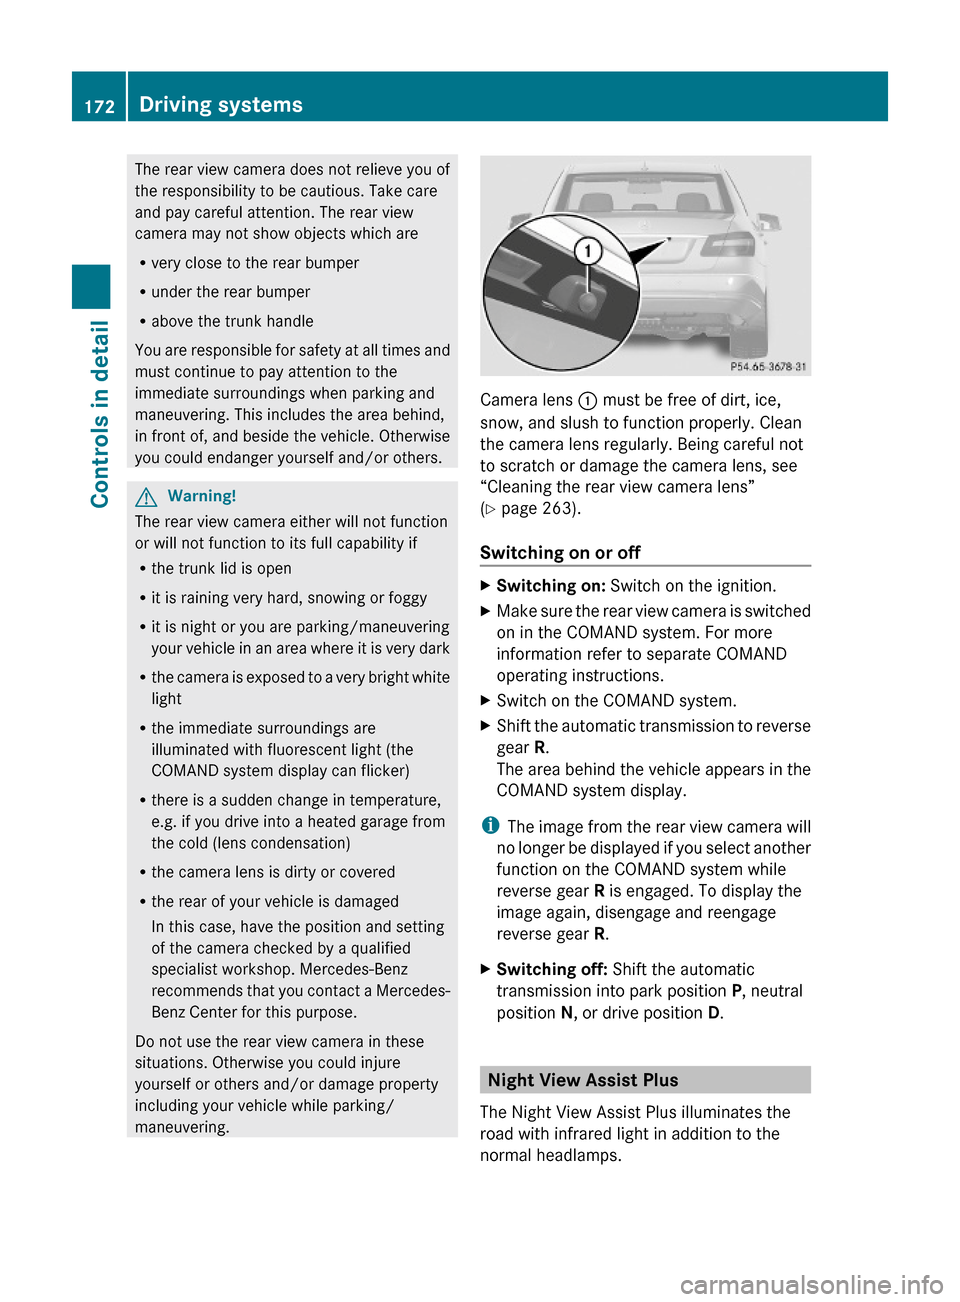
Camera lens : must be free of dirt, ice,
snow, and slush to function properly. Clean
the camera lens regularly. Being careful not
to scratch or damage the camera lens, see
“Cleaning the rear view camera lens”
(Y page 263).
Switching on or off
XSwitching on: Switch on the ignition.XMake sure the rear view camera is switched
on in the COMAND system. For more
information refer to separate COMAND
operating instructions.
XSwitch on the COMAND system.XShift the automatic transmission to reverse
gear R.
The area behind the vehicle appears in the
COMAND system display.
iThe image from the rear view camera will
no longer be displayed if you select another
function on the COMAND system while
reverse gear R is engaged. To display the
image again, disengage and reengage
reverse gear R.
XSwitching off: Shift the automatic
transmission into park position P, neutral
position N, or drive position D.
Night View Assist Plus
The Night View Assist Plus illuminates the
road with infrared light in addition to the
normal headlamps.
172Driving systemsControls in detail
212_AKB; 2; 41, en-USd2ureepe,Version: 2.11.8.12009-07-17T09:14:21+02:00 - Seite 172
Page 214 of 372
iThe remote door unlock feature is
available if the relevant cellular phone
network is available.
The SOS button will flash and the message
Connecting Call will appear in the
multifunction display to indicate receipt of
the door unlock command.
If the trunk lid handle was pulled for more
than 20 seconds before door unlock
authorization was received, you must wait
15 minutes before pulling the trunk lid
handle again.
Remote door lock
If you have forgotten to lock your vehicle and
are no longer near it, you can have it locked
remotely through the Customer Assistance
Center.
The vehicle can be remotely locked within
four days after the ignition has been switched
off.
XContact the Customer Assistance Center
at 1-800-FOR-MERCedes
(1-800-367-6372) (USA only) or
1-888-923-8367 (Canada only).
You will be asked to provide your password.
When you are inside your vehicle the next
time and switch on the ignition, the message
Tele Aid Doors locked by remote
control will appear on the multifunction
display.
i The remote door lock feature is available
if the relevant cellular phone network is
available and data connection is possible.
Stolen Vehicle Recovery Services
In the event your vehicle was stolen:
XReport the incident to the police.
The police will issue a numbered incident
report.XPass this number on to the Customer
Assistance Center along with your
password.
The Customer Assistance Center will then
attempt to covertly contact the vehicle’s
Tele Aid system. Once the vehicle is
located, the Customer Assistance Center
will contact the local law enforcement and
you. The vehicle’s location will only be
provided to law enforcement.
i If the anti-theft alarm stays on for more
than 30 seconds, the Tele Aid system will
notify the Customer Assistance Center
automatically.
Garage door opener
The integrated remote control can operate up
to three separately controlled devices
compatible with HomeLink ®
or some other
systems.
GWarning!
Before programming the integrated remote
control to a garage door opener or gate
operator, make sure people and objects are
out of the way of the device to prevent
potential harm or damage. When
programming a garage door opener, the door
moves up or down. When programming a gate
operator, the gate opens or closes.
Do not use the integrated remote control with
any garage door opener that lacks safety stop
and reverse features as required by U.S.
federal safety standards (this includes any
garage door opener model manufactured
before April 1, 1982). A garage door that
cannot detect an object - signaling the door
to stop and reverse - does not meet current
U.S. federal safety standards.
212Useful featuresControls in detail
212_AKB; 2; 41, en-USd2ureepe,Version: 2.11.8.12009-07-17T09:14:21+02:00 - Seite 212
Page 215 of 372
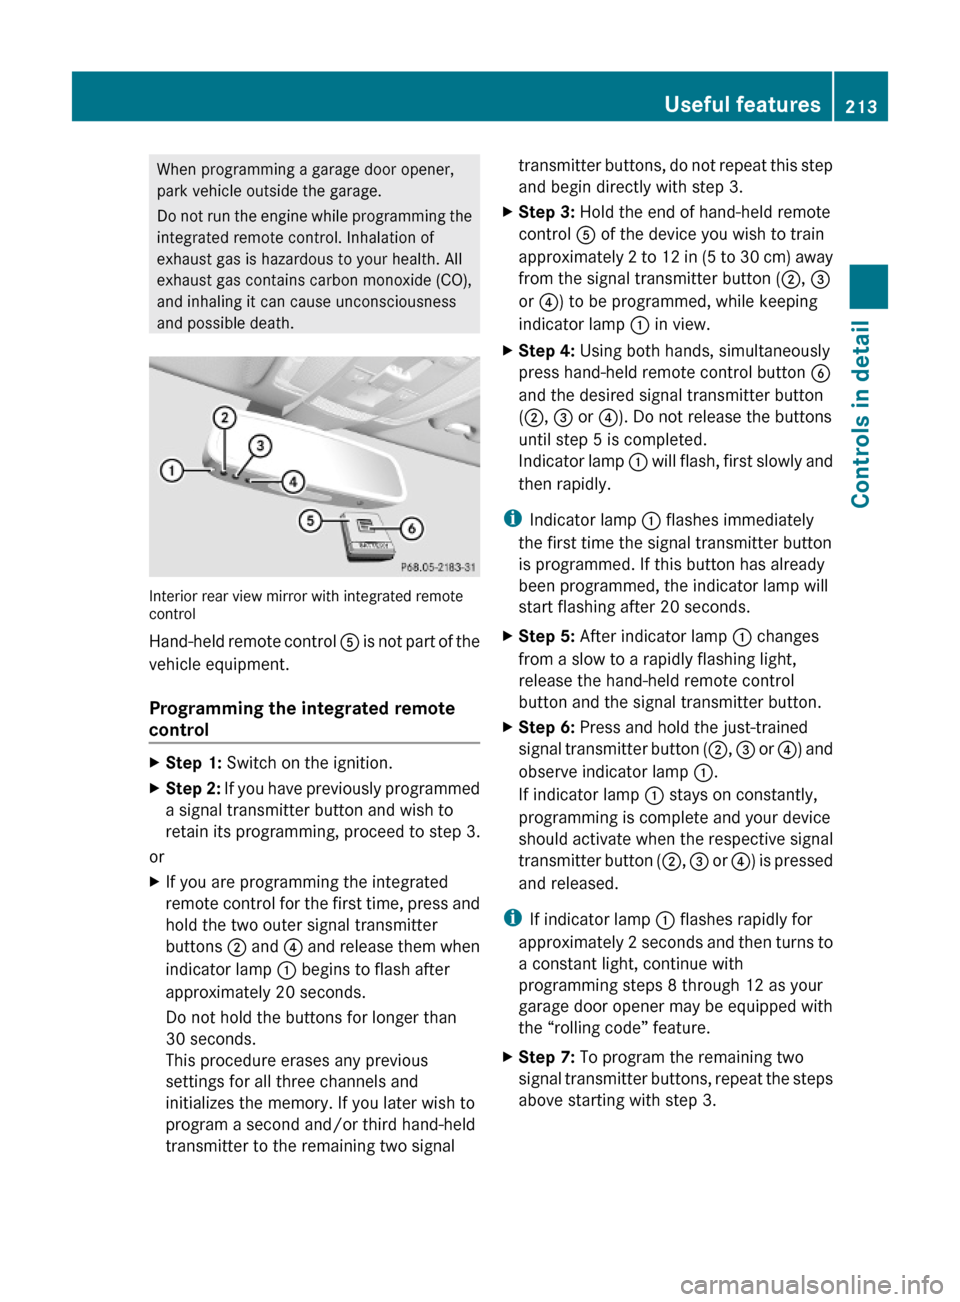
When programming a garage door opener,
park vehicle outside the garage.
Do not run the engine while programming the
integrated remote control. Inhalation of
exhaust gas is hazardous to your health. All
exhaust gas contains carbon monoxide (CO),
and inhaling it can cause unconsciousness
and possible death.
Interior rear view mirror with integrated remotecontrol
Hand-held remote control A is not part of the
vehicle equipment.
Programming the integrated remote
control
XStep 1: Switch on the ignition.XStep 2: If you have previously programmed
a signal transmitter button and wish to
retain its programming, proceed to step 3.
or
XIf you are programming the integrated
remote control for the first time, press and
hold the two outer signal transmitter
buttons ; and ? and release them when
indicator lamp : begins to flash after
approximately 20 seconds.
Do not hold the buttons for longer than
30 seconds.
This procedure erases any previous
settings for all three channels and
initializes the memory. If you later wish to
program a second and/or third hand-held
transmitter to the remaining two signal
transmitter buttons, do not repeat this step
and begin directly with step 3.
XStep 3: Hold the end of hand-held remote
control A of the device you wish to train
approximately 2 to 12 in (5 to 30 cm) away
from the signal transmitter button (;, =
or ?) to be programmed, while keeping
indicator lamp : in view.
XStep 4: Using both hands, simultaneously
press hand-held remote control button B
and the desired signal transmitter button
(;, = or ?). Do not release the buttons
until step 5 is completed.
Indicator lamp : will flash, first slowly and
then rapidly.
iIndicator lamp : flashes immediately
the first time the signal transmitter button
is programmed. If this button has already
been programmed, the indicator lamp will
start flashing after 20 seconds.
XStep 5: After indicator lamp : changes
from a slow to a rapidly flashing light,
release the hand-held remote control
button and the signal transmitter button.
XStep 6: Press and hold the just-trained
signal transmitter button (;, = or ?) and
observe indicator lamp :.
If indicator lamp : stays on constantly,
programming is complete and your device
should activate when the respective signal
transmitter button (;, = or ?) is pressed
and released.
iIf indicator lamp : flashes rapidly for
approximately 2 seconds and then turns to
a constant light, continue with
programming steps 8 through 12 as your
garage door opener may be equipped with
the “rolling code” feature.
XStep 7: To program the remaining two
signal transmitter buttons, repeat the steps
above starting with step 3.
Useful features213Controls in detail212_AKB; 2; 41, en-USd2ureepe,Version: 2.11.8.12009-07-17T09:14:21+02:00 - Seite 213Z