2010 MERCEDES-BENZ E350 battery type CR
[x] Cancel search: battery type CRPage 13 of 372

Rear ............................................... 104
Rear reading lamps ........................104
Interior rear view mirror ..................... 94
Auto-dimming rear view mirrors ....... 95
Interior storage spaces
see Storage compartments
Intermittent wiping ........................... 104
Rain sensor .................................... 104
IR emitter
Replacing bulbs ............................. 319
ISOFIX (Child seat anchors –
LATCH-type) see Children in the vehicle
J
Jack ..................................................... 270
Jump starting ..................................... 338
K
Key, Mechanical
Loss of ............................................. 79
Replacing ......................................... 80
Unlocking/locking manually ..........314
Valet locking .................................... 85
Key, SmartKey
Battery check lamp ..........................79
Checking batteries ...........................79
Factory setting ........................... 77, 79
Global locking (KEYLESS-
GO) .................................................. 79
Global locking (SmartKey) ................ 77
Global unlocking (KEYLESS-
GO) .................................................. 79
Global unlocking
(SmartKey) ....................................... 77
Important notes on KEYLESS-GO .....78
Locking/unlocking ........................... 76
Loss of ............................................. 79
Messages in the multifunction
display ........................................... 293
Opening, trunk ................................. 82
Opening and closing the power
tilt/sliding sunroof or the
panorama roof ............................... 107
Opening and closing the windows . 107
Remote control ................................ 76
Replacing ......................................... 80
Replacing batteries ........................317
Restoring to factory setting .......77, 79
Selective setting ........................77, 79
Starter switch positions ...................85
KEYLESS-GO
Starter switch positions ...................86
Kickdown ........................................... 119
Kickdown (manual shift program) ... 124
Kilopascal (air pressure unit) ........... 250
Knee bag .............................................. 40
L
Labels
Certification ................................... 346
Emission control information .........347
Tire and Loading Information
placard ........................................... 237
Tire inflation pressure ....................230
Lamps, exterior
Exterior lamp switch ........................97
Front .............................................. 319
Messages in the multifunction
display ........................................... 299
Switching on/off .............................. 97
Lamps, indicator and warning
ABS .......................................... 29, 305
Adaptive Highbeam Assist .............100
Brakes ........................................... 305
Coolant .......................................... 311
Distance warning lamp ..........151, 309
Engine malfunction ........................310
ESC .......................................... 29, 309
ESC OFF ........................................ 308
Fog lamps ........................................ 99
Front passenger front air bag off
(Canada only) .......................... 46, 313
Front passenger front air bag off
(USA only) ................................ 43, 314
Fuel tank reserve ........................... 310
High-beam headlamps .............29, 100
Instrument cluster .........................304
Low-beam headlamps ................30, 98
Low tire pressure/TPMS
malfunction telltale ........................312
Seat belt telltale ................29, 52, 307
Index11212_AKB; 2; 41, en-USd2ureepe,Version: 2.11.8.12009-07-17T09:14:21+02:00 - Seite 11
Page 14 of 372

SRS .......................................... 36, 308
Turn signals ..................................... 29
Lane Keeping Assist .......................... 177
Messages in the multifunction
display ........................................... 283
Switching on or off ......................... 138
LATCH-type child seat anchors (ISOFIX)
see Children in the vehicle
License plate lamps
Messages in the multifunction
display ........................................... 301
Light alloy wheels, cleaning ............. 265
Lighter see Cigarette lighter
Lighting ................................................ 97
Daytime running lamp mode ............98
Exterior ............................................ 97
Interior ........................................... 103
Limp-home mode .............................. 124
Load index (tires) ...................... 246, 250
Loading see Vehicle loading
Locator lighting ................................. 142
Locking the vehicle
KEYLESS-GO .................................... 77
Manually ........................................ 315
SmartKey ......................................... 76
Loss of
Key .................................................. 79
Service and Warranty Information
booklet .......................................... 346
Low-beam headlamps ......................... 98
Exterior lamp switch ........................97
Indicator lamp .................................. 30
Replacing bulbs ............................. 319
Switching on .................................... 98
Lubricants .......................................... 359
Lumbar support ................................... 89
M
Maintenance ........................................ 21
Maintenance System
Service indicator display ................259
Service indicator message .............258
Service term exceeded ..................259
Manual headlamp mode (Low-
beam headlamps) ................................ 98
Manual shift program ....................... 122
Maximum engine speed see Vehicle specification
Maximum loaded vehicle weight ..... 250
Maximum load rating (tires) ............. 250
Maximum permissible tire
inflation pressure .............................. 251
Mechanical key see Key, Mechanical
Media interface ................................. 201
Memory function ................................. 96
Menus see Control system menus
Minispare wheel
see Spare wheel
Mirrors .................................................. 94
Auto-dimming rear view mirrors ....... 95
Exterior rear view mirror parking
position ............................................ 95
Exterior rear view mirrors ................95
Interior rear view mirror ...................94
Memory function .............................. 96
Vanity mirror .................................. 205
MOExtended system ......................... 329
MOExtended tires ..................... 329, 353
MON (Motor Octane Number) .......... 363
Motor Octane Number see MON
Multifunction display ........................ 128
Symbol messages ..........................287
Text messages ............................... 274
Vehicle status messages ...............272
Multifunction display messages
ABS ....................................... 288, 289
Active headlamps .......................... 299
Advanced TPMS ............................. 285
Air bags ......................................... 276
Air filter .......................................... 299
AIRMATIC ...................................... 292
Alternator .............................. 284, 297
ATTENTION ASSIST ........................292
Automatic
transmission .......................... 283, 284
Backrests ....................................... 293
Battery ................................... 284, 297
Blind Spot Assist ............................ 281
Brake fluid ..................................... 28912Index212_AKB; 2; 41, en-USd2ureepe,Version: 2.11.8.12009-07-17T09:14:21+02:00 - Seite 12
Page 113 of 372

The engine does not start. You can hear
the starter.
There could be a malfunction in the engine
electronics or in the fuel supply system.
Carry out the following steps:XIf you are starting the engine with the
SmartKey: Turn the SmartKey in the starter
switch to position 0 and repeat the starting
procedure.XIf you are starting the engine with KEYLESS-
GO: Close any doors that may be open to
allow for better detection of the SmartKey.
or
XRemove the KEYLESS-GO start/stop
button from the starter switch.XStart the engine with the SmartKey as radio
signals from another source may be
interfering with the KEYLESS-GO function.XRepeat the starting procedure.
If the engine does not start after several
starting attempts:
XContact an authorized Mercedes-Benz
Center or call Roadside Assistance.
The engine does not start. You cannot
hear the starter.
The battery may not be charged sufficiently.
XGet a jump start ( Y page 338).
If the engine will not start despite a jump
start:
XContact an authorized Mercedes-Benz
Center or call Roadside Assistance.
The starter has been exposed to excessive
temperatures.
XLet the starter cool for about 2 minutes.XRepeat the starting procedure.
If the engine does not start after several
starting attempts:
XContact an authorized Mercedes-Benz
Center or call Roadside Assistance.Driving offGWarning!
On slippery road surfaces, never downshift in
order to obtain braking action. This could
result in drive wheel slip and reduced vehicle
control. Your vehicle’s ABS will not prevent
this type of loss of control.
! Do not run a cold engine at high engine
speeds. Running a cold engine at high
engine speeds may shorten the service life
of the engine. This is not covered by the
Mercedes-Benz Limited Warranty.
E 63 AMG: At engine temperatures below
68‡ (20†), the engine’s maximum speed
is restricted in order to protect it from
damage. Avoid driving your vehicle at full
speed when the engine is cold to prevent
premature engine wear and/or diminished
comfort.
! If an acoustic warning sounds and the
message Release Parking Brake
appears in the multifunction display when
driving off, you have forgotten to release
the parking brake.
Release the parking brake.
! Avoid spinning of a drive wheel. This may
cause serious damage to the drivetrain
which is not covered by the Mercedes-Benz
Limited Warranty.
! Simultaneously depressing the
accelerator pedal and applying the brakes
reduces engine performance and causes
premature brake and drivetrain wear which
is not covered by the Mercedes-Benz
Limited Warranty.
i Once the vehicle is in motion, the
automatic central locking function engages
and the locking knobs in the doors move
down.
Driving and parking111Controls in detail212_AKB; 2; 41, en-USd2ureepe,Version: 2.11.8.12009-07-17T09:14:21+02:00 - Seite 111Z
Page 217 of 372
Reprogramming a single signal
transmitter button
To program a device using a signal
transmitter button previously trained, follow
these steps:
XSwitch on the ignition.XPress and hold the desired signal
transmitter button ( ;, = or ?). Do not
release the button.
Indicator lamp : will begin to flash after
20 seconds.XWithout releasing the signal transmitter
button, proceed with programming starting
with step 3.
Operation of integrated remote control
XSwitch on the ignition.XSelect and press the appropriate
integrated signal transmitter button ( ;,
= or ?) to activate the remote controlled
device.
The integrated remote control transmitter
continues to send the signal as long as the
button is pressed – up to 20 seconds.
Erasing the integrated remote control
memory
i If you sell your vehicle, erase the codes of
all three channels.
XSwitch on the ignition.XSimultaneously press and hold outer signal
transmitter buttons ; and ?, for
approximately 20 seconds, until indicator
lamp : flashes rapidly. Do not hold for
longer than 30 seconds.
The codes of all three channels are erased.Programming tips
If you are having difficulty programming the
integrated remote control, here are some
helpful tips:
R Check the frequency of hand-held remote
control A (typically located on the reverse
side of the remote). The integrated remote
control is compatible with radio-frequency
devices operating between 280-390 MHz.
R Put a new battery in hand-held remote
control A. This will increase the likelihood
of the hand-held remote control sending a
stronger and more accurate signal to the
integrated remote control.
R While performing step 3, hold hand-held
remote control A at different lengths and
angles from the signal transmitter button
( ; , = or ?) you are programming.
Attempt varying angles at the distance of 2
to 12 inches (5 to 30 cm) away or the same
angle at varying distances.
R If another hand-held remote control is
available for the same device, try the
programming steps again using that other
hand-held remote control. Make sure new
batteries are in the hand-held remote
control before beginning the procedure.
R Straighten the antenna wire from the
garage door opener assembly. This may
help improve transmitting and/or receiving
signals.
i Certain types of garage door openers are
incompatible with the integrated remote
control. If you should experience further
difficulties with programming the
integrated remote control, contact an
authorized Mercedes-Benz Center, or call
the Mercedes-Benz Customer Assistance
Center (USA only) at
1-800-FOR-MERCedes (1-800-367-6372),
or the HomeLink ®
Hotline (USA only) at
1-800-355-3515, or the Customer Service
(Canada only) at 1-800-387-0100.
Useful features215Controls in detail212_AKB; 2; 41, en-USd2ureepe,Version: 2.11.8.12009-07-17T09:14:21+02:00 - Seite 215Z
Page 253 of 372
Maximum permissible tire inflation
pressure
This number is the greatest amount of air
pressure that should ever be put in the tire.
Normal occupant weight
The number of occupants the vehicle is
designed to seat, multiplied by 68 kilograms
(150 lb).
Occupant distribution
The distribution of occupants in a vehicle at
their designated seating positions.
Production options weight
The combined weight of those installed
regular production options weighing over
5 lbs (2.3 kilograms) in excess of those
standard items which they replace, not
previously considered in curb weight or
accessory weight, including heavy duty
brakes, ride levelers, roof rack, heavy duty
battery, and special trim.
PSI (Pounds per square inch)
A standard unit of measure for air pressure.
Recommended tire inflation pressure
The recommended tire inflation pressure for
normal driving conditions is listed on the Tire
and Loading Information placard located on
the driver’s door B-pillar. It provides best
handling, tread life and riding comfort.
Supplemental information pertaining to
special driving situations can be found on the
tire inflation pressure label on the inside of
the fuel filler flap.
Rim
A metal support for a tire or a tire and tube
assembly upon which the tire beads are
seated.
Sidewall
The portion of a tire between the tread and
the bead.
TIN (Tire Identification Number)
Unique identifier which facilitates efforts by
tire manufacturers to notify purchasers in
recall situations or other safety matters
concerning tires and gives purchasers the
means to easily identify such tires. The TIN is
comprised of “Manufacturer’s identification
mark”, “Tire size”, “Tire type code” and “Date
of manufacture”.
Tire ply composition and material used
This indicates the number of plies or the
number of layers of rubber-coated fabric in
the tire tread and sidewall. Tire
manufacturers also must indicate the ply
materials in the tire and sidewall, which
include steel, nylon, polyester, and others.
Tire speed rating
Part of tire designation (speed symbol);
indicates the speed range for which a tire is
approved.
Total load limit
Rated cargo and luggage load plus
68 kilograms (150 lb) times the vehicle’s
designated seating capacity.
Traction
The adhesive friction of a tire on a surface on
which it moves. The amount of grip provided.
Tread
The portion of a tire that comes into contact
with the road.
Tires and wheels251Operation212_AKB; 2; 41, en-USd2ureepe,Version: 2.11.8.12009-07-17T09:14:21+02:00 - Seite 251Z
Page 319 of 372
GWarning!
When pushing back the head restraint
cushion, make sure your fingers do not
become caught between the head restraint
cushion and the cover. Failing to do so may
lead to injury.
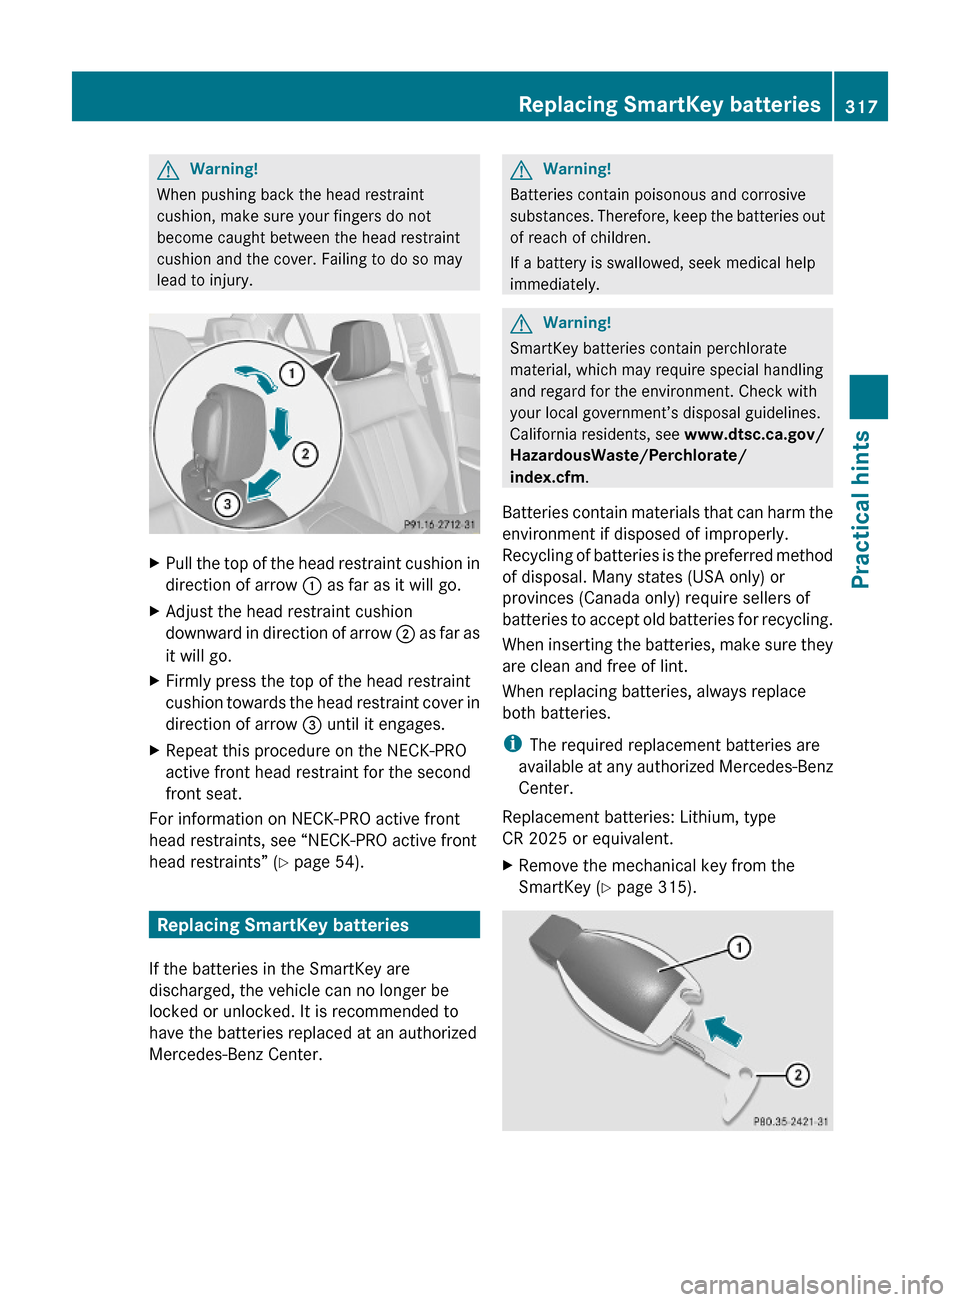
XPull the top of the head restraint cushion in
direction of arrow : as far as it will go.
XAdjust the head restraint cushion
downward in direction of arrow ; as far as
it will go.
XFirmly press the top of the head restraint
cushion towards the head restraint cover in
direction of arrow = until it engages.
XRepeat this procedure on the NECK-PRO
active front head restraint for the second
front seat.
For information on NECK-PRO active front
head restraints, see “NECK-PRO active front
head restraints” (Y page 54).
Replacing SmartKey batteries
If the batteries in the SmartKey are
discharged, the vehicle can no longer be
locked or unlocked. It is recommended to
have the batteries replaced at an authorized
Mercedes-Benz Center.
GWarning!
Batteries contain poisonous and corrosive
substances. Therefore, keep the batteries out
of reach of children.
If a battery is swallowed, seek medical help
immediately.
GWarning!
SmartKey batteries contain perchlorate
material, which may require special handling
and regard for the environment. Check with
your local government’s disposal guidelines.
California residents, see www.dtsc.ca.gov/
HazardousWaste/Perchlorate/
index.cfm.
Batteries contain materials that can harm the
environment if disposed of improperly.
Recycling of batteries is the preferred method
of disposal. Many states (USA only) or
provinces (Canada only) require sellers of
batteries to accept old batteries for recycling.
When inserting the batteries, make sure they
are clean and free of lint.
When replacing batteries, always replace
both batteries.
iThe required replacement batteries are
available at any authorized Mercedes-Benz
Center.
Replacement batteries: Lithium, type
CR 2025 or equivalent.
XRemove the mechanical key from the
SmartKey (Y page 315).
Replacing SmartKey batteries317Practical hints212_AKB; 2; 41, en-USd2ureepe,Version: 2.11.8.12009-07-17T09:14:21+02:00 - Seite 317Z
Page 342 of 372
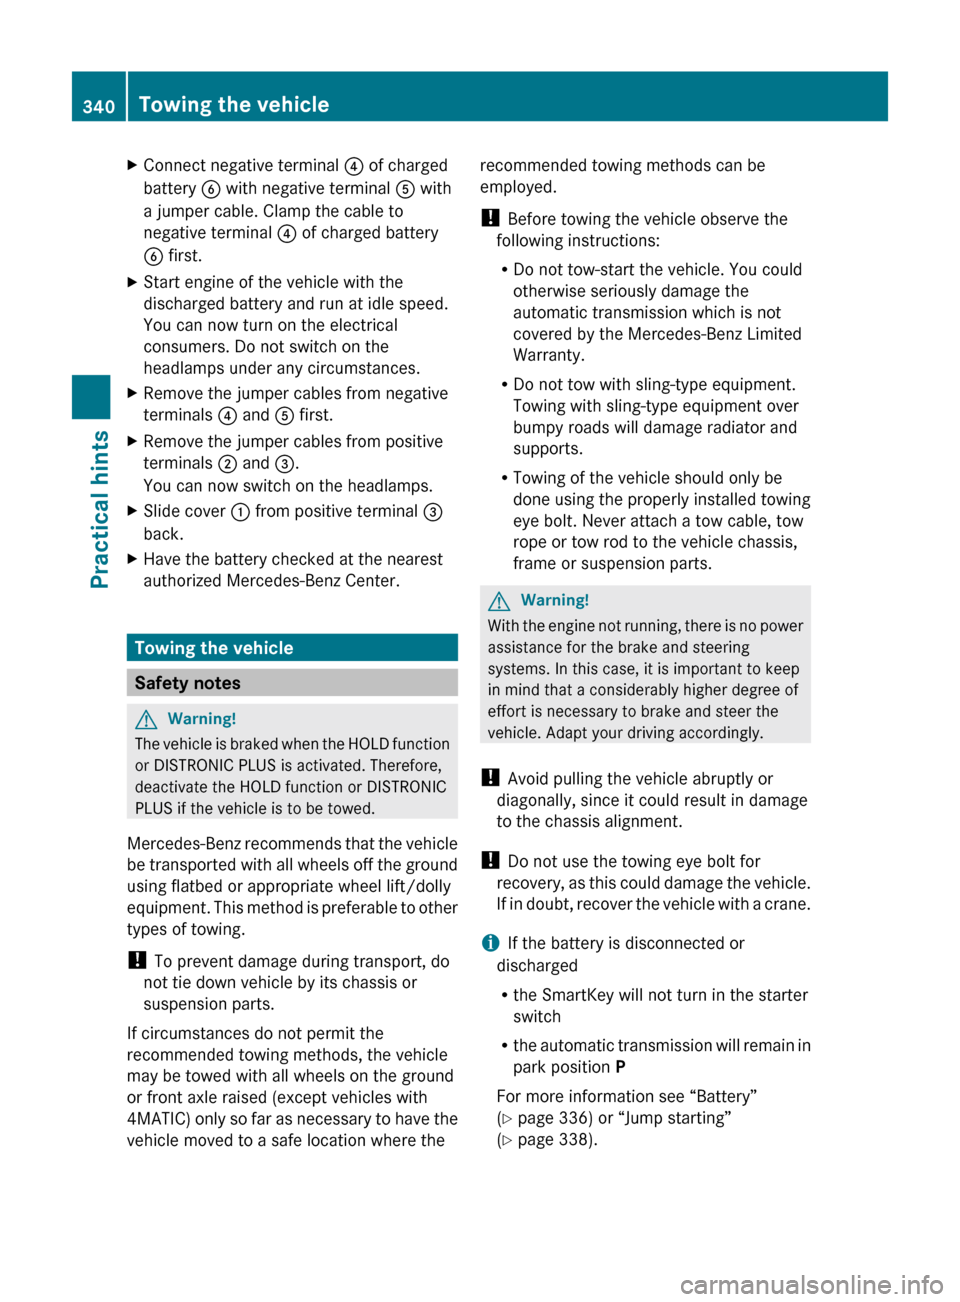
XConnect negative terminal ? of charged
battery B with negative terminal A with
a jumper cable. Clamp the cable to
negative terminal ? of charged battery
B first.XStart engine of the vehicle with the
discharged battery and run at idle speed.
You can now turn on the electrical
consumers. Do not switch on the
headlamps under any circumstances.XRemove the jumper cables from negative
terminals ? and A first.XRemove the jumper cables from positive
terminals ; and =.
You can now switch on the headlamps.XSlide cover : from positive terminal =
back.XHave the battery checked at the nearest
authorized Mercedes-Benz Center.
Towing the vehicle
Safety notes
GWarning!
The vehicle is braked when the HOLD function
or DISTRONIC PLUS is activated. Therefore,
deactivate the HOLD function or DISTRONIC
PLUS if the vehicle is to be towed.
Mercedes-Benz recommends that the vehicle
be transported with all wheels off the ground
using flatbed or appropriate wheel lift/dolly
equipment. This method is preferable to other
types of towing.
! To prevent damage during transport, do
not tie down vehicle by its chassis or
suspension parts.
If circumstances do not permit the
recommended towing methods, the vehicle
may be towed with all wheels on the ground
or front axle raised (except vehicles with
4MATIC) only so far as necessary to have the
vehicle moved to a safe location where the
recommended towing methods can be
employed.
! Before towing the vehicle observe the
following instructions:
R Do not tow-start the vehicle. You could
otherwise seriously damage the
automatic transmission which is not
covered by the Mercedes-Benz Limited
Warranty.
R Do not tow with sling-type equipment.
Towing with sling-type equipment over
bumpy roads will damage radiator and
supports.
R Towing of the vehicle should only be
done using the properly installed towing
eye bolt. Never attach a tow cable, tow
rope or tow rod to the vehicle chassis,
frame or suspension parts.GWarning!
With the engine not running, there is no power
assistance for the brake and steering
systems. In this case, it is important to keep
in mind that a considerably higher degree of
effort is necessary to brake and steer the
vehicle. Adapt your driving accordingly.
! Avoid pulling the vehicle abruptly or
diagonally, since it could result in damage
to the chassis alignment.
! Do not use the towing eye bolt for
recovery, as this could damage the vehicle.
If in doubt, recover the vehicle with a crane.
i If the battery is disconnected or
discharged
R the SmartKey will not turn in the starter
switch
R the automatic transmission will remain in
park position P
For more information see “Battery”
( Y page 336) or “Jump starting”
( Y page 338).
340Towing the vehiclePractical hints
212_AKB; 2; 41, en-USd2ureepe,Version: 2.11.8.12009-07-17T09:14:21+02:00 - Seite 340
Page 350 of 372

Vehicle specification E 350 (212.056)
The quoted data apply only to the standard
vehicle. Contact an authorized Mercedes-
Benz Center for the corresponding data of all
special bodies and special equipment.Engine E 350Engine, type272Mode of operation4-stroke engine,
gasoline injectionNo. of cylinders6Bore3.66 in (92.90 mm)Stroke3.39 in (86.00 mm)Total piston
displacement213.5 cu in
(3 498 cm 3
)Compression
ratio10.7:1Output acc. to
SAE J 1349 23268 hp/6
000 rpm
(200 kW/6 000 rpm)Maximum torque
acc. to SAE J 1349258 lb-ft/
2 400 - 5 000 rpm
(350 Nm/
2 400 - 5 000 rpm)Maximum engine
speed6 500 rpmFiring order1-4-3-6-2-5Poly-V-belt2 392 mmElectrical system E 350Alternator14 V/180 AStarter motor12 V/1.4 kWBattery12 V/70 AhSpark plugs, typeBosch Y 7 MPP33Electrical system E 350Spark plugs,
electrode gap0.031 in (0.8 mm)Spark plugs,
tightening torque15 - 18 lb-ft
(20 - 25 Nm)Main dimensions E 350Overall vehicle
length191.9 in (4 874 mm)Overall vehicle
width 2481.5 in (2
071 mm)Overall vehicle
height57.8 in (1 467 mm)Wheelbase113.1 in (2 874 mm)Track, front62.2 in (1 580 mm)Track, rear63.0 in (1 599 mm)Ground clearance4.1 in (104 mm)Turning circle36.9 ft (11.3 m)Weights E 350Roof loadmax. 220 lb (100 kg)Trunk loadmax. 220 lb (100 kg)
Vehicle specification E 350 BlueTEC
(212.024)
The quoted data apply only to the standard
vehicle. Contact an authorized Mercedes-
Benz Center for the corresponding data of all
special bodies and special equipment.
23 Premium fuel required. Performance may vary with fuel octane rating.
24 Exterior rear view mirrors folded out.348Vehicle specification E 350 BlueTEC (212.024)Technical data
212_AKB; 2; 41, en-USd2ureepe,Version: 2.11.8.12009-07-17T09:14:21+02:00 - Seite 348