2010 MERCEDES-BENZ E350 Battery check lamp SmartKey
[x] Cancel search: Battery check lamp SmartKeyPage 7 of 372

ATTENTION ASSIST ........................... 178
Messages in the multifunction
display ........................................... 292
Switching on or off ......................... 138
Audio menu ........................................ 134
Auto-dimming rear view mirrors ........ 95
Automatic central locking .......... 80, 144
Automatic climate control see Climate control system
Automatic headlamp mode ................ 98
Automatic interior lighting control .. 103
Automatic locking when driving ...... 144
Automatic shift program .................. 120
Automatic transmission ................... 114
Automatic shift program ................120
Gear range indicator ......................120
Gear ranges ................................... 120
Gear selector lever ........................115
Hill-start assist system ..................160
Kickdown ....................................... 119
Kickdown (manual shift program) ..124
Manual shift program ..................... 122
One-touch gearshifting ..................121
Program mode indicator ................121
Program mode selector dial
(E 63 AMG) ............................ 121, 123
Program mode selector switch
(automatic shift program) ..............120
Shifting procedure .........................118
Steering wheel gearshift control ....122
Transmission position indicator .....118
Transmission positions ..................118
AUX socket ........................................ 201
Axle oils .............................................. 360
B
BabySmart™
Air bag deactivation system .............46
Self-test ........................................... 47
Backrest
see Seats
Backup lamps
Messages in the multifunction
display ........................................... 300
Bar (air pressure unit) ....................... 250
BAS (Brake Assist System) ................. 63
BAS PLUS (Brake Assist System
PLUS) .................................................... 63
Batteries, SmartKey
Checking condition ..........................79
Replacing ....................................... 317
Battery, Vehicle ................................. 336
Charging ........................................ 337
Jump starting ................................. 338
Messages in the multifunction
display ................................... 284, 297
Bead (tire) .......................................... 250
Beverage holders see Cup holders
Bleeding the fuel system (diesel
engine) ............................................... 333
Blind Spot Assist ............................... 175
Messages in the multifunction
display ........................................... 281
Switching on or off ......................... 138
BlueTEC
AdBlue ®
tank ................................. 333
Brake Assist System
see BAS
Brake Assist System PLUS
see BAS PLUS
Brake fluid
Checking level ............................... 227
Messages in the multifunction
display ........................................... 289
Brake lamps
Cleaning lenses ............................. 262
Brake pads
Messages in the multifunction
display ........................................... 287
Brakes ................................................ 254
Ceramic brake system ...................256
High-performance brake system ....256
Parking brake ................................ 113
Warning lamp ................................. 305
Break-in period .................................. 220
Bug cover (Radiator) ......................... 224
Bulbs see Replacing bulbs Index5212_AKB; 2; 41, en-USd2ureepe,Version: 2.11.8.12009-07-17T09:14:21+02:00 - Seite 5
Page 13 of 372

Rear ............................................... 104
Rear reading lamps ........................104
Interior rear view mirror ..................... 94
Auto-dimming rear view mirrors ....... 95
Interior storage spaces
see Storage compartments
Intermittent wiping ........................... 104
Rain sensor .................................... 104
IR emitter
Replacing bulbs ............................. 319
ISOFIX (Child seat anchors –
LATCH-type) see Children in the vehicle
J
Jack ..................................................... 270
Jump starting ..................................... 338
K
Key, Mechanical
Loss of ............................................. 79
Replacing ......................................... 80
Unlocking/locking manually ..........314
Valet locking .................................... 85
Key, SmartKey
Battery check lamp ..........................79
Checking batteries ...........................79
Factory setting ........................... 77, 79
Global locking (KEYLESS-
GO) .................................................. 79
Global locking (SmartKey) ................ 77
Global unlocking (KEYLESS-
GO) .................................................. 79
Global unlocking
(SmartKey) ....................................... 77
Important notes on KEYLESS-GO .....78
Locking/unlocking ........................... 76
Loss of ............................................. 79
Messages in the multifunction
display ........................................... 293
Opening, trunk ................................. 82
Opening and closing the power
tilt/sliding sunroof or the
panorama roof ............................... 107
Opening and closing the windows . 107
Remote control ................................ 76
Replacing ......................................... 80
Replacing batteries ........................317
Restoring to factory setting .......77, 79
Selective setting ........................77, 79
Starter switch positions ...................85
KEYLESS-GO
Starter switch positions ...................86
Kickdown ........................................... 119
Kickdown (manual shift program) ... 124
Kilopascal (air pressure unit) ........... 250
Knee bag .............................................. 40
L
Labels
Certification ................................... 346
Emission control information .........347
Tire and Loading Information
placard ........................................... 237
Tire inflation pressure ....................230
Lamps, exterior
Exterior lamp switch ........................97
Front .............................................. 319
Messages in the multifunction
display ........................................... 299
Switching on/off .............................. 97
Lamps, indicator and warning
ABS .......................................... 29, 305
Adaptive Highbeam Assist .............100
Brakes ........................................... 305
Coolant .......................................... 311
Distance warning lamp ..........151, 309
Engine malfunction ........................310
ESC .......................................... 29, 309
ESC OFF ........................................ 308
Fog lamps ........................................ 99
Front passenger front air bag off
(Canada only) .......................... 46, 313
Front passenger front air bag off
(USA only) ................................ 43, 314
Fuel tank reserve ........................... 310
High-beam headlamps .............29, 100
Instrument cluster .........................304
Low-beam headlamps ................30, 98
Low tire pressure/TPMS
malfunction telltale ........................312
Seat belt telltale ................29, 52, 307
Index11212_AKB; 2; 41, en-USd2ureepe,Version: 2.11.8.12009-07-17T09:14:21+02:00 - Seite 11
Page 78 of 372
Vehicle equipment
iThis Operator’s Manual describes all
features, standard or optional, potentially
available for your vehicle at the time of
purchase. Please be aware that your
vehicle might not be equipped with all
features described in this manual.
Locking and unlocking
Notes
GObserve Safety notes, see page 56.
When unlocking or locking the vehicle with
the SmartKey an acoustic signal sounds. The
acoustic signal is activated at the factory. If
you wish to deactivate the feature, or adjust
its signal volume, contact an authorized
Mercedes-Benz Center.
When unlocking the vehicle, all turn signal
lamps flash once. An acoustic signal sounds
once, and the locking knobs in the doors
move up. The anti-theft alarm system is
disarmed.
When locking the vehicle, all turn signal lamps
flash three times. An acoustic signal sounds
three times, and the locking knobs in the
doors move down. The anti-theft alarm
system is armed.
All doors and the trunk must be closed.
If you cannot lock or unlock the vehicle with
the SmartKey, the batteries in the SmartKey
are discharged, the SmartKey is
malfunctioning, or the vehicle battery is
drained.
XCheck the batteries in the SmartKey
(Y page 79) and replace them if
necessary.
XUse the mechanical key to unlock the
driver’s door and the trunk (Y page 314).
XUse the mechanical key to lock the vehicle
(Y page 315).
XHave the vehicle battery and the vehicle
battery connections checked at an
authorized Mercedes-Benz Center.
If the SmartKey is malfunctioning, contact
Roadside Assistance or an authorized
Mercedes-Benz Center.
SmartKey
Your vehicle comes supplied with two
SmartKeys, each with remote control and a
removable mechanical key.
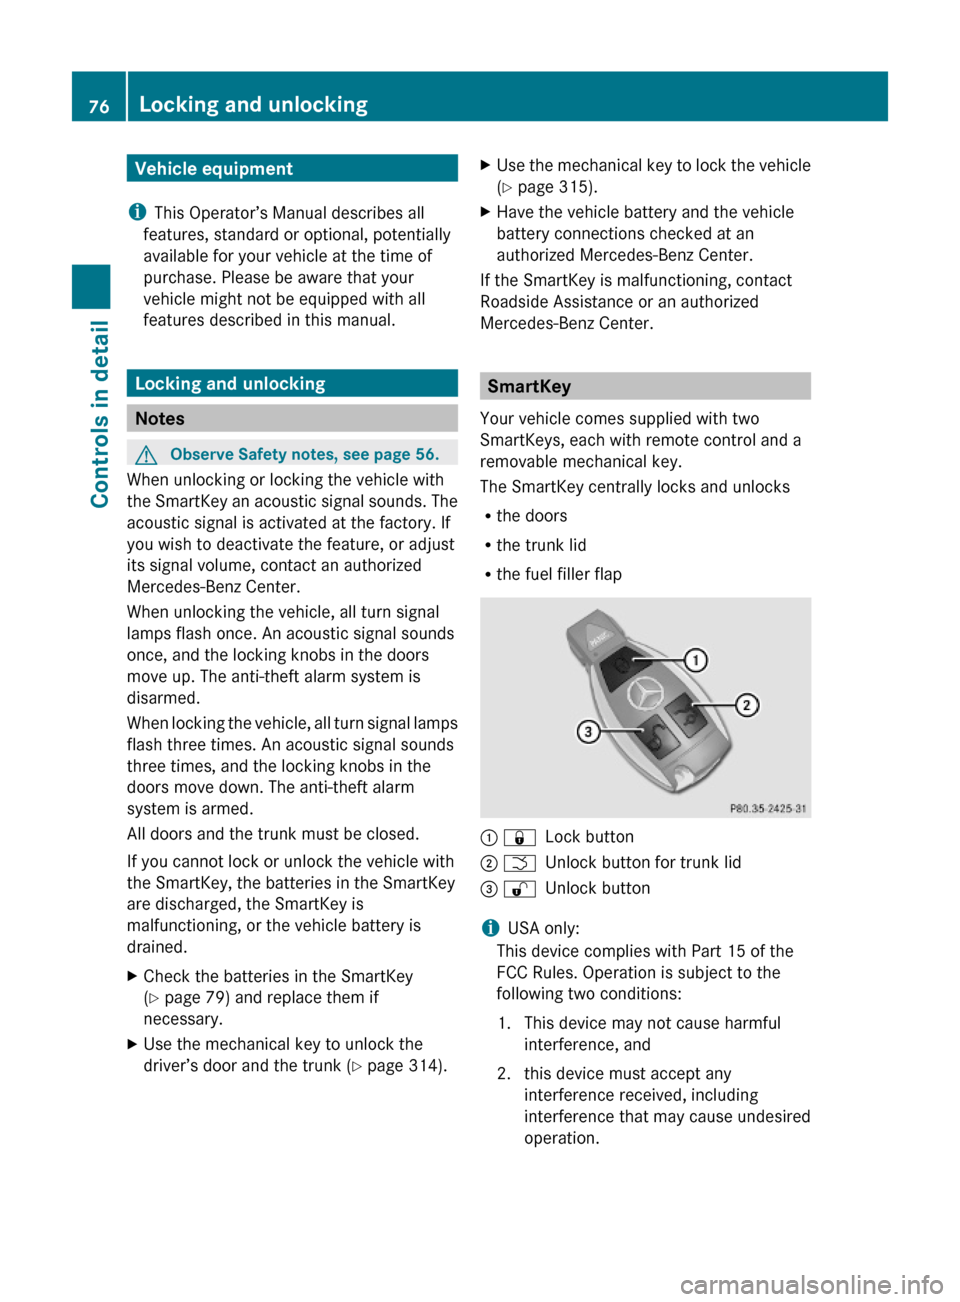
The SmartKey centrally locks and unlocks
Rthe doors
Rthe trunk lid
Rthe fuel filler flap
: &Lock button; FUnlock button for trunk lid= %Unlock button
iUSA only:
This device complies with Part 15 of the
FCC Rules. Operation is subject to the
following two conditions:
1. This device may not cause harmful
interference, and
2. this device must accept any
interference received, including
interference that may cause undesired
operation.
76Locking and unlockingControls in detail
212_AKB; 2; 41, en-USd2ureepe,Version: 2.11.8.12009-07-17T09:14:21+02:00 - Seite 76
Page 79 of 372

Any unauthorized modification to this
device could void the user’s authority to
operate the equipment.
i Canada only:
This device complies with RSS-210 of
Industry Canada. Operation is subject to
the following two conditions:
1. This device may not cause interference,
and
2. this device must accept any interference received, including
interference that may cause undesired
operation of the device.
Any unauthorized modification to this
device could void the user’s authority to
operate the equipment.
Factory setting XGlobal unlocking: Press button %.
Unless you open a door or the trunk within
approximately 40 seconds after unlocking
the vehicle:
R The vehicle will be locked again.
R The anti-theft alarm system will be
rearmed.
XGlobal locking: Press button &.
Selective setting
If you frequently travel alone, you may wish
to reprogramm the SmartKey. Pressing
button % will then only unlock the driver’s
door and the fuel filler flap.
XSwitching on/off: Press and hold buttons
% and & simultaneously for
approximately 6 seconds until the battery
check lamp ( Y page 79) flashes twice.
The SmartKey will then function as follows:
XUnlocking driver’s door and fuel filler
flap: Press button % once.XGlobal unlocking: Press button %
twice.XGlobal locking: Press button &.
KEYLESS-GO
Vehicles equipped with KEYLESS-GO come
with two SmartKeys with KEYLESS-GO, each
with remote control and a removable
mechanical key.
The KEYLESS-GO function is integrated into
the SmartKey. The validity of the SmartKey is
checked every time you grasp an outside door
handle.
When the SmartKey is valid, your vehicle
unlocks
R the doors
R the trunk lid
R the fuel filler flap
i USA only:
This device complies with Part 15 of the
FCC Rules. Operation is subject to the
following two conditions:
1. This device may not cause harmful interference, and
2. this device must accept any interference received, including
interference that may cause undesired
operation.
Any unauthorized modification to this
device could void the user’s authority to
operate the equipment.
Locking and unlocking77Controls in detail212_AKB; 2; 41, en-USd2ureepe,Version: 2.11.8.12009-07-17T09:14:21+02:00 - Seite 77Z
Page 81 of 372

Possibility 2 (One SmartKey in the vehicle,
no SmartKey outside the vehicle):
When exiting and trying to lock the vehicle,
the message Key Detected in Vehicle
appears in the multifunction display. The
vehicle will not be locked.
Factory setting
XGlobal unlocking: Grasp an outside door
handle.
Unless you open a door or the trunk within
approximately 40 seconds after unlocking
the vehicle:
RThe vehicle will be locked again.
RThe anti-theft alarm system will be
rearmed.
XGlobal locking: Touch outside of a door
handle :.
Selective setting
If you frequently travel alone, you may wish
to reprogram the SmartKey. Grasping the
driver’s outside door handle will then only
unlock the driver’s door and the fuel filler flap.
XSwitching on/off: Press and hold buttons
% and & simultaneously for
approximately 6 seconds until the battery
check lamp (Y page 79) flashes twice.
KEYLESS-GO will then function as follows:
XUnlocking driver’s door and fuel filler
flap: Grasp the driver’s outside door
handle.
XGlobal unlocking: Grasp any outside door
handle other than the driver’s outside door
handle.
XGlobal locking: Touch outside of a door
handle :.
Checking SmartKey batteries
XPress button & or % on the
SmartKey.
Battery check lamp : comes on briefly to
indicate that the SmartKey batteries are in
order.
If the battery check lamp does not come on
briefly during check, the SmartKey batteries
are discharged.
XReplace the batteries (Y page 317).
iYou can obtain the required batteries at
any authorized Mercedes-Benz Center.
iIf the batteries are checked within signal
range of the vehicle, pressing button
& or % will lock or unlock the vehicle
accordingly.
Loss of the SmartKey
If you lose your SmartKey or mechanical key,
you should do the following:
Locking and unlocking79Controls in detail212_AKB; 2; 41, en-USd2ureepe,Version: 2.11.8.12009-07-17T09:14:21+02:00 - Seite 79Z
Page 87 of 372

The emergency release button does not open
the trunk, if the vehicle battery is discharged
or disconnected.
Valet locking
You can lock the trunk separately with the
mechanical key. This denies unauthorized
access to the trunk, e.g. when you valet park
the vehicle.
XLeave only the SmartKey less its
mechanical key with the vehicle.
XValet locking: Close the trunk.XRemove the mechanical key from the
SmartKey (Y page 315).
XInsert the mechanical key in the trunk lid
lock.
XTurn the mechanical key clockwise to
position 2 and remove the mechanical
key in that position to lock the trunk.
The trunk remains locked even when the
vehicle is centrally unlocked.
You can then only open the trunk with the
mechanical key.
XCanceling: Insert the mechanical key in
the trunk lid lock.
XTurn the mechanical key counterclockwise
to neutral position 1 and remove the
mechanical key in that position to unlock
the trunk.
You can now open the trunk.
Starter switch positions
SmartKey
GObserve Safety notes, see page 56.gFor removing SmartKey (gear selector
lever must be in park position P)
1Power supply for some electrical
consumers, e.g. wipers
2Ignition (power supply for all electrical
consumers) and driving position
3Starting position
When you switch on the ignition, all lamps in
the instrument cluster come on. The low-
beam headlamp indicator lamp, high-beam
headlamp indicator lamp, turn signal
indicator lamps, and the indicator lamps for
the fog lamps will only come on if activated.
If a lamp in the instrument cluster fails to
come on when the ignition is switched on,
have it checked and replaced if necessary. If
a lamp in the instrument cluster remains on
after starting the engine or comes on while
driving, refer to “Lamps in instrument cluster”
(Y page 304).
If the SmartKey is left in starter switch
position 0 for an extended period of time, it
can no longer be turned in the starter switch.
In this case, the steering is locked. To unlock,
remove SmartKey from the starter switch and
reinsert.
The steering is locked when the SmartKey is
removed from the starter switch.
Starter switch positions85Controls in detail212_AKB; 2; 41, en-USd2ureepe,Version: 2.11.8.12009-07-17T09:14:21+02:00 - Seite 85Z
Page 320 of 372
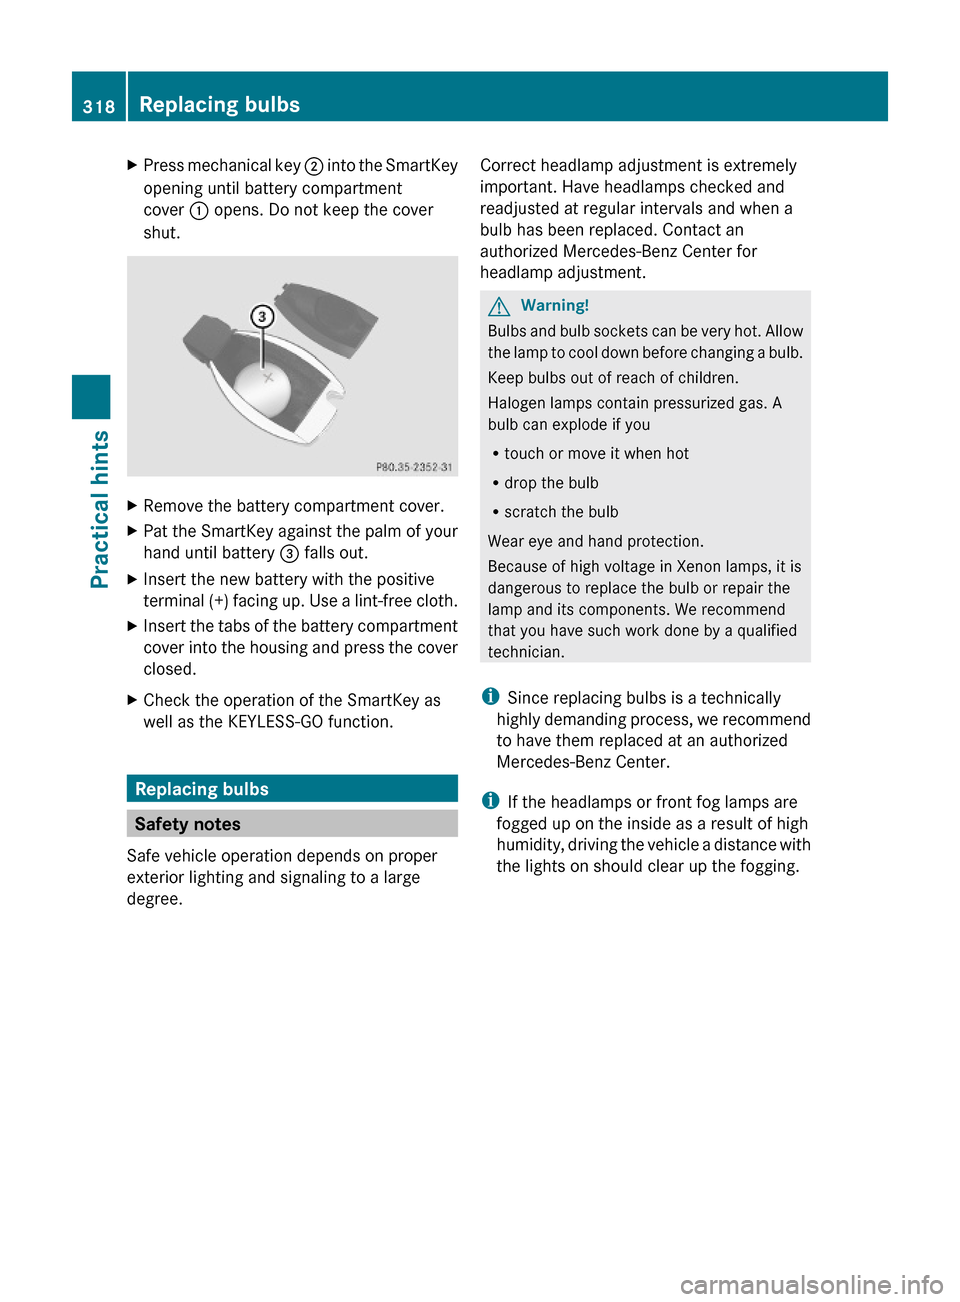
XPress mechanical key ; into the SmartKey
opening until battery compartment
cover : opens. Do not keep the cover
shut.
XRemove the battery compartment cover.XPat the SmartKey against the palm of your
hand until battery = falls out.
XInsert the new battery with the positive
terminal (+) facing up. Use a lint-free cloth.
XInsert the tabs of the battery compartment
cover into the housing and press the cover
closed.
XCheck the operation of the SmartKey as
well as the KEYLESS-GO function.
Replacing bulbs
Safety notes
Safe vehicle operation depends on proper
exterior lighting and signaling to a large
degree.
Correct headlamp adjustment is extremely
important. Have headlamps checked and
readjusted at regular intervals and when a
bulb has been replaced. Contact an
authorized Mercedes-Benz Center for
headlamp adjustment.
GWarning!
Bulbs and bulb sockets can be very hot. Allow
the lamp to cool down before changing a bulb.
Keep bulbs out of reach of children.
Halogen lamps contain pressurized gas. A
bulb can explode if you
Rtouch or move it when hot
Rdrop the bulb
Rscratch the bulb
Wear eye and hand protection.
Because of high voltage in Xenon lamps, it is
dangerous to replace the bulb or repair the
lamp and its components. We recommend
that you have such work done by a qualified
technician.
iSince replacing bulbs is a technically
highly demanding process, we recommend
to have them replaced at an authorized
Mercedes-Benz Center.
iIf the headlamps or front fog lamps are
fogged up on the inside as a result of high
humidity, driving the vehicle a distance with
the lights on should clear up the fogging.
318Replacing bulbsPractical hints
212_AKB; 2; 41, en-USd2ureepe,Version: 2.11.8.12009-07-17T09:14:21+02:00 - Seite 318
Page 339 of 372
flush affected area with water and seek
medical help if necessary.
A battery will also produce hydrogen gas,
which is flammable and explosive. Keep
flames or sparks away from battery, avoid
improper connection of jumper cables,
smoking etc.GWarning!
Do not place metal objects on the battery as
this could result in a short circuit.
Use leak-proof batteries only to avoid the risk
of acid burns in the event of an accident.
Take care that you do not become statically
charged, e.g. by wearing synthetic clothing or
rubbing against textiles. For this reason, you
also should not pull or push the battery over
carpets or other synthetic materials.
Never touch the battery first. First touch the
outside body of the vehicle in order to release
any possible electrostatic charges.
Do not rub the battery with rags or cloths. The
battery could explode if touched due to
electrostatic charge or due to spark
formation.
! The battery is a
Valve-Regulated Lead
Acid (VRLA) battery, also referred to as
“fleece” battery.
Such batteries do not require topping-up of
the electrolyte level. VRLA batteries
therefore do not have cell caps and the
battery cover is non-removable. Do not
attempt to open the battery as otherwise
the battery will be damaged.
VRLA batteries do not require topping-up of
the electrolyte level. They cannot be
opened to check the electrolyte level.
However, the battery condition must be
checked periodically by performing a
battery conductance test. Refer to
Maintenance Booklet for battery condition
testing intervals.
The factory-equipped battery may only be
replaced with a battery that
R has the same security features
R is of identical size
R is of identical voltage
R is of identical capacity
! As any other battery, the battery may
discharge if you do not operate the vehicle
for an extended period of time. Have the
battery disconnected at a qualified
workshop or an authorized Mercedes-Benz
Center in such a case. You may also
connect an accessory battery charge unit
expressly approved by Mercedes-Benz for
your vehicle model to maintain the battery
charge. Contact an authorized Mercedes-
Benz Center for further information.
The battery, the battery ventilation hose
and the lateral plug must always be
securely installed when the vehicle is in
operation.
! Never loosen or detach battery terminal
clamps while the engine is running or the
SmartKey is in the starter switch or
KEYLESS-GO button is in position 1.
Otherwise the alternator and other
electronic components could be severely
damaged.
Have the battery checked regularly at an
authorized Mercedes-Benz Center.
Refer to Maintenance Booklet for
maintenance intervals or contact an
authorized Mercedes-Benz Center for
further information.
Charging the battery
GWarning!
Never charge a battery while still installed in
the vehicle unless the accessory battery
charge unit approved by Mercedes-Benz is
being used. Gases may escape during
Battery337Practical hints212_AKB; 2; 41, en-USd2ureepe,Version: 2.11.8.12009-07-17T09:14:21+02:00 - Seite 337Z