2010 MERCEDES-BENZ E350 pre safe
[x] Cancel search: pre safePage 156 of 372
Switching on while driving
You can switch on the DISTRONIC PLUS when
the vehicle speed is above 20 mph
(30 km/h).
Below 20 mph (30 km/h), you can only switch
on the DISTRONIC PLUS if the preceding
vehicle has been detected and is shown in the
multifunction display. If you no longer see the
preceding vehicle in the multifunction display
and if it is no longer detected because it has
changed lanes, for example, the DISTRONIC
PLUS switches off and a signal sounds.
XPull the DISTRONIC PLUS lever briefly in
direction of arrow ? to call up the last set
speed, or if no speed is stored, to set and
store the current speed.
The DISTRONIC PLUS is switched on.
or
XTap the DISTRONIC PLUS lever up : or
down ; until desired speed is set.
The DISTRONIC PLUS is switched on.XRemove your foot from the accelerator
pedal.
Your vehicle adapts its speed to the
preceding vehicle, observing the set speed
as a maximum value.
If you do not completely remove your foot
from the accelerator pedal, the message
DISTRONIC PLUS Override appears in the
multifunction display. The distance to a
slower-driving vehicle will not be set. You will
drive at the speed you dictate by pressing the
accelerator pedal.
Switching on when approaching a
stationary vehicle
It is helpful to switch on the DISTRONIC PLUS
display in the multifunction display to see that
a preceding vehicle is detected
( Y page 152). You can only switch on the
DISTRONIC PLUS below a speed of 20 mph
(30 km/h) when a preceding vehicle is
detected.
If the preceding vehicle is stationary, you can
only switch on the DISTRONIC PLUS if your
vehicle is also at a standstill.XPull the DISTRONIC PLUS lever briefly in
direction of arrow ?.
The DISTRONIC PLUS is switched on.XTap the DISTRONIC PLUS lever up : or
down ; until desired speed is set.
You can adjust the set speed using the
DISTRONIC PLUS lever and the target
distance using the distance setting switch on
the DISTRONIC PLUS lever ( Y page 157).
i If the DISTRONIC PLUS is switched off,
the PRE-SAFE ®
Brake (Y page 69) will warn
of an impending collision if this function has
been activated with the instrument cluster
control system ( Y page 137).
Starting off
When the preceding vehicle starts off:
XRemove your foot from the brake pedal.XPull the DISTRONIC PLUS lever briefly in
direction of arrow ?.
or
XBriefly step on the accelerator pedal.
Your vehicle starts off and adapts its speed
to the preceding vehicle.
Driving
If there is no preceding vehicle, the
DISTRONIC PLUS functions like the cruise
control ( Y page 146).
When the DISTRONIC PLUS detects that the
preceding vehicle is driving more slowly, it
brakes the vehicle in order to keep the
distance specified by you.
When the DISTRONIC PLUS detects that the
preceding vehicle is driving faster, it
accelerates the vehicle up to the set speed.
GWarning!
When you step on the brake pedal, you switch
off the DISTRONIC PLUS except when the
vehicle is at a standstill. The DISTRONIC PLUS
154Driving systemsControls in detail
212_AKB; 2; 41, en-USd2ureepe,Version: 2.11.8.12009-07-17T09:14:21+02:00 - Seite 154
Page 159 of 372
Ryou shift the automatic transmission into
park position P, reverse gear R, or neutral
position N while driving
Rthe radar sensors are switched off
Ryou pull the DISTRONIC PLUS lever in
direction of arrow ? (Y page 153) for
driving off and the passenger door is open
The segments indicating the set speed in the
multifunction display go out, an acoustic
signal sounds, and the message DISTRONIC
PLUS Off appears in the multifunction
display for approximately 5 seconds.
GWarning!
The DISTRONIC PLUS switches off and
releases the brakes when the vehicle
decelerates below the minimum speed of
20 mph (30 km/h) by operation of the system
unless the DISTRONIC PLUS detects a vehicle
directly ahead of you. At that time the driver
must apply the brakes in order to reduce
vehicle speed further or bring it to a stop.
Depressing the accelerator pedal does not
deactivate the DISTRONIC PLUS. After a brief
acceleration (e.g. for passing), the
DISTRONIC PLUS will resume the last set
speed.
Setting the following distance in
DISTRONIC PLUS
You can set the specified following distance
for the DISTRONIC PLUS by varying the time
setting between 1.0 and 2.0 seconds. Using
this time setting and the current speed of
your vehicle, the DISTRONIC PLUS calculates
and sets the required following distance to
the preceding vehicle.
The set distance will be shown in the
multifunction display.
GWarning!
It is up to the driver to exercise discretion to
select the appropriate setting given road
conditions, traffic, driver’s preferred driving
style and applicable laws and driving
recommendations for safe following distance.
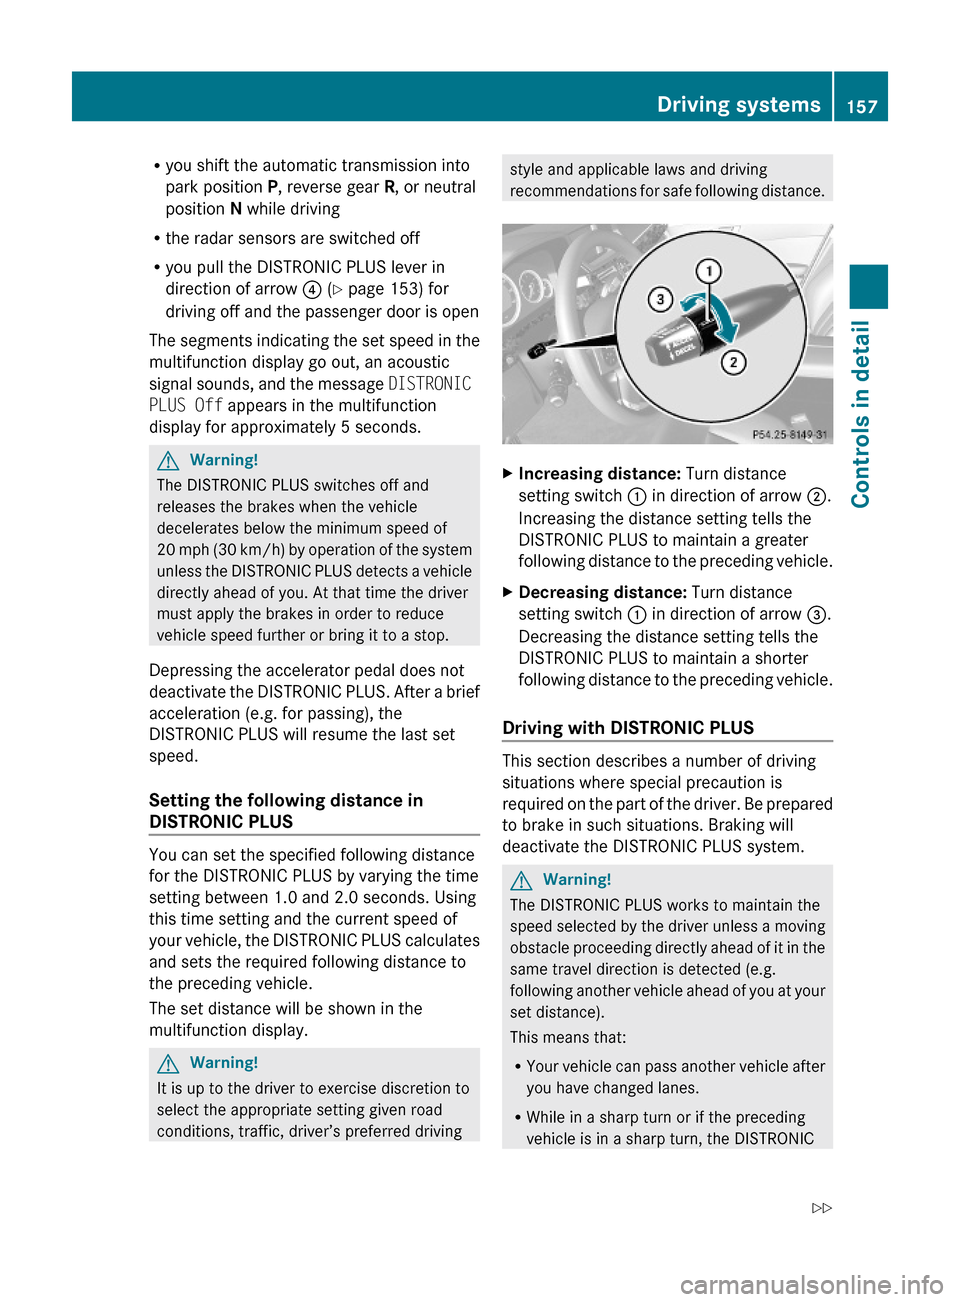
XIncreasing distance: Turn distance
setting switch : in direction of arrow ;.
Increasing the distance setting tells the
DISTRONIC PLUS to maintain a greater
following distance to the preceding vehicle.
XDecreasing distance: Turn distance
setting switch : in direction of arrow =.
Decreasing the distance setting tells the
DISTRONIC PLUS to maintain a shorter
following distance to the preceding vehicle.
Driving with DISTRONIC PLUS
This section describes a number of driving
situations where special precaution is
required on the part of the driver. Be prepared
to brake in such situations. Braking will
deactivate the DISTRONIC PLUS system.
GWarning!
The DISTRONIC PLUS works to maintain the
speed selected by the driver unless a moving
obstacle proceeding directly ahead of it in the
same travel direction is detected (e.g.
following another vehicle ahead of you at your
set distance).
This means that:
RYour vehicle can pass another vehicle after
you have changed lanes.
RWhile in a sharp turn or if the preceding
vehicle is in a sharp turn, the DISTRONIC
Driving systems157Controls in detail212_AKB; 2; 41, en-USd2ureepe,Version: 2.11.8.12009-07-17T09:14:21+02:00 - Seite 157Z
Page 165 of 372

suspension setup adjusts the damping
behavior and the ride height for your vehicle.
The AIRMATIC consists of two components.
The electronically controlled damping system
(Y page 163) and the vehicle level control
(Y page 163).
Damping system
The damping system is controlled
electronically and operates continuously. It
adjusts the damping characteristics to the
current operating and driving conditions. The
damping is adjusted individually for each
wheel. Driving safety and tire comfort are
increased.
The fine tuning of the damping is dependent
on
Ryour driving style
Rroad surface conditions
Ryour personal settings
The selected setting remains stored in
memory even if the SmartKey is removed
from the starter switch.
XStart the engine.
Sporty damping adjustment
The firmer suspension tuning in Sport driving
mode provides enhanced road contact.
Select this mode for example, on winding
highways.
XPress damping system switch :.
Indicator lamp ; comes on. The Sport
driving mode with a firmer suspension
tuning is selected. The message
AIRMATIC SPORT appears in the
multifunction display.
Comfort damping adjustment
Vehicle handling in Comfort driving mode is
softer. Select this mode when you prefer a
more comfortable driving style on straight
freeways.
XPress damping system switch :.
Indicator lamp = comes on. The Comfort
driving mode is selected. The message
AIRMATIC COMFORT appears in the
multifunction display.
Vehicle level control
Your vehicle automatically adjusts its ride
height.
The all-around vehicle level control provides
best possible suspension and constant
ground clearance. The vehicle lowers at high
speed automatically in order to increase
driving safety and to reduce fuel
consumption.
The following vehicle levels are available:
Rnormal
Rraised; the vehicle is raised by
approximately 1.0 in (25 mm) compared to
normal level
Rlowered; the vehicle is lowered by
approximately 0.4 in (10 mm) compared to
normal level
You can choose between normal or raised
level.
The vehicle chassis ride height is reduced
automatically
Rat a speed exceeding approximately
93 mph (150 km/h)
Rwith the Sport driving mode (Y page 163)
set
With decreasing speed, the ride height is
again raised to the normal level.
Driving systems163Controls in detail212_AKB; 2; 41, en-USd2ureepe,Version: 2.11.8.12009-07-17T09:14:21+02:00 - Seite 163Z
Page 166 of 372

iThese height adjustments are so small
that you may not notice any change.
Adjusting vehicle level manually
GWarning!
To help avoid personal injury, keep hands and
feet away from wheel housing area, and stay
away from under the vehicle when lowering
the vehicle chassis.
Select the normal level for driving on normal
roads. Select the raised level for driving on
rough roads or with snow chains. Select the
raised level only when required by current
driving conditions. Otherwise, the handling
may be impaired and the fuel consumption
may increase.
The selected vehicle level setting remains
stored in memory even if the SmartKey is
removed from the starter switch.
Selecting raised level
XStart the engine.
When indicator lamp ; is off:
XBriefly press vehicle level control
switch :.
Indicator lamp ; comes on. The vehicle
adjusts from normal level to raised level.
The message: Vehicle Rising appears in
the multifunction display when adjusting
from normal level to raised level. The
message disappears when the vehicle is
raised. Indicator lamp ; is then lit.
When the vehicle is in raised level, pressing
vehicle level control switch : will return
the vehicle to normal level.
The vehicle is lowered to the normal level
automatically when
Rthe vehicle speed is above 75 mph
(120 km/h)
Rthe vehicle speed stays between 50 mph
(80 km/h) and 75 mph (120 km/h) for
approximately 3 minutes.
Indicator lamp ; in
vehicle level control switch : goes out.
If you do not drive in this speed range, the
selected vehicle level setting remains stored
in memory even if the SmartKey is removed
from the starter switch.
Selecting normal level
XStart the engine.
When indicator lamp ; is on:
XBriefly press vehicle level control
switch :.
Indicator lamp ; goes out. The vehicle
adjusts from raised level to normal level.
AMG adaptive sport suspension
system (E 63 AMG)
Rear-axle level control
The rear-axle level control adjusts the vehicle
level for the rear axle. The rear-axle level
control is beneficial because it keeps the
vehicle level at the rear axle constant,
independent of the load. Your vehicle adjusts
its ride height automatically to increase
vehicle safety and to reduce fuel
consumption.
Damping system
The damping system is controlled
electronically and operates continuously. It
adjusts the damping characteristics to the
current operating and driving conditions. The
164Driving systemsControls in detail
212_AKB; 2; 41, en-USd2ureepe,Version: 2.11.8.12009-07-17T09:14:21+02:00 - Seite 164
Page 167 of 372
damping is adjusted individually for each
wheel. Driving safety and tire comfort are
increased.
The fine tuning of the damping is dependent
on:
Ryour driving style
Rroad surface conditions
Ryour personal settings (Comfort, Sport, or
Sport+)
When you start the engine, the Comfort
driving mode is selected automatically.
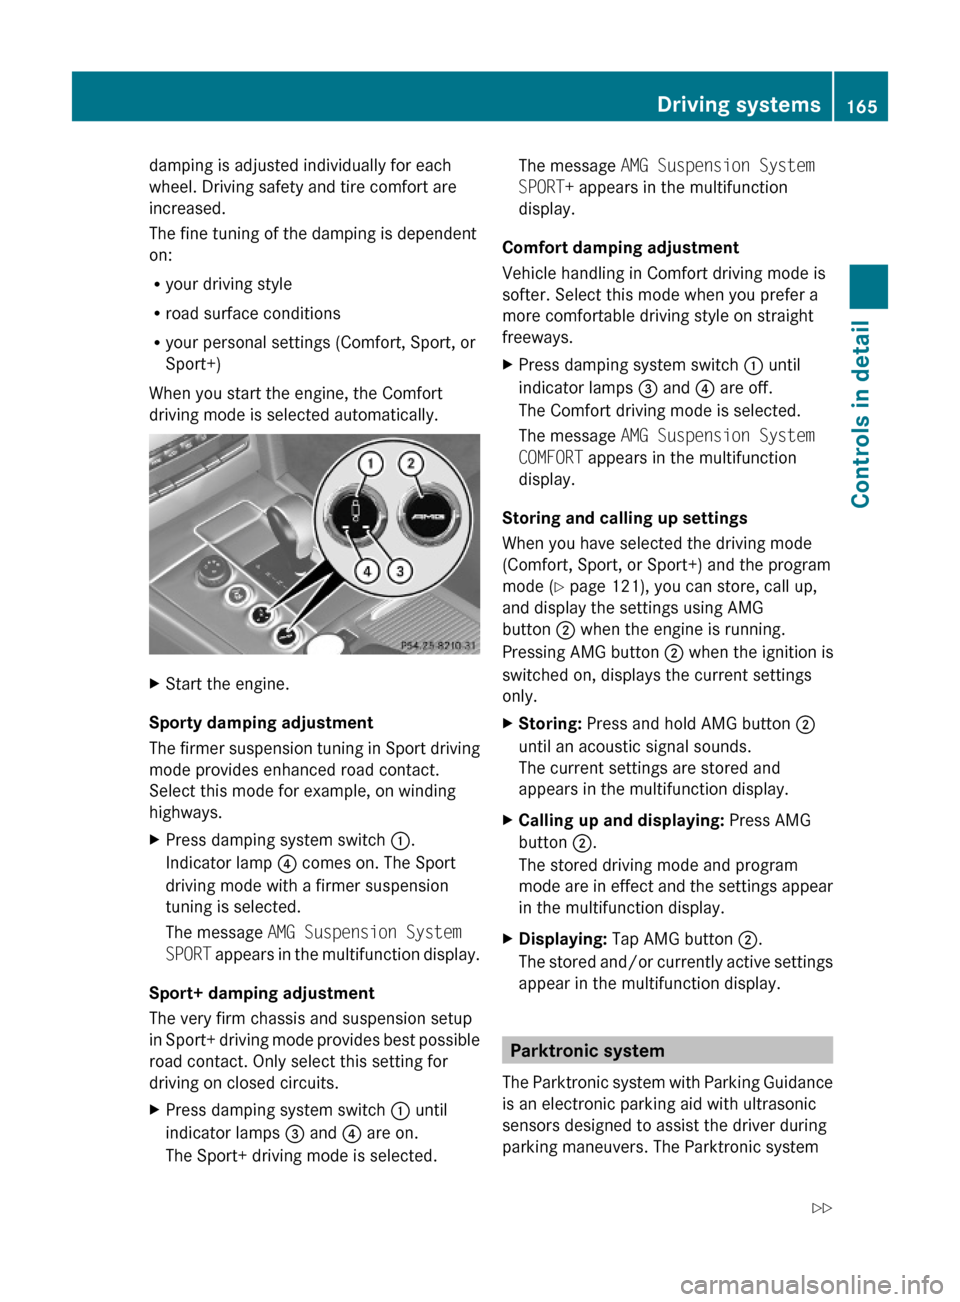
XStart the engine.
Sporty damping adjustment
The firmer suspension tuning in Sport driving
mode provides enhanced road contact.
Select this mode for example, on winding
highways.
XPress damping system switch :.
Indicator lamp ? comes on. The Sport
driving mode with a firmer suspension
tuning is selected.
The message AMG Suspension System
SPORT appears in the multifunction display.
Sport+ damping adjustment
The very firm chassis and suspension setup
in Sport+ driving mode provides best possible
road contact. Only select this setting for
driving on closed circuits.
XPress damping system switch : until
indicator lamps = and ? are on.
The Sport+ driving mode is selected.
The message AMG Suspension System
SPORT+ appears in the multifunction
display.
Comfort damping adjustment
Vehicle handling in Comfort driving mode is
softer. Select this mode when you prefer a
more comfortable driving style on straight
freeways.
XPress damping system switch : until
indicator lamps = and ? are off.
The Comfort driving mode is selected.
The message AMG Suspension System
COMFORT appears in the multifunction
display.
Storing and calling up settings
When you have selected the driving mode
(Comfort, Sport, or Sport+) and the program
mode (Y page 121), you can store, call up,
and display the settings using AMG
button ; when the engine is running.
Pressing AMG button ; when the ignition is
switched on, displays the current settings
only.
XStoring: Press and hold AMG button ;
until an acoustic signal sounds.
The current settings are stored and
appears in the multifunction display.
XCalling up and displaying: Press AMG
button ;.
The stored driving mode and program
mode are in effect and the settings appear
in the multifunction display.
XDisplaying: Tap AMG button ;.
The stored and/or currently active settings
appear in the multifunction display.
Parktronic system
The Parktronic system with Parking Guidance
is an electronic parking aid with ultrasonic
sensors designed to assist the driver during
parking maneuvers. The Parktronic system
Driving systems165Controls in detail212_AKB; 2; 41, en-USd2ureepe,Version: 2.11.8.12009-07-17T09:14:21+02:00 - Seite 165Z
Page 171 of 372
GWarning!
The Parking Guidance is only an aid and may
display parking spaces that are not suitable
for parking such as
R no-parking zones
R parking space with unsuitable road/ground
surface
R driveways
R entrances/exits
The Parking Guidance scans for and measures
potential parking spaces when driving past.
Subsequent changes to the parking space are
not taken into account. This may be the case
if the position of the vehicle parked in front or
behind the space changes or obstacles in the
parking space are moved.
The Parking Guidance does not relieve you of
the responsibility to pay attention. If you only
rely on the Parking Guidance, you may cause
an accident and injure yourself and others.
You are always responsible for safety and
must continue to pay attention to your
immediate surroundings when parking and
maneuvering.
GWarning!
The system cannot detect objects located
above the area that the sensors scan. These
objects, e.g. protruding load, overhang, or
truck tail lifts, will be ignored when computing
the parking procedure. The Parking Guidance
might therefore provide untimely steering
instructions. This could cause a collision.
Thus, do not use the Parking Guidance in such
situations.
GWarning!
Make sure no persons or animals are in the
area in which you are maneuvering. You could
otherwise injure them.
! Special attention must be paid to objects
with smooth surfaces or low silhouettes
(e.g. trailer couplings, painted posts,
elevated crossbars or road curbs). Such
objects may not be detected by the system
and can damage the vehicle.
Use the Parking Guidance for parking spaces
that are
R parallel to the direction of travel
R located on straight streets, i.e. not in
curves
R on the same level as the street, i.e. not on
sidewalks, for example.
Parking instructions:
R On narrow streets, drive by the parking
space as close as possible.
R Parking spaces that are dirty, overgrown or
located in front of trailers may not be
detected correctly.
R Snowfall or heavy rain may cause imprecise
measurement of the parking space.
R Also observe the Parktronic system
warning indicator ( Y page 167) while the
Parking Guidance is active.
R You may not use the Parking Guidance
when transporting cargo that protrudes the
vehicle.
R Do not use the Parking Guidance when
driving with snow chains or when a spare
wheel is mounted.
R How well your vehicle will be parked after
completion of the Parking Guidance
depends on the position and shape of the
vehicles parked in front of and behind the
parking space as well as the conditions of
the immediate surroundings. In certain
cases, the Parking Guidance may guide you
too far into the parking space or not far
enough. If this is the case, cancel the
parking procedure with the Parking
Guidance and correct the vehicle position
yourself.
Detecting a parking space
The Parking Guidance is active when driving
forward. The system operates at a vehicle
Driving systems169Controls in detail212_AKB; 2; 41, en-USd2ureepe,Version: 2.11.8.12009-07-17T09:14:21+02:00 - Seite 169Z
Page 172 of 372
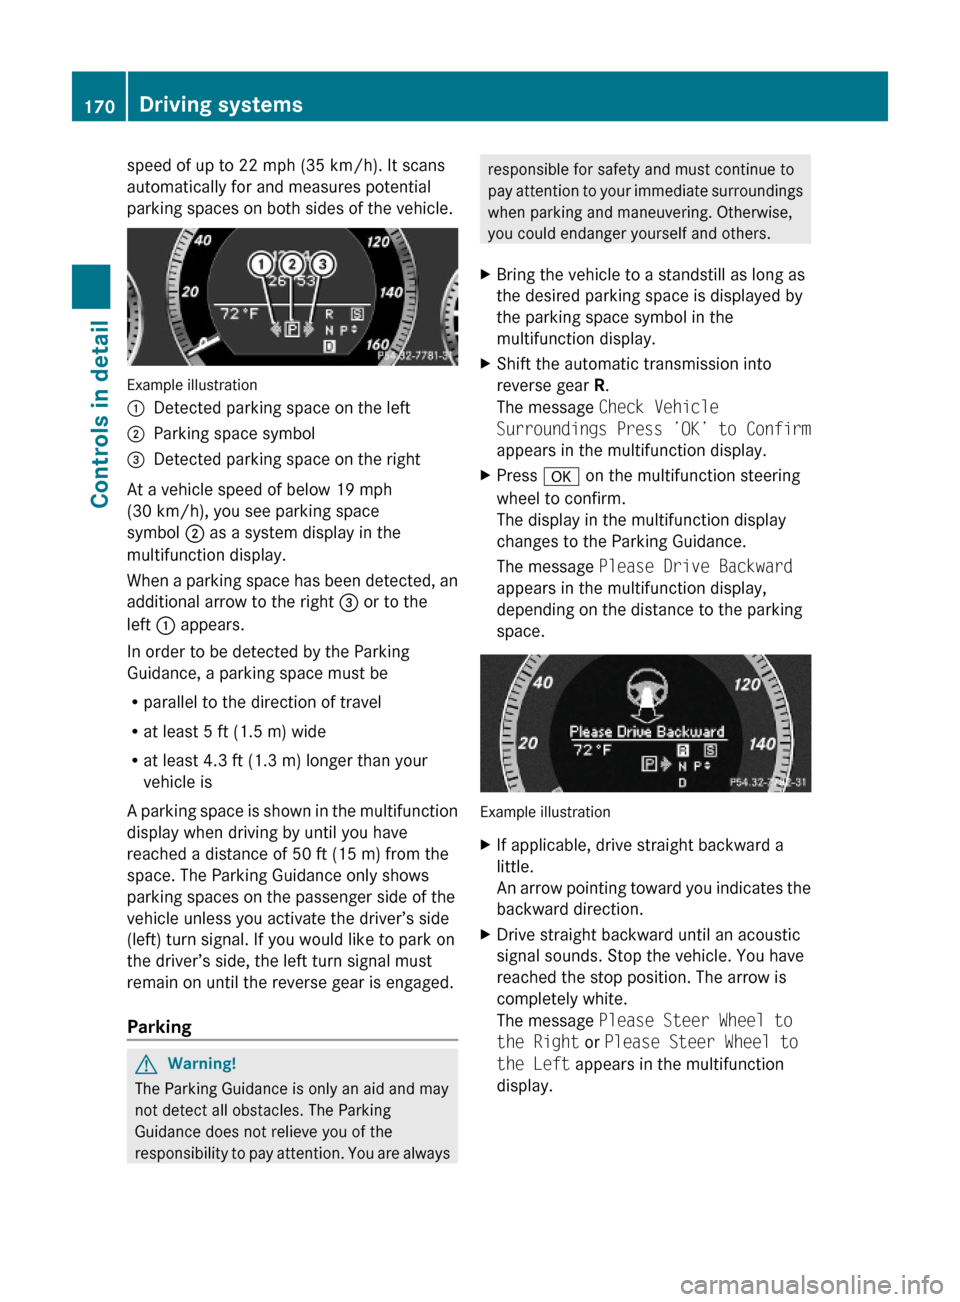
speed of up to 22 mph (35 km/h). It scans
automatically for and measures potential
parking spaces on both sides of the vehicle.
Example illustration
:Detected parking space on the left;Parking space symbol=Detected parking space on the right
At a vehicle speed of below 19 mph
(30 km/h), you see parking space
symbol ; as a system display in the
multifunction display.
When a parking space has been detected, an
additional arrow to the right = or to the
left : appears.
In order to be detected by the Parking
Guidance, a parking space must be
Rparallel to the direction of travel
Rat least 5 ft (1.5 m) wide
Rat least 4.3 ft (1.3 m) longer than your
vehicle is
A parking space is shown in the multifunction
display when driving by until you have
reached a distance of 50 ft (15 m) from the
space. The Parking Guidance only shows
parking spaces on the passenger side of the
vehicle unless you activate the driver’s side
(left) turn signal. If you would like to park on
the driver’s side, the left turn signal must
remain on until the reverse gear is engaged.
Parking
GWarning!
The Parking Guidance is only an aid and may
not detect all obstacles. The Parking
Guidance does not relieve you of the
responsibility to pay attention. You are always
responsible for safety and must continue to
pay attention to your immediate surroundings
when parking and maneuvering. Otherwise,
you could endanger yourself and others.
XBring the vehicle to a standstill as long as
the desired parking space is displayed by
the parking space symbol in the
multifunction display.
XShift the automatic transmission into
reverse gear R.
The message Check Vehicle
Surroundings Press ’OK’ to Confirm
appears in the multifunction display.
XPress a on the multifunction steering
wheel to confirm.
The display in the multifunction display
changes to the Parking Guidance.
The message Please Drive Backward
appears in the multifunction display,
depending on the distance to the parking
space.
Example illustration
XIf applicable, drive straight backward a
little.
An arrow pointing toward you indicates the
backward direction.
XDrive straight backward until an acoustic
signal sounds. Stop the vehicle. You have
reached the stop position. The arrow is
completely white.
The message Please Steer Wheel to
the Right or Please Steer Wheel to
the Left appears in the multifunction
display.
170Driving systemsControls in detail
212_AKB; 2; 41, en-USd2ureepe,Version: 2.11.8.12009-07-17T09:14:21+02:00 - Seite 170
Page 175 of 372
A camera at the top of the windshield
measures the infrared light and shows a
black-and-white image in the COMAND
system display. The image in the COMAND
system display corresponds to a road lit up
by high-beam headlamps.
GWarning!
The Night View Assist Plus is only an aid to
support you while driving and cannot
substitute your careful attention. Do not rely
on the display of the Night View Assist Plus;
instead, continue to look through the
windshield. You are always responsible for
safety and must drive in accordance with
traffic conditions. Otherwise, you could
endanger yourself and others.
The system may be impaired or unavailable
when
Rvisibility is poor, e.g. due to snow, rain, fog,
or heavy spray
Rthe camera area of the windshield is dirty,
fogged up or covered by a sticker for
example
Rdriving through curves or on inclines or
declines
GWarning!
The Night View Assist Plus cannot record
objects immediately in front of or next to the
vehicle. When maneuvering, continue to look
through the windshield. Make sure no
persons or animals are in the area in which
you are maneuvering. You could otherwise
injure them.
The Night View Assist Plus image in the
COMAND system display is not impaired by
the headlamps of approaching vehicles.
As a result, you can better follow the course
of the road and detect obstacles earlier on.
iInfrared light is invisible to the human eye
and thus does not blind. The Night View
Assist Plus can remain switched on
permanently even with oncoming traffic
present.
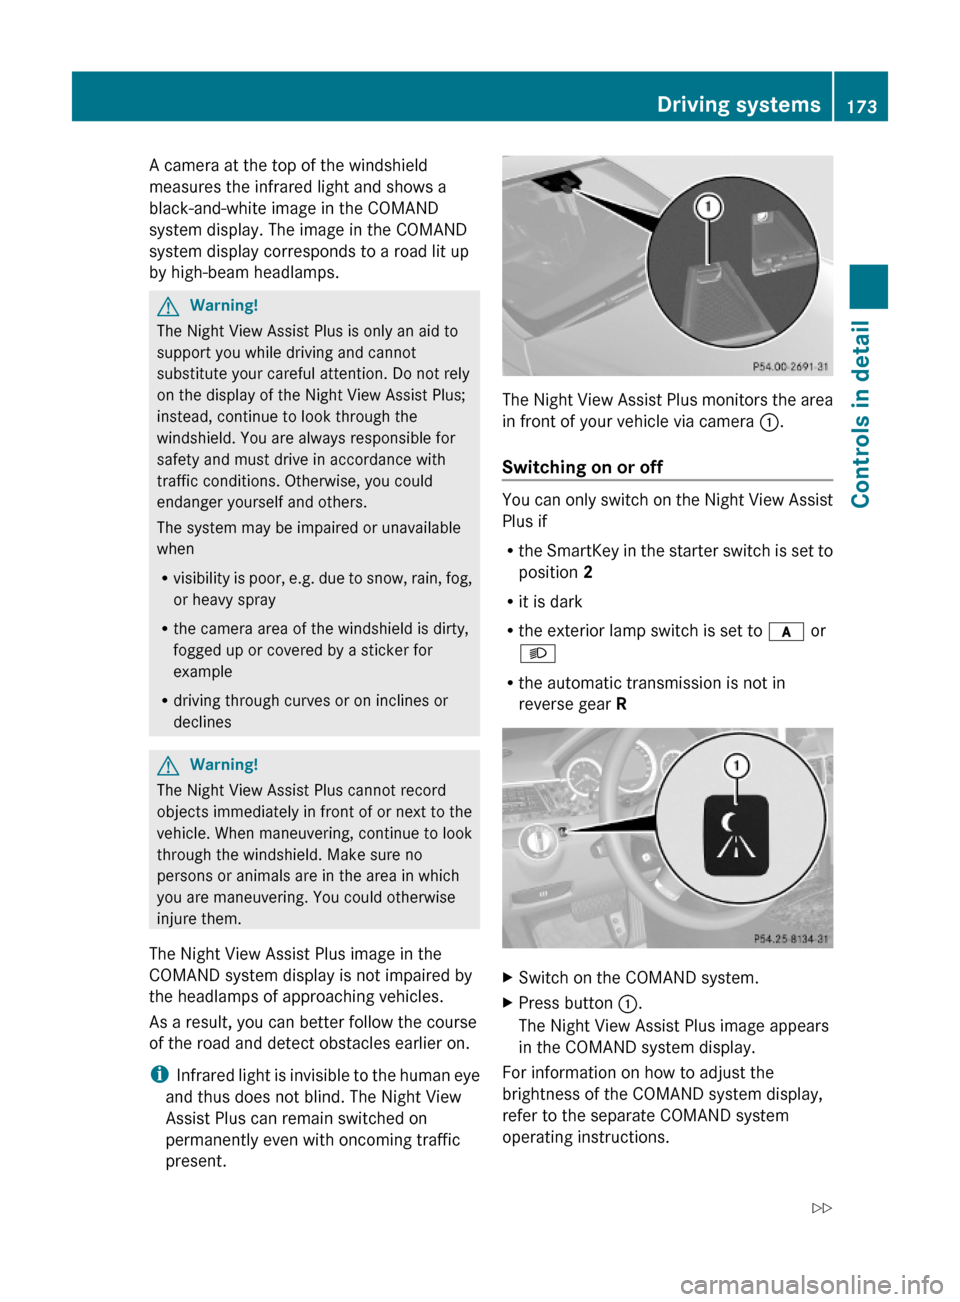
The Night View Assist Plus monitors the area
in front of your vehicle via camera :.
Switching on or off
You can only switch on the Night View Assist
Plus if
Rthe SmartKey in the starter switch is set to
position 2
Rit is dark
Rthe exterior lamp switch is set to c or
L
Rthe automatic transmission is not in
reverse gear R
XSwitch on the COMAND system.XPress button :.
The Night View Assist Plus image appears
in the COMAND system display.
For information on how to adjust the
brightness of the COMAND system display,
refer to the separate COMAND system
operating instructions.
Driving systems173Controls in detail212_AKB; 2; 41, en-USd2ureepe,Version: 2.11.8.12009-07-17T09:14:21+02:00 - Seite 173Z