2010 MERCEDES-BENZ E350 transmission
[x] Cancel search: transmissionPage 251 of 372
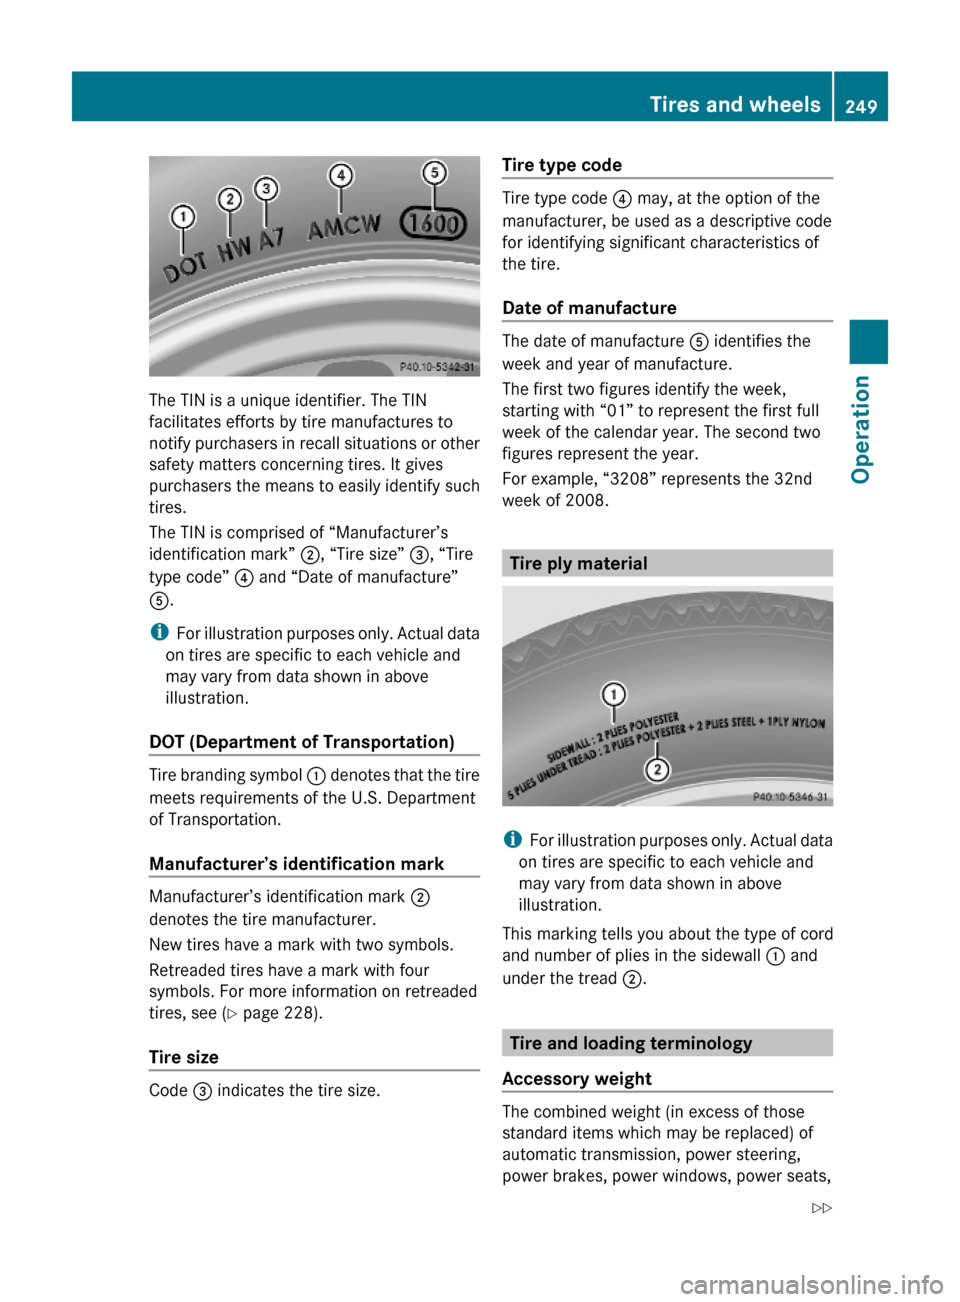
The TIN is a unique identifier. The TIN
facilitates efforts by tire manufactures to
notify purchasers in recall situations or other
safety matters concerning tires. It gives
purchasers the means to easily identify such
tires.
The TIN is comprised of “Manufacturer’s
identification mark” ;, “Tire size” =, “Tire
type code” ? and “Date of manufacture”
A.
iFor illustration purposes only. Actual data
on tires are specific to each vehicle and
may vary from data shown in above
illustration.
DOT (Department of Transportation)
Tire branding symbol : denotes that the tire
meets requirements of the U.S. Department
of Transportation.
Manufacturer’s identification mark
Manufacturer’s identification mark ;
denotes the tire manufacturer.
New tires have a mark with two symbols.
Retreaded tires have a mark with four
symbols. For more information on retreaded
tires, see (Y page 228).
Tire size
Code = indicates the tire size.
Tire type code
Tire type code ? may, at the option of the
manufacturer, be used as a descriptive code
for identifying significant characteristics of
the tire.
Date of manufacture
The date of manufacture A identifies the
week and year of manufacture.
The first two figures identify the week,
starting with “01” to represent the first full
week of the calendar year. The second two
figures represent the year.
For example, “3208” represents the 32nd
week of 2008.
Tire ply material
iFor illustration purposes only. Actual data
on tires are specific to each vehicle and
may vary from data shown in above
illustration.
This marking tells you about the type of cord
and number of plies in the sidewall : and
under the tread ;.
Tire and loading terminology
Accessory weight
The combined weight (in excess of those
standard items which may be replaced) of
automatic transmission, power steering,
power brakes, power windows, power seats,
Tires and wheels249Operation212_AKB; 2; 41, en-USd2ureepe,Version: 2.11.8.12009-07-17T09:14:21+02:00 - Seite 249Z
Page 255 of 372
control. Other settings may result in
damage to your vehicle.
! Some tire sizes do not leave adequate
clearance for snow chains. To help avoid
serious damage to your vehicle or tires,
make sure the use of snow chains is
permissible as specified in the “Technical
data” section of this Operator’s Manual.
Snow chains should only be driven on snow-
covered roads at speeds not to exceed
30 mph (50 km/h). Remove chains as soon
as possible when driving on roads without
snow.
Observe the following guidelines when using
snow chains:
R Use of snow chains is not permissible with
all wheel/tire combinations ( Y page 353).
R Use snow chains in pairs and on rear
wheels only. Follow the manufacturer’s
mounting instructions.
! If snow chains are mounted to the front
wheels, they may scrape against the body
or axle components. The tires or the vehicle
could be damaged as a result.
R Only use snow chains that are approved by
Mercedes-Benz. Any authorized Mercedes-
Benz Center will be glad to advise you on
this subject.
R Use of snow chains may be prohibited
depending on location. Always check local
and state laws before installing snow
chains.
R Do not use snow chains on the spare wheel.
i When driving with snow chains, you may
wish to switch off the ESC ( Y page 66)
before setting the vehicle in motion. This
will improve the vehicle’s traction.Winter driving instructionsGWarning!
If the vehicle becomes stuck in snow, make
sure snow is kept clear of the exhaust pipe
and from around the vehicle with the engine
running. Otherwise, deadly carbon monoxide
(CO) gases may enter vehicle interior
resulting in unconsciousness and death.
To assure sufficient fresh air ventilation, open
a window slightly on the side of the vehicle
not facing the wind.
GWarning!
The outside temperature indicator is not
designed to serve as an ice-warning device
and is therefore unsuitable for that purpose.
Indicated temperatures just above the
freezing point do not guarantee that the road
surface is free of ice. The road may still be icy,
especially in wooded areas or on bridges.
GWarning!
On slippery road surfaces, never downshift in
order to obtain braking action. This could
result in drive wheel slip and reduced vehicle
control. Your vehicle’s ABS will not prevent
this type of loss of control.
The most important rule for slippery or icy
roads is to drive sensibly and to avoid abrupt
acceleration, braking and steering
maneuvers. Do not use the cruise control or
DISTRONIC PLUS system under such
conditions.
When the vehicle is in danger of skidding, shift
the automatic transmission to neutral
position N. Try to keep the vehicle under
control by corrective steering action.
i For information on driving with snow
chains, see “Snow chains” ( Y page 252).
Road salts and chemicals can adversely
affect braking efficiency. Increased pedal
force may become necessary to produce the
normal brake effect.
Winter driving253Operation212_AKB; 2; 41, en-USd2ureepe,Version: 2.11.8.12009-07-17T09:14:21+02:00 - Seite 253Z
Page 259 of 372
Driving off
Warm up the engine smoothly. Do not place
full load on the engine until the operating
temperature has been reached.
! When driving off on a slippery surface, do
not allow a drive wheel to spin for an
extended period with the ESC switched off.
Doing so may cause serious damage to the
drivetrain which is not covered by the
Mercedes-Benz Limited Warranty.
! Simultaneously depressing the
accelerator pedal and applying the brakes
reduces engine performance and causes
premature brake and drivetrain wear which
is not covered by the Mercedes-Benz
Limited Warranty.
Hydroplaning
Depending on the depth of the water layer on
the road, hydroplaning may occur, even at low
speeds and with new tires. In heavy rain or
when conditions indicate possible
hydroplaning:
XReduce vehicle speed.XAvoid track grooves in the road.XApply brakes cautiously.
Standing water
! Do not drive through flooded areas.
Before driving through water, determine its
depth.
If you must drive through standing water,
drive slowly to prevent water from entering
the passenger compartment or the engine
compartment. Water in these areas could
cause damage to electrical components or
wiring of the engine or transmission, or
could result in water being ingested by the
engine through the air intake causing
severe internal engine damage. Any such
damage is not covered by the Mercedes-
Benz Limited Warranty.
Driving abroad
If you plan to drive the vehicle outside the U.S.
or Canada, you should request dealer
network information for your destination from
any authorized Mercedes-Benz Center.
Control and operation of radio
transmitters
Safety notes
GWarning!
Please do not forget that your primary
responsibility is to drive the vehicle. A driver’s
attention to the road must always be his/her
primary focus when driving. For your safety
and the safety of others, we recommend that
you pull over to a safe location and stop
before placing or taking a telephone call.
If you choose to use the telephone 15
while
driving, please use the hands-free device and
only use the telephone when road, weather
and traffic conditions permit. Some
jurisdictions prohibit the driver from using a
mobile telephone while driving a vehicle.
Only operate the audio system or
COMAND 15
(Cockpit Management and Data
System) if road, weather and traffic
conditions permit. Otherwise, you may not be
able to observe traffic conditions and could
endanger yourself and others.
Bear in mind that at a speed of just 30 mph
(approximately 50 km/h), your vehicle is
covering a distance of 44 feet (approximately
14 m) every second.
15 Observe all legal requirements.Driving instructions257Operation212_AKB; 2; 41, en-USd2ureepe,Version: 2.11.8.12009-07-17T09:14:21+02:00 - Seite 257Z
Page 264 of 372

XOnly use a mild vehicle wash detergent,
such as Mercedes-Benz approved Car
Shampoo.XThoroughly spray the vehicle with a
diffused jet of water.XDo not spray directly towards the
ventilation intake.XUse plenty of water and rinse the sponge
and chamois frequently.XRinse with clean water and dry with a
chamois thoroughly.
Do not allow cleaning agents to dry on the
finish.
Automatic car wash
GWarning!
The vehicle is braked when the HOLD function
or DISTRONIC PLUS is activated. Therefore,
deactivate the HOLD function or DISTRONIC
PLUS before the vehicle is washed in an
automatic car wash.
You can have your vehicle washed in an
automatic car wash from the start. Brushless
car washes are preferable.
XTo protect the filter system, activate the air
recirculation mode using button g on
the climate control panel.
! Do not clean your vehicle in an automatic
touchless car wash which uses caustic
spray. Caustic spray will damage the paint
or ornamental moldings.
If the vehicle is very dirty, prewash it before
running it through the automatic car wash.
! Make sure the combination switch is set
to wiper setting $. Otherwise, the rain
sensor could activate and cause the wipers
to move unintentionally. This may lead to
vehicle damage.
Due to the width of the vehicle, fold in
exterior rear view mirrors prior to running
the vehicle through an automatic car wash
to prevent damage to the mirrors.
XWhen taking the vehicle through an
automatic conveyor-type car wash:
Make sure the automatic transmission
remains in neutral position N. Observe
instructions, see “Remaining in neutral
position N” ( Y page 117).
When leaving the automatic car wash, make
sure the mirrors are folded out.
After running the vehicle through an
automatic car wash, wipe any wax off of the
windshield and the wiper blade inserts. This
will prevent smears and reduce wiping noise
which can be caused by residual wax on the
windshield.
Ornamental moldings
XFor regular cleaning and care of ornamental
moldings, use a damp cloth.
! Do not use chrome cleaner on ornamental
moldings. Although ornamental moldings
may have chrome appearance, they could
be made of anodized aluminum that will be
damaged when cleaned with chrome
cleaner. Instead, use a damp cloth to clean
those ornamental moldings.
For very dirty ornamental moldings of
which you are sure are chrome-plated, use
a chrome cleaner. If in doubt whether an
ornamental molding is chrome-plated,
contact an authorized Mercedes-Benz
Center.
Headlamps, brake lamps, tail lamps,
side markers, turn signal lenses
XUse a mild vehicle wash detergent, such as
Mercedes-Benz approved Car Shampoo,
with plenty of water.
! Only use window cleaning solutions that
are suitable for plastic lamp lenses.
Window cleaning solutions which are not
suitable may damage the plastic lamp
lenses of the headlamps. Therefore, do not
use abrasives, solvents or cleaners that
contain solvents.
262Vehicle careOperation
212_AKB; 2; 41, en-USd2ureepe,Version: 2.11.8.12009-07-17T09:14:21+02:00 - Seite 262
Page 285 of 372
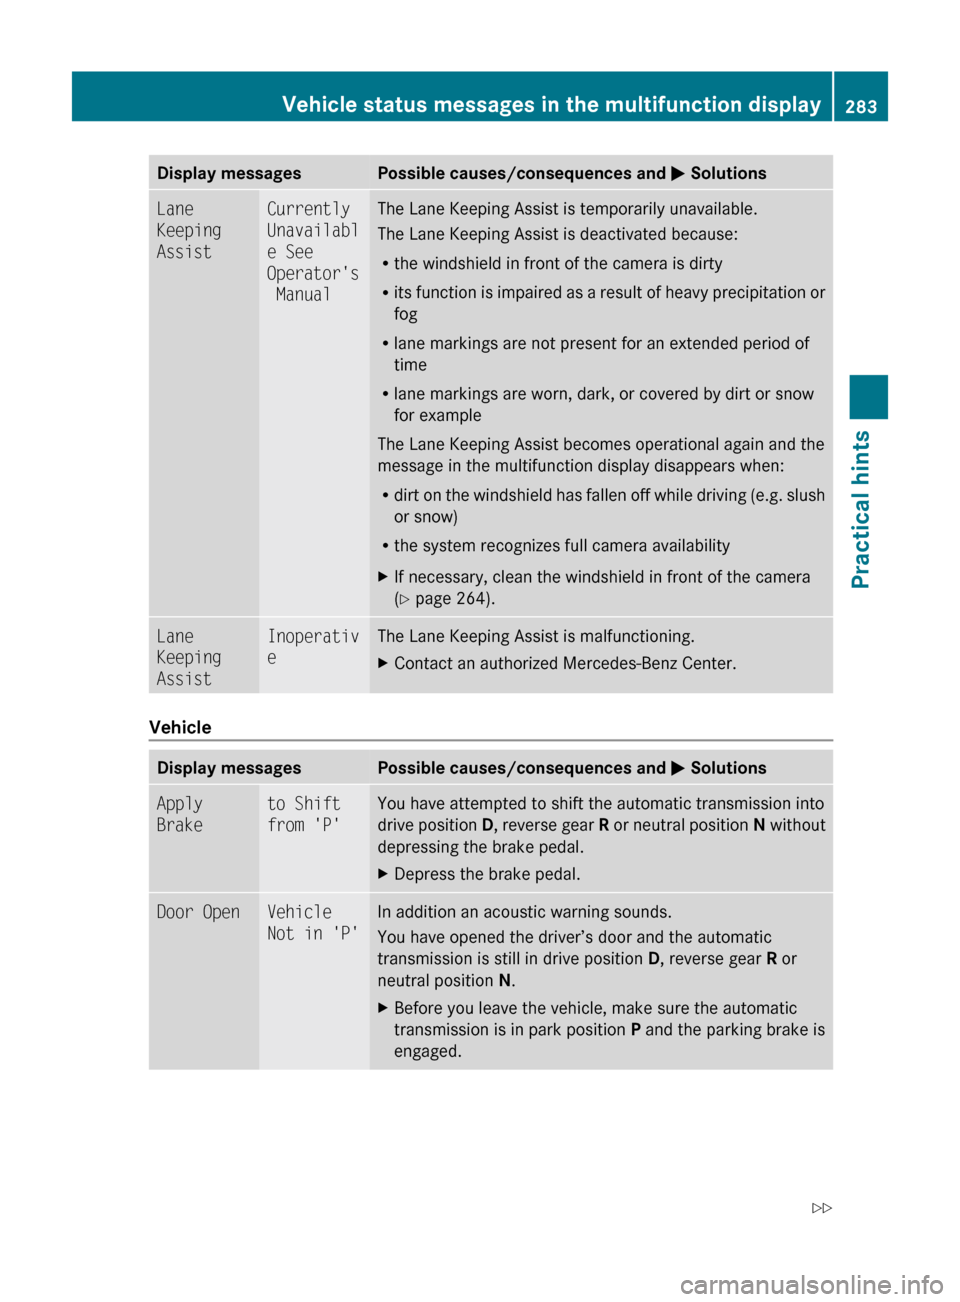
Display messagesPossible causes/consequences and M SolutionsLane
Keeping
AssistCurrently
Unavailabl
e See
Operator's
ManualThe Lane Keeping Assist is temporarily unavailable.
The Lane Keeping Assist is deactivated because:
R the windshield in front of the camera is dirty
R its function is impaired as a result of heavy precipitation or
fog
R lane markings are not present for an extended period of
time
R lane markings are worn, dark, or covered by dirt or snow
for example
The Lane Keeping Assist becomes operational again and the
message in the multifunction display disappears when:
R dirt on the windshield has fallen off while driving (e.g. slush
or snow)
R the system recognizes full camera availabilityXIf necessary, clean the windshield in front of the camera
( Y page 264).Lane
Keeping
AssistInoperativ
eThe Lane Keeping Assist is malfunctioning.XContact an authorized Mercedes-Benz Center.
Vehicle
Display messagesPossible causes/consequences and M SolutionsApply
Braketo Shift
from 'P'You have attempted to shift the automatic transmission into
drive position D, reverse gear R or neutral position N without
depressing the brake pedal.XDepress the brake pedal.Door OpenVehicle
Not in 'P'In addition an acoustic warning sounds.
You have opened the driver’s door and the automatic
transmission is still in drive position D, reverse gear R or
neutral position N.XBefore you leave the vehicle, make sure the automatic
transmission is in park position P and the parking brake is
engaged.Vehicle status messages in the multifunction display283Practical hints212_AKB; 2; 41, en-USd2ureepe,Version: 2.11.8.12009-07-17T09:14:21+02:00 - Seite 283Z
Page 286 of 372

Display messagesPossible causes/consequences and M SolutionsService
RequiredDo Not
Shift
Gears
Visit
DealerIn addition an acoustic warning sounds.
The automatic transmission cannot be shifted out of the
current transmission position because of a malfunction.
If the automatic transmission is in drive position D:XWithout shifting the automatic transmission out of drive
position D, drive to an authorized Mercedes-Benz Center.
If the automatic transmission is set to position neutral
position N, reverse gear R or park position P:
XDo not drive.XContact an authorized Mercedes-Benz Center or call
Roadside Assistance.Only
Shift to
'P' when
Vehicle
is
StationaryYou have attempted to shift the automatic transmission into
park position P although the vehicle was still in motion.XStop your vehicle as soon as it is safe to do so.XShift the automatic transmission to park position P.Shift to
'P' or 'N'to Start
EngineYou have attempted to start the engine with the KEYLESS-GO
start/stop button while the automatic transmission was in
reverse gear R or drive position D.XShift the automatic transmission into park position P or
neutral position N. Make sure the brake pedal is depressed.Auxiliary
BatteryMalfunctio
nThe backup battery for the automatic transmission is no
longer charging.XContact an authorized Mercedes-Benz Center.
Tires
Display messagesPossible causes/consequences and M SolutionsCheck
Tire
PressureThen
Restart
Run Flat
IndicatorThere has been a warning message about a loss in the tire
inflation pressure and the tire pressure loss warning system
was not restarted yet.XMake sure the correct tire inflation pressure is set for each
tire.XThen restart the tire pressure loss warning system
( Y page 232).Run Flat
IndicatorInoperativ
eThe tire pressure loss warning system is malfunctioning.XHave the tire pressure loss warning system checked at an
authorized Mercedes-Benz Center.284Vehicle status messages in the multifunction displayPractical hints
212_AKB; 2; 41, en-USd2ureepe,Version: 2.11.8.12009-07-17T09:14:21+02:00 - Seite 284
Page 325 of 372
Flat tire
Safety notes
Your vehicle may be equipped with:
R a Minispare wheel
R a spare wheel with collapsible tire
R an MOExtended system (your vehicle does
not have a spare wheel or a TIREFIT kit)
R a TIREFIT kit 19
(your vehicle does not have
a spare wheel)
GWarning!
The dimensions of the spare wheel are
different from those of the road wheels. As a
result, the vehicle handling characteristics
change when driving with a spare wheel
mounted. Adapt your driving style
accordingly.
The spare wheel is for temporary use only.
When driving with a spare wheel mounted,
ensure proper tire inflation pressure and do
not exceed a vehicle speed of 50 mph
(80 km/h).
Contact the nearest authorized Mercedes-
Benz Center as soon as possible to have the
spare wheel replaced with a regular road
wheel.
Never operate the vehicle with more than one
spare wheel mounted.
Do not switch off the ESC when a spare wheel
is mounted.
Preparing the vehicle
XVehicles with AIRMATIC:
Make sure the vehicle level is set to normal
level ( Y page 163).XWhenever possible, park the vehicle in a
safe distance from moving traffic on a hard,
flat surface.XTurn on the hazard warning flasher.XTurn the steering wheel so that the front
wheels are in a straight-ahead position.XEngage the parking brake.XShift the automatic transmission into park
position P.XTurn off the engine.XRemove the SmartKey from the starter
switch.
or
XVehicles with KEYLESS-GO: Open the
driver’s door (this puts the starter switch in
position 0, same as with the SmartKey
removed from the starter switch). The
driver’s door can then be closed again.
Open doors only when conditions are safe
to do so.XVehicles with KEYLESS-GO: Remove the
KEYLESS-GO start/stop button from the
starter switch.XHave any passenger exit the vehicle at a
safe distance from the roadway. Open
doors only when conditions are safe to do
so.
Mounting the spare wheel
Introduction
XPrepare the vehicle as described
( Y page 323).XTake the following out of the vehicle:
R spare wheel
R jack
R vehicle tool kit
R collapsible wheel chock
R electric air pump (required for vehicles
with spare wheel with collapsible tire
only)
For information on where to find the
respective items, see “Where will I find ...?”
( Y page 268) and ( Y page 271).
19
Canada only.Flat tire323Practical hints212_AKB; 2; 41, en-USd2ureepe,Version: 2.11.8.12009-07-17T09:14:21+02:00 - Seite 323Z
Page 335 of 372
Version 1: Open vent screw F on
pressure gauge G (Y page 331).
Version 2: Press yellow deflate button a
located in air pump housing next to
pressure gauge G.XDrive to the nearest qualified workshop,
e.g. an authorized Mercedes-Benz Center,
to have the damaged tire replaced.XRecommended duration of use: A
maximum of 300 miles (500 km) at 50 mph
( 80 km/h) or below with the recommended
tire inflation pressure.XContact an authorized Mercedes-Benz
Center as soon as possible to obtain a new
TIREFIT kit.XBring used TIREFIT materials to an
authorized Mercedes-Benz Center for
proper disposal.XReplace your TIREFIT container every
4 years. Replacement containers are
available at any authorized Mercedes-Benz
Center.
Bleeding the fuel system (diesel
engine only)
Driving the vehicle until the fuel tank is empty
is not recommended. Otherwise, air may be
sucked into the fuel system. If this happens,
the malfunction indicator lamp ; comes
on and the engine may not start immediately
after refueling the vehicle.
After refueling:
XMake sure the automatic transmission is in
park position P.
The transmission position indicator in the
multifunction display should be on P.XDo not depress the accelerator.XIf necessary, remove the KEYLESS-GO
start/stop button from the starter switch.XTurn the SmartKey in the starter switch to
position 2 for at least 10 seconds.XReturn the SmartKey in the starter switch
to position 0.XTurn the SmartKey in the starter switch to
position 3 and hold it there for a maximum
of 10 seconds or until the engine runs
surge-free.
If the engine does not start:
XTurn the SmartKey in the starter switch
once more to position 2 for at least
10 seconds.XReturn the SmartKey in the starter switch
to position 0.XTurn the SmartKey in the starter switch
once more to position 3 and hold it there
for a maximum of 10 seconds or until the
engine runs surge-free.XIf necessary, repeat the above steps.
If the engine still does not start after
3 attempts:
Do not make any further attempts to start the
engine. Contact an authorized Mercedes-
Benz Center or call Roadside Assistance
( Y page 210).
i When the malfunction indicator
lamp ; in the instrument cluster has
been illuminated for the above condition, it
will remain illuminated until the engine was
cycled on and off four times in a row.
AdBlue ®
(diesel engine only)
The BlueTEC exhaust gas aftertreatment
system requires a reducing agent (AdBlue ®
)
in order to function properly. Refilling with
AdBlue ®
is part of the regular maintenance
service work. A tankful of AdBlue ®
should
suffice until the next maintenance service
under normal driving conditions.
When the AdBlue ®
tank is low, the message
Check Additive See Operator’s
Manual appears in the multifunction display.
When the AdBlue ®
level drops to the
minimum level, the message Remaining
AdBlue®
(diesel engine only)333Practical hints212_AKB; 2; 41, en-USd2ureepe,Version: 2.11.8.12009-07-17T09:14:21+02:00 - Seite 333Z