2010 MERCEDES-BENZ E350 park assist
[x] Cancel search: park assistPage 334 of 372

You may operate the air pump again after
it has cooled off.
If the tire inflation pressure of at least
26 psi (1.8 bar) is not attained:
XTurn off the electric air pump by pressing
0 on electric air pump switch =.
XDetach filler hose D from tire valve E.XDrive vehicle back or forth very slowly
approximately 30 ft (10 m).
This serves to better distribute the TIREFIT
sealant material inside the tire.
XInflate the tire again.GWarning!
If a tire inflation pressure of 26 psi (1.8 bar)
is not attained, the tire is too severely
damaged for TIREFIT to provide a reliable tire
repair.
In this case, TIREFIT cannot properly seal the
tire.
Do not drive the vehicle.
Contact the nearest Mercedes-Benz Center or
call Roadside Assistance.
After attaining a tire inflation pressure of
at least 26 psi (1.8 bar):
XPress 0 on electric air pump switch =.
The electric air pump is switched off.
XDetach the TIREFIT kit from the tire valve.GWarning!
The air hose may still be hot. Exercise proper
caution to avoid burning yourself when
detaching the electric air pump.
! Remaining TIREFIT sealant could escape
from the filler hose after it has been
detached from the tire valve. TIREFIT
sealant may cause stains.
Therefore, cover the filler hose, e.g. by
inserting it into the plastic bag the TIREFIT
kit was packed in.
XDrive off immediately.GWarning!
Do not exceed a vehicle speed of 50 mph
(80 km/h). A TIREFIT repair is not designed to
operate at higher speeds.
The sticker must be attached on the
instrument cluster where it will be easily seen
by the driver.
Vehicle handling characteristics of a TIREFIT
repaired tire may change. Adapt your driving
accordingly.
XAfter driving the vehicle for an initial
10 minutes, check the tire inflation
pressure using the pressure gauge.
GWarning!
If tire inflation pressure has fallen below
20 psi (1.3 bar) do not continue to drive the
vehicle.
Park your vehicle safely away from the
roadway and contact the nearest authorized
Mercedes-Benz Center or Roadside
Assistance.
Have the damaged tire replaced.
If the tire inflation pressure is at least 20 psi
(1.3 bar), inflate or deflate the tire to the
correct tire inflation pressure (see Tire and
Loading Information placard on the driver’s
door B-pillar):
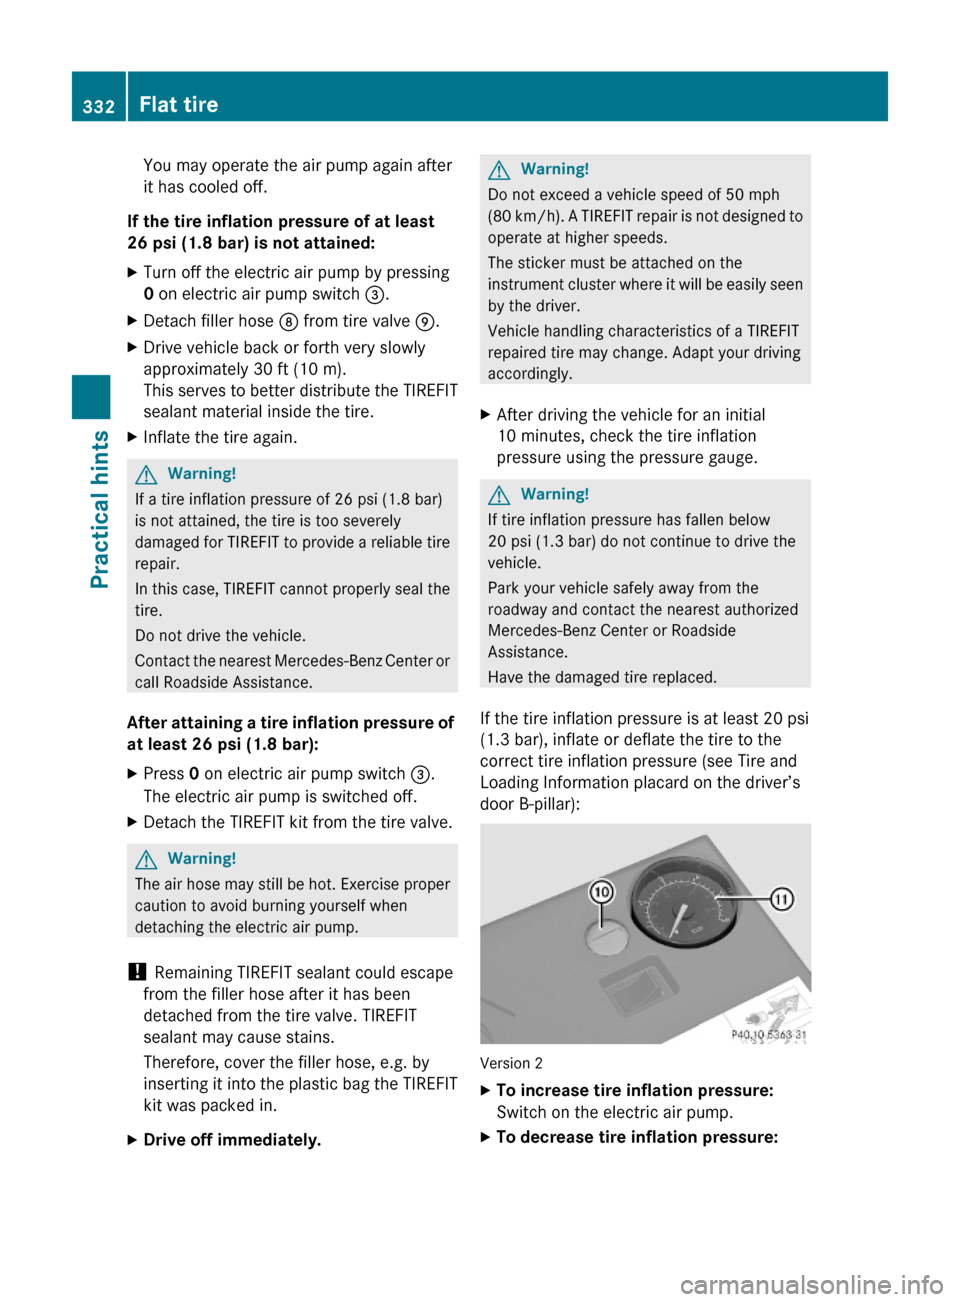
Version 2
XTo increase tire inflation pressure:
Switch on the electric air pump.
XTo decrease tire inflation pressure:332Flat tirePractical hints
212_AKB; 2; 41, en-USd2ureepe,Version: 2.11.8.12009-07-17T09:14:21+02:00 - Seite 332
Page 335 of 372

Version 1: Open vent screw F on
pressure gauge G (Y page 331).
Version 2: Press yellow deflate button a
located in air pump housing next to
pressure gauge G.XDrive to the nearest qualified workshop,
e.g. an authorized Mercedes-Benz Center,
to have the damaged tire replaced.XRecommended duration of use: A
maximum of 300 miles (500 km) at 50 mph
( 80 km/h) or below with the recommended
tire inflation pressure.XContact an authorized Mercedes-Benz
Center as soon as possible to obtain a new
TIREFIT kit.XBring used TIREFIT materials to an
authorized Mercedes-Benz Center for
proper disposal.XReplace your TIREFIT container every
4 years. Replacement containers are
available at any authorized Mercedes-Benz
Center.
Bleeding the fuel system (diesel
engine only)
Driving the vehicle until the fuel tank is empty
is not recommended. Otherwise, air may be
sucked into the fuel system. If this happens,
the malfunction indicator lamp ; comes
on and the engine may not start immediately
after refueling the vehicle.
After refueling:
XMake sure the automatic transmission is in
park position P.
The transmission position indicator in the
multifunction display should be on P.XDo not depress the accelerator.XIf necessary, remove the KEYLESS-GO
start/stop button from the starter switch.XTurn the SmartKey in the starter switch to
position 2 for at least 10 seconds.XReturn the SmartKey in the starter switch
to position 0.XTurn the SmartKey in the starter switch to
position 3 and hold it there for a maximum
of 10 seconds or until the engine runs
surge-free.
If the engine does not start:
XTurn the SmartKey in the starter switch
once more to position 2 for at least
10 seconds.XReturn the SmartKey in the starter switch
to position 0.XTurn the SmartKey in the starter switch
once more to position 3 and hold it there
for a maximum of 10 seconds or until the
engine runs surge-free.XIf necessary, repeat the above steps.
If the engine still does not start after
3 attempts:
Do not make any further attempts to start the
engine. Contact an authorized Mercedes-
Benz Center or call Roadside Assistance
( Y page 210).
i When the malfunction indicator
lamp ; in the instrument cluster has
been illuminated for the above condition, it
will remain illuminated until the engine was
cycled on and off four times in a row.
AdBlue ®
(diesel engine only)
The BlueTEC exhaust gas aftertreatment
system requires a reducing agent (AdBlue ®
)
in order to function properly. Refilling with
AdBlue ®
is part of the regular maintenance
service work. A tankful of AdBlue ®
should
suffice until the next maintenance service
under normal driving conditions.
When the AdBlue ®
tank is low, the message
Check Additive See Operator’s
Manual appears in the multifunction display.
When the AdBlue ®
level drops to the
minimum level, the message Remaining
AdBlue®
(diesel engine only)333Practical hints212_AKB; 2; 41, en-USd2ureepe,Version: 2.11.8.12009-07-17T09:14:21+02:00 - Seite 333Z
Page 342 of 372

XConnect negative terminal ? of charged
battery B with negative terminal A with
a jumper cable. Clamp the cable to
negative terminal ? of charged battery
B first.XStart engine of the vehicle with the
discharged battery and run at idle speed.
You can now turn on the electrical
consumers. Do not switch on the
headlamps under any circumstances.XRemove the jumper cables from negative
terminals ? and A first.XRemove the jumper cables from positive
terminals ; and =.
You can now switch on the headlamps.XSlide cover : from positive terminal =
back.XHave the battery checked at the nearest
authorized Mercedes-Benz Center.
Towing the vehicle
Safety notes
GWarning!
The vehicle is braked when the HOLD function
or DISTRONIC PLUS is activated. Therefore,
deactivate the HOLD function or DISTRONIC
PLUS if the vehicle is to be towed.
Mercedes-Benz recommends that the vehicle
be transported with all wheels off the ground
using flatbed or appropriate wheel lift/dolly
equipment. This method is preferable to other
types of towing.
! To prevent damage during transport, do
not tie down vehicle by its chassis or
suspension parts.
If circumstances do not permit the
recommended towing methods, the vehicle
may be towed with all wheels on the ground
or front axle raised (except vehicles with
4MATIC) only so far as necessary to have the
vehicle moved to a safe location where the
recommended towing methods can be
employed.
! Before towing the vehicle observe the
following instructions:
R Do not tow-start the vehicle. You could
otherwise seriously damage the
automatic transmission which is not
covered by the Mercedes-Benz Limited
Warranty.
R Do not tow with sling-type equipment.
Towing with sling-type equipment over
bumpy roads will damage radiator and
supports.
R Towing of the vehicle should only be
done using the properly installed towing
eye bolt. Never attach a tow cable, tow
rope or tow rod to the vehicle chassis,
frame or suspension parts.GWarning!
With the engine not running, there is no power
assistance for the brake and steering
systems. In this case, it is important to keep
in mind that a considerably higher degree of
effort is necessary to brake and steer the
vehicle. Adapt your driving accordingly.
! Avoid pulling the vehicle abruptly or
diagonally, since it could result in damage
to the chassis alignment.
! Do not use the towing eye bolt for
recovery, as this could damage the vehicle.
If in doubt, recover the vehicle with a crane.
i If the battery is disconnected or
discharged
R the SmartKey will not turn in the starter
switch
R the automatic transmission will remain in
park position P
For more information see “Battery”
( Y page 336) or “Jump starting”
( Y page 338).
340Towing the vehiclePractical hints
212_AKB; 2; 41, en-USd2ureepe,Version: 2.11.8.12009-07-17T09:14:21+02:00 - Seite 340
Page 344 of 372

Removing towing eye boltXLoosen towing eye bolt ; by turning it
counterclockwise.XUnscrew towing eye bolt ;.XReinstalling cover: Fit cover :
( Y page 341) and snap it into place.XStore the towing eye bolt ; and wheel
wrench back into the vehicle tool kit.
Towing with one axle raised
! The vehicle may be towed only for
distances up to 30 miles (50 km) and at a
speed not to exceed 30 mph (50 km/h).
! Vehicles with 4MATIC: Do not tow with
one axle raised. Doing so could damage the
transfer case, which is not covered by the
Mercedes-Benz Limited Warranty.
All wheels must be on or off the ground.
Observe instructions for towing the vehicle
with all wheels on the ground.
XMake sure the ignition is switched on.XWith the vehicle at a standstill, depress the
brake pedal and keep it pressed.XRelease the brake pedal.XIf engaged, release the parking brake.XSwitch off the automatic central locking
( Y page 144).XSwitch off the ignition and leave the
SmartKey in the starter switch.XSwitch on the hazard warning flasher
( Y page 101).
!
Because the ESC operates automatically,
the engine and ignition must be shut off
(SmartKey in starter switch position 0 or
1 or KEYLESS-GO start/stop button in
position 0 or 1) when the vehicle is being
towed with one axle raised.
Active braking action through the ESC may
otherwise seriously damage the brake
system which is not covered by the
Mercedes-Benz Limited Warranty.
Towing with all wheels on the groundGWarning!
If circumstances require towing the vehicle
with all wheels on the ground, always tow with
a tow bar if:
R the engine will not run
R there is a malfunction in the brake system
R there is a malfunction in the power supply
or in the vehicle’s electrical system
This is necessary to adequately control the
towed vehicle.
Prior to towing the vehicle with all wheels on
the ground, make sure the SmartKey is in
starter switch position 2.
If the SmartKey is left in the starter switch
position 0 for an extended period of time, it
can no longer be turned in the switch. In this
case, the steering is locked. To unlock,
remove SmartKey from starter switch and
reinsert.
GWarning!
With the engine not running, there is no power
assistance for the brake and steering
systems. In this case, it is important to keep
in mind that a considerably higher degree of
effort is necessary to brake and steer the
vehicle. Adapt your driving accordingly.
XMake sure the ignition is switched on.XWith the vehicle at a standstill, depress the
brake pedal and keep it pressed.XShift the automatic transmission into
neutral position N.XRelease the brake pedal.XIf engaged, release the parking brake.XSwitch on the hazard warning flasher
( Y page 101).
!
The vehicle may be towed only for
distances up to 30 miles (50 km) and at a
speed not to exceed 30 mph (50 km/h).
342Towing the vehiclePractical hints
212_AKB; 2; 41, en-USd2ureepe,Version: 2.11.8.12009-07-17T09:14:21+02:00 - Seite 342
Page 345 of 372

iWhile being towed with the hazard
warning flasher in use, use the combination
switch in the usual manner to signal turns.
Only the selected turn signal will operate.
Upon canceling the turn signal, the hazard
warning flasher will operate again.
Fuses
Introduction
The electrical fuses in your vehicle serve to
switch off malfunctioning power circuits.
If a fuse is blown, the components and
systems secured by that fuse will stop
operating.
GWarning!
Only use fuses approved by Mercedes-Benz
with the specified amperage for the system in
question and do not attempt to repair or
bridge a blown fuse. Using other than
approved fuses or using repaired or bridged
fuses may cause an overload leading to a fire,
and/or cause damage to electrical
components and/or systems. Have the cause
determined and remedied by an authorized
Mercedes-Benz Center.
A blown fuse must be replaced by an
appropriate spare fuse (recognizable by its
color or the fuse rating given on the fuse) of
the amperage recommended in the fuse
chart. Any Mercedes-Benz Center will be glad
to advise you on this subject.
iIn case of a blown fuse contact Roadside
Assistance or an authorized Mercedes-
Benz Center.
If a newly inserted fuse blows again, have the
cause determined and rectified by an
authorized Mercedes-Benz Center.
The fuse chart is located in the trunk with the
vehicle tool kit (Y page 268). The fuse chart
explains the fuse allocation and fuse
amperages.
Before replacing fusesXEngage the parking brake.XMake sure the automatic transmission is in
park position P.
The transmission position indicator in the
multifunction display should be on P.
XSwitch off all electrical consumers.XTurn off the engine.XRemove the SmartKey from the starter
switch.
XVehicles with KEYLESS-GO: Open the
driver’s door (this puts the starter switch in
position 0, same as with the SmartKey
removed from the starter switch). The
driver’s door then can be closed again.
Fuse box in trunk
XOpen the trunk.XOpening: Insert flat, blunt object as a lever
into the upper edge of cover : and pull
cover : downward in direction of arrow.
XClosing: Install cover :.
Fuse box in engine compartment
XOpen the hood.Fuses343Practical hints212_AKB; 2; 41, en-USd2ureepe,Version: 2.11.8.12009-07-17T09:14:21+02:00 - Seite 343Z