2010 MERCEDES-BENZ E350 Trunk
[x] Cancel search: TrunkPage 273 of 372
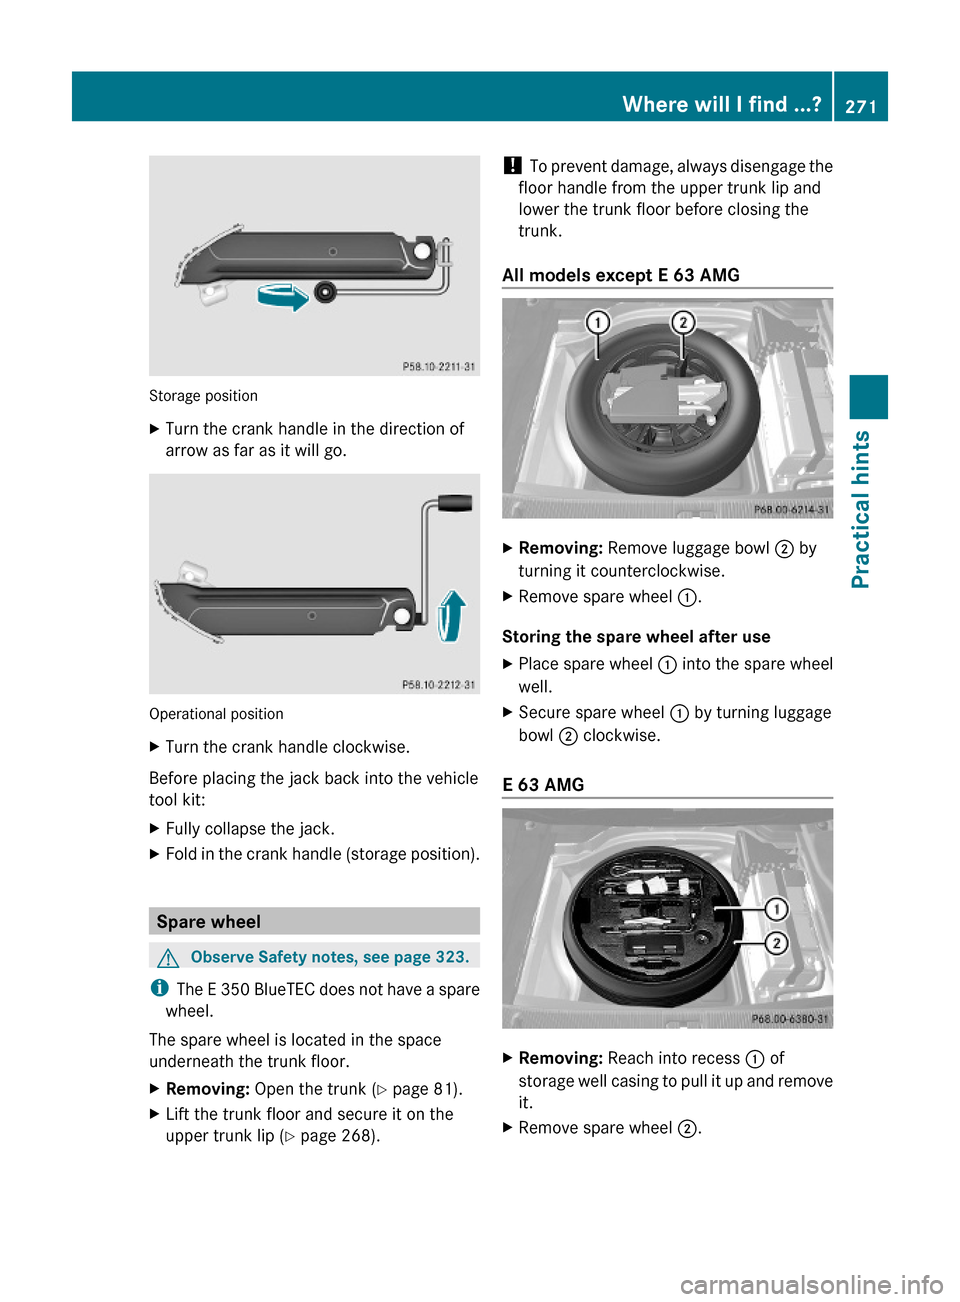
Storage position
XTurn the crank handle in the direction of
arrow as far as it will go.
Operational position
XTurn the crank handle clockwise.
Before placing the jack back into the vehicle
tool kit:
XFully collapse the jack.XFold in the crank handle (storage position).
Spare wheel
GObserve Safety notes, see page 323.
iThe E 350 BlueTEC does not have a spare
wheel.
The spare wheel is located in the space
underneath the trunk floor.
XRemoving: Open the trunk (Y page 81).XLift the trunk floor and secure it on the
upper trunk lip (Y page 268).
! To prevent damage, always disengage the
floor handle from the upper trunk lip and
lower the trunk floor before closing the
trunk.
All models except E 63 AMG
XRemoving: Remove luggage bowl ; by
turning it counterclockwise.
XRemove spare wheel :.
Storing the spare wheel after use
XPlace spare wheel : into the spare wheel
well.
XSecure spare wheel : by turning luggage
bowl ; clockwise.
E 63 AMG
XRemoving: Reach into recess : of
storage well casing to pull it up and remove
it.
XRemove spare wheel ;.Where will I find ...?271Practical hints212_AKB; 2; 41, en-USd2ureepe,Version: 2.11.8.12009-07-17T09:14:21+02:00 - Seite 271Z
Page 295 of 372
Display messagesPossible causes/consequences and M SolutionsÀAttention
Assist
Inoperativ
eThe ATTENTION ASSIST is malfunctioning.XContact an authorized Mercedes-Benz Center as soon as
possible.
Vehicle
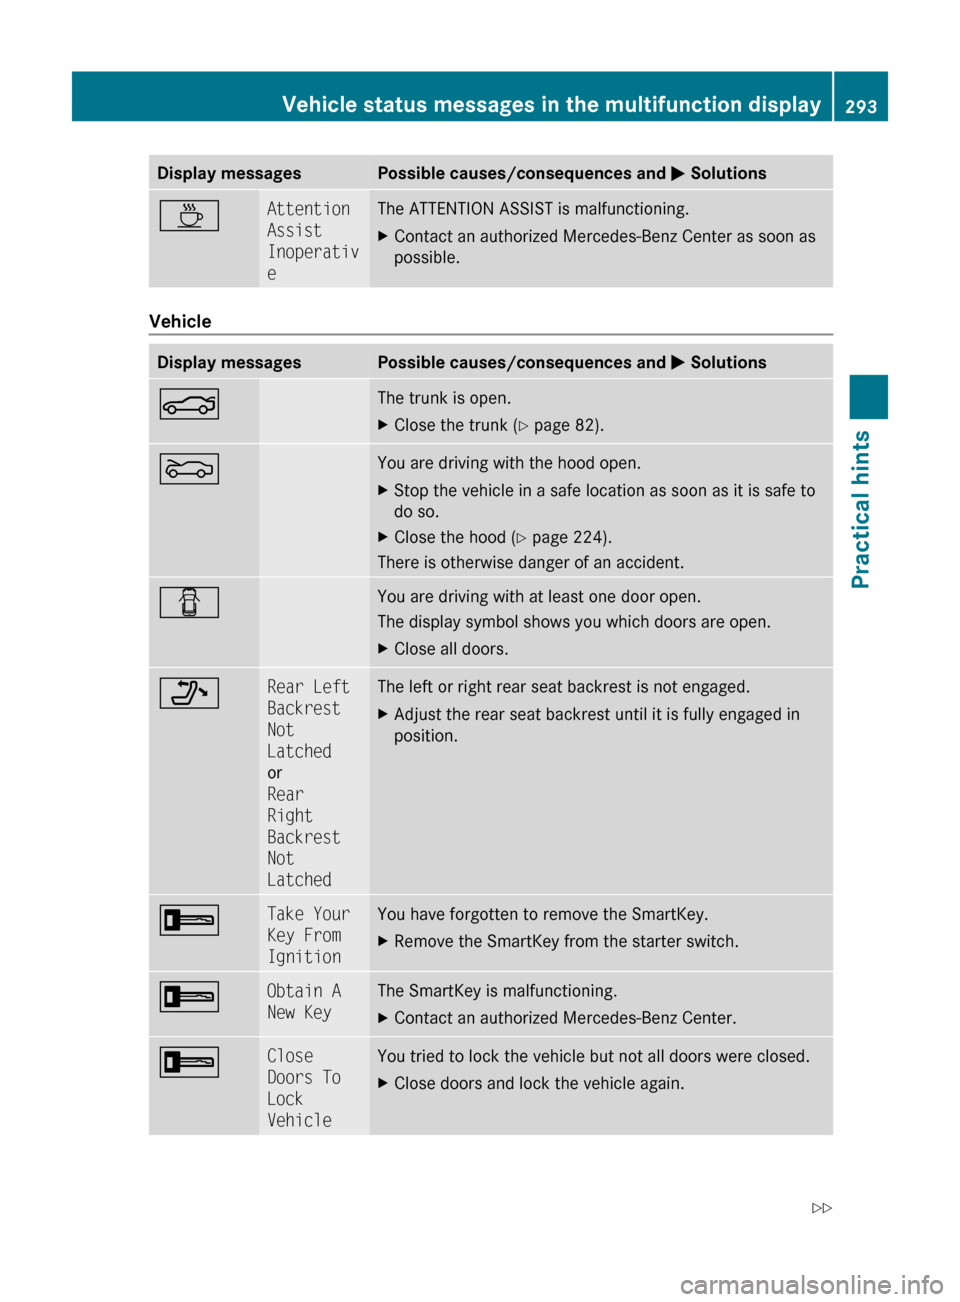
Display messagesPossible causes/consequences and M SolutionsNThe trunk is open.XClose the trunk ( Y page 82).MYou are driving with the hood open.XStop the vehicle in a safe location as soon as it is safe to
do so.XClose the hood ( Y page 224).
There is otherwise danger of an accident.
CYou are driving with at least one door open.
The display symbol shows you which doors are open.XClose all doors._Rear Left
Backrest
Not
Latched
or
Rear
Right
Backrest
Not
LatchedThe left or right rear seat backrest is not engaged.XAdjust the rear seat backrest until it is fully engaged in
position.+Take Your
Key From
IgnitionYou have forgotten to remove the SmartKey.XRemove the SmartKey from the starter switch.+Obtain A
New KeyThe SmartKey is malfunctioning.XContact an authorized Mercedes-Benz Center.+Close
Doors To
Lock
VehicleYou tried to lock the vehicle but not all doors were closed.XClose doors and lock the vehicle again.Vehicle status messages in the multifunction display293Practical hints212_AKB; 2; 41, en-USd2ureepe,Version: 2.11.8.12009-07-17T09:14:21+02:00 - Seite 293Z
Page 316 of 372

ProblemPossible causes/consequences and M SolutionsUSA only:
45
The front passenger
front air bag off
indicator lamp
illuminates and
remains illuminated
with the weight of a
typical adult or
someone larger than a
small individual on the
front passenger seat.The system is malfunctioning.XHave the system checked as soon as possible at an authorized
Mercedes-Benz Center.XRead and observe messages in the multifunction display and
follow corrective steps ( Y page 272).GWarning!
If the 45 indicator lamp illuminates
and remains illuminated with the weight of a
typical adult or someone larger than a small
individual on the front passenger seat, do not
have any passenger use the front passenger
seat until the system has been repaired.ProblemPossible causes/consequences and M SolutionsUSA only:
45
The front passenger
front air bag off
indicator lamp does not
illuminate and/or does
not remain illuminated
with the weight of a
typical 12-month-old
child in a standard child
restraint or less on the
front passenger seat.The system is malfunctioning.XMake sure there is nothing between seat cushion and child seat
and check installation of the child seat.XMake sure no objects applying supplemental weight onto the
seat are present.XIf the front passenger front air bag off indicator lamp remains
out, have the system checked as soon as possible at an
authorized Mercedes-Benz Center. Do not transport a child on
the front passenger seat until the system has been repaired.XRead and observe messages in the multifunction display and
follow corrective steps ( Y page 272).GWarning!
If the 45 indicator lamp does not
illuminate or remains out with the weight of a
typical 12-month-old child in a standard child
restraint or less on the front passenger seat,
do not transport a child on the front
passenger seat until the system has been
repaired.
Unlocking/locking manually
Unlocking the vehicle
If you cannot unlock the vehicle with the
SmartKey or with KEYLESS-GO, unlock the
driver’s door and the trunk using the
mechanical key.
314Unlocking/locking manuallyPractical hints
212_AKB; 2; 41, en-USd2ureepe,Version: 2.11.8.12009-07-17T09:14:21+02:00 - Seite 314
Page 317 of 372

The anti-theft alarm system will trigger when
you
Runlock the driver’s door or the trunk with
the mechanical key
and
Ropen the driver’s door or the trunk
To cancel the alarm, insert the SmartKey into
the starter switch.
Removing the mechanical key
XMove locking tab : in the direction of
arrow.
XSlide mechanical key ; out of the housing.
Unlocking the driver’s door
XInsert mechanical key ; into the driver’s
door lock.
XTurn mechanical key ; counterclockwise
to position 1.
XPull the door handle to open the driver’s
door.
XTurn mechanical key ; back and remove
it from the driver’s door lock.
Unlocking the trunk
A minimum height clearance of 5.78 ft
(1.76 m) is required to open the trunk lid.
XInsert mechanical key ; into the trunk lid
lock.
XTurn mechanical key ; counterclockwise
to position 1.
! When you open the trunk, the trunk lid
swings open upwards. Always make sure
there is sufficient overhead clearance.
XTurn mechanical key ; back and remove
it from the trunk lid lock.
Locking the vehicle
If you cannot lock the vehicle with the
SmartKey or with KEYLESS-GO, lock it as
follows:
XOpen the driver’s door.XClose the front passenger door, the rear
doors, and the trunk.
XPress the central locking switch
(Y page 81).
The locking knobs of the front passenger
door and the rear doors move down.
XIf the vehicle battery is disconnected or
drained: Press down the locking knobs on
Unlocking/locking manually315Practical hints212_AKB; 2; 41, en-USd2ureepe,Version: 2.11.8.12009-07-17T09:14:21+02:00 - Seite 315Z
Page 318 of 372

the front passenger door and the rear
doors.
XExit the vehicle.XClose the driver’s door.XRemove mechanical key ; from the
SmartKey (Y page 315).
XInsert mechanical key ; into the driver’s
door lock.
XTurn mechanical key ; clockwise to
position 1.
The vehicle is locked.
XTurn mechanical key ; back and remove
it from the driver’s door lock.
XCheck whether the doors and the trunk are
locked.
XIf necessary, lock the trunk with the
mechanical key (Y page 85).
iThis procedure does not arm the anti-
theft alarm system, nor does it lock the fuel
filler flap.
Fuel filler flap
GWarning!
Avoid contact with the vehicle walls as they
may contain sharp edges. Otherwise, you
could injure yourself while releasing the fuel
filler flap.
In case the central locking system does not
release the fuel filler flap, you can open it
manually.
The fuel filler flap release is located on the
passenger side in the trunk behind the cover.
XOpen the trunk (Y page 81).XPush the parcel net down.XOpen the cover (Y page 268).XRemove fuel filler flap release ; from
holder :.
XPull fuel filler flap release ; in direction of
the arrow.
XOpen the fuel filler flap (Y page 220).XClose the cover.XClose the trunk.
Resetting activated NECK-PRO active
front head restraints
If the NECK-PRO active front head restraints
have been triggered in a rear-end collision,
they must be reset.
You can tell that the NECK-PRO active front
head restraints have been triggered when
they have been moved forward and cannot be
adjusted.
GWarning!
For safety reasons, have the NECK-PRO active
front head restraints checked at an
authorized Mercedes-Benz Center after a
rear-end collision.
316Resetting activated NECK-PRO active front head restraintsPractical hints
212_AKB; 2; 41, en-USd2ureepe,Version: 2.11.8.12009-07-17T09:14:21+02:00 - Seite 316
Page 337 of 372
For more information on AdBlue®, see
(Y page 364).
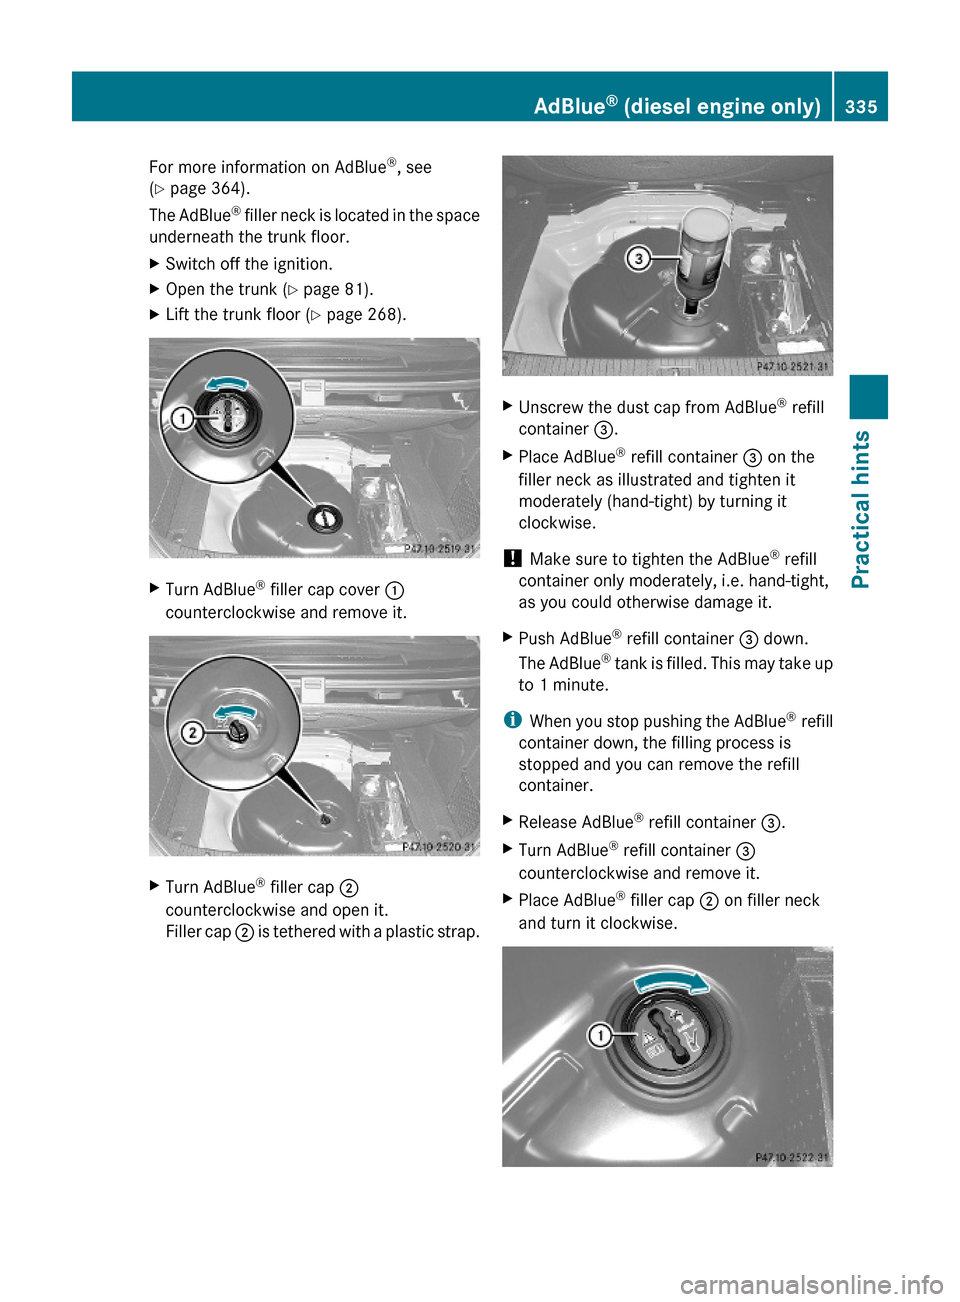
The AdBlue® filler neck is located in the space
underneath the trunk floor.
XSwitch off the ignition.XOpen the trunk (Y page 81).XLift the trunk floor (Y page 268).XTurn AdBlue® filler cap cover :
counterclockwise and remove it.
XTurn AdBlue® filler cap ;
counterclockwise and open it.
Filler cap ; is tethered with a plastic strap.
XUnscrew the dust cap from AdBlue® refill
container =.
XPlace AdBlue® refill container = on the
filler neck as illustrated and tighten it
moderately (hand-tight) by turning it
clockwise.
! Make sure to tighten the AdBlue® refill
container only moderately, i.e. hand-tight,
as you could otherwise damage it.
XPush AdBlue® refill container = down.
The AdBlue® tank is filled. This may take up
to 1 minute.
iWhen you stop pushing the AdBlue® refill
container down, the filling process is
stopped and you can remove the refill
container.
XRelease AdBlue® refill container =.XTurn AdBlue® refill container =
counterclockwise and remove it.
XPlace AdBlue® filler cap ; on filler neck
and turn it clockwise.
AdBlue® (diesel engine only)335Practical hints212_AKB; 2; 41, en-USd2ureepe,Version: 2.11.8.12009-07-17T09:14:21+02:00 - Seite 335Z
Page 338 of 372
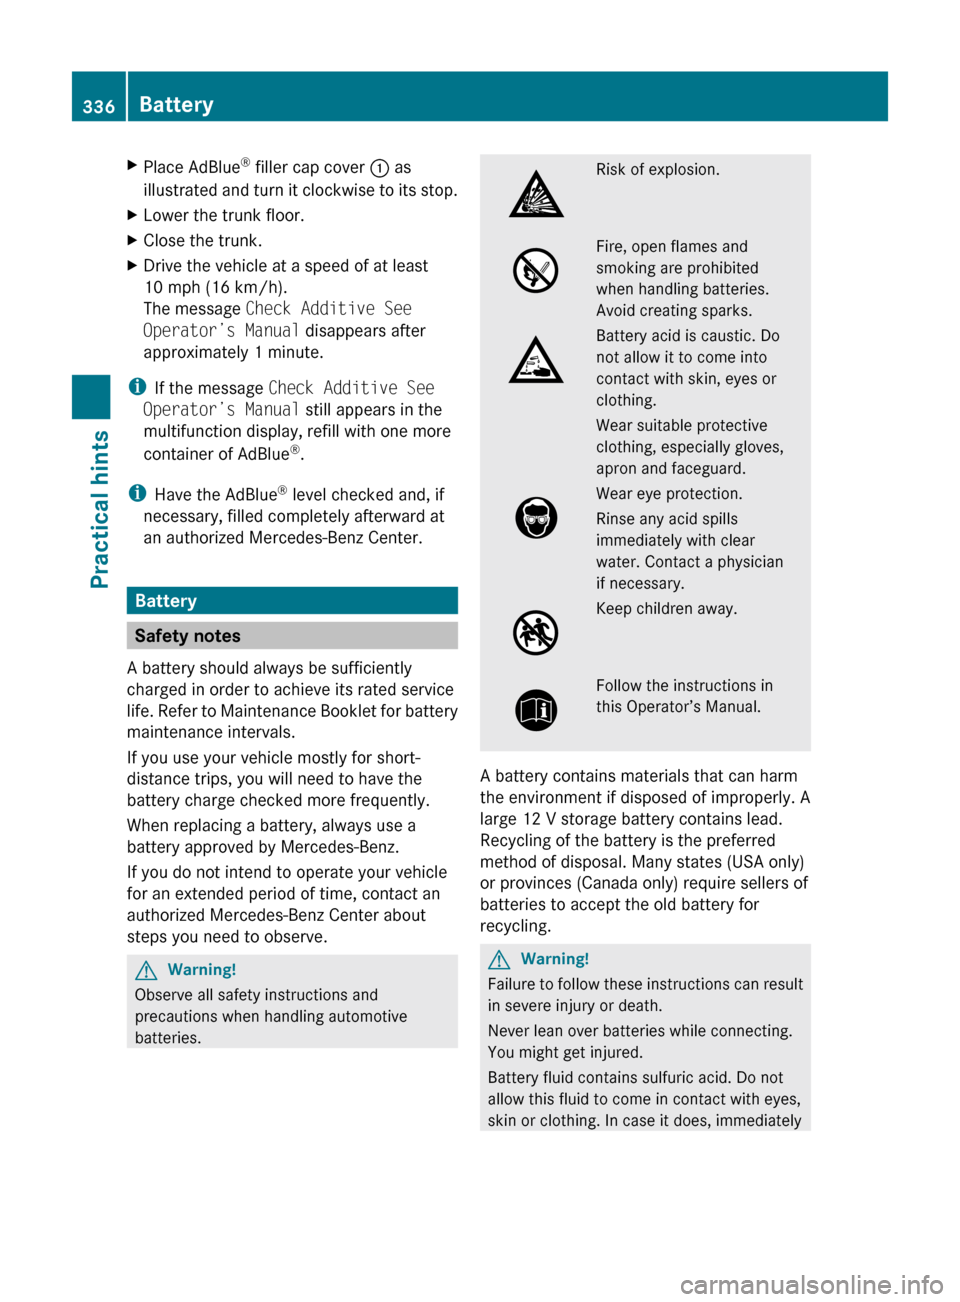
XPlace AdBlue® filler cap cover : as
illustrated and turn it clockwise to its stop.
XLower the trunk floor.XClose the trunk.XDrive the vehicle at a speed of at least
10 mph (16 km/h).
The message Check Additive See
Operator’s Manual disappears after
approximately 1 minute.
iIf the message Check Additive See
Operator’s Manual still appears in the
multifunction display, refill with one more
container of AdBlue®.
iHave the AdBlue® level checked and, if
necessary, filled completely afterward at
an authorized Mercedes-Benz Center.
Battery
Safety notes
A battery should always be sufficiently
charged in order to achieve its rated service
life. Refer to Maintenance Booklet for battery
maintenance intervals.
If you use your vehicle mostly for short-
distance trips, you will need to have the
battery charge checked more frequently.
When replacing a battery, always use a
battery approved by Mercedes-Benz.
If you do not intend to operate your vehicle
for an extended period of time, contact an
authorized Mercedes-Benz Center about
steps you need to observe.
GWarning!
Observe all safety instructions and
precautions when handling automotive
batteries.
Risk of explosion.Fire, open flames and
smoking are prohibited
when handling batteries.
Avoid creating sparks.
Battery acid is caustic. Do
not allow it to come into
contact with skin, eyes or
clothing.
Wear suitable protective
clothing, especially gloves,
apron and faceguard.
Wear eye protection.
Rinse any acid spills
immediately with clear
water. Contact a physician
if necessary.
Keep children away.Follow the instructions in
this Operator’s Manual.
A battery contains materials that can harm
the environment if disposed of improperly. A
large 12 V storage battery contains lead.
Recycling of the battery is the preferred
method of disposal. Many states (USA only)
or provinces (Canada only) require sellers of
batteries to accept the old battery for
recycling.
GWarning!
Failure to follow these instructions can result
in severe injury or death.
Never lean over batteries while connecting.
You might get injured.
Battery fluid contains sulfuric acid. Do not
allow this fluid to come in contact with eyes,
skin or clothing. In case it does, immediately
336BatteryPractical hints
212_AKB; 2; 41, en-USd2ureepe,Version: 2.11.8.12009-07-17T09:14:21+02:00 - Seite 336
Page 343 of 372
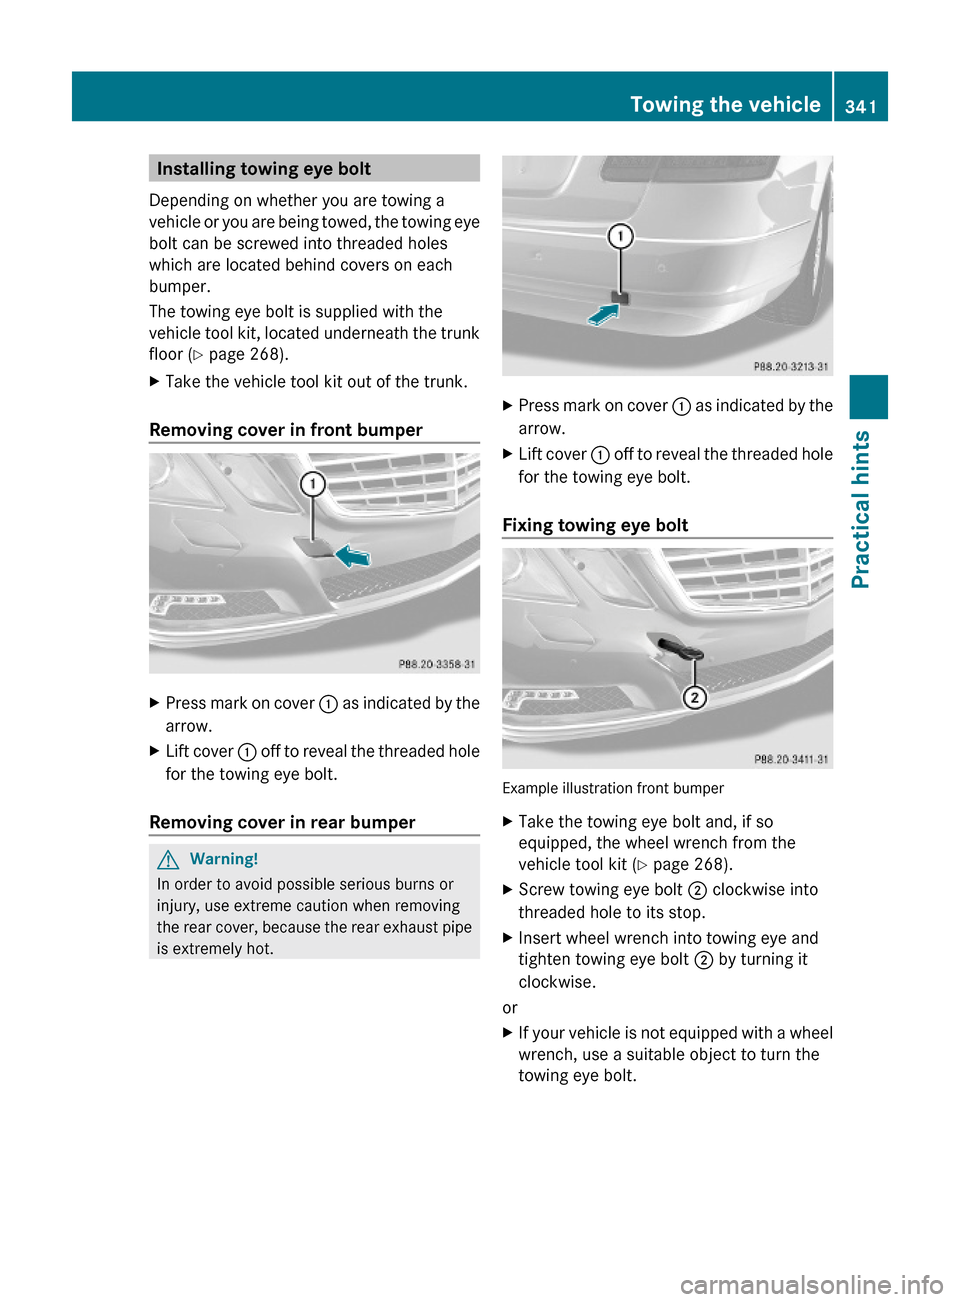
Installing towing eye bolt
Depending on whether you are towing a
vehicle or you are being towed, the towing eye
bolt can be screwed into threaded holes
which are located behind covers on each
bumper.
The towing eye bolt is supplied with the
vehicle tool kit, located underneath the trunk
floor (Y page 268).
XTake the vehicle tool kit out of the trunk.
Removing cover in front bumper
XPress mark on cover : as indicated by the
arrow.
XLift cover : off to reveal the threaded hole
for the towing eye bolt.
Removing cover in rear bumper
GWarning!
In order to avoid possible serious burns or
injury, use extreme caution when removing
the rear cover, because the rear exhaust pipe
is extremely hot.
XPress mark on cover : as indicated by the
arrow.
XLift cover : off to reveal the threaded hole
for the towing eye bolt.
Fixing towing eye bolt
Example illustration front bumper
XTake the towing eye bolt and, if so
equipped, the wheel wrench from the
vehicle tool kit (Y page 268).
XScrew towing eye bolt ; clockwise into
threaded hole to its stop.
XInsert wheel wrench into towing eye and
tighten towing eye bolt ; by turning it
clockwise.
or
XIf your vehicle is not equipped with a wheel
wrench, use a suitable object to turn the
towing eye bolt.
Towing the vehicle341Practical hints212_AKB; 2; 41, en-USd2ureepe,Version: 2.11.8.12009-07-17T09:14:21+02:00 - Seite 341Z