2010 MERCEDES-BENZ E350 display messages
[x] Cancel search: display messagesPage 65 of 372

GWarning!
If the ABS malfunctions, other driving safety
systems such as the BAS or the ESC are also
switched off. Observe indicator and warning
lamps that may come on as well as messages
in the multifunction display that may appear.
If the ABS malfunctions, the wheels may lock
during hard braking, reducing steering
capability and extending the braking distance.
BAS
GObserve Safety notes, see page 62.
The Brake Assist System (BAS) operates in
emergency situations. If you apply the brakes
very quickly, the BAS provides full brake
boost automatically, thereby potentially
reducing the braking distance.
XApply continuous full braking pressure until
the emergency braking situation is over.
The ABS will prevent the wheels from
locking.
When you release the brake pedal, the brakes
function again as normal. The BAS is then
deactivated.
GWarning!
If the BAS malfunctions, the brake system still
functions, but without the additional brake
boost available that the BAS would normally
provide in an emergency braking maneuver.
Therefore, the braking distance may increase.
BAS PLUS
The Brake Assist System PLUS (BAS PLUS)
operates in emergency braking situations and
uses radar sensors to assess the traffic
situation. BAS PLUS assists you in braking at
speeds above approximately 20 mph
(30 km/h).
When traveling in Canada in a vehicle not
registered in Canada, you must switch off the
radar sensor system ( Y page 144). Canadian
law does not permit the use of the radar
sensor system for vehicles from outside of
Canada.
When you switch off the radar system, the
following functions are deactivated:
R BAS PLUS
R PRE-SAFE ®
Brake ( Y page 69)
R DISTRONIC PLUS ( Y page 149)GWarning!
BAS PLUS is a convenience system designed
to assist the driver during vehicle operation.
The responsibility for the vehicle speed and
the distance to the vehicle ahead, including
most importantly brake operation to assure
safe stopping distance, always remains with
the driver.
Always pay attention to traffic conditions
even while BAS PLUS is switched on.
Otherwise, you may not be able to recognize
dangerous situations until it is too late and
could cause an accident. Personal or fatal
injury to you or others may be the result.
i This device has been approved by the FCC
as a “Vehicular Radar System”. The radar
sensor is intended for use in an automotive
radar system only. Removal, tampering, or
altering of the device will void any
warranties, and is not permitted by the
FCC. Do not tamper with, alter, or use in
any non-approved way.
Any unauthorized modification to this
device could void the user’s authority to
operate the equipment.
BAS PLUS detects obstacles that are in your
driving path for a sufficient period of time to
permit the system to recognize these
obstacles. If you approach the detected
obstacle quickly, BAS PLUS calculates the
level of brake power boost appropriate for the
circumstance to supply when the driver
applies the brakes.
When you step quickly on the brake pedal in
an emergency braking situation, BAS PLUS
automatically regulates the brake power
Driving safety systems63Safety and security212_AKB; 2; 41, en-USd2ureepe,Version: 2.11.8.12009-07-17T09:14:21+02:00 - Seite 63Z
Page 127 of 372

Instrument cluster
Introduction
For a full view illustration of the instrument
cluster, see “Instrument cluster”
(Y page 28).
GWarning!
No messages will be displayed if either the
instrument cluster or the multifunction
display is inoperative.
As a result, you will not be able to see
information about your driving conditions,
such as
Rspeed
Routside temperature
Rwarning/indicator lamps
Rmalfunction/warning messages
Rfailure of any systems
Driving characteristics may be impaired.
If you must continue to drive, do so with added
caution. Contact an authorized Mercedes-
Benz Center as soon as possible.
The language setting for the multifunction
display can be changed via COMAND, see
separate operating instructions.
Activating the instrument cluster
The instrument cluster is activated when you
Ropen the driver’s door
Rswitch on the ignition
Rswitch on the exterior lamps
Adjusting the instrument cluster
illumination
XTo brighten illumination: Turn
dimmer : clockwise.
XTo dim illumination: Turn dimmer :
counterclockwise.
iThe instrument cluster illumination is
dimmed or brightened automatically to suit
ambient light conditions.
Coolant temperature gauge
The coolant temperature gauge is located on
the right side in the instrument cluster
(Y page 28).
GWarning!
Driving when your engine is overheated can
cause some fluids which may have leaked into
the engine compartment to catch fire. You
could be seriously burned.
Steam from an overheated engine can cause
serious burns which can occur just by opening
the engine hood. Stay away from the engine
if you see or hear steam coming from it.
Stop the vehicle in a safe location away from
other traffic. Turn off the engine, get out of the
vehicle and do not stand near the vehicle until
the engine has cooled down.
During severe operating conditions, e.g. stop-
and-go traffic, the coolant temperature may
rise close to 248‡ (120†), i.e close to the
red zone of the temperature gauge.
Instrument cluster125Controls in detail212_AKB; 2; 41, en-USd2ureepe,Version: 2.11.8.12009-07-17T09:14:21+02:00 - Seite 125Z
Page 129 of 372

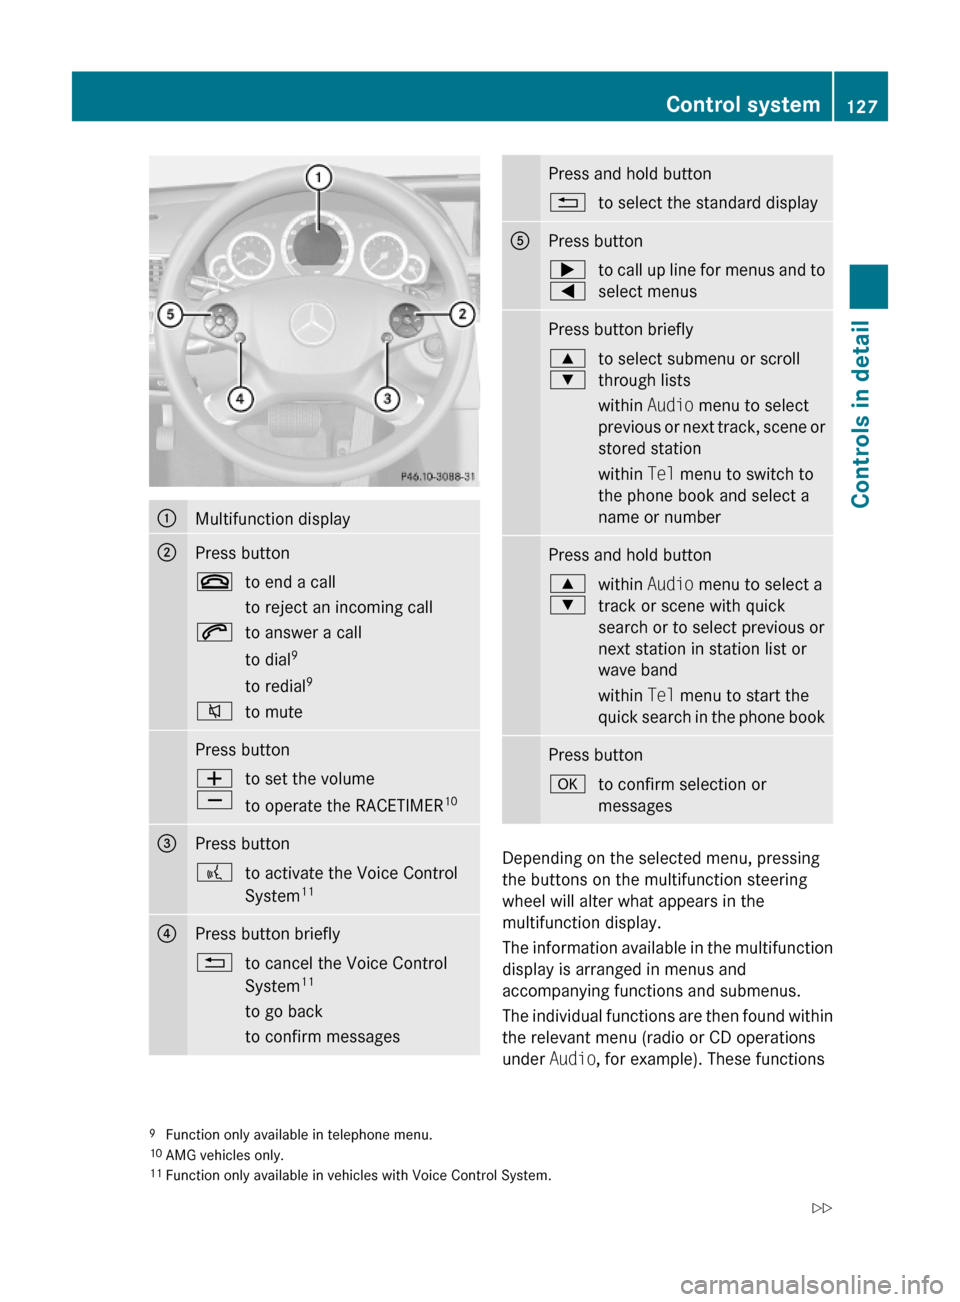
:Multifunction display;Press button~to end a call
to reject an incoming call
6to answer a call
to dial9
to redial9
8to mutePress buttonW
X
to set the volume
to operate the RACETIMER10
=Press button?to activate the Voice Control
System11?Press button briefly%to cancel the Voice Control
System11
to go back
to confirm messages
Press and hold button%to select the standard displayAPress button;
=
to call up line for menus and to
select menus
Press button briefly9
:
to select submenu or scroll
through lists
within Audio menu to select
previous or next track, scene or
stored station
within Tel menu to switch to
the phone book and select a
name or number
Press and hold button9
:
within Audio menu to select a
track or scene with quick
search or to select previous or
next station in station list or
wave band
within Tel menu to start the
quick search in the phone book
Press buttonato confirm selection or
messages
Depending on the selected menu, pressing
the buttons on the multifunction steering
wheel will alter what appears in the
multifunction display.
The information available in the multifunction
display is arranged in menus and
accompanying functions and submenus.
The individual functions are then found within
the relevant menu (radio or CD operations
under Audio, for example). These functions
9Function only available in telephone menu.10AMG vehicles only.11Function only available in vehicles with Voice Control System.
Control system127Controls in detail212_AKB; 2; 41, en-USd2ureepe,Version: 2.11.8.12009-07-17T09:14:21+02:00 - Seite 127Z
Page 130 of 372

serve to call up relevant information or to
customize the settings for your vehicle.
It is helpful to think of the menus, and the
functions within each menu, as being
arranged in a circular pattern.
In the Sett. menu, instead of functions, you
will find a number of submenus for calling up
and changing settings. For instructions on
using these submenus, see “Settings menu”
(Y page 139).
The number of menus available in the system
depends on which optional equipment is
installed in your vehicle.
Using the control system
XTo select a menu: Press button =
or ;.
XTo select a submenu: Press button :
or 9.
XTo go to the next higher menu level:
Press button %.
XTo select the standard display: Press
button % repeatedly until the standard
display featuring the odometer and
speedometer appears.
or
XPress and hold button % until the
standard display featuring the trip
odometer and the main odometer appears.
XTo confirm selection: Press button a.XTo confirm display message: Press
button a or %.
The control system saves certain display
messages. Calling up display messages
(Y page 139).
For information about warning and
malfunction messages appearing in the
multifunction display (Y page 272).
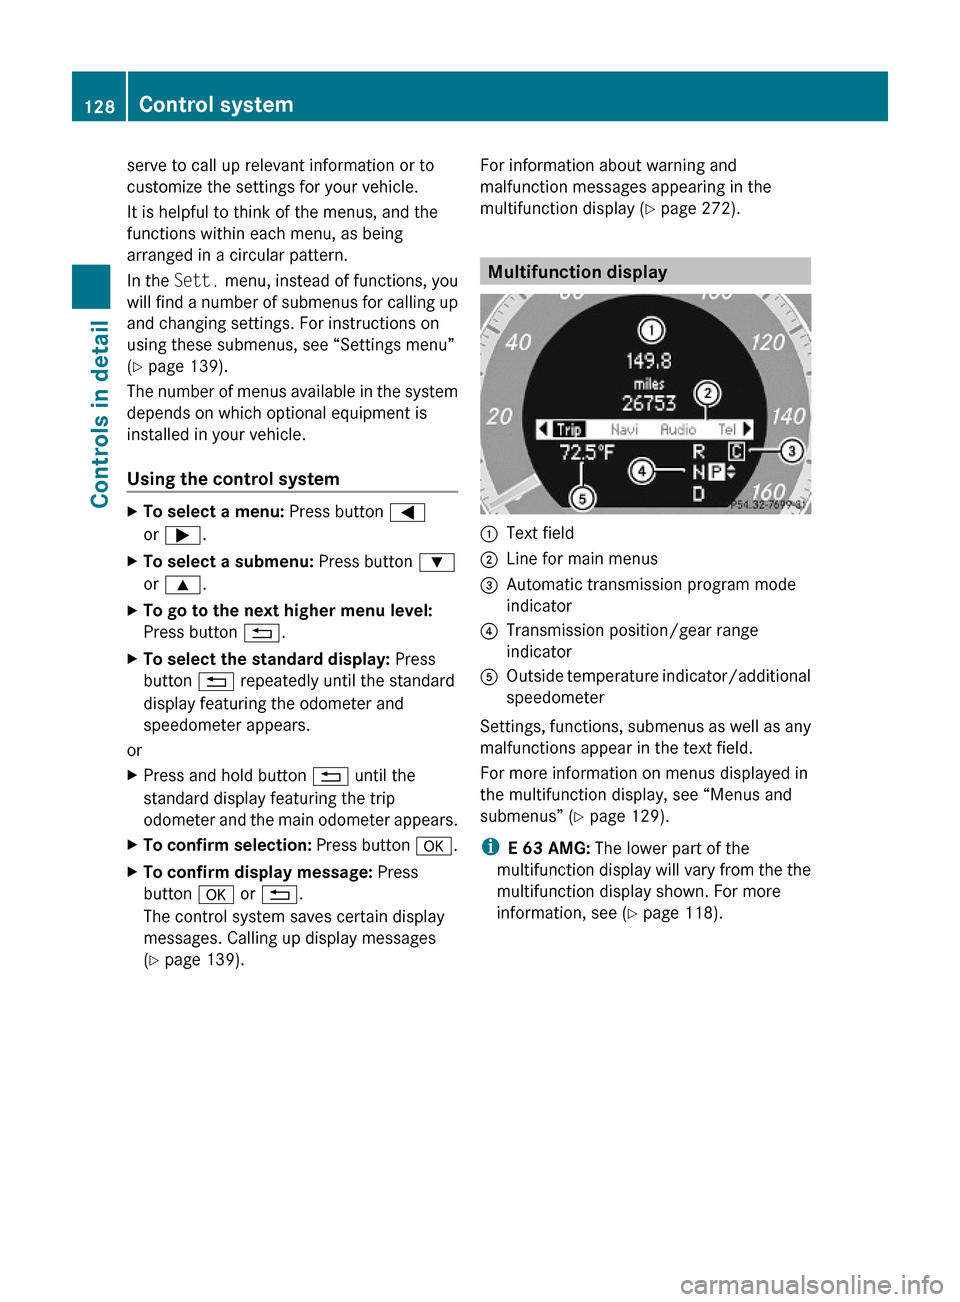
Multifunction display
:Text field;Line for main menus=Automatic transmission program mode
indicator
?Transmission position/gear range
indicator
AOutside temperature indicator/additional
speedometer
Settings, functions, submenus as well as any
malfunctions appear in the text field.
For more information on menus displayed in
the multifunction display, see “Menus and
submenus” (Y page 129).
iE 63 AMG: The lower part of the
multifunction display will vary from the the
multifunction display shown. For more
information, see (Y page 118).
128Control systemControls in detail
212_AKB; 2; 41, en-USd2ureepe,Version: 2.11.8.12009-07-17T09:14:21+02:00 - Seite 128
Page 133 of 372

XPress button : to select Yes.XPress button a to confirm.
Remaining driving range and current
fuel consumption
XPress button = or ; to select the
Trip menu.
XPress button : or 9 to select the
estimated remaining driving range and
current fuel consumption display.
Note that the values are calculated based
on the current fuel tank level and the
current driving style. Make sure to refuel in
time.
If only very little fuel is left in the tank, a
vehicle at the fuel pump C appears
instead of the estimated remaining driving
range.
:Current fuel consumption13;Estimated remaining driving range
Digital speedometer
XPress button = or ; to select the
Trip menu.
XPress button : or 9 to select the
digital speedometer.AMG menu
This function is only available in AMG
vehicles.
XPress button = or ; to select the
AMG menu.
:Digital speedometer;Gear indicator=Upshift indicator?Engine oil temperature indicatorACoolant temperature indicator
The engine oil temperature flashes if the
engine oil temperature has not yet reached
176‡ (80†). During this time, avoid driving
at full engine speed.
The upshift indicator = indicates that the
engine has reached the overrevving range.
The upshift indicator = blocks other
messages in the multifunction display until
you have shifted up.
Use buttons : or 9 to select the
following functions in the AMG menu:
RSETUP (Y page 132)
RRACETIMER (Y page 132)
ROverall analysis (Y page 133)
RLap analysis (Y page 133)
13Not available on AMG vehicles.Control system131Controls in detail212_AKB; 2; 41, en-USd2ureepe,Version: 2.11.8.12009-07-17T09:14:21+02:00 - Seite 131Z
Page 138 of 372

Some jurisdictions prohibit the driver from
using a mobile phone while driving a vehicle.
Bear in mind that at a speed of just 30 mph
(approximately 50 km/h), your vehicle is
covering a distance of 44 feet (approximately
14 m) every second.
You can connect your telephone to the
COMAND system via Bluetooth®, see
separate COMAND system operating
instructions.
XSwitch on the COMAND system.
Refer to separate COMAND system
operating instructions.
XPress button = or ; to select the
Tel menu.
One of the following messages will appear
in the multifunction display:
RNo Service: No network is available.
RReady for Bluetooth Telephony...:
The telephone has not been connected
to the COMAND system via Bluetooth®
yet.
XConnect the telephone to the
COMAND system via Bluetooth®.
RPhone READY or name of the network
provider (if available): The telephone has
found a network and is ready for use. You
can operate it using the control system.
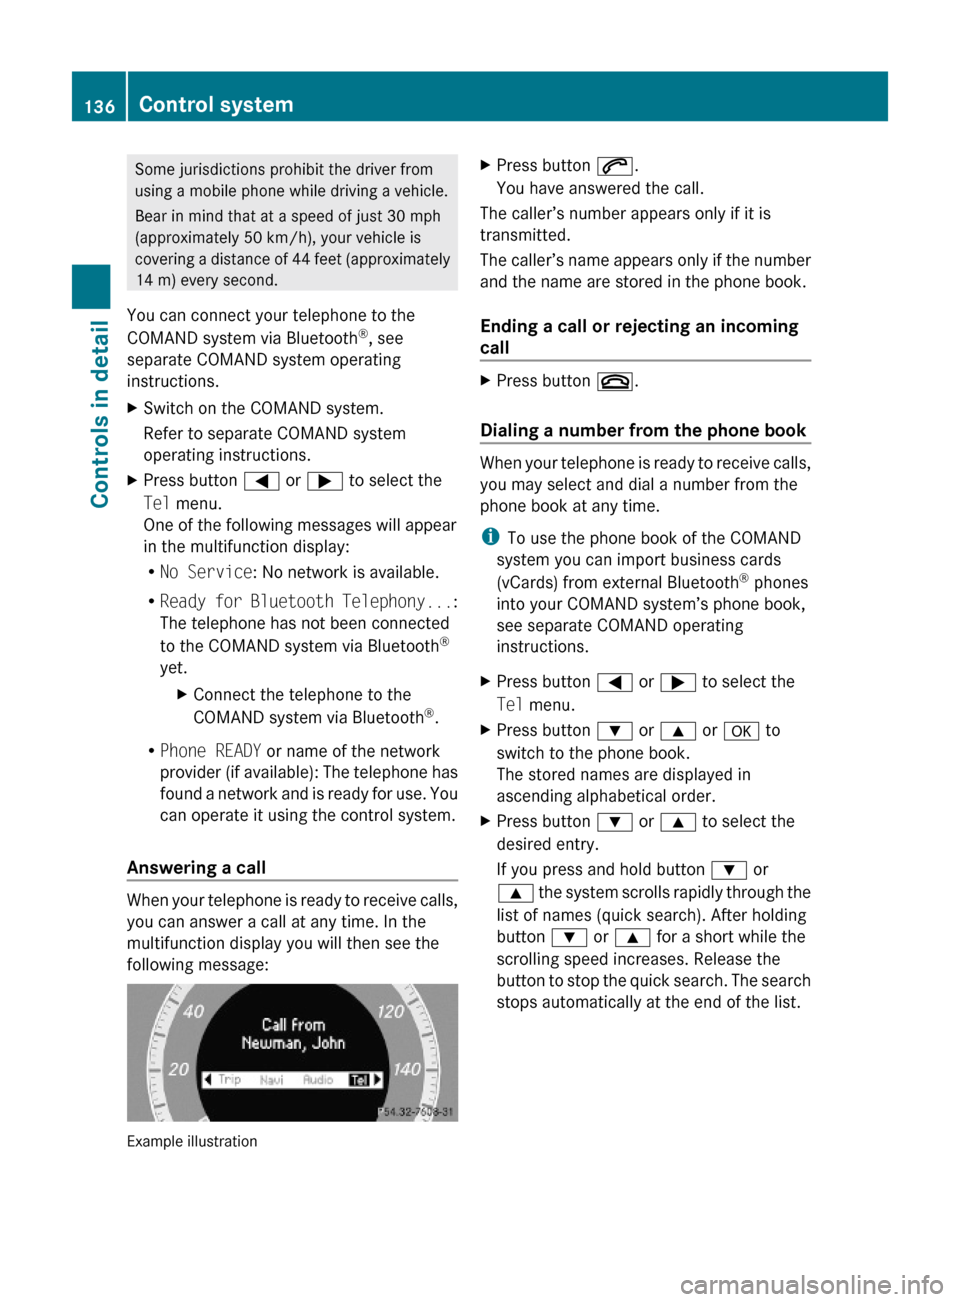
Answering a call
When your telephone is ready to receive calls,
you can answer a call at any time. In the
multifunction display you will then see the
following message:
Example illustration
XPress button 6.
You have answered the call.
The caller’s number appears only if it is
transmitted.
The caller’s name appears only if the number
and the name are stored in the phone book.
Ending a call or rejecting an incoming
call
XPress button ~.
Dialing a number from the phone book
When your telephone is ready to receive calls,
you may select and dial a number from the
phone book at any time.
iTo use the phone book of the COMAND
system you can import business cards
(vCards) from external Bluetooth® phones
into your COMAND system’s phone book,
see separate COMAND operating
instructions.
XPress button = or ; to select the
Tel menu.
XPress button : or 9 or a to
switch to the phone book.
The stored names are displayed in
ascending alphabetical order.
XPress button : or 9 to select the
desired entry.
If you press and hold button : or
9 the system scrolls rapidly through the
list of names (quick search). After holding
button : or 9 for a short while the
scrolling speed increases. Release the
button to stop the quick search. The search
stops automatically at the end of the list.
136Control systemControls in detail
212_AKB; 2; 41, en-USd2ureepe,Version: 2.11.8.12009-07-17T09:14:21+02:00 - Seite 136
Page 141 of 372

RVehicle status message memory
(Y page 139)
RRestarting the tire pressure loss warning
system (Canada only) (Y page 233)
RChecking tire inflation pressure
electronically with the Advanced TPMS
(Y page 233)
RCalling up the maintenance service
indicator display (Y page 259)
Vehicle status message memory
Use the vehicle status message memory
function to scan malfunction and warning
messages that may be stored in the system.
Such messages appear in the multifunction
display and are based on conditions or
system status the vehicle’s system has
recorded.
GWarning!
Malfunction and warning messages are only
indicated for certain systems and are
intentionally not very detailed. The
malfunction and warning messages are
simply a reminder with respect to the
operation of certain systems. They do not
replace the owner’s and/or driver’s
responsibility to maintain the vehicle’s
operating safety. Have all required
maintenance and safety checks performed on
the vehicle. Bring the vehicle to an authorized
Mercedes-Benz Center to address the
malfunction and warning messages.
XPress button = or ; to select the
Serv. menu.
If conditions have occurred causing status
messages to be recorded, the number of
messages appears in the multifunction
display:
XPress button : or 9 to select the
messages function.
XPress button a to confirm.
The stored messages will now be displayed
in the order in which they have occurred.
For malfunction and warning messages,
see “Vehicle status messages in the
multifunction display” (Y page 272).
XUse button : or 9 to scroll through
the messages.
If you turn the SmartKey in the starter switch
to position 0 and then back to position 2, all
messages will be deleted from the message
memory.
Settings menu
Introduction
In the Sett. menu there are two functions:
The function Factory Setting
(Y page 139), with which you can reset the
settings to the original factory settings and a
collection of submenus (Y page 140) with
which you can make individual settings for
your vehicle.
Resetting to factory settings
You can reset most of the settings of the
submenus to the factory settings.
For safety reasons, the function Daytime
Running Lamps in the Lights submenu
cannot be reset while driving.
XPress button = or ; to select the
Sett. menu.
Control system139Controls in detail212_AKB; 2; 41, en-USd2ureepe,Version: 2.11.8.12009-07-17T09:14:21+02:00 - Seite 139Z
Page 150 of 372

The cruise control speed segments in the
multifunction display goes out and an
acoustic warning will sound. Observe
additional messages in the multifunction
display that may appear.
Depressing the accelerator pedal does not
deactivate the cruise control. After a brief
acceleration (e.g. for passing), the cruise
control will resume the last set speed.
Changing the set speed GWarning!
Keep in mind that it may take a brief moment
until the vehicle has made the necessary
adjustments.
Increase or decrease the set vehicle speed to
a value that the prevailing road conditions and
legal speed limits permit. Otherwise, sudden
and unexpected acceleration or deceleration
of the vehicle could cause an accident and/
or serious injury to you and others.
You can increase or decrease the set speed
in 1 mph (Canada: 1 km/h) increments or in
5 mph (Canada: 10 km/h) increments.
When you use the cruise control lever to
decelerate, the brake system will brake the
vehicle automatically if the engine’s braking
power does not brake the vehicle sufficiently.
Adjustment in 1 mph (Canada:
1 km/h) increments
i The set speed value is increased or
decreased in 1 mph (Canada: 1 km/h)
increments each time you lift or press the
cruise control lever up or down to the
resistance point.
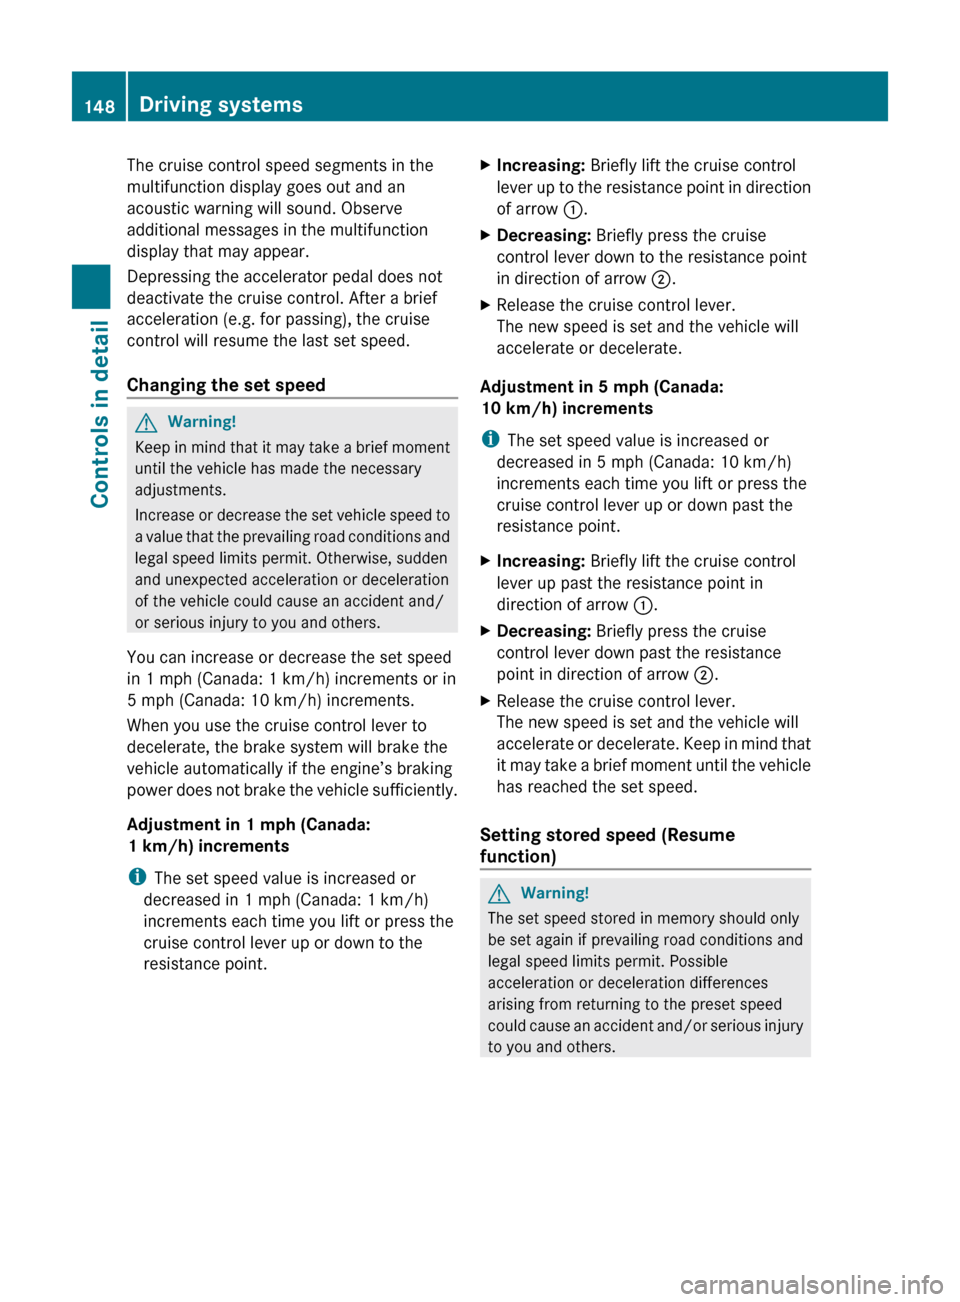
XIncreasing: Briefly lift the cruise control
lever up to the resistance point in direction
of arrow :.XDecreasing: Briefly press the cruise
control lever down to the resistance point
in direction of arrow ;.XRelease the cruise control lever.
The new speed is set and the vehicle will
accelerate or decelerate.
Adjustment in 5 mph (Canada:
10 km/h) increments
i The set speed value is increased or
decreased in 5 mph (Canada: 10 km/h)
increments each time you lift or press the
cruise control lever up or down past the
resistance point.
XIncreasing: Briefly lift the cruise control
lever up past the resistance point in
direction of arrow :.XDecreasing: Briefly press the cruise
control lever down past the resistance
point in direction of arrow ;.XRelease the cruise control lever.
The new speed is set and the vehicle will
accelerate or decelerate. Keep in mind that
it may take a brief moment until the vehicle
has reached the set speed.
Setting stored speed (Resume
function)
GWarning!
The set speed stored in memory should only
be set again if prevailing road conditions and
legal speed limits permit. Possible
acceleration or deceleration differences
arising from returning to the preset speed
could cause an accident and/or serious injury
to you and others.
148Driving systemsControls in detail
212_AKB; 2; 41, en-USd2ureepe,Version: 2.11.8.12009-07-17T09:14:21+02:00 - Seite 148