2010 MERCEDES-BENZ E350 run flat
[x] Cancel search: run flatPage 141 of 372

RVehicle status message memory
(Y page 139)
RRestarting the tire pressure loss warning
system (Canada only) (Y page 233)
RChecking tire inflation pressure
electronically with the Advanced TPMS
(Y page 233)
RCalling up the maintenance service
indicator display (Y page 259)
Vehicle status message memory
Use the vehicle status message memory
function to scan malfunction and warning
messages that may be stored in the system.
Such messages appear in the multifunction
display and are based on conditions or
system status the vehicle’s system has
recorded.
GWarning!
Malfunction and warning messages are only
indicated for certain systems and are
intentionally not very detailed. The
malfunction and warning messages are
simply a reminder with respect to the
operation of certain systems. They do not
replace the owner’s and/or driver’s
responsibility to maintain the vehicle’s
operating safety. Have all required
maintenance and safety checks performed on
the vehicle. Bring the vehicle to an authorized
Mercedes-Benz Center to address the
malfunction and warning messages.
XPress button = or ; to select the
Serv. menu.
If conditions have occurred causing status
messages to be recorded, the number of
messages appears in the multifunction
display:
XPress button : or 9 to select the
messages function.
XPress button a to confirm.
The stored messages will now be displayed
in the order in which they have occurred.
For malfunction and warning messages,
see “Vehicle status messages in the
multifunction display” (Y page 272).
XUse button : or 9 to scroll through
the messages.
If you turn the SmartKey in the starter switch
to position 0 and then back to position 2, all
messages will be deleted from the message
memory.
Settings menu
Introduction
In the Sett. menu there are two functions:
The function Factory Setting
(Y page 139), with which you can reset the
settings to the original factory settings and a
collection of submenus (Y page 140) with
which you can make individual settings for
your vehicle.
Resetting to factory settings
You can reset most of the settings of the
submenus to the factory settings.
For safety reasons, the function Daytime
Running Lamps in the Lights submenu
cannot be reset while driving.
XPress button = or ; to select the
Sett. menu.
Control system139Controls in detail212_AKB; 2; 41, en-USd2ureepe,Version: 2.11.8.12009-07-17T09:14:21+02:00 - Seite 139Z
Page 224 of 372

The fuel filler flap is located on the right-hand
side of the vehicle towards the rear.
XTurn off the engine.
iLeaving the engine running and the fuel
filler cap open can cause the yellow engine
malfunction indicator lamp ; to
illuminate.
For more information, see also “Practical
hints” (Y page 310).
XRemove the SmartKey from the starter
switch.
KEYLESS-GO: Open the driver’s door. This
puts the starter switch in position 0, same
as with the SmartKey removed from the
starter switch. The driver’s door then can
be closed again.
XOpening: Press fuel filler flap : at the
point indicated by the arrow.
XTurn fuel filler cap ; counterclockwise.XTake off fuel filler cap ;.
! The fuel filler cap is tethered to the fuel
filler neck. Do not drop the cap. It could
damage the vehicle paint finish.
XPlace fuel filler cap ; in direction of arrow
into holder =.
XFully insert filler nozzle unit and refuel.XOnly fill your tank until the filler nozzle unit
cuts out – do not top off or overfill.
XClosing: Turn fuel filler cap ; clockwise
until it audibly engages.
iClose the fuel filler flap before locking the
vehicle. Otherwise the flap locking pin will
prevent closing the fuel filler flap.
XClose fuel filler flap :.
Low outside temperatures (diesel
engine)
! Do not fill the tank with gasoline. Do not
blend diesel fuel with gasoline or kerosene.
The fuel system and engine will otherwise
be damaged, which is not covered by the
Mercedes-Benz Limited Warranty.
To prevent malfunctions, diesel fuel with
improved cold flow characteristics is offered
in the winter months. Check with your fuel
retailer.
Check regularly and before a long trip
For information on quantities and
requirements of operating agents, see “Fuels,
coolants, lubricants, etc.” (Y page 359).
Check the following:
REngine oil level (Y page 224)
RTire inflation pressure (Y page 231)
RCoolant level (Y page 226)
RVehicle lighting (Y page 318)
RWasher system and headlamp cleaning
system (Y page 227)
RBrake fluid (Y page 227)
222At the gas stationOperation
212_AKB; 2; 41, en-USd2ureepe,Version: 2.11.8.12009-07-17T09:14:21+02:00 - Seite 222
Page 235 of 372

applying the brakes and avoiding abrupt
steering maneuvers.
Restarting the tire pressure loss warning
system
The tire pressure loss warning system must
be restarted in the following situations:
R after you have changed the tire inflation
pressure
R after you have replaced the wheels or tires
R after you have installed new wheels or tiresXUsing the Tire and Loading Information
placard on the driver’s door B-pillar or, if
available, the tire inflation pressure label on
the inside of the fuel filler flap, make sure
the tire inflation pressure of all four tires is
correct.GWarning!
The tire pressure loss warning system can
only warn you in a reliable manner if you have
set the correct tire inflation pressures for
each tire.
If an incorrect tire inflation pressure was set,
the system will monitor the pressure
according to the incorrect value.
XSwitch on the ignition.XPress button = or ; on the
multifunction steering wheel to select the
Serv. menu ( Y page 138).XPress button 9 or : on the
multifunction steering wheel to select
Tire Pressure .XPress button a on the multifunction
steering wheel to confirm.
The following message appears in the
multifunction display:
Run Flat Indicator
Active
Press 'OK' to RestartXPress button a.
The following message will appear in the
multifunction display:
Tire PressureNow OK?
Cancel
YesXIf you wish to confirm: Press button
9 or : to select Yes.XPress button a.
The following message will appear in the
multifunction display:
Run Flat
Indicator
Restarted
After a certain “learning phase”, the tire
pressure loss warning system checks the
set pressure values for all four tires.XIf you wish to cancel: Press button 9
or : to select Cancel.XPress button a to confirm.
The previous settings remain unchanged.
Advanced Tire Pressure Monitoring
System (Advanced TPMS)
Your vehicle is equipped with the Advanced
Tire Pressure Monitoring System (Advanced
TPMS). It measures the tire inflation pressure
in the vehicle’s tires and issues warnings in
case of pressure loss in one or more of the
tires.
The TPMS is equipped with a combination low
tire pressure/TPMS malfunction telltale
(USA) or a low tire pressure telltale (Canada)
in the instrument cluster. Depending on how
the telltale illuminates, it indicates a low tire
pressure condition or a malfunction in the
TPMS system itself:
R If the telltale illuminates continuously, one
or more of your tires is significantly
underinflated. There is no malfunction in
the TPMS.
R USA only: If the telltale flashes for 60
seconds and then stays illuminated, the
TPMS system itself is not operating
properly.
The TPMS only functions on wheels that are
equipped with the proper electronic sensors.
Tires and wheels233Operation212_AKB; 2; 41, en-USd2ureepe,Version: 2.11.8.12009-07-17T09:14:21+02:00 - Seite 233Z
Page 244 of 372

MOExtended system
The MOExtended system allows you to
continue driving your vehicle even if there is
a total loss of pressure in one or more tires.
You may only use the MOExtended system in
conjunction with the tire pressure loss
warning system ( Y page 232) or the
Advanced TPMS ( Y page 233).
i Vehicles with MOExtended system are
not factory-equipped with a TIREFIT kit.
When retrofitting with tires that do not have
run-flat characteristics, e.g. winter tires,
you should also equip your vehicle with a
TIREFIT kit. TIREFIT kits are available at any
authorized Mercedes-Benz Center.
For information on driving in case of pressure
loss in one or more tires (emergency mode),
see the “Practical hints” section
( Y page 329).
Tire care and maintenance
GWarning!
Regularly check the tires for damage.
Damaged tires can cause tire inflation
pressure loss. As a result, you could lose
control of your vehicle.
Worn, old tires can cause accidents. If the tire
tread is worn to minimum tread depth, or if
the tires have sustained damage, replace
them.
Check the tire inflation pressure at least once
a month. For more information on checking
tire inflation pressure, see “Recommended
tire inflation pressure” ( Y page 229).
Tire inspection
Every time you check the tire inflation
pressure, you should also inspect your tires
for the following:
R excessive treadwear ( Y page 242)
R cord or fabric showing through the tire’s
rubber
R bumps, bulges, cuts, cracks or splits in the
tread or side of the tire
Replace the tire if you find any of the above
conditions.
Make sure you also inspect the spare tire
periodically for condition and inflation. Spare
tires will age and become worn over time even
if never used, and thus should be inspected
and replaced when necessary.
Life of tire
GWarning!
Tires and spare tire should be replaced after
6 years, regardless of the remaining tread.
The service life of a tire is dependent upon
varying factors including but not limited to:
R Driving style
R Tire inflation pressure
R Distance driven
Tread depth
GWarning!
Although the applicable federal motor vehicle
safety laws consider a tire to be worn when
the treadwear indicators (TWI) become visible
at approximately 1
/ 16 in (1.6 mm), we
recommend that you do not allow your tires
to wear down to that level. As tread depth
approaches 1
/ 8 in (3 mm), the adhesion
properties on a wet road are sharply reduced.
Depending upon the weather and/or road
surface (conditions), the tire traction varies
widely.
242Tires and wheelsOperation
212_AKB; 2; 41, en-USd2ureepe,Version: 2.11.8.12009-07-17T09:14:21+02:00 - Seite 242
Page 256 of 372

Depressing the brake pedal periodically when
traveling at length on salt-strewn roads can
bring road-salt-impaired braking efficiency
back to normal.
If the vehicle is parked after being driven on
salt-treated roads, the braking efficiency
should be tested as soon as possible after
driving is resumed.GWarning!
Make sure not to endanger any other road
users when carrying out these braking
maneuvers.
Driving instructions
Drive sensibly – save fuel
To save fuel you should:
R Keep tires at the recommended inflation
pressures.
R Remove unnecessary loads.
R Remove roof rack when not in use.
R Allow engine to warm up under low load
use.
R Avoid frequent acceleration and
deceleration.
R Have all maintenance work performed at
the intervals specified in the Maintenance
Booklet and as required by the
Maintenance system. Contact an
authorized Mercedes-Benz Center.
Fuel consumption is also increased by driving
in cold weather, in stop-and-go traffic, on
short trips and in mountainous areas.
Drinking and driving
GWarning!
Drinking and driving and/or taking drugs and
driving are very dangerous combinations.
Even a small amount of alcohol or drugs can
affect your reflexes, perceptions and
judgment.
The possibility of a serious or even fatal
accident are greatly increased when you drink
or take drugs and drive.
Do not drink or take drugs and drive or allow
anyone to drive who has been drinking or
taking drugs.
Pedals
GWarning!
Make sure absolutely no objects are
obstructing the pedals’ range of movement.
Keep the driver’s footwell clear of all
obstacles. If there are any floormats or
carpets in the footwell, make sure that the
pedals still have sufficient clearance.
During sudden driving or braking maneuvers,
the objects could get caught between the
pedals. You could then no longer brake or
accelerate. This could lead to accidents and
injury.
Power assistance
GWarning!
There is no power assistance for the steering
and the brake when the engine is not running.
Steering and braking requires significantly
more effort and you could lose control of the
vehicle and cause an accident as a result.
Do not turn off the engine while the vehicle is
in motion.
Brakes
Downhill grades
! When driving down long and steep
grades, relieve the load on the brakes by
shifting into a lower gear to use the
engine’s braking power. This helps prevent
overheating of the brakes and reduces
wear.
254Driving instructionsOperation
212_AKB; 2; 41, en-USd2ureepe,Version: 2.11.8.12009-07-17T09:14:21+02:00 - Seite 254
Page 271 of 372

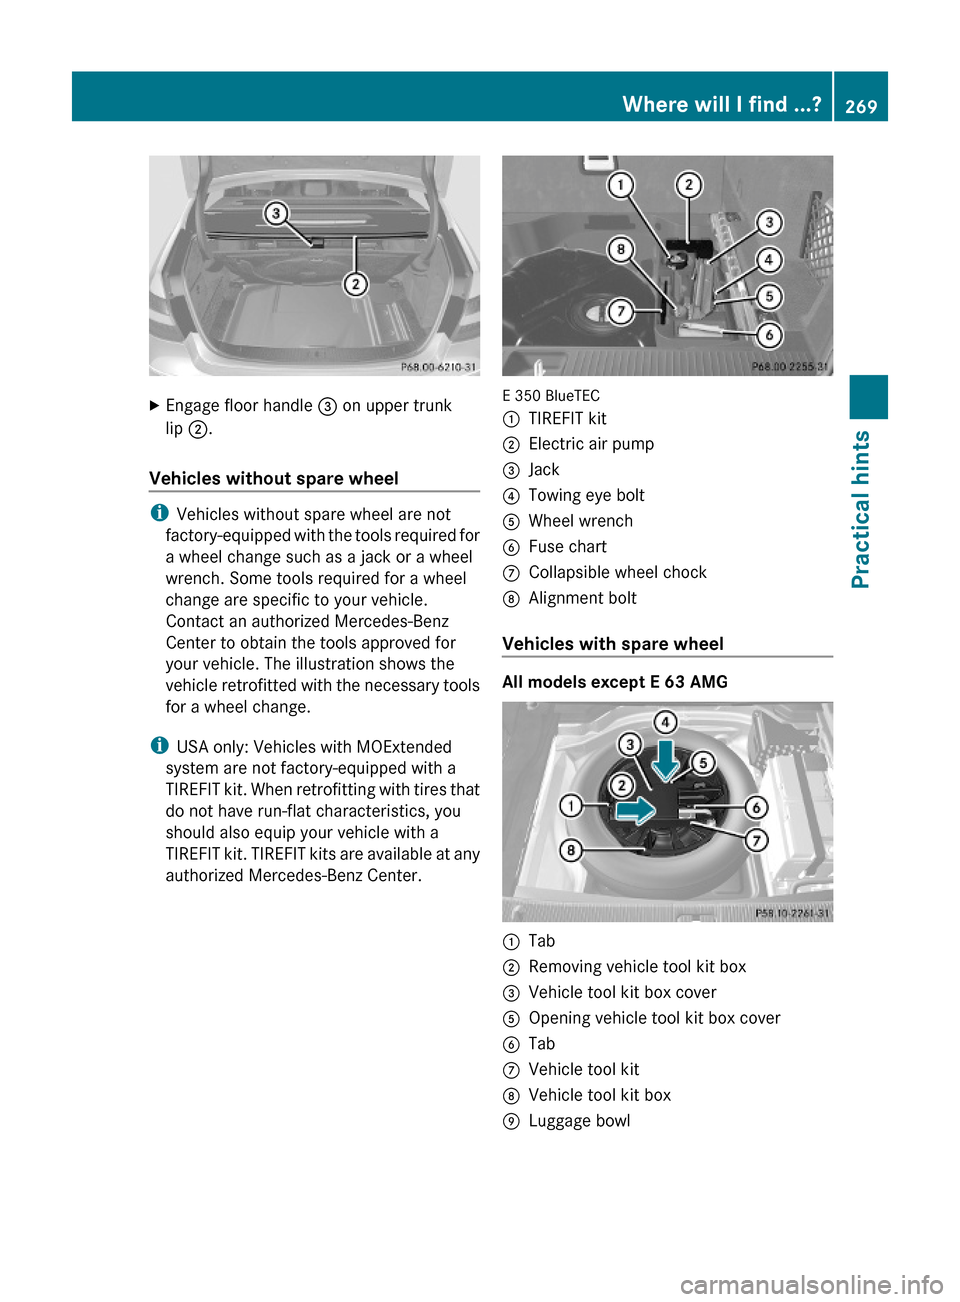
XEngage floor handle = on upper trunk
lip ;.
Vehicles without spare wheel
iVehicles without spare wheel are not
factory-equipped with the tools required for
a wheel change such as a jack or a wheel
wrench. Some tools required for a wheel
change are specific to your vehicle.
Contact an authorized Mercedes-Benz
Center to obtain the tools approved for
your vehicle. The illustration shows the
vehicle retrofitted with the necessary tools
for a wheel change.
iUSA only: Vehicles with MOExtended
system are not factory-equipped with a
TIREFIT kit. When retrofitting with tires that
do not have run-flat characteristics, you
should also equip your vehicle with a
TIREFIT kit. TIREFIT kits are available at any
authorized Mercedes-Benz Center.
E 350 BlueTEC
:TIREFIT kit;Electric air pump=Jack?Towing eye boltAWheel wrenchBFuse chartCCollapsible wheel chockDAlignment bolt
Vehicles with spare wheel
All models except E 63 AMG
:Tab;Removing vehicle tool kit box=Vehicle tool kit box coverAOpening vehicle tool kit box coverBTabCVehicle tool kitDVehicle tool kit boxELuggage bowlWhere will I find ...?269Practical hints212_AKB; 2; 41, en-USd2ureepe,Version: 2.11.8.12009-07-17T09:14:21+02:00 - Seite 269Z
Page 286 of 372

Display messagesPossible causes/consequences and M SolutionsService
RequiredDo Not
Shift
Gears
Visit
DealerIn addition an acoustic warning sounds.
The automatic transmission cannot be shifted out of the
current transmission position because of a malfunction.
If the automatic transmission is in drive position D:XWithout shifting the automatic transmission out of drive
position D, drive to an authorized Mercedes-Benz Center.
If the automatic transmission is set to position neutral
position N, reverse gear R or park position P:
XDo not drive.XContact an authorized Mercedes-Benz Center or call
Roadside Assistance.Only
Shift to
'P' when
Vehicle
is
StationaryYou have attempted to shift the automatic transmission into
park position P although the vehicle was still in motion.XStop your vehicle as soon as it is safe to do so.XShift the automatic transmission to park position P.Shift to
'P' or 'N'to Start
EngineYou have attempted to start the engine with the KEYLESS-GO
start/stop button while the automatic transmission was in
reverse gear R or drive position D.XShift the automatic transmission into park position P or
neutral position N. Make sure the brake pedal is depressed.Auxiliary
BatteryMalfunctio
nThe backup battery for the automatic transmission is no
longer charging.XContact an authorized Mercedes-Benz Center.
Tires
Display messagesPossible causes/consequences and M SolutionsCheck
Tire
PressureThen
Restart
Run Flat
IndicatorThere has been a warning message about a loss in the tire
inflation pressure and the tire pressure loss warning system
was not restarted yet.XMake sure the correct tire inflation pressure is set for each
tire.XThen restart the tire pressure loss warning system
( Y page 232).Run Flat
IndicatorInoperativ
eThe tire pressure loss warning system is malfunctioning.XHave the tire pressure loss warning system checked at an
authorized Mercedes-Benz Center.284Vehicle status messages in the multifunction displayPractical hints
212_AKB; 2; 41, en-USd2ureepe,Version: 2.11.8.12009-07-17T09:14:21+02:00 - Seite 284
Page 335 of 372

Version 1: Open vent screw F on
pressure gauge G (Y page 331).
Version 2: Press yellow deflate button a
located in air pump housing next to
pressure gauge G.XDrive to the nearest qualified workshop,
e.g. an authorized Mercedes-Benz Center,
to have the damaged tire replaced.XRecommended duration of use: A
maximum of 300 miles (500 km) at 50 mph
( 80 km/h) or below with the recommended
tire inflation pressure.XContact an authorized Mercedes-Benz
Center as soon as possible to obtain a new
TIREFIT kit.XBring used TIREFIT materials to an
authorized Mercedes-Benz Center for
proper disposal.XReplace your TIREFIT container every
4 years. Replacement containers are
available at any authorized Mercedes-Benz
Center.
Bleeding the fuel system (diesel
engine only)
Driving the vehicle until the fuel tank is empty
is not recommended. Otherwise, air may be
sucked into the fuel system. If this happens,
the malfunction indicator lamp ; comes
on and the engine may not start immediately
after refueling the vehicle.
After refueling:
XMake sure the automatic transmission is in
park position P.
The transmission position indicator in the
multifunction display should be on P.XDo not depress the accelerator.XIf necessary, remove the KEYLESS-GO
start/stop button from the starter switch.XTurn the SmartKey in the starter switch to
position 2 for at least 10 seconds.XReturn the SmartKey in the starter switch
to position 0.XTurn the SmartKey in the starter switch to
position 3 and hold it there for a maximum
of 10 seconds or until the engine runs
surge-free.
If the engine does not start:
XTurn the SmartKey in the starter switch
once more to position 2 for at least
10 seconds.XReturn the SmartKey in the starter switch
to position 0.XTurn the SmartKey in the starter switch
once more to position 3 and hold it there
for a maximum of 10 seconds or until the
engine runs surge-free.XIf necessary, repeat the above steps.
If the engine still does not start after
3 attempts:
Do not make any further attempts to start the
engine. Contact an authorized Mercedes-
Benz Center or call Roadside Assistance
( Y page 210).
i When the malfunction indicator
lamp ; in the instrument cluster has
been illuminated for the above condition, it
will remain illuminated until the engine was
cycled on and off four times in a row.
AdBlue ®
(diesel engine only)
The BlueTEC exhaust gas aftertreatment
system requires a reducing agent (AdBlue ®
)
in order to function properly. Refilling with
AdBlue ®
is part of the regular maintenance
service work. A tankful of AdBlue ®
should
suffice until the next maintenance service
under normal driving conditions.
When the AdBlue ®
tank is low, the message
Check Additive See Operator’s
Manual appears in the multifunction display.
When the AdBlue ®
level drops to the
minimum level, the message Remaining
AdBlue®
(diesel engine only)333Practical hints212_AKB; 2; 41, en-USd2ureepe,Version: 2.11.8.12009-07-17T09:14:21+02:00 - Seite 333Z