2010 MERCEDES-BENZ E350 manual transmission
[x] Cancel search: manual transmissionPage 125 of 372
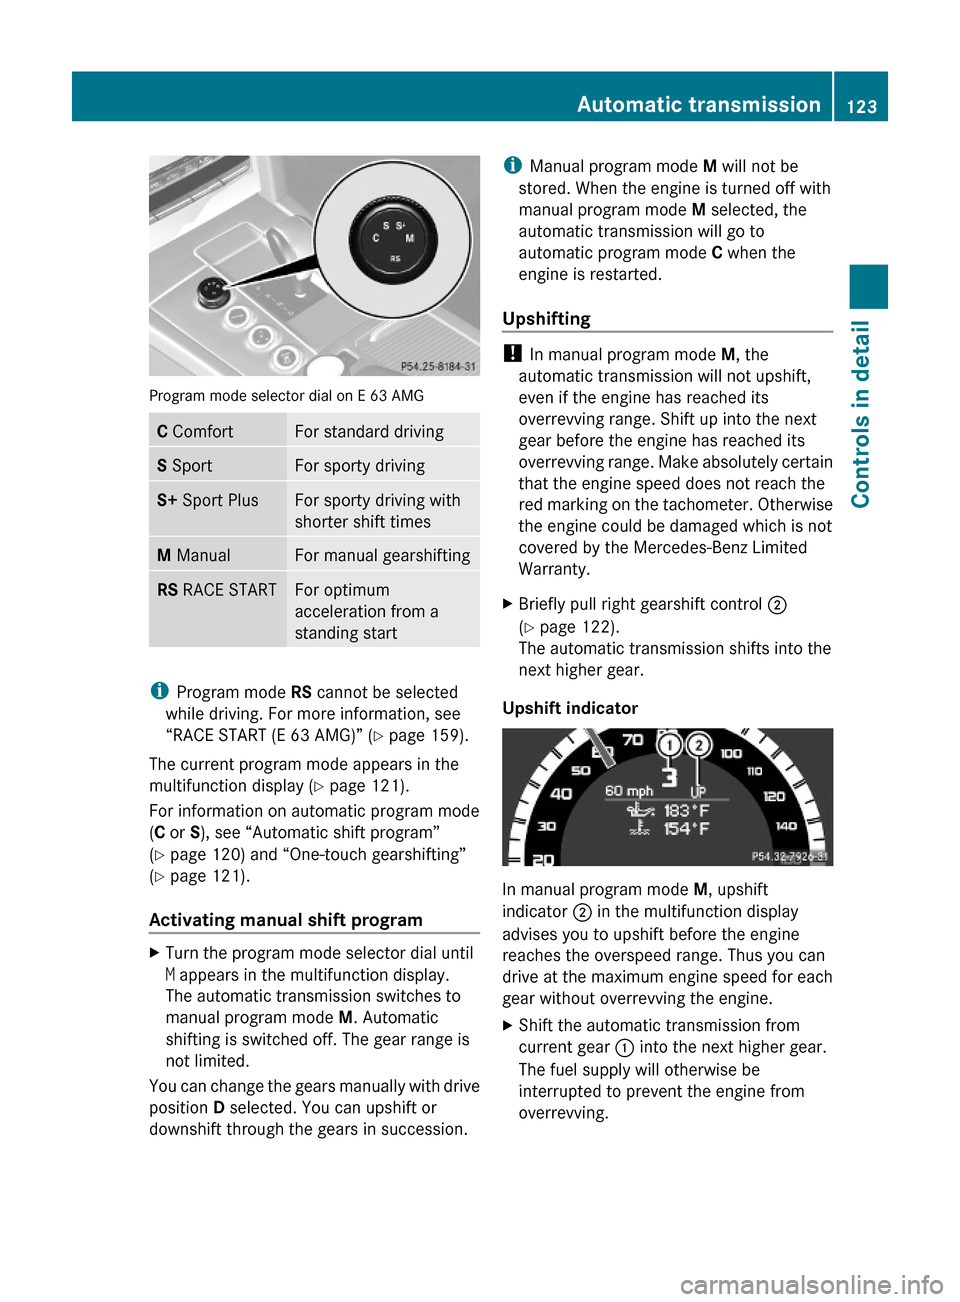
Program mode selector dial on E 63 AMG
C ComfortFor standard drivingS SportFor sporty drivingS+ Sport PlusFor sporty driving with
shorter shift times
M ManualFor manual gearshiftingRS RACE STARTFor optimum
acceleration from a
standing start
iProgram mode RS cannot be selected
while driving. For more information, see
“RACE START (E 63 AMG)” (Y page 159).
The current program mode appears in the
multifunction display (Y page 121).
For information on automatic program mode
(C or S), see “Automatic shift program”
(Y page 120) and “One-touch gearshifting”
(Y page 121).
Activating manual shift program
XTurn the program mode selector dial until
M appears in the multifunction display.
The automatic transmission switches to
manual program mode M. Automatic
shifting is switched off. The gear range is
not limited.
You can change the gears manually with drive
position D selected. You can upshift or
downshift through the gears in succession.
iManual program mode M will not be
stored. When the engine is turned off with
manual program mode M selected, the
automatic transmission will go to
automatic program mode C when the
engine is restarted.
Upshifting
! In manual program mode M, the
automatic transmission will not upshift,
even if the engine has reached its
overrevving range. Shift up into the next
gear before the engine has reached its
overrevving range. Make absolutely certain
that the engine speed does not reach the
red marking on the tachometer. Otherwise
the engine could be damaged which is not
covered by the Mercedes-Benz Limited
Warranty.
XBriefly pull right gearshift control ;
(Y page 122).
The automatic transmission shifts into the
next higher gear.
Upshift indicator
In manual program mode M, upshift
indicator ; in the multifunction display
advises you to upshift before the engine
reaches the overspeed range. Thus you can
drive at the maximum engine speed for each
gear without overrevving the engine.
XShift the automatic transmission from
current gear : into the next higher gear.
The fuel supply will otherwise be
interrupted to prevent the engine from
overrevving.
Automatic transmission123Controls in detail212_AKB; 2; 41, en-USd2ureepe,Version: 2.11.8.12009-07-17T09:14:21+02:00 - Seite 123Z
Page 126 of 372

DownshiftingGWarning!
On slippery road surfaces, never downshift in
order to obtain braking action. This could
result in drive wheel slip and reduced vehicle
control. Your vehicle’s ABS will not prevent
this type of loss of control.
XBriefly pull left gearshift control :
( Y page 122).
The automatic transmission shifts into the
next lower gear.
i When you brake or stop, the automatic
transmission shifts down into a gear from
which you can easily accelerate or take off.
Kickdown
Using the kickdown while driving in manual
program mode M is not possible.
Deactivating manual shift program
XTurn the program mode selector dial until
C or S appears in the multifunction display.
or
XRestart the engine.
The automatic transmission will go to
automatic program mode C.
Manual program mode M is not stored.
Emergency operation (limp-home
mode)
If vehicle acceleration becomes less
responsive or sluggish or the automatic
transmission no longer shifts, the automatic
transmission is most likely operating in limp-
home (emergency operation) mode. In this
mode only second gear and reverse gear R
can be selected.
XStop the vehicle in a safe location.XShift the automatic transmission into park
position P.XTurn off the engine.XWait at least 10 seconds before restarting.XRestart the engine.XShift the automatic transmission into drive
position D (for second gear) or reverse gear
R .XHave the automatic transmission checked
at an authorized Mercedes-Benz Center as
soon as possible.
Transfer case
This section applies to vehicles equipped with
all-wheel drive (4MATIC) only. Both the front
and rear axles are powered at all times when
the vehicle is being operated.
! Only conduct operational or performance
tests on a two-axle dynamometer. If such
tests are necessary, contact an authorized
Mercedes-Benz Center. You could
otherwise seriously damage the brake
system or the transfer case which is not
covered by the Mercedes-Benz Limited
Warranty.
! Because the ESC operates automatically,
the engine and ignition must be shut off
(SmartKey in starter switch position 0, or
1 , or KEYLESS-GO start/stop button in
position 0, or 1) when
R the parking brake is being tested on a
brake test dynamometer
R towing the vehicle with the front or rear
axle raised (not permissible for vehicles
with 4MATIC)
Active braking action through the ESC may
otherwise seriously damage the brake
system which is not covered by the
Mercedes-Benz Limited Warranty.
124Transfer caseControls in detail
212_AKB; 2; 41, en-USd2ureepe,Version: 2.11.8.12009-07-17T09:14:21+02:00 - Seite 124
Page 162 of 372
Rthe vehicle is standing still and the brake
pedal is depressed (left foot)
R the automatic transmission is in drive
position D
Activating RACE STARTXDepress the brake pedal with your left foot
and keep it depressed.XTurn the program mode selector dial
clockwise ( Y page 121) until the RS lamp
on the dial comes on.
The message RACE START Confirm:
Paddle UP Cancel: Paddle DOWN
appears in the multifunction display.
i When the activation conditions are not
fulfilled anymore, RACE START is canceled.
The message RACE START Canceled
appears in the multifunction display.
XTo cancel: Pull left steering wheel gearshift
control ( Y page 122).
or
XTo confirm: Pull right steering wheel
gearshift control ( Y page 122).
The message RACE START Available
Depress gas pedal. appears in the
multifunction display.
i If you do not depress the accelerator
pedal within 2 seconds, RACE START is
canceled. The message RACE START Not
Possible See Operator’s Manual
appears in the multifunction display.
XDepress the accelerator pedal fully.
The engine speed rises to approximately
4000 rpm.
The message RACE START Release
brake to start appears in the
multifunction display.
i If you do not release the brake pedal
within 7 seconds, RACE START is canceled.
The message RACE START Canceled
appears in the multifunction display.XTake your foot off the brake pedal while
keeping the accelerator pedal depressed.
The vehicle pulls away at maximum
acceleration.
The message RACE START Active appears
in the multifunction display.
RACE START deactivates at a vehicle speed
of approximately 30 mph
(Canada: 50 km/h). The automatic
transmission switches to program mode S+.
ESC SPORT remains switched on.
RACE START is canceled immediately if you
release the accelerator pedal while RACE
START is active or when the activation
conditions are not fulfilled anymore. The
message RACE START Not Possible See
Operator’s Manual appears in the
multifunction display.
i If RACE START is used repeatedly in a
short period of time, it is only available
again after having driven the vehicle a
certain distance.
Hill-start assist system
On uphill grades, the hill-start assist system
maintains the pressure in the brake system
for approximately 1 second after you have
released the brake pedal. Therefore, you can
start off smoothly without the vehicle moving
immediately after releasing the brake pedal.
GWarning!
The hill-start assist system is not designed to
function as a parking brake. It does not
prevent the vehicle from moving when parked
on an incline.
Always engage the parking brake in addition
to shifting the automatic transmission into
park position P.
XDepress the brake pedal.XShift the automatic transmission into drive
position D or reverse gear R.160Driving systemsControls in detail
212_AKB; 2; 41, en-USd2ureepe,Version: 2.11.8.12009-07-17T09:14:21+02:00 - Seite 160
Page 216 of 372
Rolling code programming
To train a garage door opener (or other rolling
code devices) with the rolling code feature,
follow these instructions after completing the
“Programming” portion (steps 1 through 6) of
this text. For your convenience and to
complete the procedure faster, you might
want to have someone assist you.XStep 8: Locate the “training” button on the
garage door opener motor head unit.
i Exact location and color of the button may
vary by garage door opener brand.
Depending on manufacturer, the “training”
button may also be referred to as “learn” or
“smart” button. If there is difficulty locating
the transmitting button, refer to the garage
door opener Operator’s Manual.
XStep 9: Press the “training” button on the
garage door opener motor head unit.
The “training light” is activated.
You have 30 seconds to initiate the
following two steps.XStep 10: Return to the vehicle and firmly
press, hold for 2 seconds and release the
programmed signal transmitter button ( ;,
= or ?).XStep 11: Press, hold for 2 seconds and
release same signal transmitter button a
second time to complete the training
process.
i Some garage door openers (or other
rolling code equipped devices) may require
you to press, hold for 2 seconds and
release the same signal transmitter button
a third time to complete the training
process.
XStep 12: Confirm the garage door
operation by pressing the programmed
signal transmitter button ( ;, = or ?).XStep 13: To program the remaining two
signal transmitter buttons, repeat the steps
above starting with step 3.Gate operator/Canadian programming
Canadian radio-frequency laws require
transmitter signals to “time-out” (or quit)
after several seconds of transmission which
may not be long enough for the integrated
signal transmitter to pick up the signal during
programming. Similar to this Canadian law,
some U.S. gate operators are designed to
“time-out” in the same manner.
If you live in Canada or if you are having
difficulties programming a gate operator
(regardless of where you live) by using the
programming procedures, replace step 4 with
the following:XStep 4: Press and hold the signal
transmitter button ( ;, = or ?). Do not
release this button until it has been
successfully trained.XWhile still holding down the signal
transmitter button ( ;, = or ?), “cycle”
your hand-held remote control button B
as follows: Press and hold button B for
2 seconds, then release it for 2 seconds,
and again press and hold it for 2 seconds.
Repeat this sequence on the hand-held
remote control until the frequency signal
has been learned.
Upon successful training, indicator
lamp : will flash slowly and then rapidly
after several seconds.XProceed with programming step 5 and
step 6 to complete.
i Upon completion of programming the
integrated remote control, make sure you
retain the hand-held remote control that
came with the garage door opener, gate
operator or other device. You may need it
for use in other vehicles, for future
programming of an integrated remote
control, or simply for continued use as a
hand-held remote control to operate the
respective device in other situations.
214Useful featuresControls in detail
212_AKB; 2; 41, en-USd2ureepe,Version: 2.11.8.12009-07-17T09:14:21+02:00 - Seite 214
Page 255 of 372
control. Other settings may result in
damage to your vehicle.
! Some tire sizes do not leave adequate
clearance for snow chains. To help avoid
serious damage to your vehicle or tires,
make sure the use of snow chains is
permissible as specified in the “Technical
data” section of this Operator’s Manual.
Snow chains should only be driven on snow-
covered roads at speeds not to exceed
30 mph (50 km/h). Remove chains as soon
as possible when driving on roads without
snow.
Observe the following guidelines when using
snow chains:
R Use of snow chains is not permissible with
all wheel/tire combinations ( Y page 353).
R Use snow chains in pairs and on rear
wheels only. Follow the manufacturer’s
mounting instructions.
! If snow chains are mounted to the front
wheels, they may scrape against the body
or axle components. The tires or the vehicle
could be damaged as a result.
R Only use snow chains that are approved by
Mercedes-Benz. Any authorized Mercedes-
Benz Center will be glad to advise you on
this subject.
R Use of snow chains may be prohibited
depending on location. Always check local
and state laws before installing snow
chains.
R Do not use snow chains on the spare wheel.
i When driving with snow chains, you may
wish to switch off the ESC ( Y page 66)
before setting the vehicle in motion. This
will improve the vehicle’s traction.Winter driving instructionsGWarning!
If the vehicle becomes stuck in snow, make
sure snow is kept clear of the exhaust pipe
and from around the vehicle with the engine
running. Otherwise, deadly carbon monoxide
(CO) gases may enter vehicle interior
resulting in unconsciousness and death.
To assure sufficient fresh air ventilation, open
a window slightly on the side of the vehicle
not facing the wind.
GWarning!
The outside temperature indicator is not
designed to serve as an ice-warning device
and is therefore unsuitable for that purpose.
Indicated temperatures just above the
freezing point do not guarantee that the road
surface is free of ice. The road may still be icy,
especially in wooded areas or on bridges.
GWarning!
On slippery road surfaces, never downshift in
order to obtain braking action. This could
result in drive wheel slip and reduced vehicle
control. Your vehicle’s ABS will not prevent
this type of loss of control.
The most important rule for slippery or icy
roads is to drive sensibly and to avoid abrupt
acceleration, braking and steering
maneuvers. Do not use the cruise control or
DISTRONIC PLUS system under such
conditions.
When the vehicle is in danger of skidding, shift
the automatic transmission to neutral
position N. Try to keep the vehicle under
control by corrective steering action.
i For information on driving with snow
chains, see “Snow chains” ( Y page 252).
Road salts and chemicals can adversely
affect braking efficiency. Increased pedal
force may become necessary to produce the
normal brake effect.
Winter driving253Operation212_AKB; 2; 41, en-USd2ureepe,Version: 2.11.8.12009-07-17T09:14:21+02:00 - Seite 253Z
Page 285 of 372
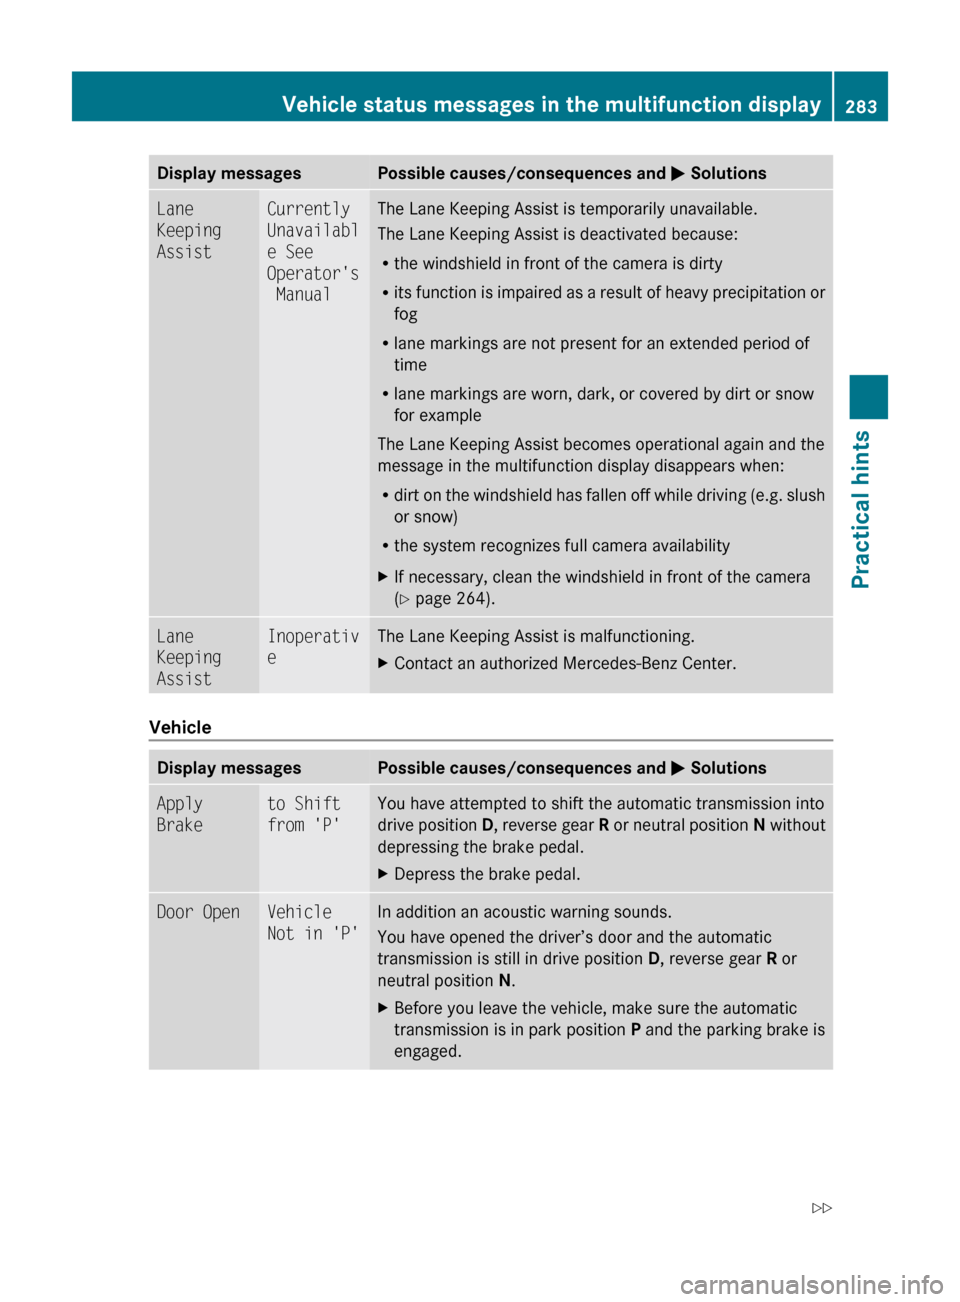
Display messagesPossible causes/consequences and M SolutionsLane
Keeping
AssistCurrently
Unavailabl
e See
Operator's
ManualThe Lane Keeping Assist is temporarily unavailable.
The Lane Keeping Assist is deactivated because:
R the windshield in front of the camera is dirty
R its function is impaired as a result of heavy precipitation or
fog
R lane markings are not present for an extended period of
time
R lane markings are worn, dark, or covered by dirt or snow
for example
The Lane Keeping Assist becomes operational again and the
message in the multifunction display disappears when:
R dirt on the windshield has fallen off while driving (e.g. slush
or snow)
R the system recognizes full camera availabilityXIf necessary, clean the windshield in front of the camera
( Y page 264).Lane
Keeping
AssistInoperativ
eThe Lane Keeping Assist is malfunctioning.XContact an authorized Mercedes-Benz Center.
Vehicle
Display messagesPossible causes/consequences and M SolutionsApply
Braketo Shift
from 'P'You have attempted to shift the automatic transmission into
drive position D, reverse gear R or neutral position N without
depressing the brake pedal.XDepress the brake pedal.Door OpenVehicle
Not in 'P'In addition an acoustic warning sounds.
You have opened the driver’s door and the automatic
transmission is still in drive position D, reverse gear R or
neutral position N.XBefore you leave the vehicle, make sure the automatic
transmission is in park position P and the parking brake is
engaged.Vehicle status messages in the multifunction display283Practical hints212_AKB; 2; 41, en-USd2ureepe,Version: 2.11.8.12009-07-17T09:14:21+02:00 - Seite 283Z
Page 335 of 372
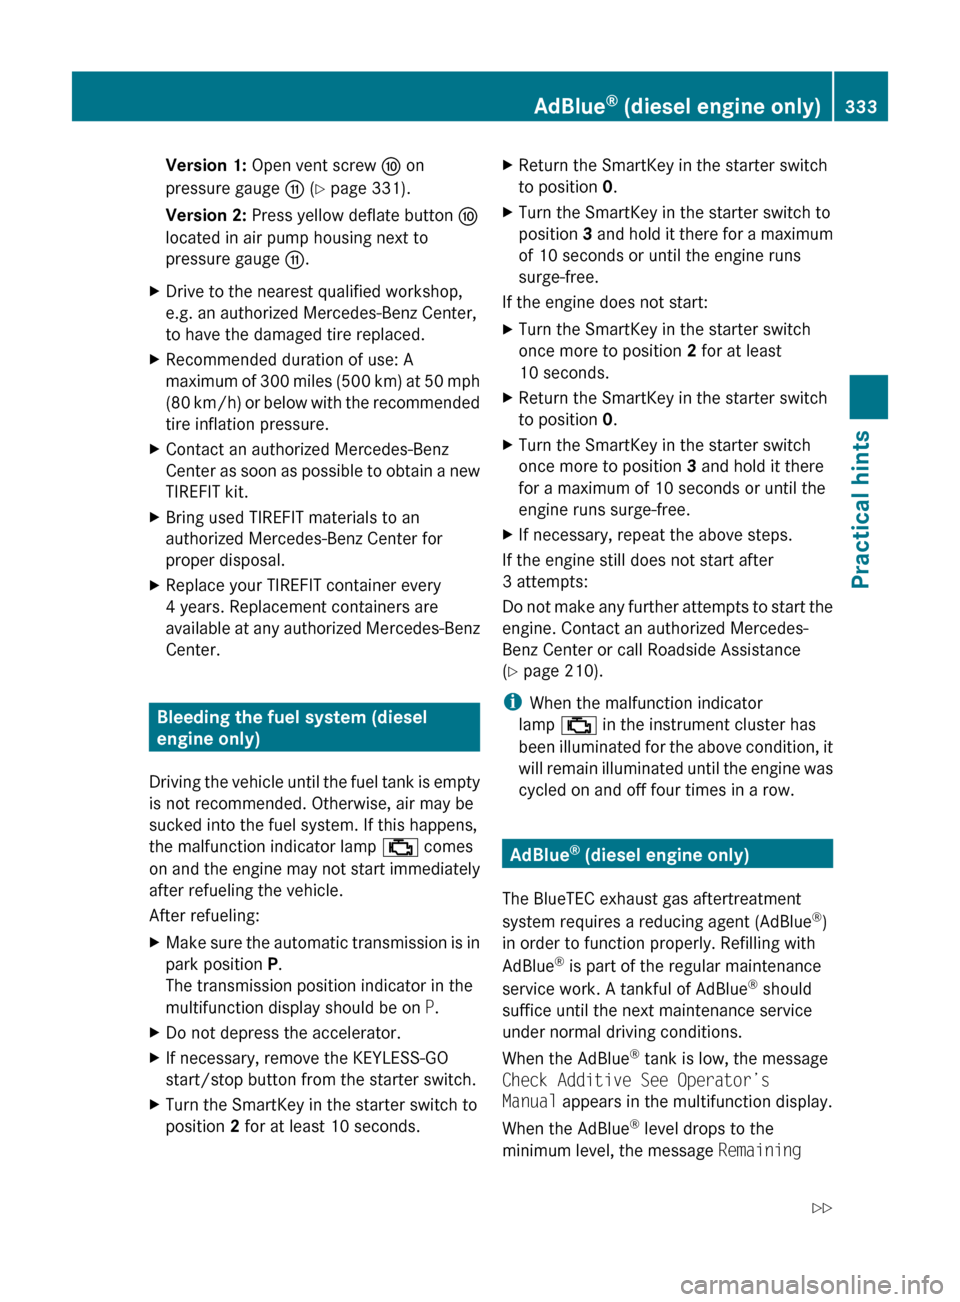
Version 1: Open vent screw F on
pressure gauge G (Y page 331).
Version 2: Press yellow deflate button a
located in air pump housing next to
pressure gauge G.XDrive to the nearest qualified workshop,
e.g. an authorized Mercedes-Benz Center,
to have the damaged tire replaced.XRecommended duration of use: A
maximum of 300 miles (500 km) at 50 mph
( 80 km/h) or below with the recommended
tire inflation pressure.XContact an authorized Mercedes-Benz
Center as soon as possible to obtain a new
TIREFIT kit.XBring used TIREFIT materials to an
authorized Mercedes-Benz Center for
proper disposal.XReplace your TIREFIT container every
4 years. Replacement containers are
available at any authorized Mercedes-Benz
Center.
Bleeding the fuel system (diesel
engine only)
Driving the vehicle until the fuel tank is empty
is not recommended. Otherwise, air may be
sucked into the fuel system. If this happens,
the malfunction indicator lamp ; comes
on and the engine may not start immediately
after refueling the vehicle.
After refueling:
XMake sure the automatic transmission is in
park position P.
The transmission position indicator in the
multifunction display should be on P.XDo not depress the accelerator.XIf necessary, remove the KEYLESS-GO
start/stop button from the starter switch.XTurn the SmartKey in the starter switch to
position 2 for at least 10 seconds.XReturn the SmartKey in the starter switch
to position 0.XTurn the SmartKey in the starter switch to
position 3 and hold it there for a maximum
of 10 seconds or until the engine runs
surge-free.
If the engine does not start:
XTurn the SmartKey in the starter switch
once more to position 2 for at least
10 seconds.XReturn the SmartKey in the starter switch
to position 0.XTurn the SmartKey in the starter switch
once more to position 3 and hold it there
for a maximum of 10 seconds or until the
engine runs surge-free.XIf necessary, repeat the above steps.
If the engine still does not start after
3 attempts:
Do not make any further attempts to start the
engine. Contact an authorized Mercedes-
Benz Center or call Roadside Assistance
( Y page 210).
i When the malfunction indicator
lamp ; in the instrument cluster has
been illuminated for the above condition, it
will remain illuminated until the engine was
cycled on and off four times in a row.
AdBlue ®
(diesel engine only)
The BlueTEC exhaust gas aftertreatment
system requires a reducing agent (AdBlue ®
)
in order to function properly. Refilling with
AdBlue ®
is part of the regular maintenance
service work. A tankful of AdBlue ®
should
suffice until the next maintenance service
under normal driving conditions.
When the AdBlue ®
tank is low, the message
Check Additive See Operator’s
Manual appears in the multifunction display.
When the AdBlue ®
level drops to the
minimum level, the message Remaining
AdBlue®
(diesel engine only)333Practical hints212_AKB; 2; 41, en-USd2ureepe,Version: 2.11.8.12009-07-17T09:14:21+02:00 - Seite 333Z