2010 MERCEDES-BENZ E350 button
[x] Cancel search: buttonPage 53 of 372

XWith a smooth motion, pull the seat belt out
of seat belt outlet :.XPlace the shoulder portion of the seat belt
across the top of your shoulder and the lap
portion across your hips.XPush latch plate ; into buckle = until it
clicks.
Seat belt adjustment function: The seat
belts on both front seats adjust to the
upper body automatically as necessary
( Y page 51).XIf necessary, adjust the seat belt to the
correct height ( Y page 51).XIf necessary, tighten the lap portion to a
snug fit by pulling shoulder portion up.
All lap/shoulder belts except the driver’s seat
belt have special seat belt retractors to
secure child restraints properly. For more
information on special seat belt retractors,
see “Infant and child restraint systems”
( Y page 56).
To release the seat belt with seat belt release
button ?, see ( Y page 51).
Seat belt adjustment function
The seat belt adjustment function adjusts the
seat belts on both front seats to the upper
body of the respective vehicle occupant. The
seat belt will be pulled slightly tighter for that
purpose when
R you engage the latch plate into the buckle
and then turn the SmartKey in the starter
switch to position 2
R the SmartKey in the starter switch is in
position 2 and you then engage the latch
plate in the buckle
The seat belt adjustment function takes place
with a certain amount of retracting force
when the system senses slack between the
vehicle occupant and the seat belt. Do not
retain the seat belt during this procedure. You
can activate or deactivate the seat belt
adjustment function via the control system
( Y page 145).
Releasing the seat beltsXPress seat belt release button ?
( Y page 50).
Allow the retractor to completely rewind
the seat belt by guiding latch plate ;
( Y page 50).
!
Make sure the seat belt retracts
completely. Otherwise the seat belt and/or
latch plate could get caught or pinched in
the door or in the seat mechanism. This can
damage the seat belt and impair its
effectiveness, and/or cause damage to the
door and/or door trim panel. Such damage
is not covered by the Mercedes-Benz
Limited Warranty.
Damaged seat belts must be replaced.
Contact an authorized Mercedes-Benz
Center.
Rear center seat belt
The seat belt of the rear center seat may be
blocked when the left rear seat backrest is
folded forward and back ( Y page 199). The
seat belt can then not be pulled out.
XUnblocking the seat belt of the rear
center seat: Pull the center seat belt
approximately 1 in (25 mm) out of the seat
belt outlet in the seat backrest and release
it.
The seat belt is retracted and unblocked.
Seat belt outlet height adjustment
You can adjust the height of the seat belt
outlet for the driver’s and front passenger
seat.
Occupant safety51Safety and security212_AKB; 2; 41, en-USd2ureepe,Version: 2.11.8.12009-07-17T09:14:21+02:00 - Seite 51Z
Page 54 of 372

XRaising: Slide the seat belt outlet height
adjuster upward.
The seat belt outlet height adjuster
engages in different positions.
XLowering: Press and hold release
button :.
XSlide the seat belt outlet height adjuster
downward.
XRelease release button : and make sure
the seat belt outlet height adjuster engages
into place.
Enhanced seat belt reminder system
When the engine is started, the seat belt
telltale 7 will always illuminate for
6 seconds to remind you and your passengers
to fasten your seat belts.
If the driver’s seat belt is not fastened when
the engine is started, an additional warning
chime will sound. The warning chime goes out
after approximately 6 seconds or once the
driver’s seat belt is fastened.
If after these 6 seconds the driver’s or the
front passenger’s seat belt (with the front
passenger seat occupied) is not fastened with
front doors closed,
Rthe seat belt telltale 7 remains
illuminated for as long as either the driver’s
or front passenger’s seat belt is not
fastened.
Rand if the vehicle speed once exceeds
15 mph (25 km/h), the seat belt telltale
7 starts flashing and a warning chime
sounds with increasing intensity for a
maximum of 60 seconds or until the
driver’s and front passenger’s seat belt are
fastened.
If you and/or your passenger release the
seat belt during driving, the seat belt
telltale 7 starts flashing and the
warning chime sounds as described before.
If the driver’s or the front passenger’s seat
belt remains unfastened after 60 seconds,
the warning chime stops sounding, the seat
belt telltale 7 stops flashing but
continues to be illuminated.
After a vehicle standstill, the warning chime
is reactivated and the seat belt telltale
7 is flashing again if the vehicle speed
once exceeds 15 mph (25 km/h).
The seat belt telltale 7 will only go out if
both the driver’s and the front passenger’s
seat belt (with the front passenger seat
occupied) are fastened, or the vehicle is
standing still and a front door is opened.
For more information, see “Practical hints”
(Y page 307).
Emergency Tensioning Device (ETD),
seat belt force limiter
The seat belts for the front seats and rear
outer seats are equipped with ETDs and seat
belt force limiters.
The ETDs are designed to activate in the
following cases:
Rin frontal or rear-end impacts exceeding
the system’s preset deployment threshold
Rin side impacts exceeding the system’s
preset deployment threshold on the far
side of the impact
Rin certain vehicle rollovers
Rif the restraint systems are operational and
functioning correctly, see “SRS indicator
lamp” (Y page 36)
The ETDs for the front seats will only activate
if the front seat belts are fastened (latch plate
properly inserted into buckle).
52Occupant safetySafety and security
212_AKB; 2; 41, en-USd2ureepe,Version: 2.11.8.12009-07-17T09:14:21+02:00 - Seite 52
Page 63 of 372

The rear door windows can no longer be
operated using the respective switch
located in the rear doors.
You can still operate the rear door windows
using the switches located on the door
control panel of the driver’s door.
XDeactivating: Press override switch :
again.
Indicator lamp ; goes out.
The rear door windows can be operated
again using the respective switch located
in the rear doors.
For more information on power windows, see
the “Controls in detail” section
(Y page 105).
Panic alarm
XActivating: Press and hold !
button : for at least 1 second.
An audible alarm and flashing exterior
lamps will operate.
XDeactivating: Press ! button : again.
or
XInsert the SmartKey into the starter switch.
or
XPress the KEYLESS-GO start/stop button.
The SmartKey with KEYLESS-GO must be
inside the vehicle.
iUSA only:
This device complies with Part 15 of the
FCC Rules. Operation is subject to the
following two conditions:
1. This device may not cause harmful
interference, and
2. this device must accept any
interference received, including
interference that may cause undesired
operation.
Any unauthorized modification to this
device could void the user’s authority to
operate the equipment.
iCanada only:
This device complies with RSS-210 of
Industry Canada. Operation is subject to
the following two conditions:
1.This device may not cause interference,
and
2. this device must accept any
interference received, including
interference that may cause undesired
operation of the device.
Any unauthorized modification to this
device could void the user’s authority to
operate the equipment.
Driving safety systems
Introduction
This section contains information about the
following driving safety systems:
RABS (Antilock Brake System)
RAdaptive Brake
RBAS (Brake Assist System)
RBAS PLUS (Brake Assist System PLUS)
REBP (Electronic Brake Proportioning)
RESC (Electronic Stability Control)
RPRE-SAFE® Brake (Preventive Occupant
Safety System Brake)
Driving safety systems61Safety and security212_AKB; 2; 41, en-USd2ureepe,Version: 2.11.8.12009-07-17T09:14:21+02:00 - Seite 61Z
Page 67 of 372

ESCGObserve Safety notes, see page 62.
The Electronic Stability Control (ESC) is
operational as soon as the engine is running.
It monitors the vehicle’s traction (force of
adhesive friction between the tires and the
road surface) and handling.
The ESC recognizes that the vehicle deviates
from the direction of travel as intended by the
driver. By applying brakes to individual
wheels and by limiting the engine output, the
ESC works to stabilize the vehicle. The ESC is
especially useful while driving off and on wet
or slippery road surfaces. The ESC also
stabilizes the vehicle during braking and
steering maneuvers.
The ESC warning lamp ä in the instrument
cluster comes on when you switch on the
ignition. It goes out when the engine is
running.
GWarning!
Never switch off the ESC when you see the
ESC warning lamp ä flashing in the
instrument cluster. In this case proceed as
follows:
R When driving off, apply as little throttle as
possible.
R While driving, ease up on the accelerator
pedal.
R Adapt your speed and driving style to the
prevailing road conditions.
Failure to observe these guidelines could
cause the vehicle to skid. The ESC cannot
prevent accidents resulting from excessive
speed.
! Vehicles with 4MATIC: Because the ESC
operates automatically, the engine and
ignition must be shut off (SmartKey in
starter switch position 0 or 1 or KEYLESS-
GO start/stop button in position 0 or 1)
when the parking brake is being tested on
a brake test dynamometer.
Active braking action through the ESC may
otherwise seriously damage the brake
system which is not covered by the
Mercedes-Benz Limited Warranty.
! Vehicles without 4MATIC: Because the
ESC operates automatically, the engine
and ignition must be shut off (SmartKey in
starter switch position 0 or 1 or KEYLESS-
GO start/stop button in position 0 or 1)
when the parking brake is being tested on
a brake test dynamometer or when the
vehicle is being towed with one axle raised.
Active braking action through the ESC may
otherwise seriously damage the brake
system which is not covered by the
Mercedes-Benz Limited Warranty.
! The ESC will only function properly if you
use wheels of the recommended tire size
as specified in the “Technical data” section
of this Operator’s Manual.
i The DISTRONIC PLUS and cruise control
switch off automatically when the ESC
engages.
Electronic Traction System
(ETS/4-ETS) GObserve Safety notes, see page 62.
The ETS (Electronic Traction System) and
4-ETS (four-wheel Electronic Traction
System, vehicles with 4MATIC only) are
components of the ESC. The ETS/4-ETS
improves the vehicle’s ability to utilize
available traction, especially under slippery
road conditions by applying the brakes to a
spinning wheel. Vehicles with 4MATIC also
transfer more power to the wheel(s) with
traction.
When you switch off the ESC, the
ETS/4-ETS is still enabled.
Driving safety systems65Safety and security212_AKB; 2; 41, en-USd2ureepe,Version: 2.11.8.12009-07-17T09:14:21+02:00 - Seite 65Z
Page 74 of 372

ActivatingXWith SmartKey: Remove the SmartKey
from the starter switch.
XWith KEYLESS-GO: Turn off the engine and
open the driver’s door.
Deactivating
XSwitch on the ignition.
iStarting the engine will also deactivate
the immobilizer.
In the event that the engine cannot be
started (yet the vehicle’s battery is
charged), the system is not operational.
Contact an authorized Mercedes-Benz
Center or call 1-800-FOR-MERCedes (in the
USA) or 1-800-387-0100 (in Canada).
Anti-theft alarm system
Once the alarm system has been armed, a
visual and audible alarm is triggered when
someone opens
Ra door
Rthe trunk
Rthe hood
The alarm will stay on even if the activating
element, a door, for example, is closed
immediately.
The alarm system will also be triggered when
Rthe vehicle is opened with the mechanical
key
Ra door is opened from the inside
Rthe trunk is opened with the emergency
release button
To cancel the alarm after it has been
triggered, see “Canceling the alarm”
(Y page 73).
iIf the alarm stays on for more than
30 seconds, the Tele Aid system initiates a
call to the Customer Assistance Center
automatically. The Tele Aid system will
initiate the call provided that
Ryou have subscribed to the Tele Aid
service
Rthe Tele Aid service has been activated
properly
Rthe necessary mobile phone, power
supply and GPS coverage are available
XArming: Lock the vehicle with the
SmartKey or with KEYLESS-GO.
The turn signal lamps flash three times and
an acoustic warning sounds three times to
indicate that the vehicle is locked. Indicator
lamp : flashes to indicate that the alarm
system is armed.
iIf the turn signal lamps do not flash three
times and the acoustic warning does not
sound three times, a door or the trunk may
not be properly closed.
Close the respective element.
XDisarming: Unlock the vehicle with the
SmartKey or with KEYLESS-GO.
The turn signal lamps flash once and an
acoustic warning sounds once to indicate
that the alarm system is disarmed.
72Anti-theft systemsSafety and security
212_AKB; 2; 41, en-USd2ureepe,Version: 2.11.8.12009-07-17T09:14:21+02:00 - Seite 72
Page 75 of 372

iUnless you open a door or the trunk within
approximately 40 seconds after unlocking
the vehicle:
R The vehicle will be locked again.
R The anti-theft alarm system will be
rearmed.
Canceling the alarm
To cancel the alarm, do one of the following:
XInsert the SmartKey into the starter switch.XPress button % or & on the
SmartKey.
In vehicles with KEYLESS-GO:
XGrasp an outside door handle.
The SmartKey must be within 3 ft (1 m) of
the vehicle.XPress the KEYLESS-GO start/stop button.
The SmartKey must be inside the vehicle.Anti-theft systems73Safety and security212_AKB; 2; 41, en-USd2ureepe,Version: 2.11.8.12009-07-17T09:14:21+02:00 - Seite 73Z
Page 78 of 372

Vehicle equipment
iThis Operator’s Manual describes all
features, standard or optional, potentially
available for your vehicle at the time of
purchase. Please be aware that your
vehicle might not be equipped with all
features described in this manual.
Locking and unlocking
Notes
GObserve Safety notes, see page 56.
When unlocking or locking the vehicle with
the SmartKey an acoustic signal sounds. The
acoustic signal is activated at the factory. If
you wish to deactivate the feature, or adjust
its signal volume, contact an authorized
Mercedes-Benz Center.
When unlocking the vehicle, all turn signal
lamps flash once. An acoustic signal sounds
once, and the locking knobs in the doors
move up. The anti-theft alarm system is
disarmed.
When locking the vehicle, all turn signal lamps
flash three times. An acoustic signal sounds
three times, and the locking knobs in the
doors move down. The anti-theft alarm
system is armed.
All doors and the trunk must be closed.
If you cannot lock or unlock the vehicle with
the SmartKey, the batteries in the SmartKey
are discharged, the SmartKey is
malfunctioning, or the vehicle battery is
drained.
XCheck the batteries in the SmartKey
(Y page 79) and replace them if
necessary.
XUse the mechanical key to unlock the
driver’s door and the trunk (Y page 314).
XUse the mechanical key to lock the vehicle
(Y page 315).
XHave the vehicle battery and the vehicle
battery connections checked at an
authorized Mercedes-Benz Center.
If the SmartKey is malfunctioning, contact
Roadside Assistance or an authorized
Mercedes-Benz Center.
SmartKey
Your vehicle comes supplied with two
SmartKeys, each with remote control and a
removable mechanical key.
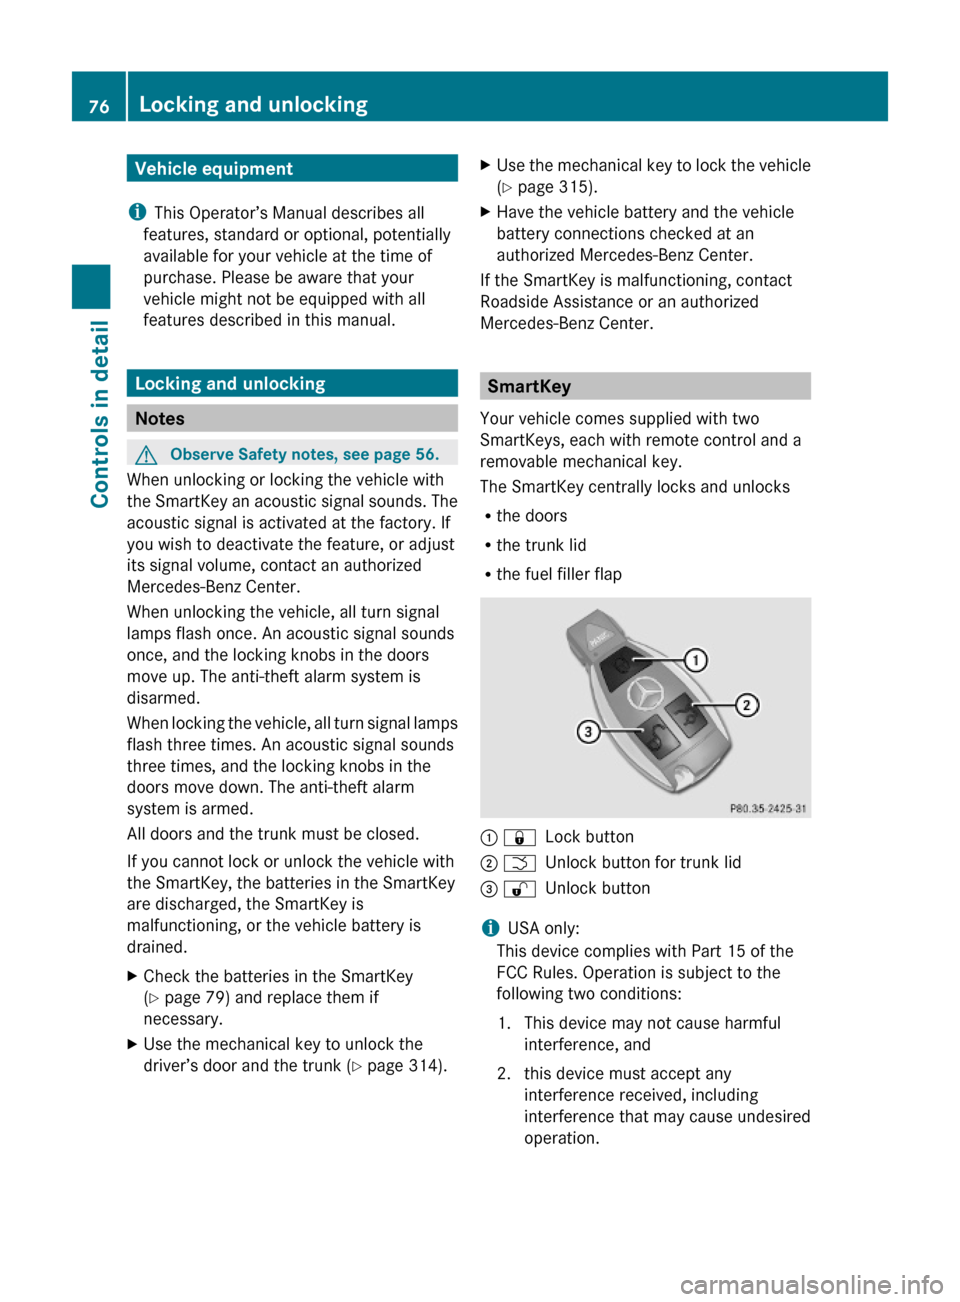
The SmartKey centrally locks and unlocks
Rthe doors
Rthe trunk lid
Rthe fuel filler flap
: &Lock button; FUnlock button for trunk lid= %Unlock button
iUSA only:
This device complies with Part 15 of the
FCC Rules. Operation is subject to the
following two conditions:
1. This device may not cause harmful
interference, and
2. this device must accept any
interference received, including
interference that may cause undesired
operation.
76Locking and unlockingControls in detail
212_AKB; 2; 41, en-USd2ureepe,Version: 2.11.8.12009-07-17T09:14:21+02:00 - Seite 76
Page 79 of 372

Any unauthorized modification to this
device could void the user’s authority to
operate the equipment.
i Canada only:
This device complies with RSS-210 of
Industry Canada. Operation is subject to
the following two conditions:
1. This device may not cause interference,
and
2. this device must accept any interference received, including
interference that may cause undesired
operation of the device.
Any unauthorized modification to this
device could void the user’s authority to
operate the equipment.
Factory setting XGlobal unlocking: Press button %.
Unless you open a door or the trunk within
approximately 40 seconds after unlocking
the vehicle:
R The vehicle will be locked again.
R The anti-theft alarm system will be
rearmed.
XGlobal locking: Press button &.
Selective setting
If you frequently travel alone, you may wish
to reprogramm the SmartKey. Pressing
button % will then only unlock the driver’s
door and the fuel filler flap.
XSwitching on/off: Press and hold buttons
% and & simultaneously for
approximately 6 seconds until the battery
check lamp ( Y page 79) flashes twice.
The SmartKey will then function as follows:
XUnlocking driver’s door and fuel filler
flap: Press button % once.XGlobal unlocking: Press button %
twice.XGlobal locking: Press button &.
KEYLESS-GO
Vehicles equipped with KEYLESS-GO come
with two SmartKeys with KEYLESS-GO, each
with remote control and a removable
mechanical key.
The KEYLESS-GO function is integrated into
the SmartKey. The validity of the SmartKey is
checked every time you grasp an outside door
handle.
When the SmartKey is valid, your vehicle
unlocks
R the doors
R the trunk lid
R the fuel filler flap
i USA only:
This device complies with Part 15 of the
FCC Rules. Operation is subject to the
following two conditions:
1. This device may not cause harmful interference, and
2. this device must accept any interference received, including
interference that may cause undesired
operation.
Any unauthorized modification to this
device could void the user’s authority to
operate the equipment.
Locking and unlocking77Controls in detail212_AKB; 2; 41, en-USd2ureepe,Version: 2.11.8.12009-07-17T09:14:21+02:00 - Seite 77Z