2010 MERCEDES-BENZ CLS63AMG gear
[x] Cancel search: gearPage 222 of 308

An automotive glass cleaner is
recommended.
! Fold the windshield wiper arms back onto
the windshield before turning the SmartKey
in the starter switch or pressing the
KEYLESS-GO start/stop button.
Hold on to the wiper when folding the wiper
arm back. If released, the force of the
impact from the tensioning spring could
crack the windshield.
! To clean the window interior, do not use
a dry cloth, abrasives, solvents or cleaners
containing solvents. Do not touch the
inside of the windows with hard objects
such as an ice scraper or ring. Doing so may
damage the windows.
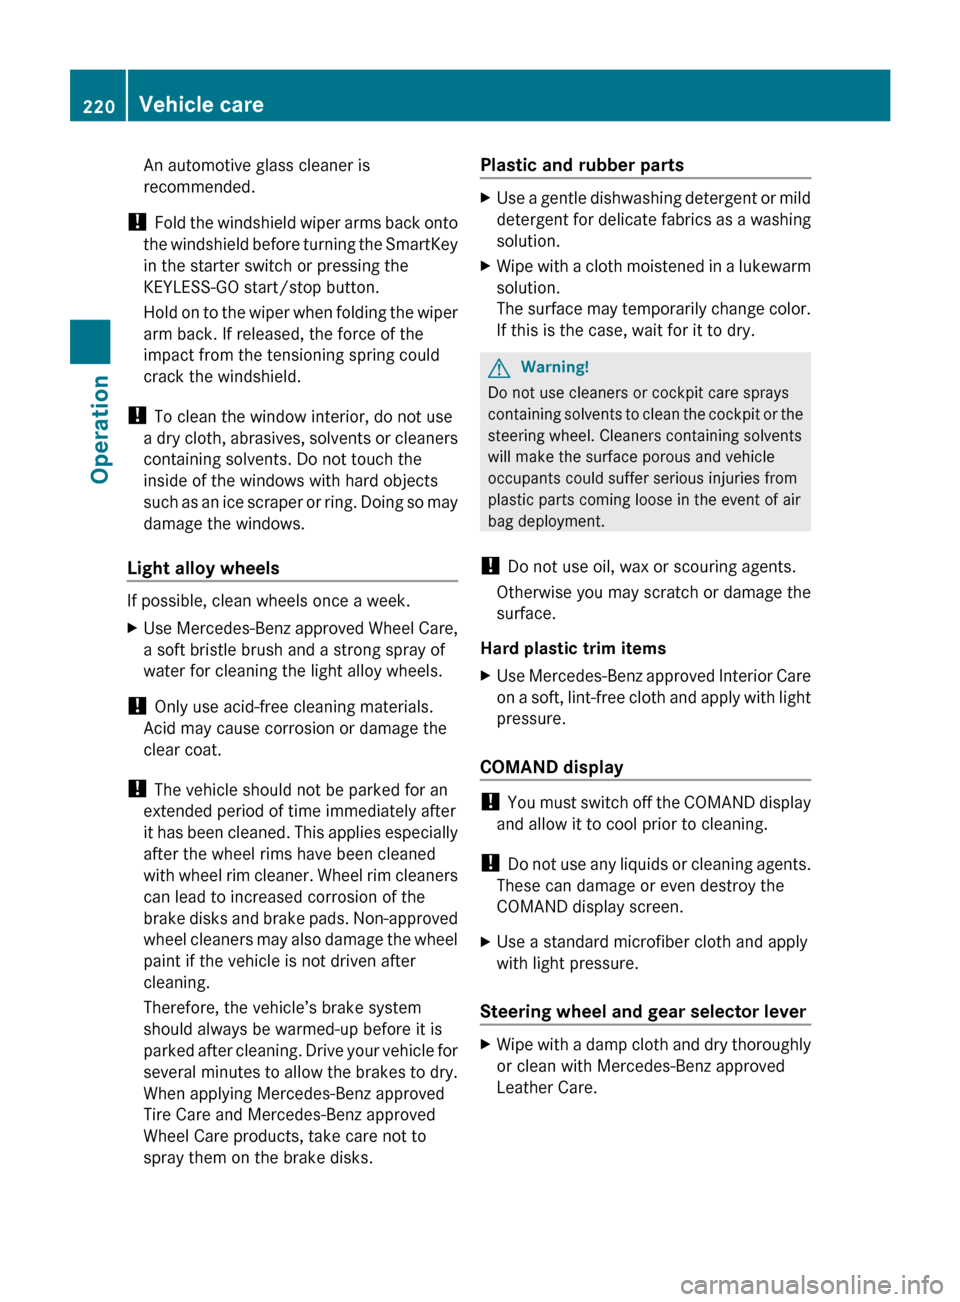
Light alloy wheels If possible, clean wheels once a week.
X
Use Mercedes-Benz approved Wheel Care,
a soft bristle brush and a strong spray of
water for cleaning the light alloy wheels.
! Only use acid-free cleaning materials.
Acid may cause corrosion or damage the
clear coat.
! The vehicle should not be parked for an
extended period of time immediately after
it
has been cleaned. This applies especially
after the wheel rims have been cleaned
with wheel rim cleaner. Wheel rim cleaners
can lead to increased corrosion of the
brake disks and brake pads. Non-approved
wheel cleaners may also damage the wheel
paint if the vehicle is not driven after
cleaning.
Therefore, the vehicle’s brake system
should always be warmed-up before it is
parked after cleaning. Drive your vehicle for
several minutes to allow the brakes to dry.
When applying Mercedes-Benz approved
Tire Care and Mercedes-Benz approved
Wheel Care products, take care not to
spray them on the brake disks. Plastic and rubber parts X
Use a gentle dishwashing detergent or mild
detergent
for delicate fabrics as a washing
solution.
X Wipe with a cloth moistened in a lukewarm
solution.
The
surface may temporarily change color.
If this is the case, wait for it to dry. G
Warning!
Do not use cleaners or cockpit care sprays
containing
solvents to clean the cockpit or the
steering wheel. Cleaners containing solvents
will make the surface porous and vehicle
occupants could suffer serious injuries from
plastic parts coming loose in the event of air
bag deployment.
! Do not use oil, wax or scouring agents.
Otherwise you may scratch or damage the
surface.
Hard plastic trim items
X Use Mercedes-Benz approved Interior Care
on
a soft, lint-free cloth and apply with light
pressure.
COMAND display !
You
must switch off the COMAND display
and allow it to cool prior to cleaning.
! Do not use any liquids or cleaning agents.
These can damage or even destroy the
COMAND display screen.
X Use a standard microfiber cloth and apply
with light pressure.
Steering wheel and gear selector lever X
Wipe with a damp cloth and dry thoroughly
or clean with Mercedes-Benz approved
Leather Care. 220
Vehicle care
Operation
219_AKB; 4; 54, en-US
d2ureepe,
Version: 2.11.8.1 2009-05-11T16:21:02+02:00 - Seite 220
Page 237 of 308

Vehicle
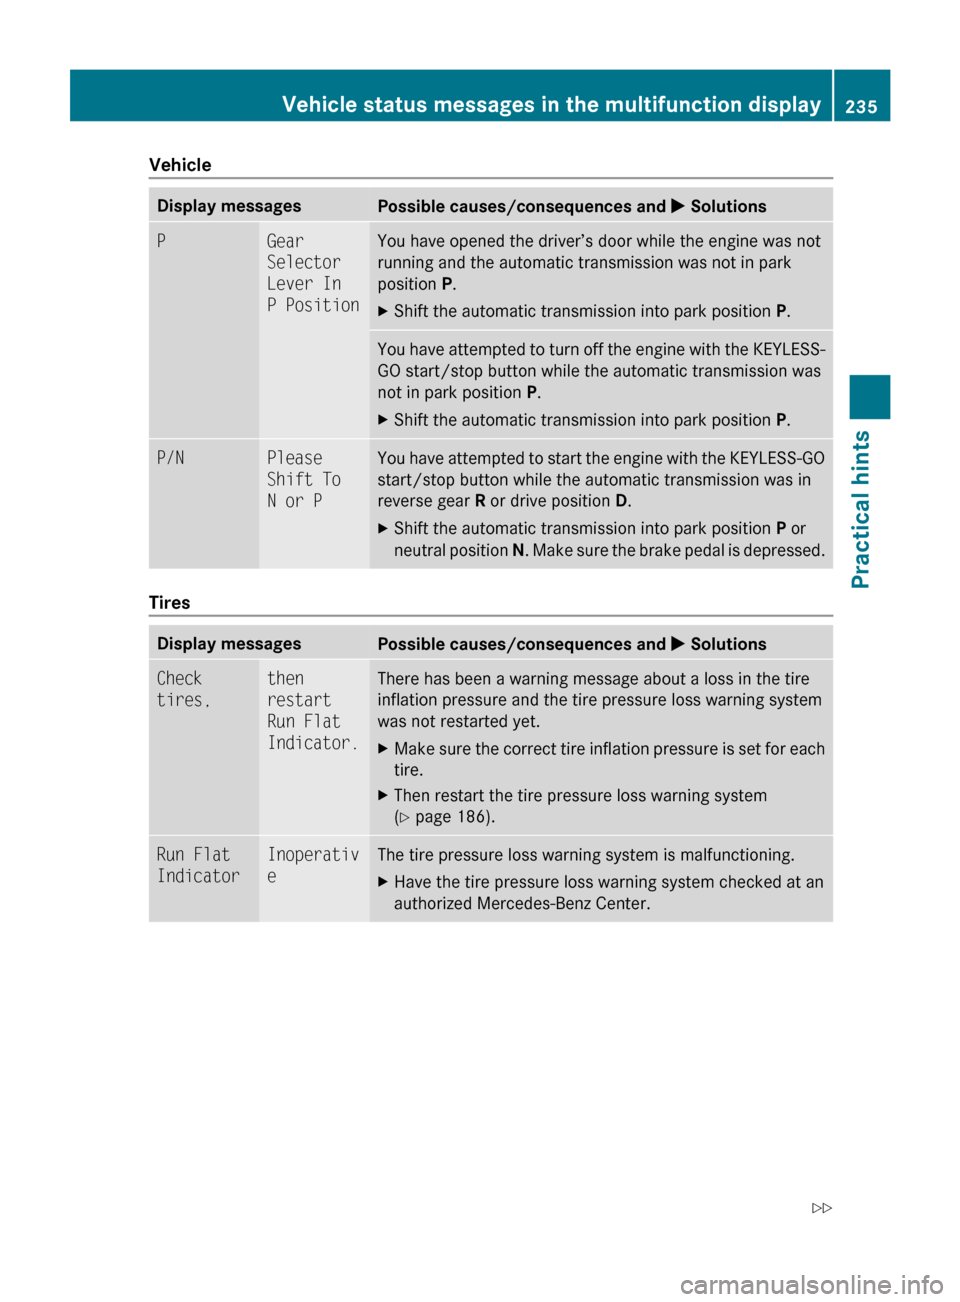
Display messages
Possible causes/consequences and
X SolutionsP Gear
Selector
Lever In
P Position You have opened the driver’s door while the engine was not
running and the automatic transmission was not in park
position P.
X
Shift the automatic transmission into park position P.You have attempted to turn off the engine with the KEYLESS-
GO start/stop button while the automatic transmission was
not in park position
P.
X Shift the automatic transmission into park position P.P/N Please
Shift To
N or P You have attempted to start the engine with the KEYLESS-GO
start/stop button while the automatic transmission was in
reverse gear
R or drive position D.
X Shift the automatic transmission into park position P or
neutral position N. Make sure the brake pedal is depressed. Tires
Display messages
Possible causes/consequences and
X SolutionsCheck
tires, then
restart
Run Flat
Indicator. There has been a warning message about a loss in the tire
inflation pressure and the tire pressure loss warning system
was not restarted yet.
X
Make sure the correct tire inflation pressure is set for each
tire.
X Then restart the tire pressure loss warning system
(Y page 186). Run Flat
Indicator Inoperativ
e The tire pressure loss warning system is malfunctioning.
X
Have the tire pressure loss warning system checked at an
authorized Mercedes-Benz Center. Vehicle status messages in the multifunction display
235
Practical hints
219_AKB; 4; 54, en-US
d2ureepe,Version: 2.11.8.1 2009-05-11T16:21:02+02:00 - Seite 235 Z
Page 265 of 308

X
Insert mechanical key ; into the driver’s
door lock.
X Turn mechanical key ; clockwise to
position 1.
The driver’s door is locked.
X Turn mechanical key ; back and remove
it from the driver’s door lock.
i This procedure does not arm the anti-
theft alarm system, nor does it lock the fuel
filler flap. Manually unlocking the gear selector
lever
If the vehicle’s electrical system is
malfunctioning, the gear selector lever could
remain locked in park position P. In this case
the gear selector lever can be unlocked
manually, e.g. to tow the vehicle.
X Engage the parking brake. !
Do not use sharp objects to loosen the
gear selector lever cover in the center
console, as this could damage the gear
selector lever cover or the center console.
X Insert a flat, blunt object into the left edge
of gear selector lever cover : at the
positions indicated by the arrows.
X Loosen gear selector lever cover : using
this object. X
Pull gear selector lever cover : out and
remove.
X Simultaneously push down release ; and
move the gear selector lever out of park
position P.
The gear selector lever is unlocked.
i The gear selector lever is locked again as
soon as you move it back to park position
P. Fuel filler flap
G
Warning!
Avoid contact with the vehicle walls as they
may contain sharp edges. Otherwise, you
could injure yourself while releasing the fuel
filler flap.
In case the central locking system does not
release the fuel filler flap, you can open it
manually.
The fuel filler flap release is located on the
passenger side in the trunk behind the side
trim panel.
X Open the trunk (Y page 71).
X Remove side trim panel.
i Removing the side trim panel is a
demanding process. We recommend that
you contact Roadside Assistance
(Y page 166) if you do not feel to have the
ability to perform this process. Unlocking/locking manually
263Practical hints
219_AKB; 4; 54, en-US
d2ureepe, Version: 2.11.8.1 2009-05-11T16:21:02+02:00 - Seite 263 Z
Page 284 of 308

using flatbed or appropriate wheel lift/dolly
equipment. This method is preferable to other
types of towing.
!
To prevent damage during transport, do
not tie down vehicle by its chassis or
suspension parts.
If circumstances do not permit the
recommended towing methods, the vehicle
may be towed with all wheels on the ground
or one axle raised only so far as necessary to
have the vehicle moved to a safe location
where the recommended towing methods
can be employed.
! Before towing the vehicle observe the
following instructions:
R Do not tow-start the vehicle. You could
otherwise seriously damage the
automatic transmission which is not
covered by the Mercedes-Benz Limited
Warranty.
R Do not tow with sling-type equipment.
Towing with sling-type equipment over
bumpy roads will damage radiator and
supports.
R Towing of the vehicle should only be
done using the properly installed towing
eye bolt. Never attach a tow cable, tow
rope or tow rod to the vehicle chassis,
frame or suspension parts. G
Warning!
With the engine not running, there is no power
assistance for the brake and steering
systems. In this case, it is important to keep
in mind that a considerably higher degree of
effort is necessary to brake and steer the
vehicle. Adapt your driving accordingly.
! Avoid pulling the vehicle abruptly or
diagonally, since it could result in damage
to the chassis alignment.
! Do not use the towing eye bolt for
recovery, as this could damage the vehicle.
If in doubt, recover the vehicle with a crane. i
If the battery is disconnected or
discharged
R the SmartKey will not turn in the starter
switch
R the automatic transmission will remain in
park position P
For more information see “Battery”
(Y page 278) or “Jump starting”
(Y page 280).
For information on manually unlocking the
gear selector lever, see ( Y page 263). Installing towing eye bolt
Depending on whether you are towing a
vehicle or you are being towed, the towing eye
bolt can be screwed into threaded holes
which are located behind covers on each
bumper.
The towing eye bolt is supplied with the
vehicle tool kit, located underneath the trunk
floor ( Y page 224).
X Take the vehicle tool kit out of the trunk.
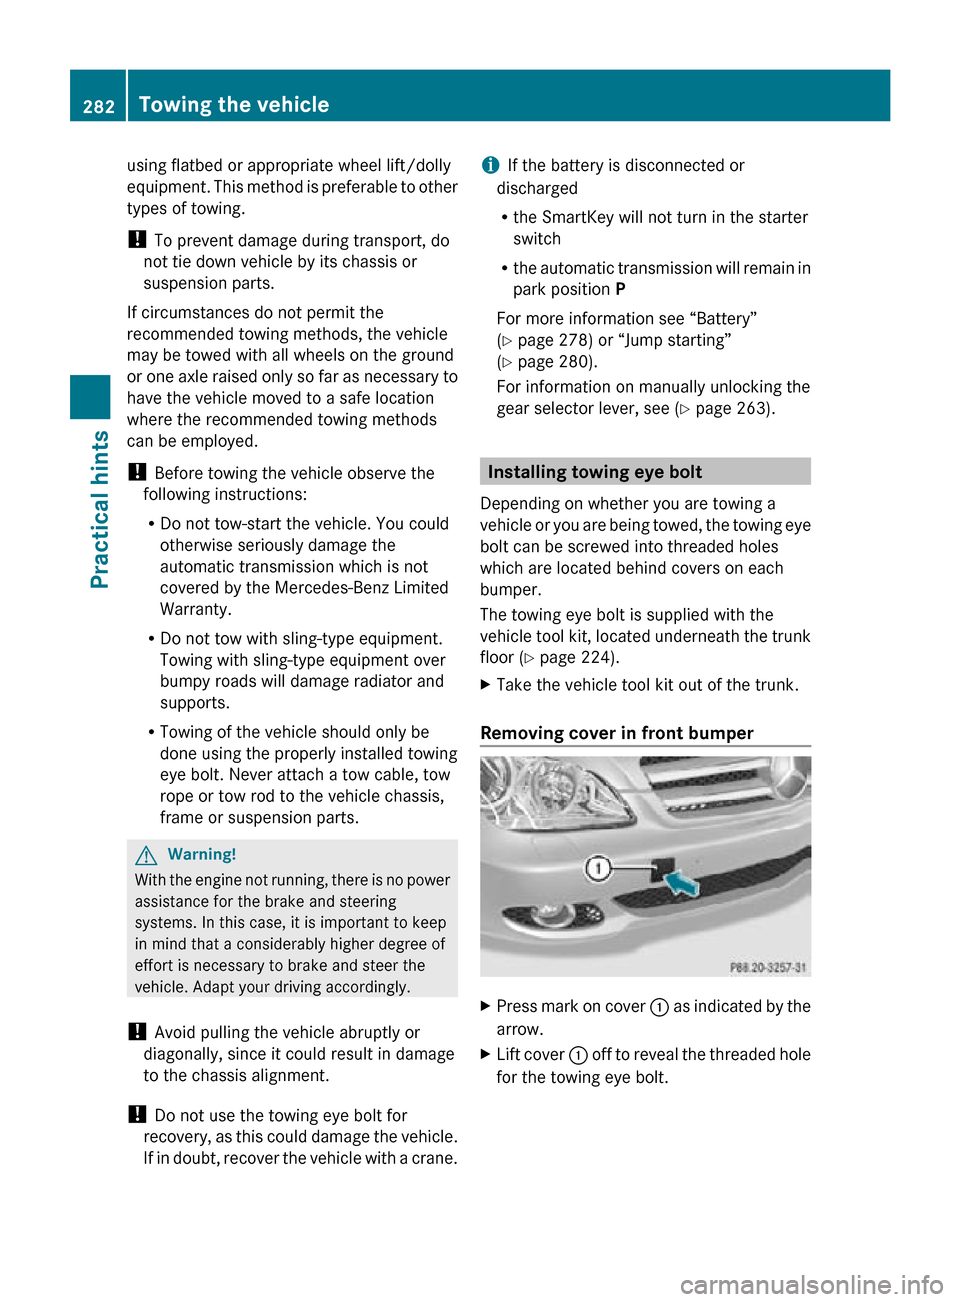
Removing cover in front bumper X
Press mark on cover : as indicated by the
arrow.
X Lift cover : off to reveal the threaded hole
for the towing eye bolt. 282
Towing the vehiclePractical hints
219_AKB; 4; 54, en-US
d2ureepe,
Version: 2.11.8.1 2009-05-11T16:21:02+02:00 - Seite 282
Page 299 of 308

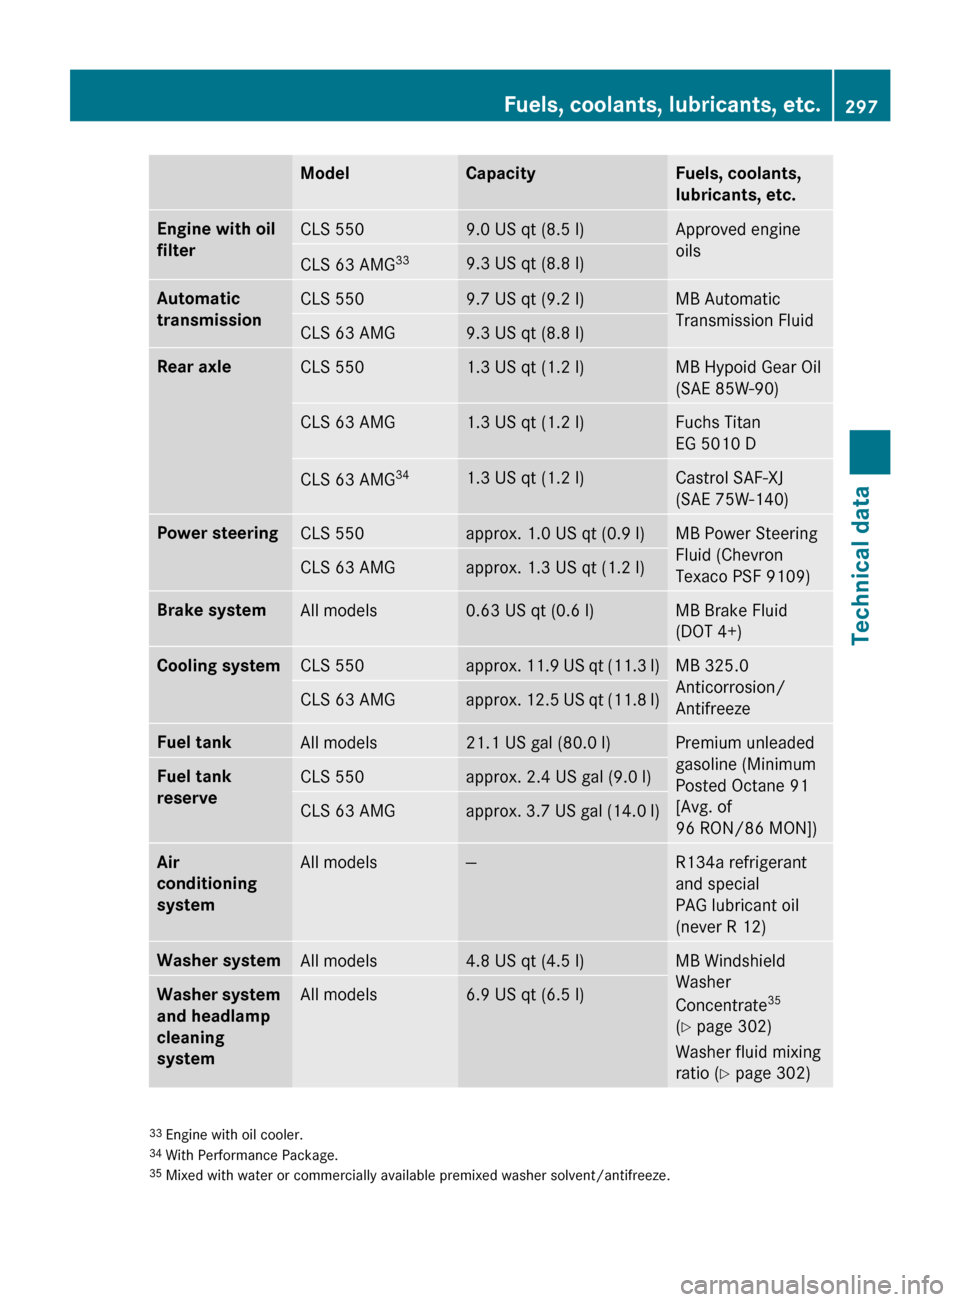
Model Capacity Fuels, coolants,
lubricants, etc.
Engine with oil
filter
CLS 550 9.0 US qt (8.5 l) Approved engine
oils
CLS 63 AMG
33 9.3 US qt (8.8 l)
Automatic
transmission
CLS 550 9.7 US qt (9.2 l) MB Automatic
Transmission Fluid
CLS 63 AMG 9.3 US qt (8.8 l)
Rear axle
CLS 550 1.3 US qt (1.2 l) MB Hypoid Gear Oil
(SAE 85W-90)
CLS 63 AMG 1.3 US qt (1.2 l) Fuchs Titan
EG 5010 D
CLS 63 AMG
34 1.3 US qt (1.2 l) Castrol SAF-XJ
(SAE 75W-140)
Power steering
CLS 550 approx. 1.0 US qt (0.9 l) MB Power Steering
Fluid (Chevron
Texaco PSF 9109)
CLS 63 AMG approx. 1.3 US qt (1.2 l)
Brake system
All models 0.63 US qt (0.6 l) MB Brake Fluid
(DOT 4+)
Cooling system
CLS 550 approx. 11.9 US qt (11.3 l) MB 325.0
Anticorrosion/
Antifreeze
CLS 63 AMG approx. 12.5 US qt (11.8 l)
Fuel tank
All models 21.1 US gal (80.0 l) Premium unleaded
gasoline (Minimum
Posted Octane 91
[Avg. of
96 RON/86 MON])
Fuel tank
reserve
CLS 550 approx. 2.4 US gal (9.0 l)
CLS 63 AMG approx. 3.7 US gal (14.0 l)
Air
conditioning
system
All models — R134a refrigerant
and special
PAG lubricant oil
(never R 12)
Washer system
All models 4.8 US qt (4.5 l) MB Windshield
Washer
Concentrate
35
(Y page 302)
Washer fluid mixing
ratio ( Y page 302) Washer system
and headlamp
cleaning
system
All models 6.9 US qt (6.5 l)
33
Engine with oil cooler.
34 With Performance Package.
35 Mixed with water or commercially available premixed washer solvent/antifreeze. Fuels, coolants, lubricants, etc.
297Technical data
219_AKB; 4; 54, en-US
d2ureepe, Version: 2.11.8.1 2009-05-11T16:21:02+02:00 - Seite 297 Z