2010 MERCEDES-BENZ CLS63AMG belt
[x] Cancel search: beltPage 55 of 308
Infant and child restraint systems
G
Observe Safety notes, see page 52.
We recommend all infants and children be
properly restrained at all times while the
vehicle is in motion.
All
lap/shoulder belts except the driver’s seat
belt have special seat belt retractors for
secure fastening of child restraints.
To fasten a child restraint, follow the child
restraint manufacturer’s instructions for
mounting.
To activate the special seat belt retractor:
X Pull the shoulder belt out completely and
let it retract.
During seat belt retraction, a ratcheting
sound can be heard to indicate that the
special seat belt retractor is activated.
The seat belt is now locked.
X Push down on child restraint to take up any
slack.
To deactivate the special seat belt retractor:
X Release the seat belt buckle and let the
seat belt retract completely.
The
seat belt can then again be used in the
usual manner. G
Warning!
Never release the seat belt buckle while the
vehicle
is in motion, since the special seat belt
retractor will be deactivated.
i Information on child seats with mounting
fittings for tether anchorages
(Y page 54).
For information on LATCH-type (ISOFIX)
child seat anchors ( Y page 55).
The use of infant or child restraints is required
by law in all 50 states, the District of
Columbia, the U.S. territories and all
Canadian provinces.
Infants and small children should be seated
in an appropriate infant or child restraint
system. They must be properly secured in
accordance with the manufacturer’s instructions for the child restraint. All infant
or child restraint systems must comply with
U.S. Federal Motor Vehicle Safety Standards
213 and 225 and Canadian Motor Vehicle
Safety Standards 213 and 210.2.
A statement by the child restraint
manufacturer of compliance with these
standards can be found on the instruction
label on the restraint and in the instruction
manual provided with the restraint.
When using any infant restraint, toddler
restraint, or booster seat, make sure to
carefully read and follow all manufacturer’s
instructions for installation and use.
Please read and observe warning labels
affixed to the inside of the vehicle and to
infant or child restraints.
G
Warning!
According to accident statistics, children are
safer when properly restrained in the rear
seating positions than in the front seating
position. Thus, we strongly recommend that
children
be placed in the rear seats whenever
possible. Regardless of seating position,
children 12 years old and under must be
seated and properly secured in an appropriate
infant restraint, toddler restraint, or booster
seat recommended for the size and weight of
the child.
The infant or child restraint must be properly
secured with the vehicle’s seat belt, the seat
belt and top tether strap, or lower anchors and
top tether strap, fully in accordance with the
child seat manufacturer’s instructions.
Occupants, especially children, should always
sit as upright as possible, wear the seat belt
properly and use an appropriately sized infant
restraint, toddler restraint, or booster seat
recommended for the size and weight of the
child. Occupant safety
53
Safety and security
219_AKB; 4; 54, en-US
d2ureepe, Version: 2.11.8.1 2009-05-11T16:21:02+02:00 - Seite 53 Z
Page 56 of 308
Children can be killed or seriously injured by
an inflating air bag. Note the following
important information when circumstances
require you to place a child in the front
passenger seat:
R
Your vehicle is equipped with air bag
technology
designed to deactivate the front
passenger front air bag in your vehicle
when the system senses the weight of a
typical 12-month-old child or less along
with the weight of a standard appropriate
child restraint on the front passenger seat.
R A child in a rear-facing child restraint on the
front passenger seat will be seriously
injured or even killed if the front passenger
front air bag inflates in a collision which
could occur under some circumstances,
even with the air bag technology installed
in your vehicle. The only means to
completely eliminate this risk is to never
place a child in a rear-facing child restraint
in the front seat. We therefore strongly
recommend that you always place a child
in a rear-facing child restraint in a backseat.
R If you must install a rear-facing child
restraint on the front passenger seat
because circumstances require you to do
so, make sure the 04
indicator lamp is illuminated, indicating
that the front passenger front air bag is
deactivated. Should the 04
indicator lamp not illuminate or go out while
the restraint is installed, please check
installation. Periodically check the
04 indicator lamp while
driving to make sure the 04
indicator lamp is illuminated. If the
04 indicator lamp goes out or
remains out, do not transport a child on the
front passenger seat until the system has
been repaired.
A child in a rear-facing child restraint on the
front passenger seat will be seriously injured or even killed if the front passenger
front air bag inflates.
R If you have to place a child in a forward-
facing
child restraint on the front passenger
seat, move the seat as far back as possible,
use the proper child restraint
recommended for the age, size and weight
of the child, and secure child restraint with
the vehicle’s seat belt according to the child
seat manufacturer’s instructions. For
children larger than the typical 12-month-
old child, the front passenger front air bag
may or may not be activated. G
Warning!
Infants and small children should never share
a seat belt with another occupant. During an
accident,
they could be crushed between the
occupant and seat belt.
A child’s risk of serious or fatal injuries is
significantly increased if the child restraints
are not properly secured in the vehicle and/
or the child is not properly secured in the child
restraint.
Children too big for a toddler restraint must
ride in seats using regular seat belts. Position
shoulder belt across chest and shoulder, not
face or neck. A booster seat may be
necessary to achieve proper seat belt
positioning for children over 41 lb (18 kg) until
they reach a height where a lap/shoulder belt
fits properly without a booster.
When the child restraint is not in use, remove
it from the vehicle or secure it with the seat
belt to prevent the child restraint from
becoming a projectile in the event of an
accident.
Installation of infant and child restraint
systems G
Observe Safety notes, see page 52.
This vehicle is equipped with tether
anchorages for a top tether strap at each of
the rear seating positions. 54
Occupant safety
Safety and security
219_AKB; 4; 54, en-US
d2ureepe,
Version: 2.11.8.1 2009-05-11T16:21:02+02:00 - Seite 54
Page 57 of 308
Top tether straps enable an additional
connection to be made between child
restraint systems secured with LATCH-type
(ISOFIX) anchors and rear seats. This can
further reduce the risk of injury.
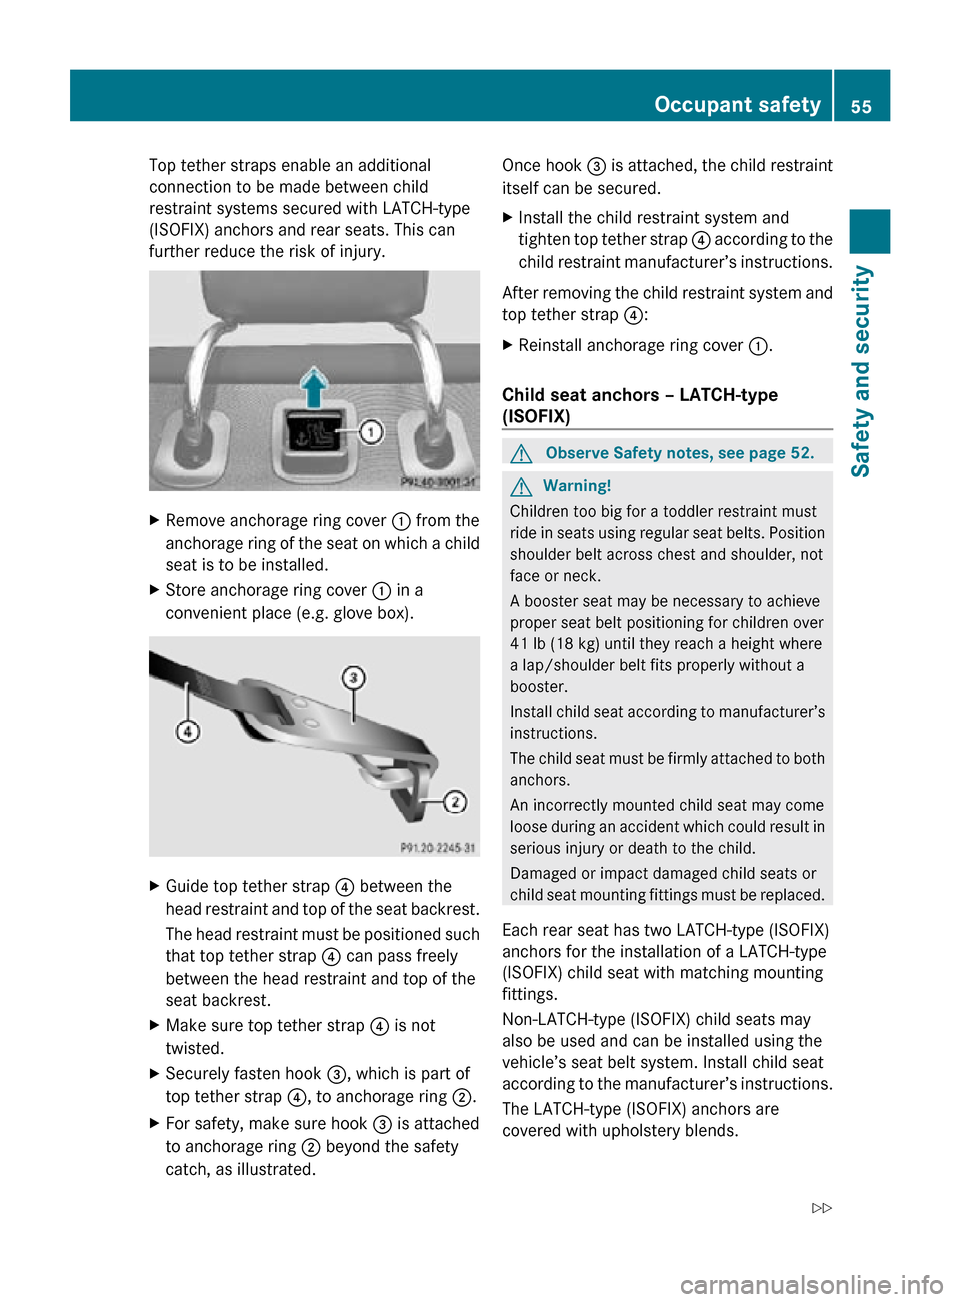
X
Remove anchorage ring cover : from the
anchorage ring of the seat on which a child
seat is to be installed.
X Store anchorage ring cover : in a
convenient place (e.g. glove box). X
Guide top tether strap ? between the
head restraint and top of the seat backrest.
The head restraint must be positioned such
that top tether strap ? can pass freely
between the head restraint and top of the
seat backrest.
X Make sure top tether strap ? is not
twisted.
X Securely fasten hook =, which is part of
top tether strap ?, to anchorage ring ;.
X For safety, make sure hook = is attached
to anchorage ring ; beyond the safety
catch, as illustrated. Once hook
= is attached, the child restraint
itself can be secured.
X Install the child restraint system and
tighten top tether strap ? according to the
child restraint manufacturer’s instructions.
After removing the child restraint system and
top tether strap ?:
X Reinstall anchorage ring cover :.
Child seat anchors – LATCH-type
(ISOFIX) G
Observe Safety notes, see page 52. G
Warning!
Children too big for a toddler restraint must
ride in seats using regular seat belts. Position
shoulder belt across chest and shoulder, not
face or neck.
A booster seat may be necessary to achieve
proper seat belt positioning for children over
41 lb (18 kg) until they reach a height where
a lap/shoulder belt fits properly without a
booster.
Install child seat according to manufacturer’s
instructions.
The child seat must be firmly attached to both
anchors.
An incorrectly mounted child seat may come
loose during an accident which could result in
serious injury or death to the child.
Damaged or impact damaged child seats or
child seat mounting fittings must be replaced.
Each rear seat has two LATCH-type (ISOFIX)
anchors for the installation of a LATCH-type
(ISOFIX) child seat with matching mounting
fittings.
Non-LATCH-type (ISOFIX) child seats may
also be used and can be installed using the
vehicle’s seat belt system. Install child seat
according to the manufacturer’s instructions.
The LATCH-type (ISOFIX) anchors are
covered with upholstery blends. Occupant safety
55Safety and security
219_AKB; 4; 54, en-US
d2ureepe, Version: 2.11.8.1 2009-05-11T16:21:02+02:00 - Seite 55 Z
Page 79 of 308
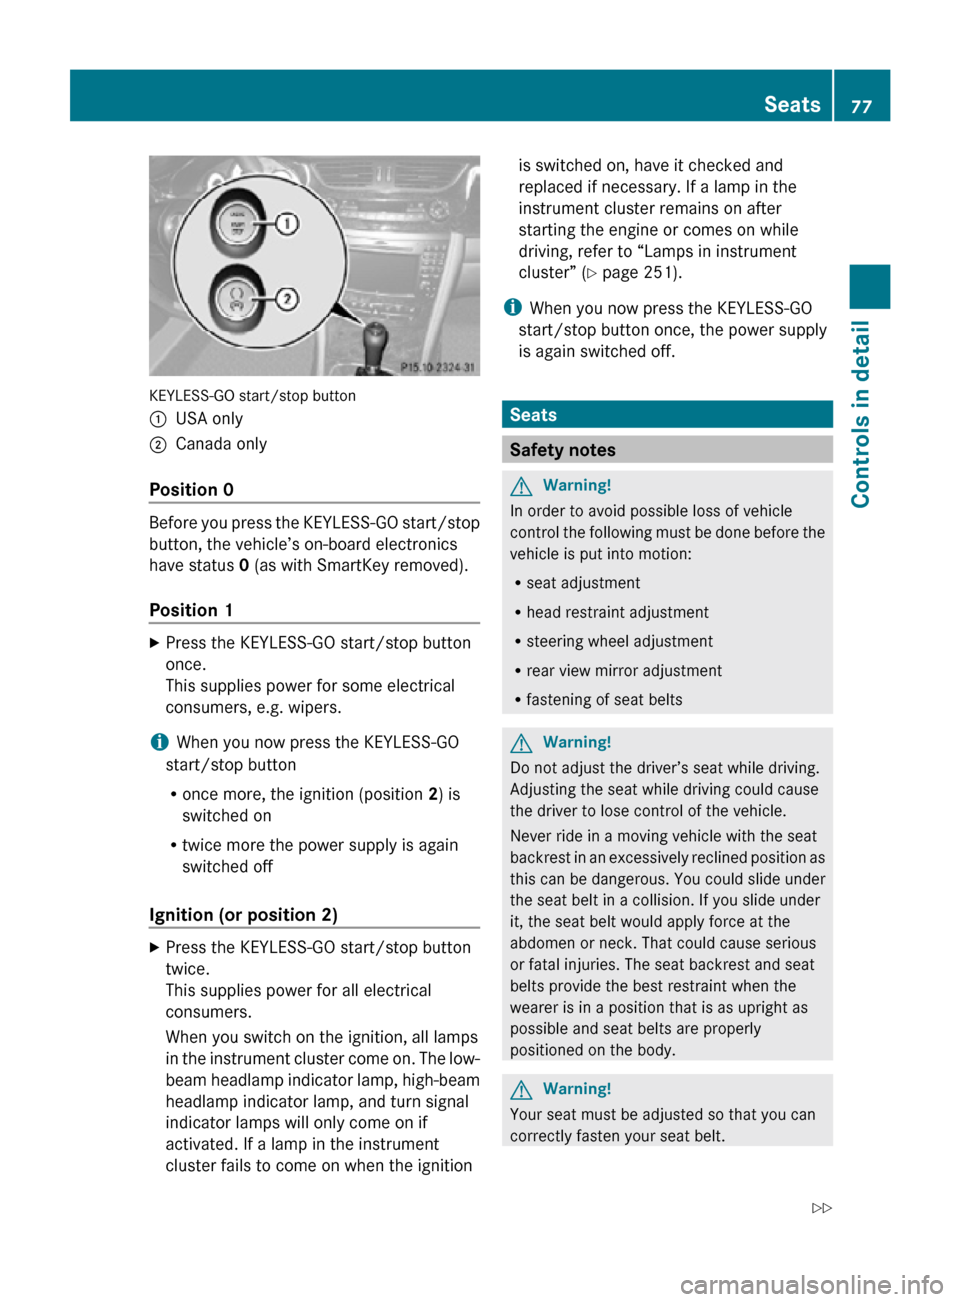
KEYLESS-GO start/stop button
:
USA only
; Canada only
Position 0 Before you press the KEYLESS-GO start/stop
button, the vehicle’s on-board electronics
have status 0 (as with SmartKey removed).
Position 1
X
Press the KEYLESS-GO start/stop button
once.
This supplies power for some electrical
consumers, e.g. wipers.
i When you now press the KEYLESS-GO
start/stop button
R once more, the ignition (position 2) is
switched on
R twice more the power supply is again
switched off
Ignition (or position 2) X
Press the KEYLESS-GO start/stop button
twice.
This supplies power for all electrical
consumers.
When you switch on the ignition, all lamps
in the instrument cluster come on. The low-
beam headlamp indicator lamp, high-beam
headlamp indicator lamp, and turn signal
indicator lamps will only come on if
activated. If a lamp in the instrument
cluster fails to come on when the ignition is switched on, have it checked and
replaced if necessary. If a lamp in the
instrument cluster remains on after
starting the engine or comes on while
driving, refer to “Lamps in instrument
cluster” (
Y page 251).
i When you now press the KEYLESS-GO
start/stop button once, the power supply
is again switched off. Seats
Safety notes
G
Warning!
In order to avoid possible loss of vehicle
control the following must be done before the
vehicle is put into motion:
R seat adjustment
R head restraint adjustment
R steering wheel adjustment
R rear view mirror adjustment
R fastening of seat belts G
Warning!
Do not adjust the driver’s seat while driving.
Adjusting the seat while driving could cause
the driver to lose control of the vehicle.
Never ride in a moving vehicle with the seat
backrest in an excessively reclined position as
this can be dangerous. You could slide under
the seat belt in a collision. If you slide under
it, the seat belt would apply force at the
abdomen or neck. That could cause serious
or fatal injuries. The seat backrest and seat
belts provide the best restraint when the
wearer is in a position that is as upright as
possible and seat belts are properly
positioned on the body. G
Warning!
Your seat must be adjusted so that you can
correctly fasten your seat belt. Seats
77Controls in detail
219_AKB; 4; 54, en-US
d2ureepe, Version: 2.11.8.1 2009-05-11T16:21:02+02:00 - Seite 77 Z
Page 154 of 308
Power tilt/sliding sunroof
Opening and closing
G
Observe Safety notes, see page 52. G
Warning!
When opening or closing the tilt/sliding
sunroof, make sure there is no danger of
anyone being harmed by the opening/closing
procedure.
The tilt/sliding sunroof is equipped with the
express operation and automatic reversal
function. If the movement of the tilt/sliding
sunroof is blocked during the closing
procedure, the tilt/sliding sunroof will stop
and open slightly.
The tilt/sliding sunroof operates differently
when the sunroof switch is pressed and held.
See the “Closing when the tilt/sliding sunroof
is blocked” section for details.
The opening/closing procedure of the tilt/
sliding sunroof can be immediately halted by
releasing the sunroof switch or, if the sunroof
switch was moved past the resistance point
and released, by moving the sunroof switch in
any direction. G
Warning!
The tilt/sliding sunroof is made out of glass.
In the event of an accident, the glass may
shatter. This may result in an opening in the
roof.
In a vehicle rollover, occupants not wearing
their seat belts or not wearing them properly
may be thrown out of the opening. Such an
opening also presents a potential for injury for
occupants wearing their seat belts properly as
entire body parts or portions of them may
protrude from the passenger compartment.
! To avoid damaging the seals, do not
transport any objects with sharp edges
which can stick out of the tilt/sliding
sunroof. Do not open the tilt/sliding sunroof if there
is snow or ice on the roof, as this could
result in malfunctions.
If you cannot open or close the tilt/sliding
sunroof due to a malfunction contact
Roadside Assistance or an authorized
Mercedes-Benz Center.
! Please keep in mind that weather
conditions can sometimes change rapidly.
Make sure to close the tilt/sliding sunroof
when leaving the vehicle. If water enters
the vehicle interior, vehicle electronics
could be damaged which is not covered by
the Mercedes-Benz Limited Warranty.
i You can also open or close the tilt/sliding
sunroof using the SmartKey or the
KEYLESS-GO function, see “Summer
opening feature” ( Y page 96) and
“Convenience closing feature”
(Y page 96).
i After switching off the ignition or
removing the SmartKey from the starter
switch, you can operate the tilt/sliding
sunroof until you open the driver’s or front
passenger door. If no door was opened you
can operate the tilt/sliding sunroof for up
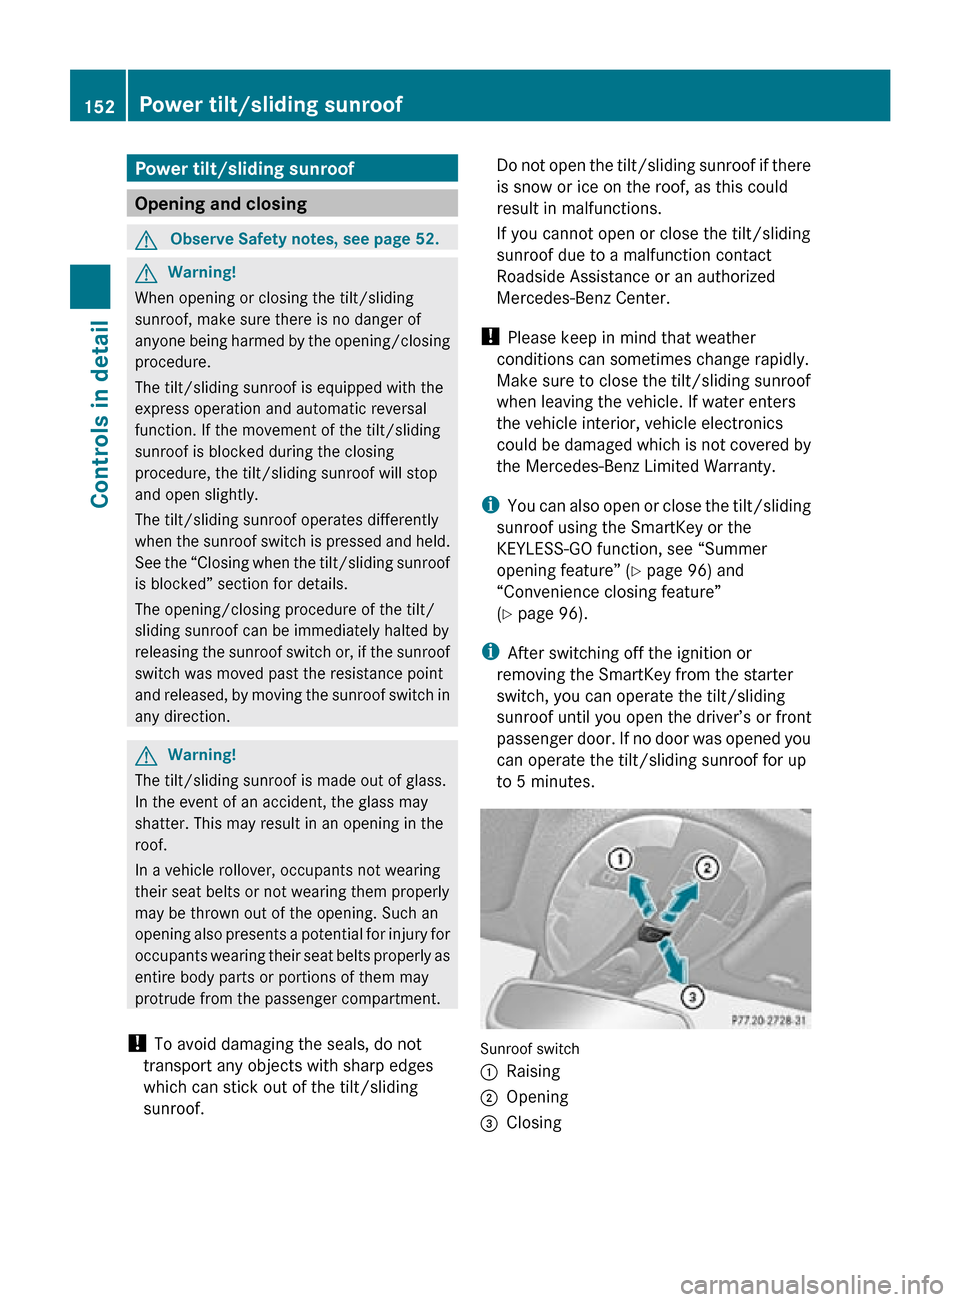
to 5 minutes. Sunroof switch
:
Raising
; Opening
= Closing 152
Power tilt/sliding sunroofControls in detail
219_AKB; 4; 54, en-US
d2ureepe,
Version: 2.11.8.1 2009-05-11T16:21:02+02:00 - Seite 152
Page 204 of 308

Tire size designation, load and speed
rating
:
Tire width
; Aspect ratio in %
= Radial tire code
? Rim diameter
A Load index
B Speed symbol
i For illustration purposes only. Actual data
on tires are specific to each vehicle and
may vary from data shown in above
illustration.
General: Depending on the design standards
used, the tire size molded into the sidewall
may have no letter or a letter preceding the
tire size designation.
No letter preceding the size designation (as
illustrated above): Passenger car tire based
on European design standards.
Letter “P” preceding the size designation:
Passenger car tire based on U.S. design
standards.
Letter “LT” preceding the size designation:
Light Truck tire based on U.S. design
standards.
Letter “T” preceding the size designation:
Temporary spare tires which are high
pressure compact spares designed for
temporary emergency use only.
Tire width
Tire width : indicates the nominal tire width
in millimeters. Aspect ratio
Aspect ratio
; is the dimensional
relationship between tire section height and
section width and is expressed in percentage.
The aspect ratio is arrived at by dividing
section height by section width.
Tire code
Tire code = indicates the tire construction
type. The “R” stands for radial tire type. Letter
“D” means diagonal or bias ply construction;
letter “B” means belted-bias ply construction.
At the tire manufacturer’s option, any tire
with a speed capability above 149 mph
(240 km/h) can include a “ZR” in the size
designation (for example: 245/40 ZR 18). For
additional information, see “Tire speed
rating” (Y page 203).
Rim diameter
Rim diameter ? is the diameter of the bead
seat, not the diameter of the rim edge. The
rim diameter is indicated in inches (in).
Load index G
Warning!
The tire load rating must always be at least
half of the GAWR of your vehicle. Otherwise,
tire failure may be the result which may cause
an accident and/or serious injury to you or
others.
Always replace rims and tires with the same
designation, manufacturer and type as shown
on the original part. G
Warning!
Do not overload the tires by exceeding the
specified load limit as indicated on the Tire
and Loading Information placard on the
driver’s door B-pillar. Overloading the tires
can overheat them, possibly causing a
blowout. Overloading the tires can also result
in handling or steering problems, or brake
failure.
Load index A is a numerical code associated
with the maximum load a tire can support. 202
Tires and wheelsOperation
219_AKB; 4; 54, en-US
d2ureepe,
Version: 2.11.8.1 2009-05-11T16:21:02+02:00 - Seite 202
Page 220 of 308

Corrosion protection, such as MB
Anticorrosion Wax should be applied to the
engine compartment after every engine
cleaning. Before applying, all control linkage
bushings
and joints should be lubricated. The
poly-V-belt and all pulleys should be
protected from any wax.
Vehicle washing In the winter, thoroughly remove all traces of
road salt as soon as possible.
When
washing the vehicle underbody, do not
forget to clean the inner sides of the wheels.
i Vehicles with KEYLESS-GO:
If a door handle is hit by a strong jet of
water, and a SmartKey is within
approximately 3 ft (1 m) of the vehicle, it
could be inadvertently locked or unlocked.
Hand-wash
X Do not use hot water or wash your vehicle
in direct sunlight.
X Only use a soft, wet cloth or sponge to
clean the vehicle.
X Only use a mild vehicle wash detergent,
such as Mercedes-Benz approved Car
Shampoo.
X Thoroughly spray the vehicle with a
diffused jet of water.
X Do not spray directly towards the
ventilation intake.
X Use plenty of water and rinse the sponge
and chamois frequently.
X Rinse with clean water and dry with a
chamois thoroughly.
Do not allow cleaning agents to dry on the
finish.
Automatic car wash
You can have your vehicle washed in an
automatic
car wash from the start. Brushless
car washes are preferable.
X To protect the filter system, activate the air
recirculation mode using button g on
the climate control panel. !
Do
not clean your vehicle in an automatic
touchless car wash which uses caustic
spray. Caustic spray will damage the paint
or ornamental moldings.
If the vehicle is very dirty, prewash it before
running it through the automatic car wash.
! Make sure the combination switch is set
to wiper setting $. Otherwise, the rain
sensor could activate and cause the wipers
to move unintentionally. This may lead to
vehicle damage.
Due to the width of the vehicle, fold in
exterior rear view mirrors prior to running
the vehicle through an automatic car wash
to prevent damage to the mirrors.
X When taking the vehicle through an
automatic conveyor-type car wash:
Make sure the automatic transmission
remains in neutral position N.
When leaving the automatic car wash, make
sure the mirrors are folded out.
After running the vehicle through an
automatic car wash, wipe any wax off of the
windshield and the wiper blade inserts. This
will prevent smears and reduce wiping noise
which can be caused by residual wax on the
windshield.
Ornamental moldings X
For regular cleaning and care of ornamental
moldings, use a damp cloth.
! Do
not use chrome cleaner on ornamental
moldings. Although ornamental moldings
may have chrome appearance, they could
be made of anodized aluminum that will be
damaged when cleaned with chrome
cleaner. Instead, use a damp cloth to clean
those ornamental moldings.
For very dirty ornamental moldings of
which you are sure are chrome-plated, use
a chrome cleaner. If in doubt whether an
ornamental molding is chrome-plated,
contact an authorized Mercedes-Benz
Center. 218
Vehicle care
Operation
219_AKB; 4; 54, en-US
d2ureepe,
Version: 2.11.8.1 2009-05-11T16:21:02+02:00 - Seite 218
Page 223 of 308
Carpets
X
Use Mercedes-Benz approved Carpet and
Fabric Care for cleaning the carpets.
Headliner and shelf below rear window X
Use a soft bristle brush or a dry-shampoo
cleaner in case of excessive dirt.
Seat belts X
Only use clear, lukewarm water and soap.
! The seat belts must not be treated with
chemical cleaning agents. Do not dry the
seat belts at temperatures above
176‡
(80†) or in direct sunlight. G
Warning!
Do not bleach or dye seat belts as this may
severely weaken them. In a crash they may
not be able to provide adequate protection.
Upholstery Using aftermarket seat covers or wearing
clothing that have the tendency to give off
coloring (e.g. when wet, etc.) may cause the
upholstery to become permanently
discolored. By lining the seats with a proper
intermediate
cover, contact-discoloration will
be prevented. G
Warning!
Only use seat or head restraint covers which
have
been tested and approved by Mercedes-
Benz for your vehicle model.
Using other seat or head restraint covers may
interfere with or prevent the activation of the
NECK-PRO active front head restraints and/
or the deployment of the front side impact air
bags.
Contact an authorized Mercedes-Benz Center
for availability.
Leather upholstery
Please note that leather upholstery is a
natural product and is therefore subject to a natural aging process. Leather upholstery
may also react to certain ambient influences
such
as high humidity or high temperature by
showing wrinkles for example.
X Wipe leather upholstery with a damp cloth
and
dry thoroughly or clean with Mercedes-
Benz approved Leather Care.
! To avoid damage to leather upholstery:
R Wipe with light pressure only.
R Do not clean with abrasive cleaning
agents
such as scouring milk or powder.
R Do not soak the leather upholstery.
As leather is a natural product, it could
otherwise harden or become porous.
R Exercise particular care when cleaning
perforated leather as its underside
should not become wet.
Wood trims X
Only use water and a damp cloth to clean
wood trims in your vehicle.
! Do not use solvents like tar remover or
wheel cleaner nor polishes or waxes as
these may be abrasive.
Chrome-plated exhaust tip Regular cleaning and care of chrome-plated
exhaust tips will help to maintain their shine
and the classy appearance.
X
Use Mercedes-Benz approved Chrome
Polishing Paste each time the vehicle has
been
washed, especially during the winter.
! Do not use alkaline cleaners such as
wheel cleaners as they could cause
corrosion. Vehicle care
221
Operation
219_AKB; 4; 54, en-US
d2ureepe, Version: 2.11.8.1 2009-05-11T16:21:02+02:00 - Seite 221 Z