2010 MERCEDES-BENZ CLS63AMG automatic transmission
[x] Cancel search: automatic transmissionPage 113 of 308

Press button
6
to answer a call
to dial8
to redial
~ to end a call
to reject an incoming call =
Press button
V
U
to select next or previous menu Press button briefly
&
*
to move within a menu
Within Audio/DVD
menu to
select previous or next track,
scene or stored station
Within Telephone menu to
switch to the phone book and
select a name or number Press and hold button
&
*
Within Audio/DVD
menu to
select previous or next track
with quick search or to select
previous or next station in
station list or wave band
Within Telephone menu to
start the quick search in the
phone book Depending on the selected menu, pressing
the buttons on the multifunction steering
wheel will alter what appears in the
multifunction display.
The information available in the multifunction
display is arranged in menus and
accompanying functions and submenus.
The individual functions are then found within
the relevant menu (radio or CD operations
under Audio/DVD
menu, for example).
These functions serve to call up relevant
information or to customize the settings for
your vehicle. It is helpful to think of the menus, and the
functions within each menu, as being
arranged in a circular pattern.
X
Press button V or U repeatedly to
pass through each menu one after the
other.
X Press button * or & repeatedly to
pass through each function display, one
after the other, in the current menu.
In the Settings menu, instead of functions,
you will find a number of submenus for calling
up and changing settings. For instructions on
using these submenus, see “Settings menu”
(Y page 118).
The number of menus available in the system
depends on which optional equipment is
installed in your vehicle. Multifunction display
:
Outside temperature indicator
; Trip odometer
= Automatic transmission program mode
indicator
? Transmission position/gear range
indicator
A Main odometer
For more information on menus displayed in
the multifunction display, see “Menus and
submenus” (Y page 112).
8 Function only available in telephone menu. Control system
111Controls in detail
219_AKB; 4; 54, en-US
d2ureepe, Version: 2.11.8.1 2009-05-11T16:21:02+02:00 - Seite 111 Z
Page 130 of 308

previously set speed and wishes to resume
this particular preset speed.
G
Warning!
The cruise control brakes automatically so
that the set speed is not exceeded. :
Setting current or higher speed
; Setting current or lower speed
= Canceling the cruise control
? Activating the cruise control or resuming
to last set speed
Activating cruise control You can activate the cruise control at a
vehicle speed above 20 mph (30 km/h).
You cannot activate the cruise control
R
when you brake
R when you have engaged the parking brake
R when the automatic transmission is in park
position P, reverse gear R, or neutral
position N
R the ESP ®
is switched off or has switched off
due to a malfunction
The vehicle speed displayed in the
speedometer can briefly vary from the speed
setting for the cruise control system. Setting current speed X
Accelerate or decelerate to the desired
speed.
X Briefly lift the cruise control lever in
direction of arrow : or press in direction
of arrow ;.
X Remove your foot from the accelerator
pedal.
i On uphill grades, the cruise control may
not be able to maintain the set speed. Once
the grade eases, the set speed will be
resumed.
On downhill grades, the cruise control
maintains the set speed by braking with the
vehicle’s brake system. In addition, on
longer downhill grades the automatic
transmission will downshift automatically.
Canceling cruise control X
Depress the brake pedal.
or
X Briefly push the cruise control lever in
direction of arrow =.
The last set speed is stored for later use.
The last stored speed is deleted from memory
when the engine is turned off.
The cruise control switches off automatically
when you depress the brake pedal or you
engage the parking brake. In this case, the
cruise control speed segments in the
multifunction display will go out.
The cruise control also switches off
automatically when
R the vehicle speed falls below 20 mph
(30 km/h)
R the ESP ®
is in operation
R the ESP ®
is switched off with the ESP ®
switch
R the ESP ®
has switched off due to a
malfunction
R you shift the automatic transmission into
neutral position N while driving 128
Driving systemsControls in detail
219_AKB; 4; 54, en-US
d2ureepe,
Version: 2.11.8.1 2009-05-11T16:21:02+02:00 - Seite 128
Page 135 of 308
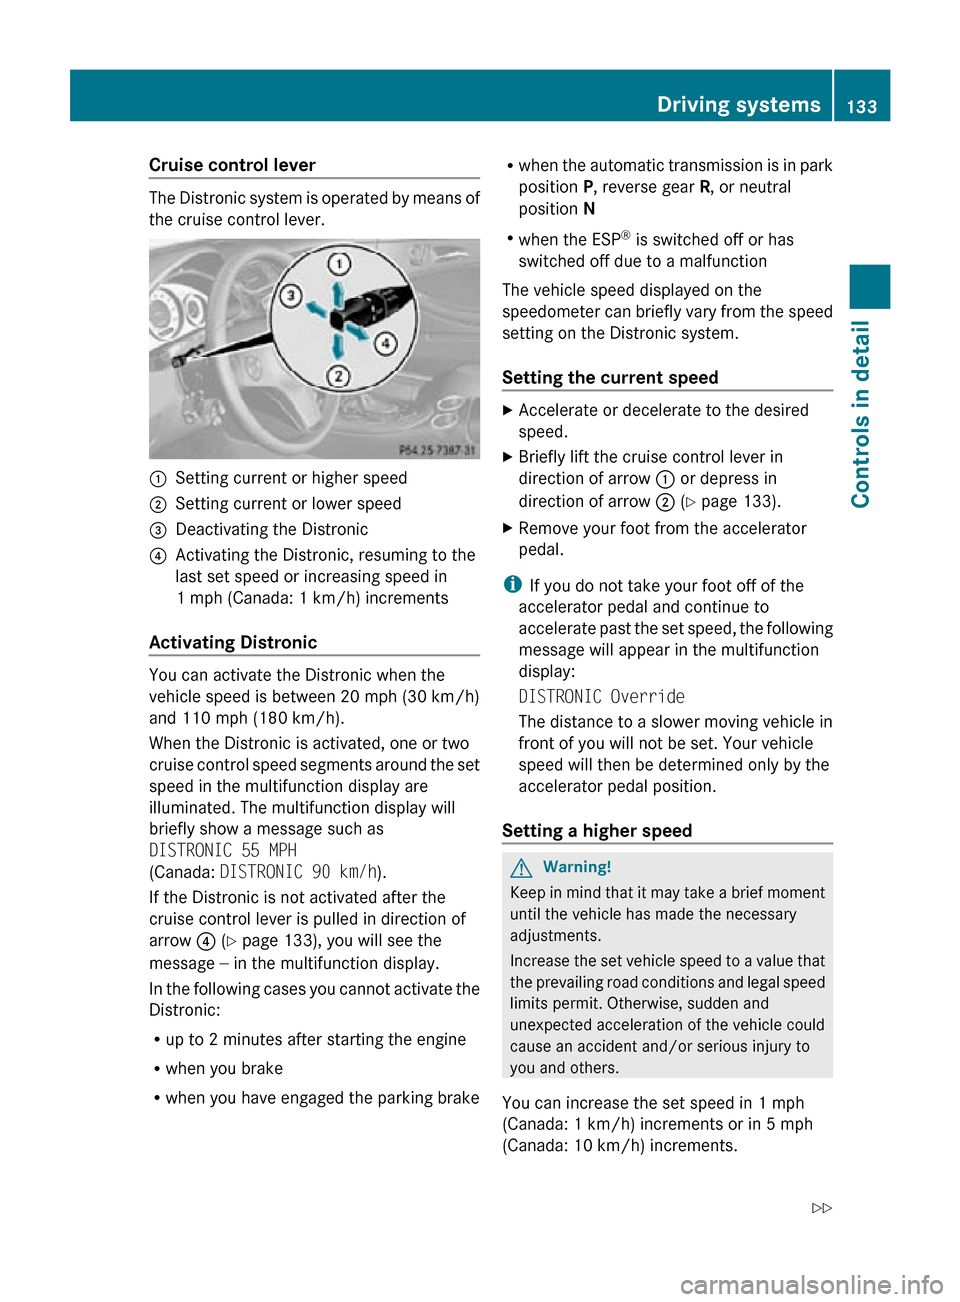
Cruise control lever
The Distronic system is operated by means of
the cruise control lever.
:
Setting current or higher speed
; Setting current or lower speed
= Deactivating the Distronic
? Activating the Distronic, resuming to the
last set speed or increasing speed in
1 mph (Canada: 1 km/h) increments
Activating Distronic You can activate the Distronic when the
vehicle speed is between 20 mph (30 km/h)
and 110 mph (180 km/h).
When the Distronic is activated, one or two
cruise control speed segments around the set
speed in the multifunction display are
illuminated. The multifunction display will
briefly show a message such as
DISTRONIC 55 MPH
(Canada: DISTRONIC 90 km/h).
If the Distronic is not activated after the
cruise control lever is pulled in direction of
arrow
? (Y page 133), you will see the
message — in the multifunction display.
In the following cases you cannot activate the
Distronic:
R up to 2 minutes after starting the engine
R when you brake
R when you have engaged the parking brake R
when the automatic transmission is in park
position P, reverse gear R, or neutral
position N
R when the ESP ®
is switched off or has
switched off due to a malfunction
The vehicle speed displayed on the
speedometer can briefly vary from the speed
setting on the Distronic system.
Setting the current speed X
Accelerate or decelerate to the desired
speed.
X Briefly lift the cruise control lever in
direction of arrow : or depress in
direction of arrow ; (Y page 133).
X Remove your foot from the accelerator
pedal.
i If you do not take your foot off of the
accelerator pedal and continue to
accelerate past the set speed, the following
message will appear in the multifunction
display:
DISTRONIC Override
The distance to a slower moving vehicle in
front of you will not be set. Your vehicle
speed will then be determined only by the
accelerator pedal position.
Setting a higher speed G
Warning!
Keep in mind that it may take a brief moment
until the vehicle has made the necessary
adjustments.
Increase the set vehicle speed to a value that
the prevailing road conditions and legal speed
limits permit. Otherwise, sudden and
unexpected acceleration of the vehicle could
cause an accident and/or serious injury to
you and others.
You can increase the set speed in 1 mph
(Canada: 1 km/h) increments or in 5 mph
(Canada: 10 km/h) increments. Driving systems
133Controls in detail
219_AKB; 4; 54, en-US
d2ureepe, Version: 2.11.8.1 2009-05-11T16:21:02+02:00 - Seite 133 Z
Page 137 of 308
R
the ESP ®
has switched off due to a
malfunction
R you shift the automatic transmission into
neutral position N while driving
The cruise control speed segments in the
multifunction display goes out and an
acoustic warning will sound. Observe
additional messages in the multifunction
display that may appear. G
Warning!
Distronic switches off and releases the brakes
when the vehicle decelerates below the
minimum speed of 20 mph (30 km/h) by
operation of the system. At that time the
driver must apply the brakes in order to
reduce vehicle speed further or bring it to a
stop.
Depressing the accelerator pedal does not
deactivate the Distronic. After a brief
acceleration (e.g. for passing), the Distronic
will resume the last set speed.
Setting the following distance in
Distronic You can set the specified following distance
for Distronic by varying the time setting
between 1.0 and 2.0 seconds. Using this time
setting and the current speed of your vehicle,
Distronic calculates and sets the required
following distance to the preceding vehicle.
The set distance will be shown in the
multifunction display.
G
Warning!
It is up to the driver to exercise discretion to
select the appropriate setting given road
conditions, traffic, driver’s preferred driving
style and applicable laws and driving
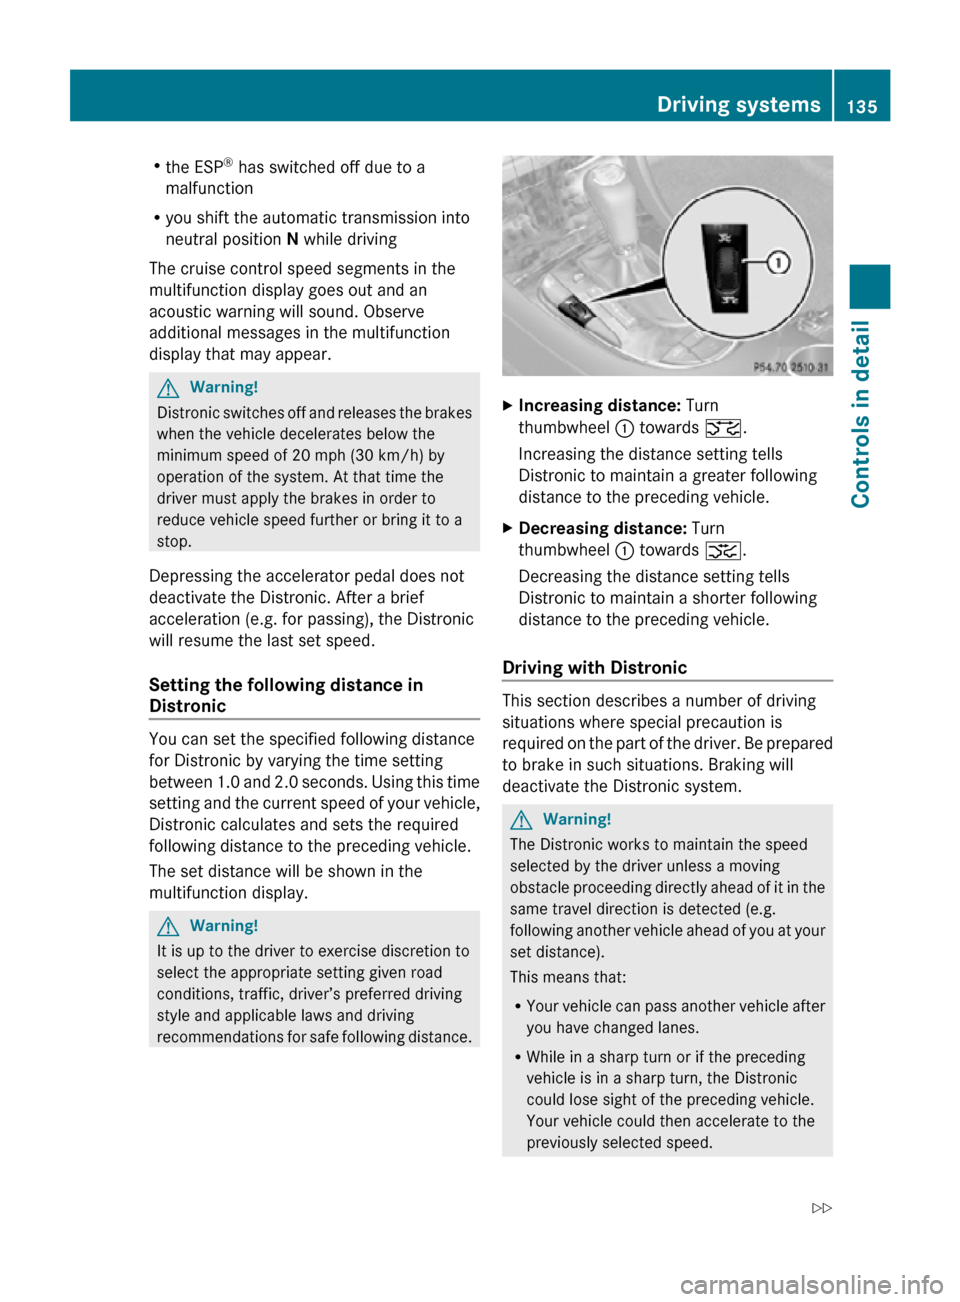
recommendations for safe following distance. X
Increasing distance: Turn
thumbwheel : towards ª.
Increasing the distance setting tells
Distronic to maintain a greater following
distance to the preceding vehicle.
X Decreasing distance: Turn
thumbwheel : towards ¥.
Decreasing the distance setting tells
Distronic to maintain a shorter following
distance to the preceding vehicle.
Driving with Distronic This section describes a number of driving
situations where special precaution is
required on the part of the driver. Be prepared
to brake in such situations. Braking will
deactivate the Distronic system.
G
Warning!
The Distronic works to maintain the speed
selected by the driver unless a moving
obstacle proceeding directly ahead of it in the
same travel direction is detected (e.g.
following another vehicle ahead of you at your
set distance).
This means that:
R Your vehicle can pass another vehicle after
you have changed lanes.
R While in a sharp turn or if the preceding
vehicle is in a sharp turn, the Distronic
could lose sight of the preceding vehicle.
Your vehicle could then accelerate to the
previously selected speed. Driving systems
135Controls in detail
219_AKB; 4; 54, en-US
d2ureepe, Version: 2.11.8.1 2009-05-11T16:21:02+02:00 - Seite 135 Z
Page 142 of 308
and
R the automatic transmission is in drive
position D, reverse gear R, or neutral
position N
The Parktronic system deactivates at speeds
above approximately 11 mph (18 km/h). At
lower speeds, the Parktronic system
activates again.
The Parktronic system also deactivates when
you shift the automatic transmission into
park position P or engage the parking brake.
The Parktronic system monitors the
surroundings of your vehicle with six sensors
in the front bumper and four sensors in the
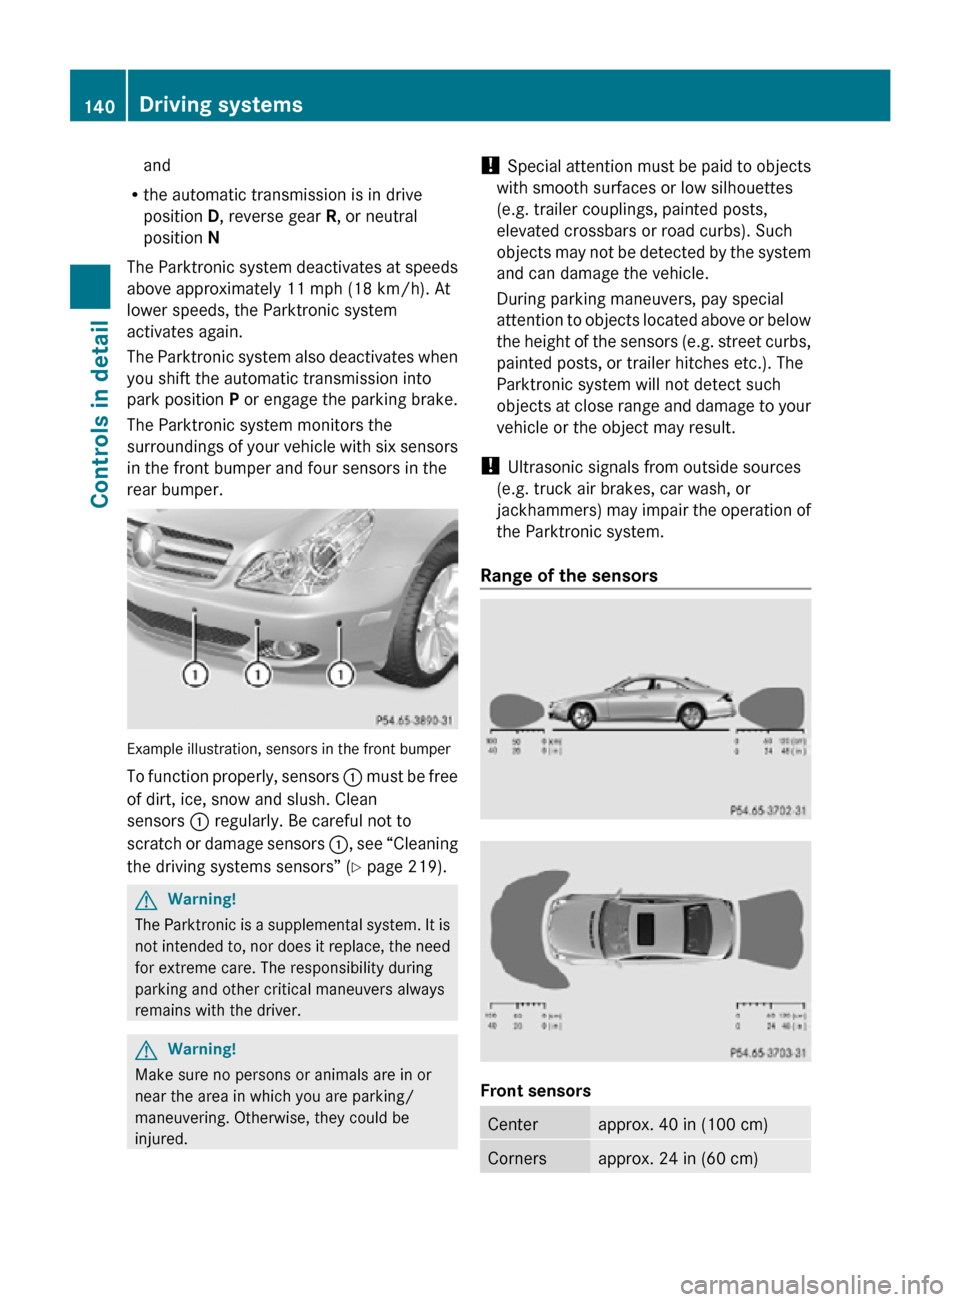
rear bumper. Example illustration, sensors in the front bumper
To function properly, sensors
: must be free
of dirt, ice, snow and slush. Clean
sensors : regularly. Be careful not to
scratch or damage sensors :, see “Cleaning
the driving systems sensors” (Y page 219). G
Warning!
The Parktronic is a supplemental system. It is
not intended to, nor does it replace, the need
for extreme care. The responsibility during
parking and other critical maneuvers always
remains with the driver. G
Warning!
Make sure no persons or animals are in or
near the area in which you are parking/
maneuvering. Otherwise, they could be
injured. !
Special attention must be paid to objects
with smooth surfaces or low silhouettes
(e.g. trailer couplings, painted posts,
elevated crossbars or road curbs). Such
objects may not be detected by the system
and can damage the vehicle.
During parking maneuvers, pay special
attention to objects located above or below
the height of the sensors (e.g. street curbs,
painted posts, or trailer hitches etc.). The
Parktronic system will not detect such
objects at close range and damage to your
vehicle or the object may result.
! Ultrasonic signals from outside sources
(e.g. truck air brakes, car wash, or
jackhammers) may impair the operation of
the Parktronic system.
Range of the sensors Front sensors
Center approx. 40 in (100 cm)
Corners approx. 24 in (60 cm)140
Driving systemsControls in detail
219_AKB; 4; 54, en-US
d2ureepe,
Version: 2.11.8.1 2009-05-11T16:21:02+02:00 - Seite 140
Page 143 of 308
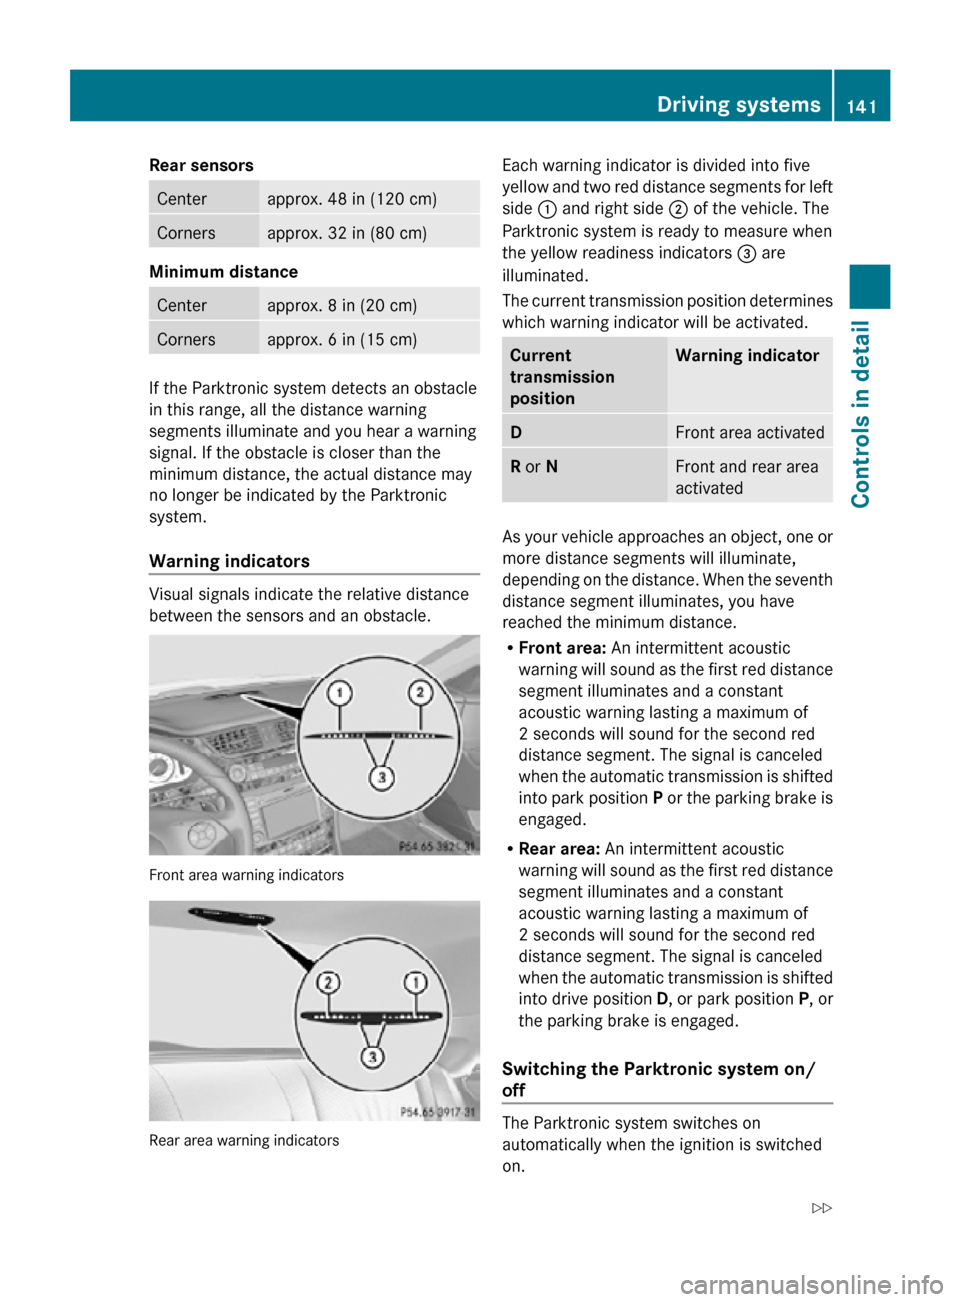
Rear sensors
Center approx. 48 in (120 cm)
Corners approx. 32 in (80 cm)
Minimum distance
Center approx. 8 in (20 cm)
Corners approx. 6 in (15 cm)
If the Parktronic system detects an obstacle
in this range, all the distance warning
segments illuminate and you hear a warning
signal. If the obstacle is closer than the
minimum distance, the actual distance may
no longer be indicated by the Parktronic
system.
Warning indicators
Visual signals indicate the relative distance
between the sensors and an obstacle.
Front area warning indicators
Rear area warning indicators Each warning indicator is divided into five
yellow and two red distance segments for left
side
: and right side ; of the vehicle. The
Parktronic system is ready to measure when
the yellow readiness indicators = are
illuminated.
The current transmission position determines
which warning indicator will be activated. Current
transmission
position Warning indicator
D
Front area activated
R or N Front and rear area
activated
As your vehicle approaches an object, one or
more distance segments will illuminate,
depending on the distance. When the seventh
distance segment illuminates, you have
reached the minimum distance.
R
Front area: An intermittent acoustic
warning will sound as the first red distance
segment illuminates and a constant
acoustic warning lasting a maximum of
2 seconds will sound for the second red
distance segment. The signal is canceled
when the automatic transmission is shifted
into park position P or the parking brake is
engaged.
R Rear area: An intermittent acoustic
warning will sound as the first red distance
segment illuminates and a constant
acoustic warning lasting a maximum of
2 seconds will sound for the second red
distance segment. The signal is canceled
when the automatic transmission is shifted
into drive position D, or park position P, or
the parking brake is engaged.
Switching the Parktronic system on/
off The Parktronic system switches on
automatically when the ignition is switched
on. Driving systems
141Controls in detail
219_AKB; 4; 54, en-US
d2ureepe, Version: 2.11.8.1 2009-05-11T16:21:02+02:00 - Seite 141 Z
Page 164 of 308
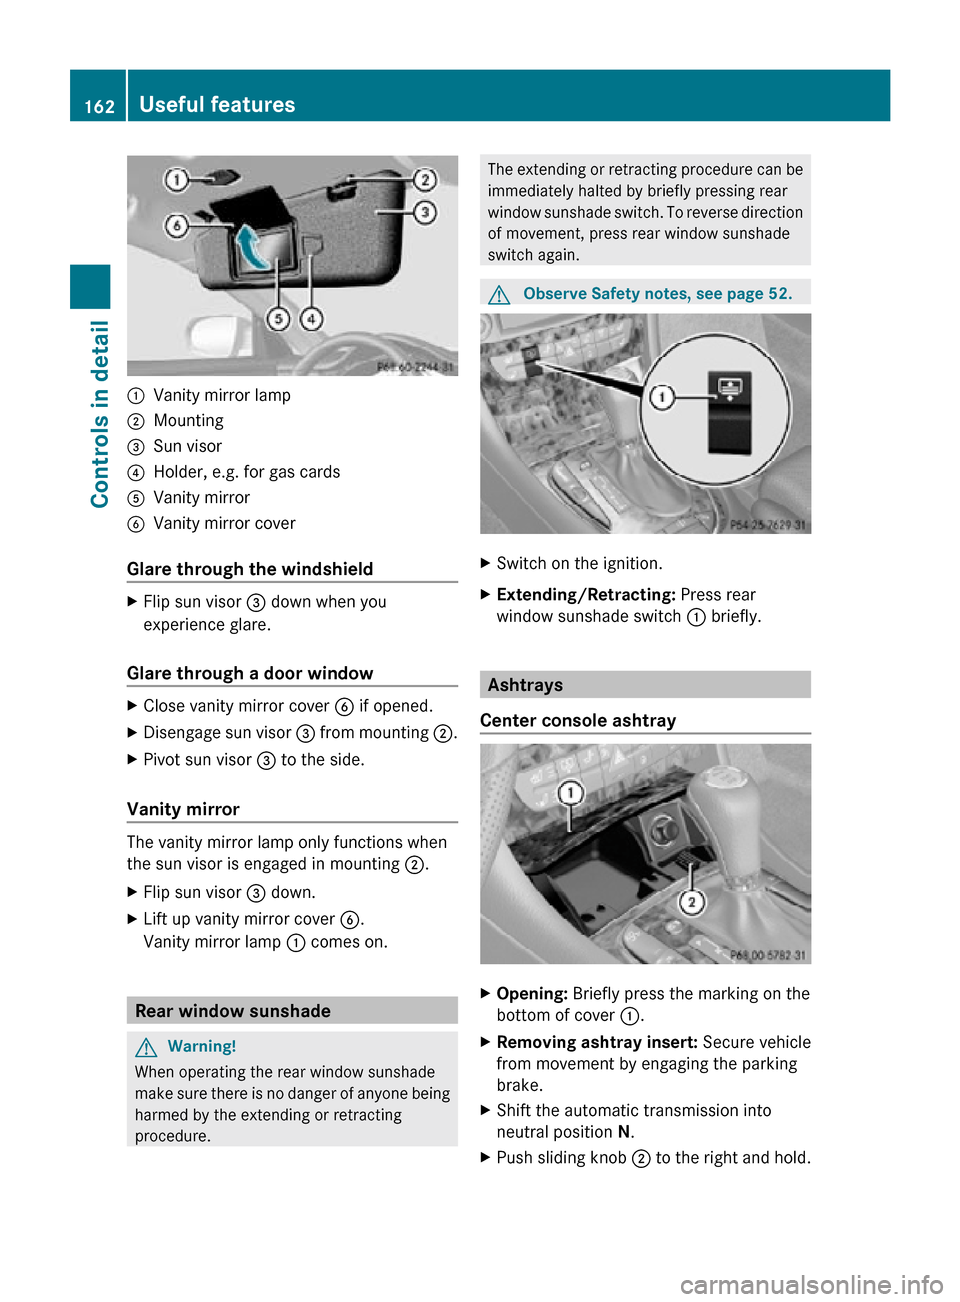
:
Vanity mirror lamp
; Mounting
= Sun visor
? Holder, e.g. for gas cards
A Vanity mirror
B Vanity mirror cover
Glare through the windshield X
Flip sun visor = down when you
experience glare.
Glare through a door window X
Close vanity mirror cover B if opened.
X Disengage sun visor = from mounting ;.
X Pivot sun visor = to the side.
Vanity mirror The vanity mirror lamp only functions when
the sun visor is engaged in mounting ;.
X
Flip sun visor = down.
X Lift up vanity mirror cover B.
Vanity mirror lamp : comes on.Rear window sunshade
G
Warning!
When operating the rear window sunshade
make sure there is no danger of anyone being
harmed by the extending or retracting
procedure. The extending or retracting procedure can be
immediately halted by briefly pressing rear
window sunshade switch. To reverse direction
of movement, press rear window sunshade
switch again.
G
Observe Safety notes, see page 52. X
Switch on the ignition.
X Extending/Retracting: Press rear
window sunshade switch : briefly. Ashtrays
Center console ashtray X
Opening: Briefly press the marking on the
bottom of cover :.
X Removing ashtray insert: Secure vehicle
from movement by engaging the parking
brake.
X Shift the automatic transmission into
neutral position N.
X Push sliding knob ; to the right and hold.162
Useful featuresControls in detail
219_AKB; 4; 54, en-US
d2ureepe,
Version: 2.11.8.1 2009-05-11T16:21:02+02:00 - Seite 162
Page 207 of 308
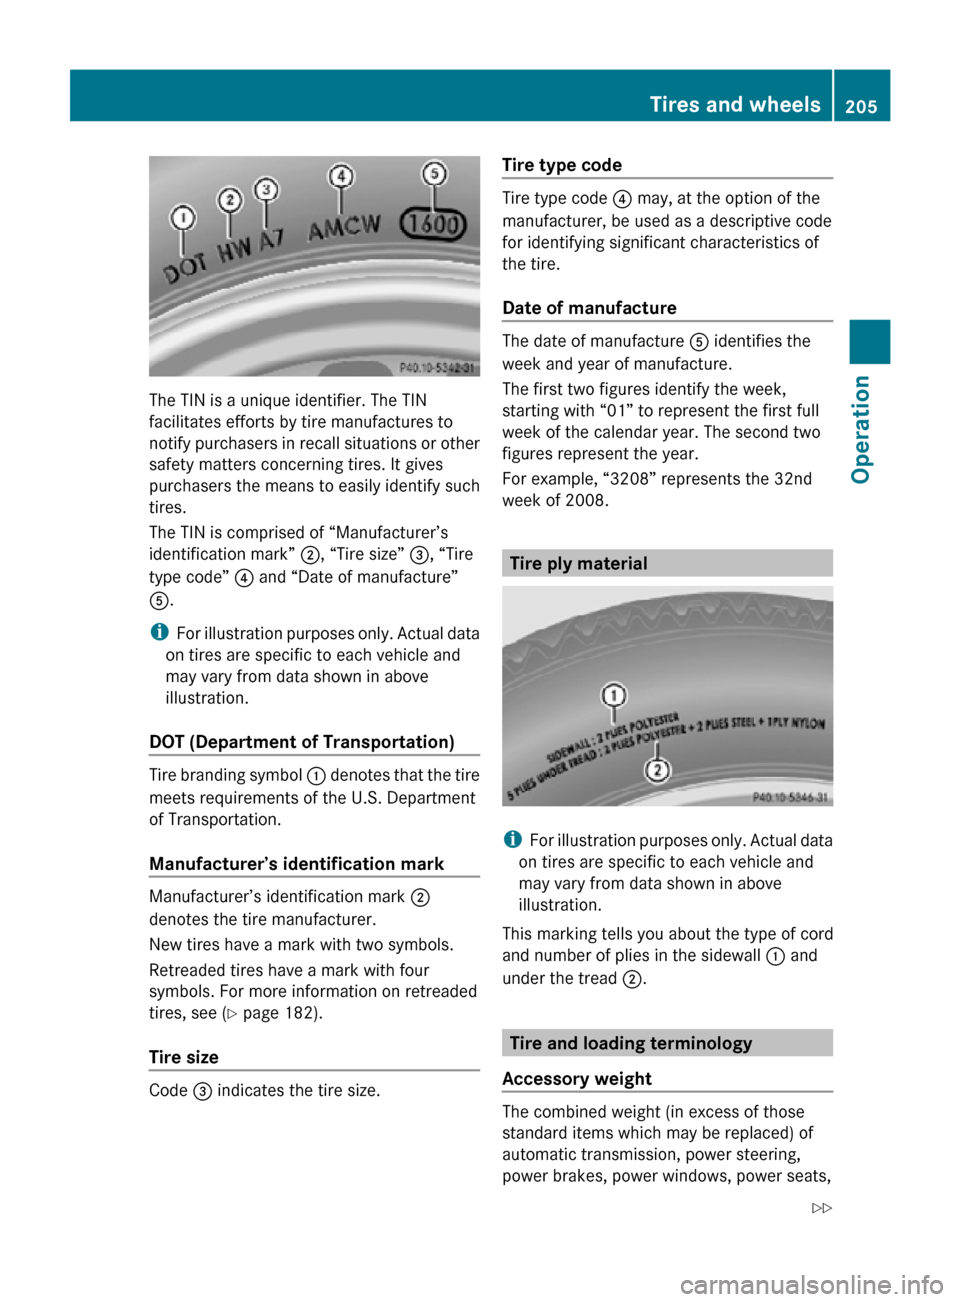
The TIN is a unique identifier. The TIN
facilitates efforts by tire manufactures to
notify purchasers in recall situations or other
safety matters concerning tires. It gives
purchasers the means to easily identify such
tires.
The TIN is comprised of “Manufacturer’s
identification mark” ;, “Tire size”
=, “Tire
type code” ? and “Date of manufacture”
A.
i For illustration purposes only. Actual data
on tires are specific to each vehicle and
may vary from data shown in above
illustration.
DOT (Department of Transportation) Tire branding symbol
: denotes that the tire
meets requirements of the U.S. Department
of Transportation.
Manufacturer’s identification mark Manufacturer’s identification mark ;
denotes the tire manufacturer.
New tires have a mark with two symbols.
Retreaded tires have a mark with four
symbols. For more information on retreaded
tires, see (
Y page 182).
Tire size Code
= indicates the tire size. Tire type code Tire type code
? may, at the option of the
manufacturer, be used as a descriptive code
for identifying significant characteristics of
the tire.
Date of manufacture The date of manufacture
A identifies the
week and year of manufacture.
The first two figures identify the week,
starting with “01” to represent the first full
week of the calendar year. The second two
figures represent the year.
For example, “3208” represents the 32nd
week of 2008. Tire ply material
i
For illustration purposes only. Actual data
on tires are specific to each vehicle and
may vary from data shown in above
illustration.
This marking tells you about the type of cord
and number of plies in the sidewall : and
under the tread ;. Tire and loading terminology
Accessory weight The combined weight (in excess of those
standard items which may be replaced) of
automatic transmission, power steering,
power brakes, power windows, power seats, Tires and wheels
205Operation
219_AKB; 4; 54, en-US
d2ureepe, Version: 2.11.8.1 2009-05-11T16:21:02+02:00 - Seite 205 Z