2010 MERCEDES-BENZ CLS63AMG mirror
[x] Cancel search: mirrorPage 88 of 308

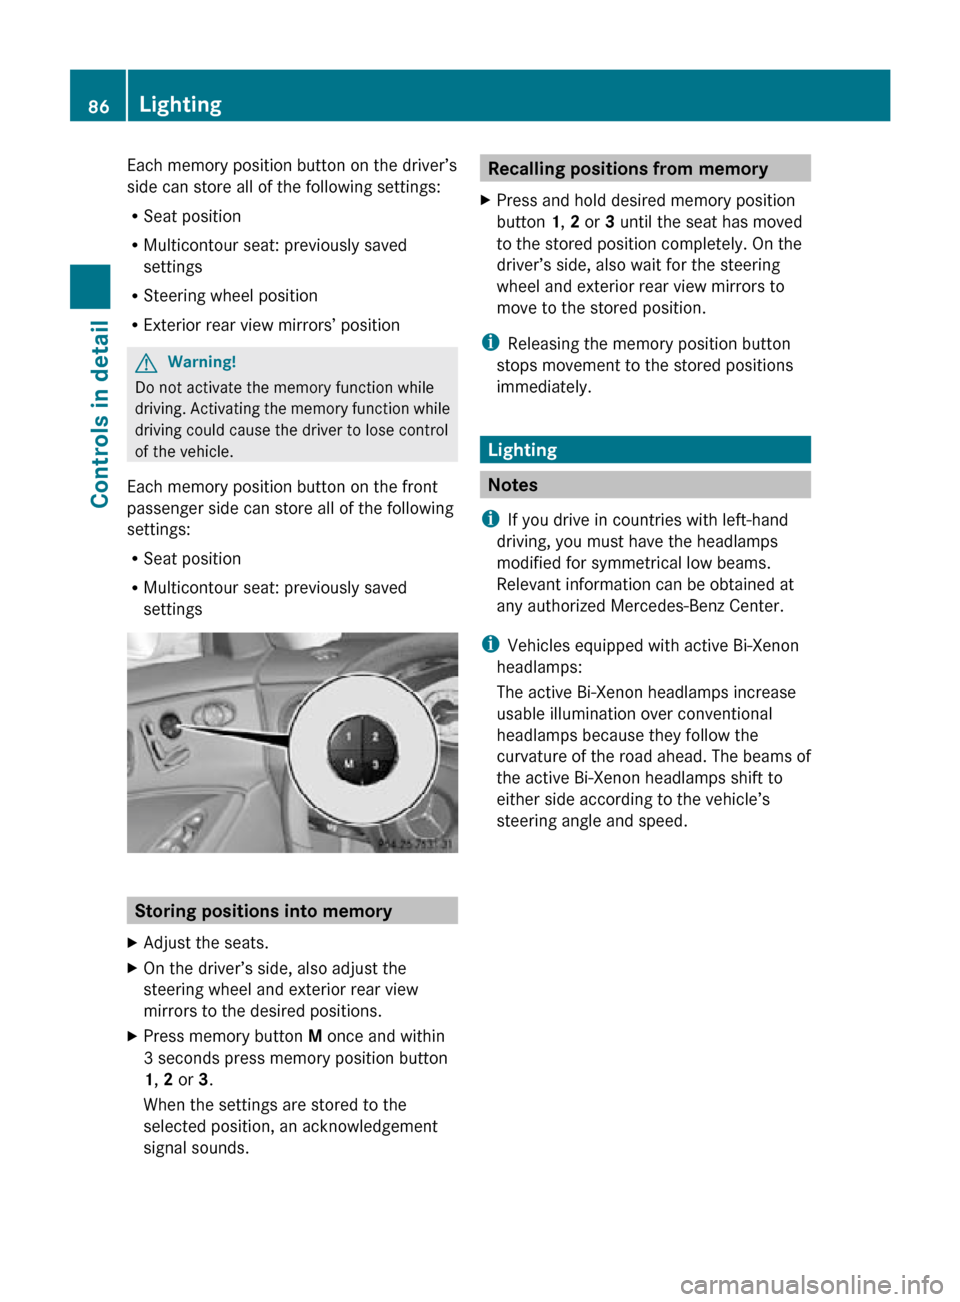
Each memory position button on the driver’s
side can store all of the following settings:
R
Seat position
R Multicontour seat: previously saved
settings
R Steering wheel position
R Exterior rear view mirrors’ position G
Warning!
Do not activate the memory function while
driving. Activating the memory function while
driving could cause the driver to lose control
of the vehicle.
Each memory position button on the front
passenger side can store all of the following
settings:
R Seat position
R Multicontour seat: previously saved
settings Storing positions into memory
X Adjust the seats.
X On the driver’s side, also adjust the
steering wheel and exterior rear view
mirrors to the desired positions.
X Press memory button M once and within
3 seconds press memory position button
1, 2 or 3.
When the settings are stored to the
selected position, an acknowledgement
signal sounds. Recalling positions from memory
X Press and hold desired memory position
button 1, 2 or 3 until the seat has moved
to the stored position completely. On the
driver’s side, also wait for the steering
wheel and exterior rear view mirrors to
move to the stored position.
i Releasing the memory position button
stops movement to the stored positions
immediately. Lighting
Notes
i If you drive in countries with left-hand
driving, you must have the headlamps
modified for symmetrical low beams.
Relevant information can be obtained at
any authorized Mercedes-Benz Center.
i Vehicles equipped with active Bi-Xenon
headlamps:
The active Bi-Xenon headlamps increase
usable illumination over conventional
headlamps because they follow the
curvature of the road ahead. The beams of
the active Bi-Xenon headlamps shift to
either side according to the vehicle’s
steering angle and speed. 86
LightingControls in detail
219_AKB; 4; 54, en-US
d2ureepe,
Version: 2.11.8.1 2009-05-11T16:21:02+02:00 - Seite 86
Page 163 of 308

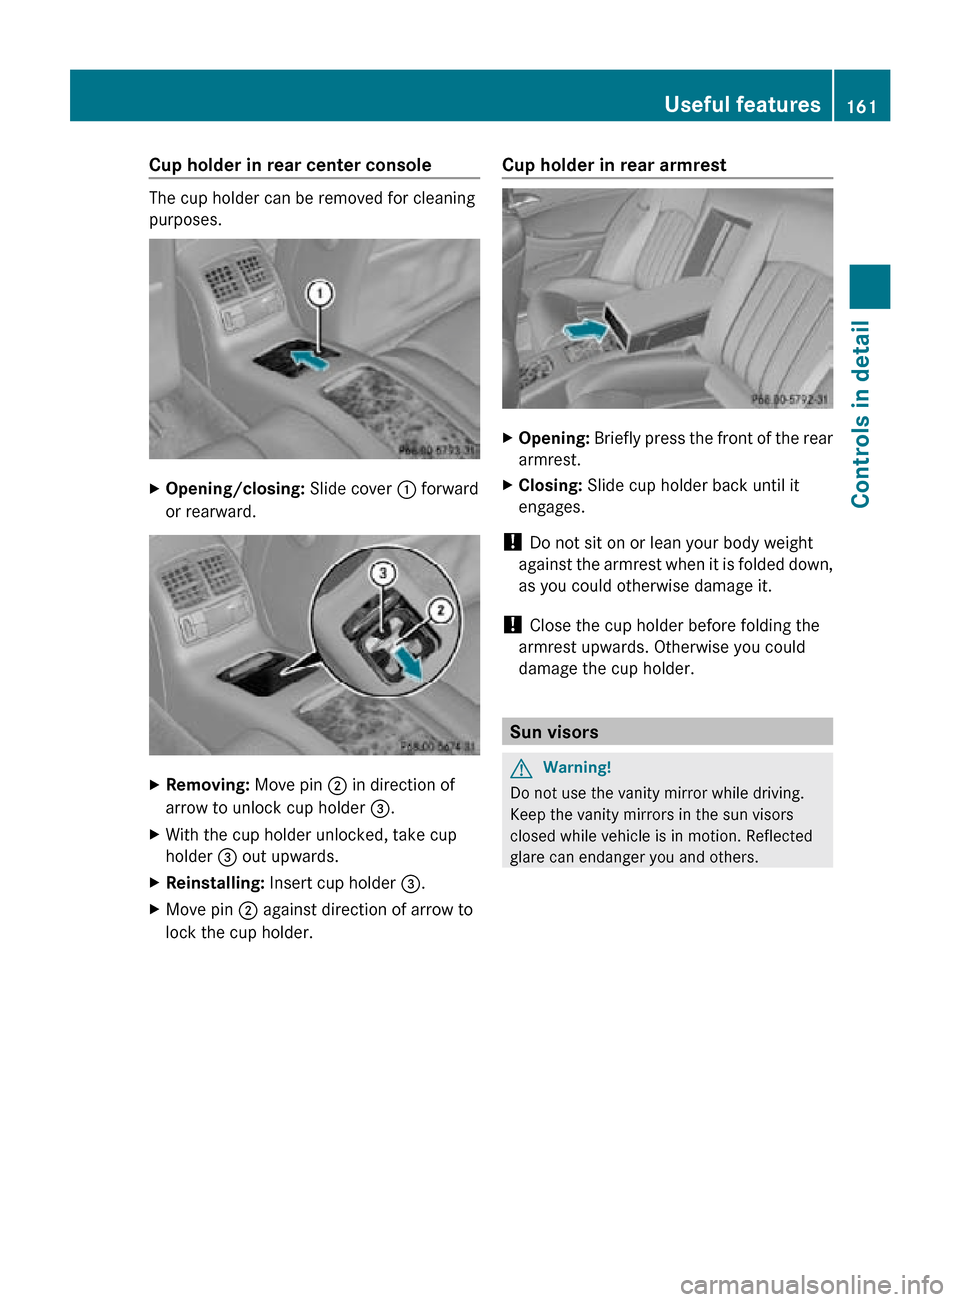
Cup holder in rear center console
The cup holder can be removed for cleaning
purposes.
X
Opening/closing: Slide cover : forward
or rearward. X
Removing: Move pin ; in direction of
arrow to unlock cup holder =.
X With the cup holder unlocked, take cup
holder = out upwards.
X Reinstalling: Insert cup holder =.
X Move pin ; against direction of arrow to
lock the cup holder. Cup holder in rear armrest X
Opening: Briefly press the front of the rear
armrest.
X Closing: Slide cup holder back until it
engages.
! Do not sit on or lean your body weight
against the armrest when it is folded down,
as you could otherwise damage it.
! Close the cup holder before folding the
armrest upwards. Otherwise you could
damage the cup holder. Sun visors
G
Warning!
Do not use the vanity mirror while driving.
Keep the vanity mirrors in the sun visors
closed while vehicle is in motion. Reflected
glare can endanger you and others. Useful features
161Controls in detail
219_AKB; 4; 54, en-US
d2ureepe, Version: 2.11.8.1 2009-05-11T16:21:02+02:00 - Seite 161 Z
Page 164 of 308

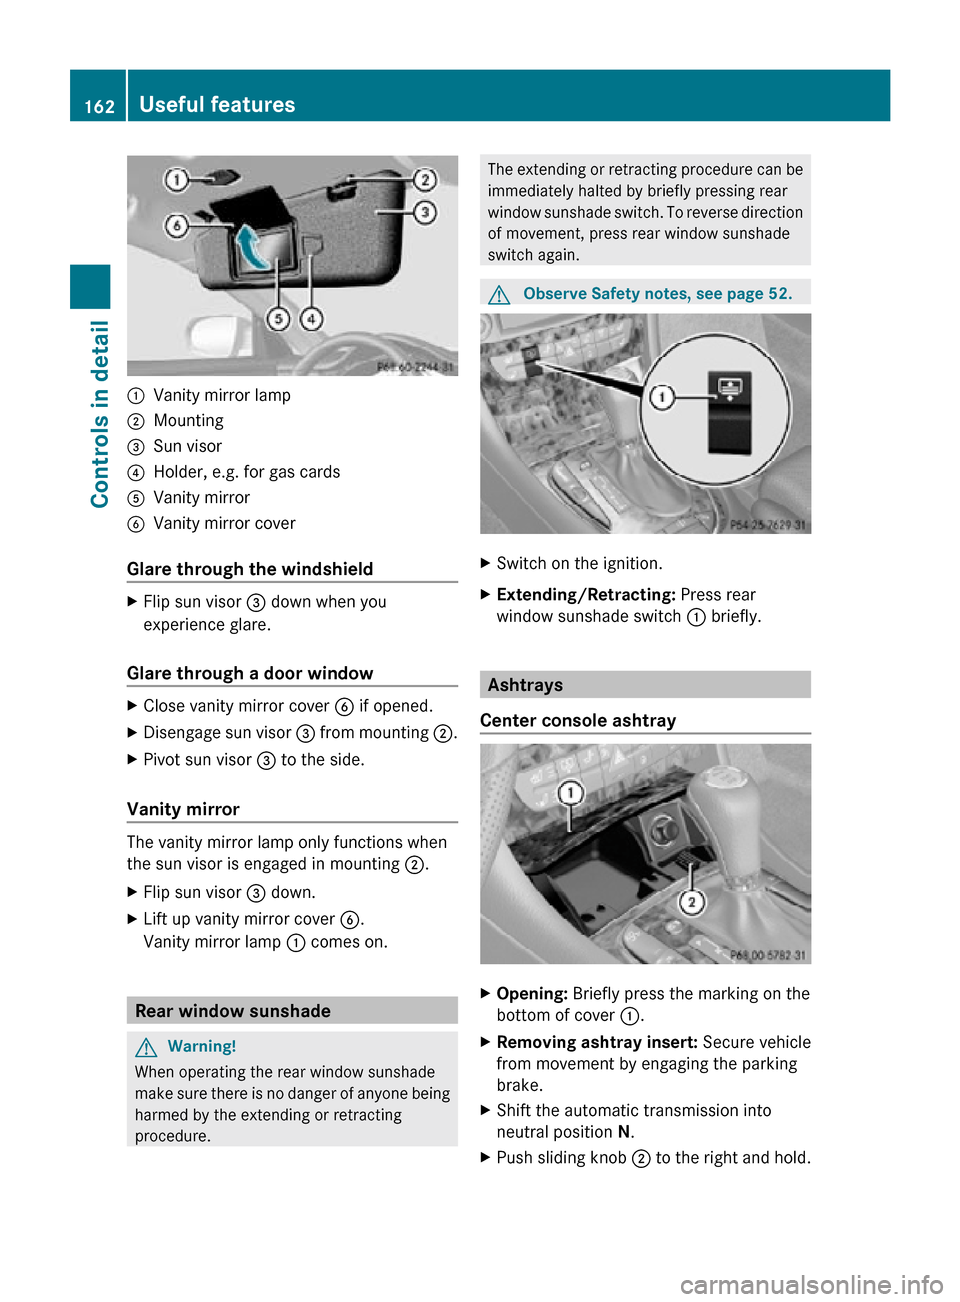
:
Vanity mirror lamp
; Mounting
= Sun visor
? Holder, e.g. for gas cards
A Vanity mirror
B Vanity mirror cover
Glare through the windshield X
Flip sun visor = down when you
experience glare.
Glare through a door window X
Close vanity mirror cover B if opened.
X Disengage sun visor = from mounting ;.
X Pivot sun visor = to the side.
Vanity mirror The vanity mirror lamp only functions when
the sun visor is engaged in mounting ;.
X
Flip sun visor = down.
X Lift up vanity mirror cover B.
Vanity mirror lamp : comes on.Rear window sunshade
G
Warning!
When operating the rear window sunshade
make sure there is no danger of anyone being
harmed by the extending or retracting
procedure. The extending or retracting procedure can be
immediately halted by briefly pressing rear
window sunshade switch. To reverse direction
of movement, press rear window sunshade
switch again.
G
Observe Safety notes, see page 52. X
Switch on the ignition.
X Extending/Retracting: Press rear
window sunshade switch : briefly. Ashtrays
Center console ashtray X
Opening: Briefly press the marking on the
bottom of cover :.
X Removing ashtray insert: Secure vehicle
from movement by engaging the parking
brake.
X Shift the automatic transmission into
neutral position N.
X Push sliding knob ; to the right and hold.162
Useful featuresControls in detail
219_AKB; 4; 54, en-US
d2ureepe,
Version: 2.11.8.1 2009-05-11T16:21:02+02:00 - Seite 162
Page 171 of 308

for a minimum of 20 seconds until the
indicator lamp in the SOS button is flashing.
The message
Connecting Call appears in
the multifunction display.
As an alternative, you may unlock the vehicle
via Internet in the “My Tele Aid” section of
“Owner’s Online”, using your ID and password
(USA only).
i The remote door unlock feature is
available if the relevant cellular phone
network is available.
The SOS button will flash and the message
Connecting Call will appear in the
multifunction display to indicate receipt of
the door unlock command.
If the tailgate recessed handle was pulled
for more than 20 seconds before door
unlock authorization was received by the
Customer Assistance Center, you must
wait 15 minutes before pulling the tailgate
recessed handle again.
Stolen Vehicle Recovery Services In the event your vehicle was stolen:
X
Report the incident to the police.
The police will issue a numbered incident
report.
X Pass this number on to the Customer
Assistance Center along with your
password.
The Customer Assistance Center will then
attempt to covertly contact the vehicle’s
Tele Aid system. Once the vehicle is
located, the Customer Assistance Center
will contact the local law enforcement and
you. The vehicle’s location will only be
provided to law enforcement.
i If the anti-theft alarm stays on for more
than 30 seconds, the Tele Aid system will
notify the Customer Assistance Center
automatically. Garage door opener
The integrated remote control can operate up
to three separately controlled devices
compatible with HomeLink ®
or some other
systems. G
Warning!
Before programming the integrated remote
control to a garage door opener or gate
operator, make sure people and objects are
out of the way of the device to prevent
potential harm or damage. When
programming a garage door opener, the door
moves up or down. When programming a gate
operator, the gate opens or closes.
Do not use the integrated remote control with
any garage door opener that lacks safety stop
and reverse features as required by U.S.
federal safety standards (this includes any
garage door opener model manufactured
before April 1, 1982). A garage door that
cannot detect an object - signaling the door
to stop and reverse - does not meet current
U.S. federal safety standards.
When programming a garage door opener,
park vehicle outside the garage.
Do not run the engine while programming the
integrated remote control. Inhalation of
exhaust gas is hazardous to your health. All
exhaust gas contains carbon monoxide (CO),
and inhaling it can cause unconsciousness
and possible death. Interior rear view mirror with integrated remote
control Useful features
169Controls in detail
219_AKB; 4; 54, en-US
d2ureepe, Version: 2.11.8.1 2009-05-11T16:21:02+02:00 - Seite 169 Z
Page 220 of 308

Corrosion protection, such as MB
Anticorrosion Wax should be applied to the
engine compartment after every engine
cleaning. Before applying, all control linkage
bushings
and joints should be lubricated. The
poly-V-belt and all pulleys should be
protected from any wax.
Vehicle washing In the winter, thoroughly remove all traces of
road salt as soon as possible.
When
washing the vehicle underbody, do not
forget to clean the inner sides of the wheels.
i Vehicles with KEYLESS-GO:
If a door handle is hit by a strong jet of
water, and a SmartKey is within
approximately 3 ft (1 m) of the vehicle, it
could be inadvertently locked or unlocked.
Hand-wash
X Do not use hot water or wash your vehicle
in direct sunlight.
X Only use a soft, wet cloth or sponge to
clean the vehicle.
X Only use a mild vehicle wash detergent,
such as Mercedes-Benz approved Car
Shampoo.
X Thoroughly spray the vehicle with a
diffused jet of water.
X Do not spray directly towards the
ventilation intake.
X Use plenty of water and rinse the sponge
and chamois frequently.
X Rinse with clean water and dry with a
chamois thoroughly.
Do not allow cleaning agents to dry on the
finish.
Automatic car wash
You can have your vehicle washed in an
automatic
car wash from the start. Brushless
car washes are preferable.
X To protect the filter system, activate the air
recirculation mode using button g on
the climate control panel. !
Do
not clean your vehicle in an automatic
touchless car wash which uses caustic
spray. Caustic spray will damage the paint
or ornamental moldings.
If the vehicle is very dirty, prewash it before
running it through the automatic car wash.
! Make sure the combination switch is set
to wiper setting $. Otherwise, the rain
sensor could activate and cause the wipers
to move unintentionally. This may lead to
vehicle damage.
Due to the width of the vehicle, fold in
exterior rear view mirrors prior to running
the vehicle through an automatic car wash
to prevent damage to the mirrors.
X When taking the vehicle through an
automatic conveyor-type car wash:
Make sure the automatic transmission
remains in neutral position N.
When leaving the automatic car wash, make
sure the mirrors are folded out.
After running the vehicle through an
automatic car wash, wipe any wax off of the
windshield and the wiper blade inserts. This
will prevent smears and reduce wiping noise
which can be caused by residual wax on the
windshield.
Ornamental moldings X
For regular cleaning and care of ornamental
moldings, use a damp cloth.
! Do
not use chrome cleaner on ornamental
moldings. Although ornamental moldings
may have chrome appearance, they could
be made of anodized aluminum that will be
damaged when cleaned with chrome
cleaner. Instead, use a damp cloth to clean
those ornamental moldings.
For very dirty ornamental moldings of
which you are sure are chrome-plated, use
a chrome cleaner. If in doubt whether an
ornamental molding is chrome-plated,
contact an authorized Mercedes-Benz
Center. 218
Vehicle care
Operation
219_AKB; 4; 54, en-US
d2ureepe,
Version: 2.11.8.1 2009-05-11T16:21:02+02:00 - Seite 218
Page 252 of 308

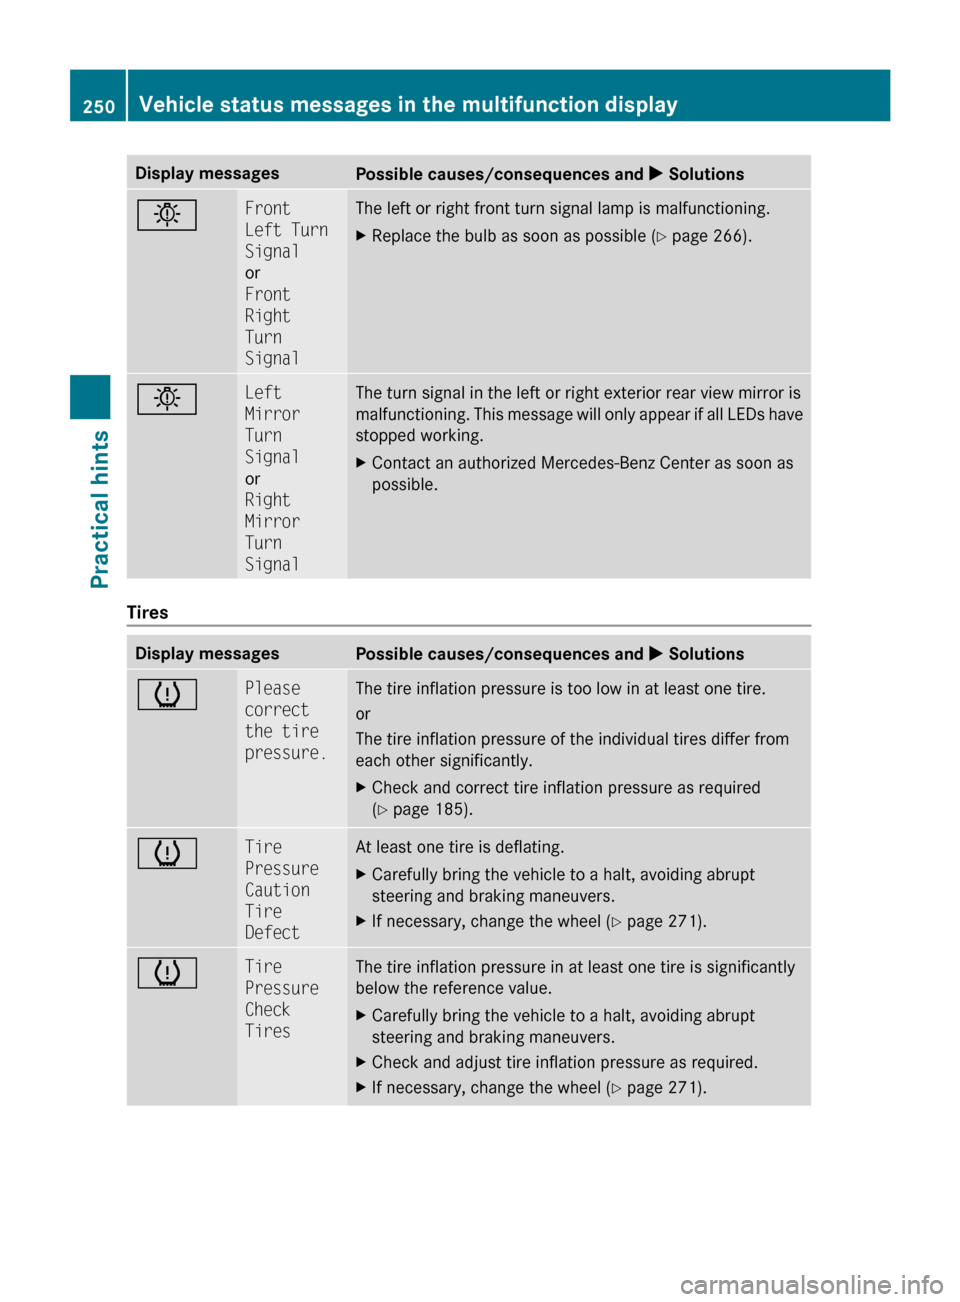
Display messages
Possible causes/consequences and
X Solutionsb Front
Left Turn
Signal
or
Front
Right
Turn
Signal The left or right front turn signal lamp is malfunctioning.
X
Replace the bulb as soon as possible (Y page 266). b Left
Mirror
Turn
Signal
or
Right
Mirror
Turn
Signal The turn signal in the left or right exterior rear view mirror is
malfunctioning.
This message will only appear if all LEDs have
stopped working.
X Contact an authorized Mercedes-Benz Center as soon as
possible. Tires
Display messages
Possible causes/consequences and
X Solutionsh Please
correct
the tire
pressure. The tire inflation pressure is too low in at least one tire.
or
The tire inflation pressure of the individual tires differ from
each other significantly.
X
Check and correct tire inflation pressure as required
(Y page 185). h Tire
Pressure
Caution
Tire
Defect At least one tire is deflating.
X
Carefully bring the vehicle to a halt, avoiding abrupt
steering and braking maneuvers.
X If necessary, change the wheel (Y page 271). h Tire
Pressure
Check
Tires The tire inflation pressure in at least one tire is significantly
below the reference value.
X
Carefully bring the vehicle to a halt, avoiding abrupt
steering and braking maneuvers.
X Check and adjust tire inflation pressure as required.
X If necessary, change the wheel (Y page 271). 250
Vehicle status messages in the multifunction display
Practical hints
219_AKB; 4; 54, en-US
d2ureepe,
Version: 2.11.8.1 2009-05-11T16:21:02+02:00 - Seite 250
Page 292 of 308

Vehicle specification CLS 550
(219.372)
The quoted data apply only to the standard
vehicle. Contact an authorized Mercedes-
Benz
Center for the corresponding data of all
special bodies and special equipment. Engine CLS 550
Engine, type
273
Mode of operation
4-stroke engine,
gasoline injection No. of cylinders
8
Bore
3.86 in (98.00 mm)
Stroke
3.56 in (90.50 mm)
Total piston
displacement
333.2 cu in
(5 461 cm 3
) Compression
ratio
10.7:1
Output acc. to
SAE J 1349
16 382 hp/6
000 rpm
(285 kW/6 000 rpm) Maximum torque
acc.
to SAE J 1349 391 lb-ft/
2 800 - 4 800 rpm
(530 Nm/
2 800 - 4 800 rpm) Maximum engine
speed
6 500 rpm
Firing order
1-5-4-2-6-3-7-8
Poly-V-belt
2 398 mm
Electrical system CLS 550
Alternator
14 V/180 A
Starter motor
12 V/1.7 kW
Battery
12 V/100 Ah Electrical system CLS 550
Spark plugs, type
Bosch F8 DPP 332U
NGK PFR 5R-11
Spark plugs,
electrode gap
0.039 in (1.0 mm)
Spark plugs,
tightening torque
18 - 22 lb-ft
(25 - 30 Nm) Main dimensions CLS 550
Overall vehicle
length
193.7 in (4
920 mm) Overall vehicle
width
17 83.0 in (2
107 mm) Overall vehicle
height
55.7 in (1
414 mm) Wheelbase
112.4 in (2
854 mm) Track, front
62.5 in (1
587 mm) Track, rear
61.8 in (1
570 mm) Turning circle
36.8 ft (11.2 m)
Weights CLS 550
Roof load
max. 220 lb (100 kg)
Trunk load
max. 220 lb (100 kg)
Vehicle specification CLS 63 AMG
(219.377)
The quoted data apply only to the standard
vehicle. Contact an authorized Mercedes-
Benz
Center for the corresponding data of all
special bodies and special equipment.
16 Premium fuel required. Performance may vary with fuel octane rating.
17 Exterior rear view mirrors folded out. 290
Vehicle specification CLS 63 AMG (219.377)
Technical data
219_AKB; 4; 54, en-US
d2ureepe,
Version: 2.11.8.1 2009-05-11T16:21:02+02:00 - Seite 290
Page 293 of 308

Engine CLS 63 AMG
Engine, type
156
Mode of operation
4-stroke engine,
gasoline injection No. of cylinders
8
Bore
4.02 in (102.20 mm)
Stroke
3.72 in (94.60 mm)
Total piston
displacement
378.8 cu in
(6 208 cm 3
) Compression
ratio
11.3:1
Output acc. to
SAE J 1349
18 507 hp/6
800 rpm
(378 kW/6 800 rpm) Maximum torque
acc.
to SAE J 1349 465 lb-ft/5
200 rpm
(630 Nm/5 200 rpm) Maximum engine
speed
7 200 rpm
Firing order
1-5-4-2-6-3-7-8
Poly-V-belt
2 360 mm
Electrical system CLS 63 AMG
Alternator
14 V/180 A
Starter motor
12 V/2.1 kW
Battery
12 V/95 Ah
Spark plugs, type
NGK ILZKAR 7A10
Spark plugs,
electrode gap
0.039 in (1.0 mm)
Spark plugs,
tightening torque
15 - 18 lb-ft
(20 - 25 Nm) Main dimensions CLS 63 AMG
Overall vehicle
length
193.5 in (4
915 mm) Overall vehicle
width
19 83.0 in (2
107 mm) Overall vehicle
height
54.7 in (1
389 mm) Wheelbase
112.4 in (2
854 mm) Track, front
63.0 in (1
599 mm) Track, rear
62.3 in (1
583 mm) Turning circle
37.7 ft (11.5 m)
Weights CLS 63 AMG
Roof load
max. 220 lb (100 kg)
Trunk load
max. 220 lb (100 kg)
Rims and tires
Notes
! Only
use tires which have been tested and
approved by Mercedes-Benz. Tires
approved by Mercedes-Benz are developed
to provide best possible performance in
conjunction with the driving safety systems
on your vehicle such as the ABS or the
ESP ®
. Tires specially developed for your
vehicle and tested and approved by
Mercedes-Benz can be identified by finding
the following on the tire’s sidewall:
R MO = Mercedes-Benz Original
equipment tires
R MOE
= Mercedes-Benz Original Extended
(tires with limited run-flat
characteristics) original equipment tires
Using tires other than those approved by
Mercedes-Benz may result in damage that
18 Premium fuel required. Performance may vary with fuel octane rating.
19 Exterior rear view mirrors folded out. Rims and tires
291
Technical data
219_AKB; 4; 54, en-US
d2ureepe, Version: 2.11.8.1 2009-05-11T16:21:02+02:00 - Seite 291 Z