2010 MERCEDES-BENZ CLS63AMG light
[x] Cancel search: lightPage 35 of 308
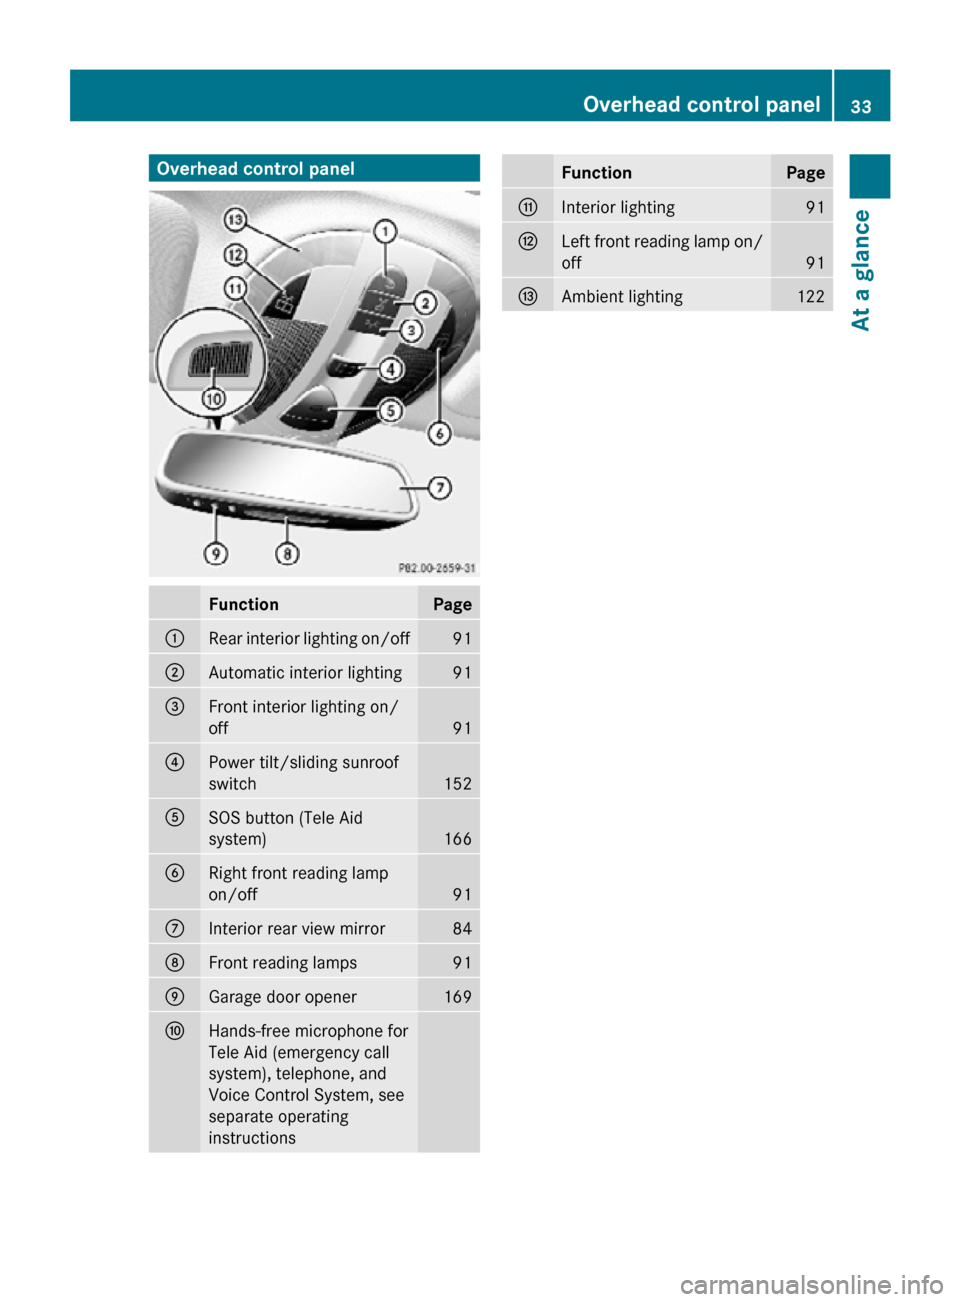
Overhead control panel
Function Page
:
Rear interior lighting on/off 91
;
Automatic interior lighting 91
=
Front interior lighting on/
off
91
?
Power tilt/sliding sunroof
switch
152
A
SOS button (Tele Aid
system)
166
B
Right front reading lamp
on/off
91
C
Interior rear view mirror 84
D
Front reading lamps 91
E
Garage door opener 169
F
Hands-free microphone for
Tele Aid (emergency call
system), telephone, and
Voice Control System, see
separate operating
instructions Function Page
G
Interior lighting 91
H
Left front reading lamp on/
off
91
I
Ambient lighting 122Overhead control panel
33At a glance
219_AKB; 4; 54, en-US
d2ureepe, Version: 2.11.8.1 2009-05-11T16:21:02+02:00 - Seite 33 Z
Page 42 of 308
followed. These instructions are available
from any authorized Mercedes-Benz
Center.
R Given the considerable deployment speed,
required inflation volume, and the material
of the air bags, there is the possibility of
abrasions or other, potentially more serious
injuries resulting from air bag deployment.
If you sell your vehicle, we strongly
recommend that you inform the subsequent
owner that the vehicle is equipped with SRS.
Also refer them to the applicable section in
the Operator’s Manual.
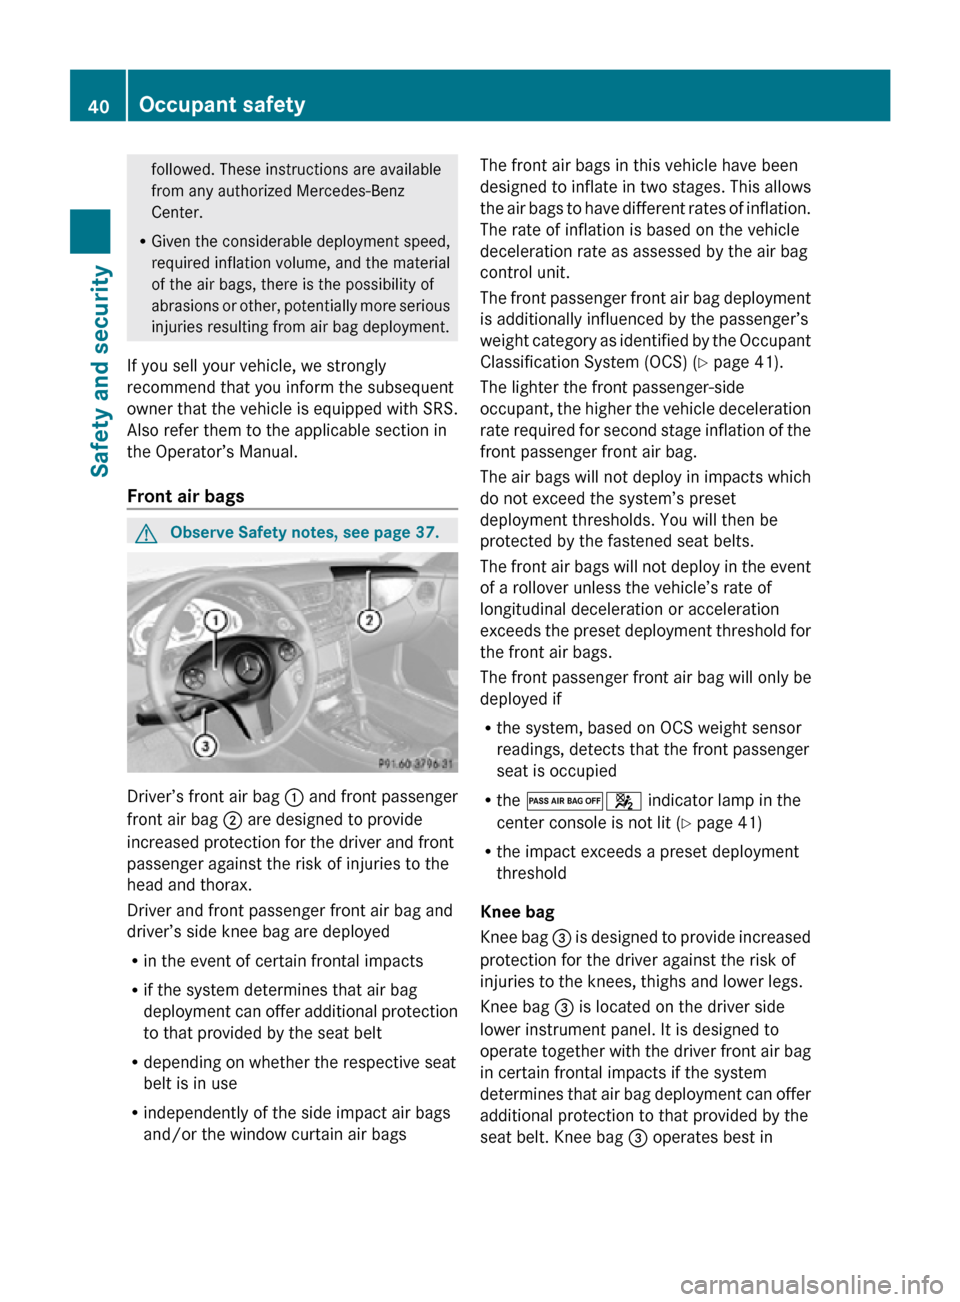
Front air bags G
Observe Safety notes, see page 37. Driver’s front air bag
: and front passenger
front air bag ; are designed to provide
increased protection for the driver and front
passenger against the risk of injuries to the
head and thorax.
Driver and front passenger front air bag and
driver’s side knee bag are deployed
R in the event of certain frontal impacts
R if the system determines that air bag
deployment can offer additional protection
to that provided by the seat belt
R depending on whether the respective seat
belt is in use
R independently of the side impact air bags
and/or the window curtain air bags The front air bags in this vehicle have been
designed to inflate in two stages. This allows
the air bags to have different rates of inflation.
The rate of inflation is based on the vehicle
deceleration rate as assessed by the air bag
control unit.
The front passenger front air bag deployment
is additionally influenced by the passenger’s
weight category as identified by the Occupant
Classification System (OCS) (
Y page 41).
The lighter the front passenger-side
occupant, the higher the vehicle deceleration
rate required for second stage inflation of the
front passenger front air bag.
The air bags will not deploy in impacts which
do not exceed the system’s preset
deployment thresholds. You will then be
protected by the fastened seat belts.
The front air bags will not deploy in the event
of a rollover unless the vehicle’s rate of
longitudinal deceleration or acceleration
exceeds the preset deployment threshold for
the front air bags.
The front passenger front air bag will only be
deployed if
R the system, based on OCS weight sensor
readings, detects that the front passenger
seat is occupied
R the 04 indicator lamp in the
center console is not lit (Y page 41)
R the impact exceeds a preset deployment
threshold
Knee bag
Knee bag = is designed to provide increased
protection for the driver against the risk of
injuries to the knees, thighs and lower legs.
Knee bag = is located on the driver side
lower instrument panel. It is designed to
operate together with the driver front air bag
in certain frontal impacts if the system
determines that air bag deployment can offer
additional protection to that provided by the
seat belt. Knee bag = operates best in 40
Occupant safetySafety and security
219_AKB; 4; 54, en-US
d2ureepe,
Version: 2.11.8.1 2009-05-11T16:21:02+02:00 - Seite 40
Page 52 of 308
The PRE-SAFE
®
system takes preventive
measures to better protect the occupants
from
the possibility of personal injuries in the
following hazardous situations:
R emergency braking situations, e.g. if the
Brake Assist System (BAS) ( Y page 59) is
activated
R critical dynamic driving situations, e.g.
when the vehicle has been caused to
understeer or oversteer because it has
exceeded its physical limitations or in case
of evasive steering maneuvers at speeds
above approximately 85 mph (140 km/h)
The PRE-SAFE ®
system takes the following
measures when it is activated:
R The front seat belts are pre-tensioned
automatically.
R If the front passenger seat is in an
unfavorable position, the seat will be
adjusted to a position that seeks to better
protect the occupant.
R If the vehicle is in a critical dynamic driving
situation, the door windows and the tilt/
sliding sunroof also closes, except for a
minimal gap that remains open.
If the closing procedure of any of these
elements is blocked, it will stop and open
slightly.
Once the hazardous situation no longer exists
and an accident has been avoided, the seat
belt pre-tensioning is deactivated. All of the
PRE-SAFE ®
system settings can be re-
adjusted following the critical driving event.
If the seat belts do not release:
X Adjust the seat backrest or seat slightly to
the rear until the seat belt tension is
reduced.
The locking mechanism releases.
! When moving the seats, make sure there
are no items in the footwell or behind the
seats. Otherwise, you could damage the
seats and/or the items. NECK-PRO active front head
restraints
The NECK-PRO active front head restraints
are intended to offer the driver and front
passenger increased protection from
whiplash-type injuries. In the event of a rear-
end
collision, the NECK-PRO active front head
restraints on the front seats are designed to
move forward in the direction of travel. They
thus provide the head with increased support
earlier on in the collision sequence. The
NECK-PRO active front head restraints will
move forward whether the seats are occupied
or not. G
Warning!
Do not attach any objects (e.g. hangers) to the
head restraint posts. Otherwise, the NECK-
PRO active front head restraints may not be
able
to function properly or offer the intended
degree of protection they were designed for
in the event of a rear-end collision. G
Warning!
Only use seat or head restraint covers which
have
been tested and approved by Mercedes-
Benz for your vehicle model.
Using other seat or head restraint covers may
interfere with or prevent the activation of the
NECK-PRO active front head restraints and/
or the deployment of the front side impact air
bags.
Contact an authorized Mercedes-Benz Center
for availability.
When the NECK-PRO active front head
restraints have been triggered in an accident,
the NECK-PRO active front head restraints
must be reset. Otherwise, the NECK-PRO
active front head restraints cannot offer any
additional protection in the event of another
rear-end collision.
For information on resetting the activated
NECK-PRO active front head restraints, see
“Resetting activated head restraints”
(Y page 264). 50
Occupant safety
Safety and security
219_AKB; 4; 54, en-US
d2ureepe,
Version: 2.11.8.1 2009-05-11T16:21:02+02:00 - Seite 50
Page 53 of 308
You cannot remove the NECK-PRO active
front head restraints.
G
Warning!
For your protection, drive only with properly
positioned head restraints.
Adjust the head restraint so that it is as close
to the head as possible and the center of the
head restraint supports the back of the head
at eye level. This will reduce the potential for
injury to the head and neck in the event of an
accident or similar situation.
For information on head restraint adjustment,
see “Head restraint height” ( Y page 79), or
see “Head restraint fore and aft adjustment”
(Y page 79). Correct driver seat adjustment
G
Warning!
In order to avoid possible loss of vehicle
control the following must be done before the
vehicle is put into motion:
R seat adjustment
R head restraint adjustment
R steering wheel adjustment
R rear view mirror adjustment
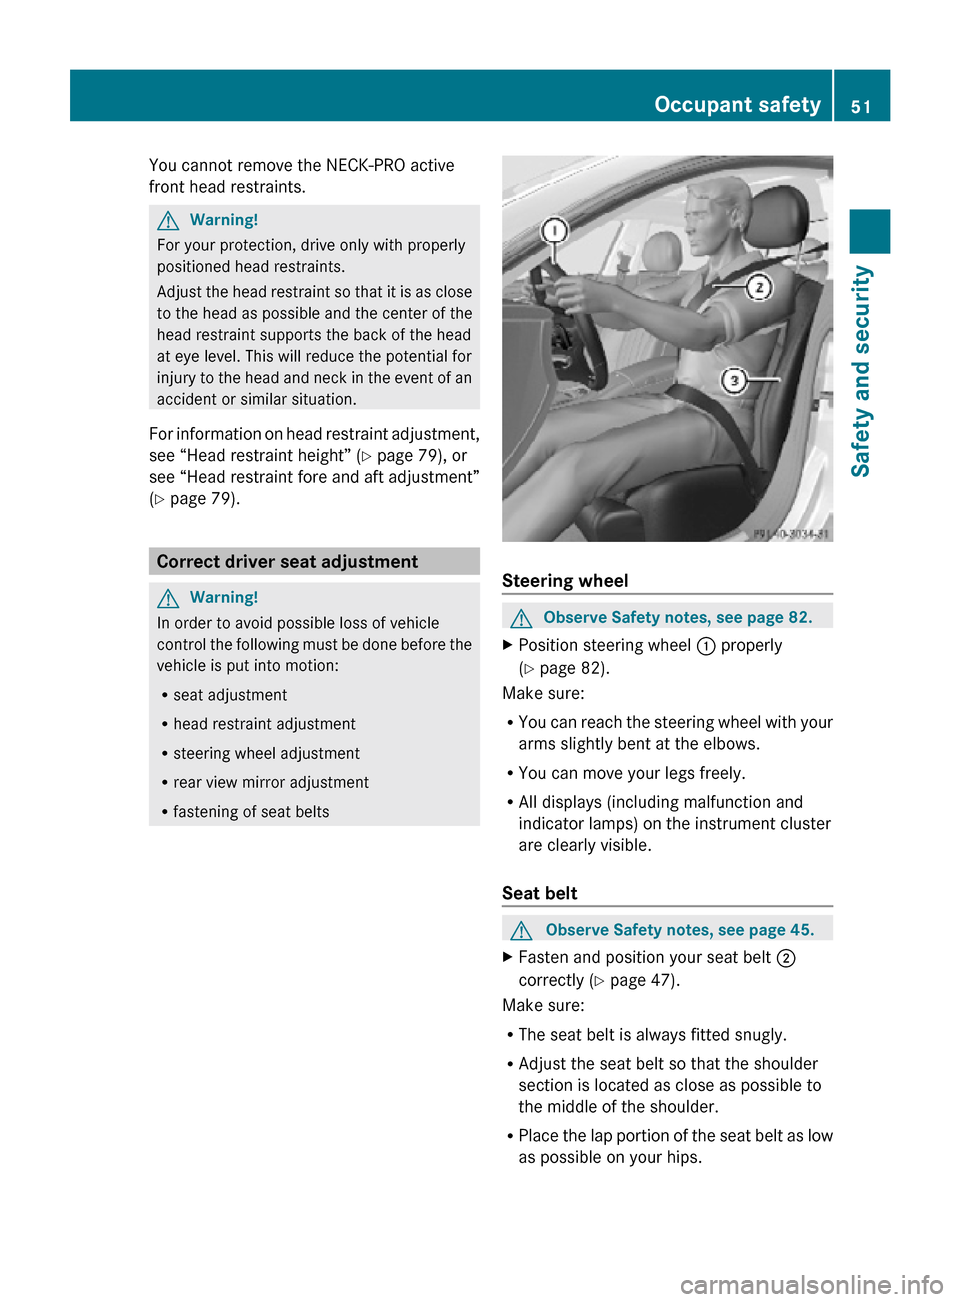
R fastening of seat belts Steering wheel
G
Observe Safety notes, see page 82.
X Position steering wheel : properly
(Y page 82).
Make sure:
R You can reach the steering wheel with your
arms slightly bent at the elbows.
R You can move your legs freely.
R All displays (including malfunction and
indicator lamps) on the instrument cluster
are clearly visible.
Seat belt G
Observe Safety notes, see page 45.
X Fasten and position your seat belt ;
correctly (Y page 47).
Make sure:
R The seat belt is always fitted snugly.
R Adjust the seat belt so that the shoulder
section is located as close as possible to
the middle of the shoulder.
R Place the lap portion of the seat belt as low
as possible on your hips. Occupant safety
51Safety and security
219_AKB; 4; 54, en-US
d2ureepe, Version: 2.11.8.1 2009-05-11T16:21:02+02:00 - Seite 51 Z
Page 54 of 308
Seat and head restraint
G
Observe Safety notes, see page 77.
X Position seat = and head restraint
properly. See ( Y page 78) for seat and
head restraint adjustment.
Observe the following points:
R Always be in a properly seated position.
R The
position should be as far rearward from
the front air bag in the steering wheel as
possible, while still permitting proper
operation of vehicle controls.
R Adjust the seat to a comfortable seating
position that still allows you to reach the
accelerator/brake pedal safely.
R The seat must be adjusted so that you can
correctly fasten and position your seat belt.
R The seat backrest must be in a position that
is as nearly upright as possible.
R Adjust the seat cushion so that the front
edge of the seat cushion lightly supports
your legs.
R Adjust the head restraint so that it is as
close to the head as possible and the
center of the head restraint supports the
back of the head at eye level.
R Never place hands under the seat or near
any moving parts while the seat is being
adjusted. Children in the vehicle
Safety notes If an infant or child is traveling with you in the
vehicle:
X
Secure the child using an infant or child
restraint
appropriate to the age and size of
the child.
X Make sure the infant or child is properly
secured at all times while the vehicle is in
motion. G
Warning!
When leaving the vehicle, always remove the
SmartKey from the starter switch. Always
take the SmartKey with you and lock the
vehicle. Do not leave children unattended in
the
vehicle, even if they are secured in a child
restraint system, or with access to an
unlocked vehicle. A child’s unsupervised
access to a vehicle could result in an accident
and/or serious personal injury. The children
could
R injure themselves on parts of the vehicle
R be seriously or fatally injured through
excessive exposure to extreme heat or cold
R injure themselves or cause an accident with
vehicle equipment that can be operated
even if the SmartKey is removed from the
starter switch or removed from the vehicle,
such as seat adjustment, steering wheel
adjustment, or the memory function
If children open a door, they could injure other
persons or get out of the vehicle and injure
themselves or be injured by following traffic.
Do not expose the child restraint system to
direct sunlight. The child restraint system’s
metal parts, for example, could become very
hot, and the child could be burned by these
parts. G
Warning!
Do not carry heavy or hard objects in the
passenger compartment unless they are
firmly secured in place.
Unsecured or improperly positioned cargo
increases a child’s risk of injury in the event
of
R strong braking maneuvers
R sudden changes of direction
R an accident 52
Occupant safety
Safety and security
219_AKB; 4; 54, en-US
d2ureepe,
Version: 2.11.8.1 2009-05-11T16:21:02+02:00 - Seite 52
Page 60 of 308
achieved with winter tires, or snow chains
as required.
Safety notes G
Warning!
The following factors increase the risk of
accidents:
R Excessive speed, especially in turns
R Wet and slippery road surfaces
R Following another vehicle too closely
The driving safety systems described in this
section cannot reduce these risks or prevent
the
natural laws of physics from acting on the
vehicle. They cannot increase braking or
steering efficiency beyond that afforded by
the condition of the vehicle brakes and tires
or the traction afforded.
Only a safe, attentive, and skillful driver can
prevent accidents.
The capabilities of a vehicle equipped with the
driving safety systems described in this
section must never be exploited in a reckless
or dangerous manner which could jeopardize
the user’s safety or the safety of others.
Always adjust your driving style to the
prevailing road and weather conditions and
keep a safe distance to other road users and
objects on the street.
If a driving system malfunctions, other driving
safety systems may also switch off. Observe
indicator and warning lamps that may come
on as well as messages in the multifunction
display that may appear. ABS
G
Observe Safety notes, see page 58. G
Warning!
Do not pump the brake pedal. Use firm, steady
brake pedal pressure instead. Pumping the
brake pedal defeats the purpose of the ABS and significantly reduces braking
effectiveness.
The Antilock Brake System (ABS) regulates
the
brake pressure so that the wheels do not
lock during braking. This allows you to
maintain the ability to steer your vehicle.
The ABS is functional above a speed of
approximately 5 mph (8 km/h) independent
of road surface conditions.
On slippery road surfaces, the ABS will
respond even to light brake pressure.
The ABS indicator lamp ! in the
instrument cluster comes on when you switch
on the ignition. It goes out when the engine
is running.
Braking At the instant one of the wheels is about to
lock up, a slight pulsation can be felt in the
brake pedal. The pulsation indicates that the
ABS is in the regulating mode.
X
Keep firm and steady pressure on the brake
pedal while you feel the pulsation.
Continuous, steady brake pedal pressure
yields the advantages provided by the ABS,
namely
braking power and the ability to steer
the vehicle.
The pulsating brake pedal can be an
indication of hazardous road conditions and
functions as a reminder to take extra care
while driving.
Emergency brake maneuver X
Keep continuous full pressure on the brake
pedal. G
Warning!
If the ABS malfunctions, other driving safety
systems
such as the BAS or the ESP ®
are also
switched off. Observe indicator and warning
lamps that may come on as well as messages
in the multifunction display that may appear. 58
Driving safety systems
Safety and security
219_AKB; 4; 54, en-US
d2ureepe,
Version: 2.11.8.1 2009-05-11T16:21:02+02:00 - Seite 58
Page 67 of 308
Vehicle equipment ..............................
66
Locking and unlocking .......................66
Starter switch positions ..................... 76
Seats .................................................... 77
Multifunction steering wheel .............82
Mirrors ................................................. 84
Memory function ................................. 85
Lighting ................................................ 86
Wipers .................................................. 92
Power windows ................................... 94
Driving and parking ............................ 96
Automatic transmission ................... 101
Instrument cluster ............................108
Control system .................................. 110
Driving systems ................................ 127
Climate control system ....................143
Rear window defroster ..................... 151
Power tilt/sliding sunroof ...............152
Loading and storing ..........................154
Useful features ................................. 160 65Controls in detail
219_AKB; 4; 54, en-US
d2ureepe,
Version: 2.11.8.1 2009-05-11T16:21:02+02:00 - Seite 65
Page 68 of 308
Vehicle equipment
i This Operator’s Manual describes all
features, standard or optional, potentially
available for your vehicle at the time of
purchase. Please be aware that your
vehicle might not be equipped with all
features described in this manual. Locking and unlocking
Notes
G
Observe Safety notes, see page 52.
When unlocking or locking the vehicle with
the SmartKey an acoustic signal sounds. The
acoustic signal is activated at the factory. If
you wish to deactivate the feature, or adjust
its signal volume, contact an authorized
Mercedes-Benz Center.
When unlocking the vehicle, all turn signal
lamps flash once. An acoustic signal sounds
once, and the locking knobs in the doors
move up. The anti-theft alarm system is
disarmed.
When locking the vehicle, all turn signal lamps
flash three times. An acoustic signal sounds
three times, and the locking knobs in the
doors move down. The anti-theft alarm
system is armed.
All doors and the trunk must be closed.
If you cannot lock or unlock the vehicle with
the SmartKey, the batteries in the SmartKey
are discharged, the SmartKey is
malfunctioning, or the vehicle battery is
drained.
X Check the batteries in the SmartKey
(Y page 69) and replace them if
necessary.
X Use the mechanical key to unlock the
driver’s door and the trunk (Y page 261). X
Use the mechanical key to lock the vehicle
(Y page 262).
X Have the vehicle battery and the vehicle
battery connections checked at an
authorized Mercedes-Benz Center.
If the SmartKey is malfunctioning, contact
Roadside Assistance or an authorized
Mercedes-Benz Center. SmartKey
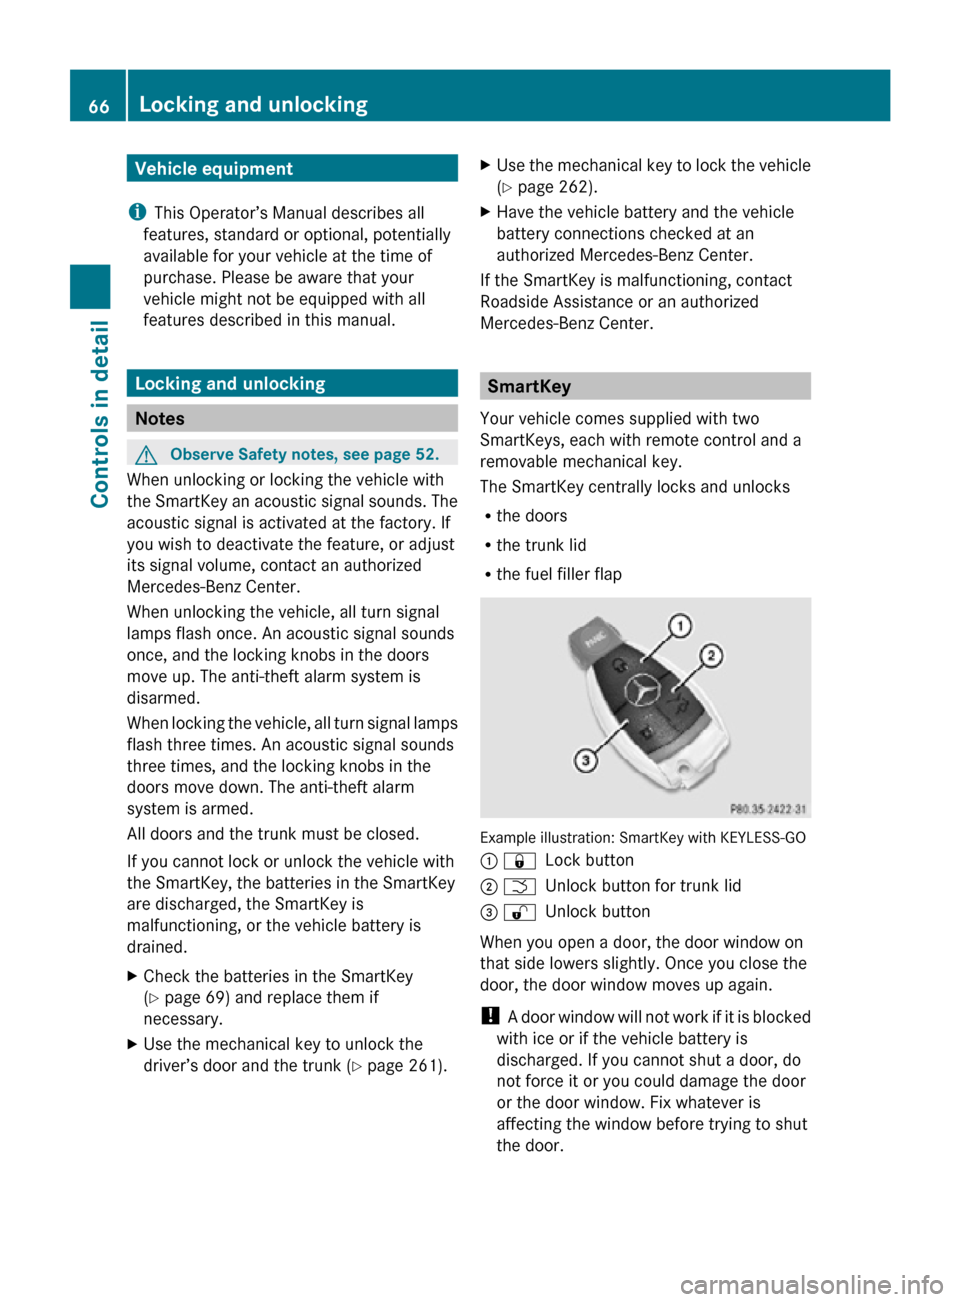
Your vehicle comes supplied with two
SmartKeys, each with remote control and a
removable mechanical key.
The SmartKey centrally locks and unlocks
R the doors
R the trunk lid
R the fuel filler flap Example illustration: SmartKey with KEYLESS-GO
: &
Lock button
; F Unlock button for trunk lid
= % Unlock button
When you open a door, the door window on
that side lowers slightly. Once you close the
door, the door window moves up again.
! A door window will not work if it is blocked
with ice or if the vehicle battery is
discharged. If you cannot shut a door, do
not force it or you could damage the door
or the door window. Fix whatever is
affecting the window before trying to shut
the door. 66
Locking and unlockingControls in detail
219_AKB; 4; 54, en-US
d2ureepe,
Version: 2.11.8.1 2009-05-11T16:21:02+02:00 - Seite 66