2010 MERCEDES-BENZ CLS550 steering wheel
[x] Cancel search: steering wheelPage 88 of 308
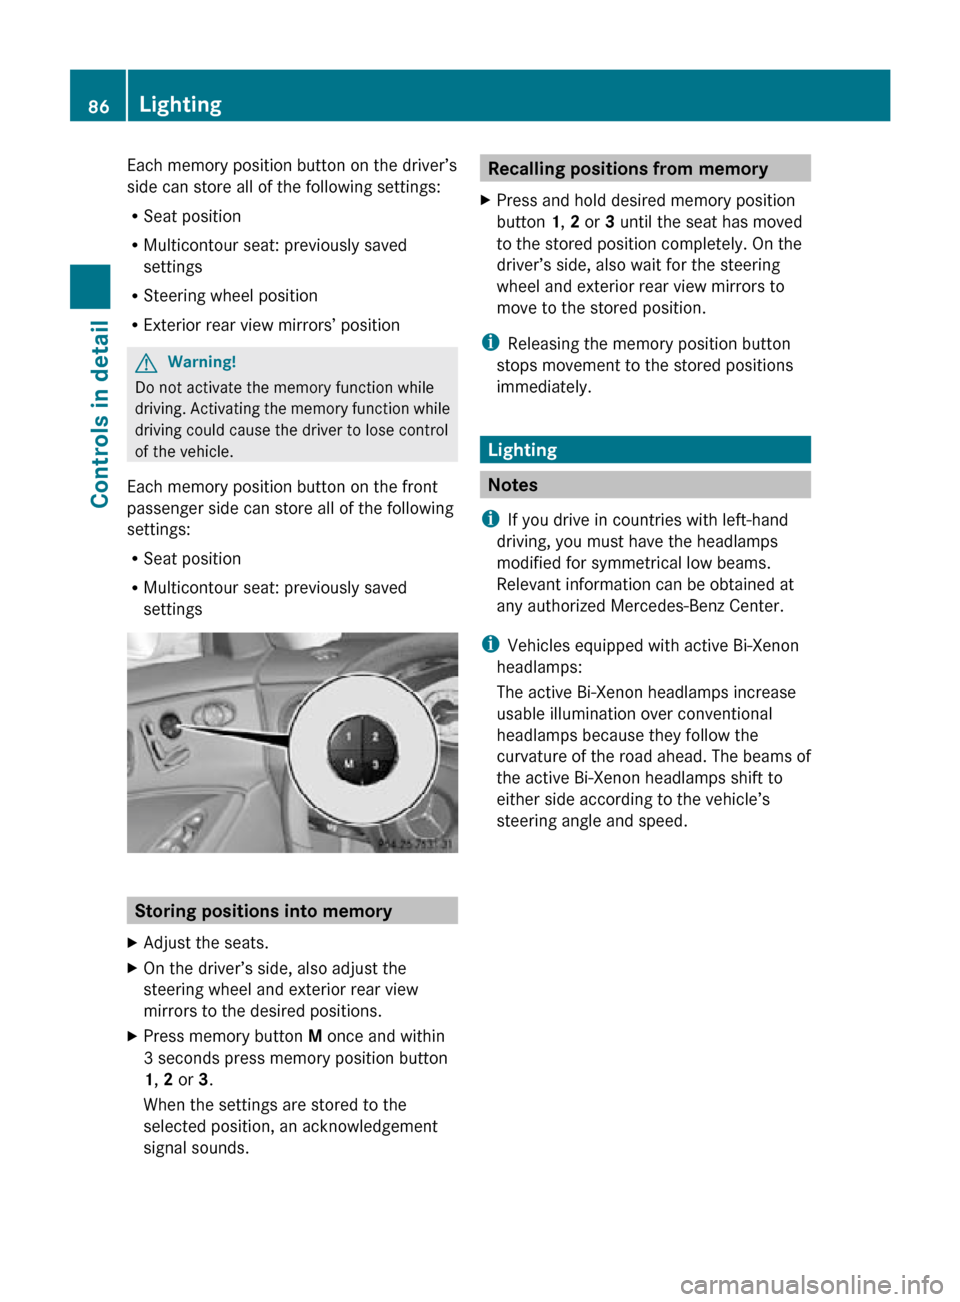
Each memory position button on the driver’s
side can store all of the following settings:
R
Seat position
R Multicontour seat: previously saved
settings
R Steering wheel position
R Exterior rear view mirrors’ position G
Warning!
Do not activate the memory function while
driving. Activating the memory function while
driving could cause the driver to lose control
of the vehicle.
Each memory position button on the front
passenger side can store all of the following
settings:
R Seat position
R Multicontour seat: previously saved
settings Storing positions into memory
X Adjust the seats.
X On the driver’s side, also adjust the
steering wheel and exterior rear view
mirrors to the desired positions.
X Press memory button M once and within
3 seconds press memory position button
1, 2 or 3.
When the settings are stored to the
selected position, an acknowledgement
signal sounds. Recalling positions from memory
X Press and hold desired memory position
button 1, 2 or 3 until the seat has moved
to the stored position completely. On the
driver’s side, also wait for the steering
wheel and exterior rear view mirrors to
move to the stored position.
i Releasing the memory position button
stops movement to the stored positions
immediately. Lighting
Notes
i If you drive in countries with left-hand
driving, you must have the headlamps
modified for symmetrical low beams.
Relevant information can be obtained at
any authorized Mercedes-Benz Center.
i Vehicles equipped with active Bi-Xenon
headlamps:
The active Bi-Xenon headlamps increase
usable illumination over conventional
headlamps because they follow the
curvature of the road ahead. The beams of
the active Bi-Xenon headlamps shift to
either side according to the vehicle’s
steering angle and speed. 86
LightingControls in detail
219_AKB; 4; 54, en-US
d2ureepe,
Version: 2.11.8.1 2009-05-11T16:21:02+02:00 - Seite 86
Page 91 of 308
USA only
You can only switch on the high-beam
headlamps in low ambient lighting conditions.
The high-beam flasher is available at all times.
X
For nighttime driving turn the exterior lamp
switch to position L or à to permit
activation of the high-beam headlamps.
When the engine is running, and you turn the
exterior lamp switch to position T or
L, the manual headlamp mode has
priority over the daytime running lamp mode.
The corresponding exterior lamps come on
(Y page 87).
Fog lamps Fog lamps cannot be switched on with the
exterior lamp switch in position Ã.
G
Warning!
In low ambient lighting or foggy conditions,
only switch from position à to L with
the vehicle at a standstill in a safe location.
Switching from à to L will briefly
switch off the headlamps. Doing so while
driving in low ambient lighting conditions may
result in an accident.
Fog lamps will operate with the parking lamps
and/or the low-beam headlamps on. Fog
lamps should only be used in conjunction with
low-beam headlamps. Consult your State or
Province Motor Vehicle Regulations
regarding permissible lamp operation.
X Switch on the ignition.
X Turn the exterior lamp switch to position
T or L (Y page 87).
X Switching on front fog lamps: Pull out the
exterior lamp switch to first stop.
The green indicator lamp N in the
exterior lamp switch comes on. X
Switching on rear fog lamp: Pull out the
exterior lamp switch to second stop.
The rear fog lamp, the front fog lamps, the
green N and the yellow indicator lamp
R in the exterior lamp switch come on.
X Switching off front fog lamps/rear fog
lamp: Push in the exterior lamp switch to
its stop.
Locator lighting and night security
illumination Locator lighting and night security
illumination are described in the “Control
system” section, see “Switching locator
lighting on or off” (Y page 121) and
“Switching night security illumination
(Headlamps delayed shut-off feature) on or
off” (Y page 122). Combination switch
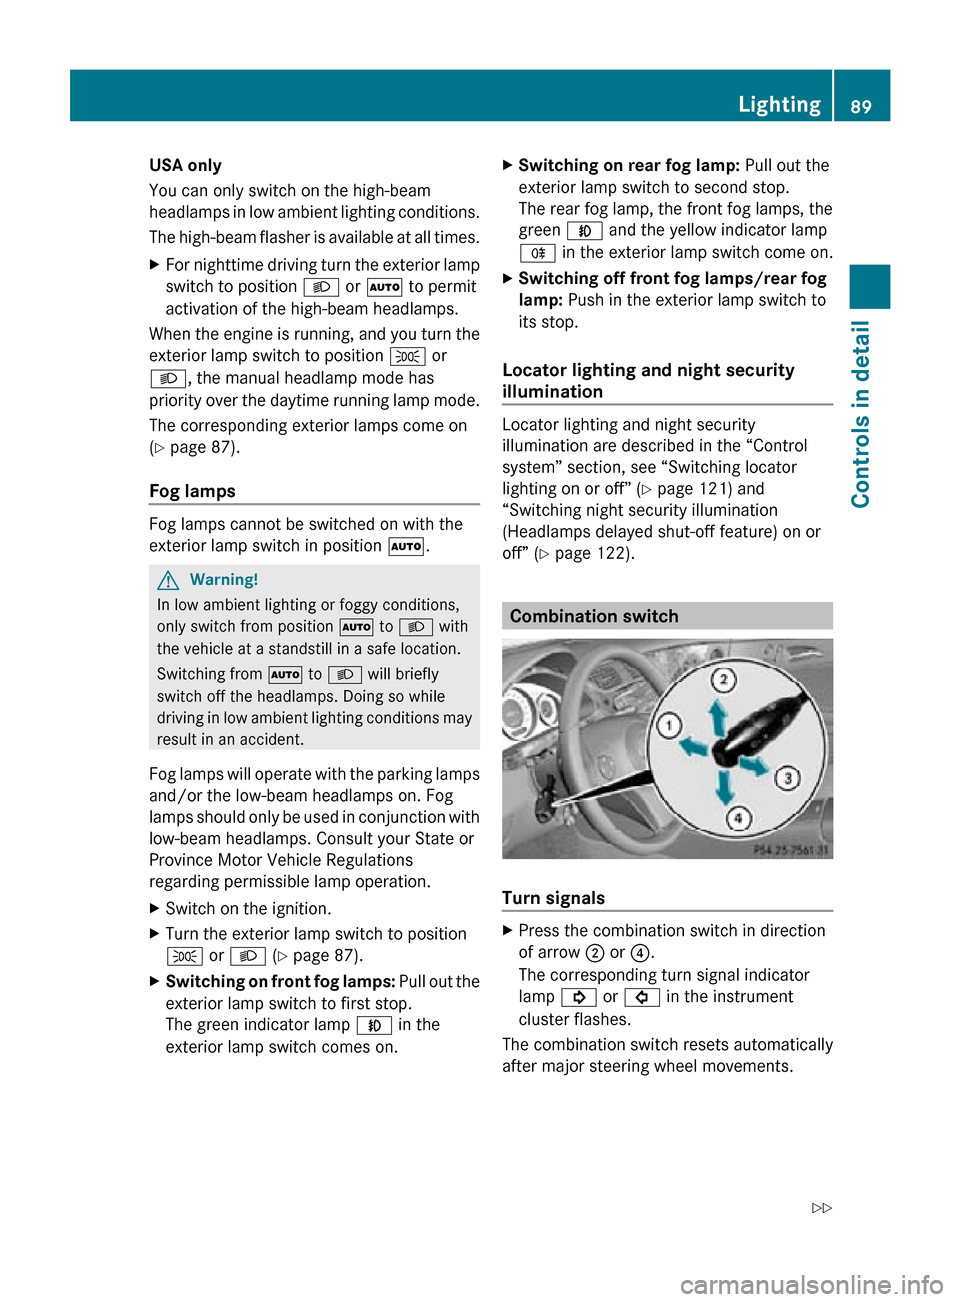
Turn signals
X
Press the combination switch in direction
of arrow ; or ?.
The corresponding turn signal indicator
lamp ! or # in the instrument
cluster flashes.
The combination switch resets automatically
after major steering wheel movements. Lighting
89Controls in detail
219_AKB; 4; 54, en-US
d2ureepe, Version: 2.11.8.1 2009-05-11T16:21:02+02:00 - Seite 89 Z
Page 93 of 308
Corner-illuminating front fog lamps
Corner-illuminating front fog lamps are not
available on vehicles with AMG Sport
Package and on CLS 63 AMG.
The corner-illuminating front fog lamps
improve illumination of the area in the
direction into which you are turning.
The corner-illuminating front fog lamps will
only operate
R in low ambient lighting conditions
R at vehicle speeds below 25 mph
(40 km/h)
R with the front fog lamps switched off
R when the engine is running
Switching on X
Turn the exterior lamp switch to position
L or Ã.
or
X Activate the daytime running lamp mode
(Y page 88).
X Switch on the left or right turn signal,
depending on whether you are turning left
or right.
The respective front fog lamp comes on. If
you have switched on the turn signal for
one side but turn the steering wheel in the
other direction, the corner-illuminating
front fog lamp on the side of the turn signal
comes on.
or
X Turn the steering wheel in the desired
direction.
Driving forward: The front fog lamp on the
side of your steering direction comes on.
Driving in reverse: The front fog lamp
opposite to your steering direction comes
on.
The corner-illuminating front fog lamps will
come on automatically depending on the
steering angle, even if you did not switch on
either turn signal. If the corner-illuminating
front fog lamps came on automatically, they will also go out automatically depending on
the steering angle and vehicle speed.
The corner-illuminating front fog lamps
temporarily come on on both sides of the
vehicle if you turn the steering wheel in one
direction and then again in the other direction
shortly thereafter.
The corner-illuminating front fog lamp
remains lit for a short time only. It then goes
out automatically.
Switching off
X
Switch off the left or right turn signal.
or
X Steer straight ahead.
i There may be a brief delay before the
corner-illuminating front fog lamps go out. Interior lighting in the front
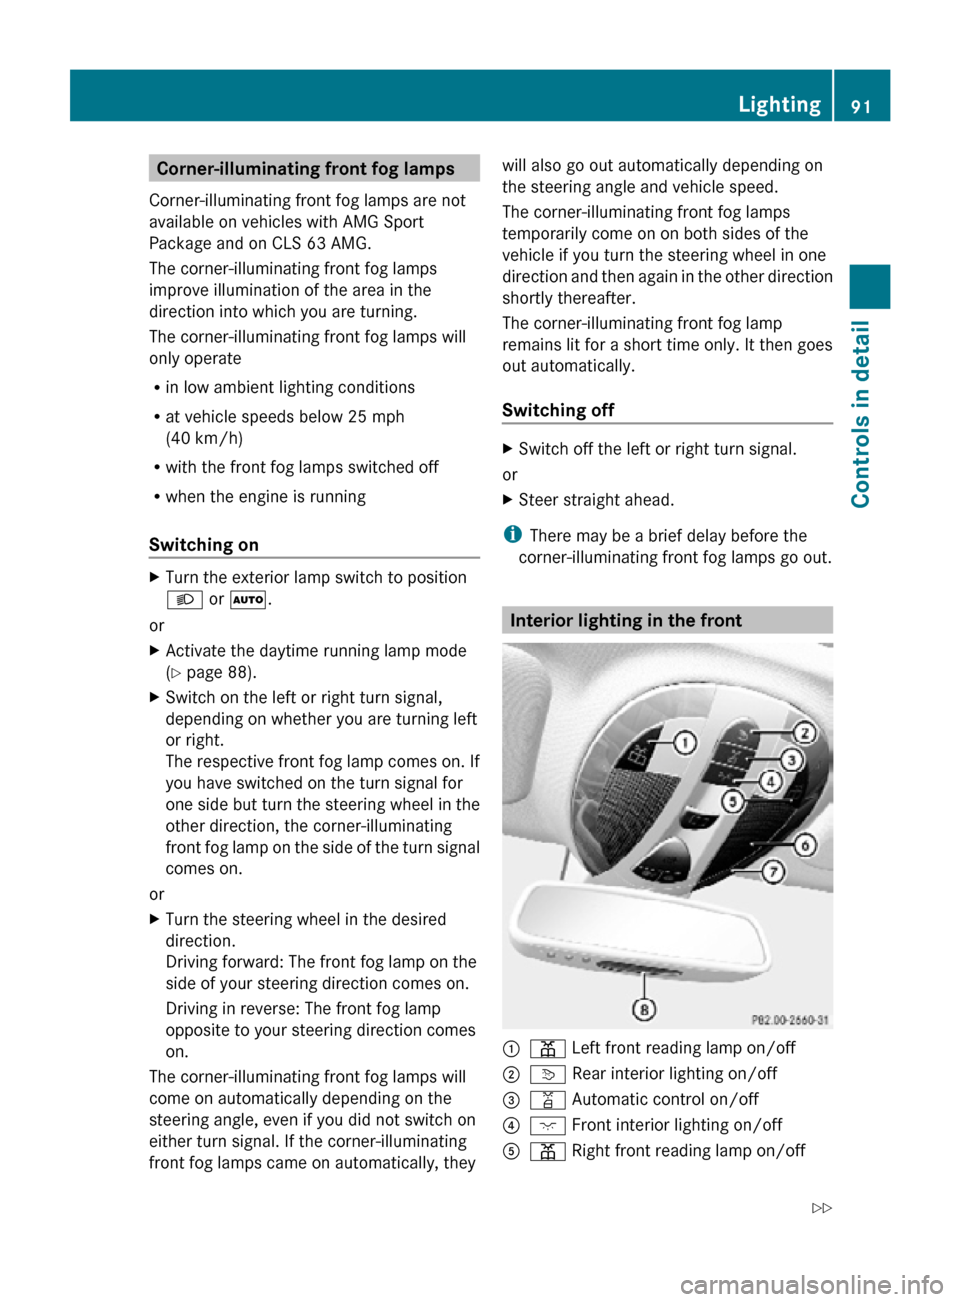
:
p Left front reading lamp on/off
; v Rear interior lighting on/off
= q Automatic control on/off
? c Front interior lighting on/off
A p Right front reading lamp on/off Lighting
91Controls in detail
219_AKB; 4; 54, en-US
d2ureepe, Version: 2.11.8.1 2009-05-11T16:21:02+02:00 - Seite 91 Z
Page 108 of 308
mode
C or S, you can limit or extend the gear
range using the gear selector lever or the
steering wheel gearshift control.
Steering wheel gearshift control is available
on vehicles with AMG Sport Package and on
CLS 63 AMG only.
CLS 63 AMG: For information on using the
gear selector lever or the steering wheel
gearshift control in manual program mode
M, see “Manual shift program”
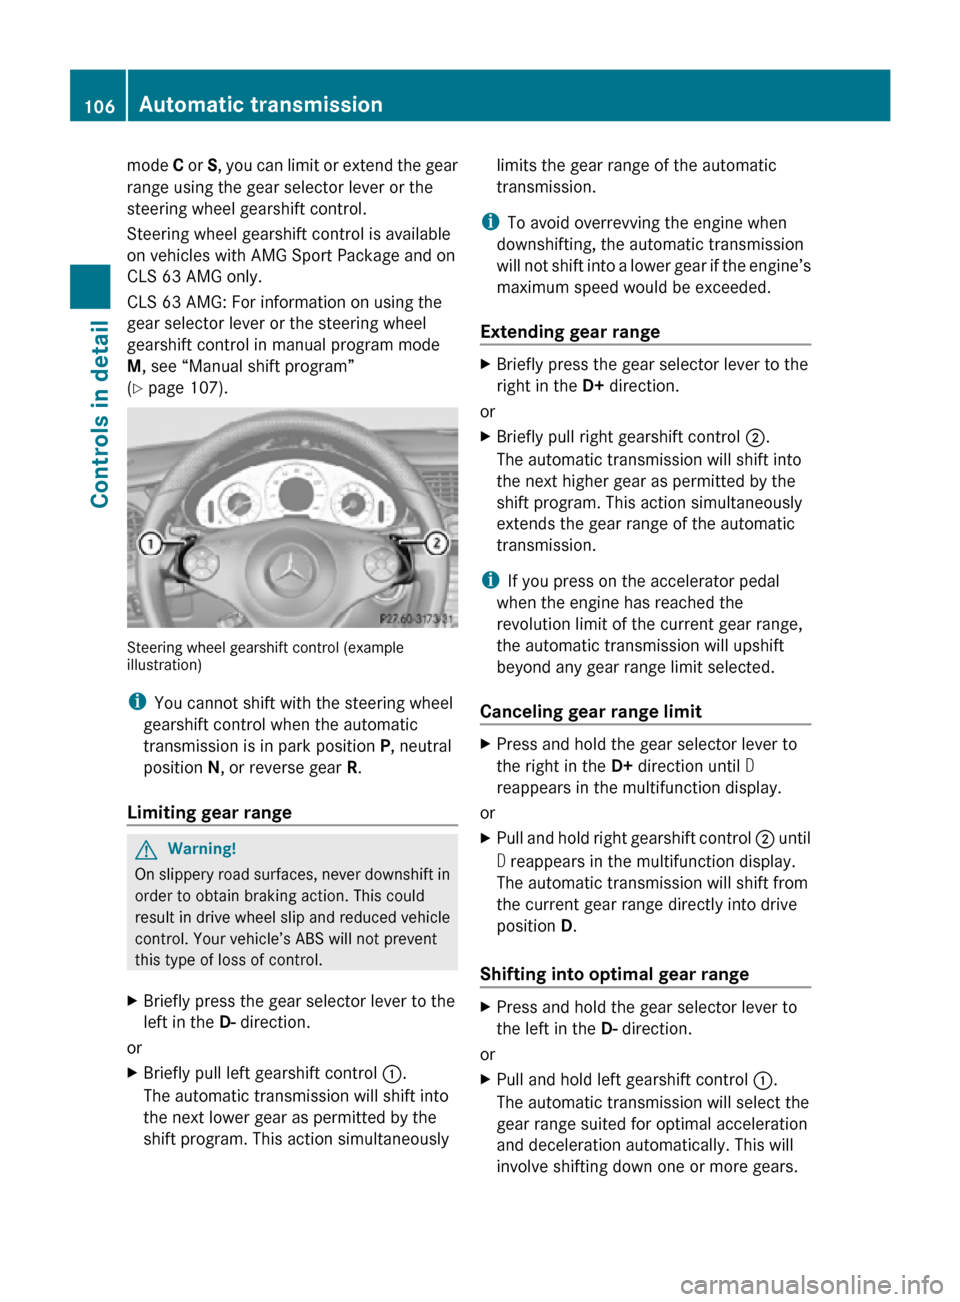
(Y page 107). Steering wheel gearshift control (example
illustration)
i
You cannot shift with the steering wheel
gearshift control when the automatic
transmission is in park position P, neutral
position N, or reverse gear R.
Limiting gear range G
Warning!
On slippery road surfaces, never downshift in
order to obtain braking action. This could
result in drive wheel slip and reduced vehicle
control. Your vehicle’s ABS will not prevent
this type of loss of control.
X Briefly press the gear selector lever to the
left in the D- direction.
or
X Briefly pull left gearshift control :.
The automatic transmission will shift into
the next lower gear as permitted by the
shift program. This action simultaneously limits the gear range of the automatic
transmission.
i To avoid overrevving the engine when
downshifting, the automatic transmission
will not shift into a lower gear if the engine’s
maximum speed would be exceeded.
Extending gear range X
Briefly press the gear selector lever to the
right in the D+ direction.
or
X Briefly pull right gearshift control ;.
The automatic transmission will shift into
the next higher gear as permitted by the
shift program. This action simultaneously
extends the gear range of the automatic
transmission.
i If you press on the accelerator pedal
when the engine has reached the
revolution limit of the current gear range,
the automatic transmission will upshift
beyond any gear range limit selected.
Canceling gear range limit X
Press and hold the gear selector lever to
the right in the D+ direction until D
reappears in the multifunction display.
or
X Pull and hold right gearshift control ; until
D reappears in the multifunction display.
The automatic transmission will shift from
the current gear range directly into drive
position D.
Shifting into optimal gear range X
Press and hold the gear selector lever to
the left in the D- direction.
or
X Pull and hold left gearshift control :.
The automatic transmission will select the
gear range suited for optimal acceleration
and deceleration automatically. This will
involve shifting down one or more gears. 106
Automatic transmissionControls in detail
219_AKB; 4; 54, en-US
d2ureepe,
Version: 2.11.8.1 2009-05-11T16:21:02+02:00 - Seite 106
Page 109 of 308
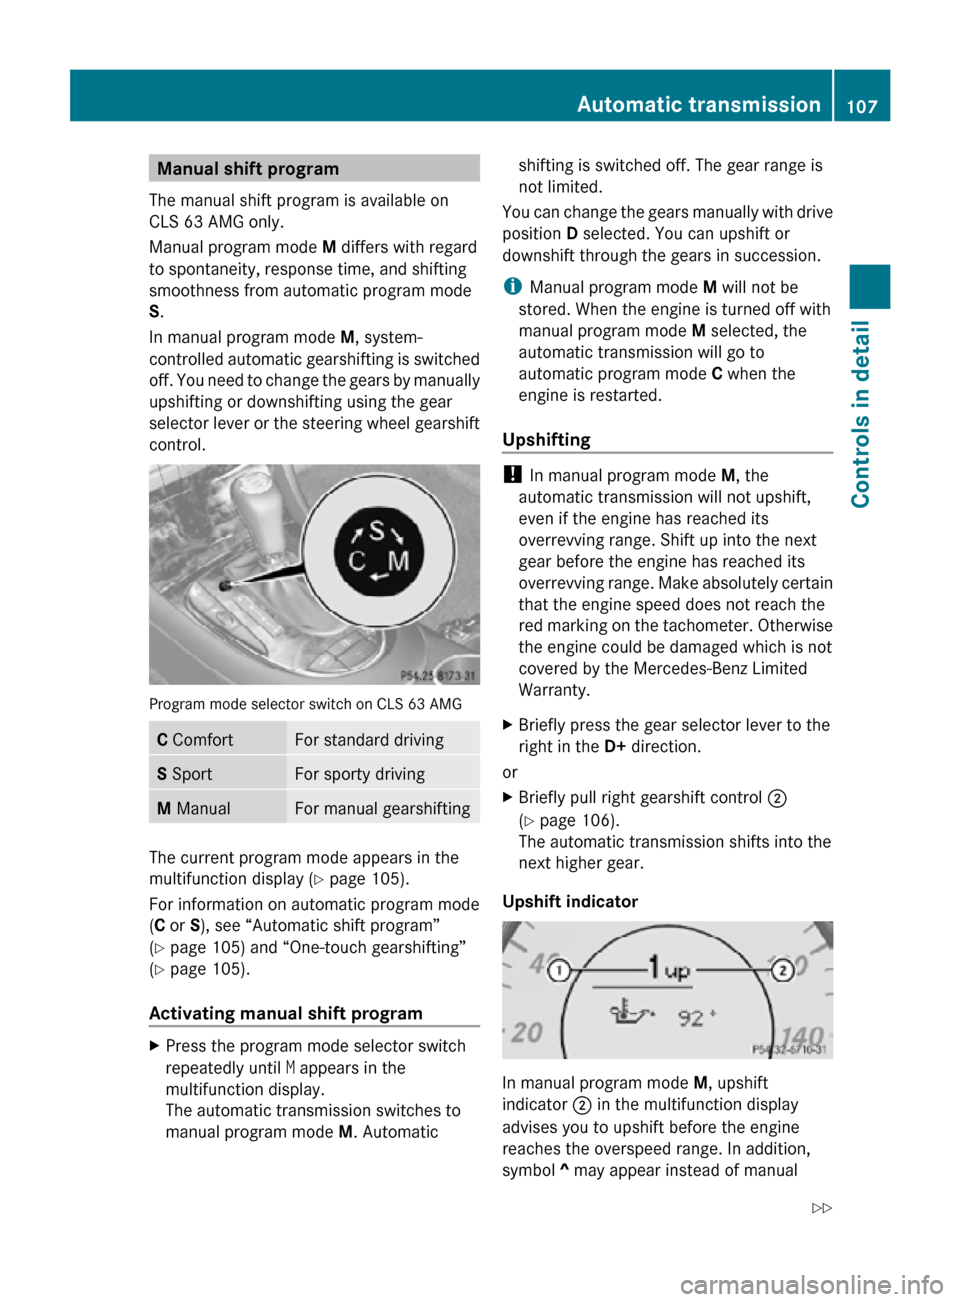
Manual shift program
The manual shift program is available on
CLS 63 AMG only.
Manual program mode M differs with regard
to spontaneity, response time, and shifting
smoothness from automatic program mode
S.
In manual program mode M, system-
controlled automatic gearshifting is switched
off. You need to change the gears by manually
upshifting or downshifting using the gear
selector lever or the steering wheel gearshift
control. Program mode selector switch on CLS 63 AMG
C Comfort For standard driving
S Sport For sporty driving
M Manual For manual gearshifting
The current program mode appears in the
multifunction display (
Y page 105).
For information on automatic program mode
(C or S), see “Automatic shift program”
(Y page 105) and “One-touch gearshifting”
(Y page 105).
Activating manual shift program X
Press the program mode selector switch
repeatedly until M appears in the
multifunction display.
The automatic transmission switches to
manual program mode M. Automatic shifting is switched off. The gear range is
not limited.
You can change the gears manually with drive
position D selected. You can upshift or
downshift through the gears in succession.
i Manual program mode M will not be
stored. When the engine is turned off with
manual program mode M selected, the
automatic transmission will go to
automatic program mode C when the
engine is restarted.
Upshifting !
In manual program mode M, the
automatic transmission will not upshift,
even if the engine has reached its
overrevving range. Shift up into the next
gear before the engine has reached its
overrevving range. Make absolutely certain
that the engine speed does not reach the
red marking on the tachometer. Otherwise
the engine could be damaged which is not
covered by the Mercedes-Benz Limited
Warranty.
X Briefly press the gear selector lever to the
right in the D+ direction.
or
X Briefly pull right gearshift control ;
(Y page 106).
The automatic transmission shifts into the
next higher gear.
Upshift indicator In manual program mode
M, upshift
indicator ; in the multifunction display
advises you to upshift before the engine
reaches the overspeed range. In addition,
symbol ^ may appear instead of manual Automatic transmission
107Controls in detail
219_AKB; 4; 54, en-US
d2ureepe, Version: 2.11.8.1 2009-05-11T16:21:02+02:00 - Seite 107 Z
Page 112 of 308

Resetting trip odometer
X Make sure you are viewing the standard
display ( Y page 112) in the multifunction
display.
X Press and hold the reset button in the
instrument cluster (Y page 108) until the
trip odometer is reset. Tachometer
The red marking on the tachometer
(Y page 28) denotes excessive engine speed.
! Avoid driving at excessive engine speeds,
as it may result in serious engine damage
that is not covered by the Mercedes-Benz
Limited Warranty.
To help protect the engine, the fuel supply is
interrupted if the engine is operated within
the red marking. Control system
Introduction
The control system is activated as soon as the
starter switch is in position 1.
The control system enables you to call up
information about your vehicle and to change
vehicle settings.
For example, you can use the control system
to find out when your vehicle is next due for
maintenance service, to set the language for
messages in the instrument cluster display,
and much more. G
Warning!
A driver’s attention to the road and traffic
conditions must always be his/her primary
focus when driving.
For your safety and the safety of others,
selecting features through the multifunction
steering wheel should only be done by the driver when traffic and road conditions permit
it to be done safely.
Bear in mind that at a speed of just 30 mph
(approximately 50 km/h), your vehicle is
covering a distance of 44 feet (approximately
14 m) every second.
The control system relays information to the
multifunction display. Multifunction steering wheel
The displays in the multifunction display and
the settings in the control system are
controlled by using the buttons on the
multifunction steering wheel. :
Multifunction display
;
Press button
W
X
to select submenus in the
Settings menu
to set values
to operate the RACETIMER
7
to set the volume 7
AMG vehicles only. 110
Control systemControls in detail
219_AKB; 4; 54, en-US
d2ureepe,
Version: 2.11.8.1 2009-05-11T16:21:02+02:00 - Seite 110
Page 113 of 308

Press button
6
to answer a call
to dial8
to redial
~ to end a call
to reject an incoming call =
Press button
V
U
to select next or previous menu Press button briefly
&
*
to move within a menu
Within Audio/DVD
menu to
select previous or next track,
scene or stored station
Within Telephone menu to
switch to the phone book and
select a name or number Press and hold button
&
*
Within Audio/DVD
menu to
select previous or next track
with quick search or to select
previous or next station in
station list or wave band
Within Telephone menu to
start the quick search in the
phone book Depending on the selected menu, pressing
the buttons on the multifunction steering
wheel will alter what appears in the
multifunction display.
The information available in the multifunction
display is arranged in menus and
accompanying functions and submenus.
The individual functions are then found within
the relevant menu (radio or CD operations
under Audio/DVD
menu, for example).
These functions serve to call up relevant
information or to customize the settings for
your vehicle. It is helpful to think of the menus, and the
functions within each menu, as being
arranged in a circular pattern.
X
Press button V or U repeatedly to
pass through each menu one after the
other.
X Press button * or & repeatedly to
pass through each function display, one
after the other, in the current menu.
In the Settings menu, instead of functions,
you will find a number of submenus for calling
up and changing settings. For instructions on
using these submenus, see “Settings menu”
(Y page 118).
The number of menus available in the system
depends on which optional equipment is
installed in your vehicle. Multifunction display
:
Outside temperature indicator
; Trip odometer
= Automatic transmission program mode
indicator
? Transmission position/gear range
indicator
A Main odometer
For more information on menus displayed in
the multifunction display, see “Menus and
submenus” (Y page 112).
8 Function only available in telephone menu. Control system
111Controls in detail
219_AKB; 4; 54, en-US
d2ureepe, Version: 2.11.8.1 2009-05-11T16:21:02+02:00 - Seite 111 Z
Page 126 of 308
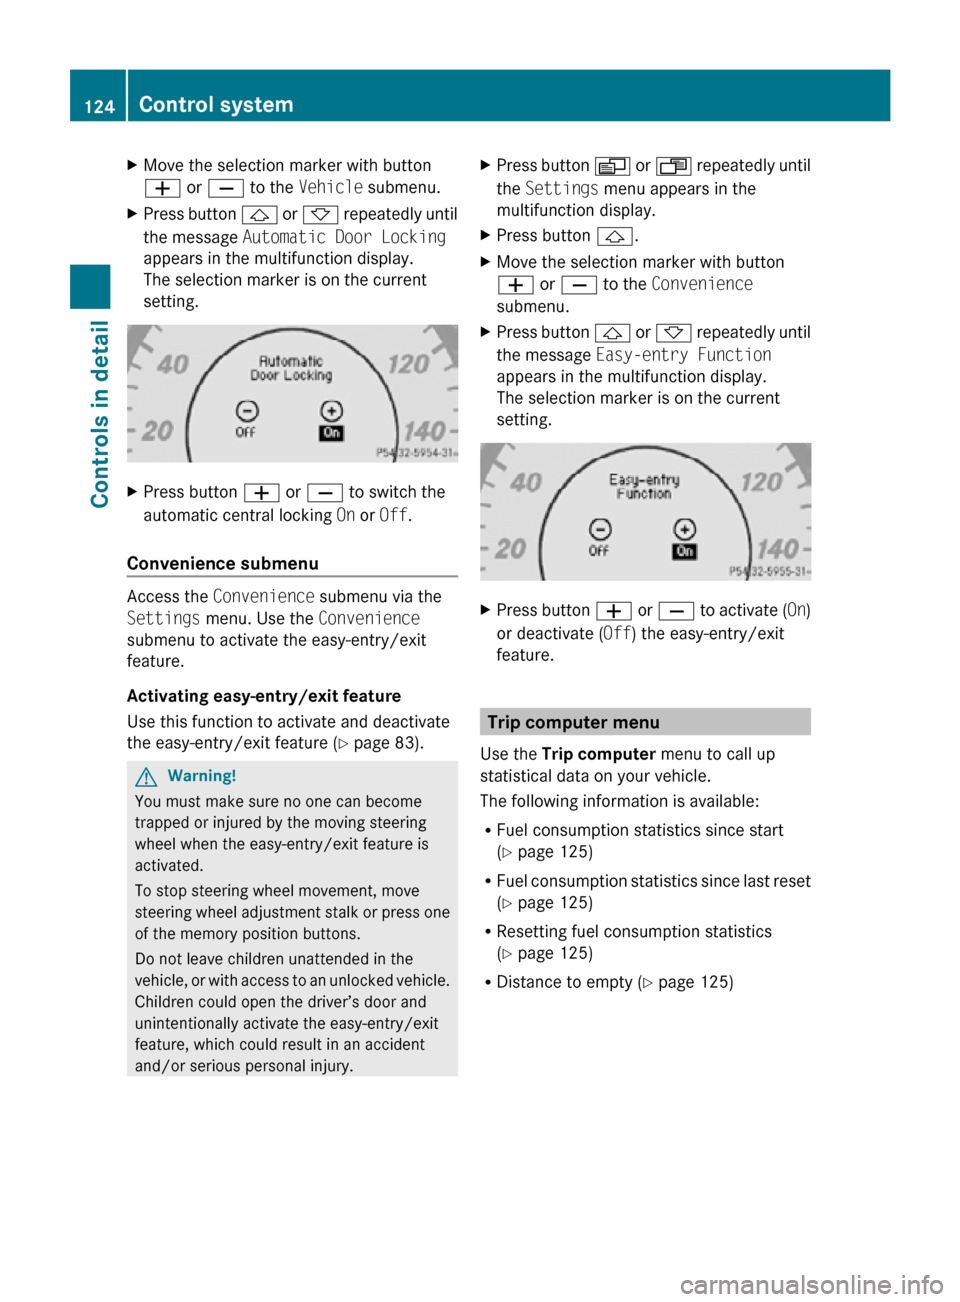
X
Move the selection marker with button
W or X to the Vehicle submenu.
X Press button & or * repeatedly until
the message Automatic Door Locking
appears in the multifunction display.
The selection marker is on the current
setting. X
Press button W or X to switch the
automatic central locking On or Off.
Convenience submenu Access the
Convenience submenu via the
Settings menu. Use the Convenience
submenu to activate the easy-entry/exit
feature.
Activating easy-entry/exit feature
Use this function to activate and deactivate
the easy-entry/exit feature (Y page 83). G
Warning!
You must make sure no one can become
trapped or injured by the moving steering
wheel when the easy-entry/exit feature is
activated.
To stop steering wheel movement, move
steering wheel adjustment stalk or press one
of the memory position buttons.
Do not leave children unattended in the
vehicle, or with access to an unlocked vehicle.
Children could open the driver’s door and
unintentionally activate the easy-entry/exit
feature, which could result in an accident
and/or serious personal injury. X
Press button V or U repeatedly until
the Settings menu appears in the
multifunction display.
X Press button &.
X Move the selection marker with button
W or X to the Convenience
submenu.
X Press button & or * repeatedly until
the message Easy-entry Function
appears in the multifunction display.
The selection marker is on the current
setting. X
Press button W or X to activate ( On)
or deactivate (Off) the easy-entry/exit
feature. Trip computer menu
Use the Trip computer menu to call up
statistical data on your vehicle.
The following information is available:
R Fuel consumption statistics since start
(Y page 125)
R Fuel consumption statistics since last reset
(Y page 125)
R Resetting fuel consumption statistics
(Y page 125)
R Distance to empty ( Y page 125)124
Control systemControls in detail
219_AKB; 4; 54, en-US
d2ureepe,
Version: 2.11.8.1 2009-05-11T16:21:02+02:00 - Seite 124