2010 MERCEDES-BENZ CLS instrument cluster
[x] Cancel search: instrument clusterPage 111 of 308

G
Warning!
No messages will be displayed if either the
instrument cluster or the multifunction
display is inoperative.
As a result, you will not be able to see
information about your driving conditions,
such as
R speed
R outside temperature
R warning/indicator lamps
R malfunction/warning messages
R failure of any systems
Driving characteristics may be impaired.
If you must continue to drive, do so with added
caution. Contact an authorized Mercedes-
Benz Center as soon as possible. :
Reset button
For information on changing the instrument
cluster settings, e.g. the language, see
(Y page 119). Activating the instrument cluster
The instrument cluster is activated when you
R open a front door
R switch on the ignition
R press reset button :
R switch on the exterior lamps Adjusting the instrument cluster
illumination
X To brighten illumination: Turn reset
button : clockwise until the desired level
of illumination is reached.
X To dim illumination: Turn reset
button : counterclockwise until the
desired level of illumination is reached.
i The instrument cluster illumination is
dimmed or brightened automatically to suit
ambient light conditions.
The instrument cluster illumination will also
be adjusted automatically when you switch
on the vehicle’s exterior lamps. Coolant temperature indicator
G
Warning!
Driving when your engine is overheated can
cause some fluids which may have leaked into
the engine compartment to catch fire. You
could be seriously burned.
Steam from an overheated engine can cause
serious burns which can occur just by opening
the engine hood. Stay away from the engine
if you see or hear steam coming from it.
Stop the vehicle in a safe location away from
other traffic. Turn off the engine, get out of the
vehicle and do not stand near the vehicle until
the engine has cooled down.
During severe operating conditions, e.g. stop-
and-go traffic, the coolant temperature may
rise close to 248‡ (120†).
! Excessive coolant temperature triggers a
warning in the multifunction display and the
red coolant temperature warning
lamp ? in the instrument cluster comes
on.
The engine should not be operated with a
coolant temperature above 248‡ (120†).
Doing so may cause serious engine damage
which is not covered by the Mercedes-Benz
Limited Warranty. Instrument cluster
109Controls in detail
219_AKB; 4; 54, en-US
d2ureepe, Version: 2.11.8.1 2009-05-11T16:21:02+02:00 - Seite 109 Z
Page 112 of 308
Resetting trip odometer
X Make sure you are viewing the standard
display ( Y page 112) in the multifunction
display.
X Press and hold the reset button in the
instrument cluster (Y page 108) until the
trip odometer is reset. Tachometer
The red marking on the tachometer
(Y page 28) denotes excessive engine speed.
! Avoid driving at excessive engine speeds,
as it may result in serious engine damage
that is not covered by the Mercedes-Benz
Limited Warranty.
To help protect the engine, the fuel supply is
interrupted if the engine is operated within
the red marking. Control system
Introduction
The control system is activated as soon as the
starter switch is in position 1.
The control system enables you to call up
information about your vehicle and to change
vehicle settings.
For example, you can use the control system
to find out when your vehicle is next due for
maintenance service, to set the language for
messages in the instrument cluster display,
and much more. G
Warning!
A driver’s attention to the road and traffic
conditions must always be his/her primary
focus when driving.
For your safety and the safety of others,
selecting features through the multifunction
steering wheel should only be done by the driver when traffic and road conditions permit
it to be done safely.
Bear in mind that at a speed of just 30 mph
(approximately 50 km/h), your vehicle is
covering a distance of 44 feet (approximately
14 m) every second.
The control system relays information to the
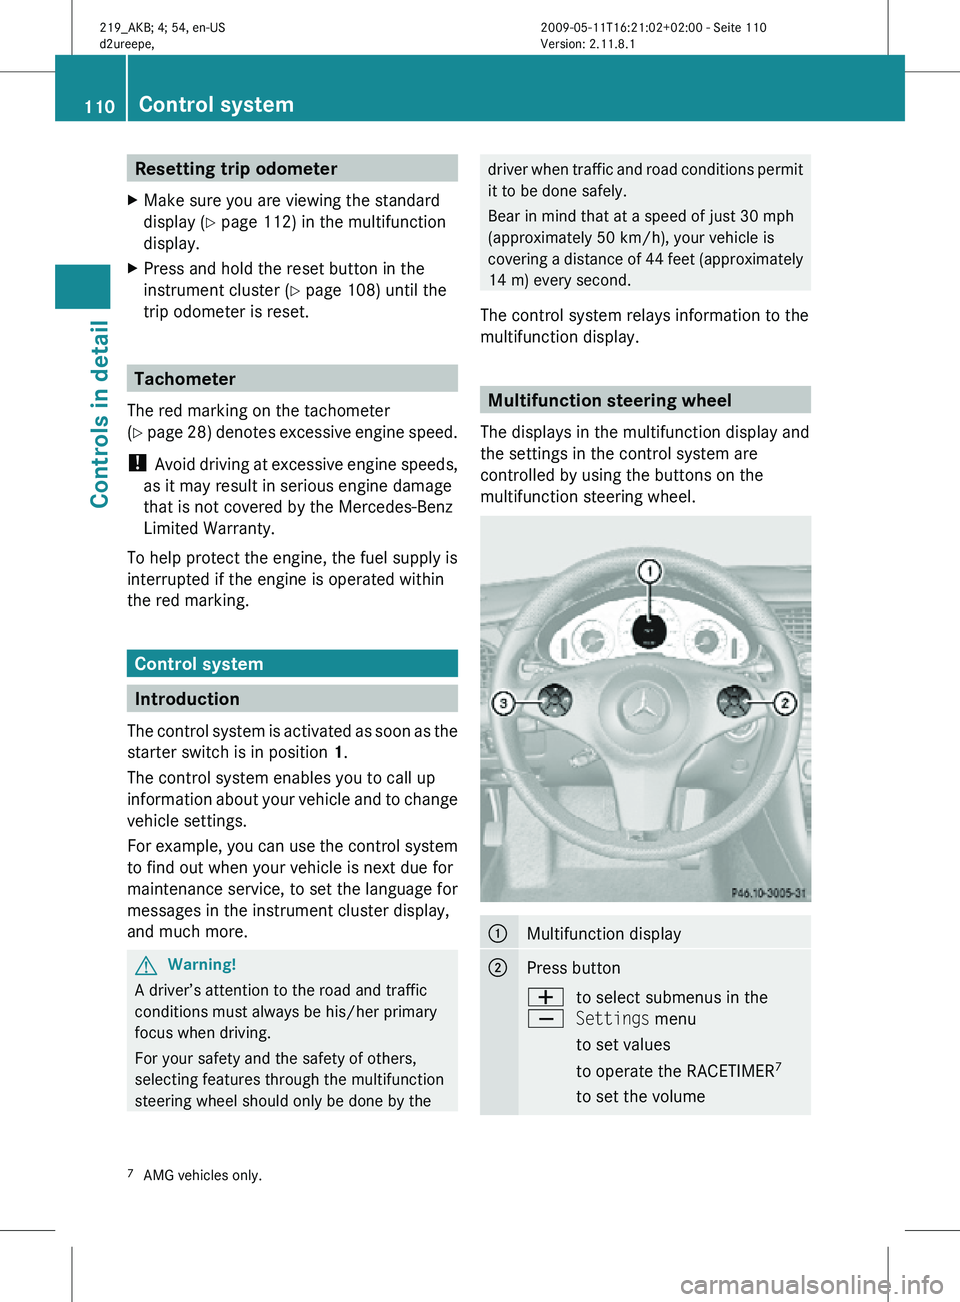
multifunction display. Multifunction steering wheel
The displays in the multifunction display and
the settings in the control system are
controlled by using the buttons on the
multifunction steering wheel. :
Multifunction display
;
Press button
W
X
to select submenus in the
Settings menu
to set values
to operate the RACETIMER
7
to set the volume 7
AMG vehicles only. 110
Control systemControls in detail
219_AKB; 4; 54, en-US
d2ureepe,
Version: 2.11.8.1 2009-05-11T16:21:02+02:00 - Seite 110
Page 117 of 308
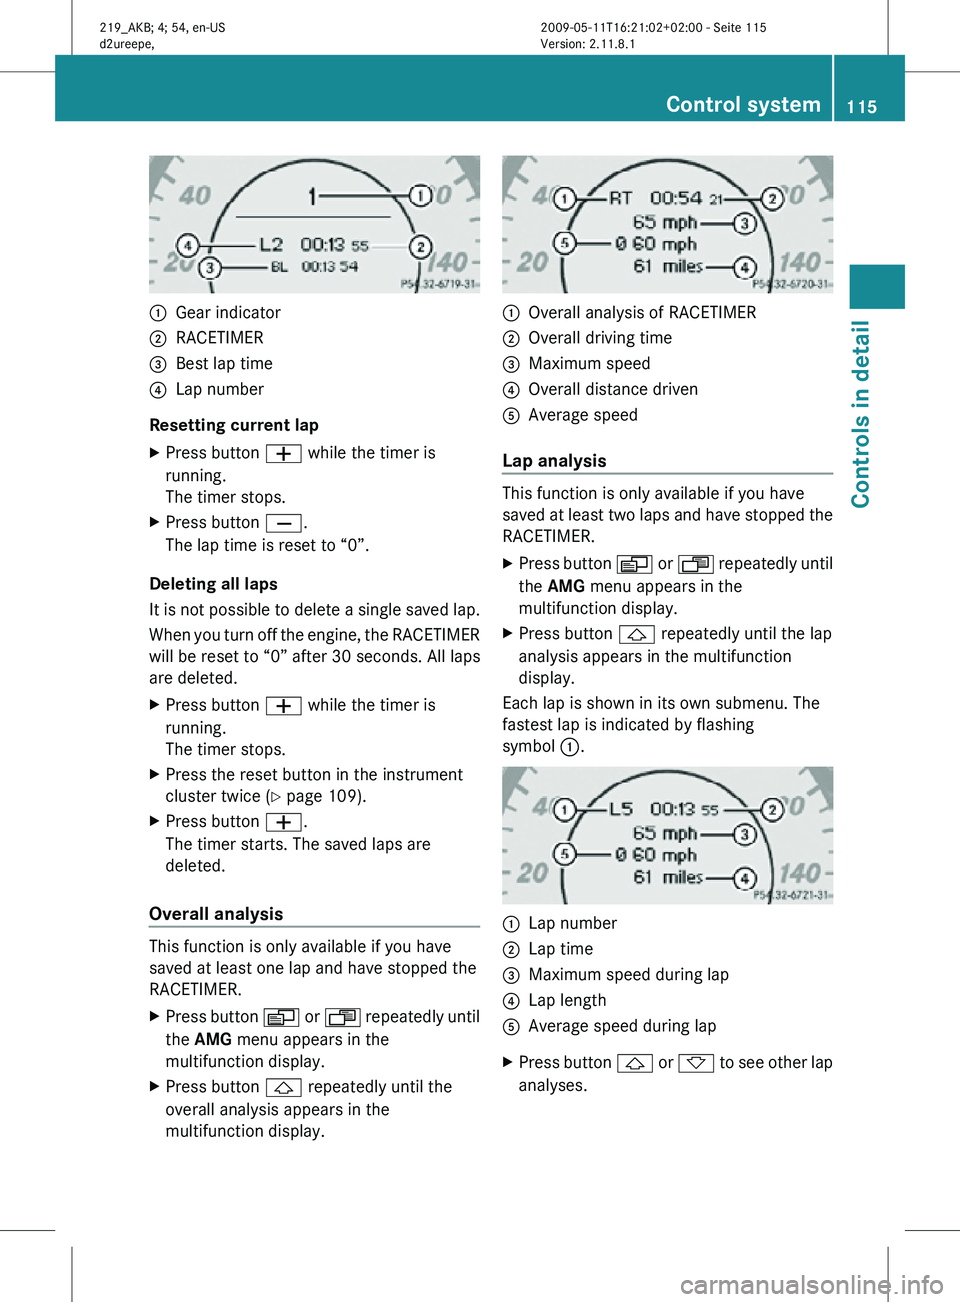
:
Gear indicator
; RACETIMER
= Best lap time
? Lap number
Resetting current lap
X Press button W while the timer is
running.
The timer stops.
X Press button X.
The lap time is reset to “0”.
Deleting all laps
It is not possible to delete a single saved lap.
When you turn off the engine, the RACETIMER
will be reset to “0” after 30 seconds. All laps
are deleted.
X Press button W while the timer is
running.
The timer stops.
X Press the reset button in the instrument
cluster twice (Y page 109).
X Press button W.
The timer starts. The saved laps are
deleted.
Overall analysis This function is only available if you have
saved at least one lap and have stopped the
RACETIMER.
X
Press button V or U repeatedly until
the AMG menu appears in the
multifunction display.
X Press button & repeatedly until the
overall analysis appears in the
multifunction display. :
Overall analysis of RACETIMER
; Overall driving time
= Maximum speed
? Overall distance driven
A Average speed
Lap analysis This function is only available if you have
saved at least two laps and have stopped the
RACETIMER.
X
Press button V or U repeatedly until
the AMG menu appears in the
multifunction display.
X Press button & repeatedly until the lap
analysis appears in the multifunction
display.
Each lap is shown in its own submenu. The
fastest lap is indicated by flashing
symbol :. :
Lap number
; Lap time
= Maximum speed during lap
? Lap length
A Average speed during lap
X Press button & or * to see other lap
analyses. Control system
115Controls in detail
219_AKB; 4; 54, en-US
d2ureepe, Version: 2.11.8.1 2009-05-11T16:21:02+02:00 - Seite 115 Z
Page 120 of 308
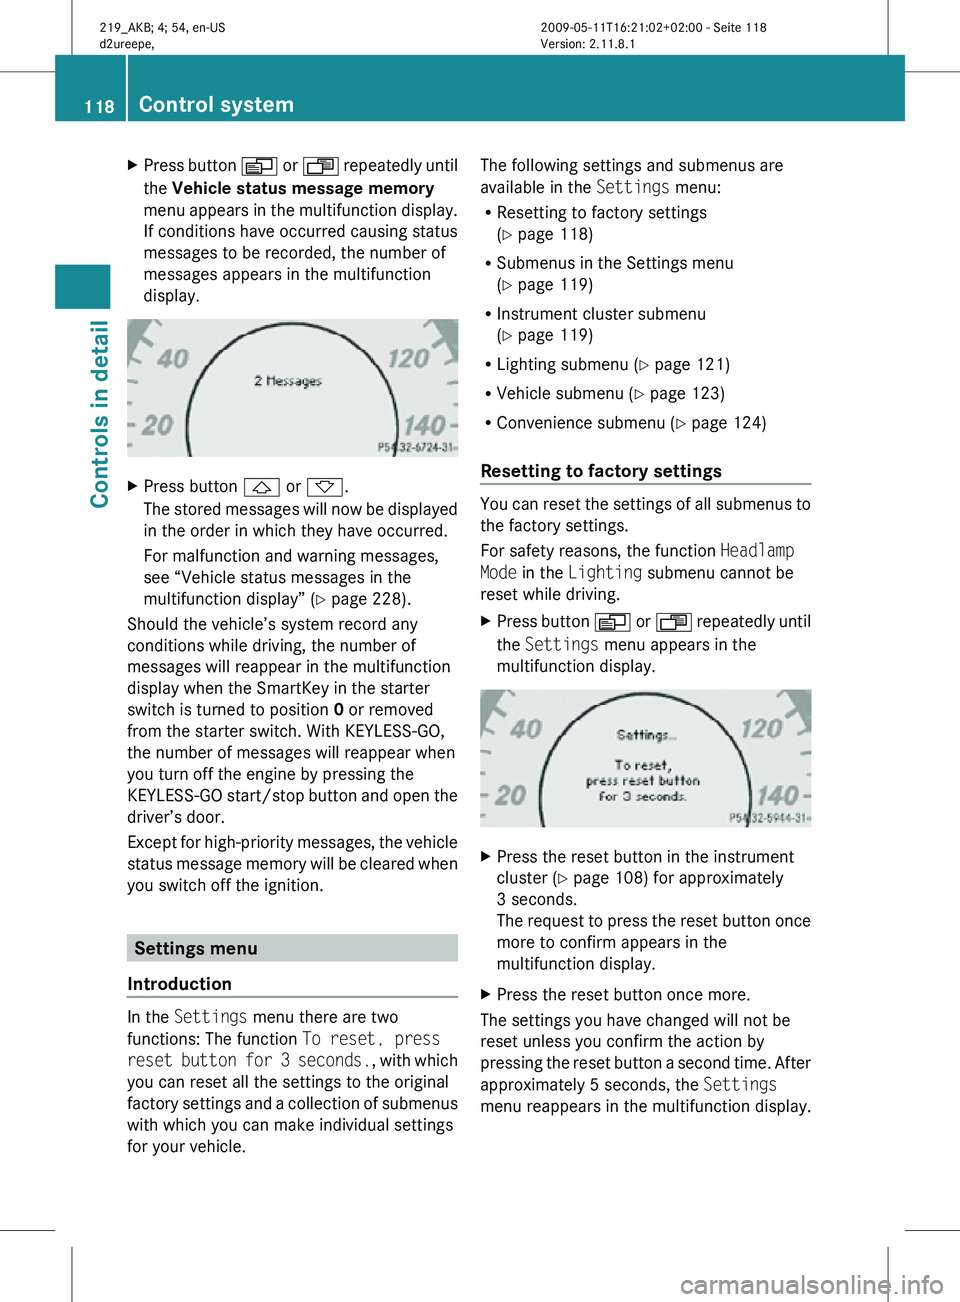
X
Press button V or U repeatedly until
the Vehicle status message memory
menu appears in the multifunction display.
If conditions have occurred causing status
messages to be recorded, the number of
messages appears in the multifunction
display. X
Press button & or *.
The stored messages will now be displayed
in the order in which they have occurred.
For malfunction and warning messages,
see “Vehicle status messages in the
multifunction display” ( Y page 228).
Should the vehicle’s system record any
conditions while driving, the number of
messages will reappear in the multifunction
display when the SmartKey in the starter
switch is turned to position 0 or removed
from the starter switch. With KEYLESS-GO,
the number of messages will reappear when
you turn off the engine by pressing the
KEYLESS-GO start/stop button and open the
driver’s door.
Except for high-priority messages, the vehicle
status message memory will be cleared when
you switch off the ignition. Settings menu
Introduction In the
Settings menu there are two
functions: The function To reset, press
reset button for 3 seconds. , with which
you can reset all the settings to the original
factory settings and a collection of submenus
with which you can make individual settings
for your vehicle. The following settings and submenus are
available in the
Settings menu:
R Resetting to factory settings
(Y page 118)
R Submenus in the Settings menu
(Y page 119)
R Instrument cluster submenu
(Y page 119)
R Lighting submenu ( Y page 121)
R Vehicle submenu ( Y page 123)
R Convenience submenu ( Y page 124)
Resetting to factory settings You can reset the settings of all submenus to
the factory settings.
For safety reasons, the function
Headlamp
Mode in the Lighting submenu cannot be
reset while driving.
X Press button V or U repeatedly until
the Settings menu appears in the
multifunction display. X
Press the reset button in the instrument
cluster (Y page 108) for approximately
3 seconds.
The request to press the reset button once
more to confirm appears in the
multifunction display.
X Press the reset button once more.
The settings you have changed will not be
reset unless you confirm the action by
pressing the reset button a second time. After
approximately 5 seconds, the Settings
menu reappears in the multifunction display. 118
Control systemControls in detail
219_AKB; 4; 54, en-US
d2ureepe,
Version: 2.11.8.1 2009-05-11T16:21:02+02:00 - Seite 118
Page 121 of 308

Submenus in the Settings menu
X
Press button V or U repeatedly until
the Settings menu appears in the
multifunction display.
X Press button &.
The collection of the submenus appears in
the multifunction display. There are more
submenus than can be displayed
simultaneously. X
Press button X.
The selection marker moves to the next
submenu.
X Scroll down with button X, scroll up
with button W.
X With the selection marker on the desired
submenu, use button & to access the
individual functions within that submenu.
X Once within the submenu, use button
& to move to the next function or button
* to move to the previous function
within that submenu.
X Use button W or X to change the
settings of the respective function.
The following lists show what settings can be
changed within the various menus. Detailed
instructions on making individual settings can
be found on the following pages.
Instrument cluster submenu
R Selecting speedometer display mode
(Y page 120)
R Selecting language ( Y page 120) R
Selecting display (speed or outside
temperature) for status line ( Y page 120)
R Selecting display (speed or outside
temperature) for standard display
(Y page 120)
Lighting submenu
R Switching daytime running lamp mode on
or off (USA only) (Y page 121)
R Switching locator lighting on or off
(Y page 121)
R Setting ambient lighting ( Y page 122)
R Switching night security illumination
(Headlamps delayed shut-off feature) on or
off (Y page 122)
R Switching interior lighting delayed shut-off
on or off ( Y page 123)
Vehicle submenu
R Switching automatic central locking on or
off (Y page 123)
Convenience submenu
R Activating easy-entry/exit feature
(Y page 124)
Instrument cluster submenu Access the
Instr. Cluster submenu via
the Settings menu. Use the Instr.
Cluster submenu to change the instrument
cluster display settings.
The following functions are available:
R Selecting speedometer display mode
(Y page 120)
R Selecting language ( Y page 120)
R Selecting display (speed or outside
temperature) for status line ( Y page 120)
R Selecting display (speed or outside
temperature) for standard display
(Y page 120) Control system
119Controls in detail
219_AKB; 4; 54, en-US
d2ureepe, Version: 2.11.8.1 2009-05-11T16:21:02+02:00 - Seite 119 Z
Page 127 of 308
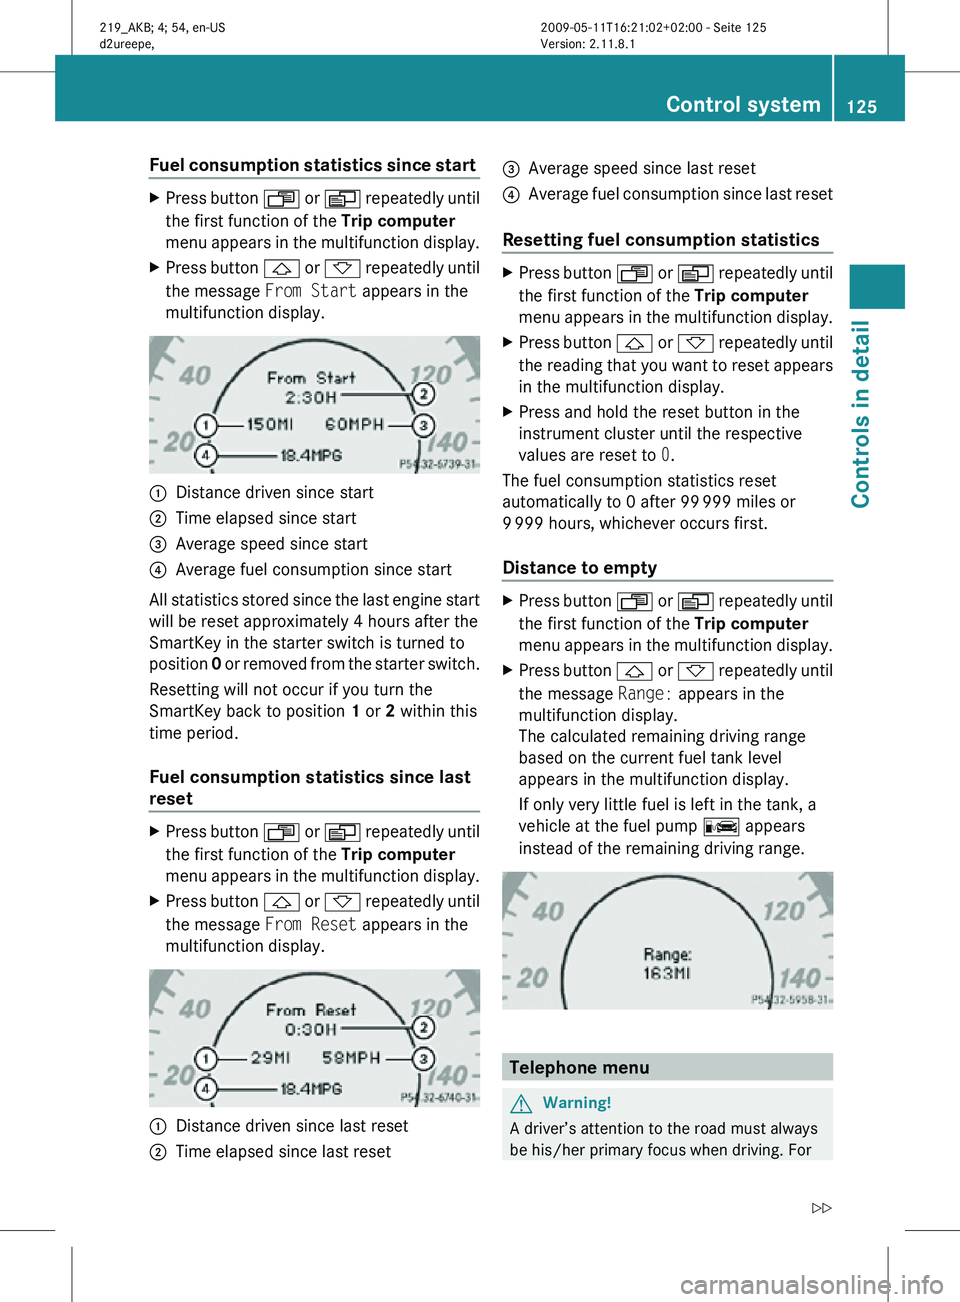
Fuel consumption statistics since start
X
Press button U or V repeatedly until
the first function of the Trip computer
menu appears in the multifunction display.
X Press button & or * repeatedly until
the message From Start appears in the
multifunction display. :
Distance driven since start
; Time elapsed since start
= Average speed since start
? Average fuel consumption since start
All statistics stored since the last engine start
will be reset approximately 4 hours after the
SmartKey in the starter switch is turned to
position 0 or removed from the starter switch.
Resetting will not occur if you turn the
SmartKey back to position 1 or 2 within this
time period.
Fuel consumption statistics since last
reset X
Press button U or V repeatedly until
the first function of the Trip computer
menu appears in the multifunction display.
X Press button & or * repeatedly until
the message From Reset appears in the
multifunction display. :
Distance driven since last reset
; Time elapsed since last reset =
Average speed since last reset
? Average fuel consumption since last reset
Resetting fuel consumption statistics X
Press button U or V repeatedly until
the first function of the Trip computer
menu appears in the multifunction display.
X Press button & or * repeatedly until
the reading that you want to reset appears
in the multifunction display.
X Press and hold the reset button in the
instrument cluster until the respective
values are reset to 0.
The fuel consumption statistics reset
automatically to 0 after 99 999 miles or
9 999 hours, whichever occurs first.
Distance to empty X
Press button U or V repeatedly until
the first function of the Trip computer
menu appears in the multifunction display.
X Press button & or * repeatedly until
the message Range: appears in the
multifunction display.
The calculated remaining driving range
based on the current fuel tank level
appears in the multifunction display.
If only very little fuel is left in the tank, a
vehicle at the fuel pump C appears
instead of the remaining driving range. Telephone menu
G
Warning!
A driver’s attention to the road must always
be his/her primary focus when driving. For Control system
125Controls in detail
219_AKB; 4; 54, en-US
d2ureepe, Version: 2.11.8.1 2009-05-11T16:21:02+02:00 - Seite 125 Z
Page 133 of 308
Distronic will also not respond to oncoming
vehicles.
Switch off the Distronic
R
when changing from the left to the right
lane if vehicles are moving more slowly in
the left lane
R when entering a turn lane or highway off
ramp
R in complex driving situations, such as in
highway construction zones
In these situations, the Distronic will continue
to maintain the set speed unless deactivated.
The Distronic is designed and intended only
to maintain a set speed and keep a set
distance from moving objects in front of it.
i USA only:
This device has been approved by the FCC
as a “Vehicular Radar System”. The radar
sensor is intended for use in an automotive
radar system only. Removal, tampering, or
altering of the device will void any
warranties, and is not permitted by the
FCC. Do not tamper with, alter, or use in
any non-approved way.
Any unauthorized modification to this
device could void the user’s authority to
operate the equipment.
i Canada only:
This device complies with RSS-210 of
Industry Canada. Operation is subject to
the following two conditions:
1. This device may not cause interference, and
2. this device must accept any interference received, including
interference that may cause undesired
operation of the device.
Removal, tampering, or altering of the
device will void any warranties, and is not
permitted. Do not tamper with, alter, or use
in any non-approved way. Any unauthorized modification to this
device could void the user’s authority to
operate the equipment.
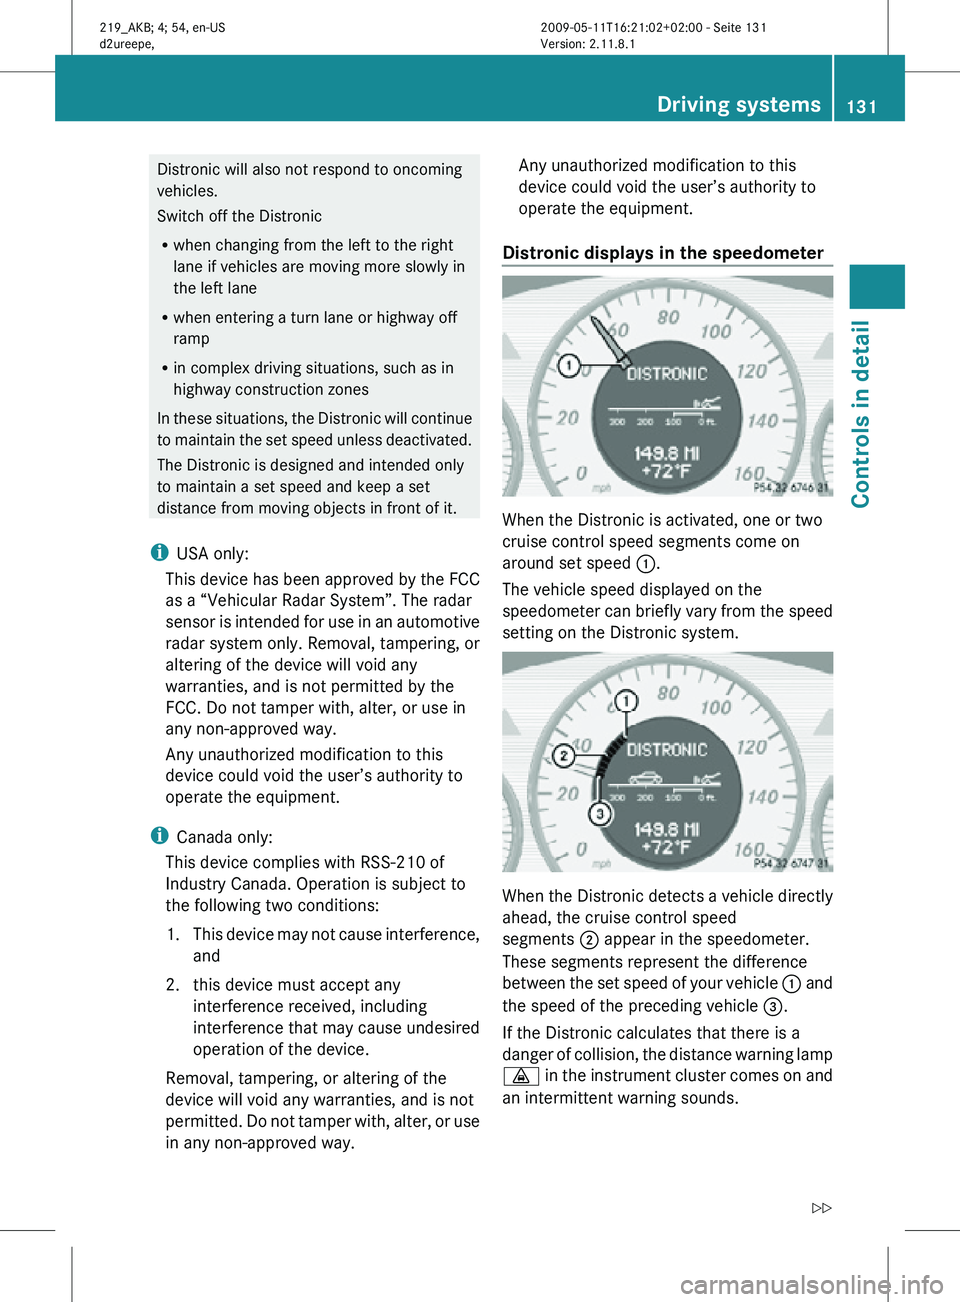
Distronic displays in the speedometer When the Distronic is activated, one or two
cruise control speed segments come on
around set speed
:.
The vehicle speed displayed on the
speedometer can briefly vary from the speed
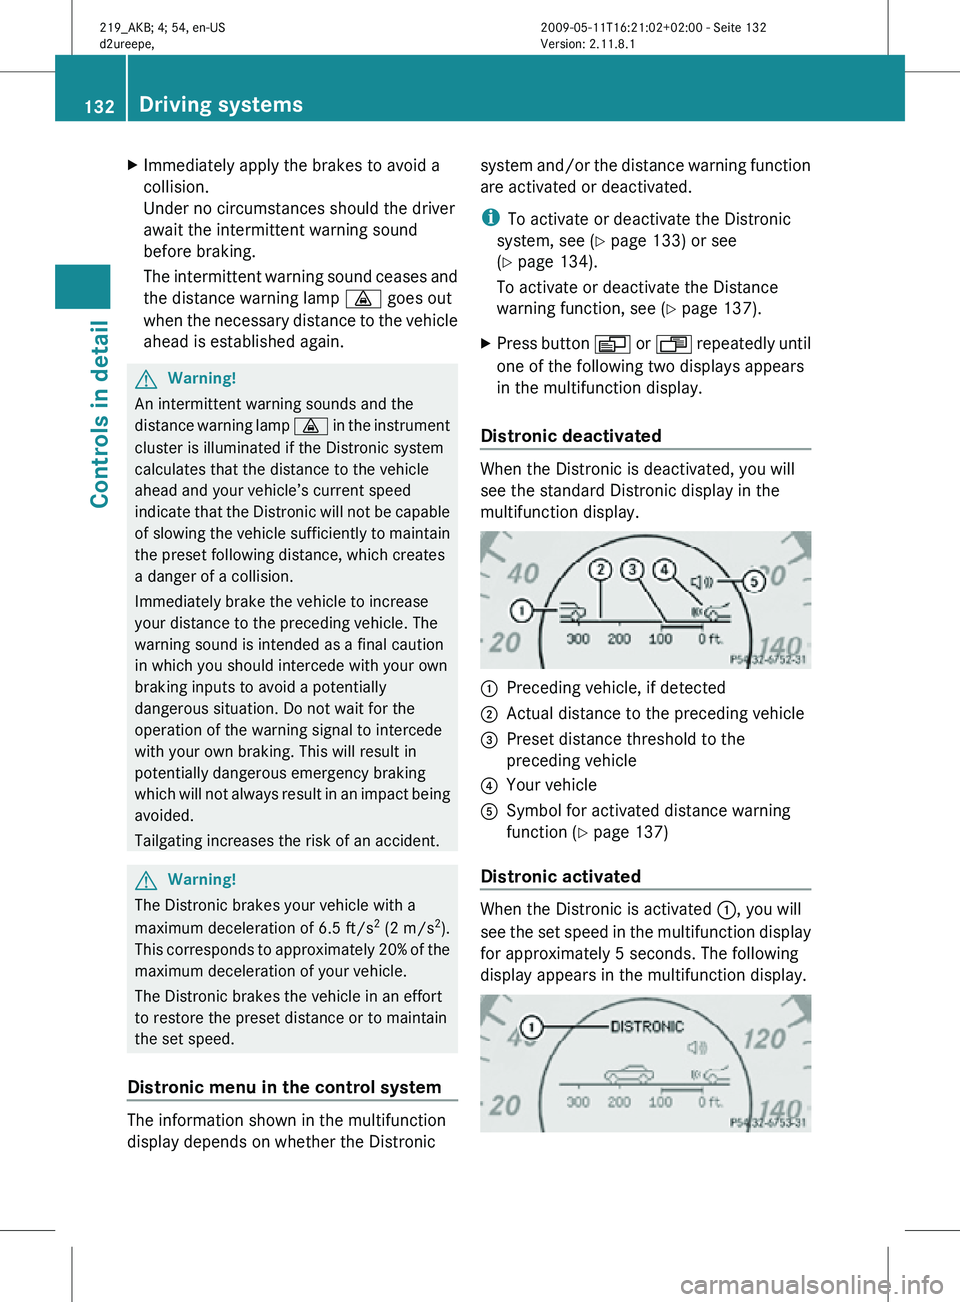
setting on the Distronic system. When the Distronic detects a vehicle directly
ahead, the cruise control speed
segments
; appear in the speedometer.
These segments represent the difference
between the set speed of your vehicle : and
the speed of the preceding vehicle =.
If the Distronic calculates that there is a
danger of collision, the distance warning lamp
· in the instrument cluster comes on and
an intermittent warning sounds. Driving systems
131Controls in detail
219_AKB; 4; 54, en-US
d2ureepe, Version: 2.11.8.1 2009-05-11T16:21:02+02:00 - Seite 131 Z
Page 134 of 308
X
Immediately apply the brakes to avoid a
collision.
Under no circumstances should the driver
await the intermittent warning sound
before braking.
The intermittent warning sound ceases and
the distance warning lamp · goes out
when the necessary distance to the vehicle
ahead is established again. G
Warning!
An intermittent warning sounds and the
distance warning lamp · in the instrument
cluster is illuminated if the Distronic system
calculates that the distance to the vehicle
ahead and your vehicle’s current speed
indicate that the Distronic will not be capable
of slowing the vehicle sufficiently to maintain
the preset following distance, which creates
a danger of a collision.
Immediately brake the vehicle to increase
your distance to the preceding vehicle. The
warning sound is intended as a final caution
in which you should intercede with your own
braking inputs to avoid a potentially
dangerous situation. Do not wait for the
operation of the warning signal to intercede
with your own braking. This will result in
potentially dangerous emergency braking
which will not always result in an impact being
avoided.
Tailgating increases the risk of an accident. G
Warning!
The Distronic brakes your vehicle with a
maximum deceleration of 6.5 ft/s 2
(2 m/s 2
).
This corresponds to approximately 20% of the
maximum deceleration of your vehicle.
The Distronic brakes the vehicle in an effort
to restore the preset distance or to maintain
the set speed.
Distronic menu in the control system The information shown in the multifunction
display depends on whether the Distronic system and/or the distance warning function
are activated or deactivated.
i
To activate or deactivate the Distronic
system, see ( Y page 133) or see
(Y page 134).
To activate or deactivate the Distance
warning function, see (Y page 137).
X Press button V or U repeatedly until
one of the following two displays appears
in the multifunction display.
Distronic deactivated When the Distronic is deactivated, you will
see the standard Distronic display in the
multifunction display.
:
Preceding vehicle, if detected
; Actual distance to the preceding vehicle
= Preset distance threshold to the
preceding vehicle
? Your vehicle
A Symbol for activated distance warning
function ( Y page 137)
Distronic activated When the Distronic is activated
:, you will
see the set speed in the multifunction display
for approximately 5 seconds. The following
display appears in the multifunction display. 132
Driving systemsControls in detail
219_AKB; 4; 54, en-US
d2ureepe,
Version: 2.11.8.1 2009-05-11T16:21:02+02:00 - Seite 132