2010 MERCEDES-BENZ CLS center console
[x] Cancel search: center consolePage 92 of 308
To signal minor directional changes:
X
Press the combination switch only to the
point of resistance in direction of
arrow ; or ? and release.
The corresponding turn signal lamps will
flash three times.
High beam X
Turn the exterior lamp switch to position
L (Y page 87).
X Switching on: Push the combination
switch in direction of arrow :.
The high-beam headlamp indicator lamp
K in the instrument cluster comes on.
X Switching off: Pull the combination switch
in direction of arrow = to its original
position.
i Also note the information on high-beam
headlamps with activated automatic
headlamp mode (Y page 87) or the daytime
running lamp mode ( Y page 88).
High-beam flasher X
Switching on: Pull the combination switch
briefly in direction of arrow =.Hazard warning flasher
The hazard warning flasher can be switched
on at all times, even with the SmartKey
removed from the starter switch.
The hazard warning flasher comes on
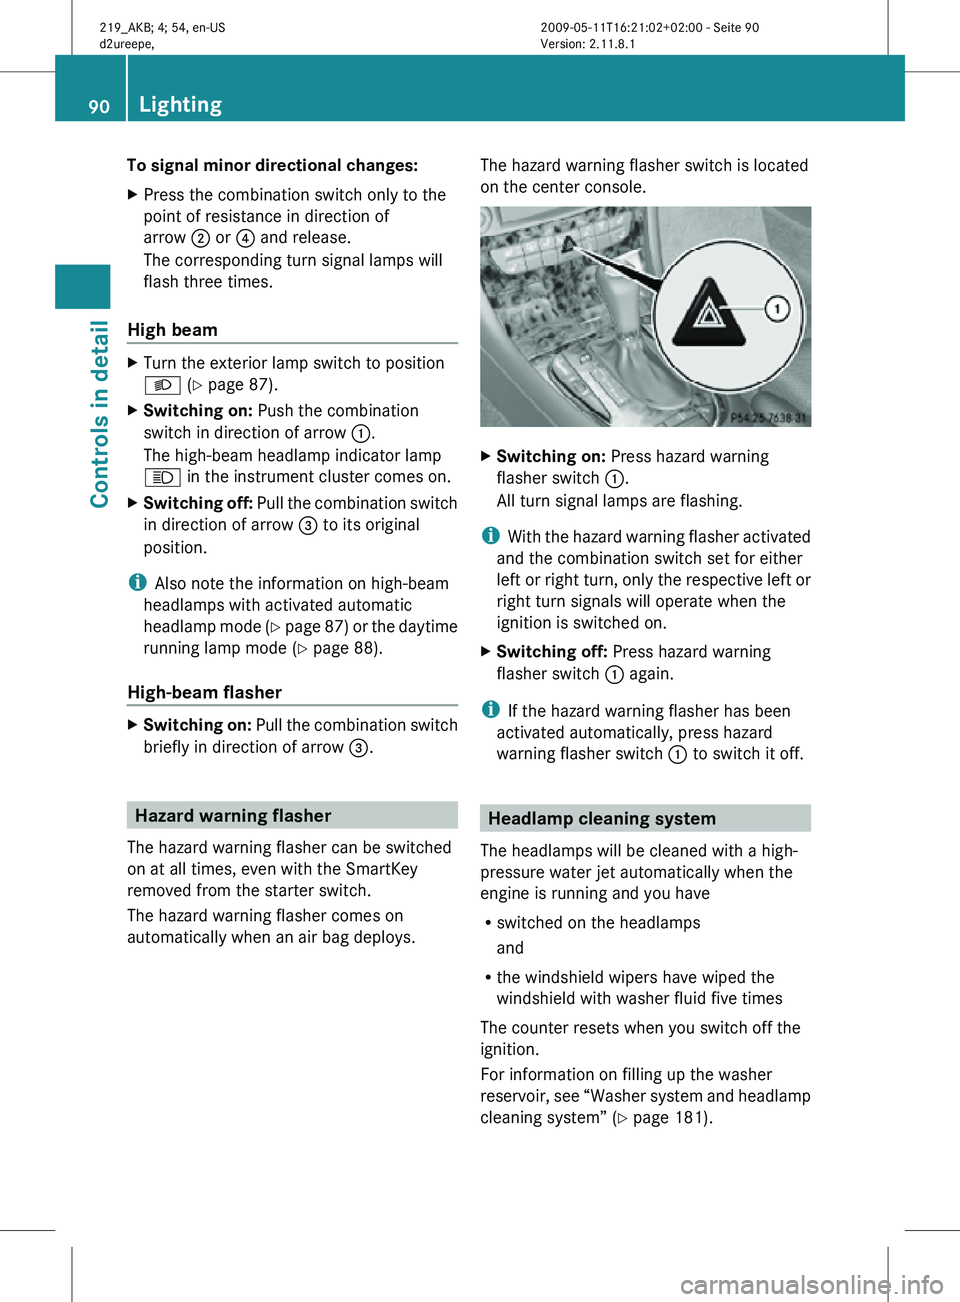
automatically when an air bag deploys. The hazard warning flasher switch is located
on the center console. X
Switching on: Press hazard warning
flasher switch :.
All turn signal lamps are flashing.
i With the hazard warning flasher activated
and the combination switch set for either
left or right turn, only the respective left or
right turn signals will operate when the
ignition is switched on.
X Switching off: Press hazard warning
flasher switch : again.
i If the hazard warning flasher has been
activated automatically, press hazard
warning flasher switch : to switch it off. Headlamp cleaning system
The headlamps will be cleaned with a high-
pressure water jet automatically when the
engine is running and you have
R switched on the headlamps
and
R the windshield wipers have wiped the
windshield with washer fluid five times
The counter resets when you switch off the
ignition.
For information on filling up the washer
reservoir, see “Washer system and headlamp
cleaning system” ( Y page 181).90
LightingControls in detail
219_AKB; 4; 54, en-US
d2ureepe,
Version: 2.11.8.1 2009-05-11T16:21:02+02:00 - Seite 90
Page 151 of 308
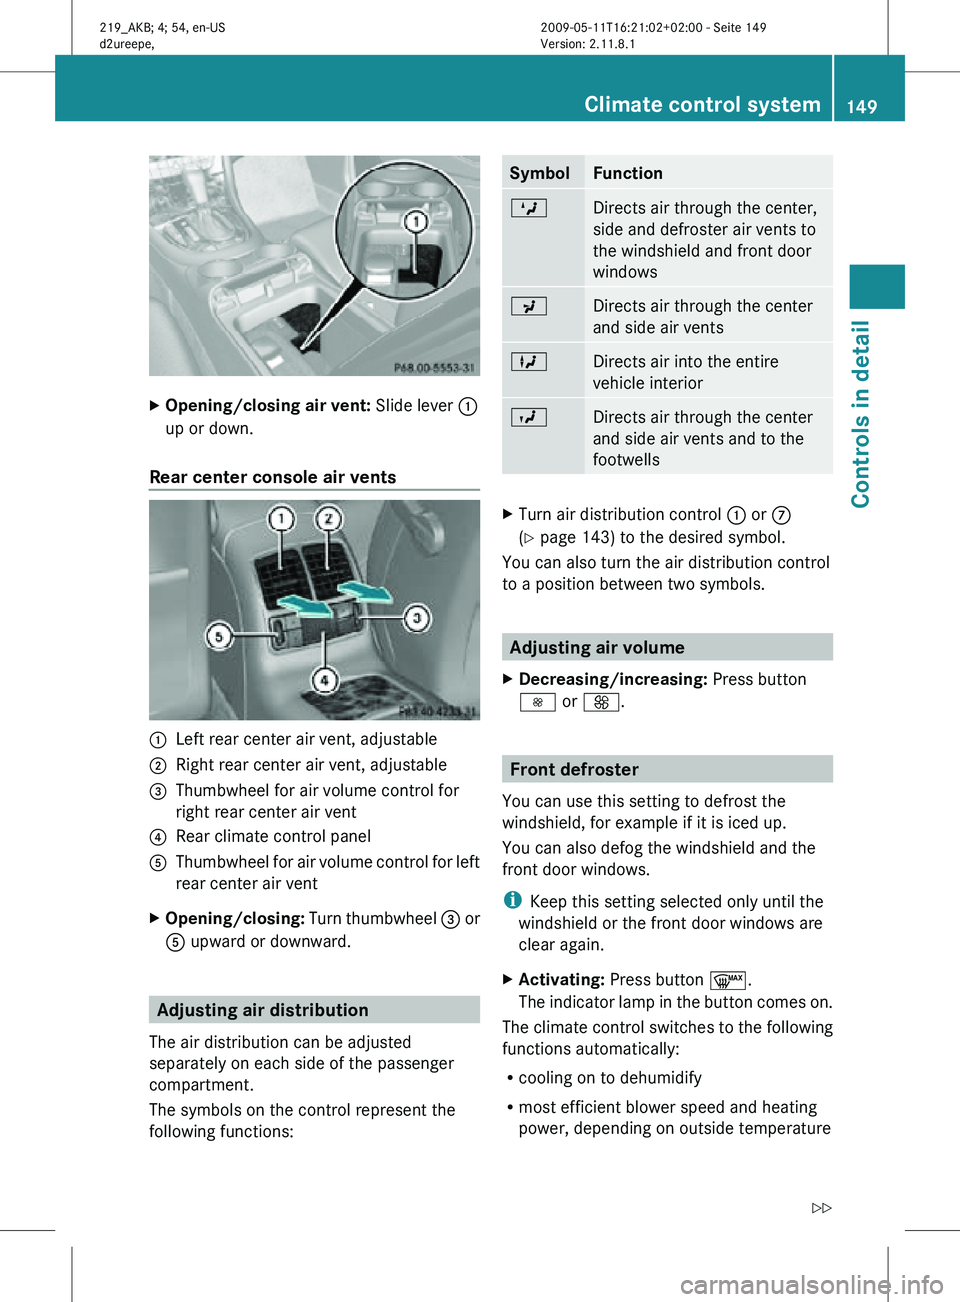
X
Opening/closing air vent: Slide lever :
up or down.
Rear center console air vents :
Left rear center air vent, adjustable
; Right rear center air vent, adjustable
= Thumbwheel for air volume control for
right rear center air vent
? Rear climate control panel
A Thumbwheel for air volume control for left
rear center air vent
X Opening/closing: Turn thumbwheel = or
A upward or downward. Adjusting air distribution
The air distribution can be adjusted
separately on each side of the passenger
compartment.
The symbols on the control represent the
following functions: Symbol Function
M
Directs air through the center,
side and defroster air vents to
the windshield and front door
windows
P
Directs air through the center
and side air vents
L
Directs air into the entire
vehicle interior
O
Directs air through the center
and side air vents and to the
footwells
X
Turn air distribution control : or C
(Y page 143) to the desired symbol.
You can also turn the air distribution control
to a position between two symbols. Adjusting air volume
X Decreasing/increasing: Press button
I or K. Front defroster
You can use this setting to defrost the
windshield, for example if it is iced up.
You can also defog the windshield and the
front door windows.
i Keep this setting selected only until the
windshield or the front door windows are
clear again.
X Activating: Press button ¬.
The indicator lamp in the button comes on.
The climate control switches to the following
functions automatically:
R cooling on to dehumidify
R most efficient blower speed and heating
power, depending on outside temperature Climate control system
149Controls in detail
219_AKB; 4; 54, en-US
d2ureepe, Version: 2.11.8.1 2009-05-11T16:21:02+02:00 - Seite 149 Z
Page 158 of 308
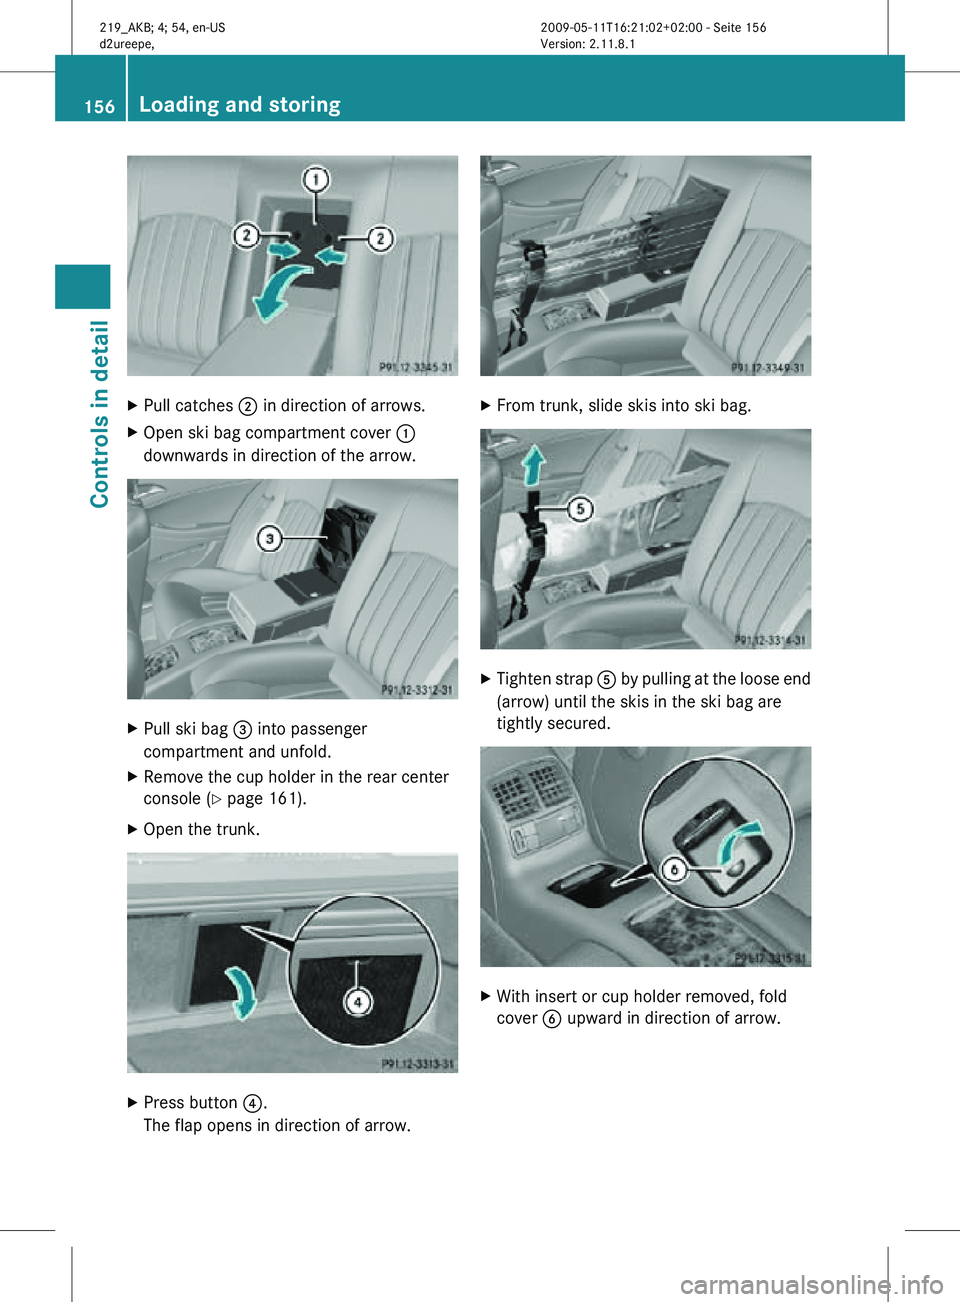
X
Pull catches ; in direction of arrows.
X Open ski bag compartment cover :
downwards in direction of the arrow. X
Pull ski bag = into passenger
compartment and unfold.
X Remove the cup holder in the rear center
console (Y page 161).
X Open the trunk. X
Press button ?.
The flap opens in direction of arrow. X
From trunk, slide skis into ski bag. X
Tighten strap A by pulling at the loose end
(arrow) until the skis in the ski bag are
tightly secured. X
With insert or cup holder removed, fold
cover B upward in direction of arrow. 156
Loading and storingControls in detail
219_AKB; 4; 54, en-US
d2ureepe,
Version: 2.11.8.1 2009-05-11T16:21:02+02:00 - Seite 156
Page 159 of 308
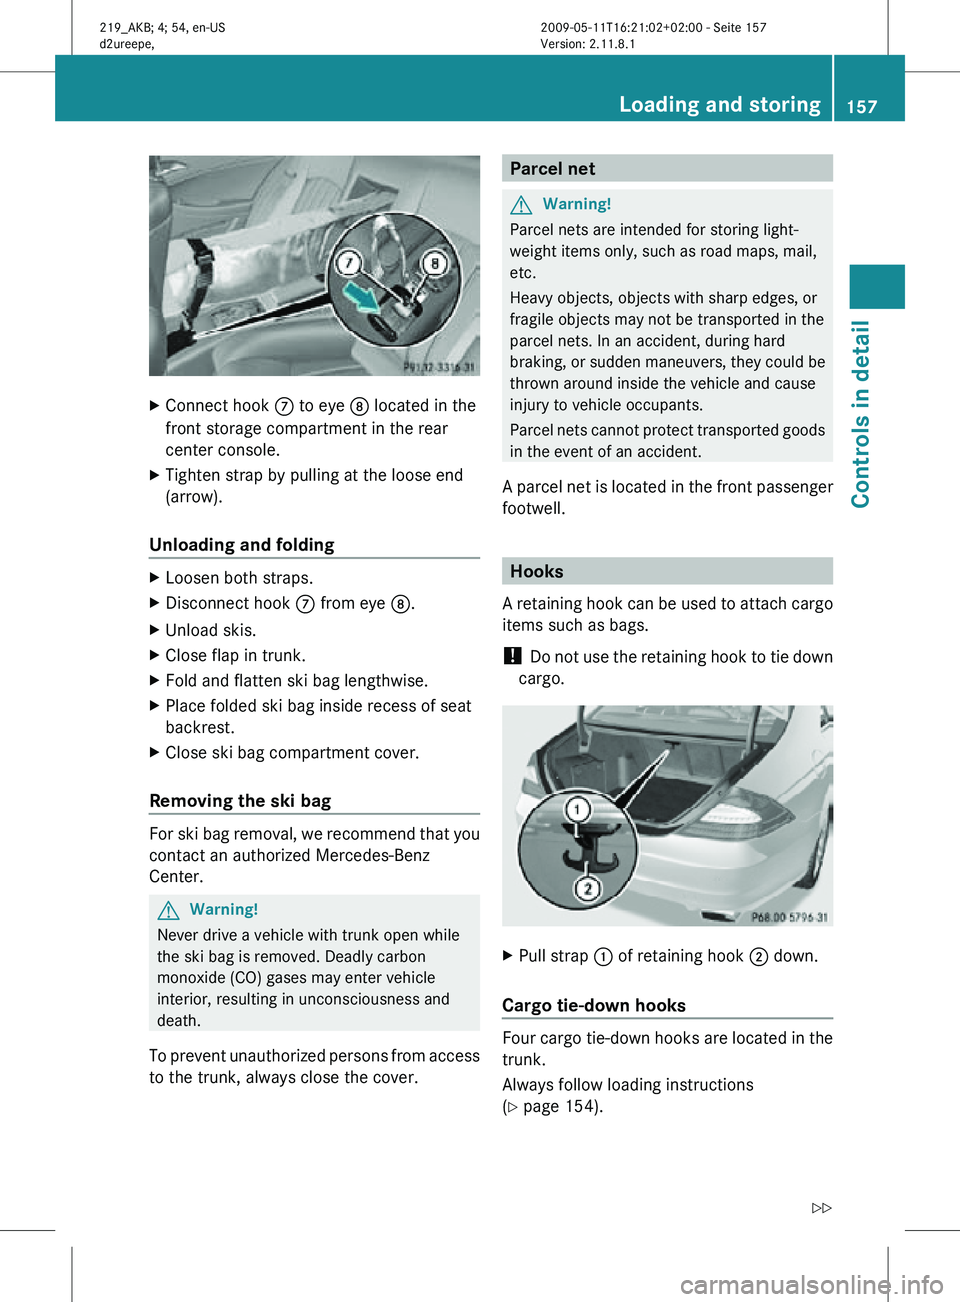
X
Connect hook C to eye D located in the
front storage compartment in the rear
center console.
X Tighten strap by pulling at the loose end
(arrow).
Unloading and folding X
Loosen both straps.
X Disconnect hook C from eye D.
X Unload skis.
X Close flap in trunk.
X Fold and flatten ski bag lengthwise.
X Place folded ski bag inside recess of seat
backrest.
X Close ski bag compartment cover.
Removing the ski bag For ski bag removal, we recommend that you
contact an authorized Mercedes-Benz
Center.
G
Warning!
Never drive a vehicle with trunk open while
the ski bag is removed. Deadly carbon
monoxide (CO) gases may enter vehicle
interior, resulting in unconsciousness and
death.
To prevent unauthorized persons from access
to the trunk, always close the cover. Parcel net
G
Warning!
Parcel nets are intended for storing light-
weight items only, such as road maps, mail,
etc.
Heavy objects, objects with sharp edges, or
fragile objects may not be transported in the
parcel nets. In an accident, during hard
braking, or sudden maneuvers, they could be
thrown around inside the vehicle and cause
injury to vehicle occupants.
Parcel nets cannot protect transported goods
in the event of an accident.
A parcel net is located in the front passenger
footwell. Hooks
A retaining hook can be used to attach cargo
items such as bags.
! Do not use the retaining hook to tie down
cargo. X
Pull strap : of retaining hook ; down.
Cargo tie-down hooks Four cargo tie-down hooks are located in the
trunk.
Always follow loading instructions
(Y page 154). Loading and storing
157Controls in detail
219_AKB; 4; 54, en-US
d2ureepe, Version: 2.11.8.1 2009-05-11T16:21:02+02:00 - Seite 157 Z
Page 161 of 308
i
The Roadside Assistance button º
(Y page 164) and the Information button
E (Y page 167) are located in the
storage compartment.
The front armrest storage compartment can
be ventilated ( Y page 148).
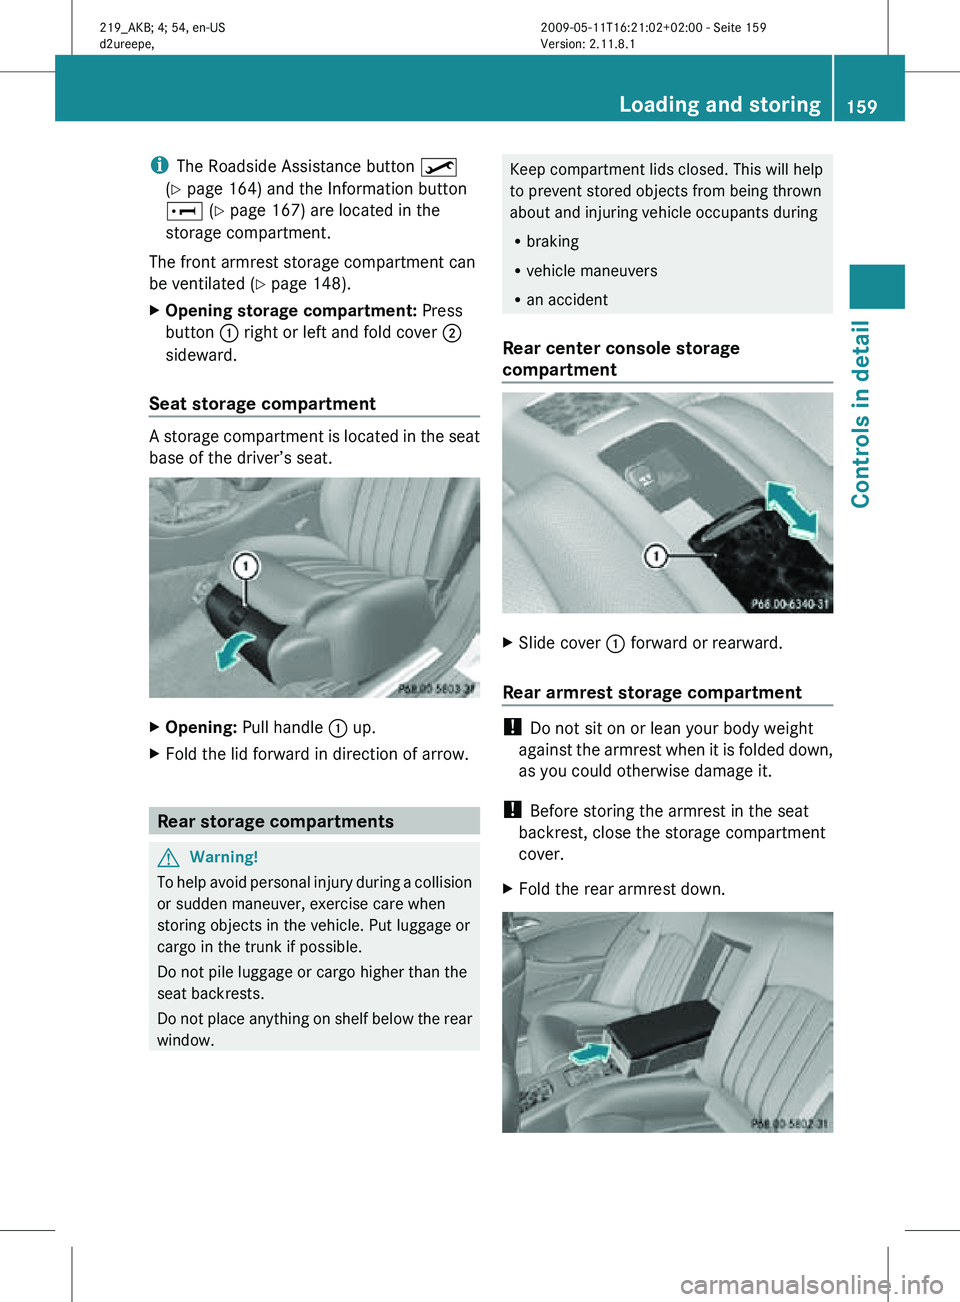
X Opening storage compartment: Press
button : right or left and fold cover ;
sideward.
Seat storage compartment A storage compartment is located in the seat
base of the driver’s seat.
X
Opening: Pull handle : up.
X Fold the lid forward in direction of arrow. Rear storage compartments
G
Warning!
To help avoid personal injury during a collision
or sudden maneuver, exercise care when
storing objects in the vehicle. Put luggage or
cargo in the trunk if possible.
Do not pile luggage or cargo higher than the
seat backrests.
Do not place anything on shelf below the rear
window. Keep compartment lids closed. This will help
to prevent stored objects from being thrown
about and injuring vehicle occupants during
R
braking
R vehicle maneuvers
R an accident
Rear center console storage
compartment X
Slide cover : forward or rearward.
Rear armrest storage compartment !
Do not sit on or lean your body weight
against the armrest when it is folded down,
as you could otherwise damage it.
! Before storing the armrest in the seat
backrest, close the storage compartment
cover.
X Fold the rear armrest down. Loading and storing
159Controls in detail
219_AKB; 4; 54, en-US
d2ureepe, Version: 2.11.8.1 2009-05-11T16:21:02+02:00 - Seite 159 Z
Page 162 of 308
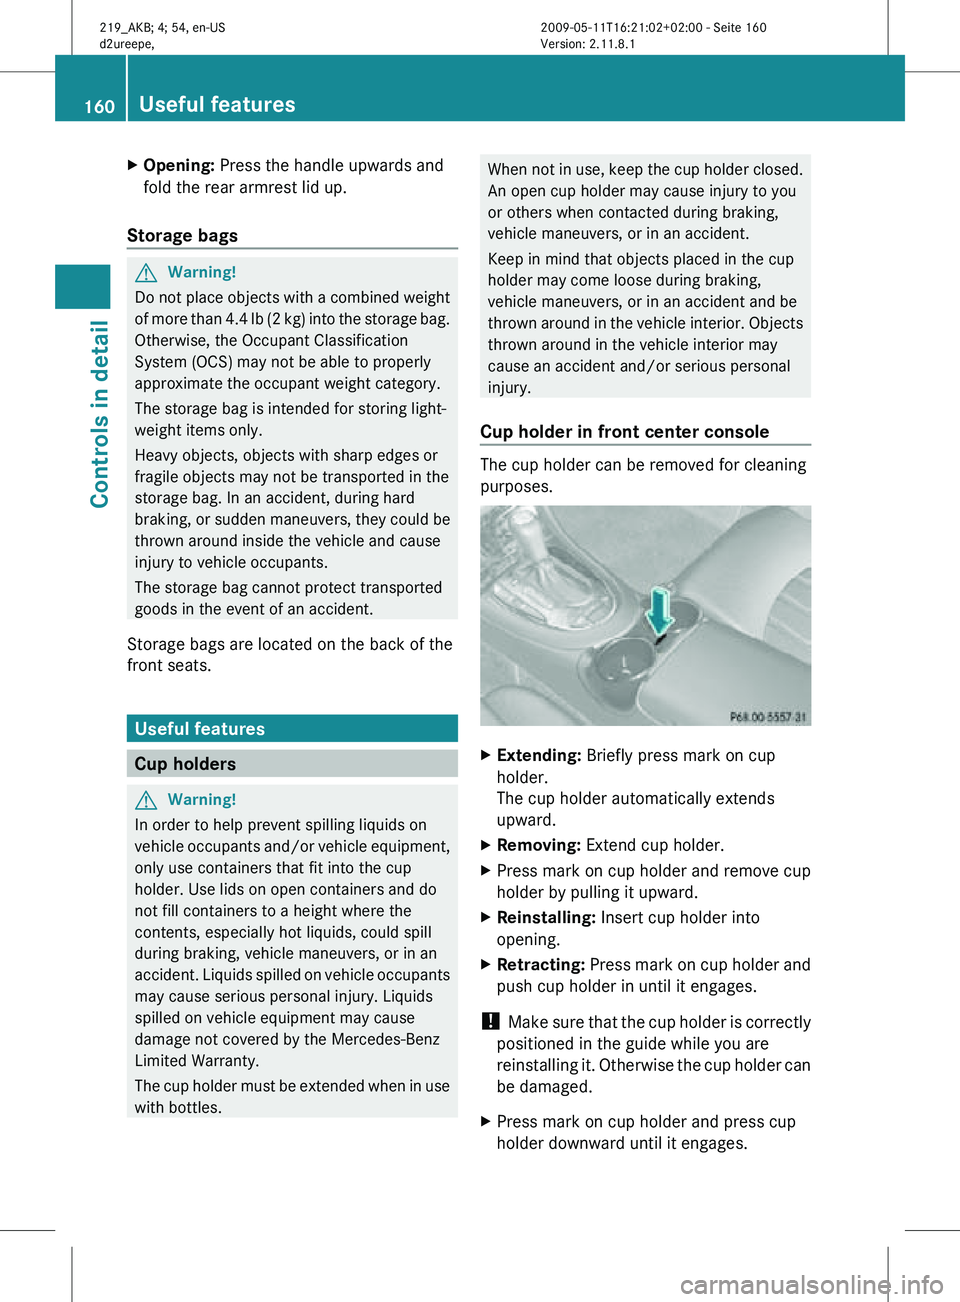
X
Opening: Press the handle upwards and
fold the rear armrest lid up.
Storage bags G
Warning!
Do not place objects with a combined weight
of more than 4.4 lb (2 kg) into the storage bag.
Otherwise, the Occupant Classification
System (OCS) may not be able to properly
approximate the occupant weight category.
The storage bag is intended for storing light-
weight items only.
Heavy objects, objects with sharp edges or
fragile objects may not be transported in the
storage bag. In an accident, during hard
braking, or sudden maneuvers, they could be
thrown around inside the vehicle and cause
injury to vehicle occupants.
The storage bag cannot protect transported
goods in the event of an accident.
Storage bags are located on the back of the
front seats. Useful features
Cup holders
G
Warning!
In order to help prevent spilling liquids on
vehicle occupants and/or vehicle equipment,
only use containers that fit into the cup
holder. Use lids on open containers and do
not fill containers to a height where the
contents, especially hot liquids, could spill
during braking, vehicle maneuvers, or in an
accident. Liquids spilled on vehicle occupants
may cause serious personal injury. Liquids
spilled on vehicle equipment may cause
damage not covered by the Mercedes-Benz
Limited Warranty.
The cup holder must be extended when in use
with bottles. When not in use, keep the cup holder closed.
An open cup holder may cause injury to you
or others when contacted during braking,
vehicle maneuvers, or in an accident.
Keep in mind that objects placed in the cup
holder may come loose during braking,
vehicle maneuvers, or in an accident and be
thrown around in the vehicle interior. Objects
thrown around in the vehicle interior may
cause an accident and/or serious personal
injury.
Cup holder in front center console The cup holder can be removed for cleaning
purposes.
X
Extending: Briefly press mark on cup
holder.
The cup holder automatically extends
upward.
X Removing: Extend cup holder.
X Press mark on cup holder and remove cup
holder by pulling it upward.
X Reinstalling: Insert cup holder into
opening.
X Retracting: Press mark on cup holder and
push cup holder in until it engages.
! Make sure that the cup holder is correctly
positioned in the guide while you are
reinstalling it. Otherwise the cup holder can
be damaged.
X Press mark on cup holder and press cup
holder downward until it engages. 160
Useful featuresControls in detail
219_AKB; 4; 54, en-US
d2ureepe,
Version: 2.11.8.1 2009-05-11T16:21:02+02:00 - Seite 160
Page 163 of 308
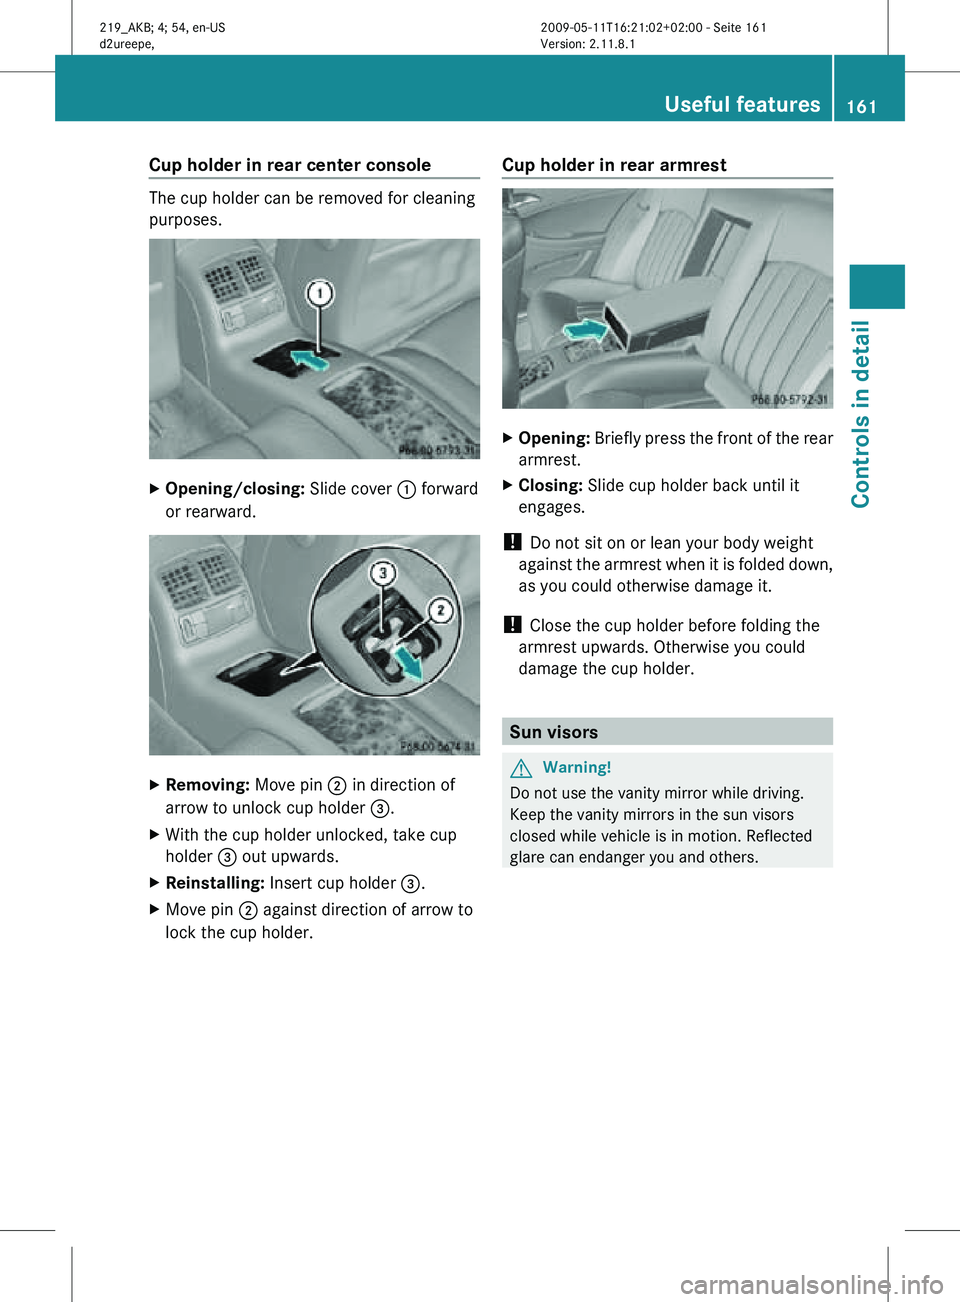
Cup holder in rear center console
The cup holder can be removed for cleaning
purposes.
X
Opening/closing: Slide cover : forward
or rearward. X
Removing: Move pin ; in direction of
arrow to unlock cup holder =.
X With the cup holder unlocked, take cup
holder = out upwards.
X Reinstalling: Insert cup holder =.
X Move pin ; against direction of arrow to
lock the cup holder. Cup holder in rear armrest X
Opening: Briefly press the front of the rear
armrest.
X Closing: Slide cup holder back until it
engages.
! Do not sit on or lean your body weight
against the armrest when it is folded down,
as you could otherwise damage it.
! Close the cup holder before folding the
armrest upwards. Otherwise you could
damage the cup holder. Sun visors
G
Warning!
Do not use the vanity mirror while driving.
Keep the vanity mirrors in the sun visors
closed while vehicle is in motion. Reflected
glare can endanger you and others. Useful features
161Controls in detail
219_AKB; 4; 54, en-US
d2ureepe, Version: 2.11.8.1 2009-05-11T16:21:02+02:00 - Seite 161 Z
Page 164 of 308
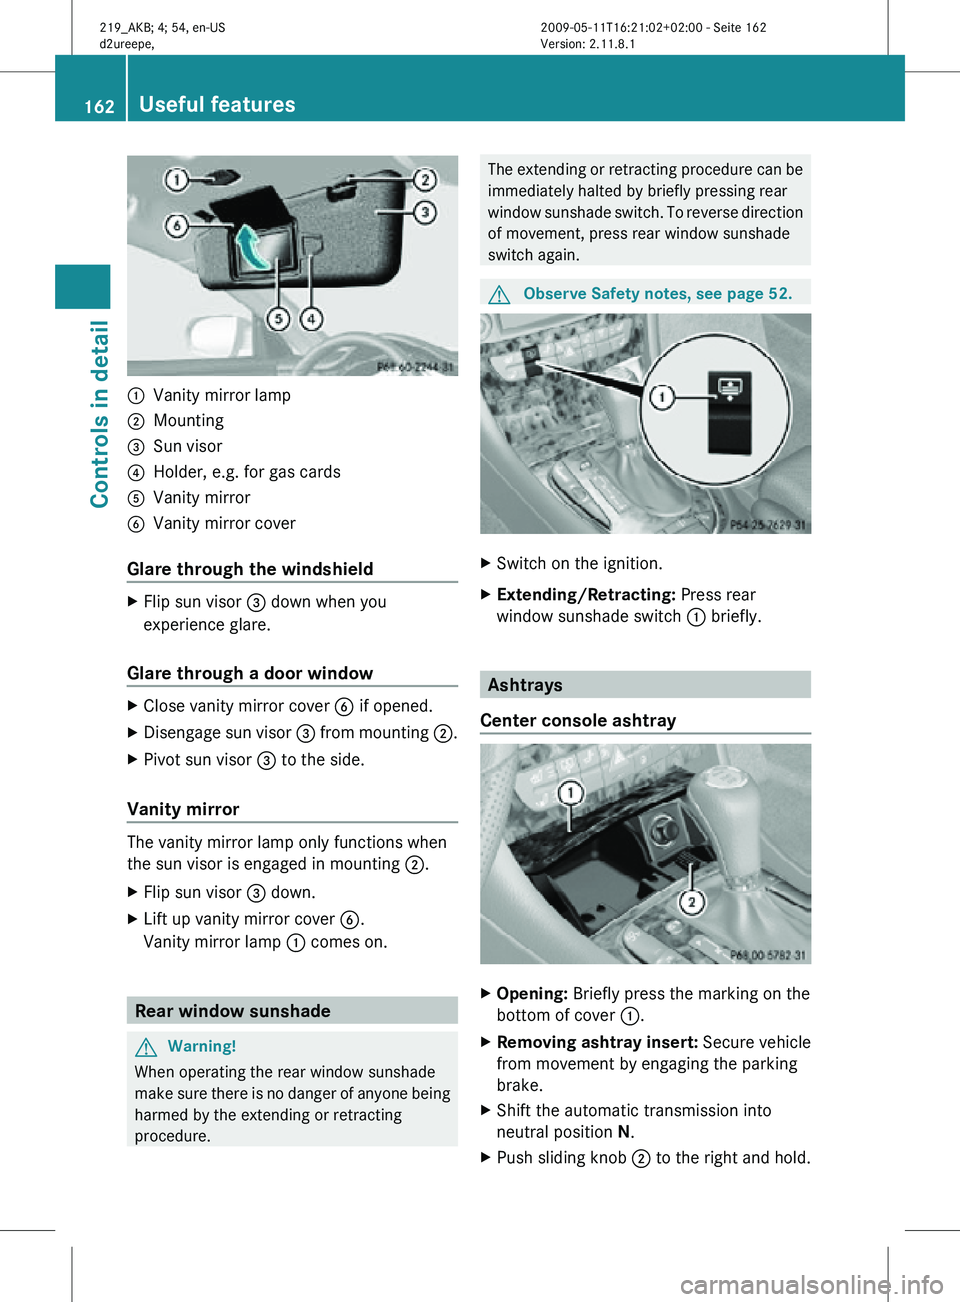
:
Vanity mirror lamp
; Mounting
= Sun visor
? Holder, e.g. for gas cards
A Vanity mirror
B Vanity mirror cover
Glare through the windshield X
Flip sun visor = down when you
experience glare.
Glare through a door window X
Close vanity mirror cover B if opened.
X Disengage sun visor = from mounting ;.
X Pivot sun visor = to the side.
Vanity mirror The vanity mirror lamp only functions when
the sun visor is engaged in mounting ;.
X
Flip sun visor = down.
X Lift up vanity mirror cover B.
Vanity mirror lamp : comes on.Rear window sunshade
G
Warning!
When operating the rear window sunshade
make sure there is no danger of anyone being
harmed by the extending or retracting
procedure. The extending or retracting procedure can be
immediately halted by briefly pressing rear
window sunshade switch. To reverse direction
of movement, press rear window sunshade
switch again.
G
Observe Safety notes, see page 52. X
Switch on the ignition.
X Extending/Retracting: Press rear
window sunshade switch : briefly. Ashtrays
Center console ashtray X
Opening: Briefly press the marking on the
bottom of cover :.
X Removing ashtray insert: Secure vehicle
from movement by engaging the parking
brake.
X Shift the automatic transmission into
neutral position N.
X Push sliding knob ; to the right and hold.162
Useful featuresControls in detail
219_AKB; 4; 54, en-US
d2ureepe,
Version: 2.11.8.1 2009-05-11T16:21:02+02:00 - Seite 162