2010 MERCEDES-BENZ CL550 Seat handle
[x] Cancel search: Seat handlePage 12 of 500

Gearshift pattern ...........................
291
Shifting procedure ......................... 293
Transmission position indicator ..... 294
Transmission positions .................. 294
Generator
see Alternator
Global locking/unlocking
see Key, SmartKey
Glove box ........................................... 348
Gracenote ®
Media Database ............ 171
Gross Axle Weight Rating see GAWR
Gross Vehicle Weight
see GVW
Gross Vehicle Weight Rating
see GVWR
GVW (Gross Vehicle Weight) ............394
GVWR (Gross Vehicle Weight
Rating) ................................................ 394H
Hard plastic trim items, cleaning ....409
Hazard warning flasher ....................278
HD Radio™ ......................................... 154
Headlamp cleaning system .............. 278
Headlamps
Active Bi-Xenon headlamps ........... 274
Automatic headlamp mode
............275
Bi-Xenon ........................................ 274
Cleaning lenses ............................. 406
Cleaning system ............................ 278
Daytime running lamp mode ..........276
High-beam flasher .........................278
High-beam headlamps ...................278
Low-beam headlamps .................... 275
Messages in the multifunction
display ........................................... 446
Replacing bulbs ............................. 463
Switch ............................................ 275
Headliner and shelf below rear
window, cleaning and care of ..........409
Head restraints ................................. 264
Adjustment ............................ 264, 267
Folding back .................................. 268
Rear seat head restraints ............... 268
Heated steering wheel ...................... 270Height adjustment
Seats ............................................. 264
Vehicle level control ...................... 318
High-beam flasher ............................. 278
High-beam headlamps ......................278
Indicator lamp .................................. 29
High-performance brake system
.....400
Hill-start assist system ..................... 315
HOLD function ................................... 316
Hood ................................................... 368
Messages in the multifunction
display ........................................... 439
Horn ...................................................... 27
Hydroplaning ..................................... 400 I
Identification labels ..........................480
Identification number, vehicle
(VIN) ................................................... 481
Ignition ....................................... 262, 285
Immobilizer .......................................... 65
Indicator lamps see Lamps, indicator and warning
Infant and child restraint systems
see Children in the vehicle
Inflation pressure
see Tires, Inflation pressure
Infrared reflecting windshield .........364
Inside door handle ......................34, 256
Instrument cluster ......................29, 300
Illumination .................................... 300
Lamps ............................................ 450
Multifunction display .....................203
Instrument lighting
see Instrument cluster, Illumination
Instrument panel
see Instrument cluster
Instruments and controls
see Cockpit
Interior lighting
Emergency lighting ........................ 280
Front .............................................. 279
Front reading lamps ....................... 279
Rear ............................................... 279
Interior rear view mirror ................... 271
Auto-dimming rear view mirrors .... 27210
Index 216_AKB; 3; 90, en-US
d2ureepe,
Version: 2.11.8.1 2009-05-15T11:47:50+02:00 - Seite 10
Page 36 of 500
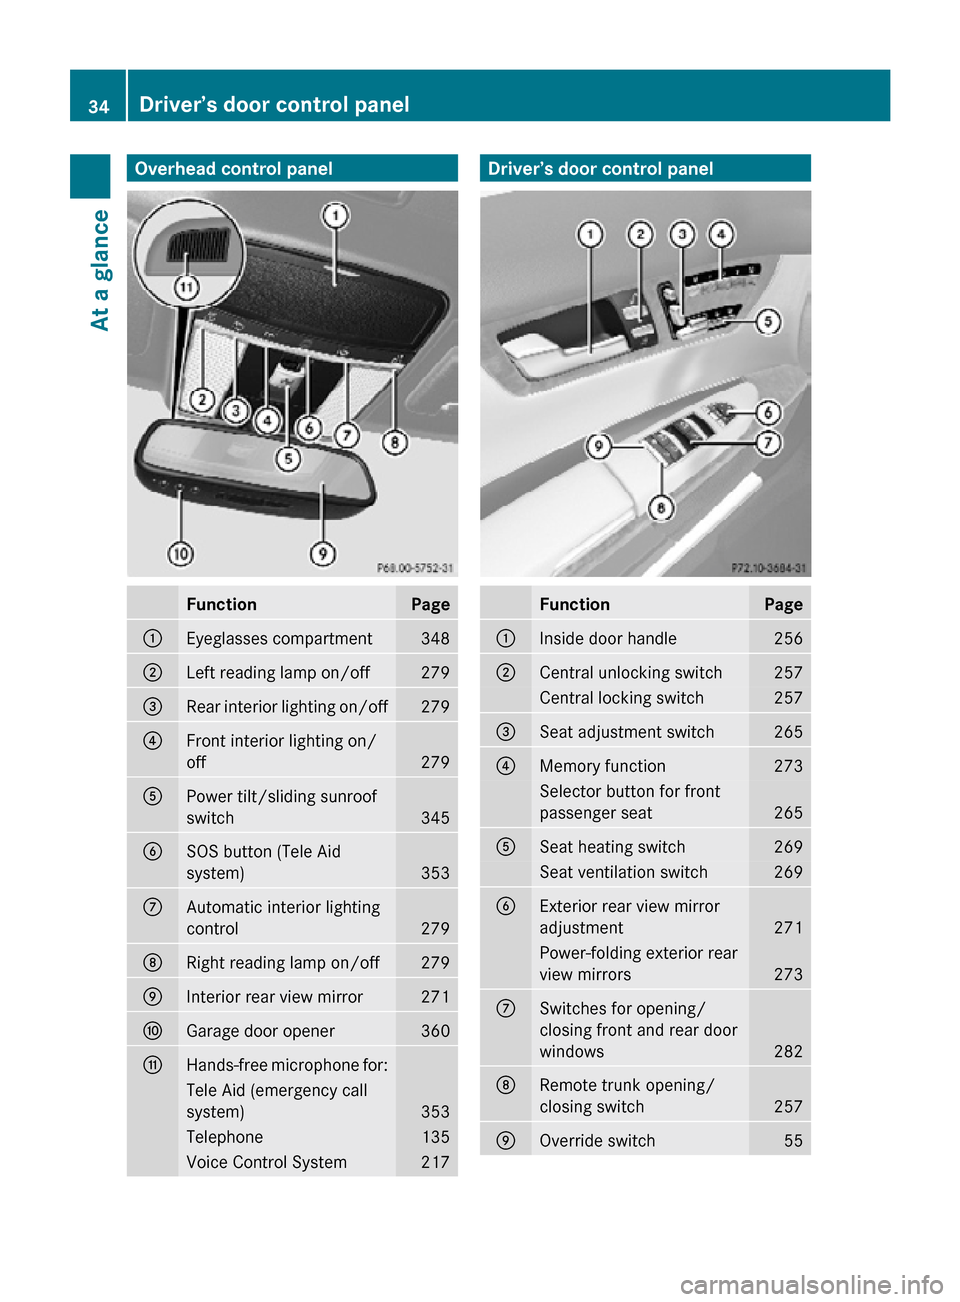
Overhead control panel
Function Page
:
Eyeglasses compartment 348
;
Left reading lamp on/off 279
=
Rear interior lighting on/off 279
?
Front interior lighting on/
off
279
A
Power tilt/sliding sunroof
switch
345
B
SOS button (Tele Aid
system)
353
C
Automatic interior lighting
control
279
D
Right reading lamp on/off 279
E
Interior rear view mirror 271
F
Garage door opener 360
G
Hands-free microphone for:
Tele Aid (emergency call
system)
353
Telephone 135
Voice Control System 217 Driver’s door control panel
Function Page
:
Inside door handle 256
;
Central unlocking switch 257
Central locking switch 257
=
Seat adjustment switch 265
?
Memory function 273
Selector button for front
passenger seat
265
A
Seat heating switch 269
Seat ventilation switch 269
B
Exterior rear view mirror
adjustment
271
Power-folding exterior rear
view mirrors
273
C
Switches for opening/
closing front and rear door
windows
282
D
Remote trunk opening/
closing switch
257
E
Override switch 5534
Driver’s door control panelAt a glance
216_AKB; 3; 90, en-US
d2ureepe,
Version: 2.11.8.1 2009-05-15T11:47:50+02:00 - Seite 34
Page 41 of 500
It is important to your safety and that of your
passengers to have deployed air bags
replaced and to have any malfunctioning air
bags
repaired.
This will help to make sure the
air bags will continue to provide supplemental
crash protection for occupants.
Safety guidelines for the seat belt,
Emergency Tensioning Device (ETD)
and air bag G
Warning!
R Damaged seat
belts or seat belts that have
been subjected to stress in an accident
must be replaced. Their anchoring points
must also be checked. Only use seat belts
installed or supplied by an authorized
Mercedes-Benz Center.
R Air bags and pyrotechnic Emergency
Tensioning Devices (ETDs) contain
perchlorate material, which may require
special handling and regard for the
environment. Check with your local
government’s disposal guidelines.
California residents, see
www.dtsc.ca.gov/HazardousWaste/
Perchlorate/index.cfm.
R Air bags and ETDs are designed to function
on a one-time-only basis. An air bag or ETD
that has deployed must be replaced.
R Do not pass seat belts over sharp edges.
They could tear.
R Do not make any modification that could
change the effectiveness of the seat belts.
R Do not bleach or dye seat belts as this may
severely weaken them. In a crash they may
not be able to provide adequate protection.
R No modifications of any kind may be made
to any components or wiring of the SRS.
R Do no change or remove any component or
part of the SRS.
R Do not install additional trim material, seat
covers, badges, etc. over the steering
wheel hub, front passenger front air bag cover, outboard sides of the seat
backrests, door trim panels, or door frame
trims.
R Do not install additional electrical/
electronic equipment on or near SRS
components and wiring.
R Keep area
between air bags and occupants
free of objects (e.g. packages, purses,
umbrellas, etc.).
R Do not hang items such as coat hangers
from the coat hooks or handles over the
door. These items may be thrown around in
the vehicle and cause head and other
injuries when the window curtain air bag is
deployed.
R Air bag system components will be hot after
an air bag has inflated. Do not touch them.
R Never place your feet on the instrument
panel, dashboard, or on the seat. Always
keep both feet on the floor in front of the
seat.
R Improper repair work on the SRS creates a
risk of rendering the SRS inoperative or
causing unintended air bag deployment.
Work on the SRS must therefore only be
performed by qualified technicians.
Contact an authorized Mercedes-Benz
Center.
R For your protection and the protection of
others, when scrapping the air bag unit or
ETD, our safety instructions must be
followed. These instructions are available
from any authorized Mercedes-Benz
Center.
R Given the considerable deployment speed,
required inflation volume, and the material
of the air bags, there is the possibility of
abrasions or other, potentially more serious
injuries resulting from air bag deployment.
If you sell your vehicle, we strongly
recommend that you inform the subsequent
owner that the vehicle is equipped with SRS.
Also refer them to the applicable section in
the Operator’s Manual. Occupant safety
39
Safety and security
216_AKB; 3; 90, en-US
d2ureepe, Version: 2.11.8.1 2009-05-15T11:47:50+02:00 - Seite 39 Z
Page 256 of 500

i
USA only:
This device complies with Part 15 of the
FCC Rules. Operation is subject to the
following two conditions:
1. This device may not cause harmful
interference, and
2.
this device must accept anyinterference received, including
interference that may cause undesired
operation.
Any unauthorized modification to this
device could void the user’s authority to
operate the equipment.
i Canada only:
This device complies with RSS-210 of
Industry Canada. Operation is subject to
the following two conditions:
1. This device may not cause interference, and
2. this device must accept any interference received, including
interference that may cause undesired
operation of the device.
Any unauthorized modification to this
device could void the user’s authority to
operate the equipment.
Important notes on using KEYLESS-GO R
You can also use the SmartKey with
KEYLESS-GO like a normal SmartKey
(Y page 252).
R You can combine KEYLESS-GO functions
with normal SmartKey functions (e.g.
unlocking with KEYLESS-GO and locking
with button &).
R Always carry the SmartKey with you.
R Never store the SmartKey together with
-electronic items
such as a mobile phone
or another SmartKey
- metallic objects such as coins or metal
foil Doing so could impair the function of the
KEYLESS-GO system.
R To lock
or unlock the vehicle, the SmartKey
must be located outside the vehicle within
approximately 3 ft (1 m) of a door or the
trunk.
R When the vehicle has been parked for more
than 72 hours, the KEYLESS-GO function is
deactivated. Pull an outside door handle
and switch on the ignition once to activate
the KEYLESS-GO function.
R If the SmartKey is positioned farther away
from the vehicle, the system may no longer
recognize the SmartKey. The vehicle
cannot be locked or the engine started via
the KEYLESS-GO system.
R If the SmartKey is removed from the vehicle
(e.g. if a passenger exits the vehicle with
the SmartKey)
-when pressing the KEYLESS-GO start/
stop button or trying to lock the vehicle
with the outside door handle the
message Key Not Detected appears in
the multifunction display
- with the engine running, the red message
Key Not Detected appears in the
multifunction display while driving off
Find the SmartKey or change its present
location immediately (e.g. place it on the
front passenger seat or insert it in shirt
pocket).
R If you have started the engine with the
KEYLESS-GO start/stop button, you can
turn it off again by
-pressing the KEYLESS-GO start/stop
button
- inserting the SmartKey into the starter
switch when the vehicle is at a standstill
and the automatic transmission is in park
position P 254
Locking and unlocking
Controls in detail
216_AKB; 3; 90, en-US
d2ureepe,
Version: 2.11.8.1 2009-05-15T11:47:50+02:00 - Seite 254
Page 291 of 500

children unattended in the vehicle, or with
access to an unlocked vehicle. Children could
release the electronic parking brake and/or
shift the automatic transmission out of park
position P, either of which could result in an
accident and/or serious personal injury.
Releasing electronic parking brake
manually
X
Switch on the ignition.
X Pull handle :.
The red indicator lamp F (USA only)
or ! (Canada only) in the instrument
cluster goes out.
Releasing electronic parking brake
automatically
The electronic parking brake releases
automatically when all of the following
conditions are fulfilled:
R The engine is running.
R The automatic transmission is in drive
position D or reverse gear R. With the
automatic transmission in reverse gear R
the trunk lid must be closed.
R The hood is closed.
R You have fastened your seat belt.
R You depress on the accelerator pedal. i
If you have not fastened your seat belt,
the following conditions must be met in
order for the electronic parking brake to
release automatically:
R The driver’s door is closed and you shift
the automatic transmission out of park
position P.
or
R The driver’s door is closed and you drive
faster than 2 mph (3 km/h).
Engaging electronic parking brake
manually
X Press handle :.
The red indicator lamp F (USA only)
or ! (Canada only) in the instrument
cluster comes on.
i You can engage the electronic parking
brake even when the SmartKey is removed
from the starter switch.
Engaging electronic parking brake
automatically
The electronic parking brake engages
automatically when the HOLD function
(Y page 316) or DISTRONIC PLUS
(Y page 304) brings your vehicle to a
standstill. In addition, at least one of the
following conditions must be met:
R The engine is turned off.
R The driver’s door is opened and the seat
belt is not inserted in the seat belt buckle.
R The hood lock is released.
R The trunk lid is opened while the automatic
transmission is in reverse gear R.
R The vehicle is stationary for an extended
period of time.
The red indicator lamp F (USA only)
or ! (Canada only) in the instrument
cluster comes on.
i In addition to engaging the electronic
parking brake, the automatic transmission
may shift into park position P
automatically. Driving and parking
289Controls in detail
216_AKB; 3; 90, en-US
d2ureepe, Version: 2.11.8.1 2009-05-15T11:47:50+02:00 - Seite 289 Z
Page 352 of 500

X
Opening: Pull release catch : and swing
the storage compartment cover upward in
direction of arrow.
Rear seat storage compartment X
Opening: Pull handle : backward in the
direction of arrow.
Rear storage box X
Fold the rear armrest down.
! Do not sit on or lean your body weight
against the armrest when it is folded down,
as you could otherwise damage it. X
Pull handle : upward in direction of arrow.
X Swing down cover ; in direction of arrow.
Storage spaces under trunk floor :
Storage space
; Cover handle
= Trunk floor cover
X Lift up trunk floor cover = and engage
cover handle ; in upper edge of trunk. Useful features
Cup holders
G
Warning!
In order to help prevent spilling liquids on
vehicle occupants and/or vehicle equipment,
only use containers that fit into the cup
holder. Use lids on open containers and do
not fill containers to a height where the
contents, especially hot liquids, could spill 350
Useful featuresControls in detail
216_AKB; 3; 90, en-US
d2ureepe,
Version: 2.11.8.1 2009-05-15T11:47:50+02:00 - Seite 350