2010 MERCEDES-BENZ CL550 tension
[x] Cancel search: tensionPage 74 of 500

Symbol How to use the COMAND
controller
XVY
X
Slide
R to move through horizontal
menus
R to exit vertical menus X
Slide and hold
R for fast forward or reverse for
audio CD or audio DVD
playback
R to move through a navigation
map aVb
X
Slide and hold
R to move through a navigation
map USB socket
Connect USB storage device to the built-in
USB socket
: in the glove box to transfer
data ( Y page 82) or to playback audio tracks
(Y page 162). i
Do not use USB extensions or adapters.
They could impair functionality.
The initialization of large USB storage
devices that contain a large number of files
may take several minutes.
Supported USB storage devices
The following USB storage devices are
supported:
R USB flash drives
R USB hard drives (1", 1.8", and 2.5") with a
starting/steady current not to exceed
800 mA (separate power supply may be
necessary)
i The USB socket supports USB storage
devices of “USB Device Subclass 6”.
Information on “USB Device Subclass 6” is
available from the manufacturer of the
respective device.
Media interface The media interface is located in the glove
box. For information about using the media
interface, see (Y page 183).
Operating COMAND
Main function menu overview Each of the main functions
Navi, Audio, Telephone, Video and Vehicle has a main menu
that consists of menus or functions. 72
COMAND introductionControl systems
216_AKB; 3; 90, en-US
d2ureepe,
Version: 2.11.8.1 2009-05-15T11:47:50+02:00 - Seite 72
Page 128 of 500

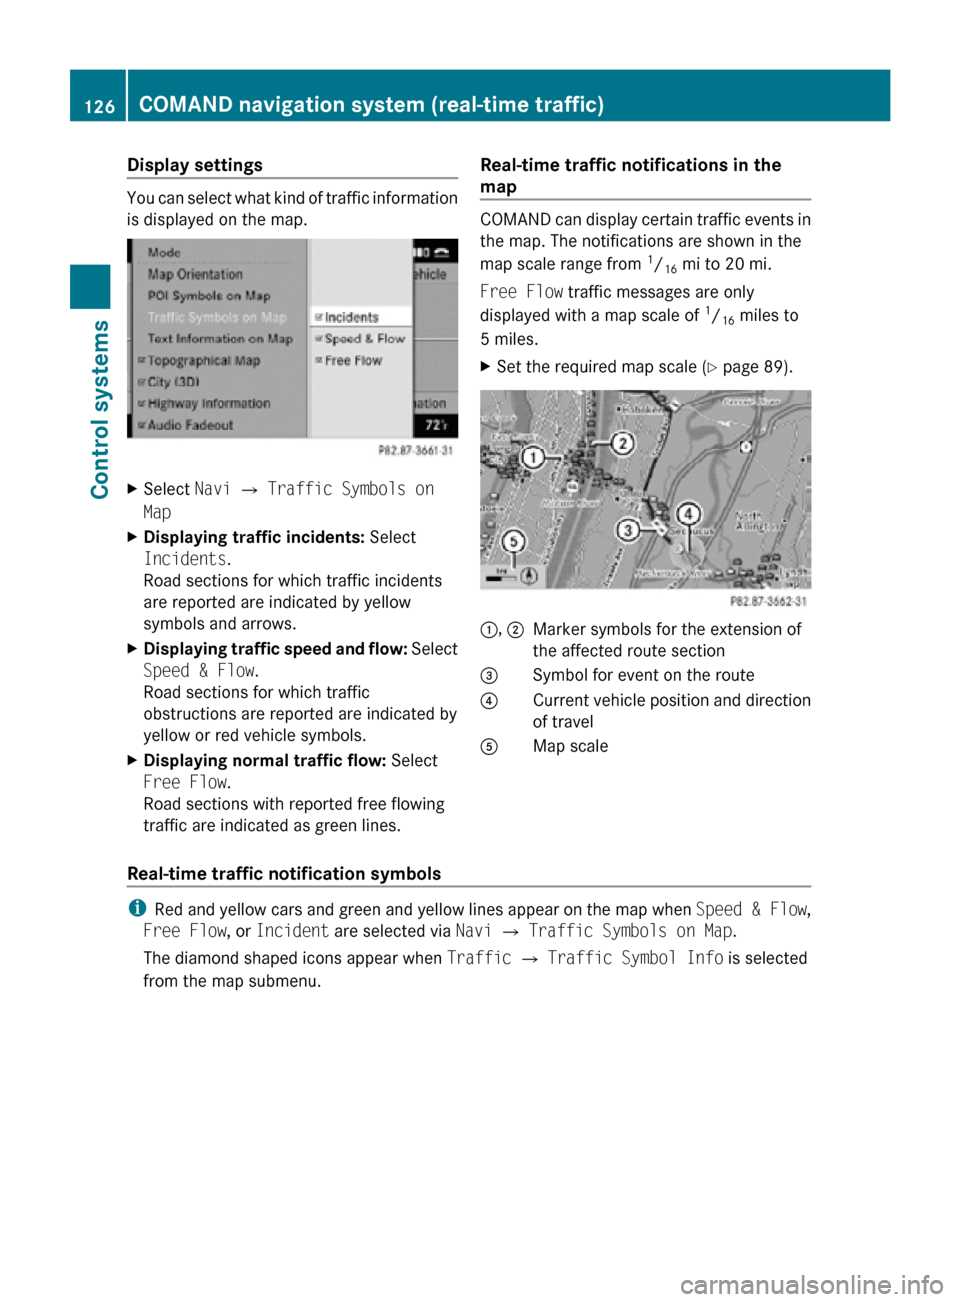
Display settings
You can select what kind of traffic information
is displayed on the map.
X
Select Navi Q Traffic Symbols on
Map
X Displaying traffic incidents: Select
Incidents.
Road sections for which traffic incidents
are reported are indicated by yellow
symbols and arrows.
X Displaying traffic speed and flow: Select
Speed & Flow.
Road sections for which traffic
obstructions are reported are indicated by
yellow or red vehicle symbols.
X Displaying normal traffic flow: Select
Free Flow.
Road sections with reported free flowing
traffic are indicated as green lines. Real-time traffic notifications in the
map COMAND can display certain traffic events in
the map. The notifications are shown in the
map scale range from
1
/ 16 mi to 20 mi.
Free Flow traffic messages are only
displayed with a map scale of 1
/ 16 miles to
5 miles.
X Set the required map scale ( Y page 89). 1, 2
Marker symbols for the extension of
the affected route section
3 Symbol for event on the route
4 Current vehicle position and direction
of travel
A Map scale
Real-time traffic notification symbols i
Red and yellow cars and green and yellow lines appear on the map when Speed & Flow,
Free Flow, or Incident are selected via Navi Q Traffic Symbols on Map.
The diamond shaped icons appear when Traffic Q Traffic Symbol Info is selected
from the map submenu. 126
COMAND navigation system (real-time traffic)Control systems
216_AKB; 3; 90, en-US
d2ureepe,
Version: 2.11.8.1 2009-05-15T11:47:50+02:00 - Seite 126
Page 166 of 500

You must observe the following when
assigning track names:
R
Track names must have at least one
character.
R Track names must have the extension
“mp3” or “wma”.
R There must be a period between the track
name and the extension.
Example of a correct track name:
Track1.mp3
Compatible file systems and
compression methods COMAND supports the following formats:
R
MPEG1 Audio Layer 3 (MP3) 19
R Microsoft Windows Media Audio (WMA) V2,
V7, V8 or V9 that are not copy-proof
Bit and sampling rates MP3
COMAND supports MP3 files of the following
types:
R
Fixed and variable bit rates from
32 kbit/s up to 320 kbit/s
R Sampling rates of 24 kHz to 48 kHz
WMA (Windows Media ®
Audio)
Windows Media ®
Audio (WMA) is an audio
data compression technology developed by
Microsoft ®
.
COMAND supports WMA files of the following
types:
R Fixed and variable bit rates from 5 kbit/s
up to 384 kbit/s
R Sampling rates of 8 kHz to 48 kHz
COMAND does not support WMA files of the
following types: R
DRM (Digital Rights Management) coded
files
R variable bit rates
R Losless Settings
R WMA Pro
R 5.1-Surround
i Only use tracks with a bit rate of above
128 kbit/s and a sampling rate of above
44.1 kHz. Lower rates will cause an audible
loss of sound quality. This applies in
particular when you have switched on 3-D
sound.
Notes on copyright The music tracks that you create and play
back in the MP3 or WMA format are generally
subject to copyright protection in accordance
with the applicable international and national
regulations.
In many countries, reproductions are not
permitted without the prior consent of the
copyright holder, not even for private use.
Make sure that you know the applicable
copyright regulations and that you comply
with these.
If you own these rights yourself, e.g. for your
own compositions and recordings, or the
copyright holder has granted you permission,
these restrictions do not apply.
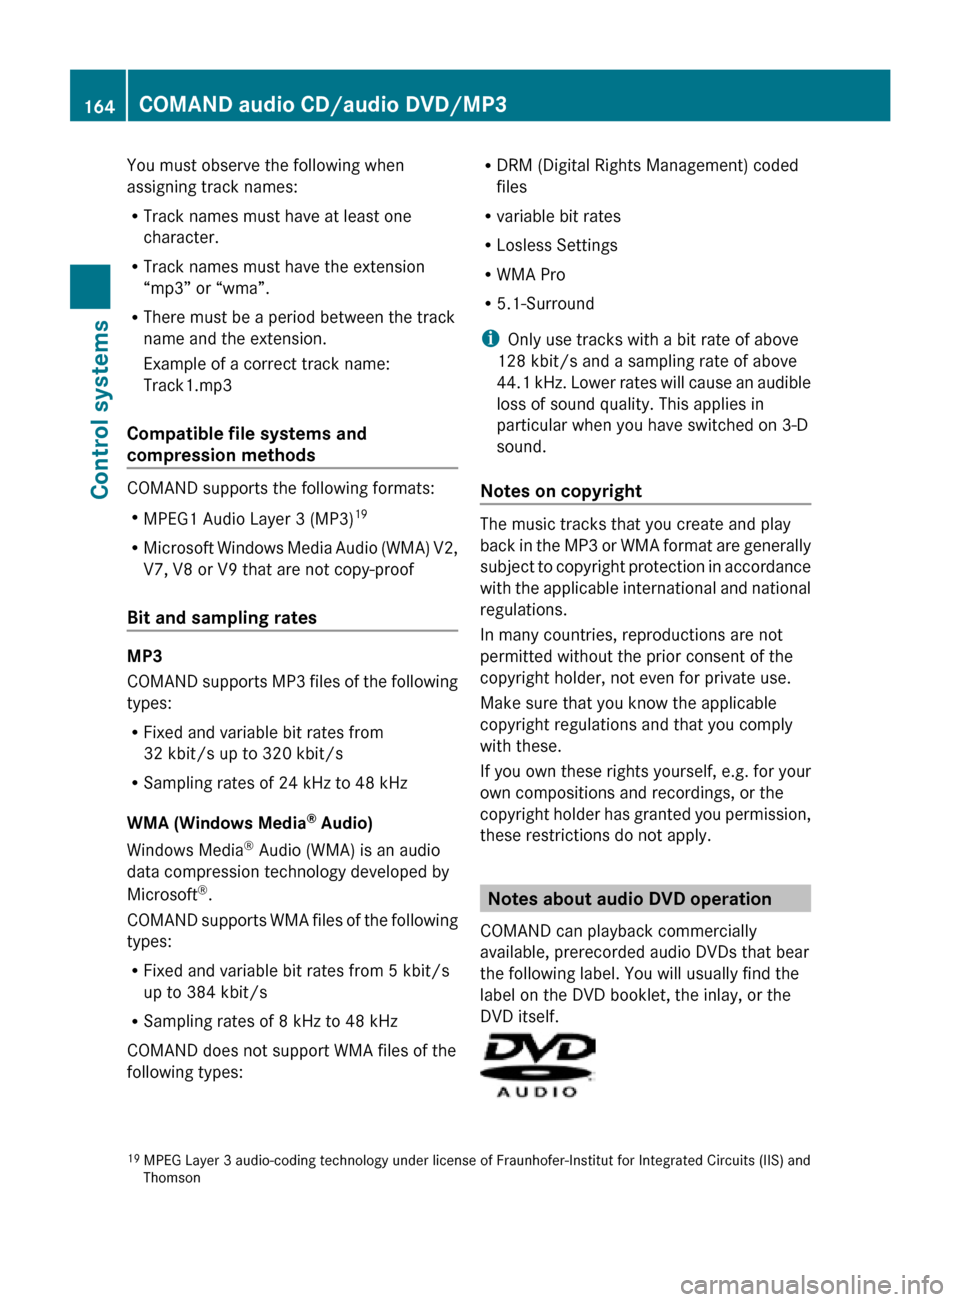
Notes about audio DVD operation
COMAND can playback commercially
available, prerecorded audio DVDs that bear
the following label. You will usually find the
label on the DVD booklet, the inlay, or the
DVD itself. 19
MPEG Layer 3 audio-coding technology under license of Fraunhofer-Institut for Integrated Circuits (IIS) and
Thomson 164
COMAND audio CD/audio DVD/MP3Control systems
216_AKB; 3; 90, en-US
d2ureepe,
Version: 2.11.8.1 2009-05-15T11:47:50+02:00 - Seite 164
Page 186 of 500

For your safety and the safety of others, pull
over to a safe location and stop before
operating an external audio source.
Connections i
Always store the devices in a safe place.
Only use genuine Mercedes-Benz
connector cables.
Suitable connector cables are located in
the vehicle or can be purchased at any
authorized Mercedes-Benz Center.
The media interface allows for connection of
the following media to the COMAND:
R iPod ®
R USB devices
R MP3 player
i For further information on compatible
multimedia devices
R visit www.mbusa-mobile.com
R call the Mercedes-Benz Customer
Assistance Center at
1-800-FOR-MERCedes
(1-800-367-6372) (in the USA)
R call Customer Service at
1-800-387-0100 (in Canada)
Supported USB devices The following USB devices are supported:
R
USB flash drives
R USB hard drives (1", 1.8", and 2.5") with a
starting/steady current not to exceed
800 mA (separate power supply may be
necessary)
R selected MP3 players
i The media interface supports USB
storage devices of “USB Device
Subclass 6”. Information on “USB Device
Subclass 6” is available from the
manufacturer of the respective device. Supported file formats on USB devices The following file formats are supported:
R
MP3: CBR, VBR (up to 320 kbit/s)
R WMA: CBR, VBR (up to 320 kbit/s)
Special characteristics of USB devices
R Do not store data other than audio data on
a USB device. Doing so will increase the
time required to initialize the USB device.
R A maximum of 8 directory levels with up to
1000 tracks each are supported.
R Do not use USB extensions or adapters.
They could impair functionality.
R Playlists on the USB device will be searched
for in the background. Playlists that were
found will be available in separate
categories among the folders. The
initialization of large USB storage devices
that contain a large number of files may
take several minutes.
i Files that are protected via DRM
(Digital Rights Management) are not
supported by the media interface. Connecting external devices
The media interface is located in the glove
box.
Only connect one device at a time. Otherwise
you will not be able to operate the external
device. For more information contact an
authorized Mercedes-Benz Center.184
Media InterfaceControl systems
216_AKB; 3; 90, en-US
d2ureepe,
Version: 2.11.8.1 2009-05-15T11:47:50+02:00 - Seite 184
Page 357 of 500

button
E to perform the acquaintance
call. Failure to complete either of these
steps may result in a system that is not
activated.
If you have any questions regarding
activation, please call the Customer
Assistance Center at
1-800-FOR-MERCedes (1-800-367-6372)
(USA only) or 1-888-923-8367 (Canada
only).
An emergency call is initiated automatically
following an accident in which the Emergency
Tensioning Devices (ETDs) or air bags have
deployed.
i An automatically initiated Tele Aid
emergency call cannot be canceled.
An emergency call can also be initiated
manually ( Y page 355).
Once the emergency call is in progress, the
indicator lamp in the SOS button will begin to
flash. The message Connecting Call
appears in the multifunction display.
Emergency Call Activated appears in the
COMAND display and the audio system is
muted. When the connection is established,
the message Call Connected appears in the
multifunction display. Emergency Call
Activated appears in the COMAND display.
All information relevant to the emergency,
such as the location of the vehicle
(determined by the GPS satellite location
system), vehicle model, identification number
and color are generated.
i While the emergency call message
Emergency Call Activated is displayed,
operation of the audio system or COMAND
system is not possible.
The climate control system can be
operated using the climate control panel
(Y page 194).
A voice connection between the Customer
Assistance Center and the occupants of the
vehicle will be established automatically soon
after the emergency call has been initiated.
The Customer Assistance Center will attempt to determine the nature of the emergency
more precisely, provided they can speak to
an occupant of the vehicle.
i
If no vehicle occupant responds, an
ambulance will be sent to the vehicle
immediately. G
Warning!
If the indicator lamp in the SOS button is
flashing continuously and there was no voice
connection to the Customer Assistance
Center established, then the Tele Aid system
could not initiate an emergency call (e.g. the
relevant cellular phone network is not
available).
The message Call Failed appears in the
multifunction display for approximately
10 seconds.
Should this occur, assistance must be
summoned by other means.
i During the emergency call the telephone
is switched off automatically and must be
switched back on to make a call.
i The “911” emergency call system is a
public service. Using it without due cause
is a criminal offense.
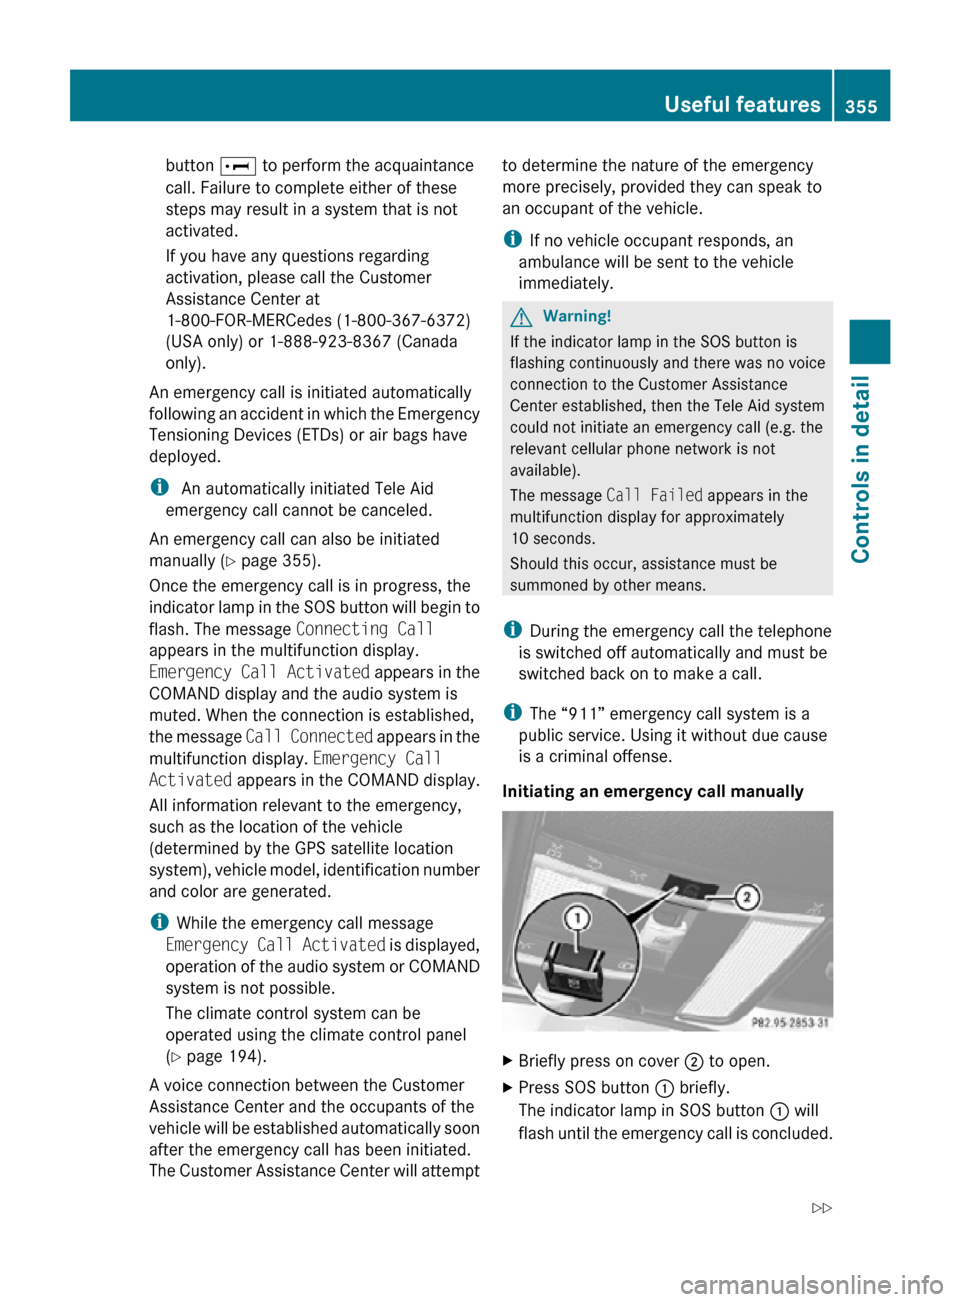
Initiating an emergency call manually X
Briefly press on cover ; to open.
X Press SOS button : briefly.
The indicator lamp in SOS button : will
flash until the emergency call is concluded. Useful features
355Controls in detail
216_AKB; 3; 90, en-US
d2ureepe, Version: 2.11.8.1 2009-05-15T11:47:50+02:00 - Seite 355 Z
Page 410 of 500

Cleaning the windows and the wiper
blades
!
The windshield wipers must be in a
vertical position before folding them away
from the windshield. They could otherwise
damage the hood.
Never open
the hood when the wiper arms
are folded forward.
X Make sure the hood is fully closed.
X Switch on the ignition.
X Turn combination switch to wiper setting
° (Y page 280).
X With wiper arms in vertical position, switch
off the ignition. G
Warning!
For safety reasons, switch off wipers and
remove SmartKey from starter switch before
cleaning the windshield and/or the wiper
blades. Vehicles with KEYLESS-GO: Make
sure the vehicle’s on-board electronics have
status 0. Otherwise, the wiper motor could
suddenly turn on and cause injury.
! Do not pull on the wiper blade inserts.
They could tear.
X Fold the wiper arms forward until they snap
into place.
X Clean the windshield and the wiper blade
inserts with a clean cloth and mild
detergent solution.
X Use a soft, clean cloth and a mild window
cleaning solution on all outside and inside
glass surfaces.
An automotive glass cleaner is
recommended.
! Fold the
windshield wiper arms back onto
the windshield before turning the SmartKey
in the starter switch or pressing the
KEYLESS-GO start/stop button.
Hold on to the wiper when folding the wiper
arm back. If released, the force of the impact from the tensioning spring could
crack the windshield.
! To clean the window interior, do not use
a dry
cloth, abrasives, solvents or cleaners
containing solvents. Do not touch the
inside of the windows with hard objects
such as an ice scraper or ring. Doing so may
damage the windows.
Light alloy wheels If possible, clean wheels once a week.
X
Use Mercedes-Benz approved Wheel Care,
a soft bristle brush and a strong spray of
water for cleaning the light alloy wheels.
! Only use acid-free cleaning materials.
Acid may cause corrosion or damage the
clear coat.
! The vehicle should not be parked for an
extended period of time immediately after
it has
been cleaned. This applies especially
after the wheel rims have been cleaned
with wheel rim cleaner. Wheel rim cleaners
can lead to increased corrosion of the
brake disks and brake pads. Non-approved
wheel cleaners may also damage the wheel
paint if the vehicle is not driven after
cleaning.
Therefore, the vehicle’s brake system
should always be warmed-up before it is
parked after cleaning. Drive your vehicle for
several minutes to allow the brakes to dry.
When applying Mercedes-Benz approved
Tire Care and Mercedes-Benz approved
Wheel Care products, take care not to
spray them on the brake disks. 408
Vehicle careOperation
216_AKB; 3; 90, en-US
d2ureepe,
Version: 2.11.8.1 2009-05-15T11:47:50+02:00 - Seite 408
Page 414 of 500

Vehicle equipment
i This Operator’s Manual describes all
features, standard or optional, potentially
available for your vehicle at the time of
purchase. Please be aware that your
vehicle might not be equipped with all
features described in this manual. Where will I find ...?
First aid kit
i Check expiration dates and contents for
completeness at least once a year and
replace missing/expired items.
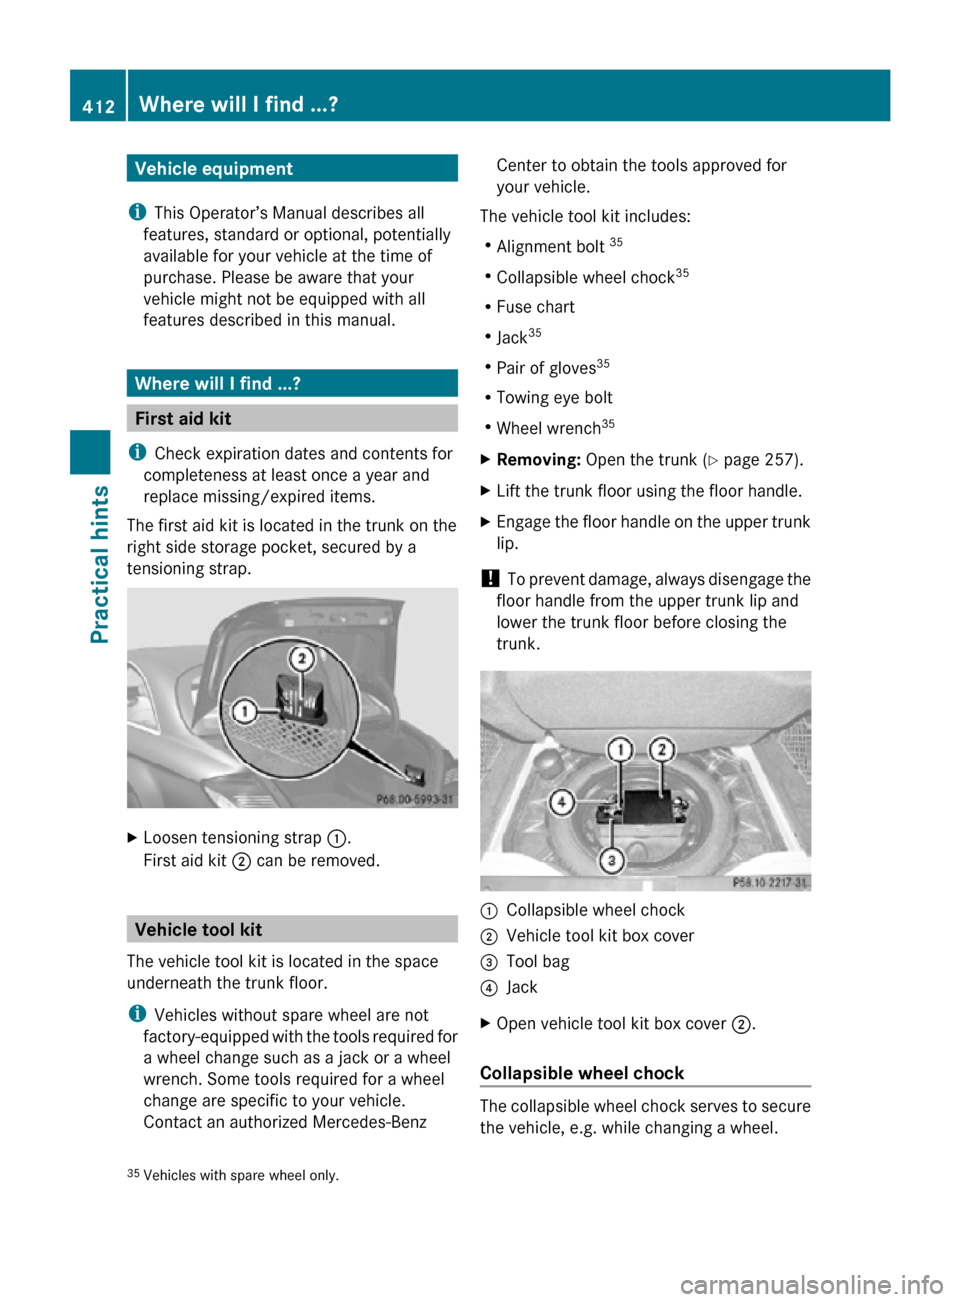
The first aid kit is located in the trunk on the
right side storage pocket, secured by a
tensioning strap. X
Loosen tensioning strap :.
First aid kit ; can be removed. Vehicle tool kit
The vehicle tool kit is located in the space
underneath the trunk floor.
i Vehicles without spare wheel are not
factory-equipped with the tools required for
a wheel change such as a jack or a wheel
wrench. Some tools required for a wheel
change are specific to your vehicle.
Contact an authorized Mercedes-Benz Center to obtain the tools approved for
your vehicle.
The vehicle tool kit includes:
R Alignment bolt 35
R Collapsible wheel chock 35
R Fuse chart
R Jack 35
R Pair of gloves 35
R Towing eye bolt
R Wheel wrench 35
X Removing: Open the trunk (Y page 257).
X Lift the trunk floor using the floor handle.
X Engage the floor handle on the upper trunk
lip.
! To prevent damage, always disengage the
floor handle from the upper trunk lip and
lower the trunk floor before closing the
trunk. :
Collapsible wheel chock
; Vehicle tool kit box cover
= Tool bag
? Jack
X Open vehicle tool kit box cover ;.
Collapsible wheel chock The collapsible wheel chock serves to secure
the vehicle, e.g. while changing a wheel.
35 Vehicles with spare wheel only. 412
Where will I find ...?Practical hints
216_AKB; 3; 90, en-US
d2ureepe,
Version: 2.11.8.1 2009-05-15T11:47:50+02:00 - Seite 412
Page 438 of 500

Display messages
Possible causes/consequences and
X Solutions÷ Currently
Unavailabl
e See
Oper.
Manual If the yellow ESC warning lamp
÷ flashes while driving and
this message appears, the Electronic Traction System (ETS/
4-ETS) has switched off to prevent overheating of the drive
wheel brakes.
The BAS PLUS and the PRE-SAFE ®
Brake are also not
available.
As soon as the brakes have cooled off, the Electronic Traction
System (ETS/4-ETS) switches on again.
The message in the multifunction display disappears and the
ESC warning lamp ÷ goes out.G Tele Aid
Inoperativ
e One or more main functions of the Tele Aid system are
malfunctioning.
X
Have the Tele Aid system checked at an authorized
Mercedes-Benz Center. 6 SRS
Malfunctio
n Service
Required There is a malfunction in the Supplemental Restraint System
(SRS). The air bags or Emergency Tensioning Devices (ETDs)
could deploy unexpectedly or fail to activate in an accident.
X
Drive with added caution to the nearest authorized
Mercedes-Benz Center. 6 Front
Left SRS
Malfunctio
n Service
Required Components of the driver’s supplemental restraint system
may not work properly.
X
Drive with added caution to the nearest authorized
Mercedes-Benz Center. 6 Front
Right SRS
Malfunctio
n Service
Required Components of the front passenger’s supplemental restraint
system may not work properly.
X
Drive with added caution to the nearest authorized
Mercedes-Benz Center. 6 Rear Left
SRS
Malfunctio
n Service
Required Components of the left rear passenger’s supplemental
restraint system may not work properly.
X
Drive with added caution to the nearest authorized
Mercedes-Benz Center. 6 Rear
Right SRS
Malfunctio
n Service
Required Components of the right rear passenger’s supplemental
restraint system may not work properly.
X
Drive with added caution to the nearest authorized
Mercedes-Benz Center. 436
Vehicle status messages in the multifunction display
Practical hints
216_AKB; 3; 90, en-US
d2ureepe,
Version: 2.11.8.1 2009-05-15T11:47:50+02:00 - Seite 436