2010 MERCEDES-BENZ CL550 Sun
[x] Cancel search: SunPage 51 of 500

The ETDs for the rear seats will activate with
or
without
the respective seat belts fastened.
In an impact, the ETDs remove slack from the
seat belts in such a way that the seat belts fit
more snugly against the body. Seat belt force
limiters, when activated, are employed to
help reduce the peak force exerted by the
seat belts on occupants during a crash.
i The ETDs do not correct an incorrect seat
position or incorrectly worn seat belts.
The ETDs do not pull occupants back
toward the seat backrest. G
Warning!
Pyrotechnic ETDs that were activated must be
replaced.
For your safety, when disposing of the
pyrotechnic ETDs always follow our safety
instructions. These are available at any
authorized Mercedes-Benz Center.
Automatic comfort-fit feature seat belt An automatic comfort-fit feature for the front
seats
reduces
the retracting force of the seat
belts when they are in normal use. Preventive occupant safety (PRE-
SAFE
®
) G
Warning!
The PRE-SAFE ®
system
is intended to reduce
the effects of an accident on vehicle
occupants who are wearing their seat belt
properly. Despite your vehicle being equipped
with the PRE-SAFE ®
system, the possibility of
personal injuries occurring as a result of an
accident cannot be eliminated. Therefore,
always drive carefully and adjust your driving
to the prevailing road, weather, and traffic
conditions. The PRE-SAFE
®
system takes preventive
measures to better protect the occupants
from the
possibility of personal injuries in the
following hazardous situations:
R emergency braking situations, e.g. if the
Brake Assist System (BAS) ( Y page 57) is
activated
or when
vehicles with DISTRONIC PLUS:
the BAS PLUS ( Y page 57) or the PRE-
SAFE ®
Brake (Y page 62) is strongly
engaging
R critical dynamic driving situations, e.g.
when the vehicle has been caused to
understeer or oversteer because it has
exceeded its physical limitations or in case
of evasive steering maneuvers at speeds
above approximately 85 mph (140 km/h)
The PRE-SAFE ®
system takes the following
measures when it is activated:
R If the front passenger seat is in an
unfavorable position, the seat will be
adjusted to a position that seeks to better
protect the occupant.
R The system increases the air pressure in
the air pockets (on the sides of the seat
cushion and backrest) of the drive-dynamic
multicontour front seats.
R If the vehicle is in a critical dynamic driving
situation, the door windows and the tilt/
sliding sunroof also closes, except for a
minimal gap that remains open.
If the closing procedure of any of these
elements is blocked, it will stop and open
slightly.
Once the hazardous situation no longer exists
and an accident has been avoided, the PRE-
SAFE ®
system decreases the air pressure in
the air pockets of the drive-dynamic
multicontour front seats. All of the PRE-
SAFE ®
system settings can be re-adjusted
following the critical driving event. Occupant safety
49
Safety and security
216_AKB; 3; 90, en-US
d2ureepe, Version: 2.11.8.1 2009-05-15T11:47:50+02:00 - Seite 49 Z
Page 53 of 500

R
The seat
backrest must be in a position that
is as nearly upright as possible.
R Adjust the seat cushion so that the front
edge of the seat cushion lightly supports
your legs.
R Adjust the head restraint so that it is as
close to the head as possible and the
center of the head restraint supports the
back of the head at eye level.
R Never place hands under the seat or near
any moving parts while the seat is being
adjusted. Children in the vehicle
Safety notes If an infant or child is traveling with you in the
vehicle:
X
Secure the child using an infant or child
restraint appropriate
to the age and size of
the child.
X Make sure the infant or child is properly
secured at all times while the vehicle is in
motion. G
Warning!
When leaving the vehicle, always remove the
SmartKey from the starter switch. Always
take the SmartKey with you and lock the
vehicle. Do not leave children unattended in
the vehicle,
even if they are secured in a child
restraint system, or with access to an
unlocked vehicle. A child’s unsupervised
access to a vehicle could result in an accident
and/or serious personal injury. The children
could
R injure themselves on parts of the vehicle
R be seriously or fatally injured through
excessive exposure to extreme heat or cold
R injure themselves or cause an accident with
vehicle equipment that can be operated
even if the SmartKey is removed from the
starter switch or removed from the vehicle, such as seat adjustment, steering wheel
adjustment, or the memory function
If children
open a door, they could injure other
persons or get out of the vehicle and injure
themselves or be injured by following traffic.
Do not expose the child restraint system to
direct sunlight. The child restraint system’s
metal parts, for example, could become very
hot, and the child could be burned by these
parts. G
Warning!
Do not carry heavy or hard objects in the
passenger compartment unless they are
firmly secured in place.
Unsecured or improperly positioned cargo
increases a child’s risk of injury in the event
of
R strong braking maneuvers
R sudden changes of direction
R an accident
Infant and child restraint systems G
Observe Safety notes, see page 51.
We recommend all infants and children be
properly restrained at all times while the
vehicle is in motion.
All lap/shoulder
belts except the driver’s seat
belt have special seat belt retractors for
secure fastening of child restraints.
To fasten a child restraint, follow the child
restraint manufacturer’s instructions for
mounting.
To activate the special seat belt retractor:
X Pull the shoulder belt out completely and
let it retract.
During seat belt retraction, a ratcheting
sound can be heard to indicate that the
special seat belt retractor is activated.
The seat belt is now locked.
X Push down on child restraint to take up any
slack. Occupant safety
51
Safety and security
216_AKB; 3; 90, en-US
d2ureepe, Version: 2.11.8.1 2009-05-15T11:47:50+02:00 - Seite 51 Z
Page 71 of 500

COMAND components
COMAND can be used to operate:
R Audio functions
R Navigation system
R Telephone
R External audio and video sources
R Video DVD
R Various vehicle settings
COMAND consists of the following:
R COMAND shortcut buttons
R COMAND display
R Telephone keypad
R COMAND controller
R Built-in USB socket to connect USB storage
devices
R Optional media interface in the glove box
to connect external devices via iPod ®
cable, jack plug, or USB cable
i For information about cleaning and care
of displays, see ( Y page 409).
COMAND shortcut buttons Use the COMAND shortcut buttons to select
main functions directly. Function
:
Shortcut button for rear window
sunshade (
Y page 352) ;
R Shortcut button for:
R
CD/DVD/SD card (Y page 168)
R Radio ( Y page 153) =
% Back button (Y page 75)
?
T Seat menu button
(Y page 198)
A
S Shortcut button for:
R
Telephone ( Y page 135)
R Navigation ( Y page 83) B
u COMAND on/off button
(Y page 68)
C
H Volume control (Y page 76)
D
h Favorite button (
Y page 81) COMAND display
In the COMAND display, you will find the
function currently selected and the
corresponding menus. The COMAND display
is divided into several areas.
:
Status line
; Main functions
= Main area
? Submenus
A Climate control settings COMAND introduction
69Control systems
216_AKB; 3; 90, en-US
d2ureepe, Version: 2.11.8.1 2009-05-15T11:47:50+02:00 - Seite 69 Z
Page 75 of 500

Example: The main function
Video contains the menus DVD-Video, AUX and the function
Video Off. Navi Audio Telephone Video Vehicle
Mode FM/AM Radio Video DVD Multi-function
Contour Seat
Settings/
Lumbar Settings
Map Orientation Sat. Radio AUX Rear Window
Sunshade
POI Symbols On Map Disc Video OFF Easy Entry/Exit
Traffic Symbols on
Map Memory Card Exterior Lighting
Delayed Shut-off
Text Information on
Map Music Register Interior Lighting
Delayed Shut-off
ªTopographical
Map Media Interface Ambient Lighting
ªCity (3D) USB ªAutomatic
Mirror Folding
ªHighway
Information AUX ªLocator
Lighting
ªAudio Fadeout Audio OFF ªAutomatic
Locking
SIRIUS Service ªTrunk
Opening-height
Restriction
Map Version COMAND introduction
73Control systems
216_AKB; 3; 90, en-US
d2ureepe, Version: 2.11.8.1 2009-05-15T11:47:50+02:00 - Seite 73 Z
Page 118 of 500

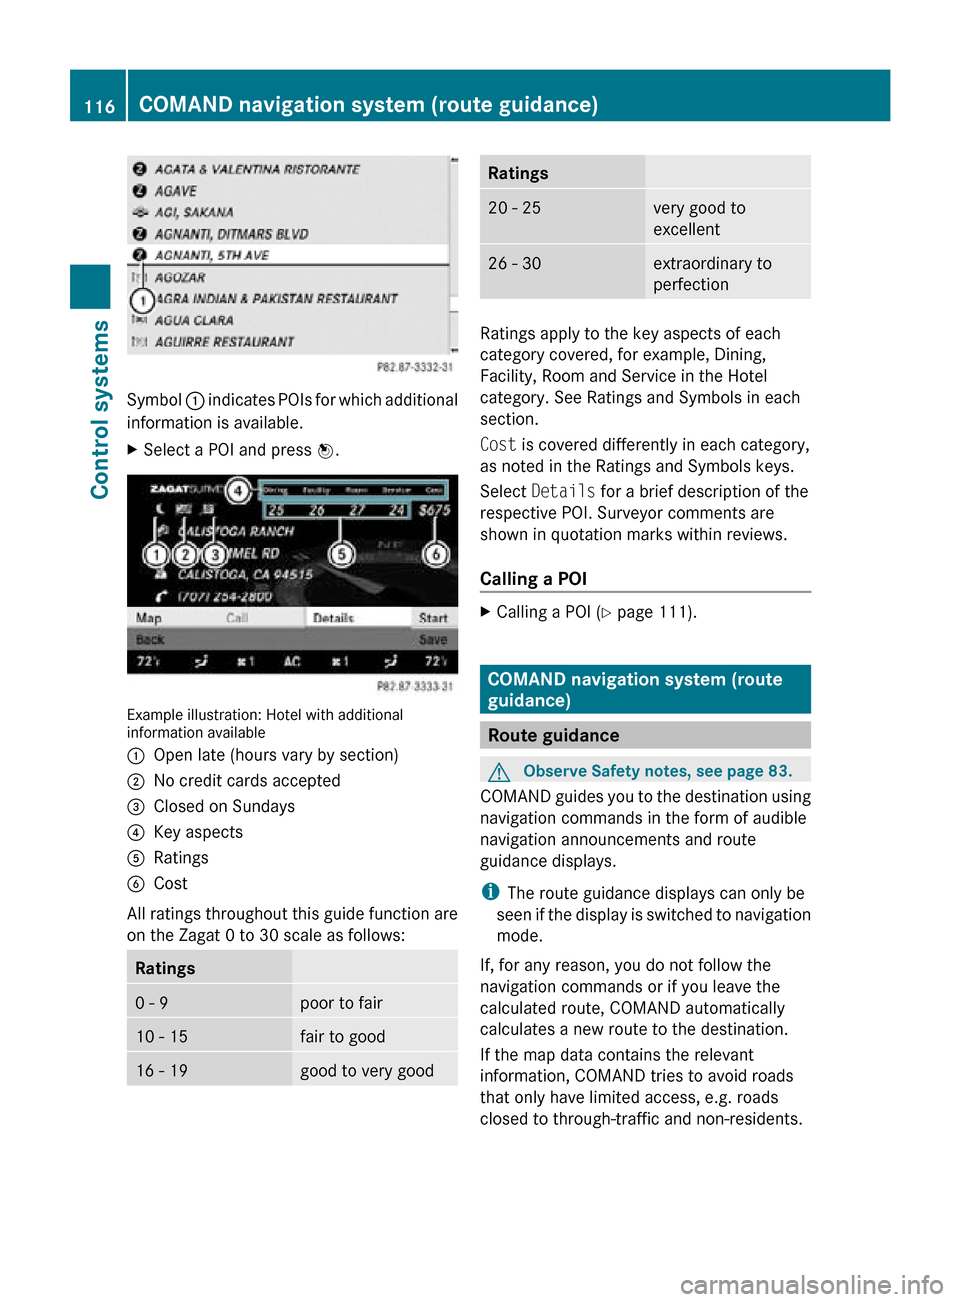
Symbol
: indicates POIs for which additional
information is available.
X Select a POI and press W. Example illustration: Hotel with additional
information available
:
Open late (hours vary by section)
; No credit cards accepted
= Closed on Sundays
? Key aspects
A Ratings
B Cost
All ratings throughout this guide function are
on the Zagat 0 to 30 scale as follows: Ratings
0 - 9 poor to fair
10 - 15 fair to good
16 - 19 good to very good Ratings
20 - 25 very good to
excellent
26 - 30 extraordinary to
perfection
Ratings apply to the key aspects of each
category covered, for example, Dining,
Facility, Room and Service in the Hotel
category. See Ratings and Symbols in each
section.
Cost is covered differently in each category,
as noted in the Ratings and Symbols keys.
Select
Details for a brief description of the
respective POI. Surveyor comments are
shown in quotation marks within reviews.
Calling a POI X
Calling a POI ( Y page 111). COMAND navigation system (route
guidance)
Route guidance
G
Observe Safety notes, see page 83.
COMAND guides you to the destination using
navigation commands in the form of audible
navigation announcements and route
guidance displays.
i The route guidance displays can only be
seen if the display is switched to navigation
mode.
If, for any reason, you do not follow the
navigation commands or if you leave the
calculated route, COMAND automatically
calculates a new route to the destination.
If the map data contains the relevant
information, COMAND tries to avoid roads
that only have limited access, e.g. roads
closed to through-traffic and non-residents. 116
COMAND navigation system (route guidance)Control systems
216_AKB; 3; 90, en-US
d2ureepe,
Version: 2.11.8.1 2009-05-15T11:47:50+02:00 - Seite 116
Page 167 of 500

i
Audio DVDs differ from recordable DVD-
R and DVD-RW discs.
Data on audio DVDs are stored either in
uncompressed format or in lossless
compressed format. The sound quality on
audio DVDs is therefore better than on
recordable DVDs that contain MP3 data
because the
MP3 format uses a lossy type of
compression.
You cannot delete data from or record
additional data to commercially available,
prerecorded audio DVDs.
Please note the following information about
CDs/DVDs and pay special attention to the
notes on copied and/or self-written CDs/
DVDs.
i The last track on many audio DVDs does
not contain audio data. COMAND will then
change to the next medium. This behavior
is system-induced and does not indicate a
system malfunction. Notes about CDs/DVDs
i Audio CDs with copy protection are not
compatible with
the CD audio standard and
therefore may not be able to be played by
COMAND.
There may be playback problems when
playing copied discs.
There is a large variety of discs, disc-writing
software and writers available. This variety
means that there is no guarantee that the
system will be able to play discs that you
have written/copied yourself.
There may be playback problems if you use
CD-R or CD-RW type discs you have copied
yourself with a storage capacity of more
than 700 MB. These CDs are not
compatible with currently applicable
standards.
! Do not affix stickers or labels to the discs.
These could peel away and damage COMAND. COMAND is designed to hold
discs which comply with the IEC 60908
standard.
You
can therefore only use discs
with a maximum thickness of 1.3 mm.
If you insert thicker discs, e.g. those that
contain data on both sides (DVD on one
side and audio data on the other), they
cannot be ejected and can damage
COMAND.
Do not use CDs with a diameter of 8 cm.
Attempting to play discs with a diameter of
8 cm or playing such discs with an adapter
may cause damage COMAND.
Such damages are not covered by the
Mercedes-Benz Limited Warranty.
Only use round discs with a diameter of
12 cm.
Notes about handling CDs/DVDs R
Only hold discs by the edge.
R Handle discs carefully to prevent playback
problems.
R Avoid getting scratches, fingerprints and
dust on discs.
R Clean discs from time to time with a
commercially-available cleaning cloth. Do
not wipe them with a circular motion, but
only in straight lines from the center
outwards.
R Only use
a pen designed for such a purpose
to label discs.
R Place discs back in their boxes after use.
R Protect discs from heat and direct sunlight. Inserting/ejecting CDs and DVD
G
Observe Safety notes, see page 162.
i If the CD/DVD has a printed side, this
must face upwards when the CD/DVD is
inserted. If neither side is printed, the side
to be played should face downwards. COMAND audio CD/audio DVD/MP3
165
Control systems
216_AKB; 3; 90, en-US
d2ureepe, Version: 2.11.8.1 2009-05-15T11:47:50+02:00 - Seite 165 Z
Page 175 of 500

The sockets for external audio and video
sources (AUX) are located in the glove box.
i
For operation of the external audio and
video sources, refer to the operating
instructions of the respective device. You
may have to adjust the proper video
standard on the external audio and video
source to ensure proper replay.
Do not leave external devices in the vehicle.
Proper function of the device could be
impaired due to excessive temperatures,
for example when exposing to direct
sunlight or when the outside temperature
is extremely low. Mercedes-Benz does not
assume liability for damage to external
devices. G
Warning!
Operating an external audio source while the
vehicle is in motion will distract you. You may
not notice changing road and/or traffic
conditions which may cause an accident.
Bear in mind that at a speed of just 30 mph
(approximately 50 km/h), your vehicle is
covering a distance of 44 feet (approximately
14 m) every second.
For your safety and the safety of others, pull
over to a safe location and stop before
operating an external audio source. G
Warning!
Due to the different volumes of the external
audio sources, system messages of the
vehicle may be much louder. You may need to
disable these system messages or adjust the
volume of these messages manually.
i The volume of external audio sources is
extremely variable. It is possible that a
device connected as an external audio
source will sound quieter or louder in the
vehicle or that the usual maximum volume
cannot be achieved. On certain devices the
volume can be set separately. In this case,
start at a moderate volume and increase it
slowly. In this way, you can determine whether the system is capable of playback
without distortion, even at high volume.
X Connect external audio and video sources
as described in the following sections. Audio and video AUX sockets in the
glove box
:
Video AUX socket, yellow socket
; Audio AUX socket, left channel, white
socket
= Audio AUX socket, right channel, red
socket
i Vehicles with media interface: Instead of
the external audio and video sockets, the
media interface ( Y page 183) is located in
the glove box. Switching to audio AUX operation
(COMAND)
X Select Audio Q AUX.
The Audio AUX menu appears. You will hear
the medium in the external audio source
provided it is connected and set to
playback.
You can adjust the following during audio AUX
operation:
R Volume ( Y page 76)
R Balance and fader ( Y page 77)
R Treble and Bass (Y page 77)
R 3D Sound (Y page 77) Audio AUX and video AUX
173Control systems
216_AKB; 3; 90, en-US
d2ureepe, Version: 2.11.8.1 2009-05-15T11:47:50+02:00 - Seite 173 Z
Page 187 of 500

i
Do not leave external devices in the
vehicle. Proper function of the device could
be impaired due to excessive
temperatures, for example when exposing
to direct sunlight or when the outside
temperature is extremely low. Mercedes-
Benz does not assume liability for damage
to external devices. :
3.5 mm stereo jack AUX cable (4-pin) for
connecting external devices via AUX port,
e.g. MP3 players (audio and video)
; iPod ®
cable
= USB cable for supported USB devices
(optional)
? Example device: iPod ®
X Connect the audio device to the media
interface in the glove box using the
required cable :, ;, or = while the
vehicle is standing still.
COMAND activates the device 23
.
When you disconnect a device, the message
No device connected. appears.
i Do not operate iPods ®
or MP3 players via
a remote control, for example Bluetooth ®
remote control, while operating the
respective device via the media interface.
This could cause unpredictable
interactions.
Connecting a completely discharged
iPod ®
or MP3 player can increase the
initialization time. i
Error messages appear while activating a
device when
R COMAND does not support the
connected device
R the power consumption of the connected
device is too high
R the media interface is malfunctioning
Contact an authorized Mercedes-Benz
Center if required.
Notes on operating a device via the AUX
socket G
Warning!
Due to the different volumes of the external
audio sources, system messages of the
vehicle may be much louder. You may need to
disable these system messages or adjust the
volume of these messages manually.
i The volume of external audio sources is
extremely variable. It is possible that a
device connected as an external audio
source will sound quieter or louder in the
vehicle or that the usual maximum volume
cannot be achieved. On certain devices the
volume can be set separately. In this case,
start at a moderate volume and increase it
slowly. In this way, you can determine
whether the system is capable of playback
without distortion, even at high volume. Switching to media interface
operation
i Starting individual function may take
several minutes, depending on the external
device and the content of the medium, for
example video podcasts.
Do not use software other than the genuine
software for uploading your iPod ®
or MP3
player. Otherwise some or all functions
may not be available.
23 Does not apply to AUX devices. Media Interface
185Control systems
216_AKB; 3; 90, en-US
d2ureepe, Version: 2.11.8.1 2009-05-15T11:47:50+02:00 - Seite 185 Z