2010 MERCEDES-BENZ CL550 Store
[x] Cancel search: StorePage 114 of 500

X
With the menu system displayed
(Y page 89), select Destination Q
From POIs Q Destination area.
The list
of POIs appears. The available POIs
in the vicinity of destination are displayed. Entering a POI by name
With this
function you can enter or select POIs
by the name of the POI.
X With the menu system displayed
(Y page 89), select Destination Q
From POIs Q By Name Q All POIs.
When selecting All POIs all POIs in the
navigation database are displayed sorted
by name.
You can also search for POIs in the vicinity of
your current position or a particular city.
X With the menu system displayed
(Y page 89), select Destination Q
From POIs Q By Name Q Current
Position or Other City. Entering a POI by telephone number
With this
function you can enter or select POIs
by the telephone number of the POI.
X With the menu system displayed
(Y page 89), select Destination Q
From POIs Q By Telephone Number.
The telephone
numbers of all POIs that are
stored in the navigation database are
displayed. Choosing a POI category and
selecting a POI
The available categories or POIs depend on
the selected search method.
R POI in the surrounding area: categories sorted alphabetically and POIs
sorted by distance around the vehicle
position are available.
R POI within the city limits of a given city:
If you
have only entered the state (USA) or
province (Canada) and the city,
alphabetically sorted categories and
alphabetically sorted POIs within the city
are available.
If you have entered more than the state
(USA) or province (Canada) and the city,
alphabetically sorted categories and POIs
sorted by distance around the address
entered are available.
R POI in the destination area:
categories sorted alphabetically and POIs
sorted by distance around the destination
area are available.
R POIs via name search:
Alphabetically sorted POIs are available.
R POIs via phone number:
Numerically sorted POIs are available.
Some search methods display a list of
available main categories. After selecting a
main category and, if available, a subcategory
a list of POIs appears.
i The main categories can have up to three
subcategories.
Other search methods provide a list of POIs
immediately. 112
COMAND navigation system (Point of interest entry)
Control systems
216_AKB; 3; 90, en-US
d2ureepe,
Version: 2.11.8.1 2009-05-15T11:47:50+02:00 - Seite 112
Page 136 of 500

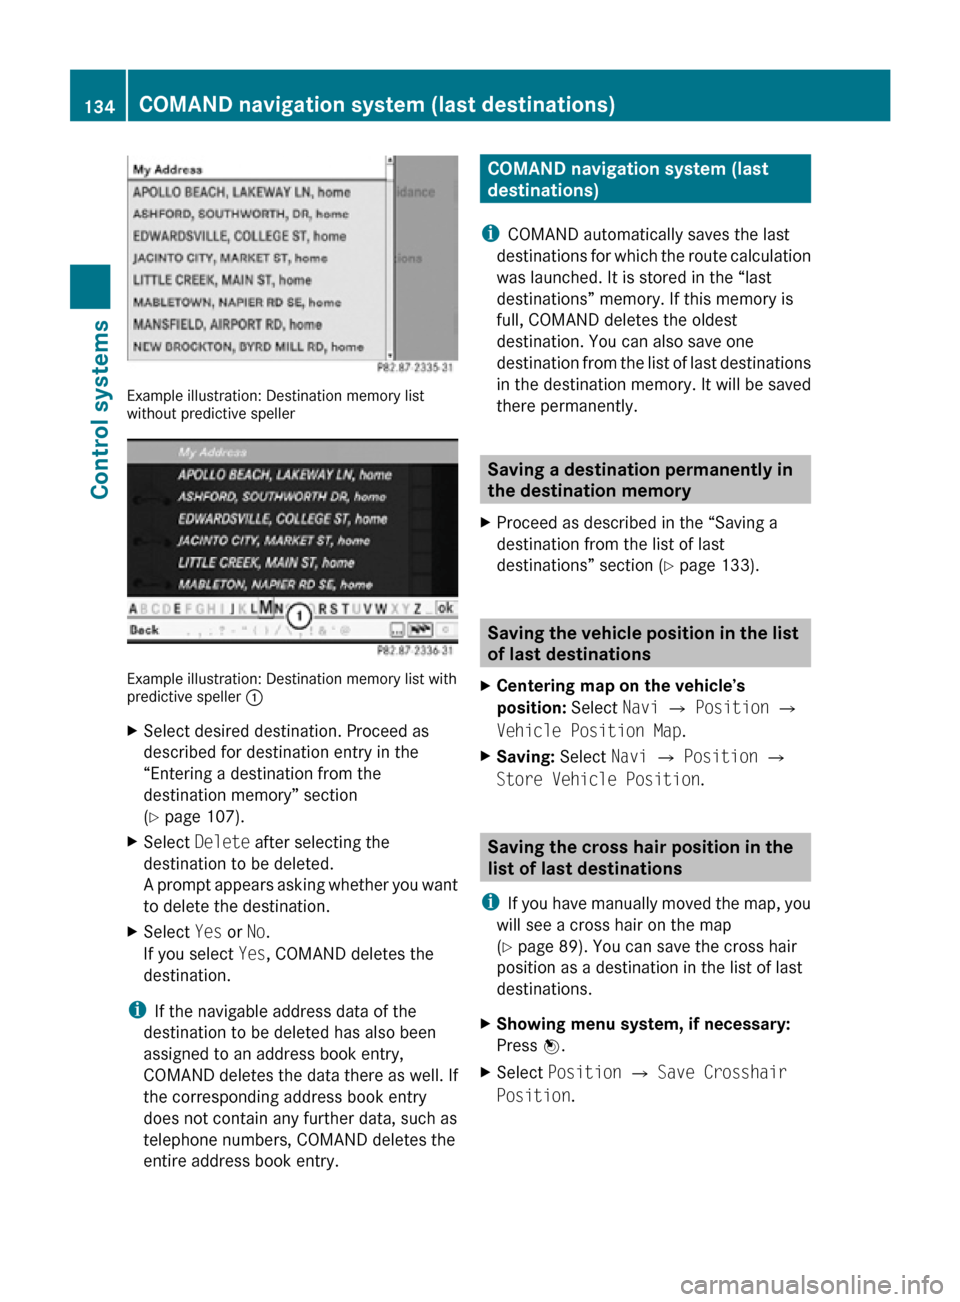
Example illustration: Destination memory list
without predictive speller
Example illustration: Destination memory list with
predictive speller
:
X Select desired destination. Proceed as
described for destination entry in the
“Entering a destination from the
destination memory” section
(Y page 107).
X Select Delete after selecting the
destination to be deleted.
A prompt appears asking whether you want
to delete the destination.
X Select Yes or No.
If you select Yes, COMAND deletes the
destination.
i If the navigable address data of the
destination to be deleted has also been
assigned to an address book entry,
COMAND deletes the data there as well. If
the corresponding address book entry
does not contain any further data, such as
telephone numbers, COMAND deletes the
entire address book entry. COMAND navigation system (last
destinations)
i COMAND automatically saves the last
destinations for which the route calculation
was launched. It is stored in the “last
destinations” memory. If this memory is
full, COMAND deletes the oldest
destination. You can also save one
destination from the list of last destinations
in the destination memory. It will be saved
there permanently. Saving a destination permanently in
the destination memory
X Proceed as described in the “Saving a
destination from the list of last
destinations” section ( Y page 133). Saving the vehicle position in the list
of last destinations
X Centering map on the vehicle’s
position: Select Navi Q Position Q
Vehicle Position Map.
X Saving: Select Navi Q Position Q
Store Vehicle Position. Saving the cross hair position in the
list of last destinations
i If you have manually moved the map, you
will see a cross hair on the map
(Y page 89). You can save the cross hair
position as a destination in the list of last
destinations.
X Showing menu system, if necessary:
Press W.
X Select Position Q Save Crosshair
Position. 134
COMAND navigation system (last destinations)Control systems
216_AKB; 3; 90, en-US
d2ureepe,
Version: 2.11.8.1 2009-05-15T11:47:50+02:00 - Seite 134
Page 145 of 500

X
Changing the volume: Slide ZVÆ and
press W. Making calls
G
Observe Safety notes, see page 135.
Incoming call X
Rejecting: Select Reject.
or
X Press button ~ on the multifunction
steering wheel or on the telephone keypad
in the center console.
X Answering: Select Accept.
or
X Press button 6 on the multifunction
steering wheel or on the telephone keypad
in the center console.
or
X Answer the call via the Voice Control
System (Y page 217). After answering the call, you will conduct the
conversation via the hands-free system. The
volume can be adjusted (Y page 76). For more
available functions during a single party call
see (
Y page 144).
When a call comes in, the following appears
in the COMAND display:
R the phone number of the calling party
R the name and number of the calling party
provided both are stored in the address
book
R Call from Unknown when the caller ID is
not being sent
i You can answer a call even when
COMAND is displaying a different main
function. After answering the call, the
display switches to the telephone display 8
.
Once you hang up, the display switches
back to the previous main function.
Outgoing call X
Enter the phone number via the telephone
keypad in the center console.
or
X Use the COMAND controller to enter the
phone number via the telephone menu.
or
X Use the Voice Control System to enter the
phone number digit by digit or to enter a
name from the phone book ( Y page 217).
X Deleting single digits: Press $ on the
telephone keypad in the center console
briefly.
or
X Select r via the telephone menu and
press W briefly.
8 Except you have accepted the call via button 6 on the multifunction steering wheel. COMAND telephone
143Control systems
216_AKB; 3; 90, en-US
d2ureepe, Version: 2.11.8.1 2009-05-15T11:47:50+02:00 - Seite 143 Z
Page 146 of 500

X
Deleting entire number: Press and hold
$ on the telephone keypad in the center
console until the number is deleted.
or
X Select r via the telephone menu and
press and hold W until the number is
deleted.
X Connecting call: Press button 6 on the
multifunction steering wheel or on the
telephone keypad in the center console.
or
X Select 6 via the telephone menu
Redial
X Go to the telephone menu.
X Press 6 on the telephone keypad in the
center console.
or
X Select SEND from the telephone menu and
press W.
The list of previously dialed number
appears. The last number you have called
at the top of the list.
X Selecting number and connecting call:
Slide ZVÆ and press W to select a number
or press 6 on the telephone keypad in
the center console.
Calling voice mail 9
Your voice mail number must be stored on the
SIM card of your mobile phone and be
assigned to key 4 on the mobile phone
keypad.
X Press and hold ´ on the telephone
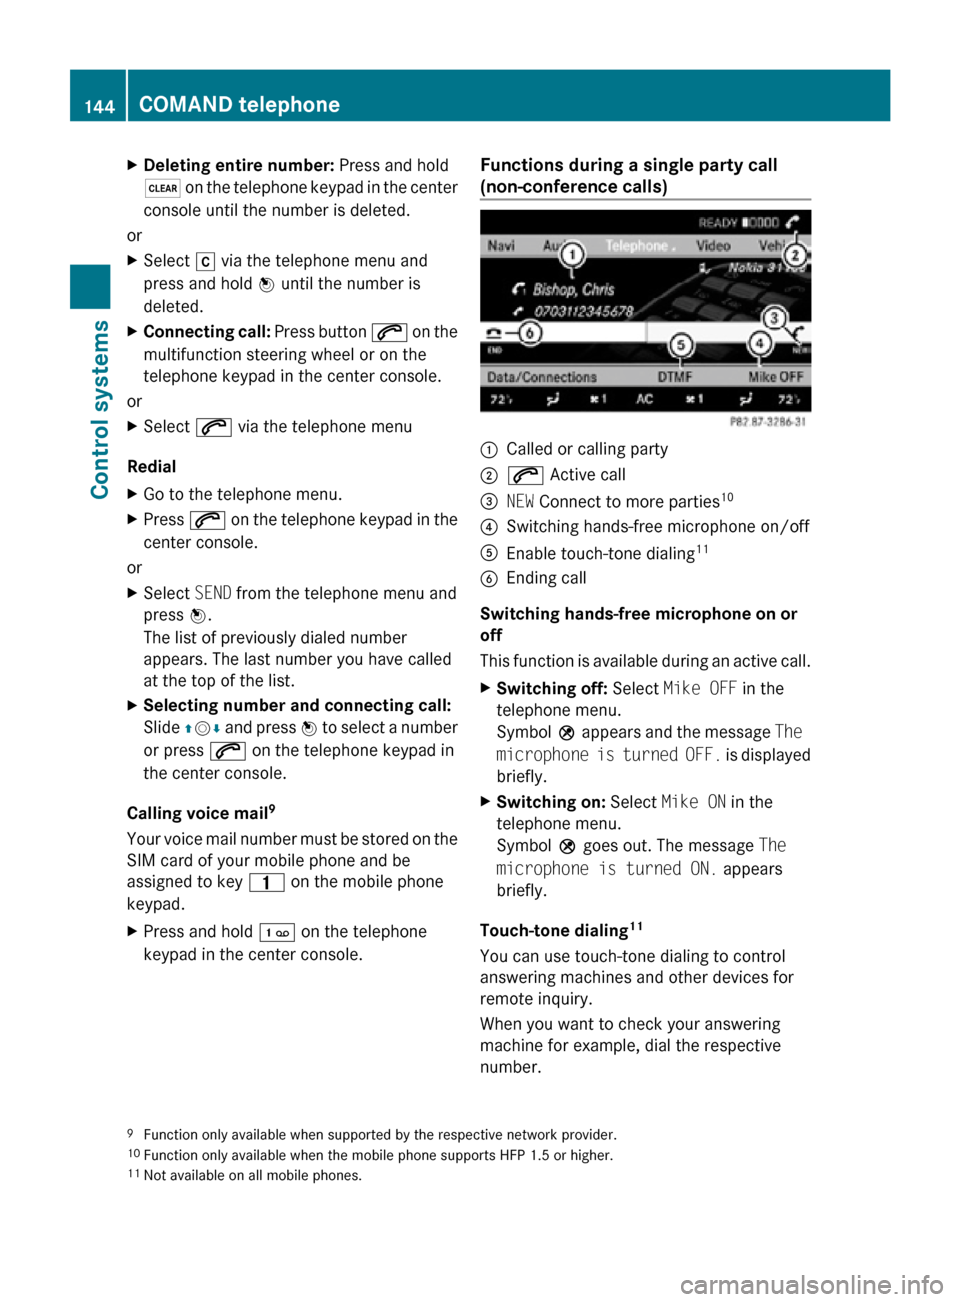
keypad in the center console. Functions during a single party call
(non-conference calls) :
Called or calling party
; 6 Active call
= NEW Connect to more parties 10
? Switching hands-free microphone on/off
A Enable touch-tone dialing 11
B Ending call
Switching hands-free microphone on or
off
This function is available during an active call.
X Switching off: Select Mike OFF in the
telephone menu.
Symbol Q appears and the message The
microphone is turned OFF. is displayed
briefly.
X Switching on: Select Mike ON in the
telephone menu.
Symbol Q goes out. The message The
microphone is turned ON. appears
briefly.
Touch-tone dialing 11
You can use touch-tone dialing to control
answering machines and other devices for
remote inquiry.
When you want to check your answering
machine for example, dial the respective
number.
9 Function only available when supported by the respective network provider.
10 Function only available when the mobile phone supports HFP 1.5 or higher.
11 Not available on all mobile phones. 144
COMAND telephoneControl systems
216_AKB; 3; 90, en-US
d2ureepe,
Version: 2.11.8.1 2009-05-15T11:47:50+02:00 - Seite 144
Page 148 of 500

Calling an additional party
You can call another party during an active
call. The active call is put on hold.
X
Select NEW from the telephone menu and
press W.
or
X Press button 6 on the telephone
keypad in the center console.
X Enter the number to call manually
(Y page 143) or from the phone book
(Y page 149).
Switching between two parties (call hold)
When you are connected to two parties, the
telephone menu appears as follows: :
Active call
; Call on hold
X Switching to the other party: Select ;
using the COMAND controller.
or
X Press button 6 on the telephone
keypad in the center console.
or
X Press button 6 on the multifunction
steering wheel.
Initiating a conference call
You can initiate a conference call with the
active parties and parties that are on hold. All
participants will be able to hear and talk to
each other. :
Active call
; Call on hold
= Initiating conference call
X Initiating conference call: Select
Conference = using the COMAND
controller. COMAND phone book and address
book
G
Observe Safety notes, see page 68.
The COMAND phone book is an extract of
entries from the address book that contain at
least one phone number.
The COMAND address book holds entries
from various sources such as mobile phones,
SD cards, imports from Bluetooth ®
devices,
the COMAND phone book, or the navigation
system. These entries can be used for making
phone calls or for navigation.
Importing contacts automatically When a mobile phone is connected to
COMAND via the Bluetooth
®
interface, the
contacts of the mobile phone are imported
into the COMAND phone book automatically.
This may take some time, depending on the
mobile phone. Phone book entries stored in
the mobile phone itself or the SIM card may
be imported, depending on the mobile phone.
Contacts in the COMAND that have been
imported automatically are identified by the
symbols d or 0. Such contacts can only 146
COMAND telephoneControl systems
216_AKB; 3; 90, en-US
d2ureepe,
Version: 2.11.8.1 2009-05-15T11:47:50+02:00 - Seite 146
Page 153 of 500

X
Select Calls Received or Calls
Dialed.
The respective list appears. Example illustration: List of numbers you have
dialed
:
Close list
; Phone number and name if available
= Options, for example saving
X Selecting entry: Slide ZVÆ.
X Dialing number: Press button 6.
Incoming calls that you have missed or
rejected are indicated by a symbol in front of
the name or number.
i Select Delete Call Lists to delete
both lists at the same time. The Delete
Call Lists option is only available when
using a mobile phone that does not support
automatic download of call lists.
Saving list entries When a call comes in, COMAND displays the
phone number in the call list if the caller
number is not stored in the address book. You
can save this entry. The entry still appears in
the call list. The phone number appears when
the number has not been used yet. The caller
name appears when the entry has been used
already.
Saving to address book as new entry
X
Open a call list.
X Select the list entry. X
Select OptionsQSave Number.
X Select New Entry to create a new entry.
X Select a phone number category, for
example Home.
X Select a telephone category, for example
Cellular Phone Number. Number category Symbol (phone
and address book)
Unclassified None
Home 6
Work \
Phone category Symbol (phone
and address book)
Unclassified None
Cellular Phone
Number ¢
Pager ¨
Car ^
Landline ¬
Preferred O
i
When you have not classified the phone
number and telephone category for a
phone number, symbol ; appears in the
display.
X Select Next (save).
The input menu with the data fields
appears. The data field for the phone
number is filled-out automatically. COMAND telephone
151Control systems
216_AKB; 3; 90, en-US
d2ureepe, Version: 2.11.8.1 2009-05-15T11:47:50+02:00 - Seite 151 Z
Page 155 of 500

Radio
(except
Weather Band) Presets
(except
Weather
Band) Channel
(only
Weather
Band) Info FM or AM
or WB Sound
Save Station Autostore Channel list Program
Information Switch to
FM wave
band Treble
Frequency Entry Preset
station list Switch to
AM wave
band Bass
Show Station
Info Switch to
Weather
Band Balance/
Fader
ª¥Radio 3D Sound
Switching to radio mode
X Select Audio Q FM/AM Radio.
or
X Press shortcut button R (Y page 69)
once or twice.
The radio display appears once you have
switched to radio mode. You will hear the
last tuned station/channel in the
previously selected wave band, provided
that the station/channel can be received.
i The number of times you have to press
shortcut button R depends on the
operating mode currently selected. Example illustration: Radio mode in FM wave band
:
Main area with frequency display
; Preset position of selected station
= Frequency of selected station
? Name of selected station; HD Radio™
stations with additional HD Radio™
symbol and program number (HD1,
HD2...)
A Sound settings
B To switch to FM wave band, AM wave
band or Weather Band
C Additional information provided by radio
station or HD Radio™ program
information
D Artist and song title (when provided by the
radio station) COMAND FM/AM radio
153Control systems
216_AKB; 3; 90, en-US
d2ureepe, Version: 2.11.8.1 2009-05-15T11:47:50+02:00 - Seite 153 Z
Page 158 of 500

X
Select channel by rotating cVd or sliding
ZVÆ and press W. Saving stations
i Twenty stations can be saved in each
wave band except for Weather Band.
You have the following options:
R Saving stations manually
R Saving stations using the autostore
function
Saving stations manually Option 1
X
Select Audio Q FM/AM Radio Q FM or
AM.
X Select Radio Q Save Station.
Option 2
X Press W when the main area is selected.
Option 3
X Select Audio Q FM/AM Radio Q FM or
AM.
X Select Presets.
All three of these will call up a station preset
screen. The dot # in front of a preset
position indicates that the currently selected
station is saved there. X
Selecting a preset position: Slide ZVÆ or
rotate cVd. Saving a station to a selected preset
position
If you have called up the station preset screen
using option 1:
X
Press W briefly.
In options 2 and 3:
X Press and hold W until you hear a signal.
The station is saved.
Saving using the autostore function i
This function is not available for Weather
Band. The autostore function saves
receivable stations as presets in order of
their reception quality. All stations saved
manually in the preset memory will be lost
if COMAND finds 20 stations. If COMAND
finds less than 20 stations, for example 9,
then the stations saved in preset
positions 1 – 9 will be overwritten.
Option 1
X Press W when the main area is selected.
X Select Autostore.
Option 2
X Select Audio Q FM/AM Radio Q FM or
AM.
X Select Presets Q Autostore.
Option 3
X Select Audio Q FM/AM Radio Q
Radio Q Save Station Q Autostore. Station name display
i In the FM wave band, COMAND can show
the name of the station currently tuned in.
Station name display : can only be seen
when it is switched on and if the station
transmits a name. 156
COMAND FM/AM radioControl systems
216_AKB; 3; 90, en-US
d2ureepe,
Version: 2.11.8.1 2009-05-15T11:47:50+02:00 - Seite 156